2025 Esp32 Clock🕑
C++, MCU, Weather station, RTC, LCD 320x240
⏱️Overview
This is a clock / weather station. It was a small project, that took about 1.5 weeks. It uses Esp32 board with LCD display, RTC module, and has few sensors.
✍️Motivation
I needed a well made clock, just to show time, date, temperatures inside and outside and humidity in our kitchen. Naturally I had to make it myself as no such thing existed. Every commercial product has something annoying or done poorly, which you can’t really change.
I already had a few Esp32 boards waiting, and I wanted to do something useful with them too.
Until now we had:
- A small, battery powered, old type LCD (black & white) clock for time, date, temperature and humidity. Was okay, but is now in other room.
Even if digits are bigger, they are less visible, since there is not back light and its viewing angles are low, also depending on coming light direction. - As for temperature outside, I just put a separate, odd thing hanging on window. Was from a PC case and just using a thermocouple (which even didn’t detect below -8°C, but sadly due to climate change it’s less likely to see such temperatures here).
- A timer with big digits on old b&w LCD. Have to press e.g. 30 times for 30 minutes, also it beeps on ever key press, which is seriously annoying. We still use it on fridge. But I intend to replace it with my own creation someday too.
- An almost good weather station. Still old b&w LCD, big but not really that visible. It measured pressure too, strangely odd low values, IDK why. But all that drained way too much power. OFC producers want you to get addicted to buying freaking batteries (yeah.. cannot stop the battery and without vocals🎶). So the first thing I did was giving it a new 3V power supply, from nearest source our old kitchen HiFi .
It was supposed to get the current time from that DCF radio signal, and I remember it had worked at first. But since years it didn’t and it always p!ssed me off when there was no power and I had to input time and date manually with stupid buttons. - Last thing I’ll mention here is that each device should have and remember its settings after power off (or battery removed). E.g. our freaking microwave oven forgets its custom programs.
Thus doing things yourself (DIY) is key here. It fixes all of the above issues and leaves room for future ideas or improvements.
For such small electronic devices it has become very easy (and cheap) in recent years. I’ve seen plenty of websites with countless projects, some have a complete guide (like for kids even) with image for wires to connect, full sources with explanation, etc.
🌎Websites with Esp32 projects:
esp32io here (great tutorial), educ8s here (with video playlist) and another playlist.
I think the key for my project with such LCD was finding a library (FabGL) that sends using SPI and DMA. First I found a video showing it works well, then sources here, and a good reference on how and what it can draw. It was the same story as with my keyboard which has the same LCD. It is most important to draw as fast as possible. Those aren’t tiny projects with small OLED displays on I2C which could use those Adafruit libraries.
There can also be numerous ideas for new features for future. E.g. since Esp32 has WiFi, it could read weather forecast from internet (if I had WiFi set up at home).
⚙️IDEs
I was pressed on time, since I wanted a new clock, not spending long time on setting up proper IDE to develop. So I just used that abomination of an IDE called Arduino “IDE” 2 (1 was even way worse) for build & upload and edited sources in VSCodium with my theme and setup.
There are definitely few alternatives for Arduino IDE (which is easiest to set up and get working, but nothing else):
- PlatformIO, sadly only for VSCode (I‘m not okay with being MS slave). There seems to be a way for VSCodium here, I didn’t try it.
- Sloeber, is based on Eclipse IDE. E.g. video of it. (I dislike Java and Eclipse too).
It worked for me, but I’m not sure if all needed libraries are there too, FabGL didn’t find SPI.h for me, probably needs even more time to set up right. - ESP IDF, the official way for Espressif MCUs like Esp32, also a video for starting.
Seems like it needs building from sources on Linux, so I also didn’t try yet.
📂Sources
Sources are here.
I was editing code in VSCodium, then building and uploading using the worst Arduino IDE 2.
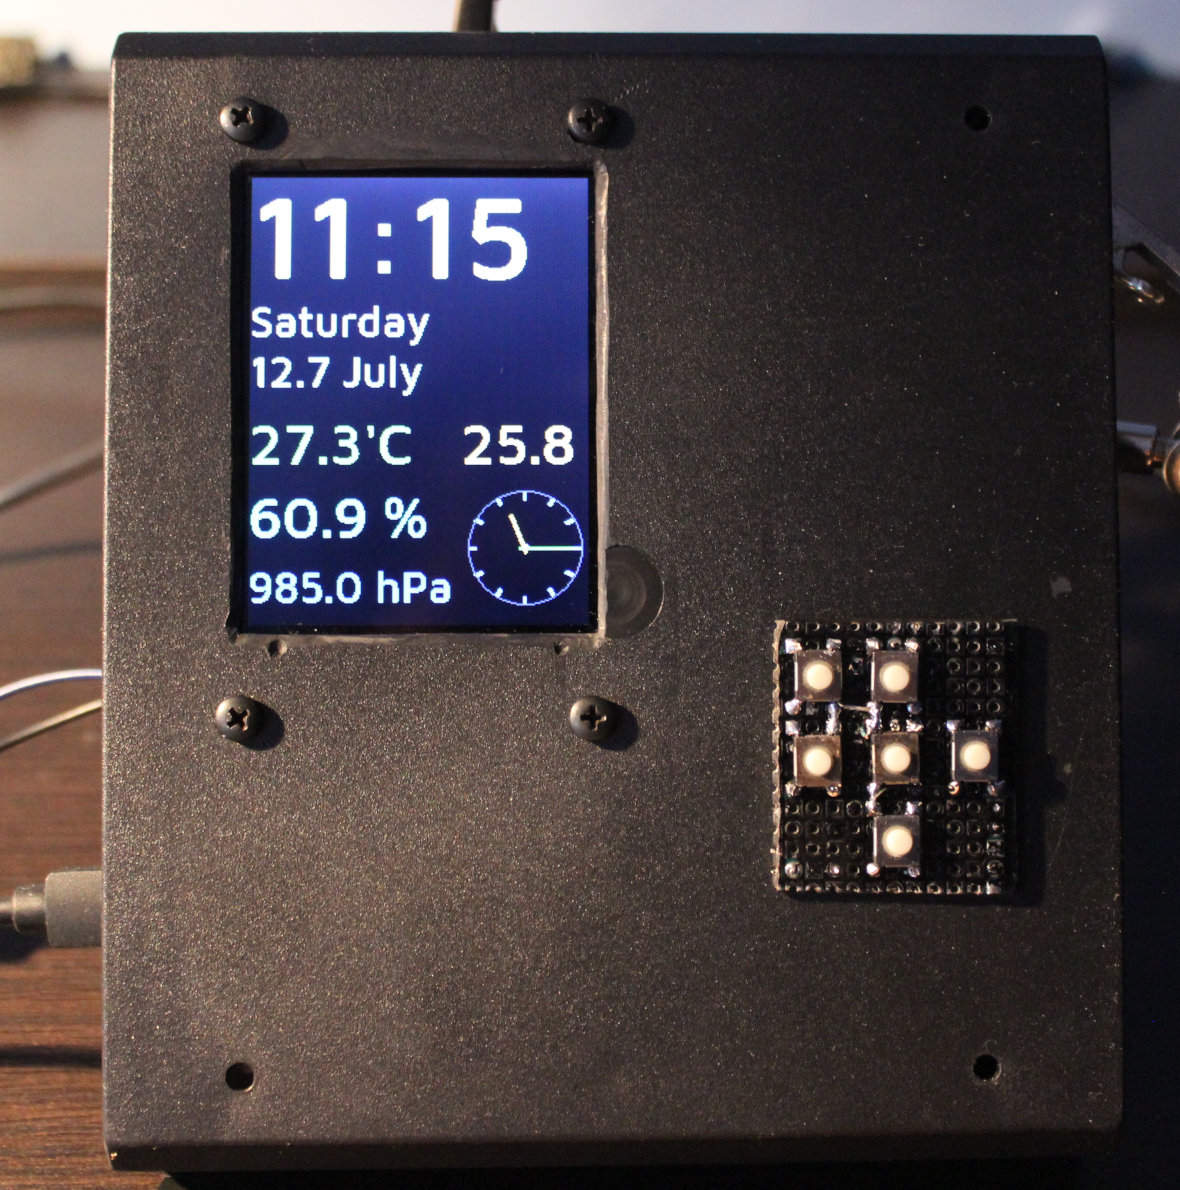
📊Features
- MCU: ESP32 dev module – older Esp-Wroom-32, has 36 pins (pinout), not really important which
- Display: LCD TFT ILI9341 – vertical 240 x 320, 1 pin with PWM for brightness LED
- RTC: DS3231 – for time and date, with CR2032 battery (used when power goes out)
- Sensors: AHT20 – temperature and humidity, DS18B20 – external temperature, BMP280 – pressure
- Keyboard with 6 keys: up, down, left/dec-, right/inc+, enter, back
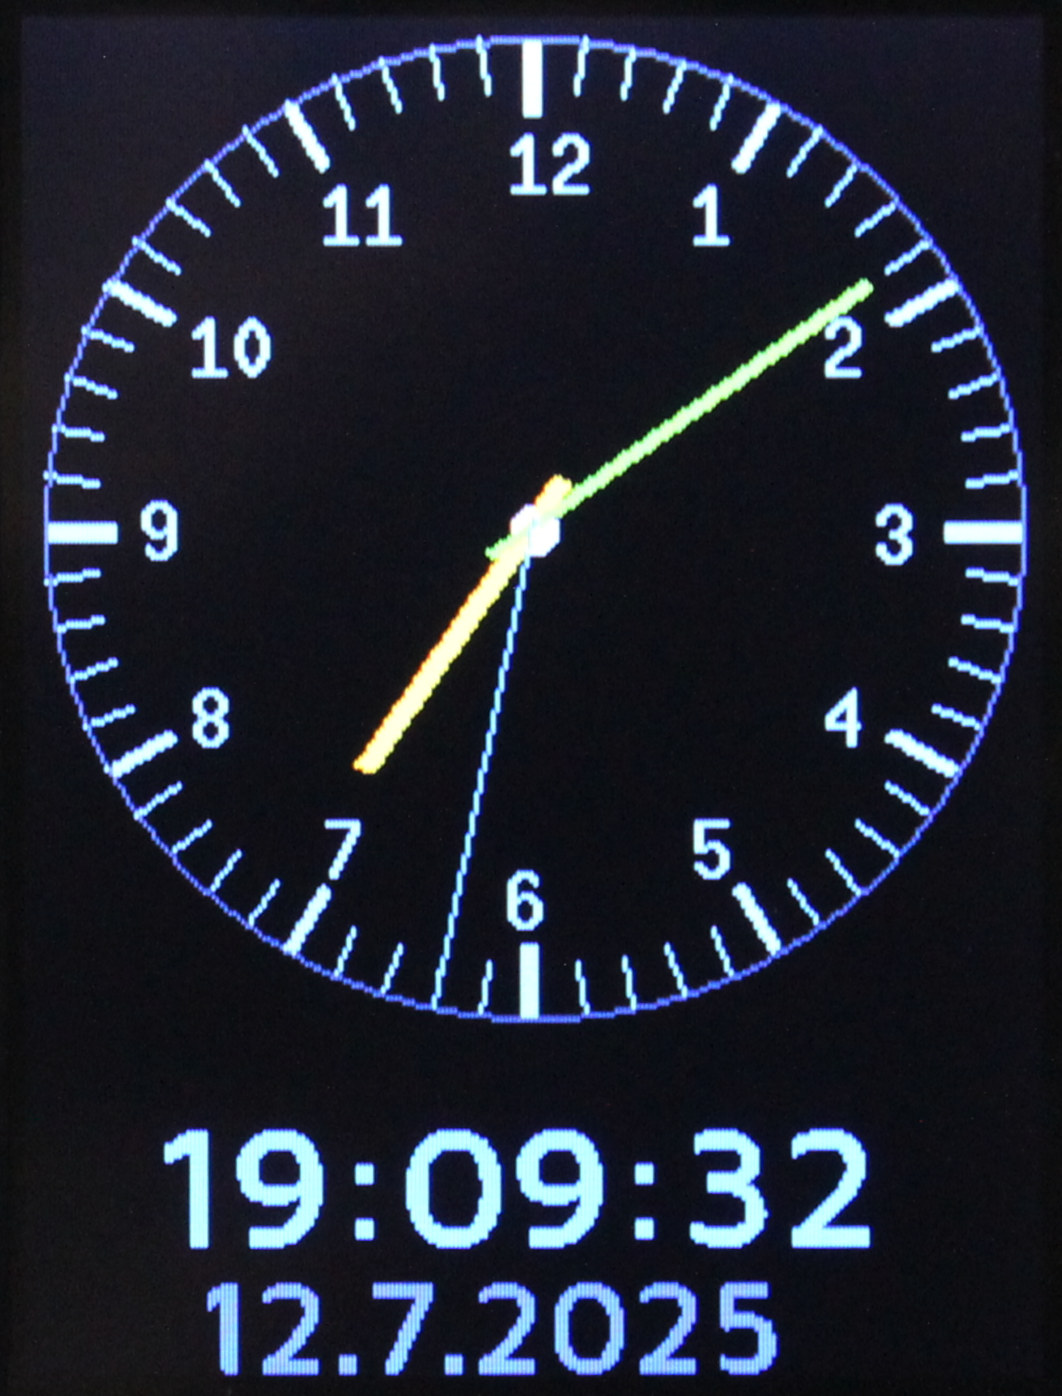
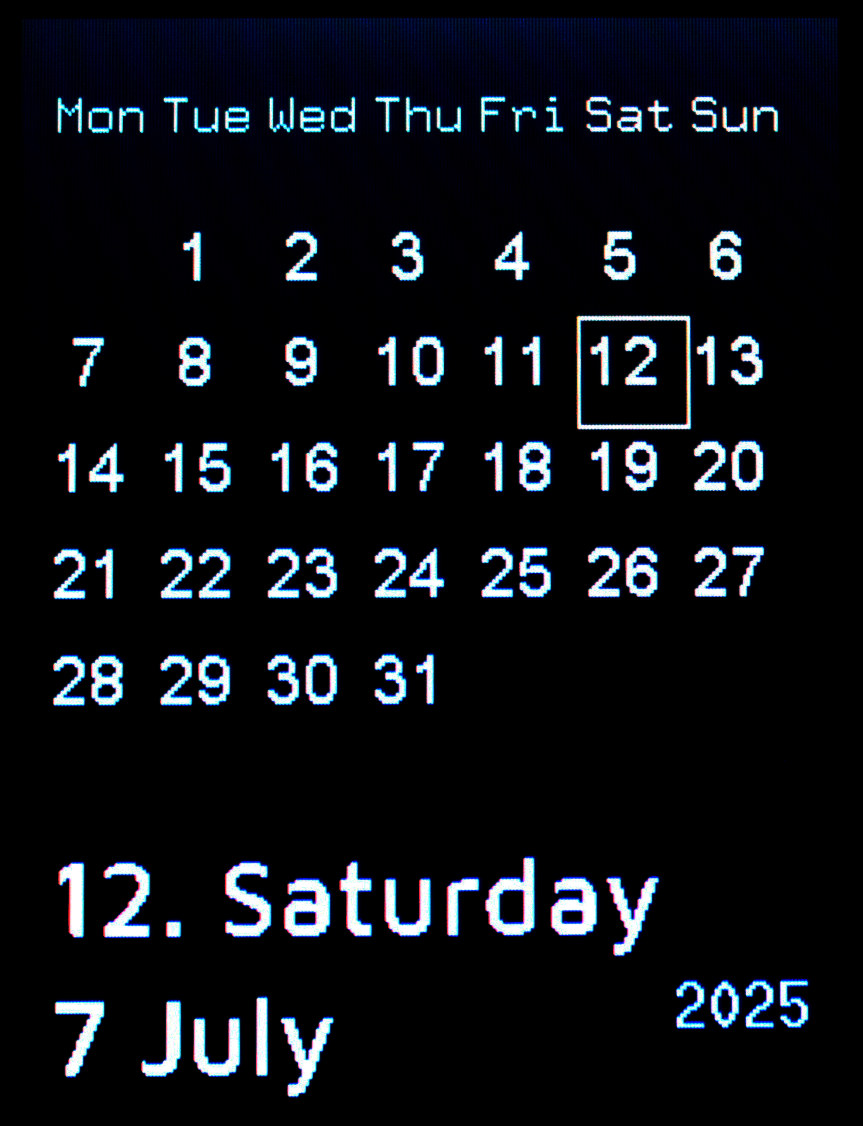
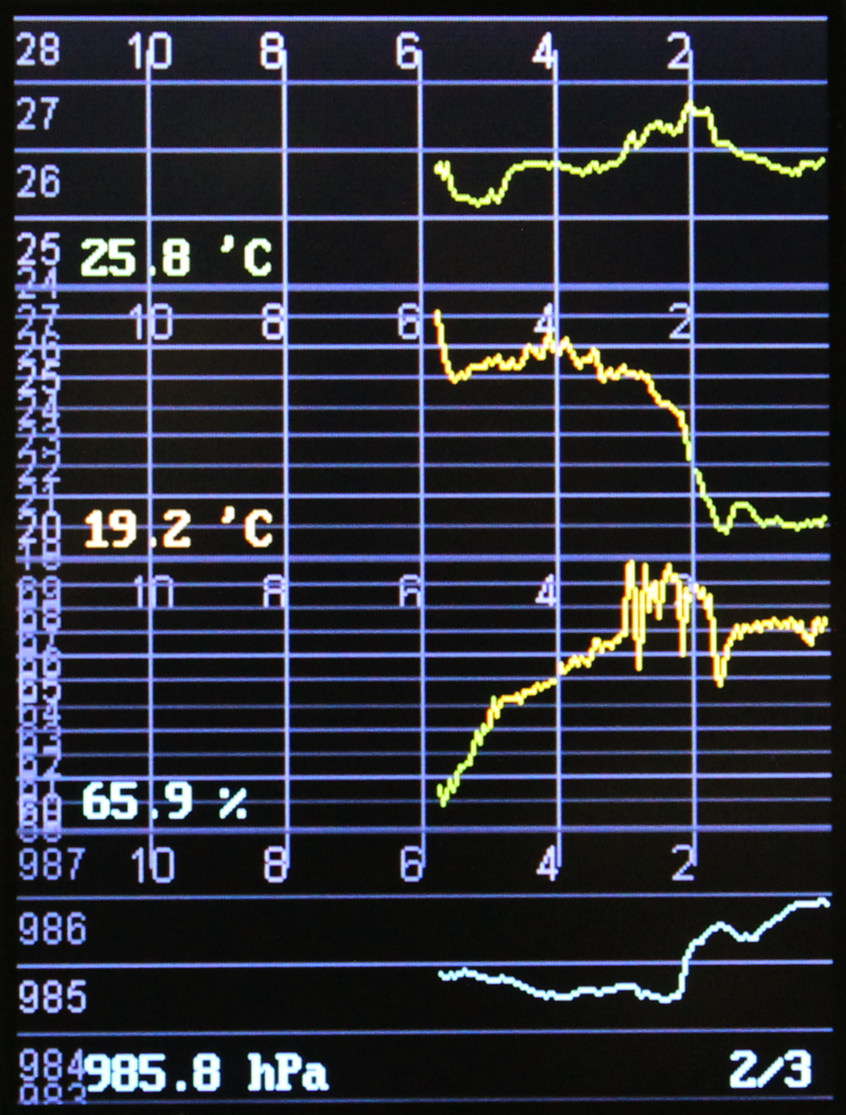
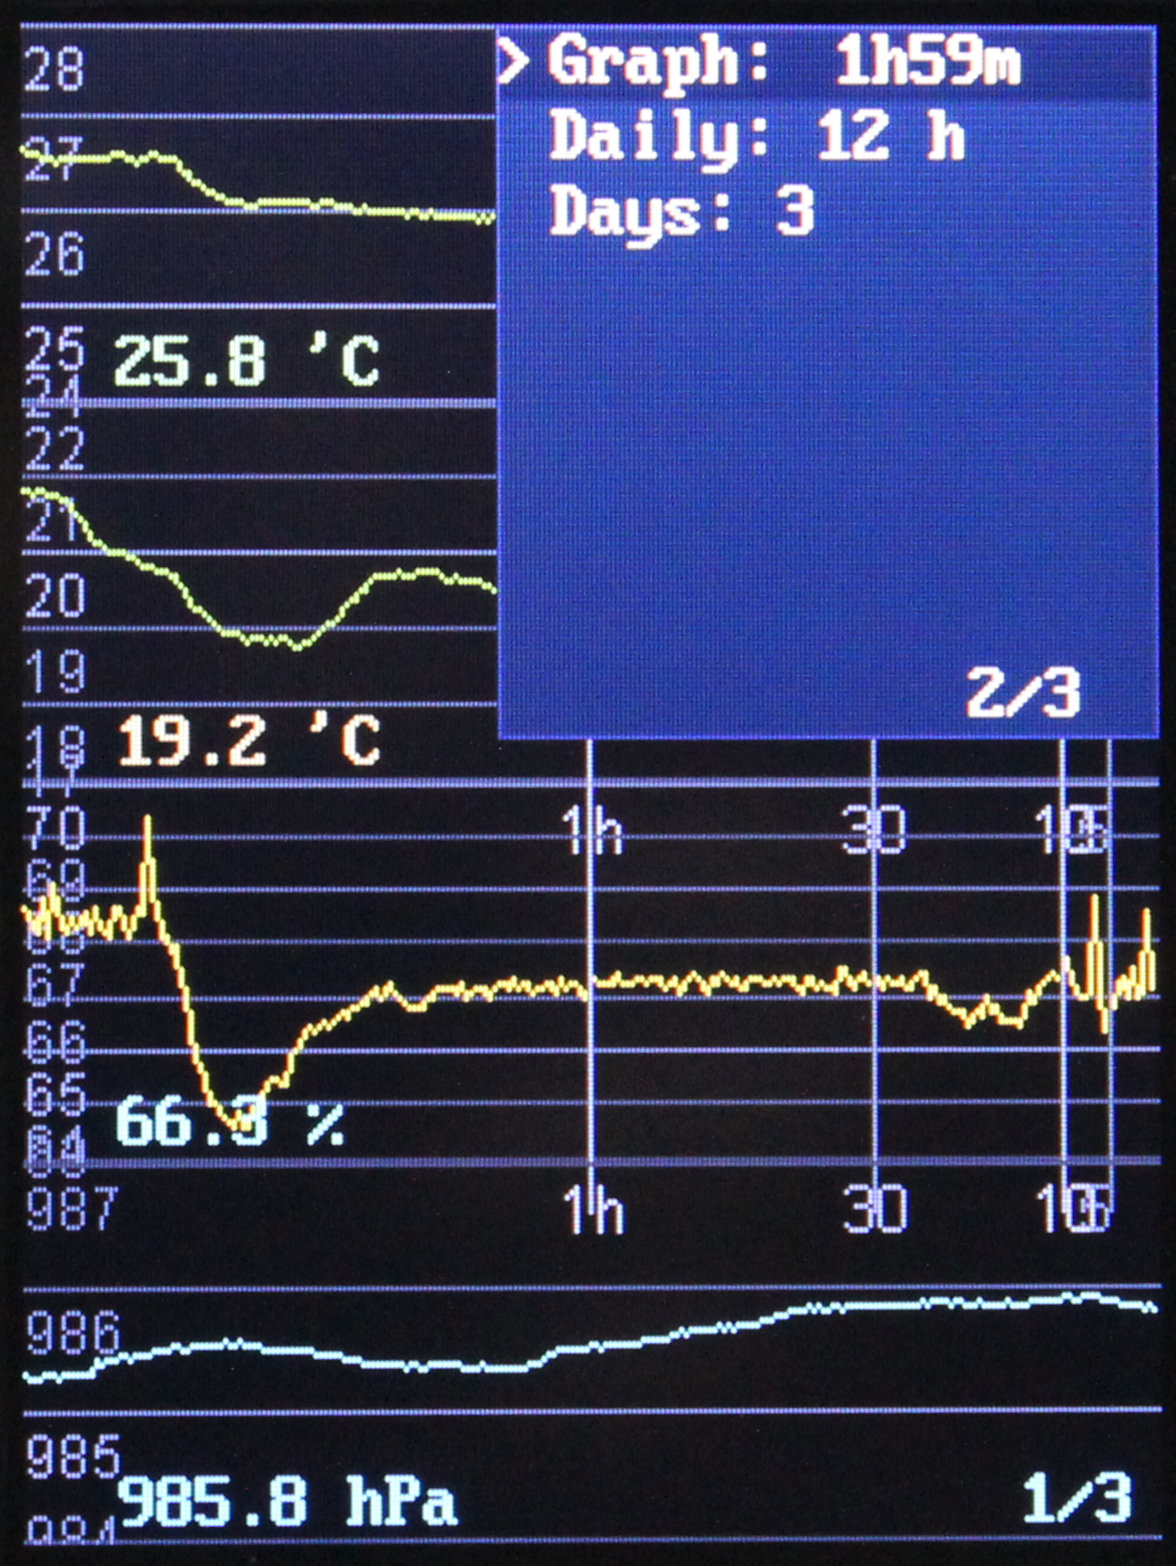
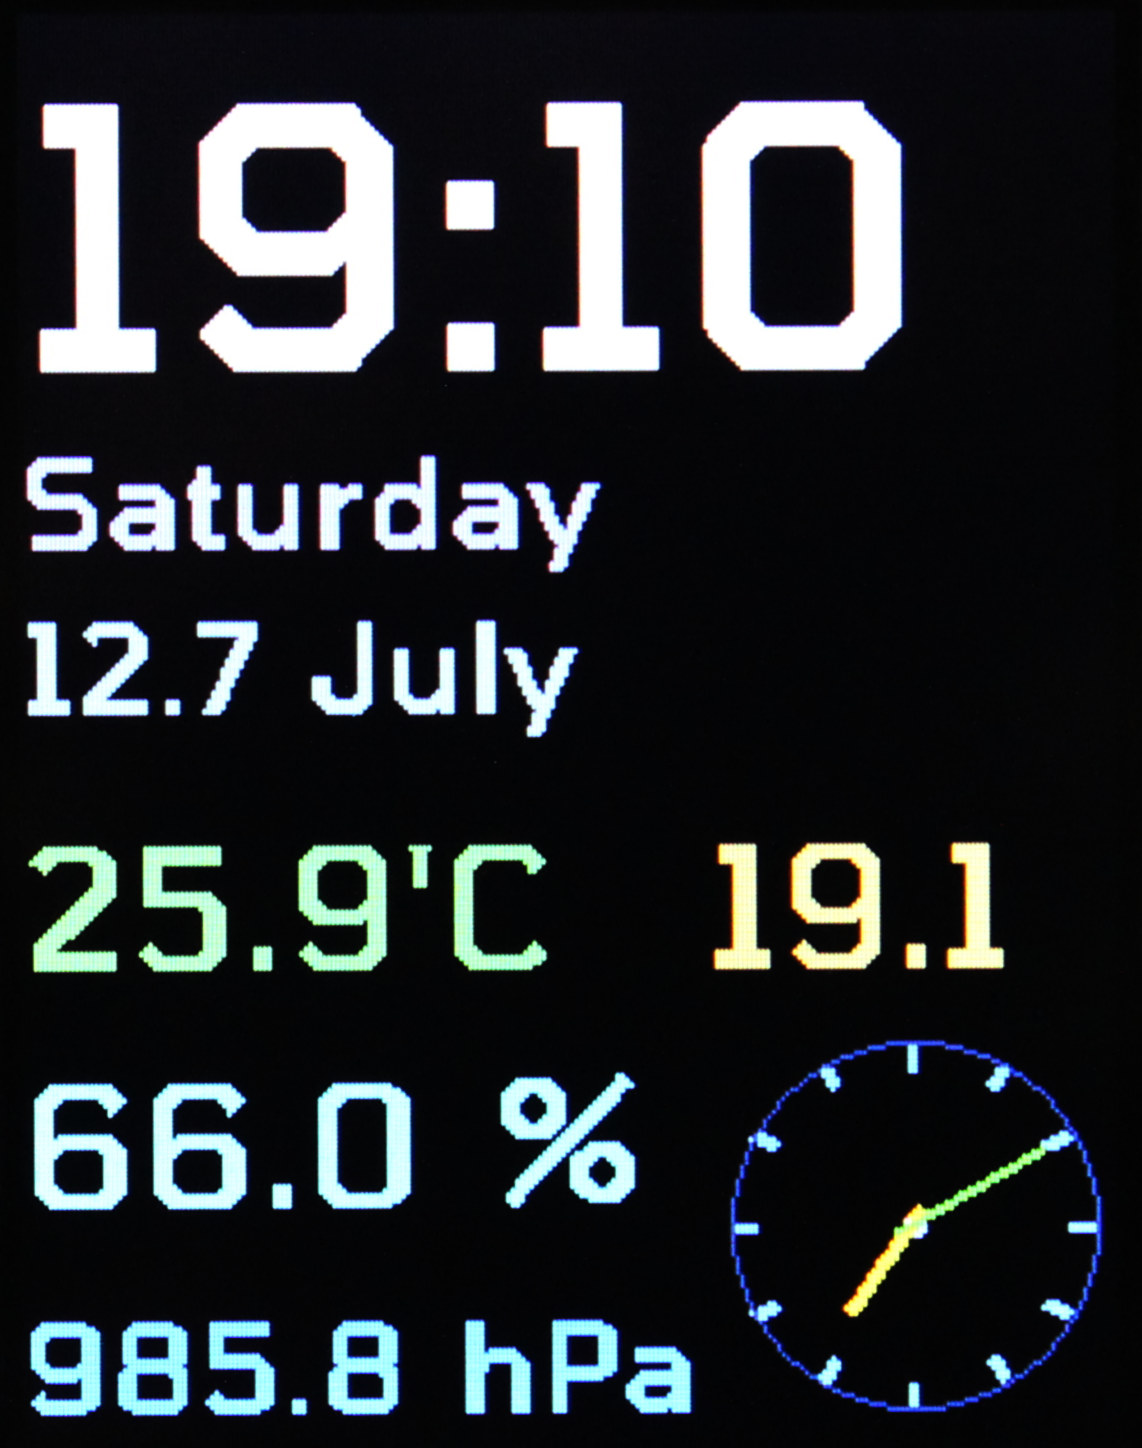
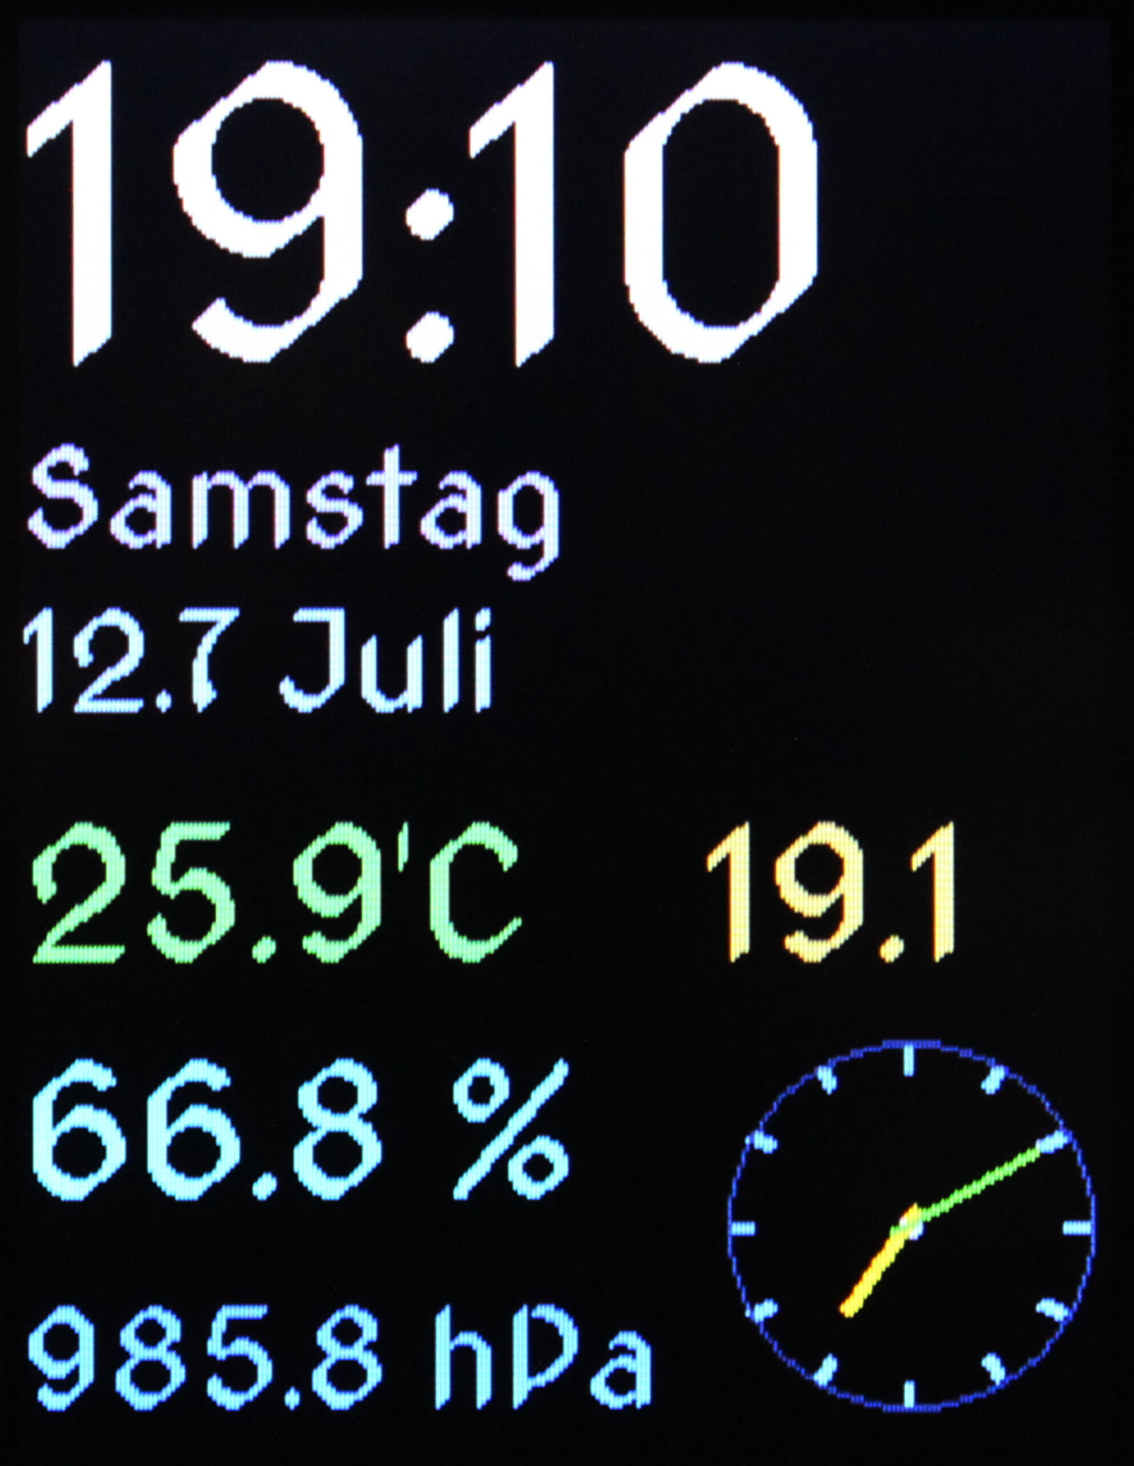
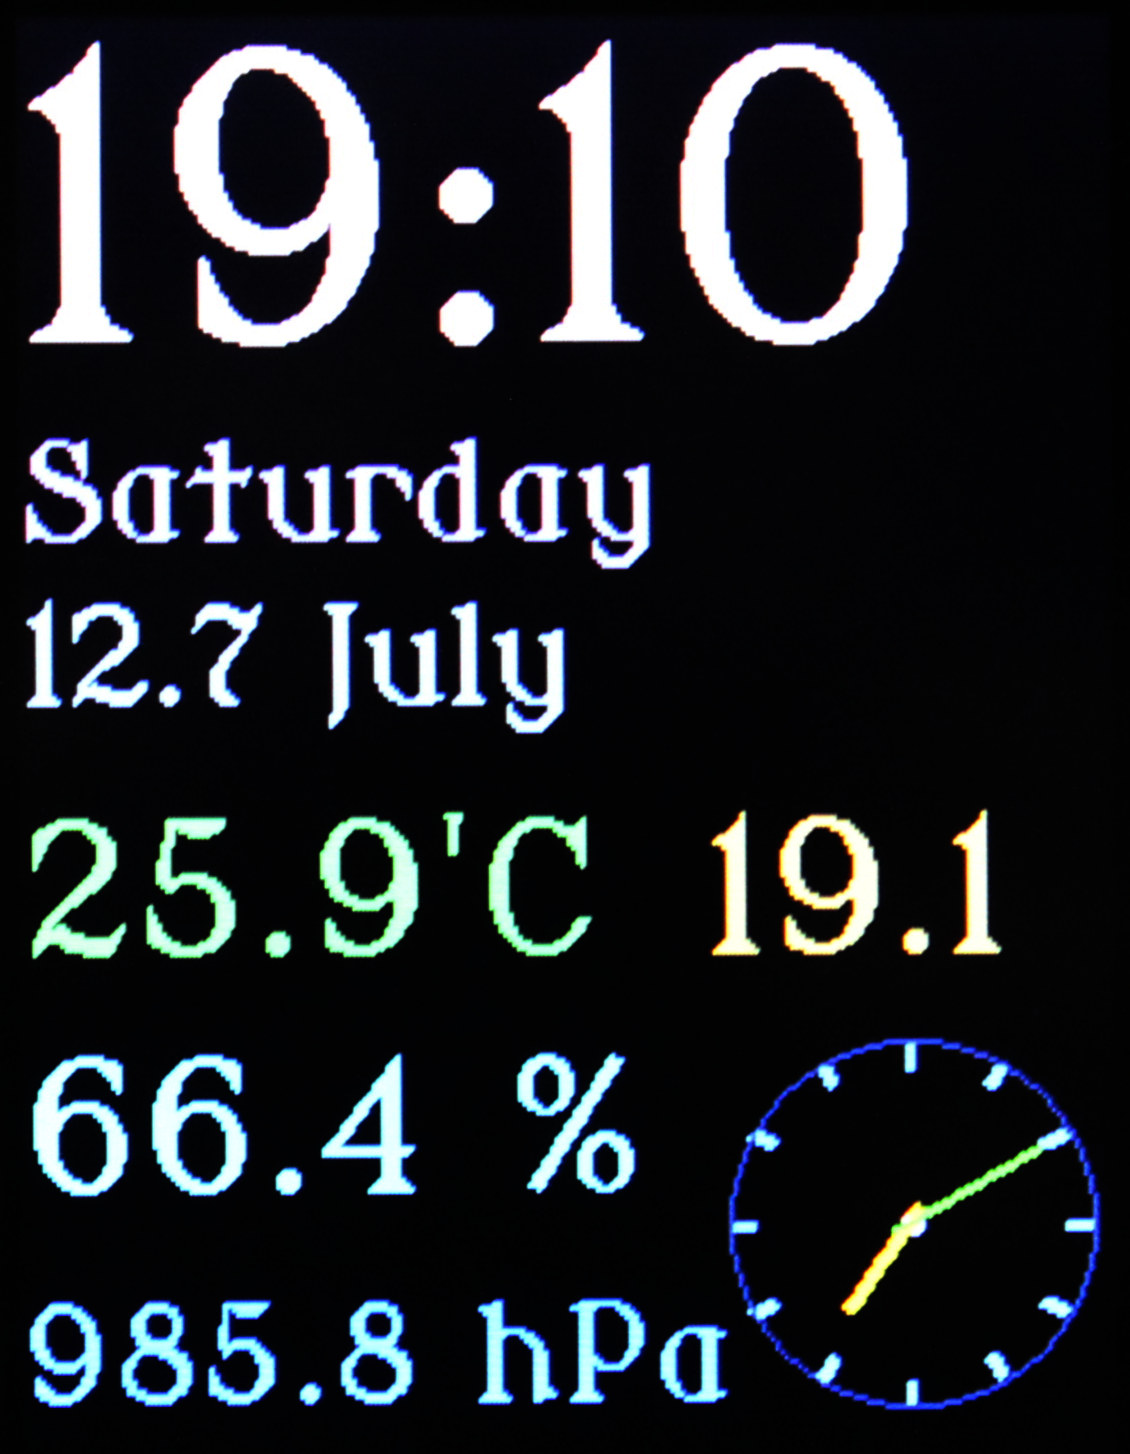
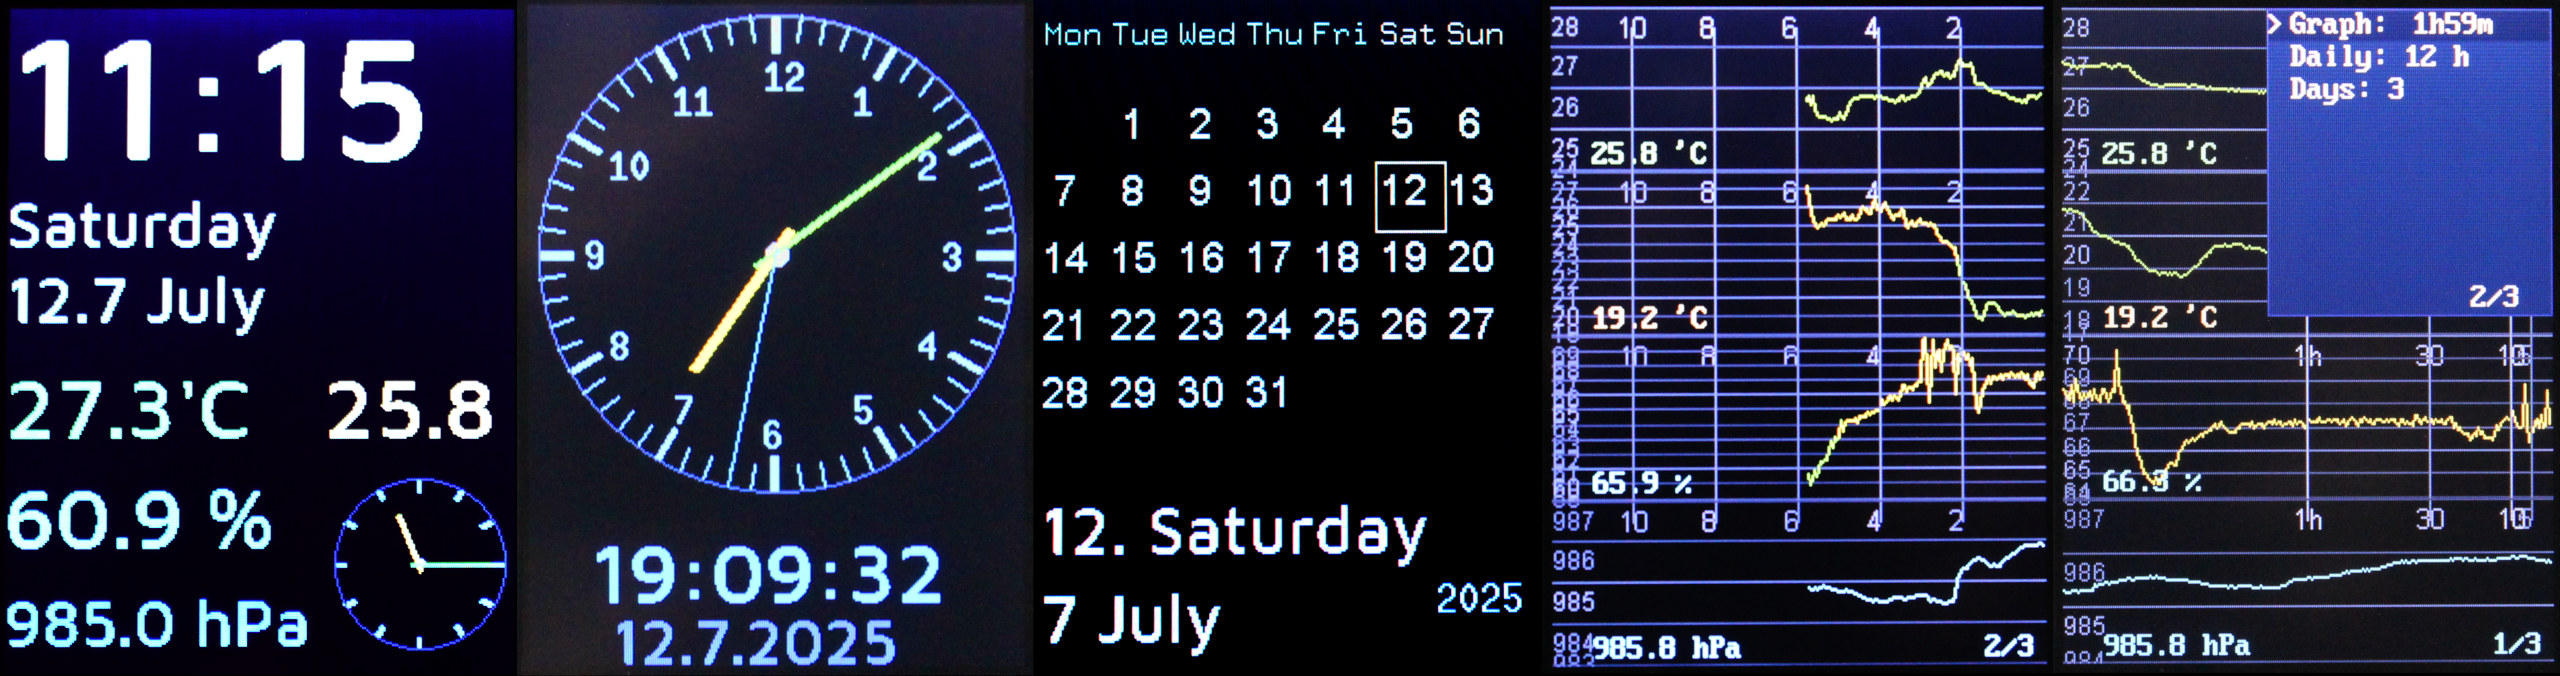
- 4 View pages showin:
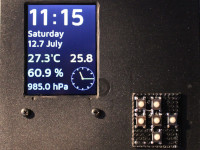
- digital clock with date and 4 sensor values:
temperature inside °C, outside °C, humidity %, pressure hPa - 📉 4 sensor graphs:
in one of 3 views: hourly, daily, days (time lengths for these are in options) - 🕑 analog clock with date
- 📅 calendar month view
- digital clock with date and 4 sensor values:
- 7 different fonts (styles), 3 sizes
searched for OFL licensed fonts on this website. Then used FabGL’s tool to generate .h file from font for each needed size. Lastly wrote a helper .py script that does this for all .ttf I have (I also put them in repo) - simple Gui with options (on 3 pages), config is stored using EEPROM
➡️Conclusions
So far it seems great. I don’t see much I’d change, and when I eventually will need to, I can just unmount it and take to develop its code and change anything really. It’s what’s missing in every commercial project. Only open harware with open software allows this.
Turns out Esp32 (at 240 MHz) can handle such 320 x 240 display very well. When using SPI at 80 MHz it does draw about 35 (with texts) to 41 Fps (when almost empty). I am already using same display in my keyboard with Teensy 4 which is even faster (600 MHz) but way more expensive, it does always 45 Fps (at 60 MHz SPI, could do 60 Fps at 80 but that failed for me).
Esp32 for me really is best in terms of performance and cost now. And since I managed to finally do something using it, this will make it easier for future projects also using it.