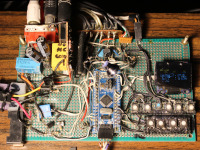
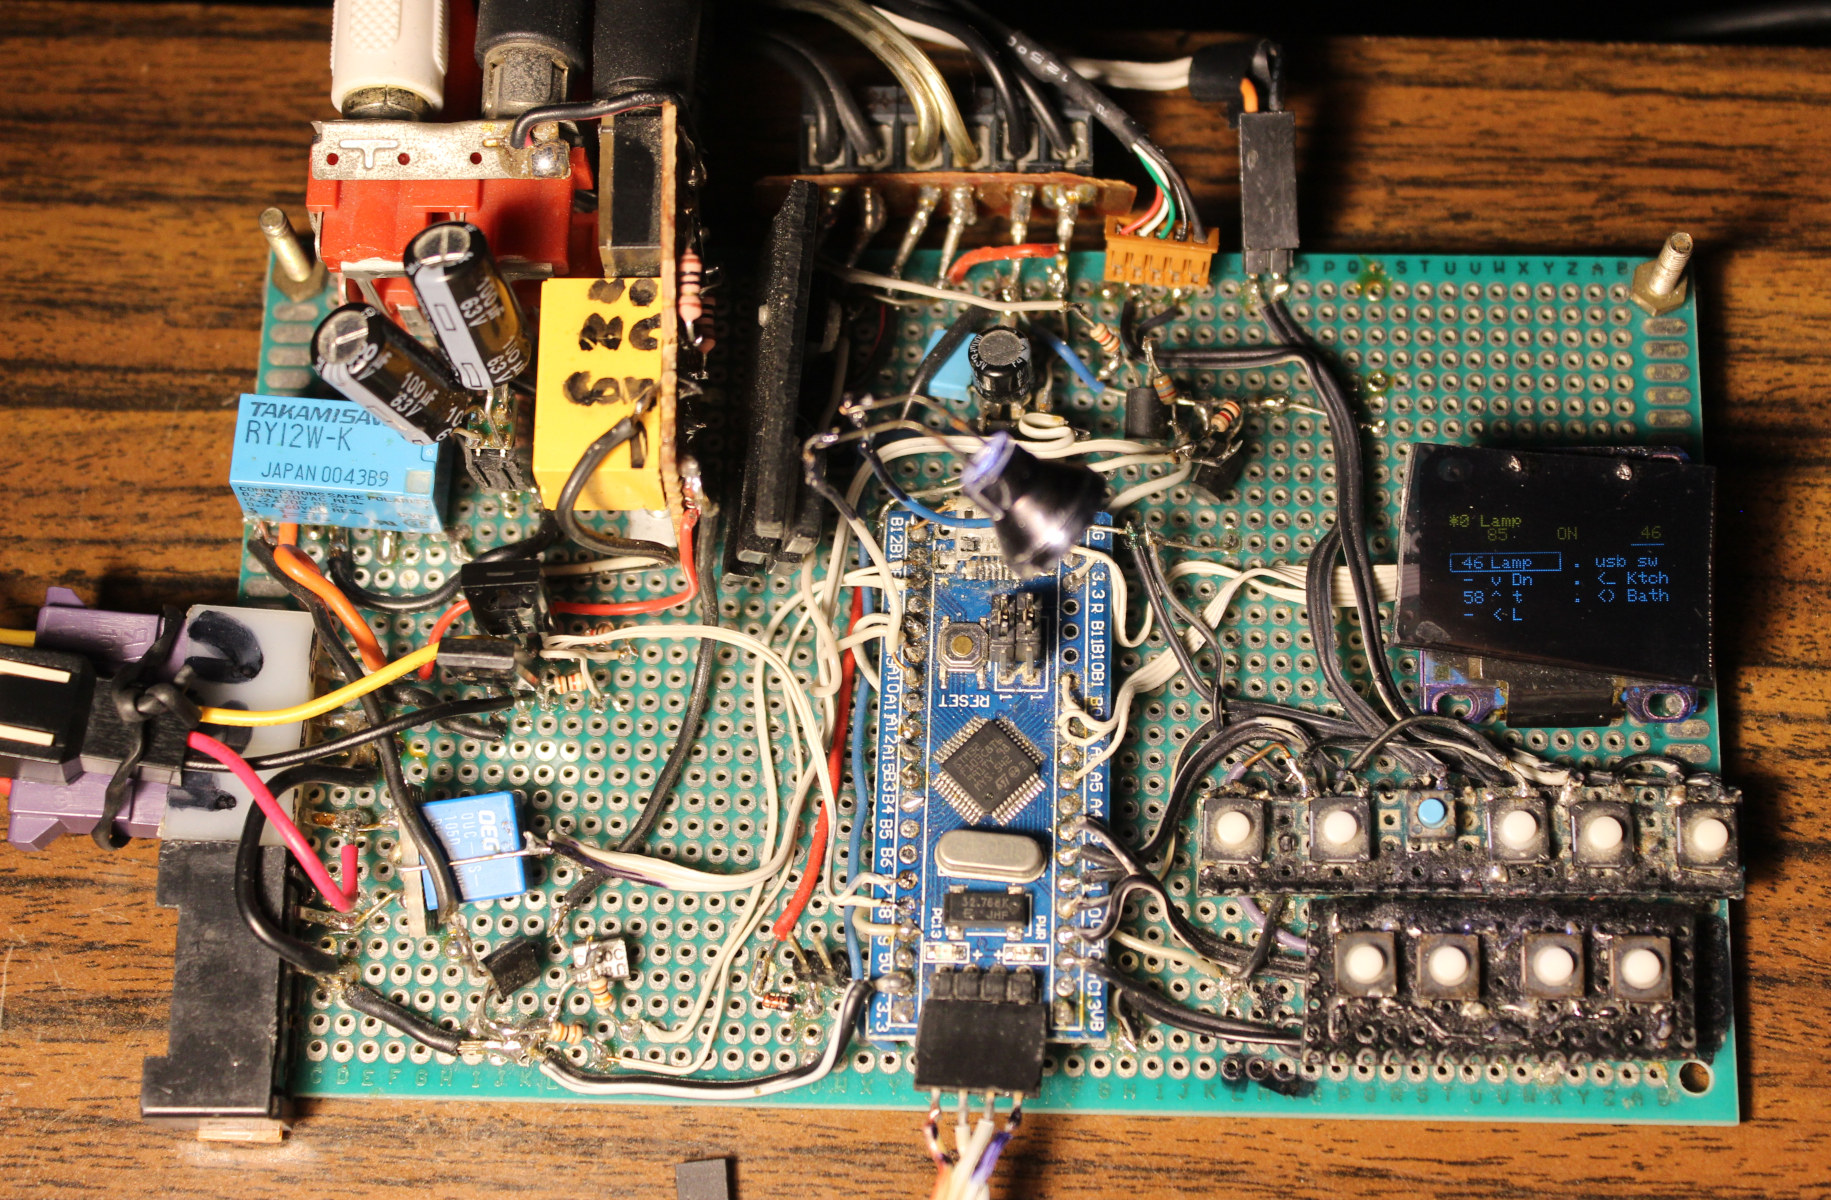
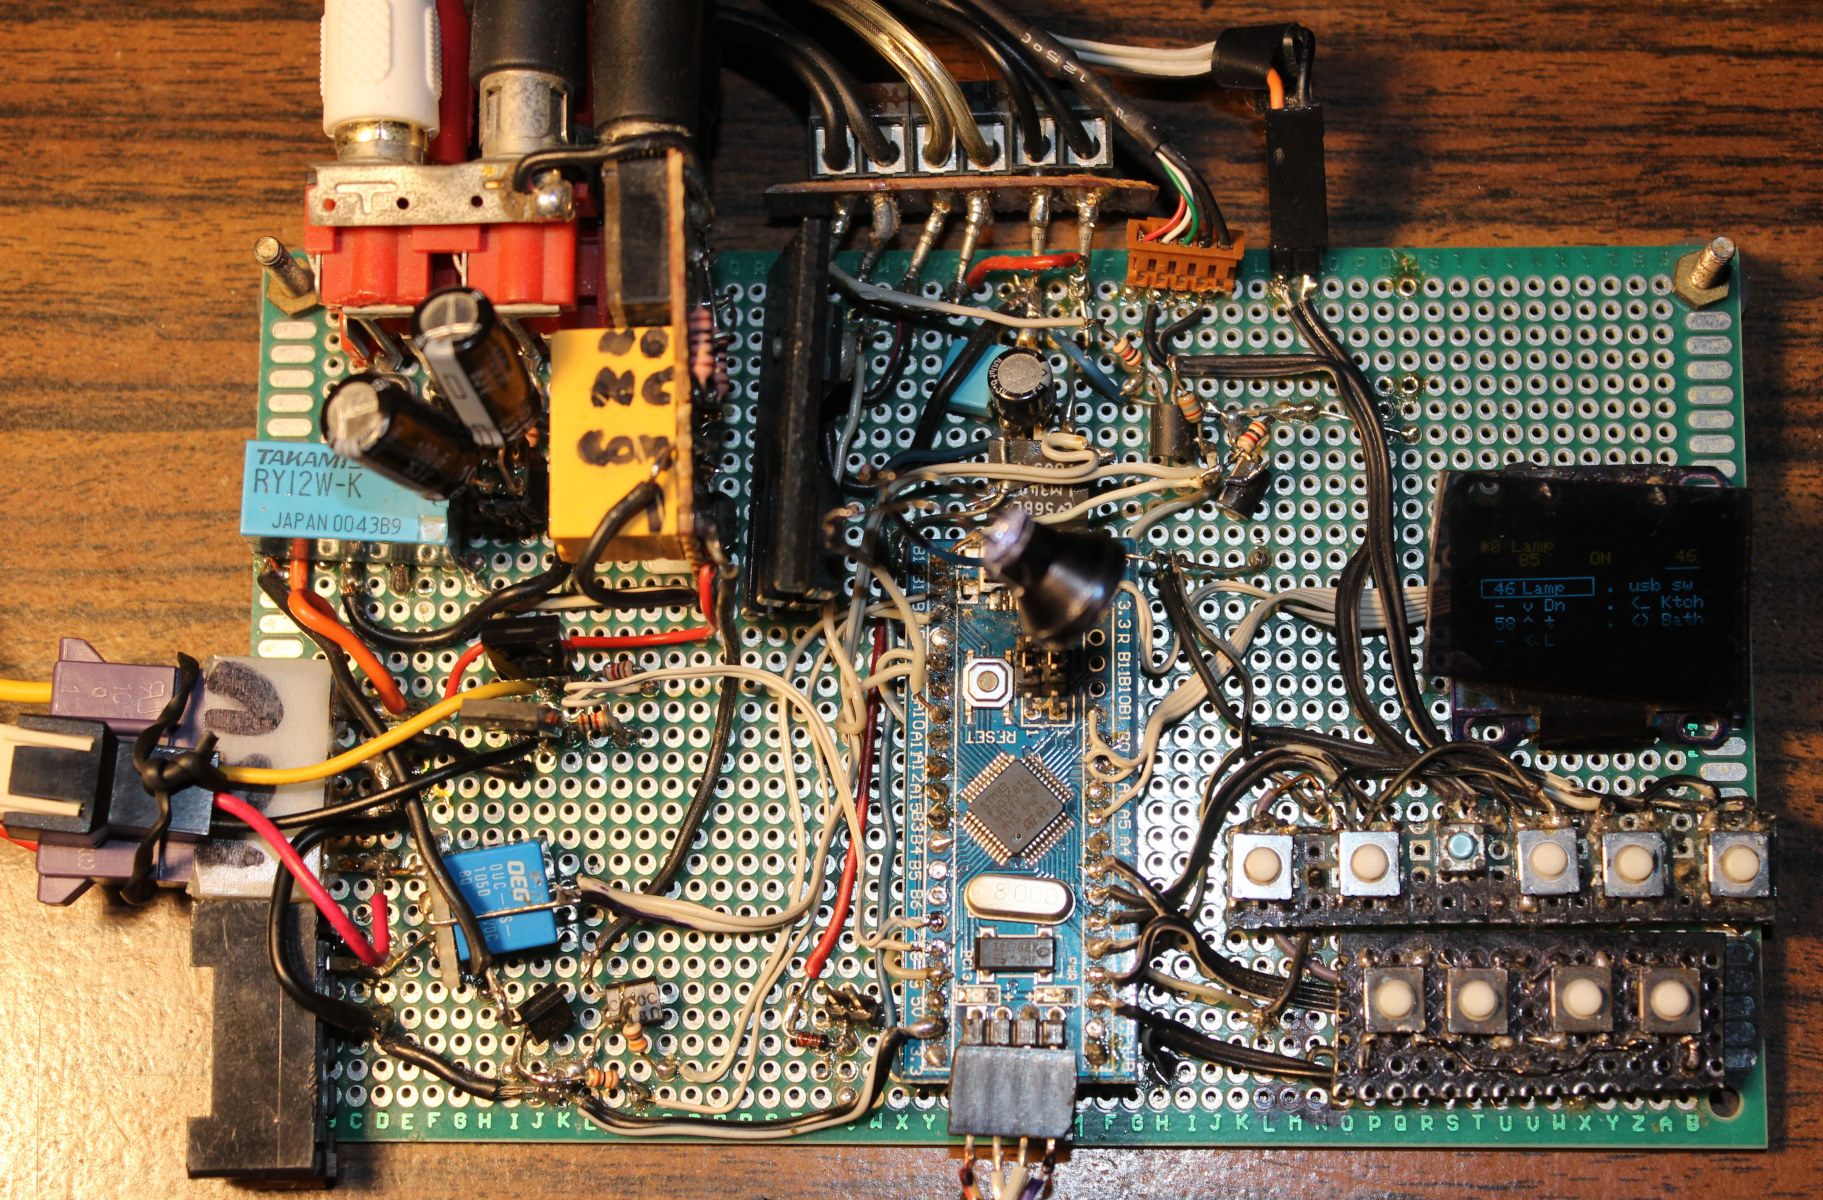
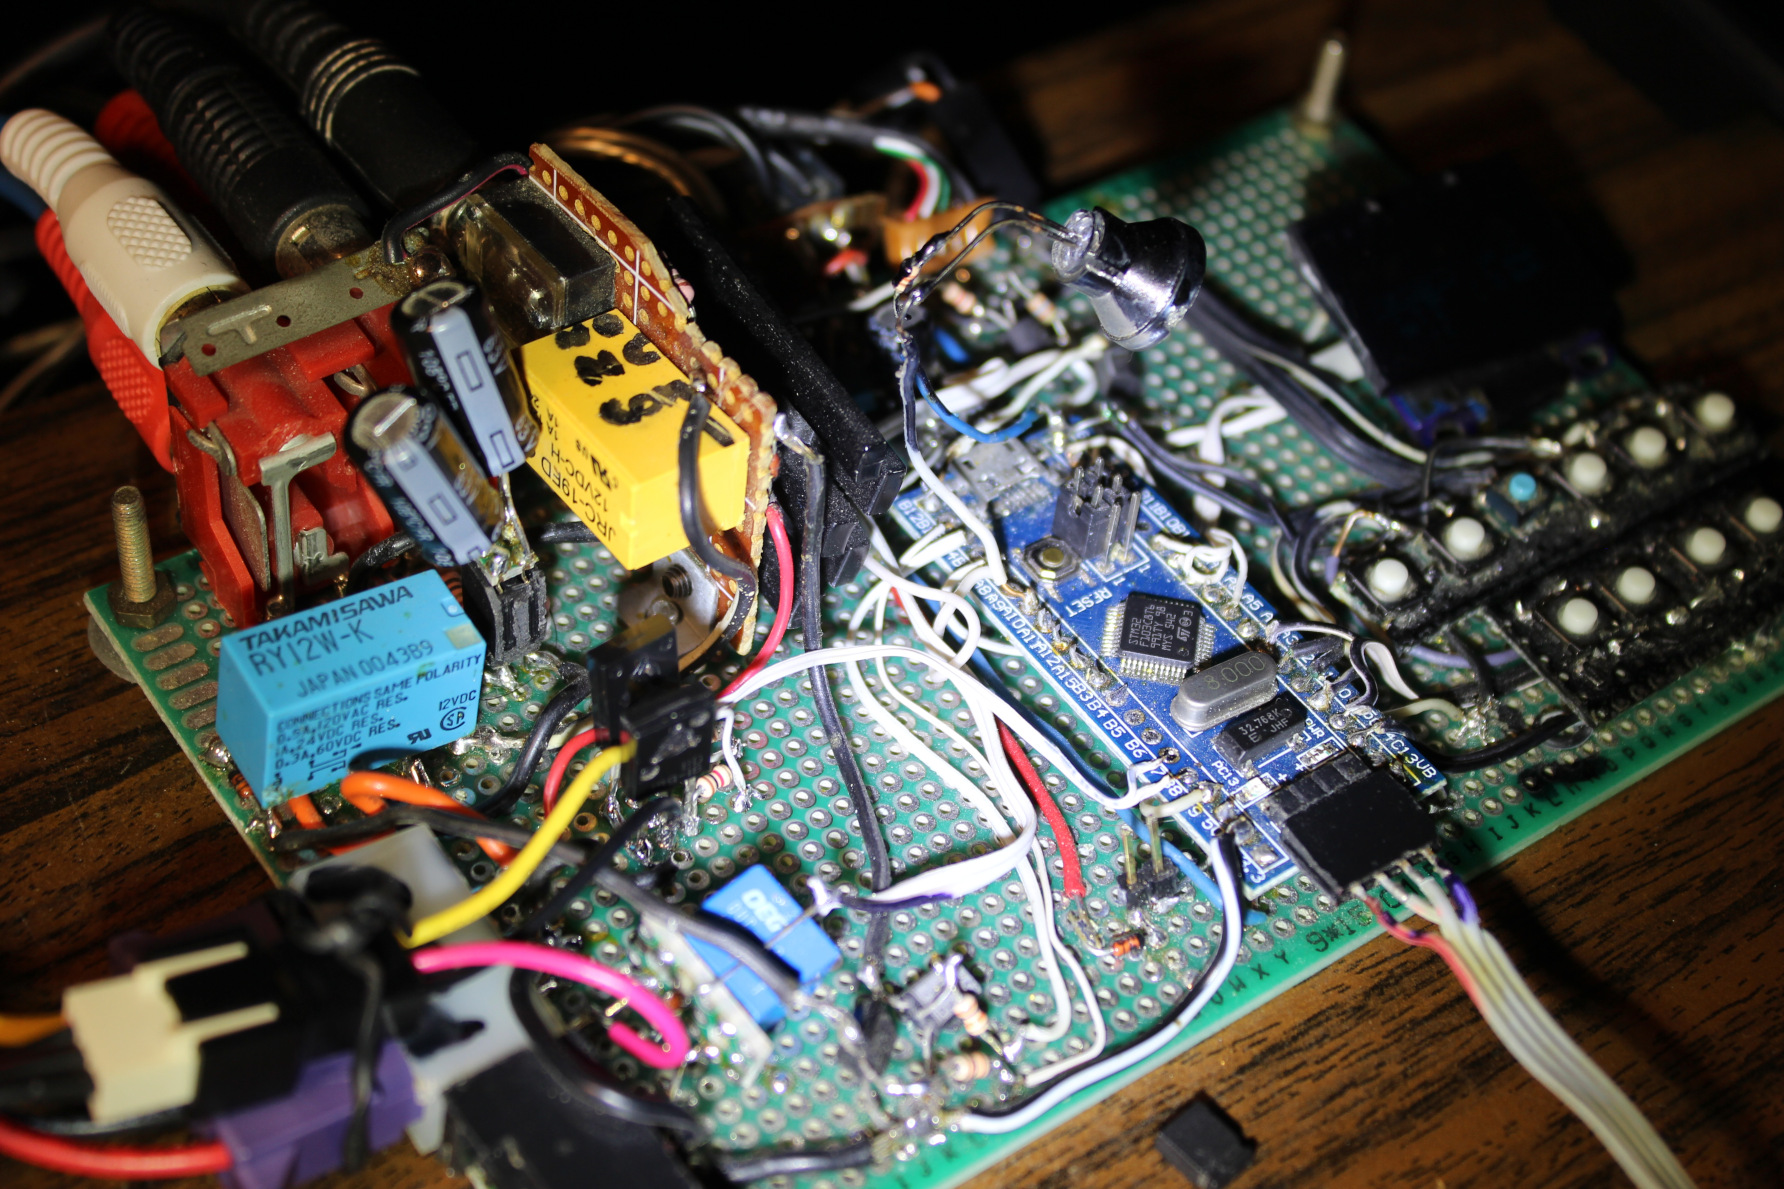
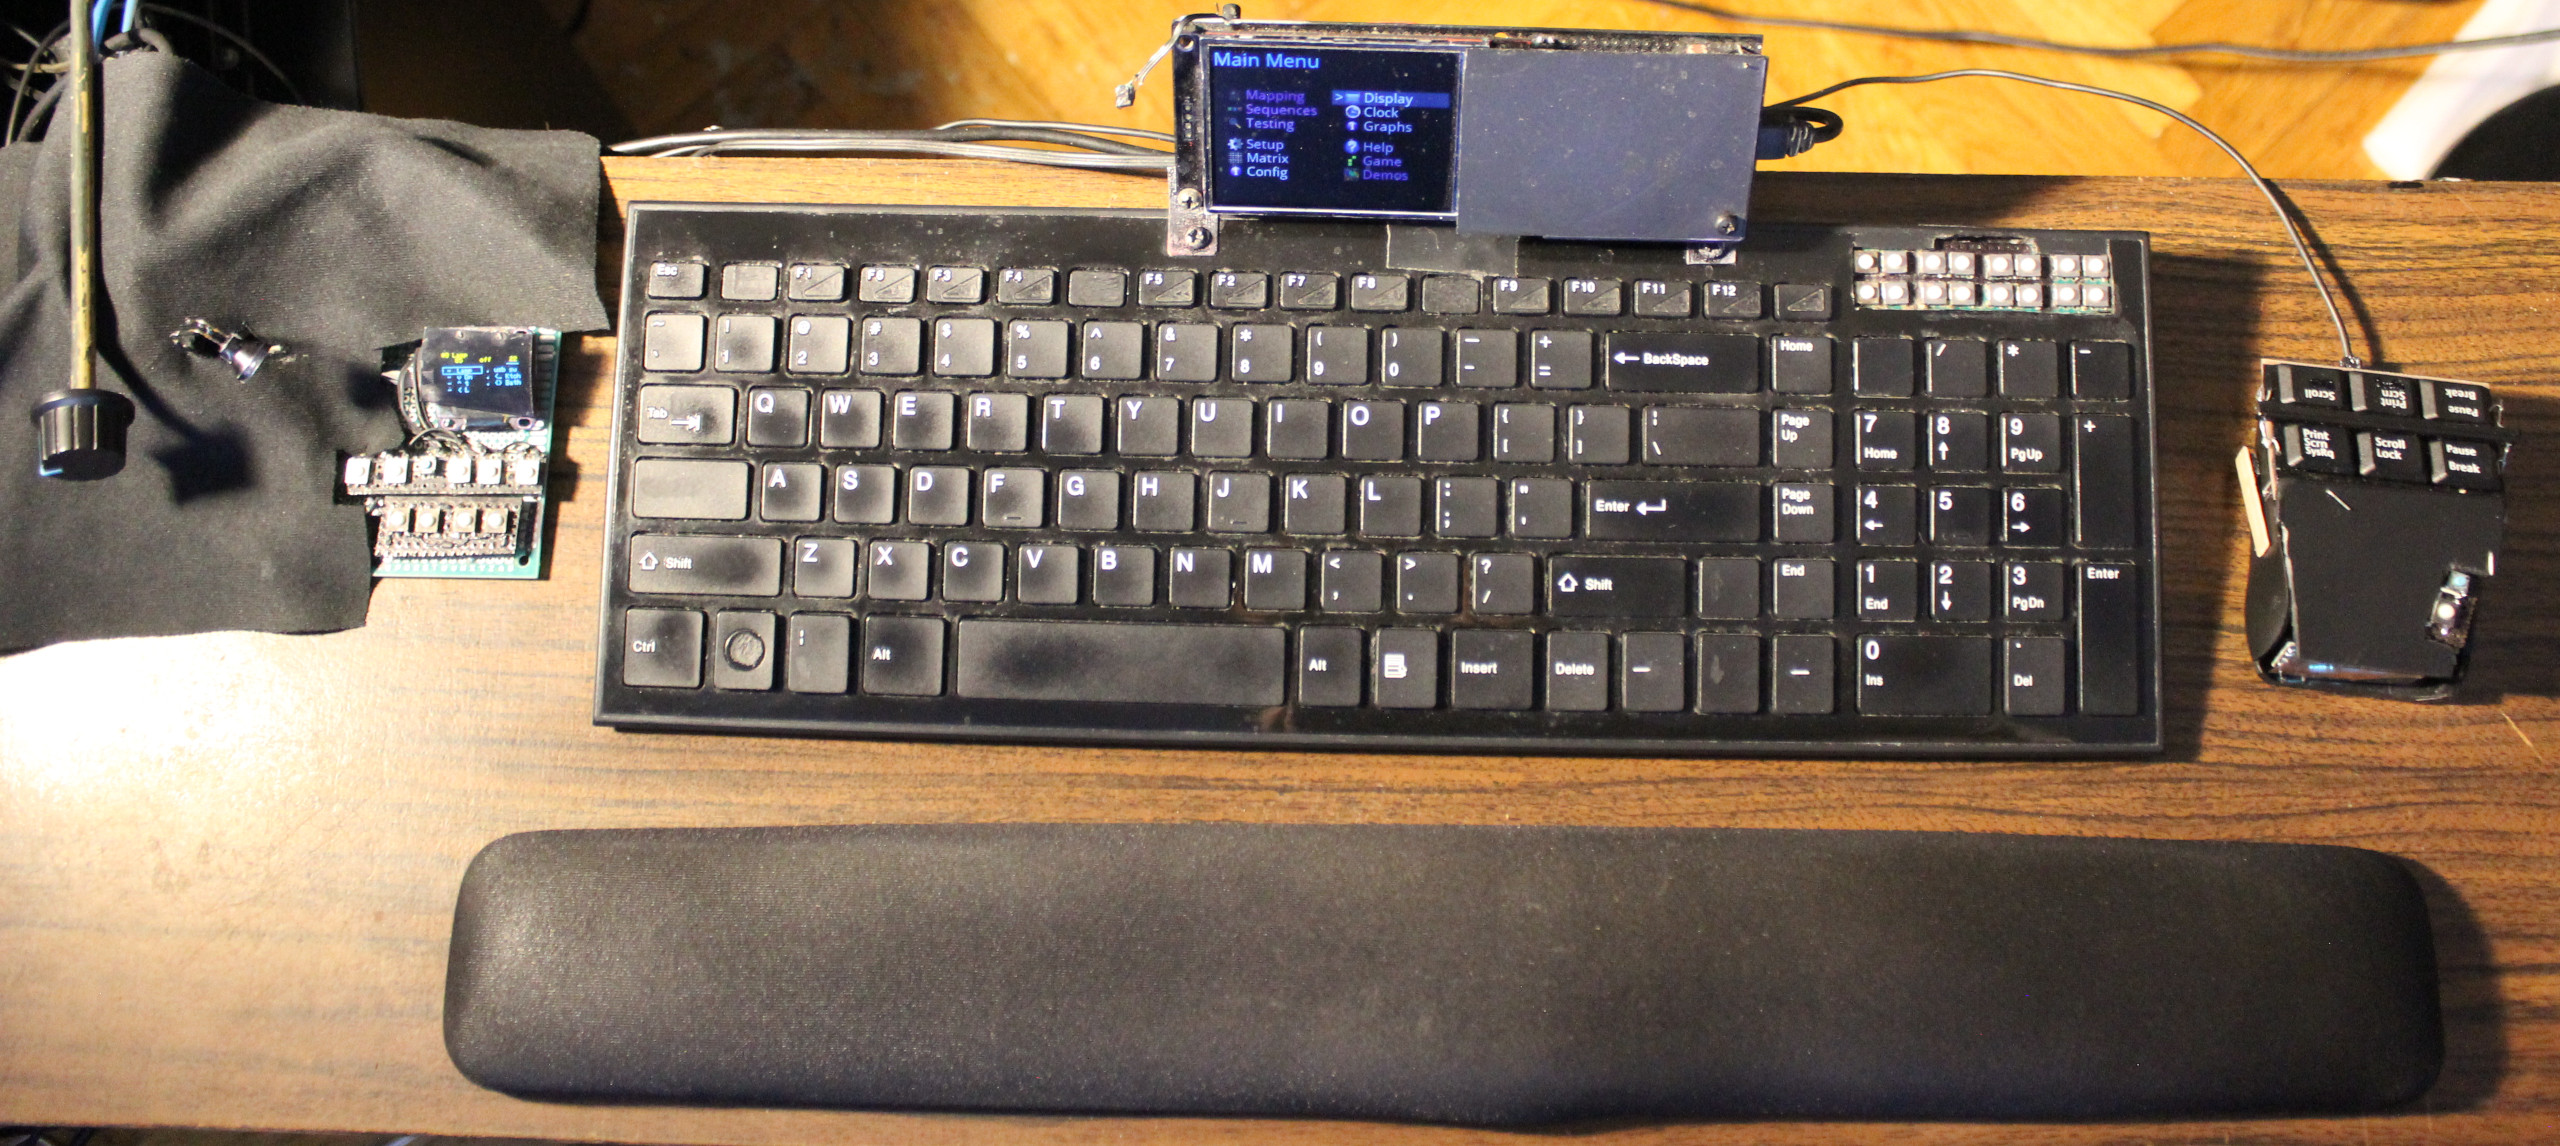
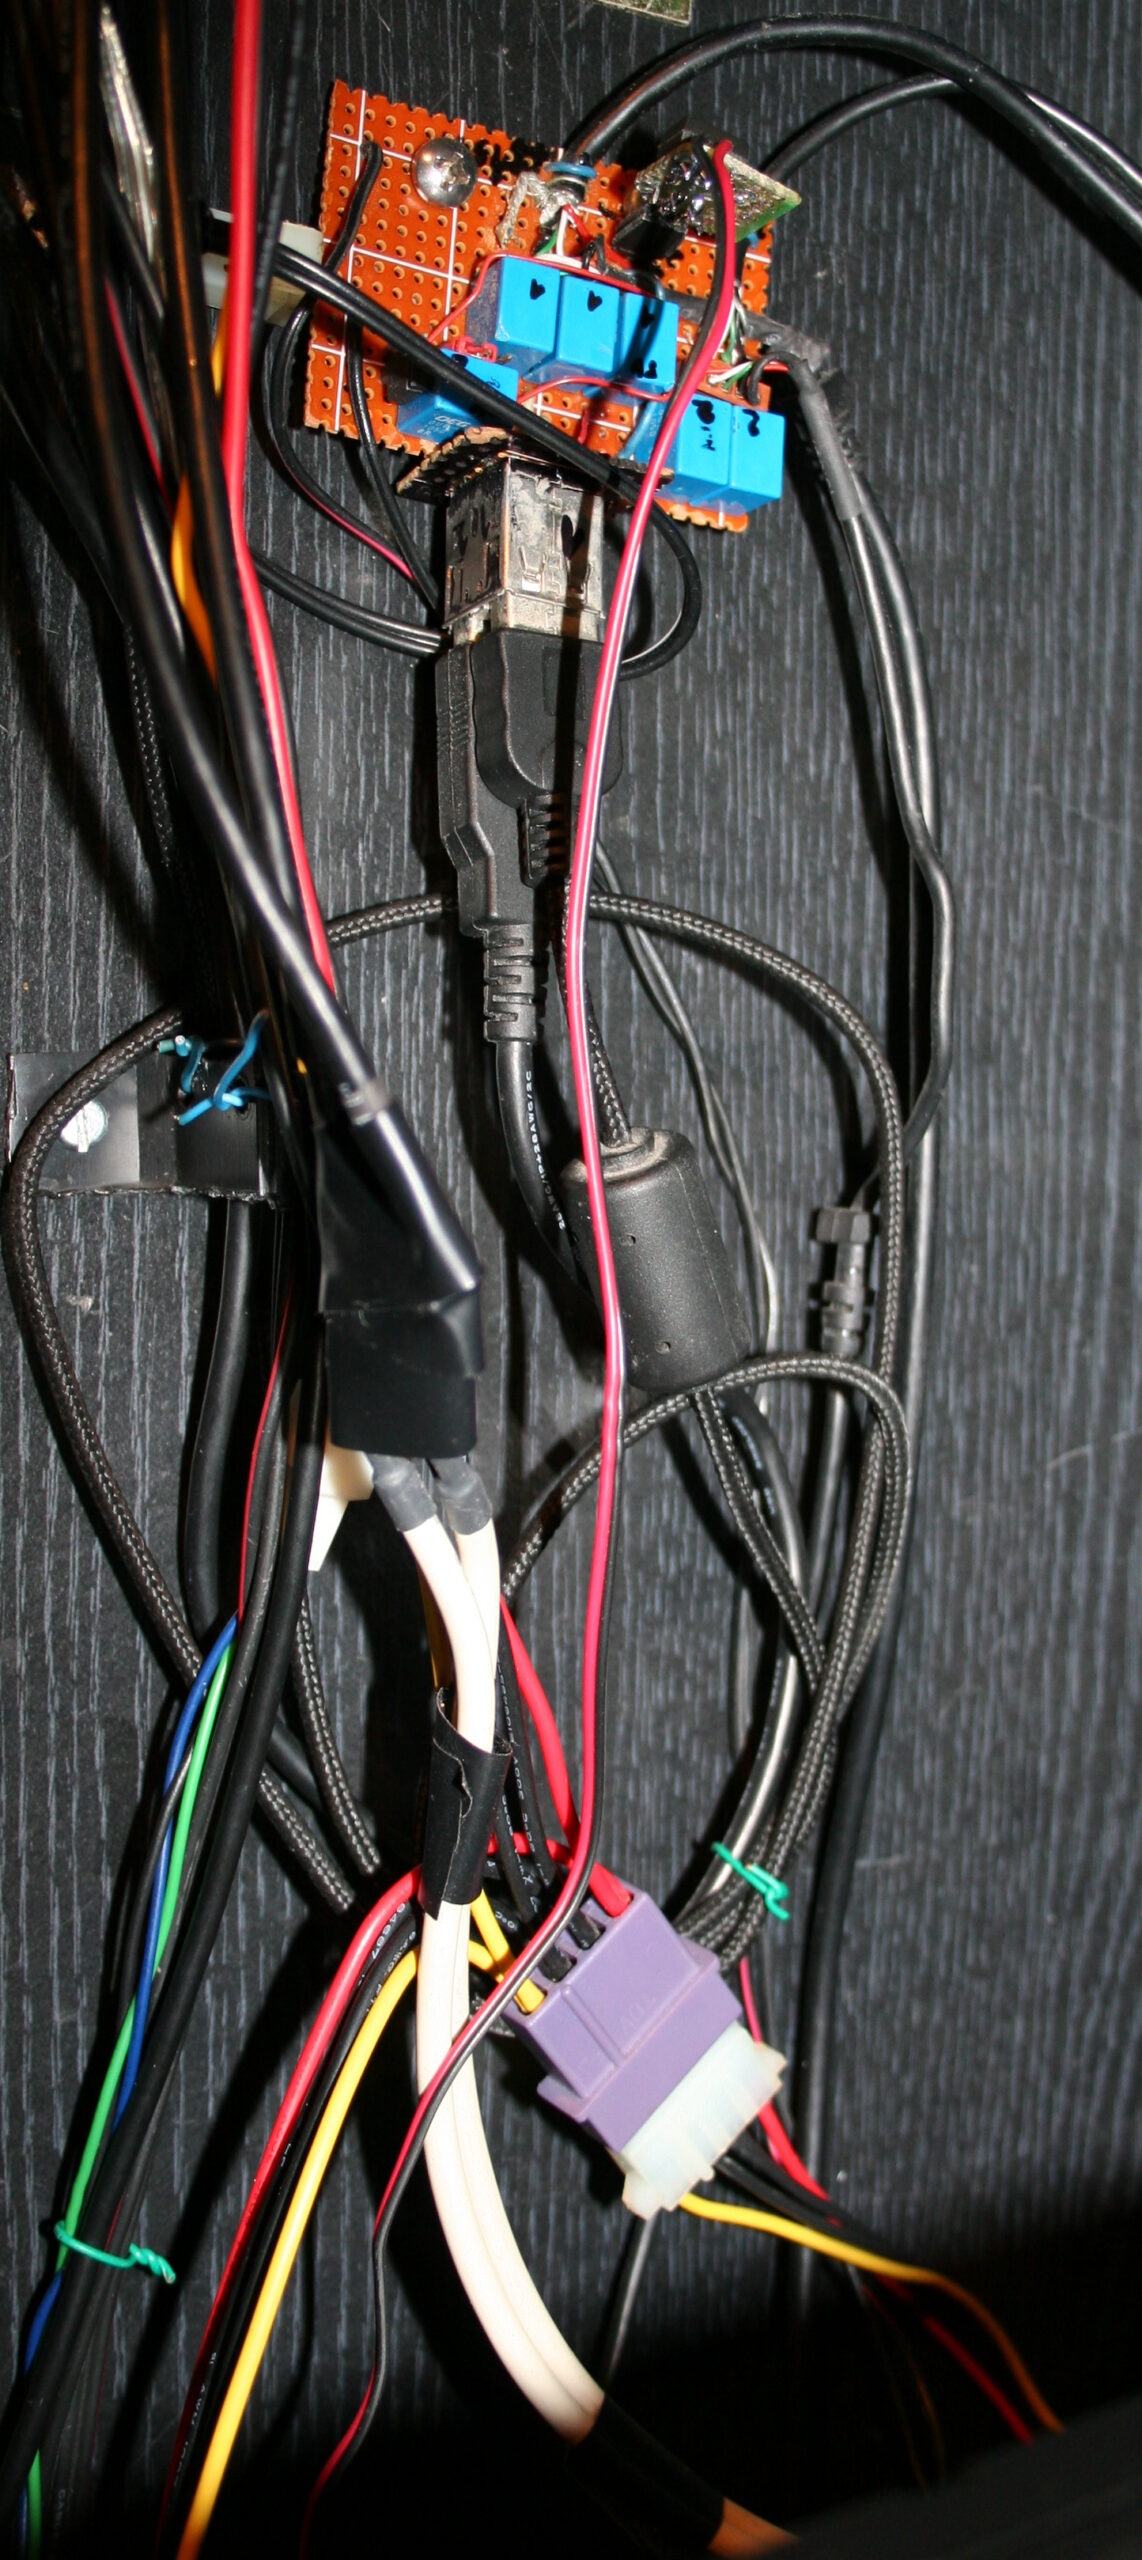
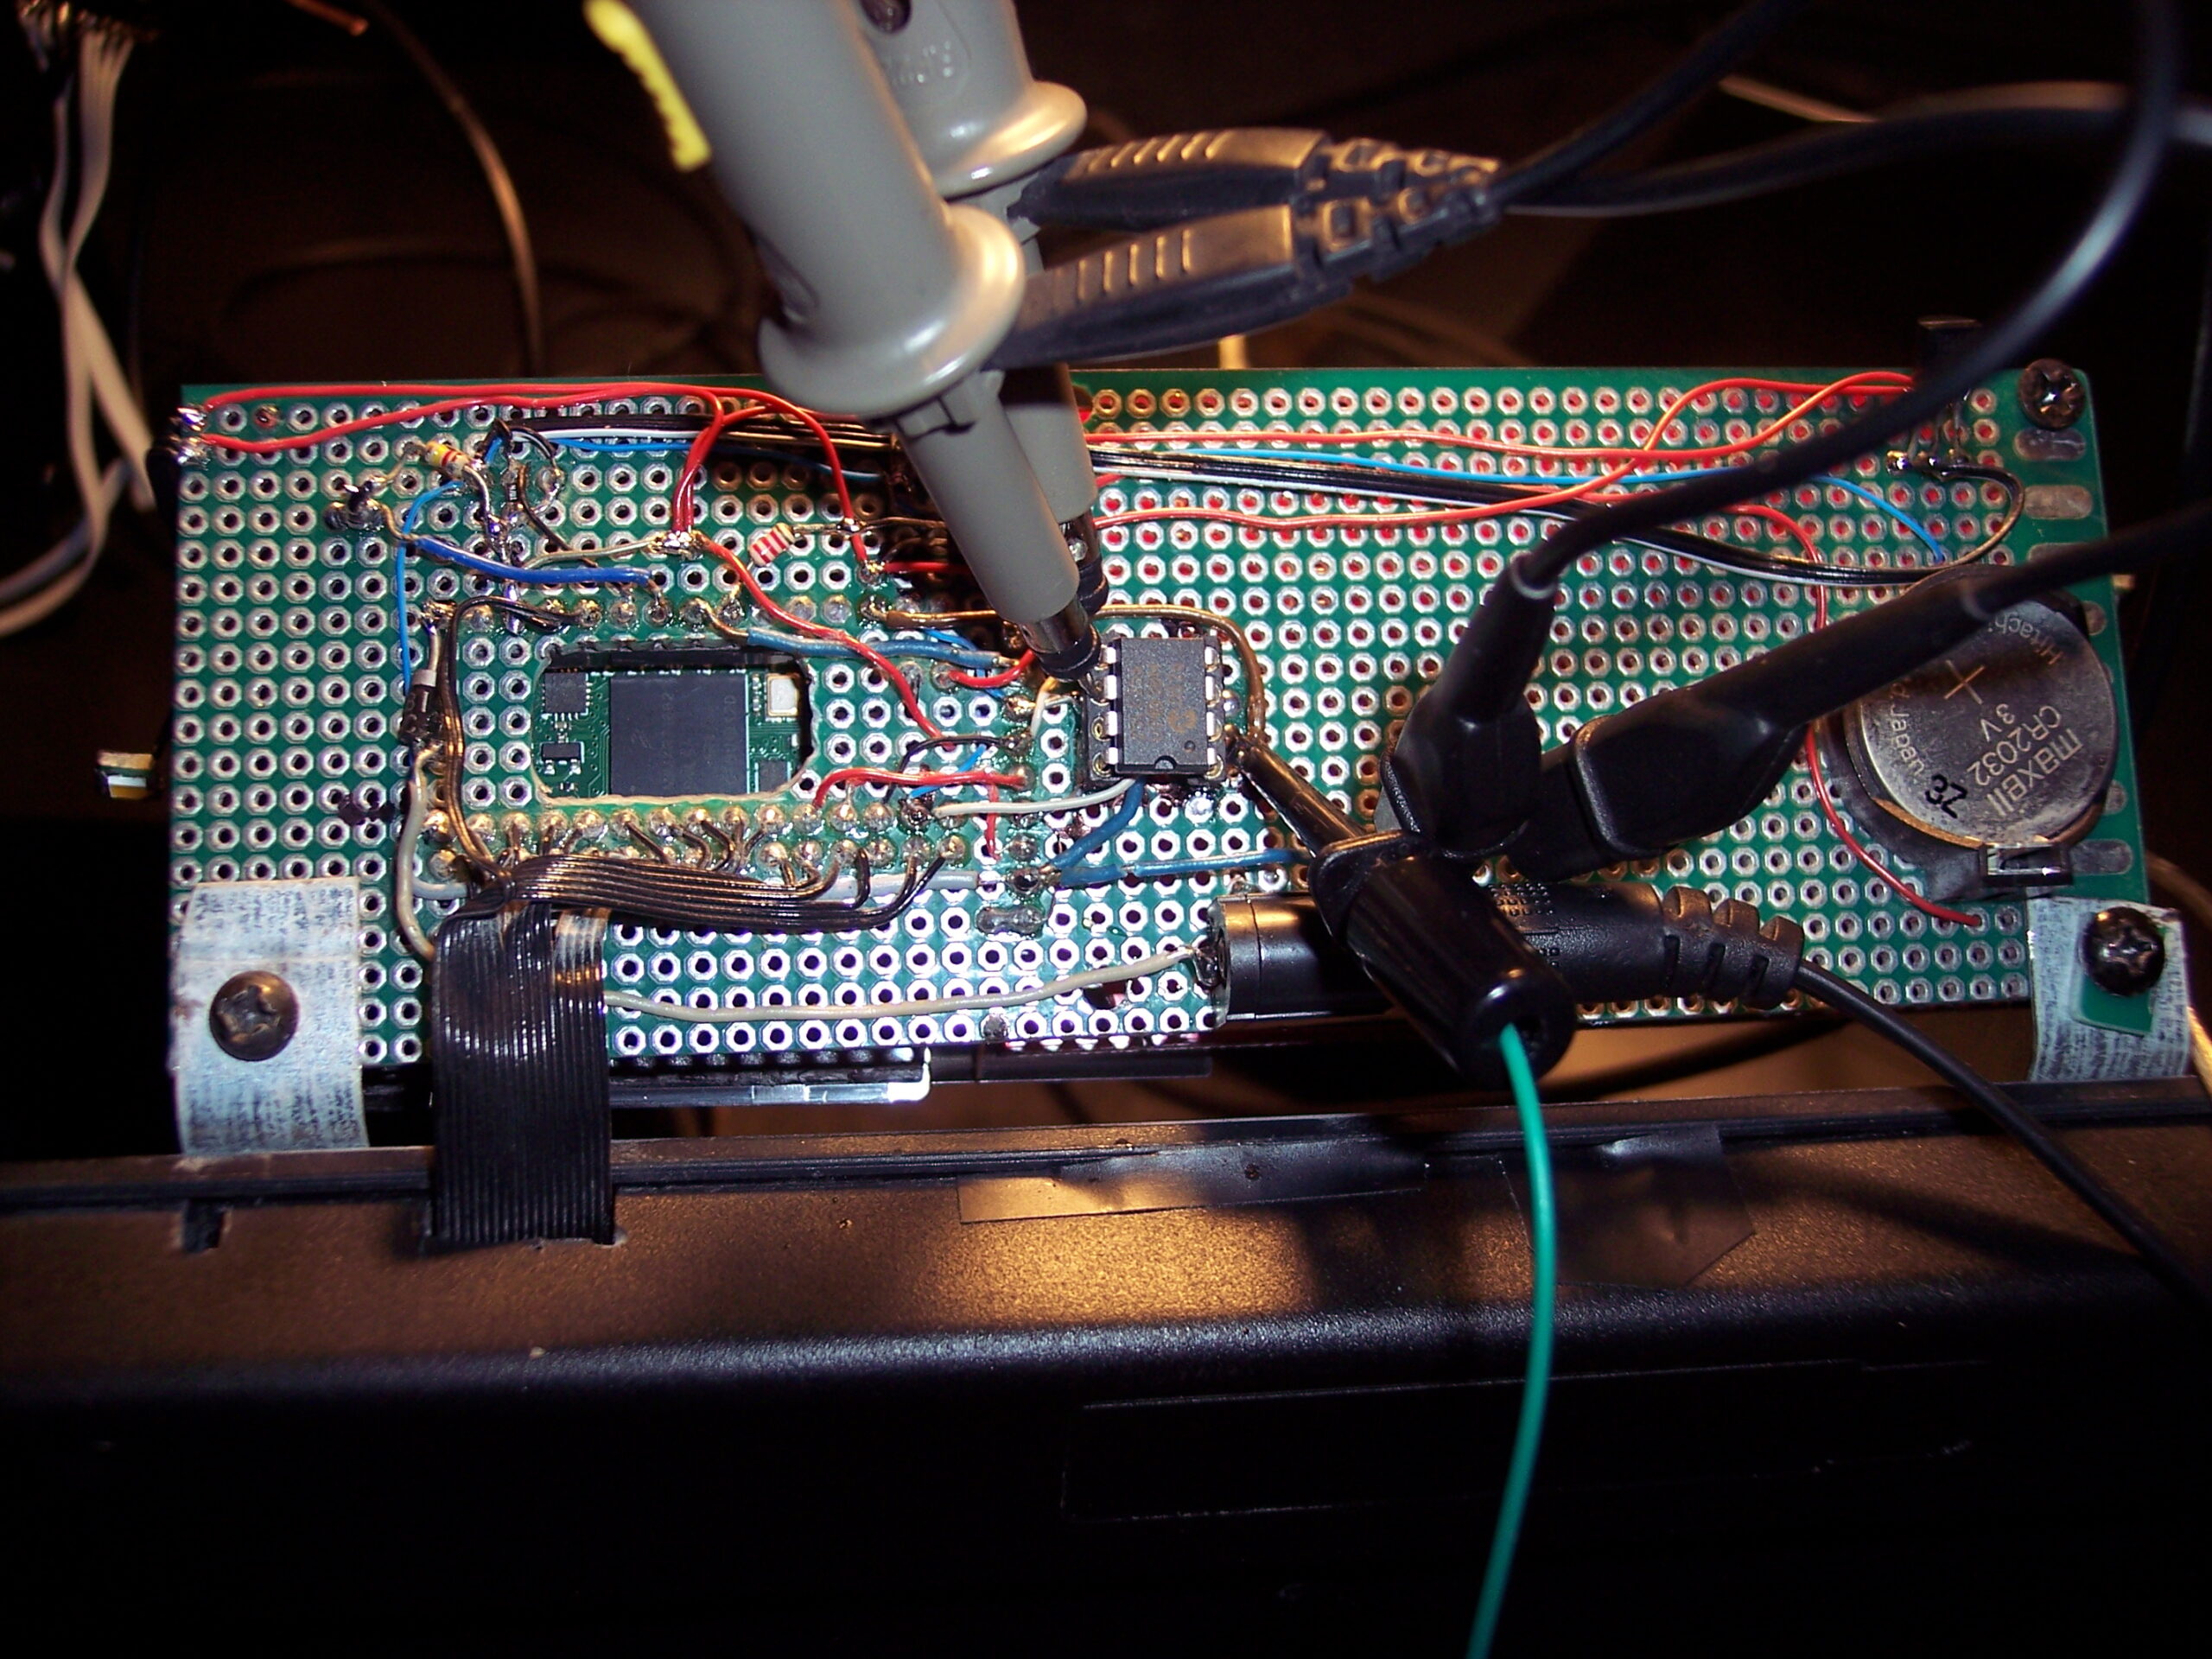
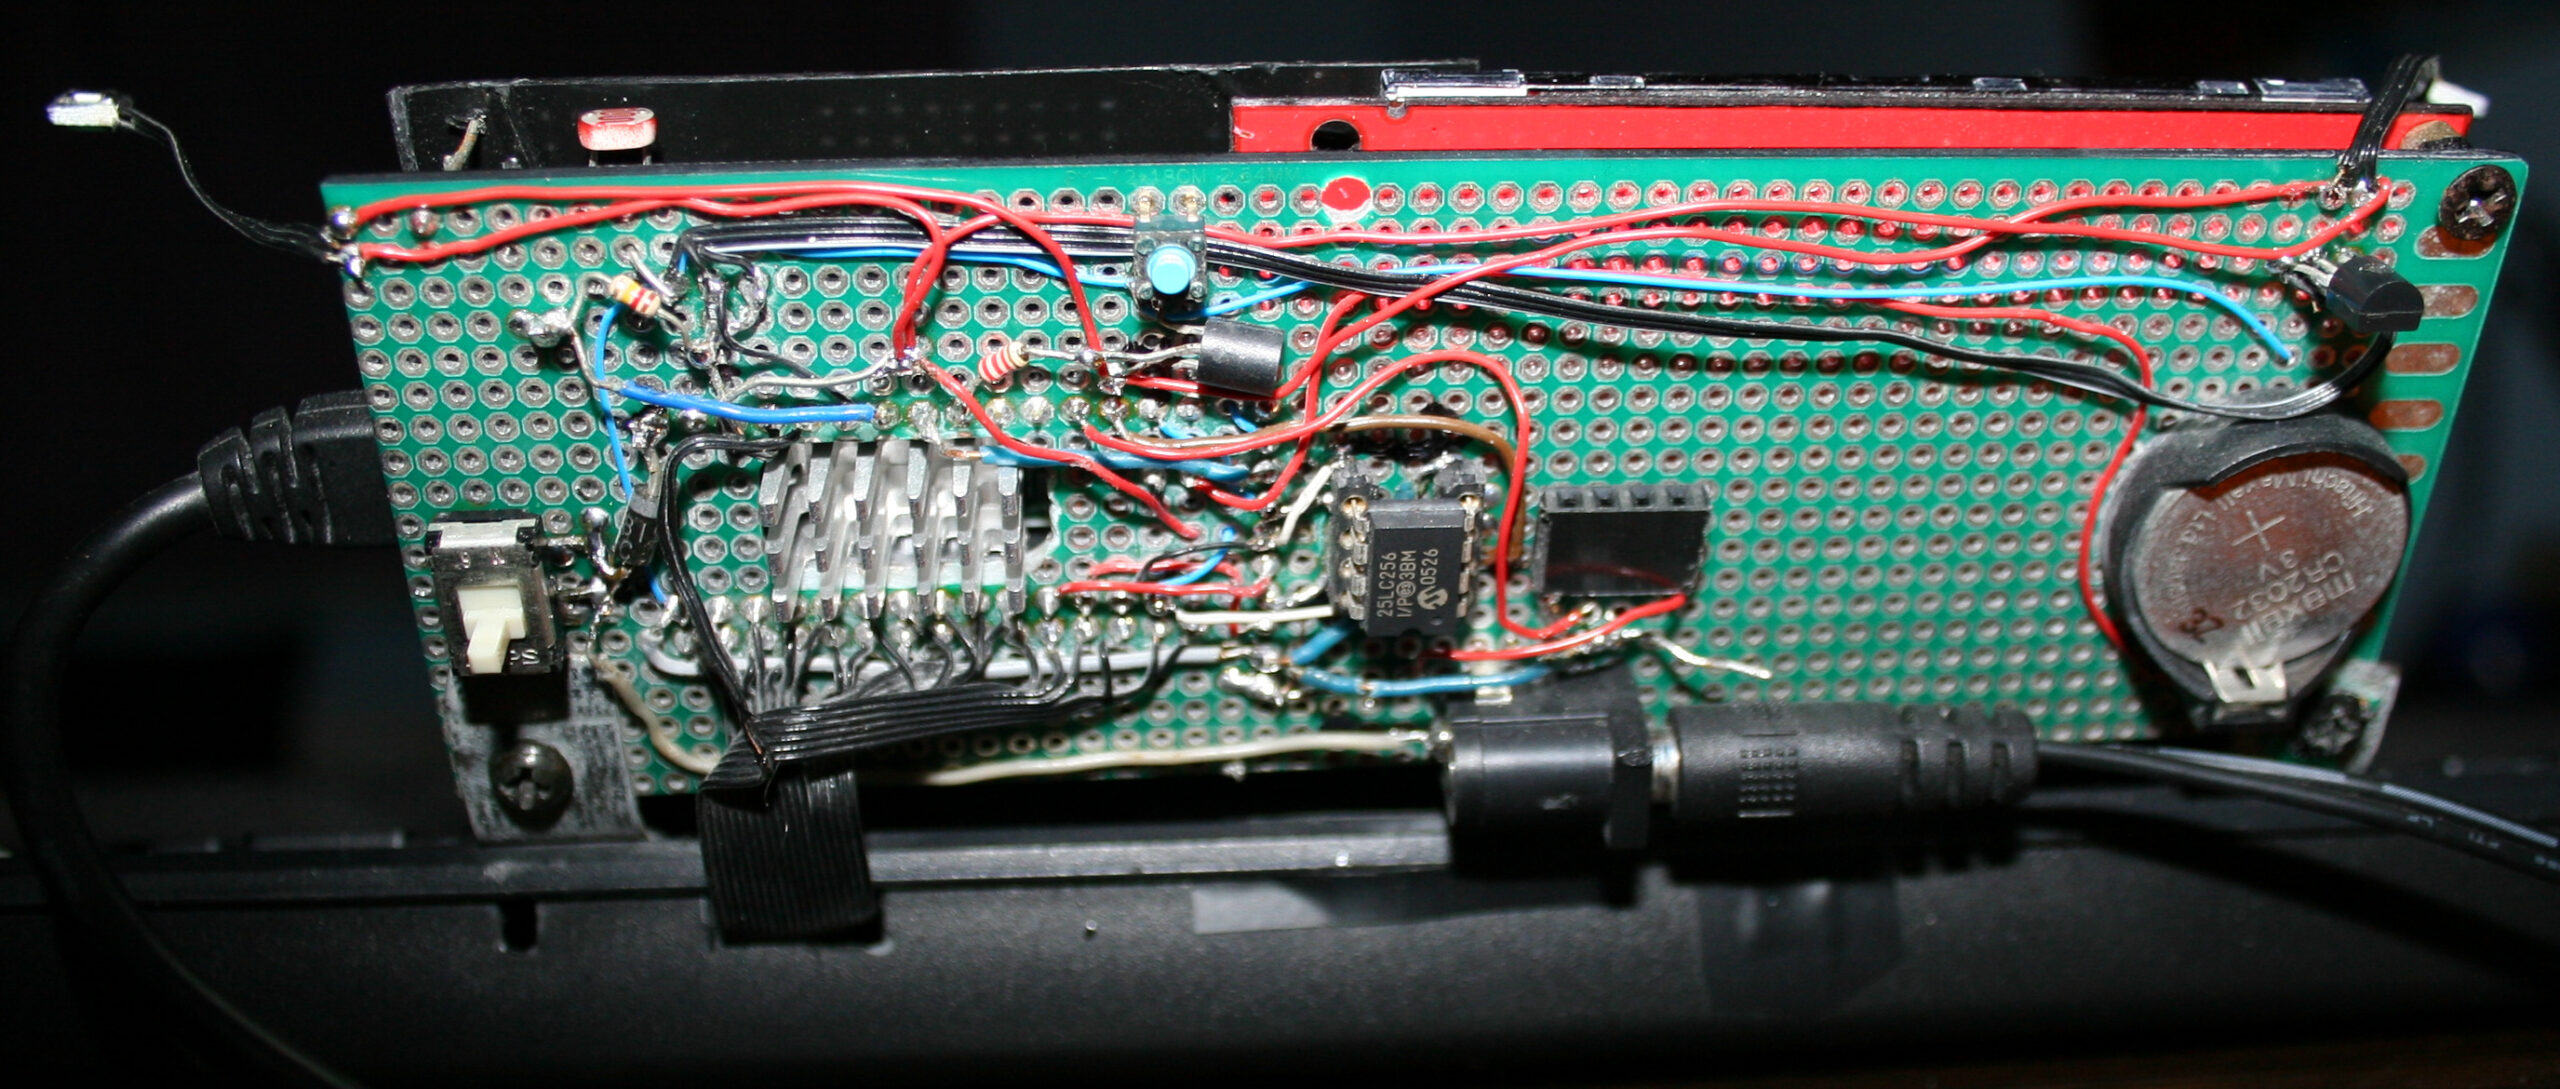
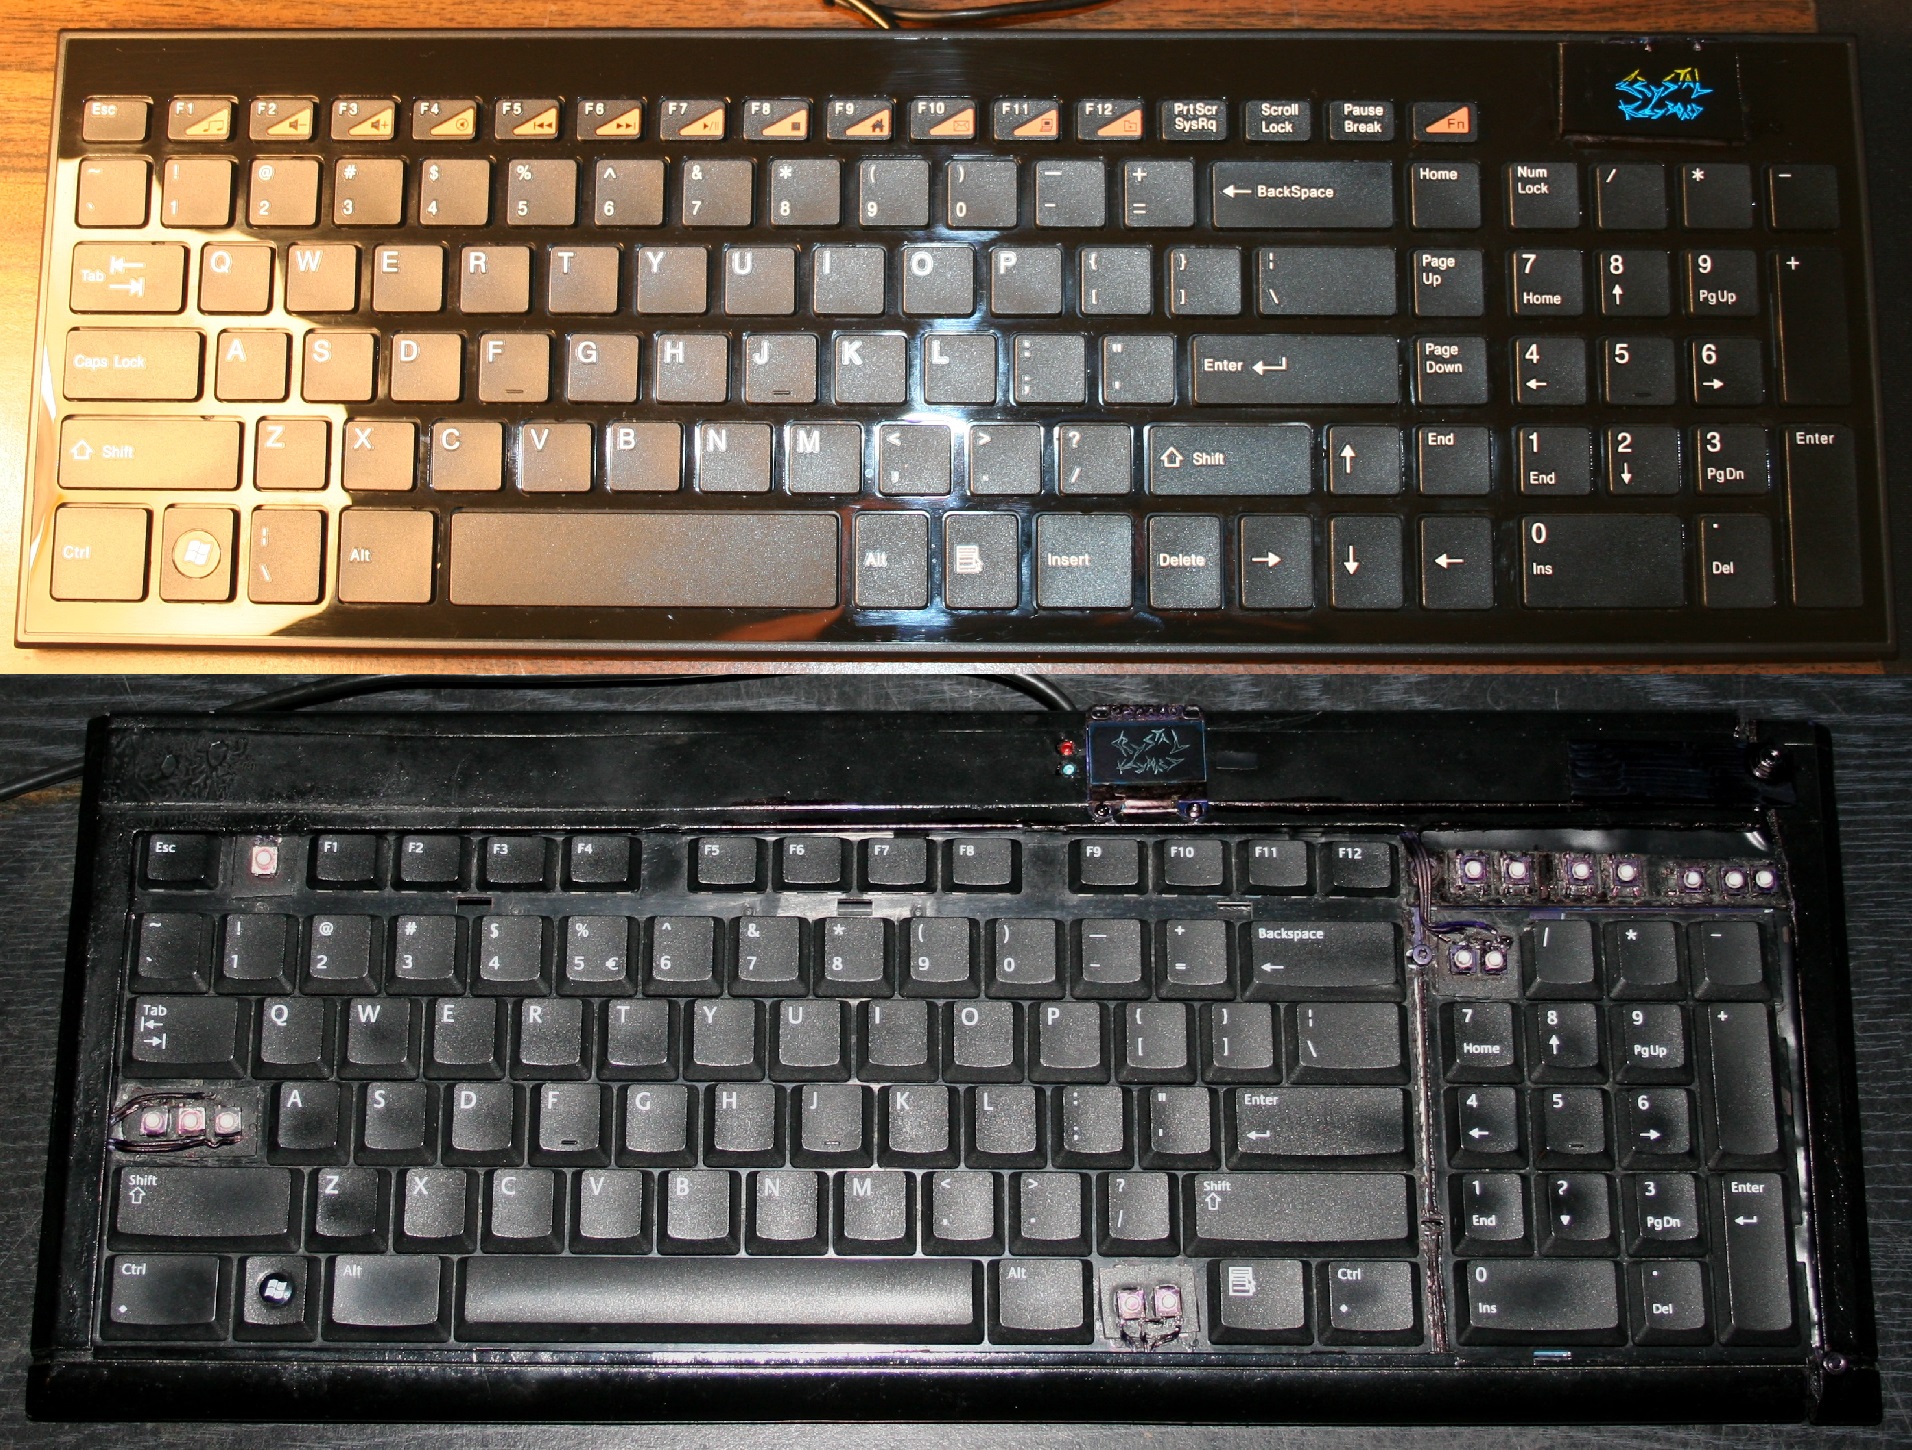
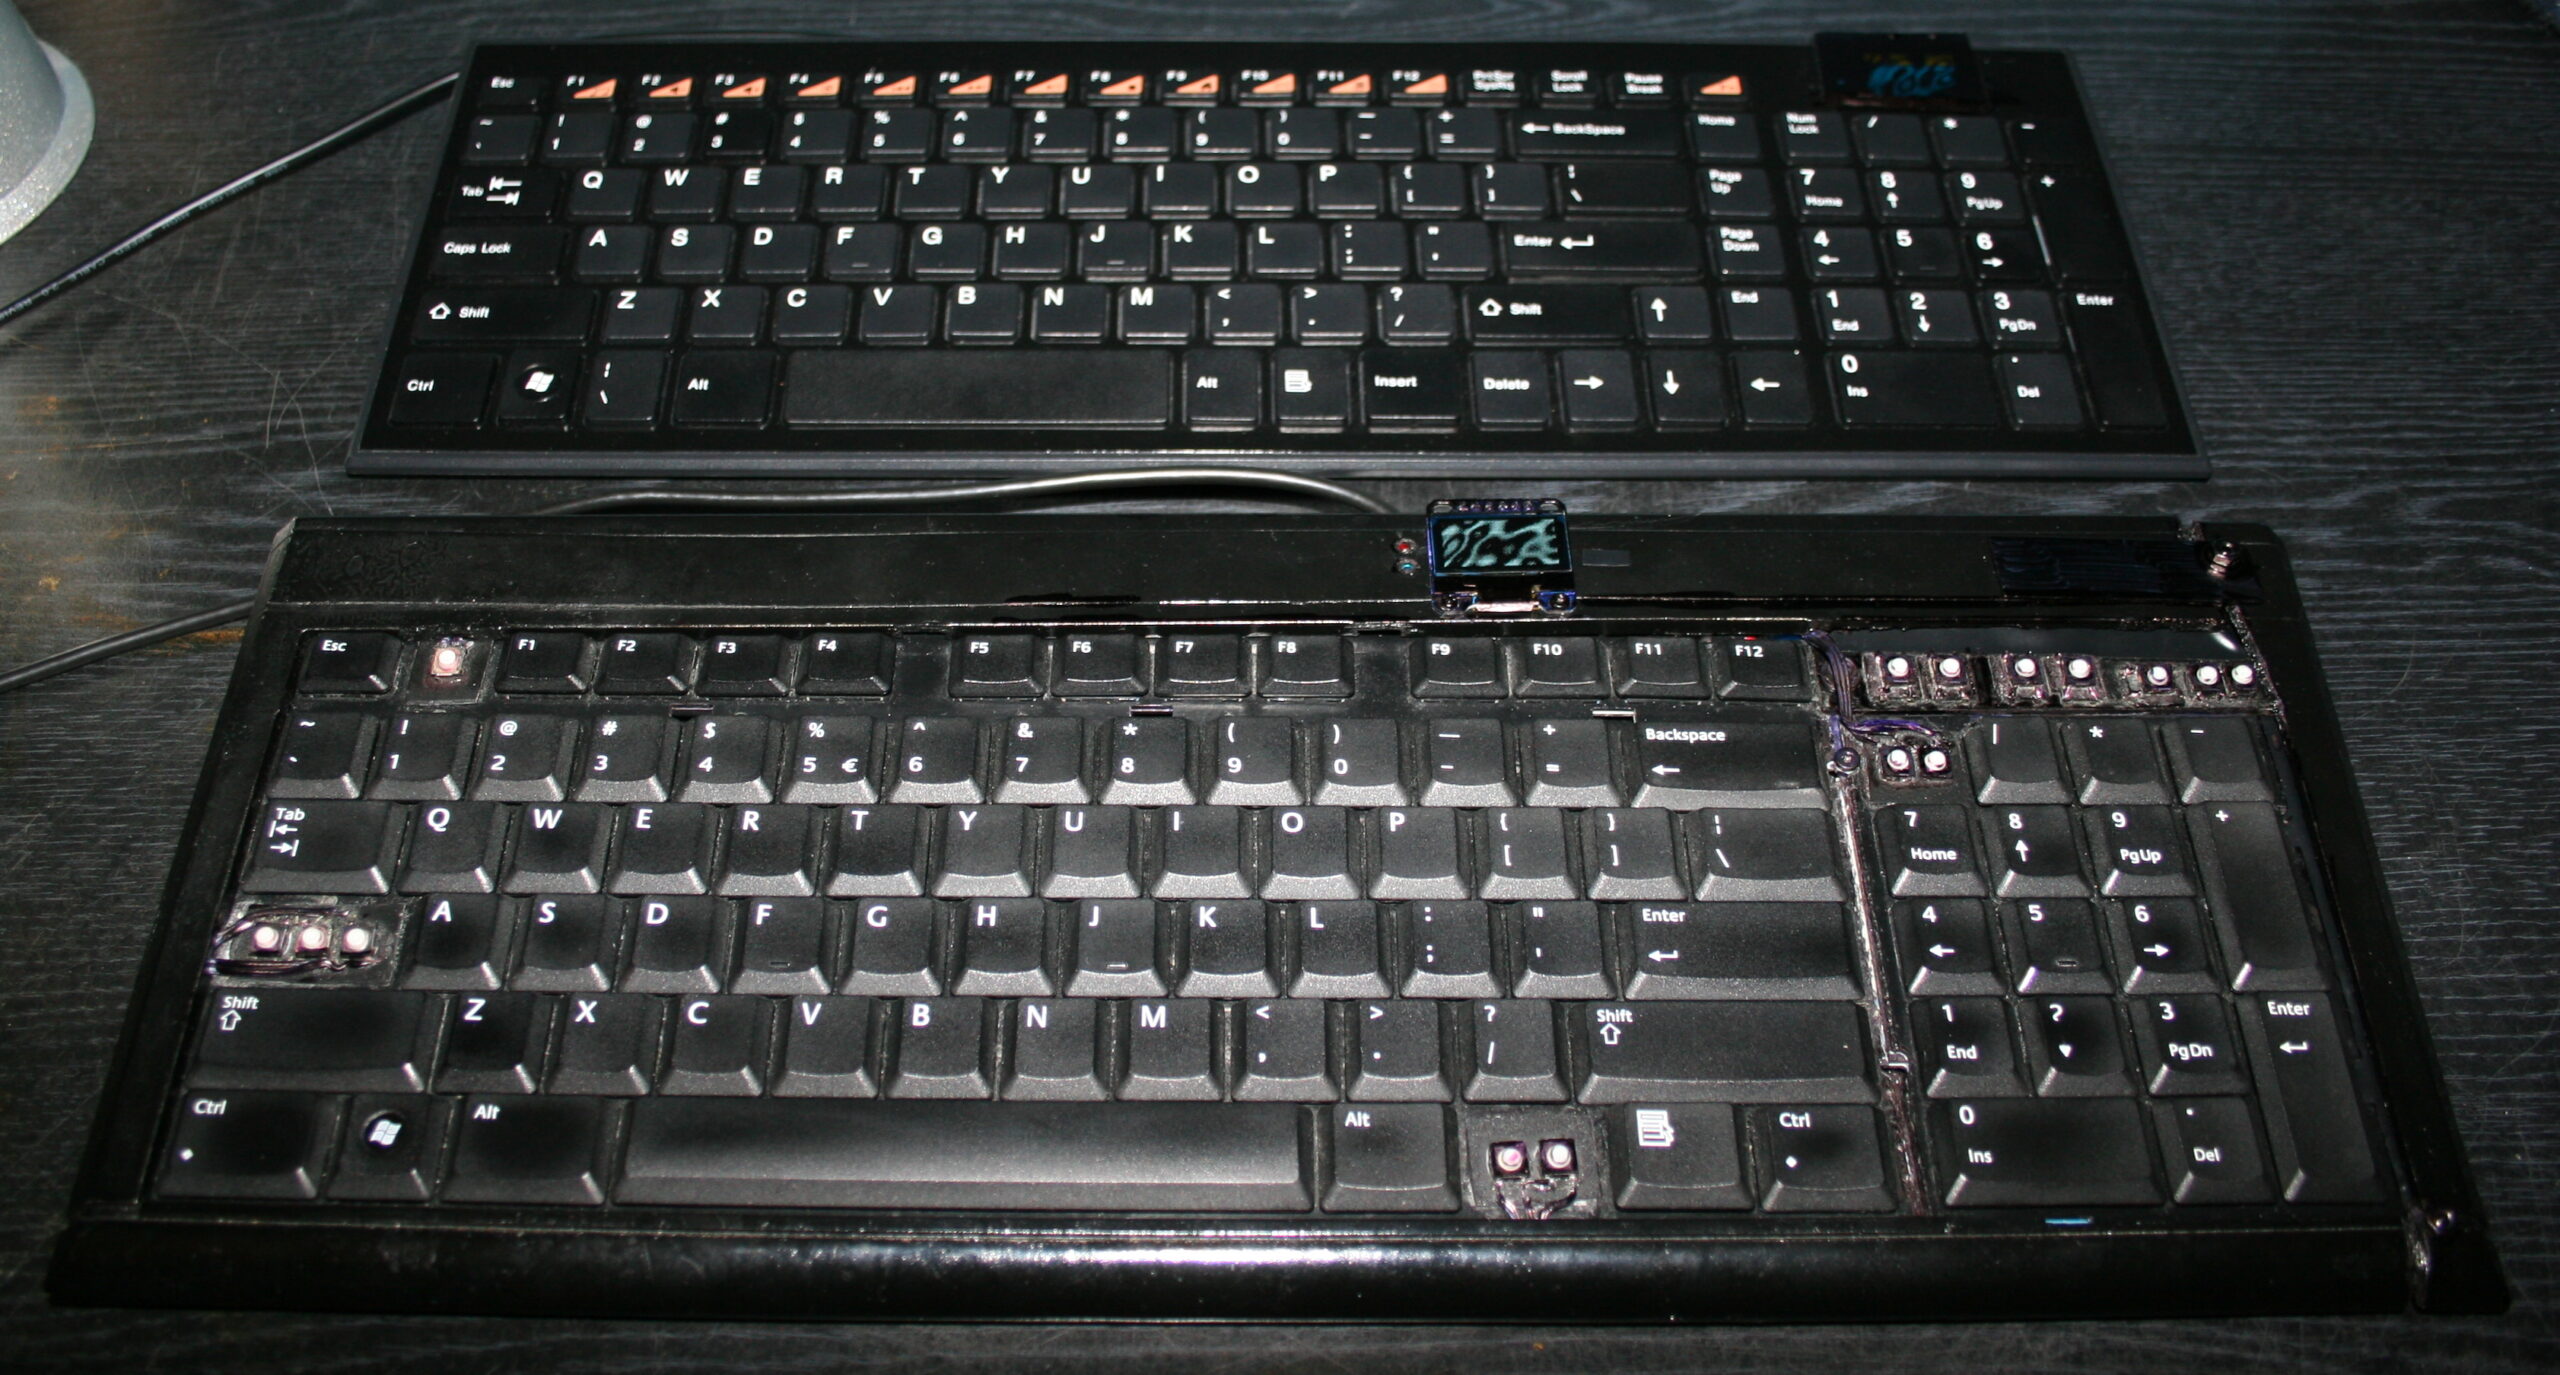
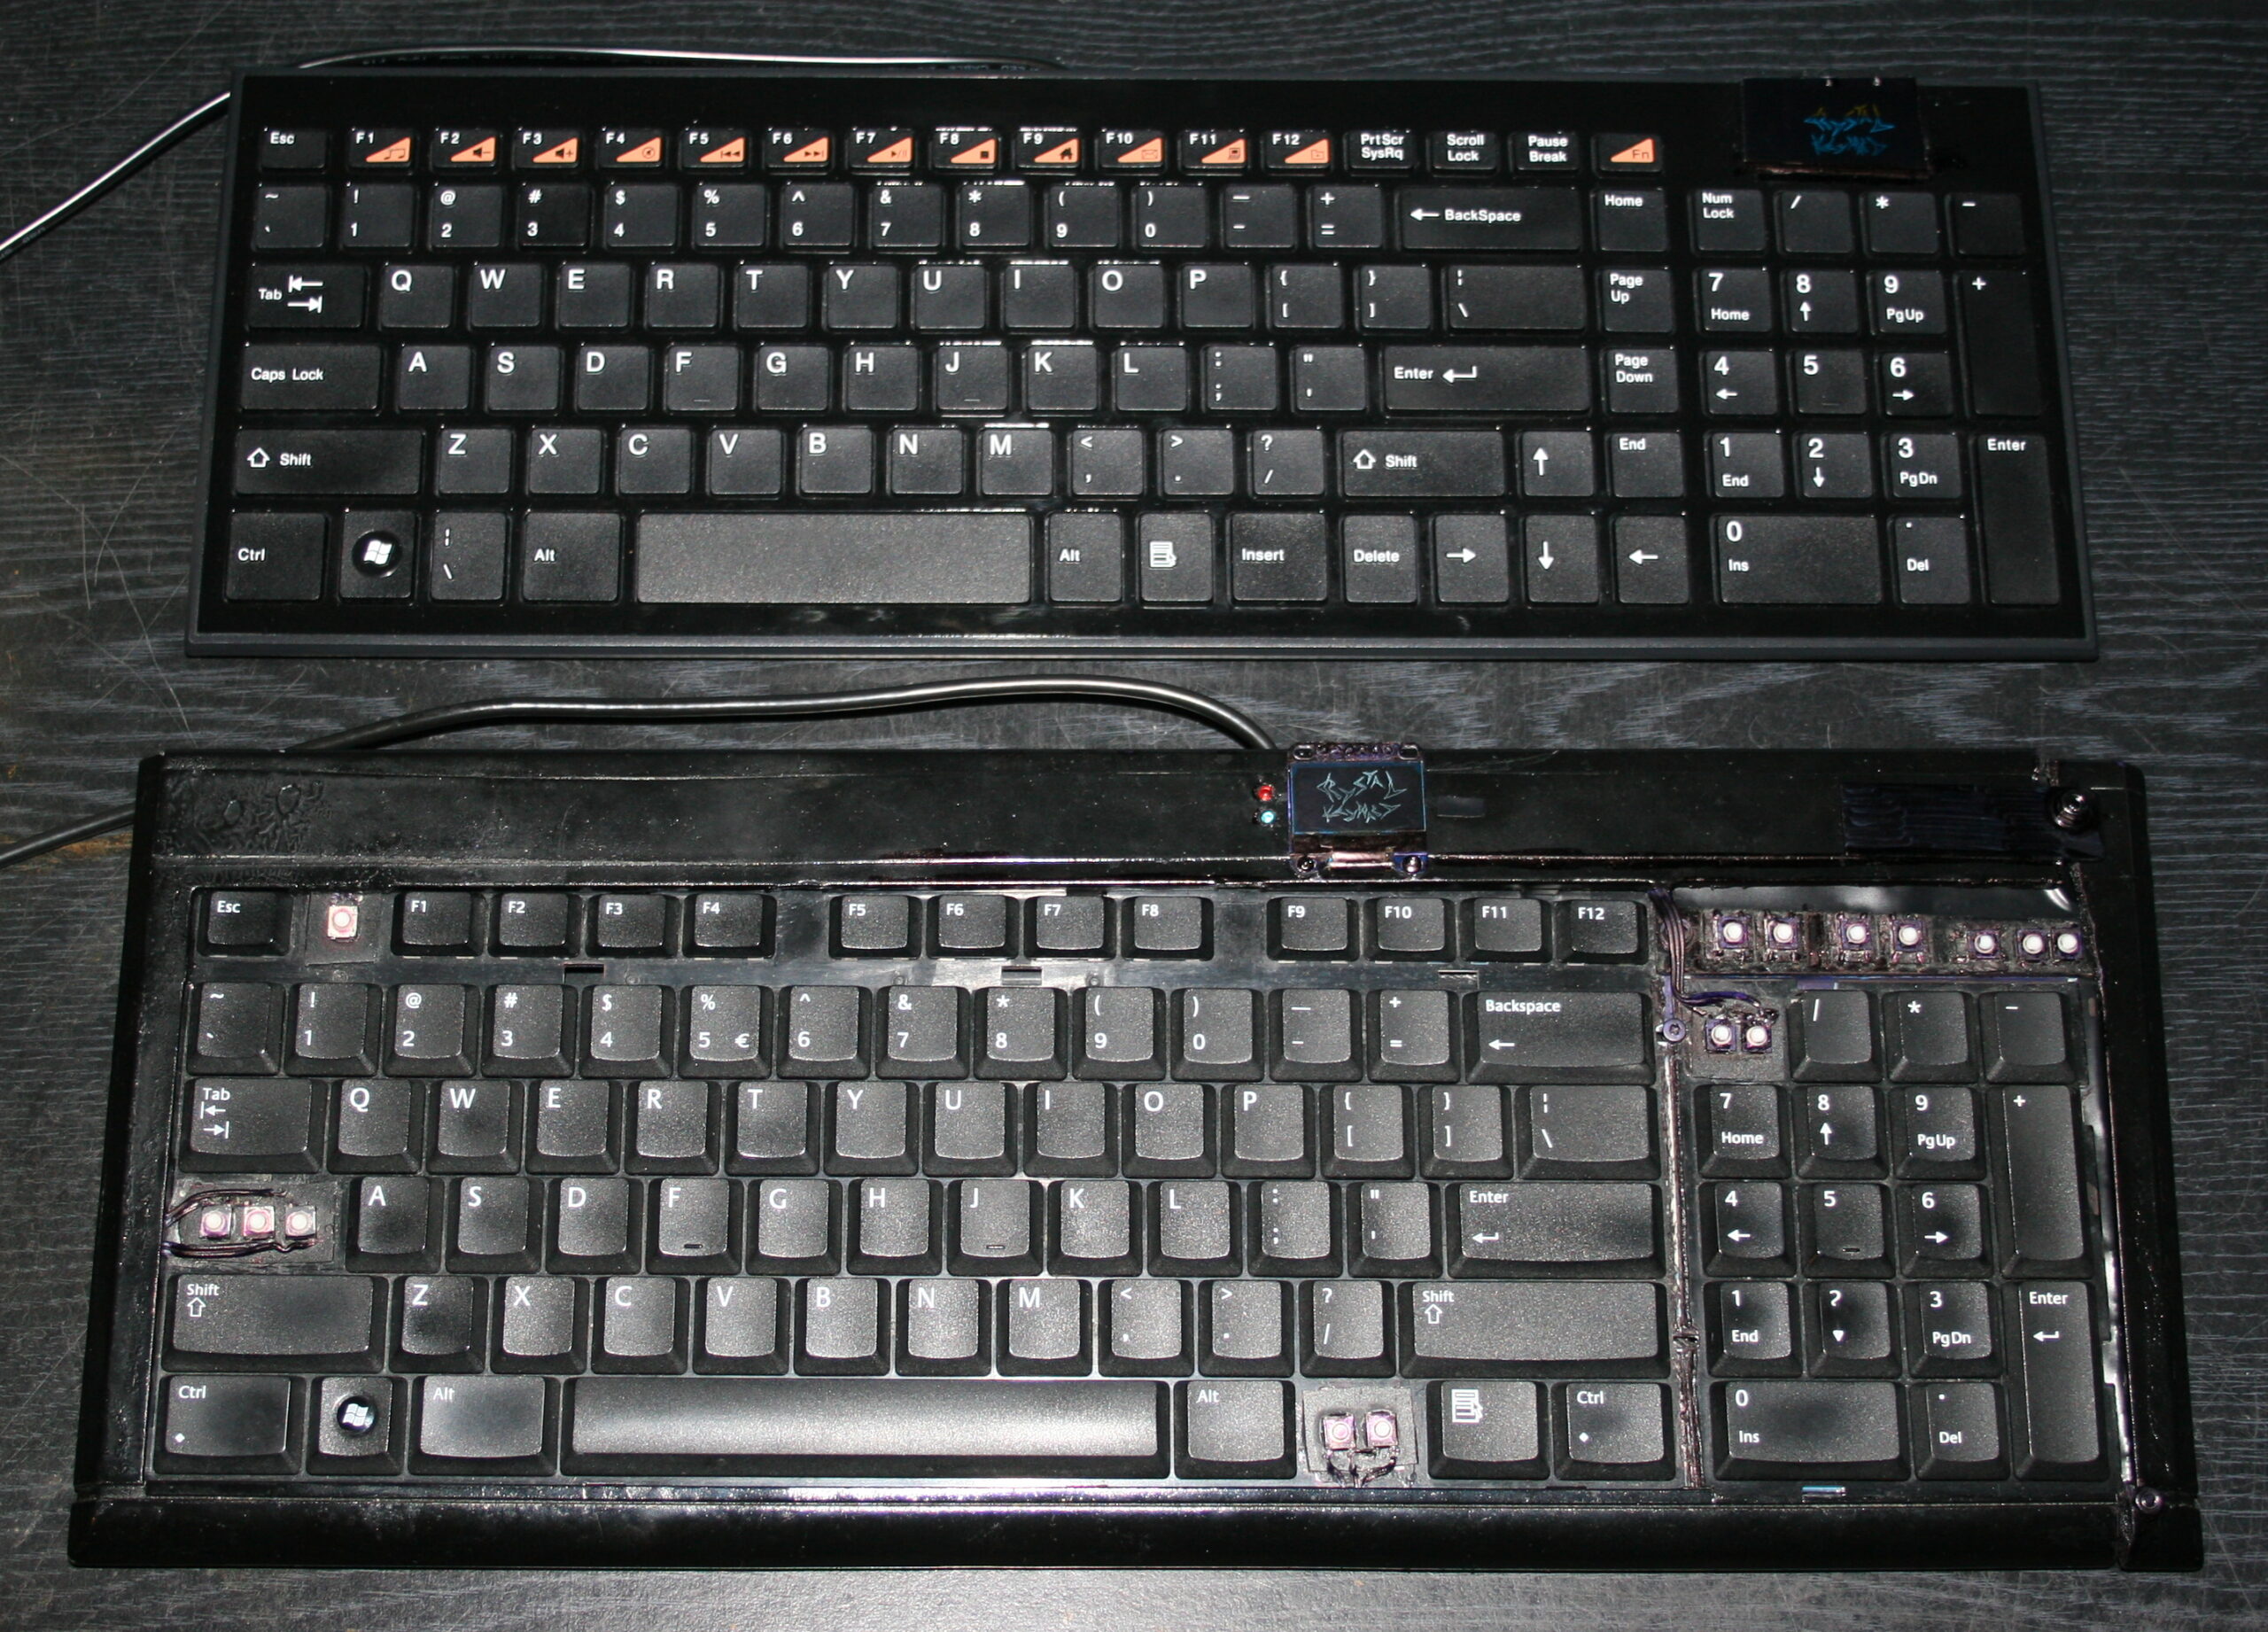
This is a tiny project, that took about 2 days in 2022. It uses the “Bluepill” MCU board with small OLED display. It has few buttons to toggle LED lights and relays for audio outputs and USB switch. In 2026 I improved Gui with menu and added LED lamp.
✍️Motivation
For many years (seems about 20) I was using just old logic chips. And it felt ancient, so I finally decided to do it with bluepill. I have a tutorial for microcontrollers here. Having a small display is nice and informative. With many inputs and outputs (pins) left, there is still room for future changes or upgrades.
This “console” is very useful and has a place just left of my keyboard. Visible on picture📸 of my movable plank / desk with also my keyboard ⌨️KC4 and mouse 🖱️MC1. Most recent addition on very left, is the new “knob on stick” for DAC’s volume🤣. Very useful and minimal, just looks weird🤨. Better than having heavy and warm DAC here.
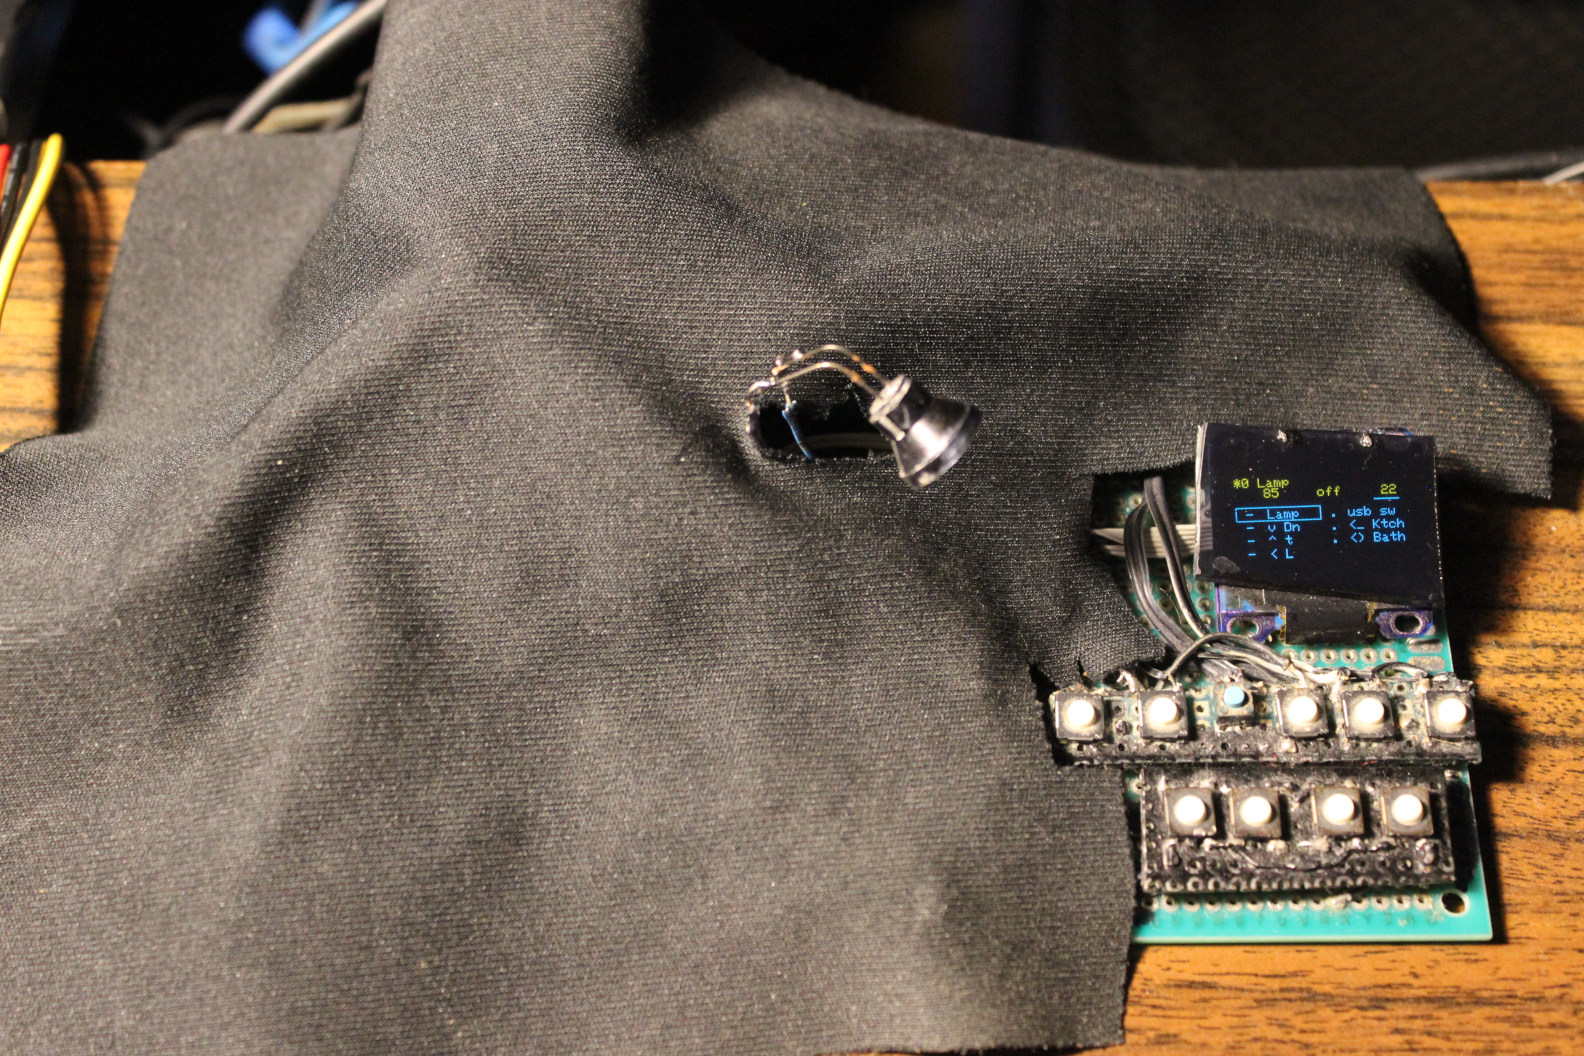
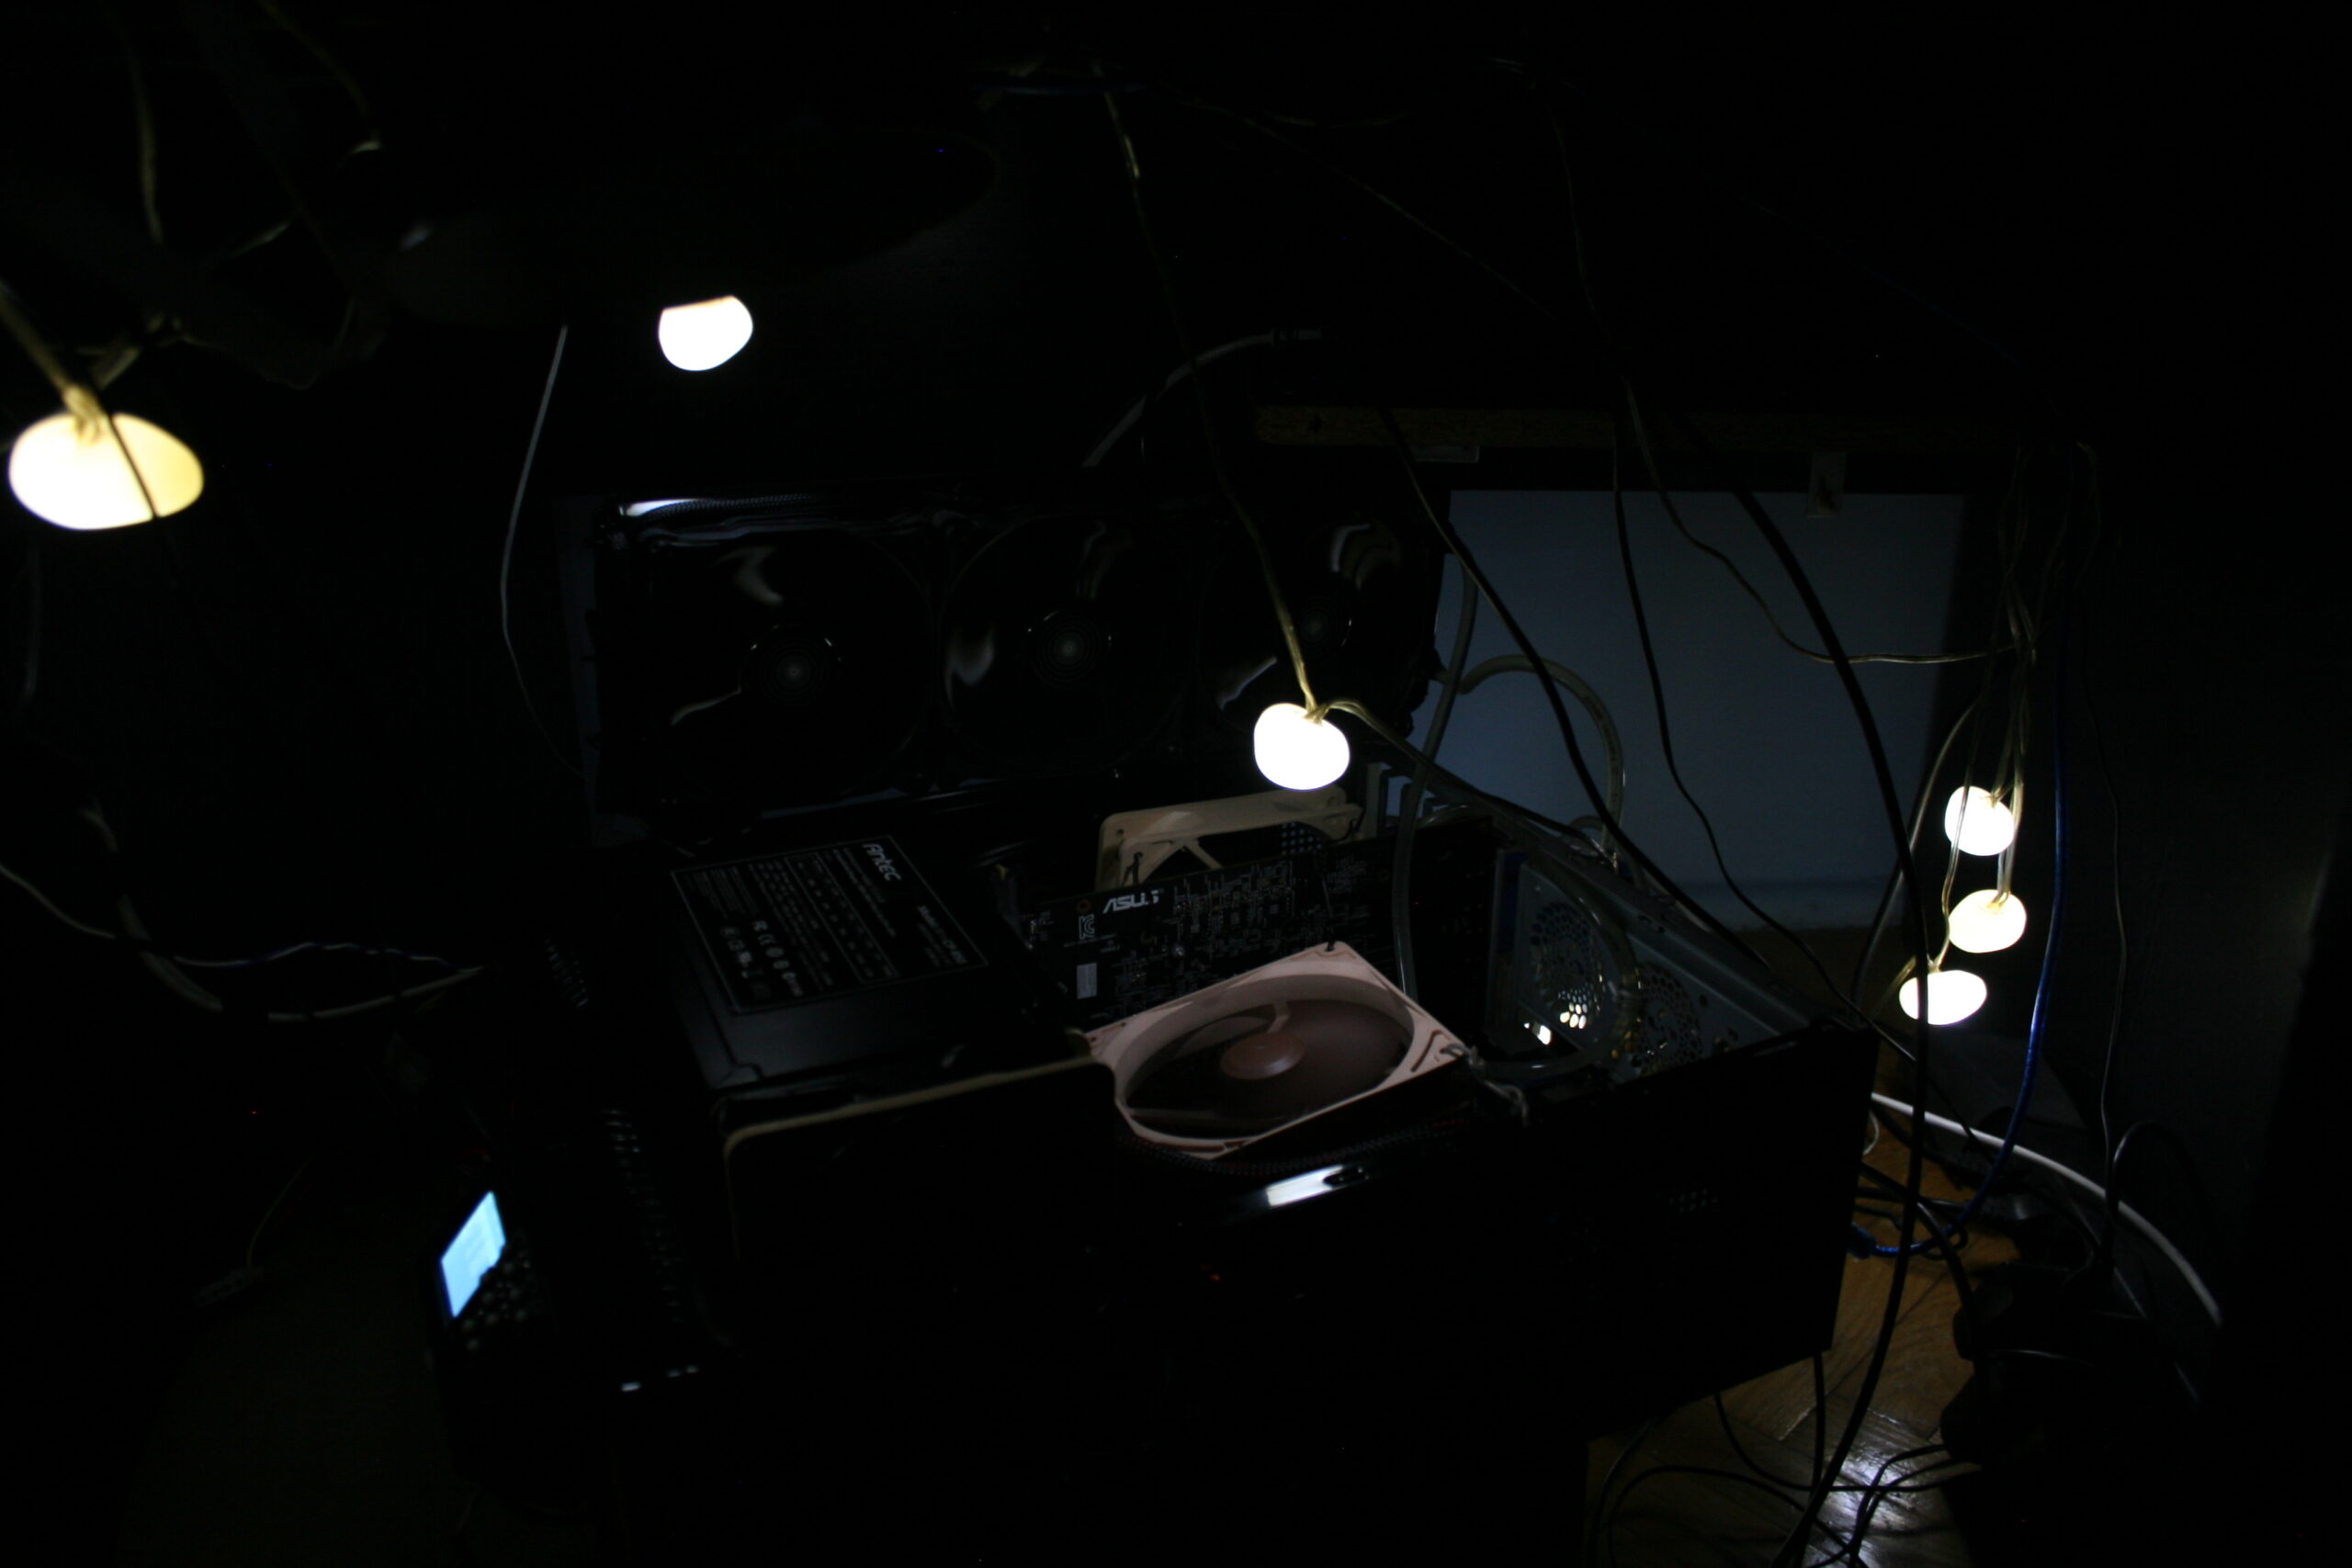
It has no case and likely never will. I’m just covering it with a black cloth, cut to match (picture).
📂Sources
Sources are here. Actually just using that Arduino .ino since it’s a small project.
I was editing its code in VSCodium using my own theme as usual, then quickly building and uploading using the worst Arduino IDE 1.8.19, then 2.3.2 (still very bad). Its options are way too minimal, and it still doesn’t even let choosing syntax coloring themes. The alternatives didn’t work for me, and are harder to set up. So Arduino still is the easiest to use, but not really an IDE.
📊Features
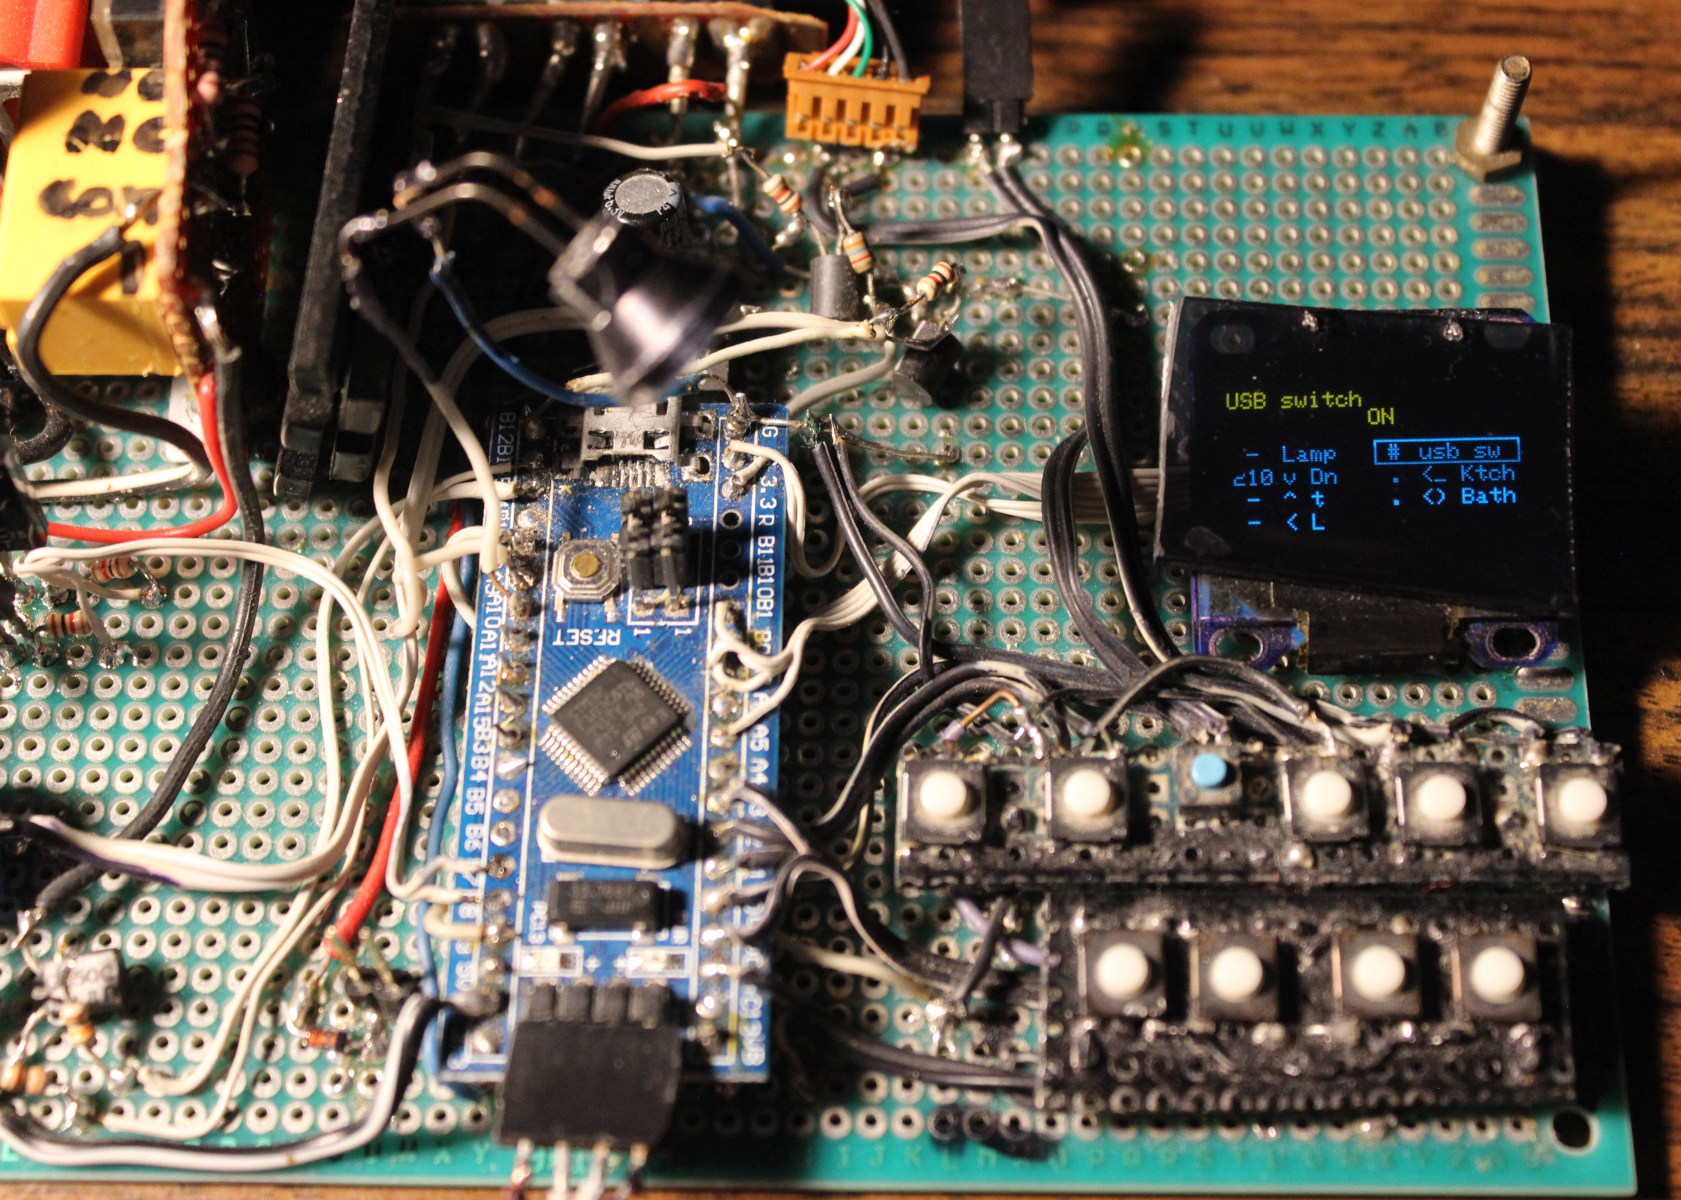
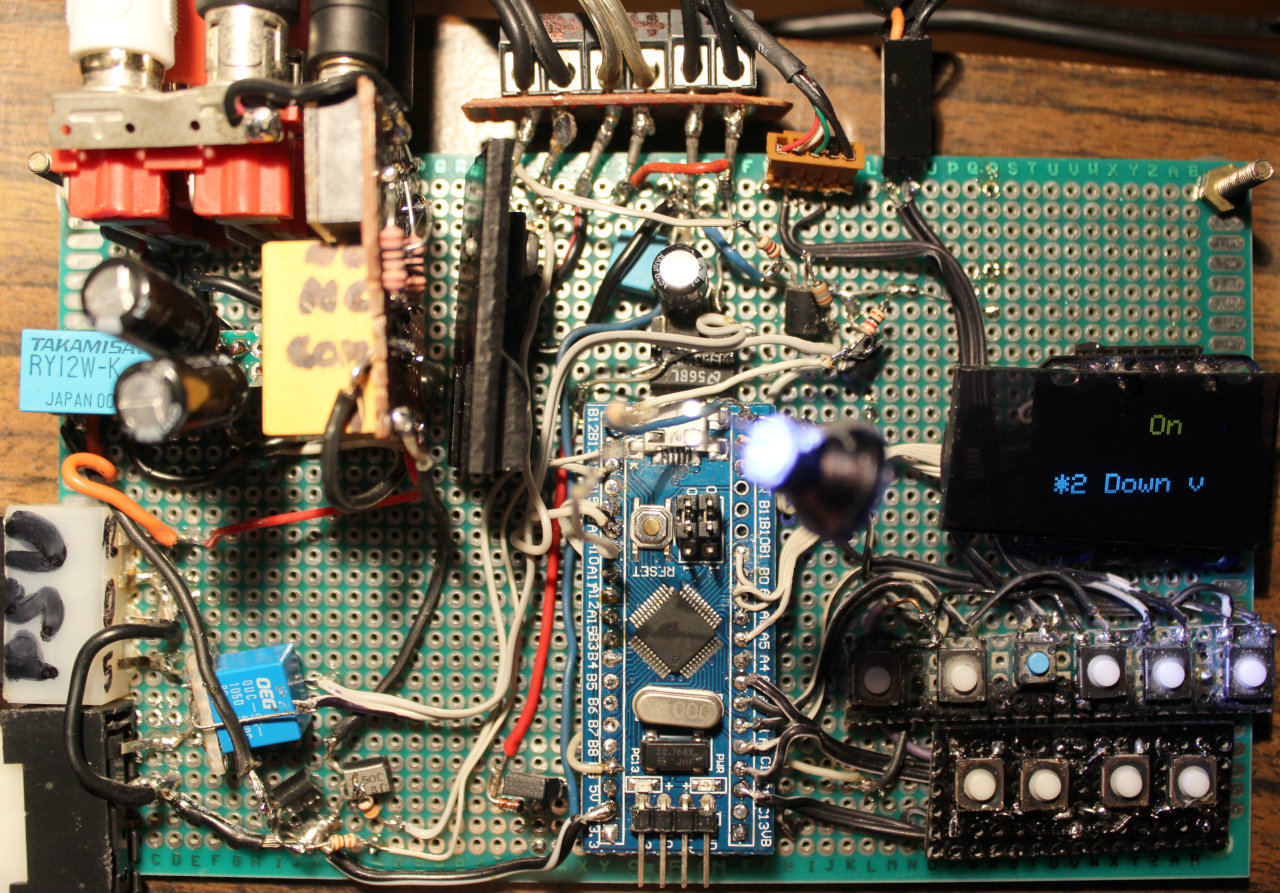
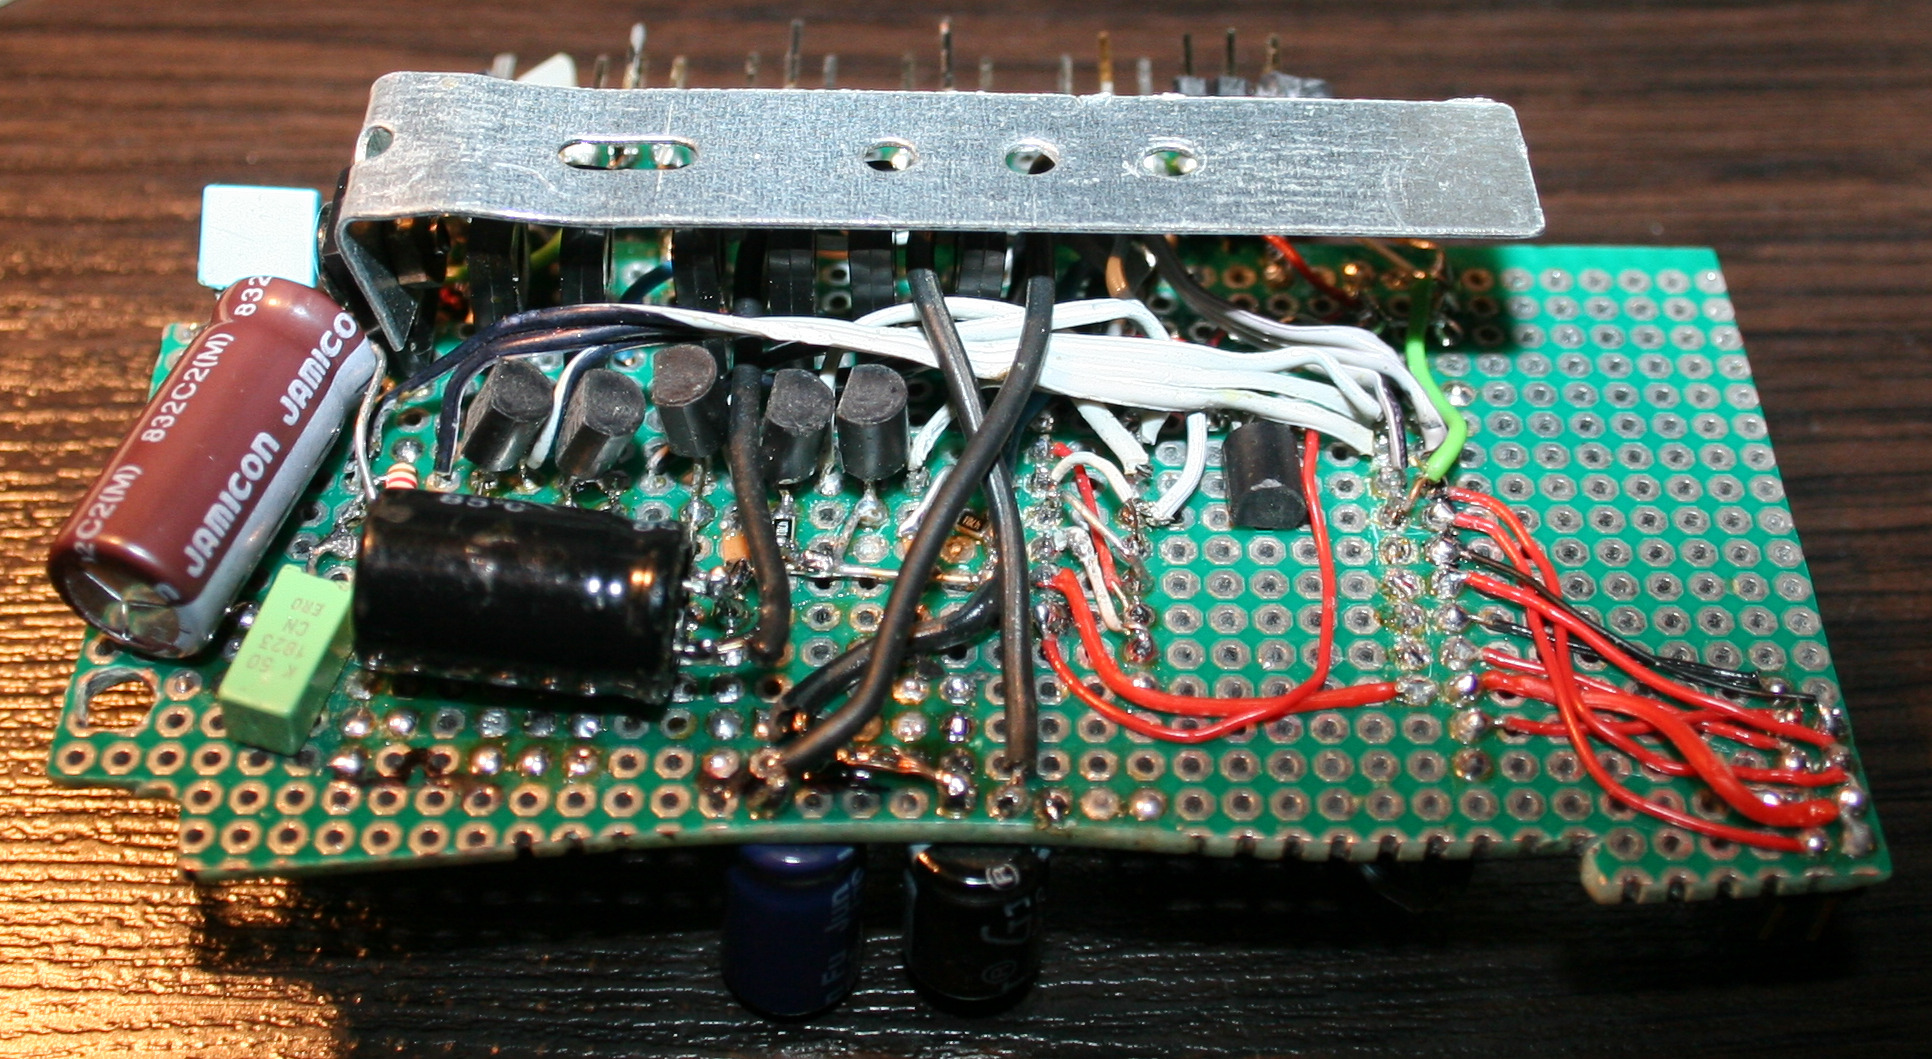
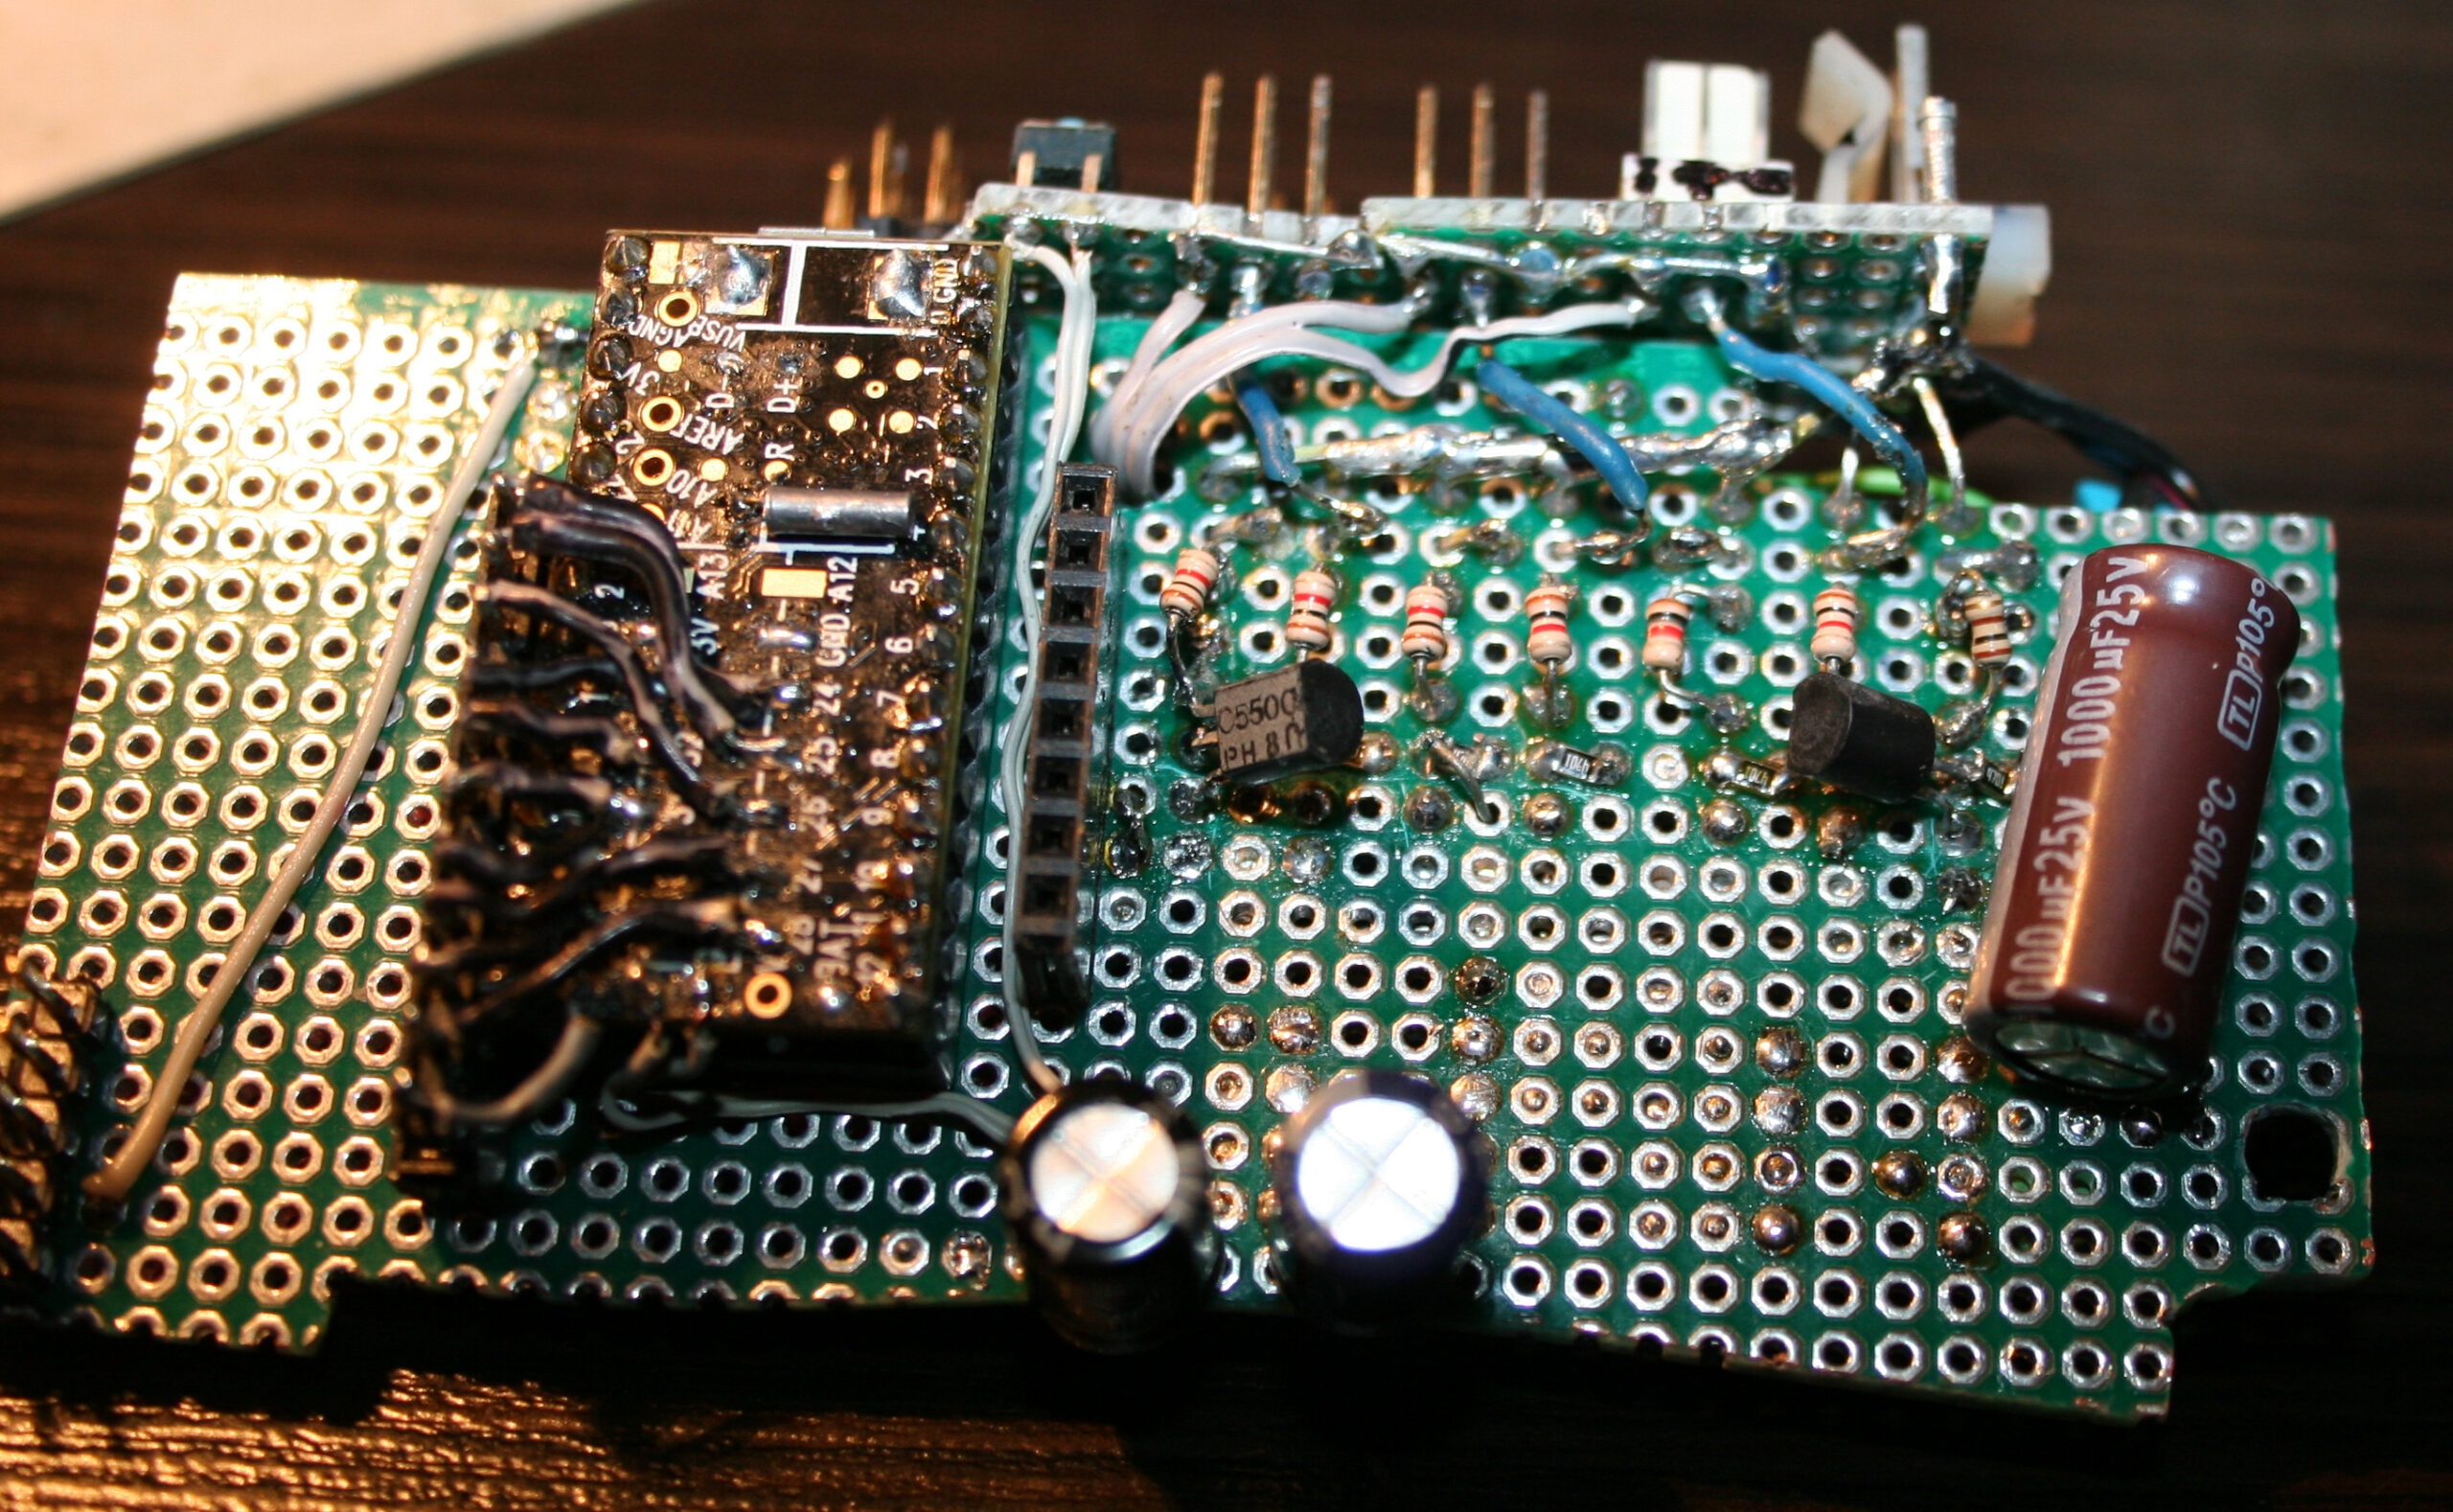
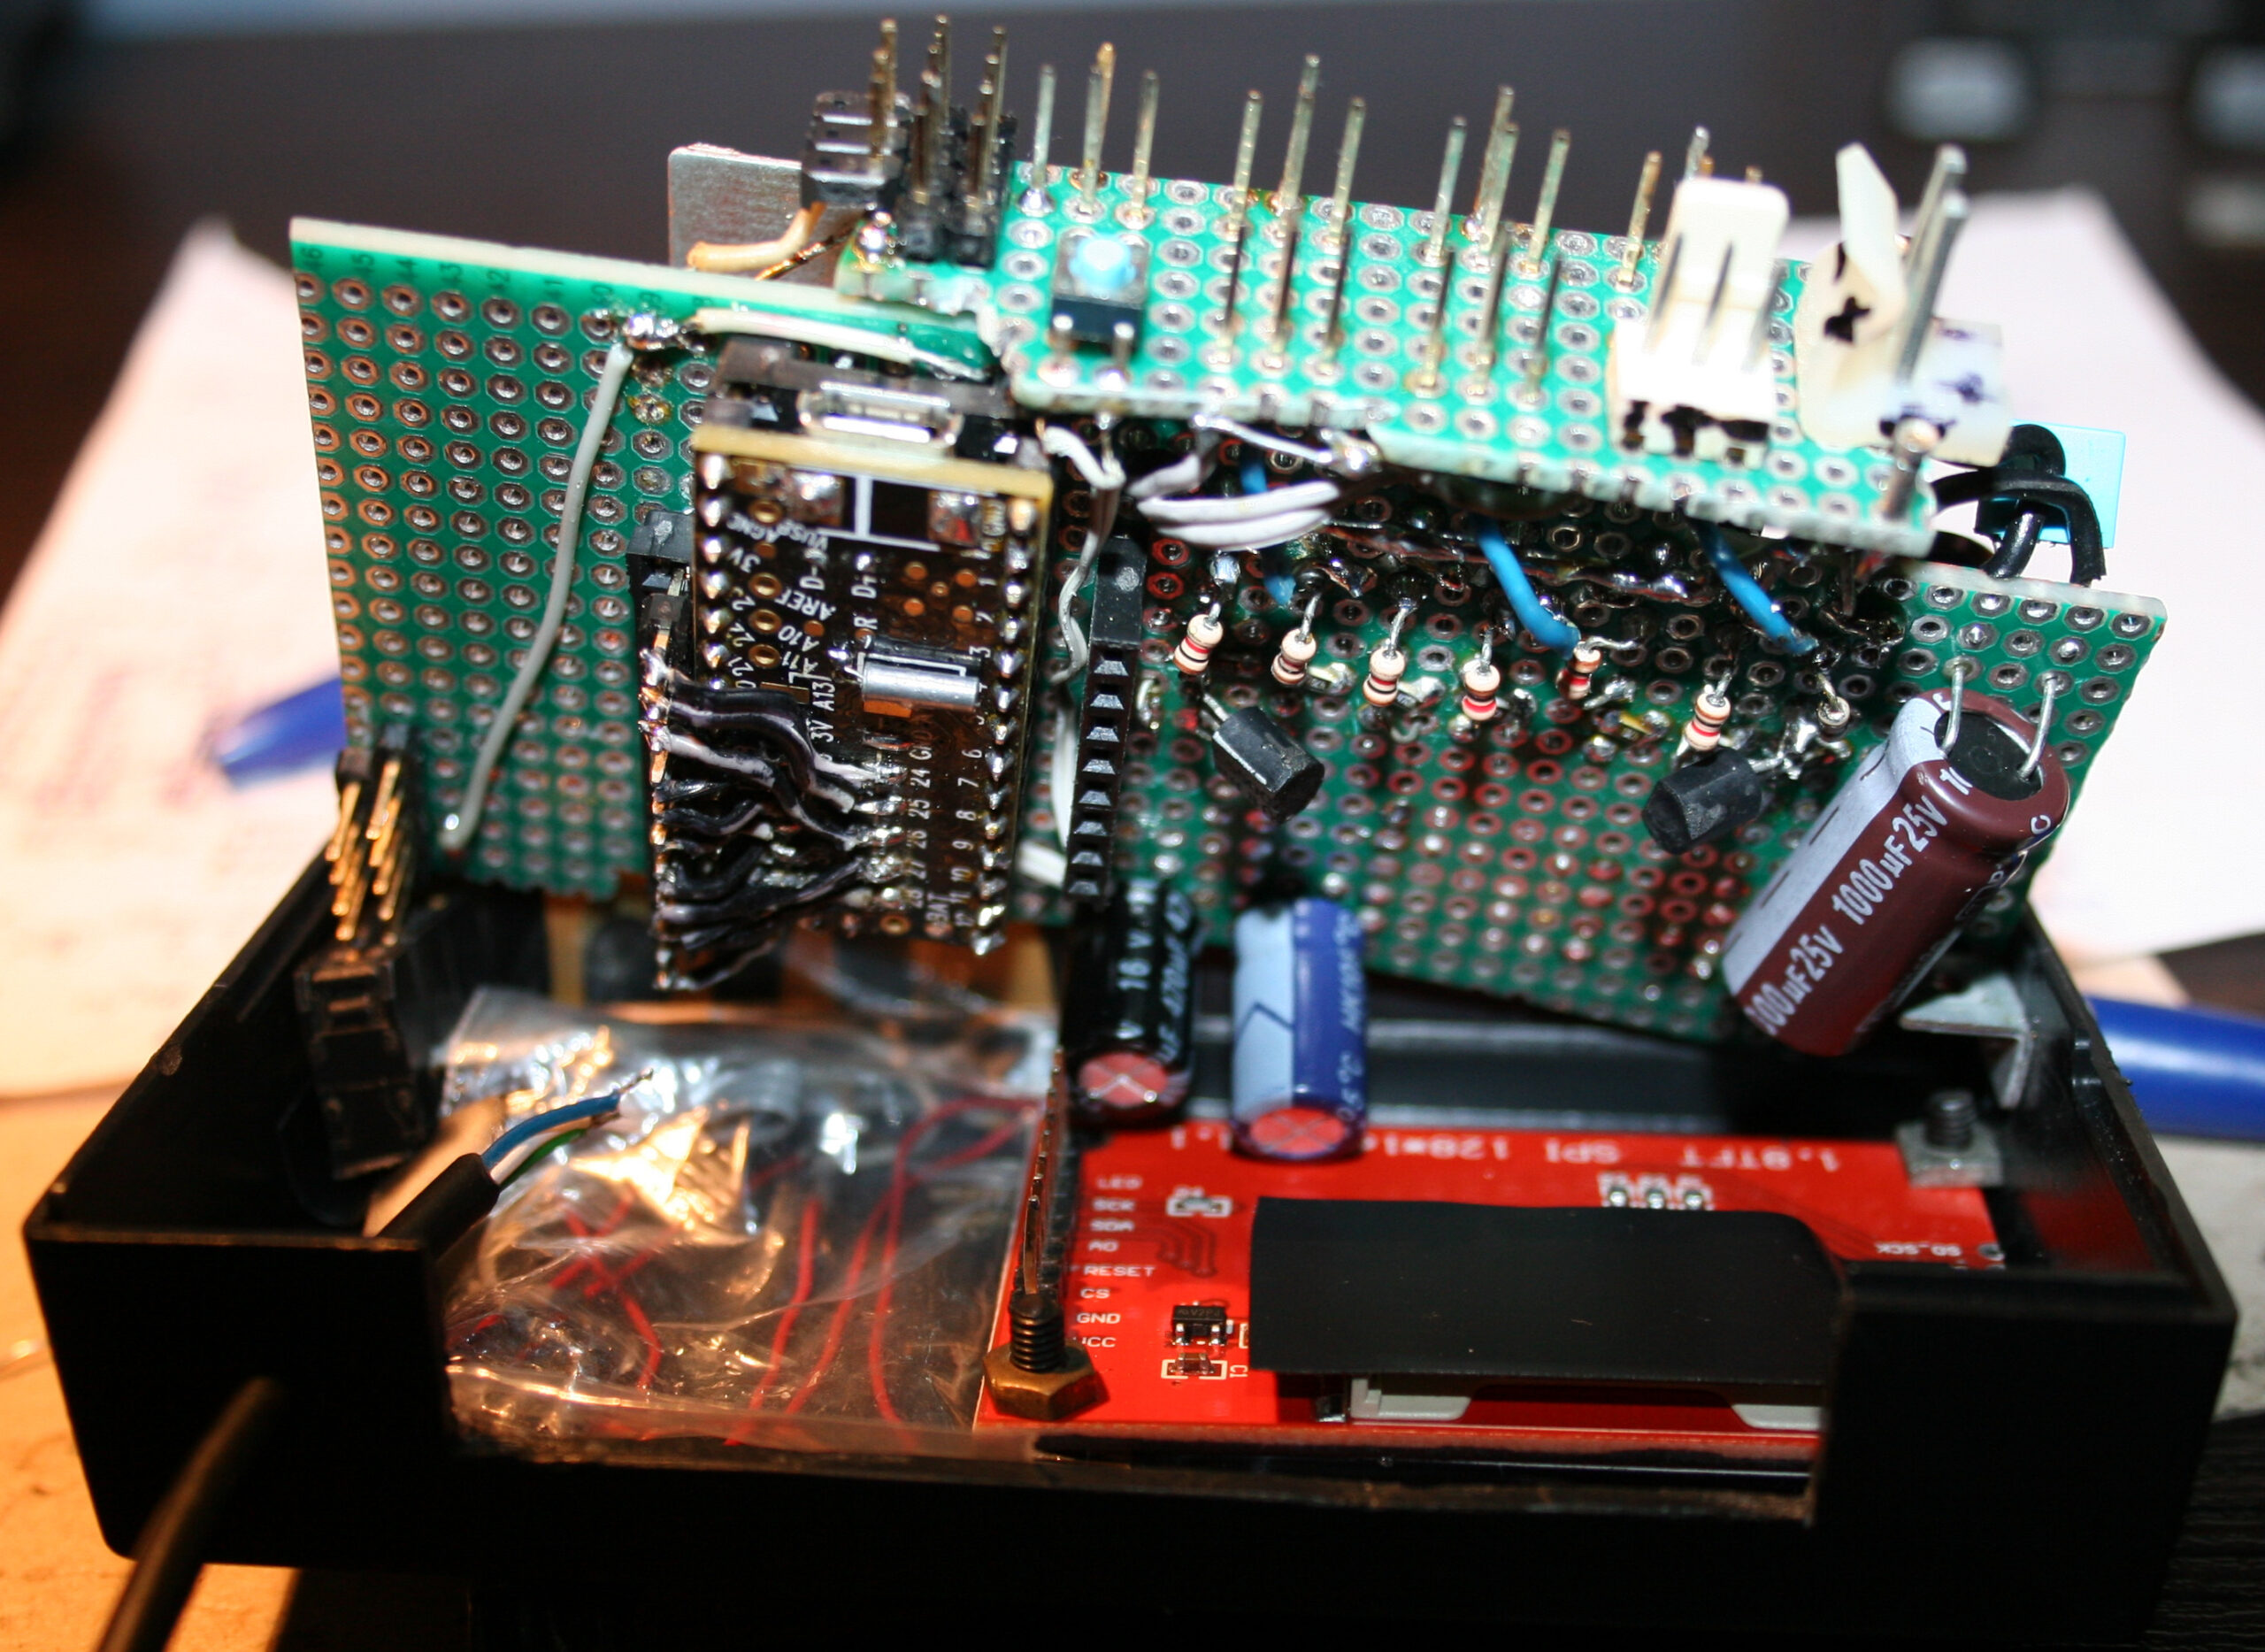
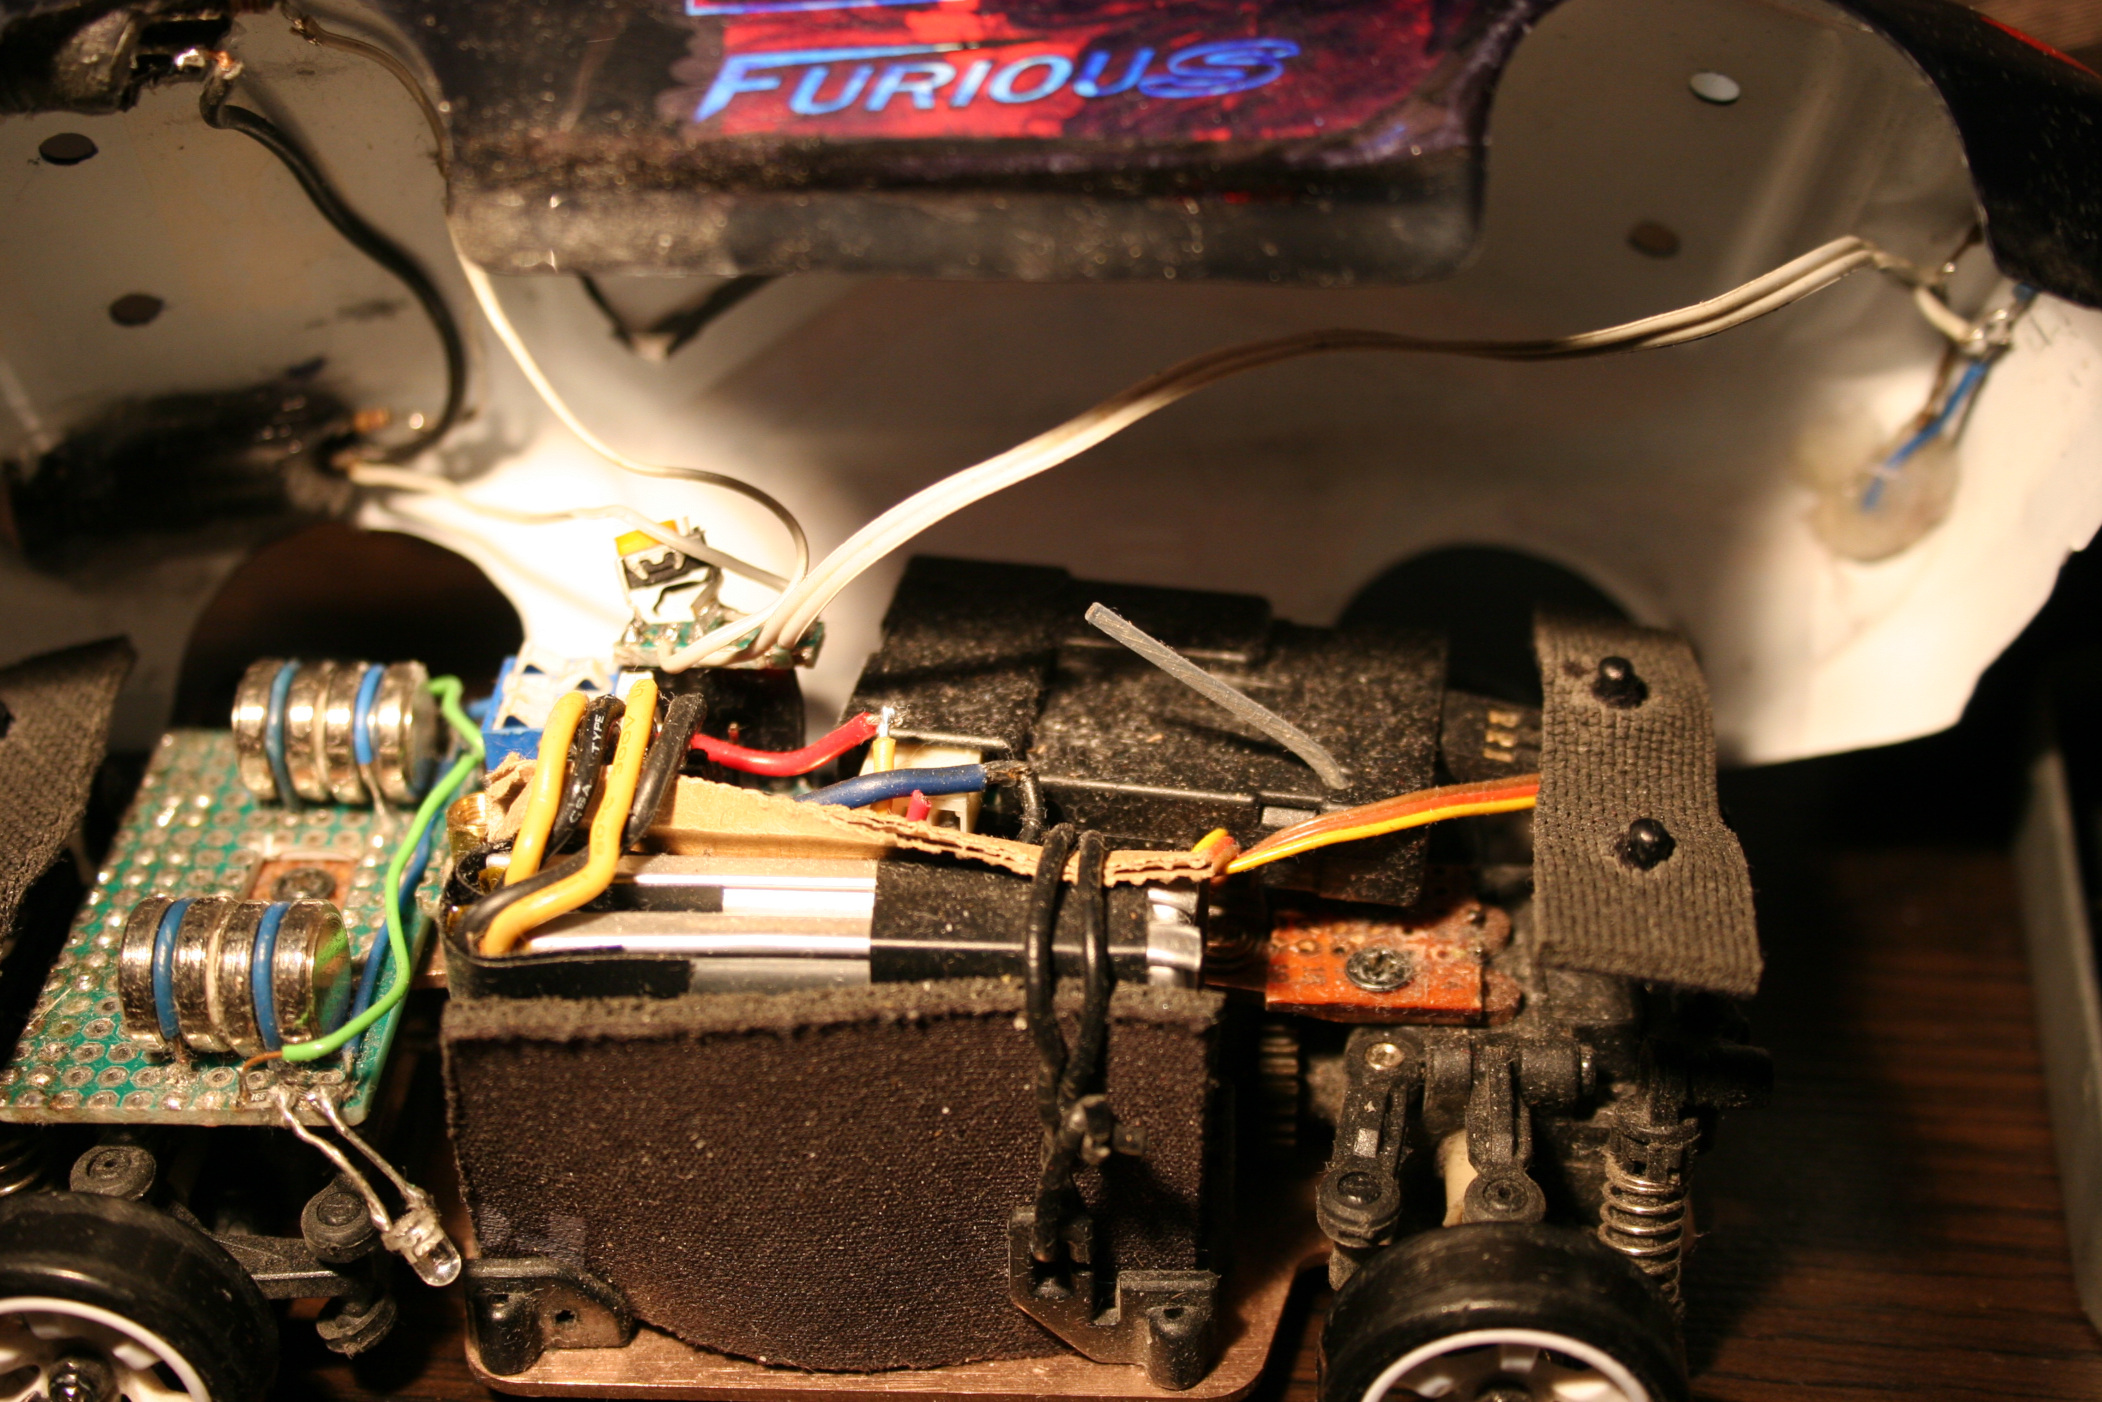
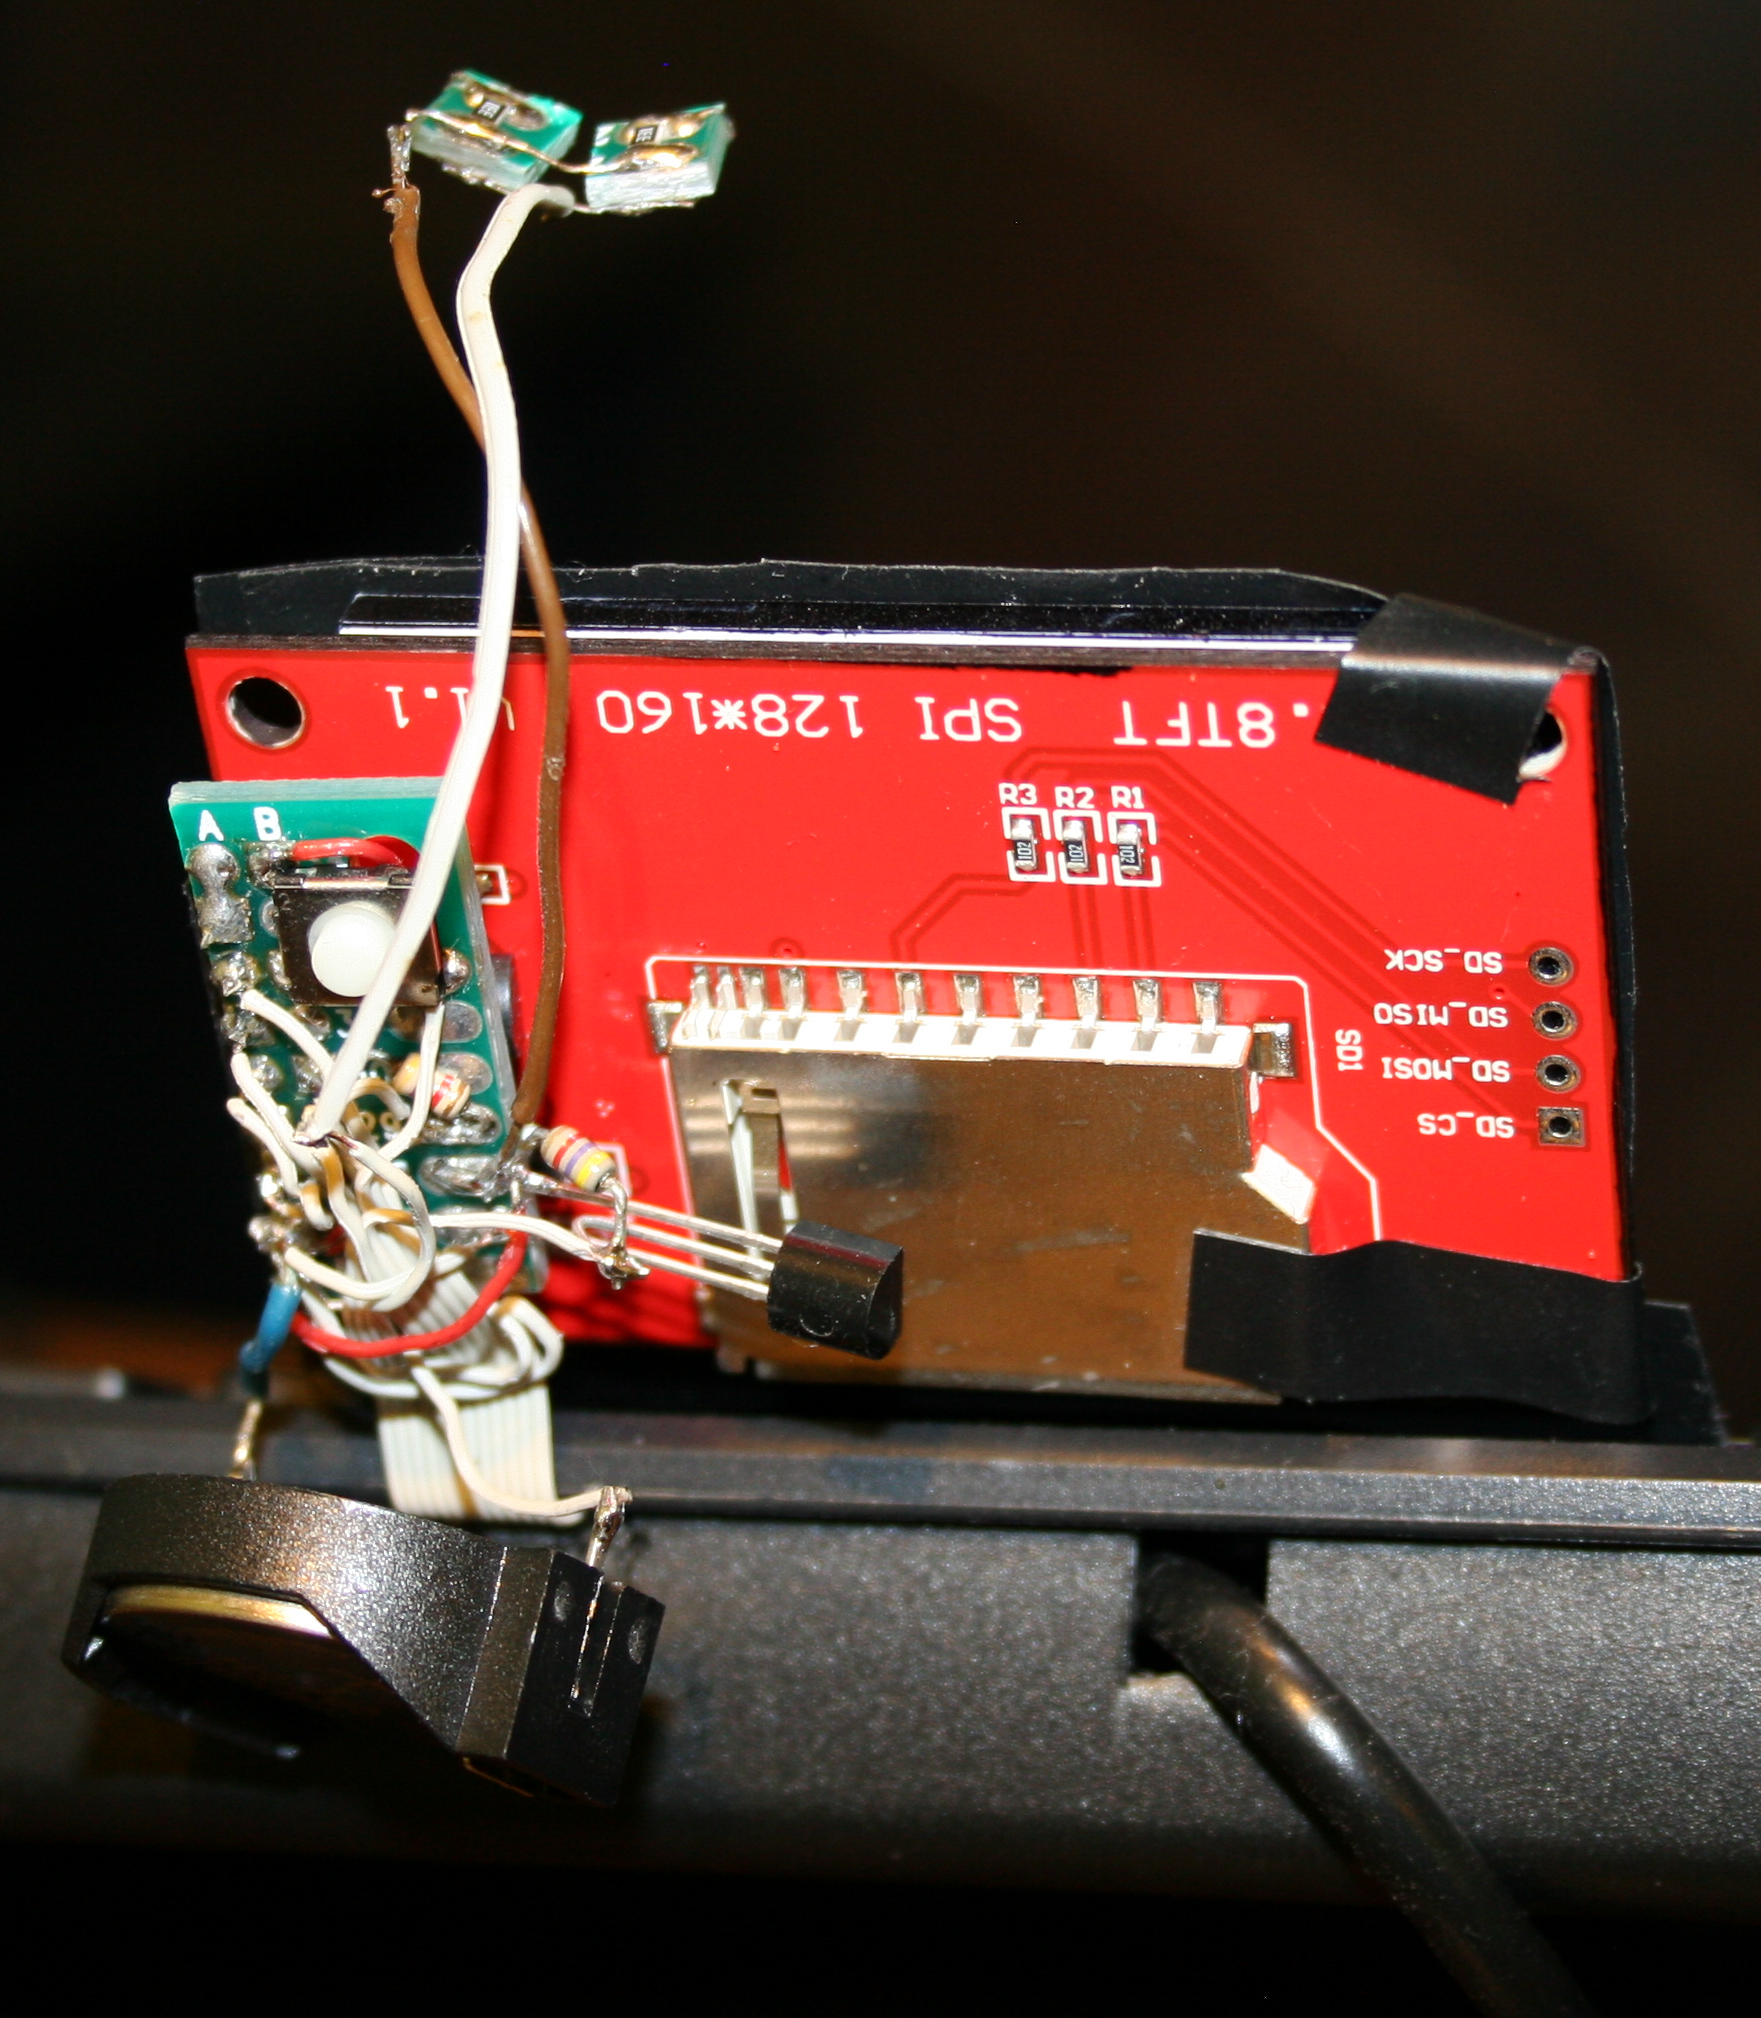
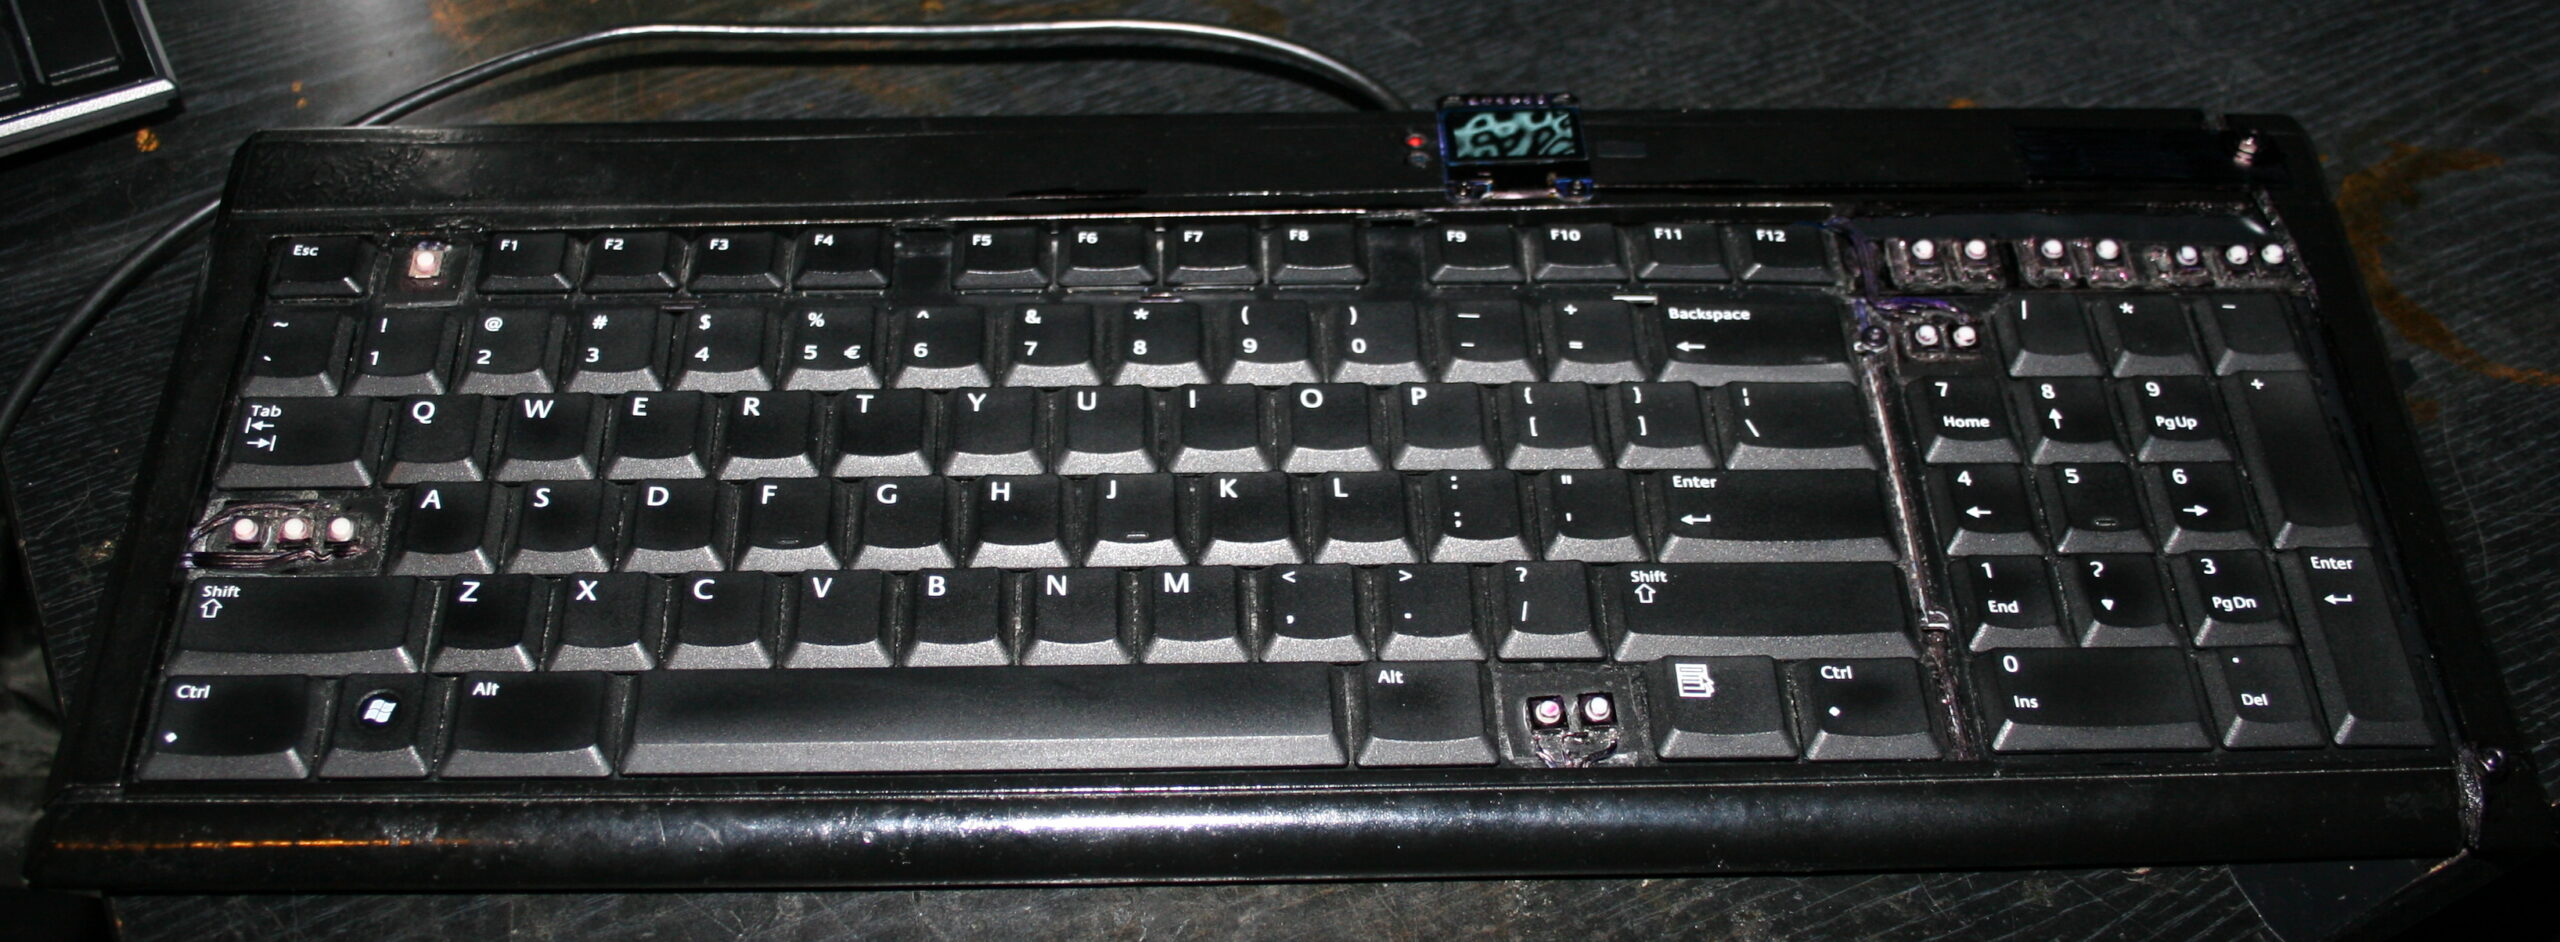
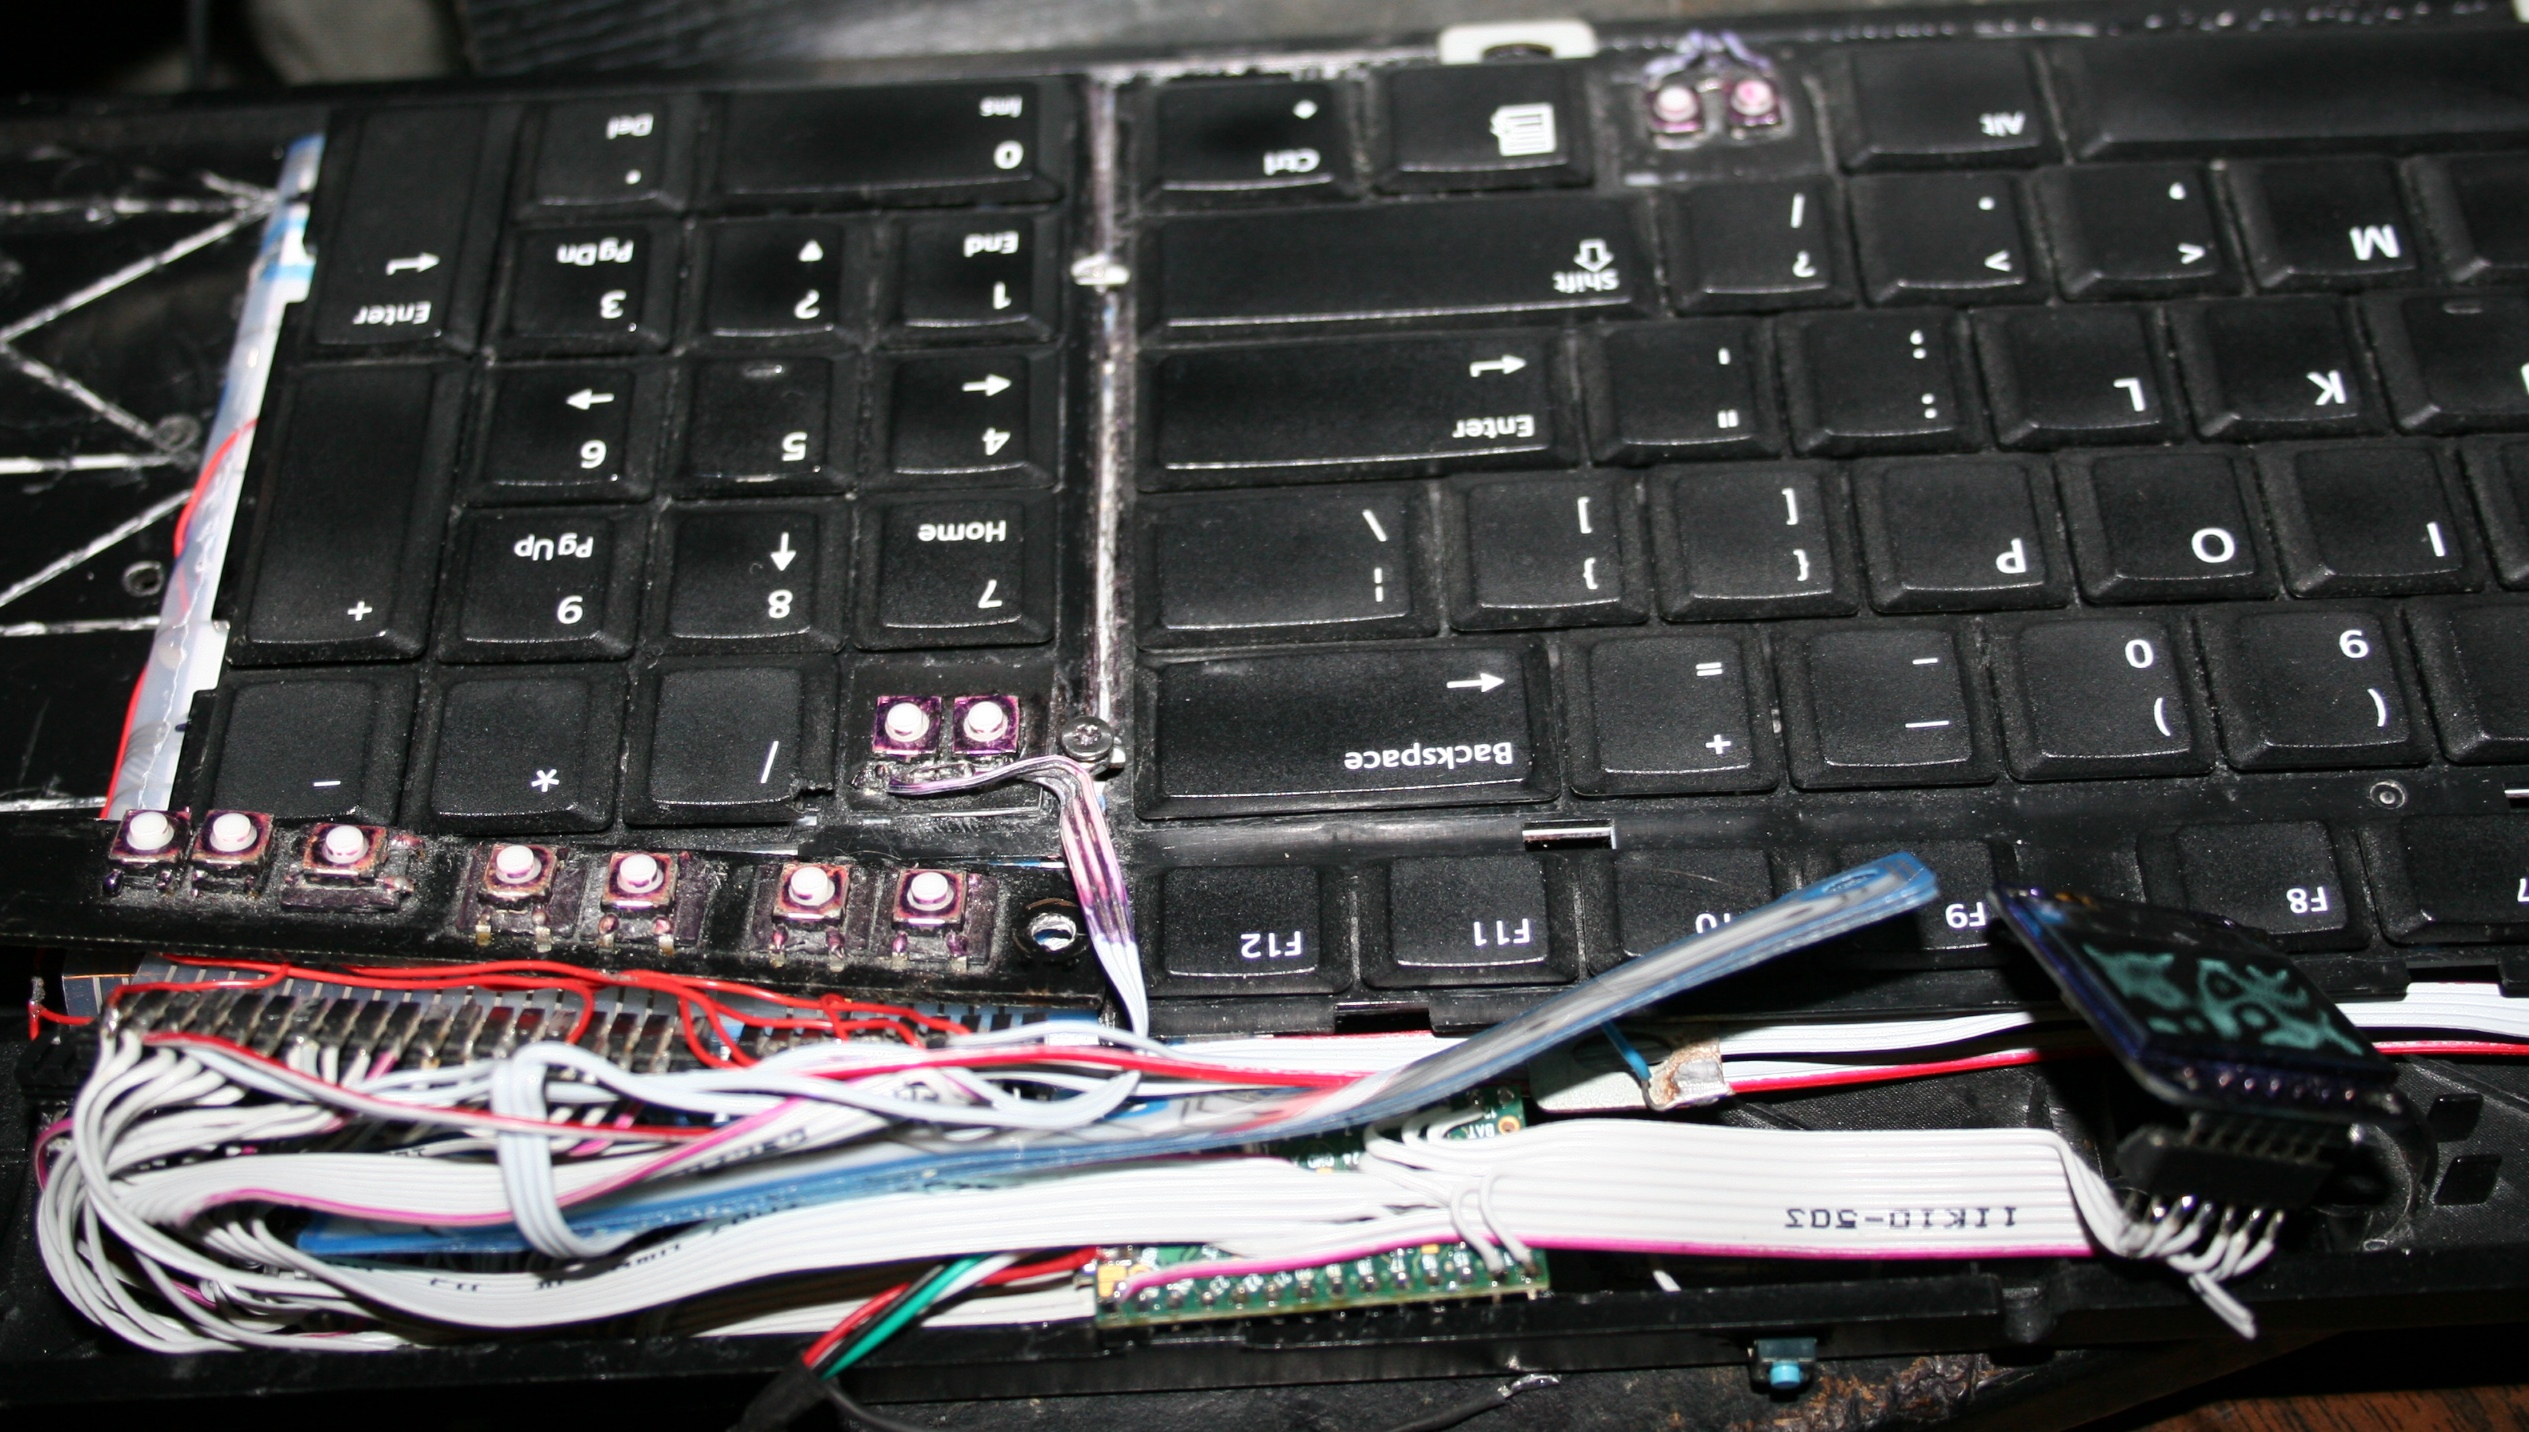
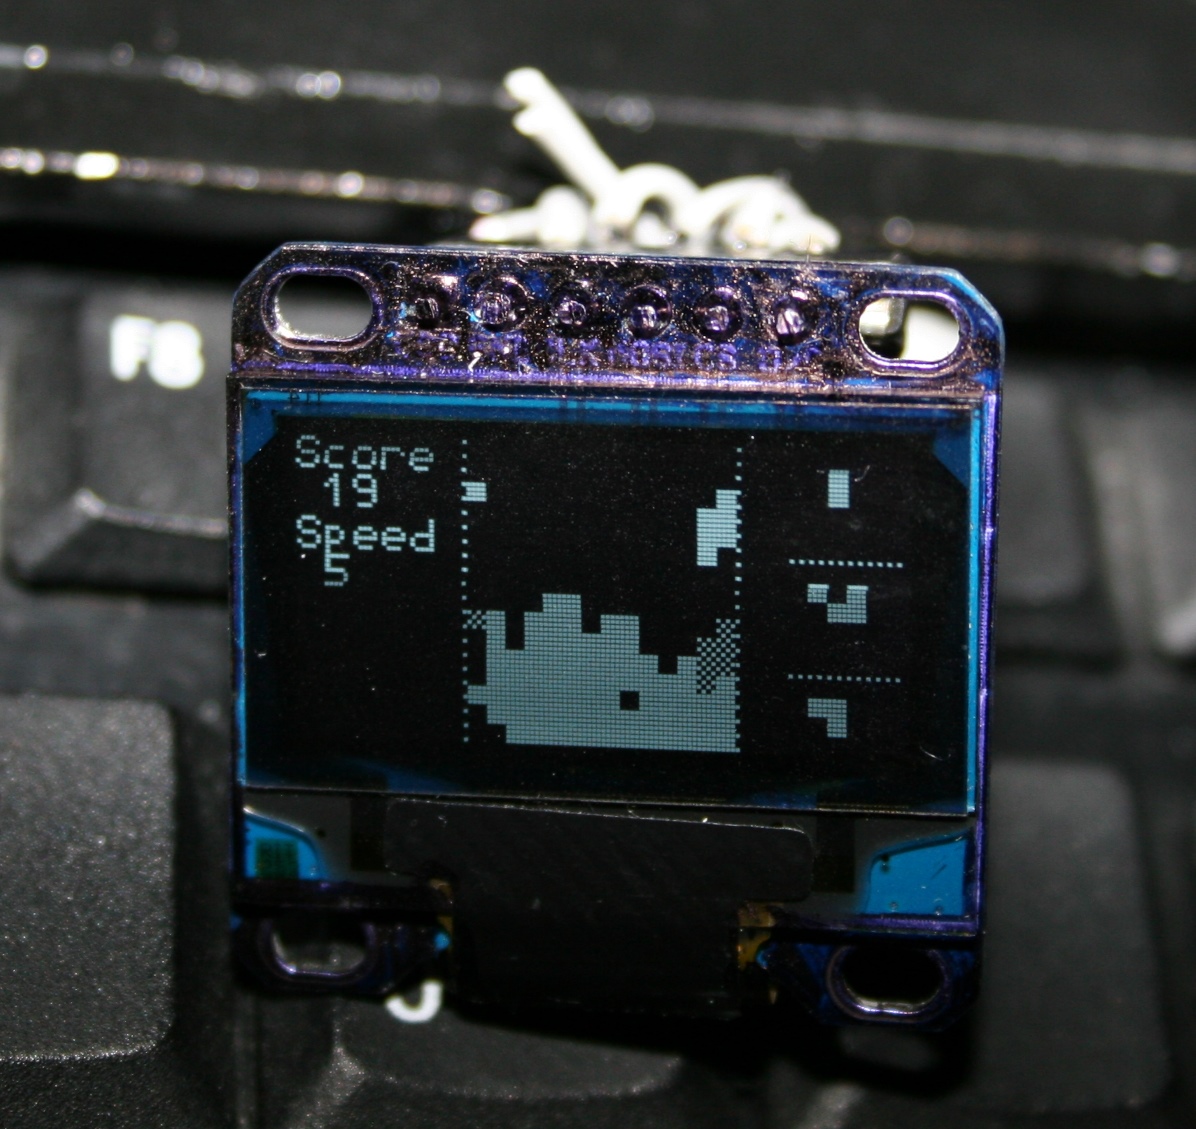
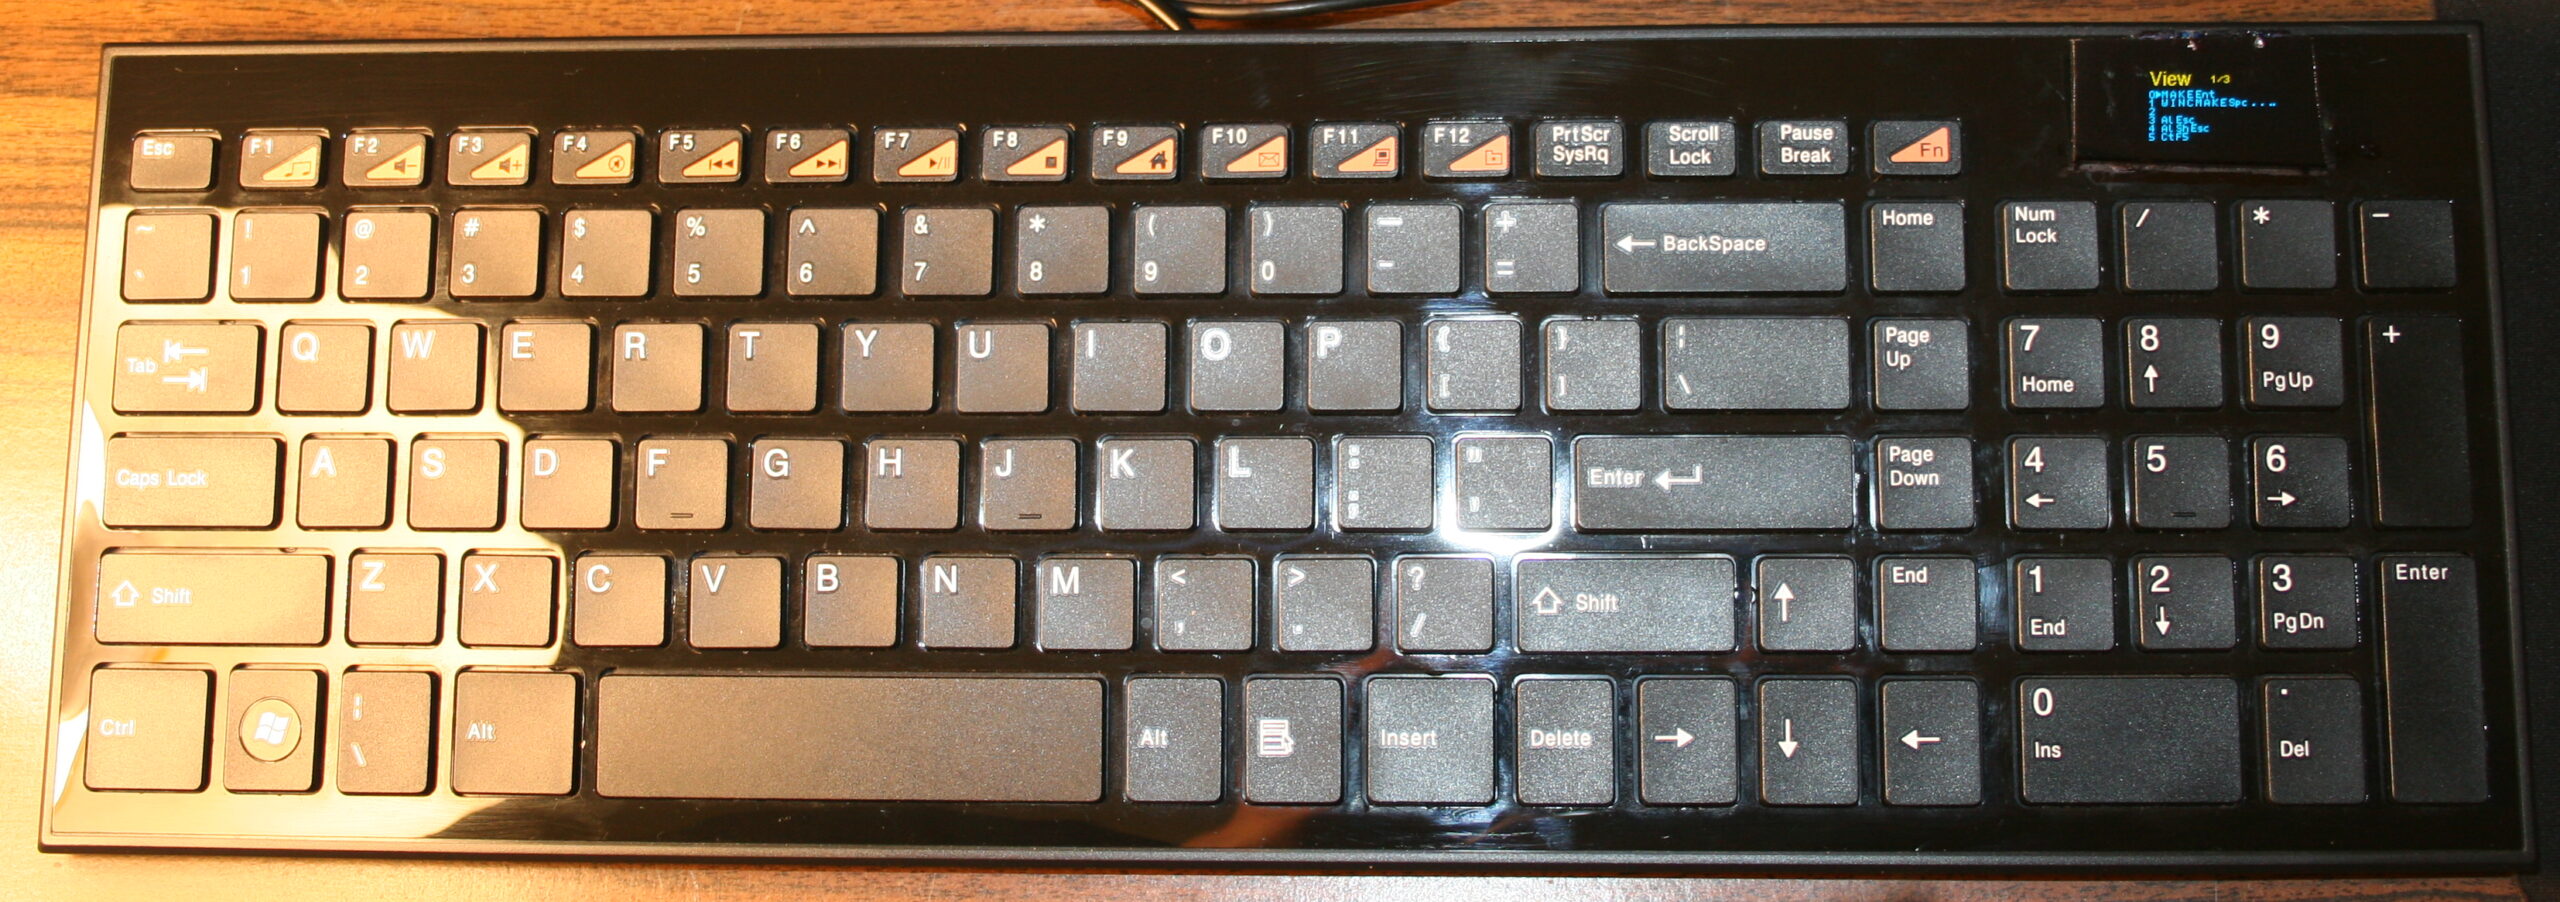
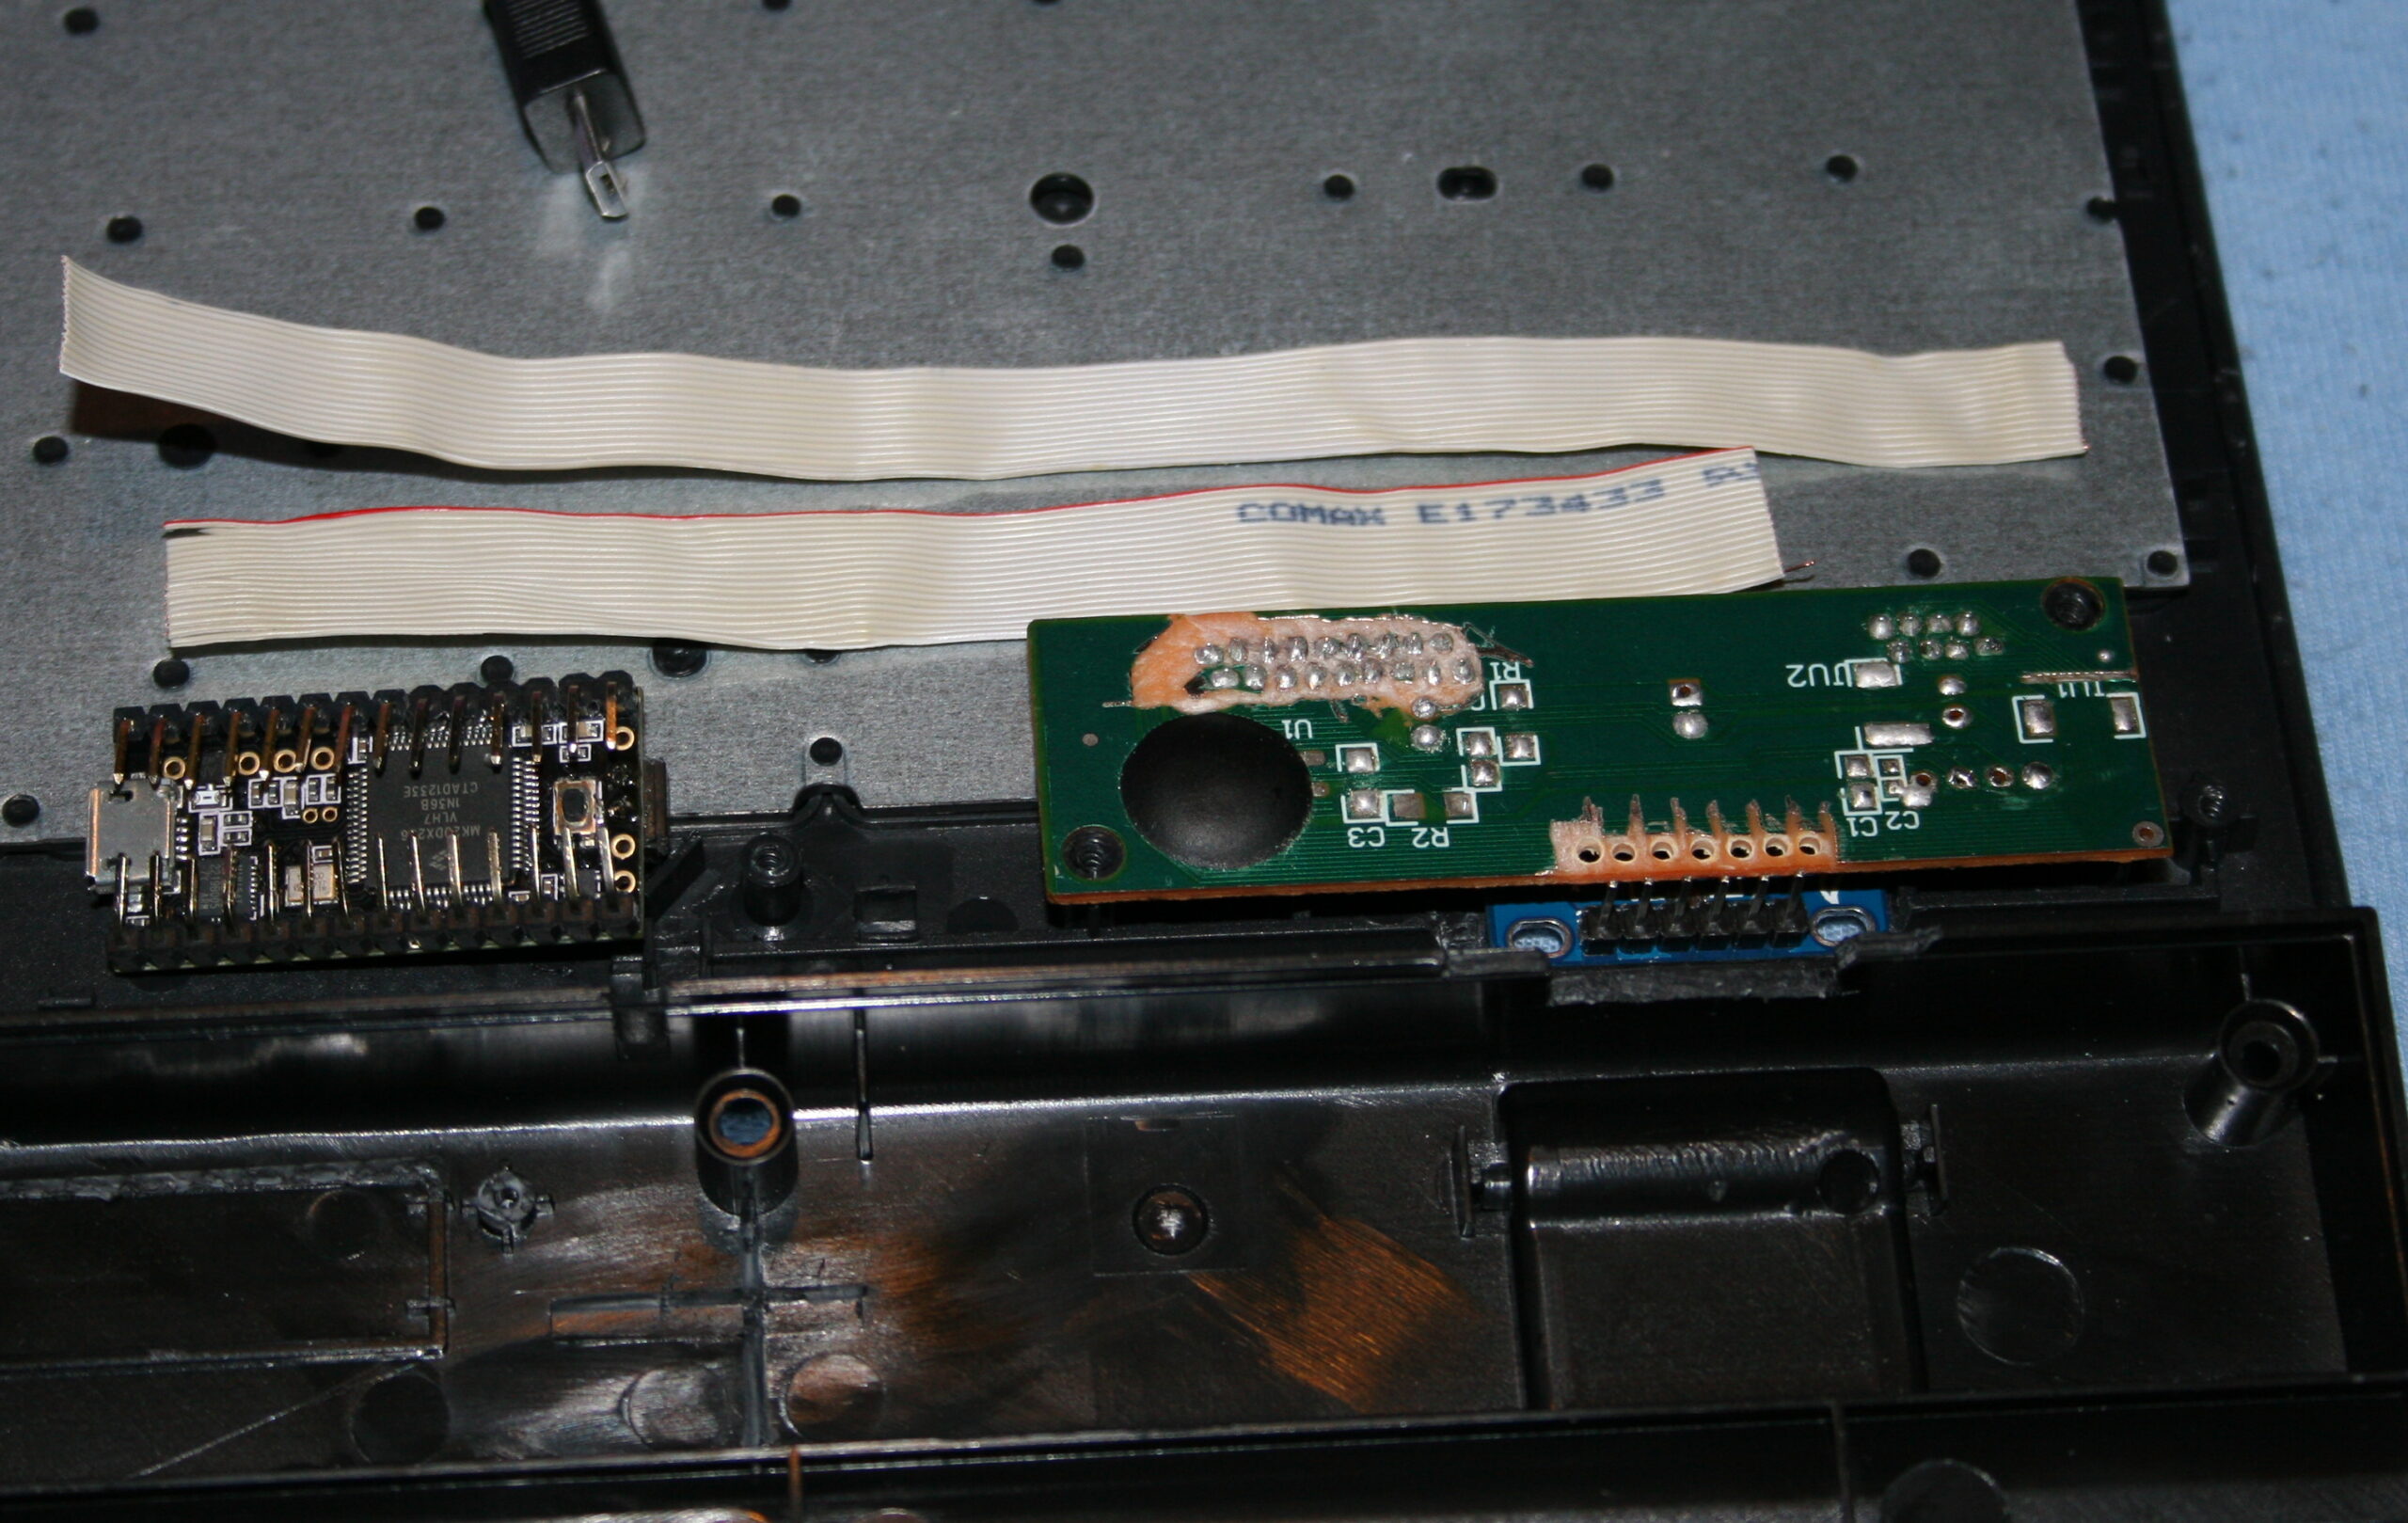
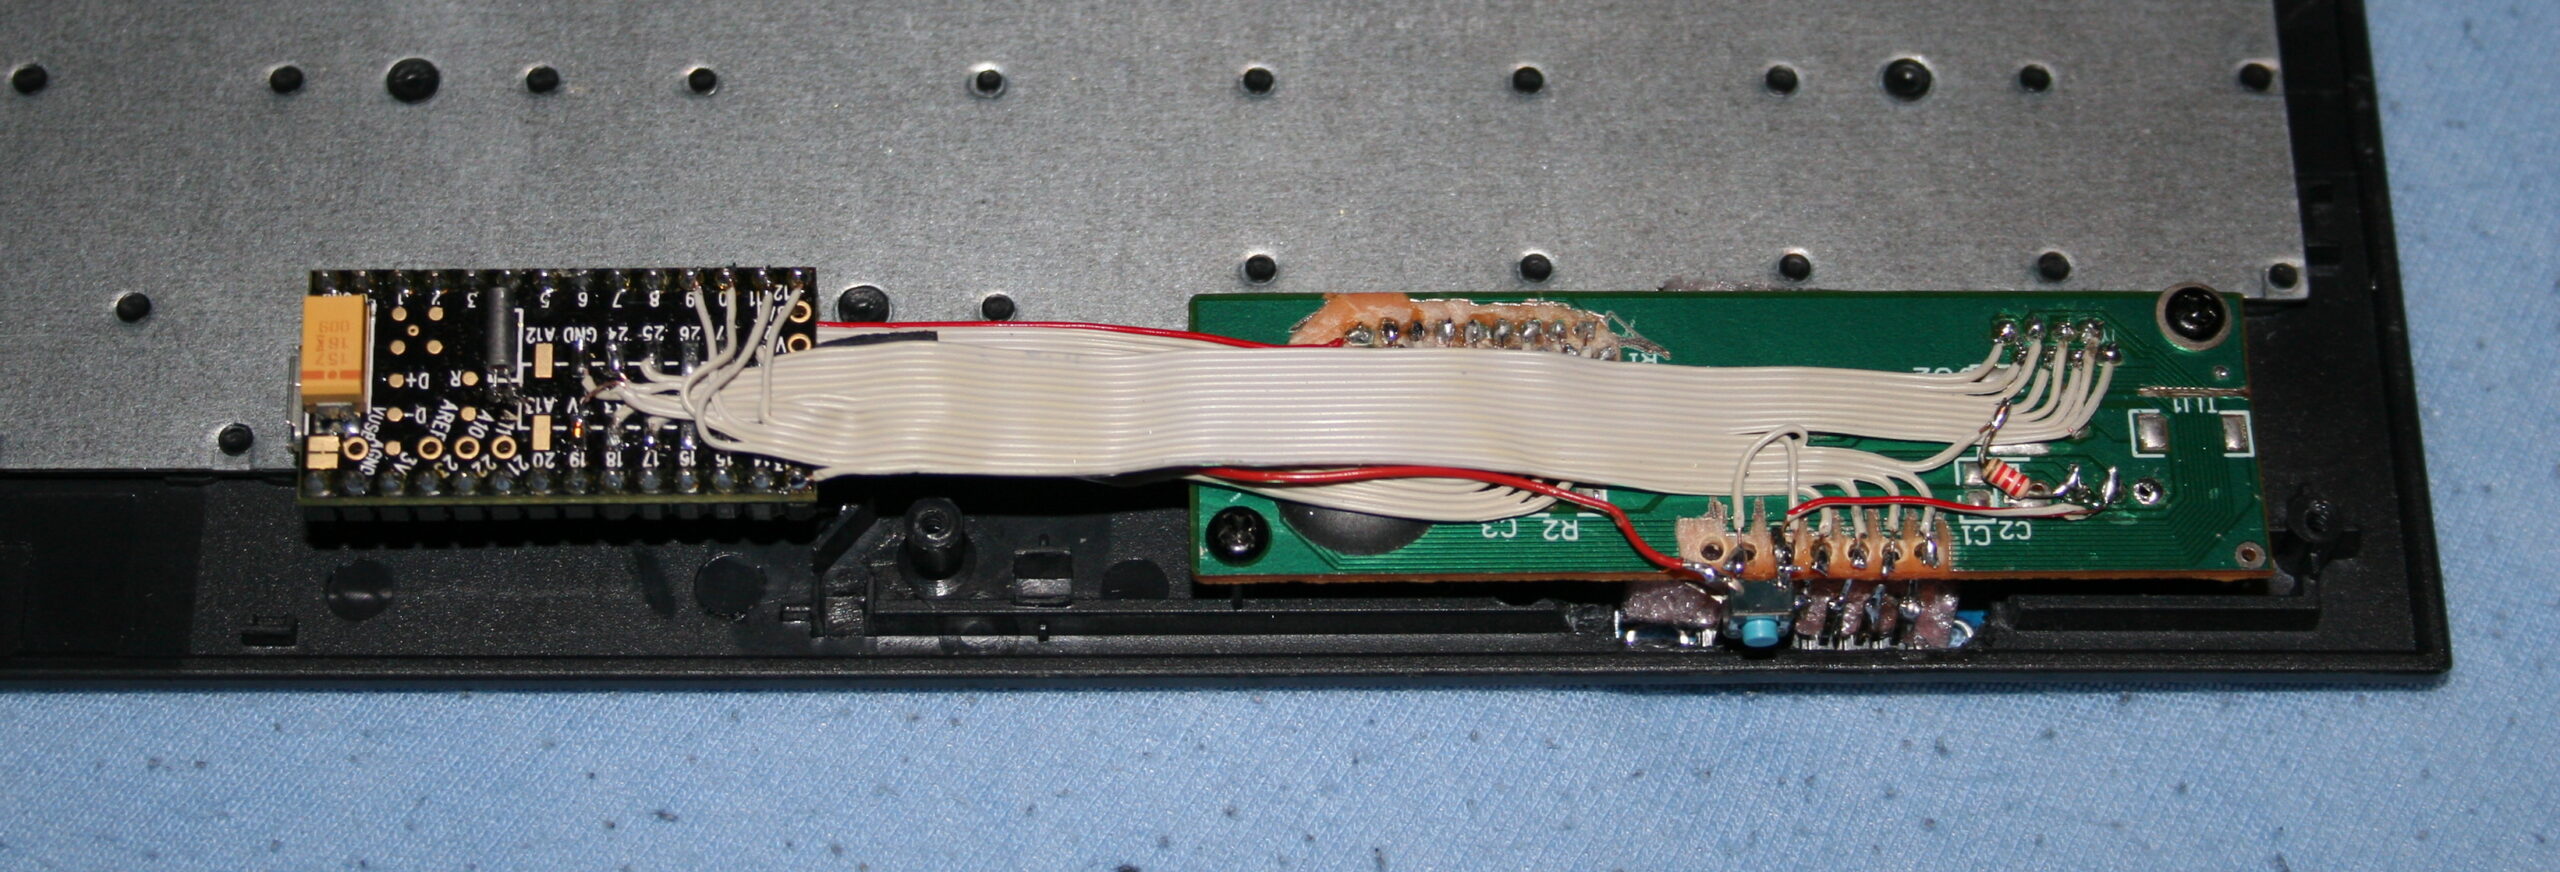
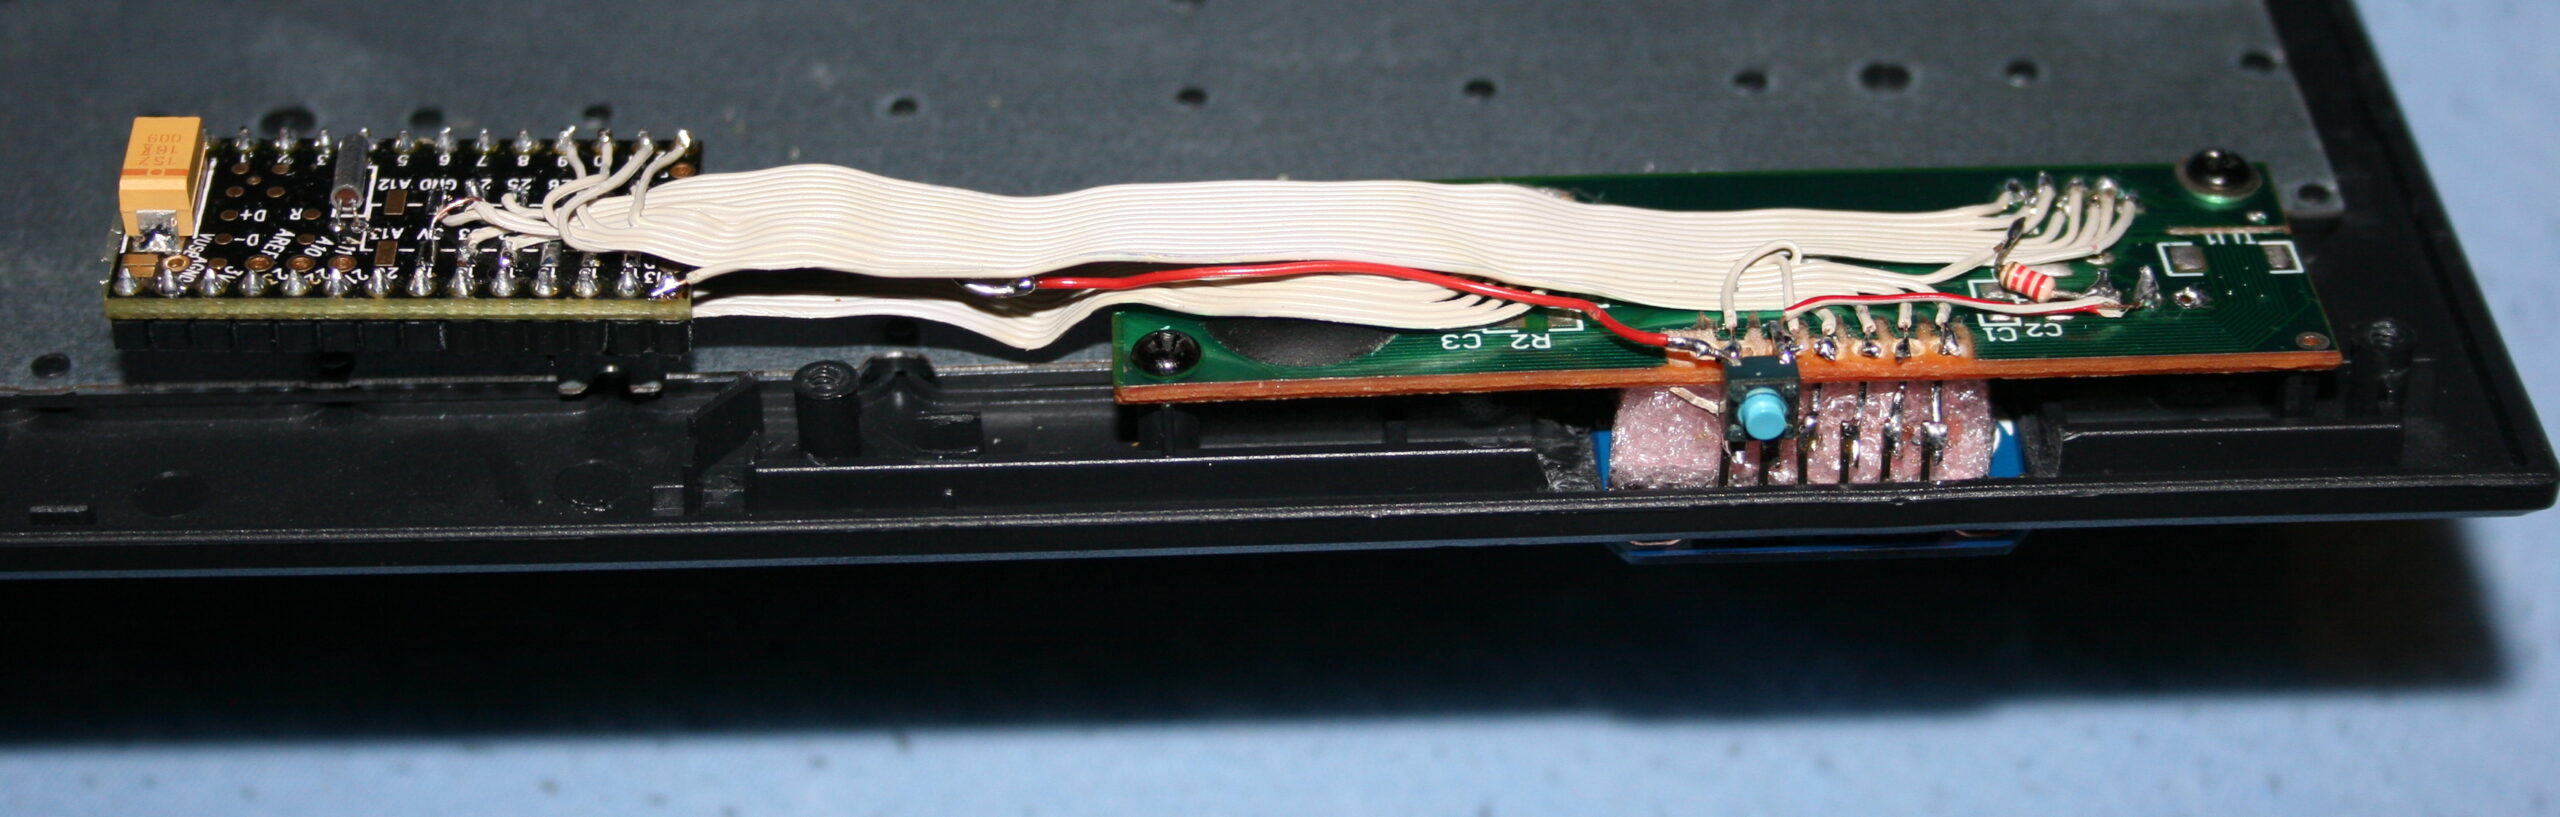
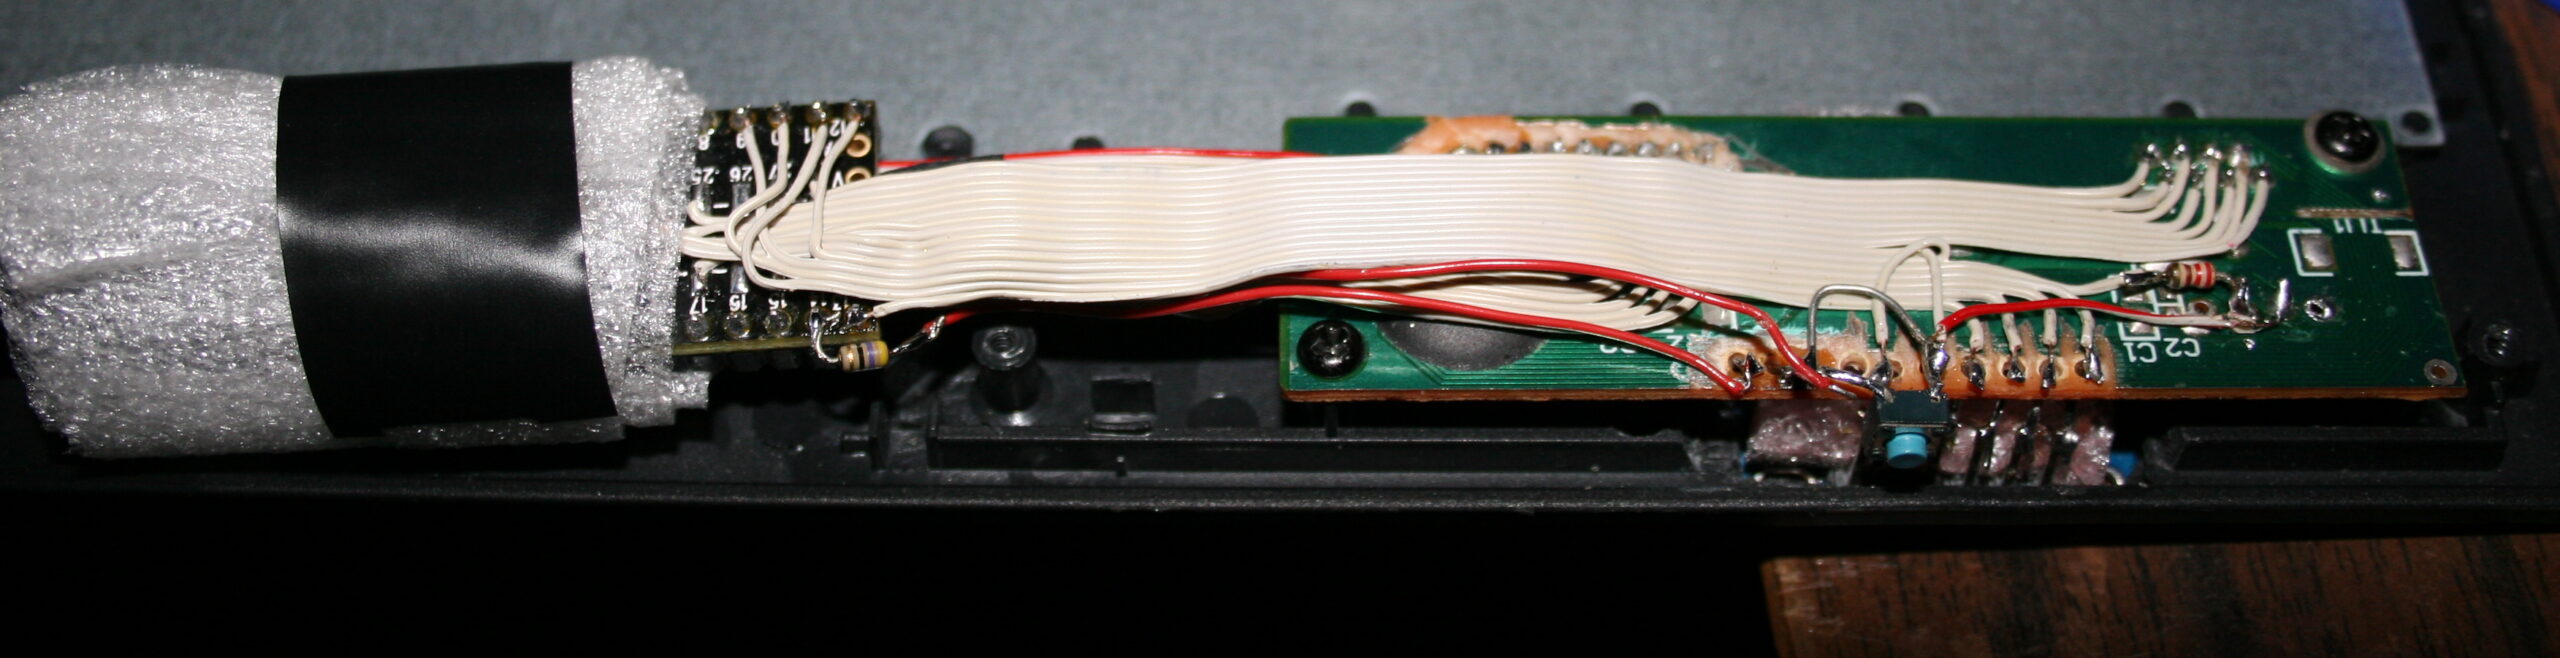
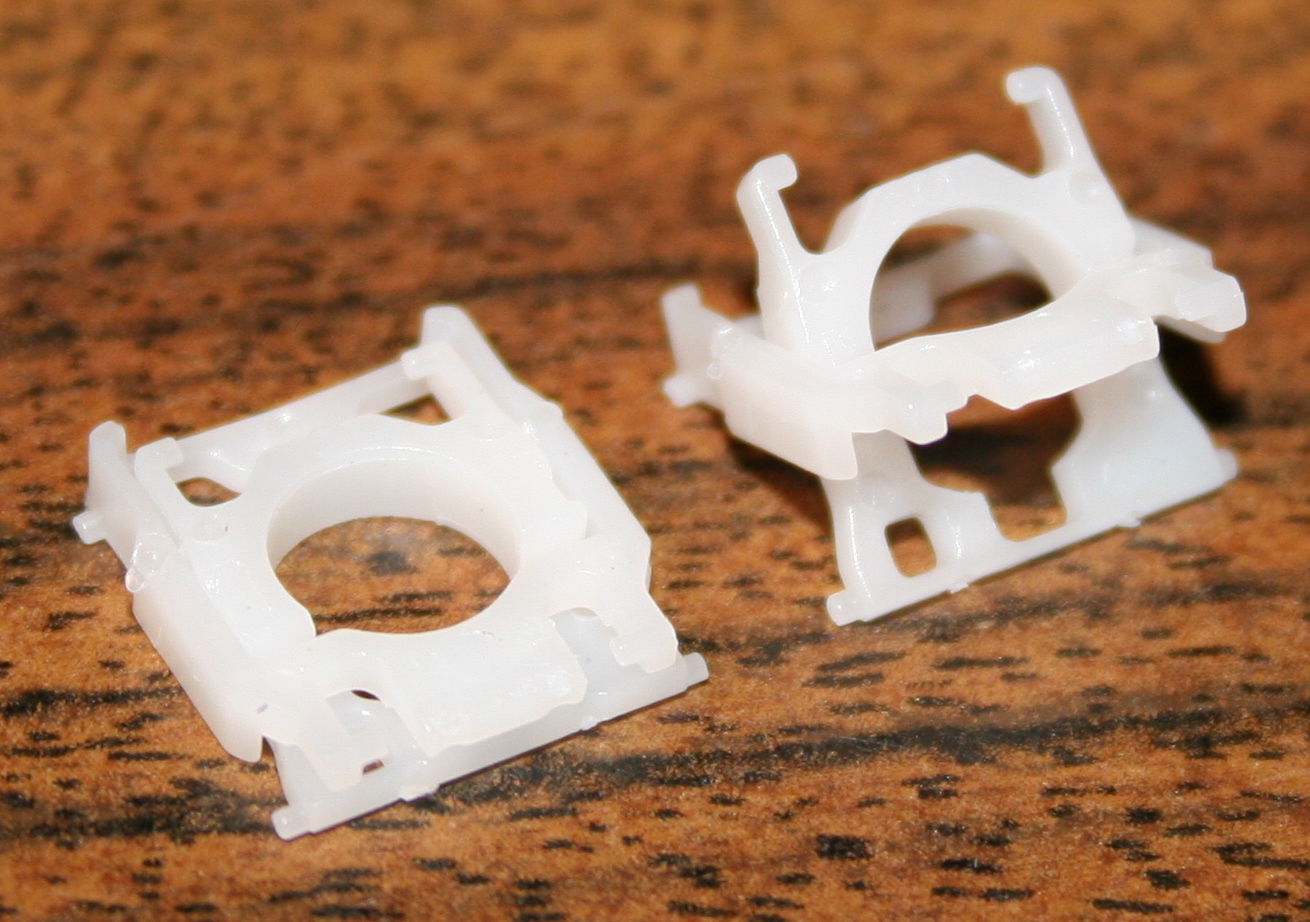
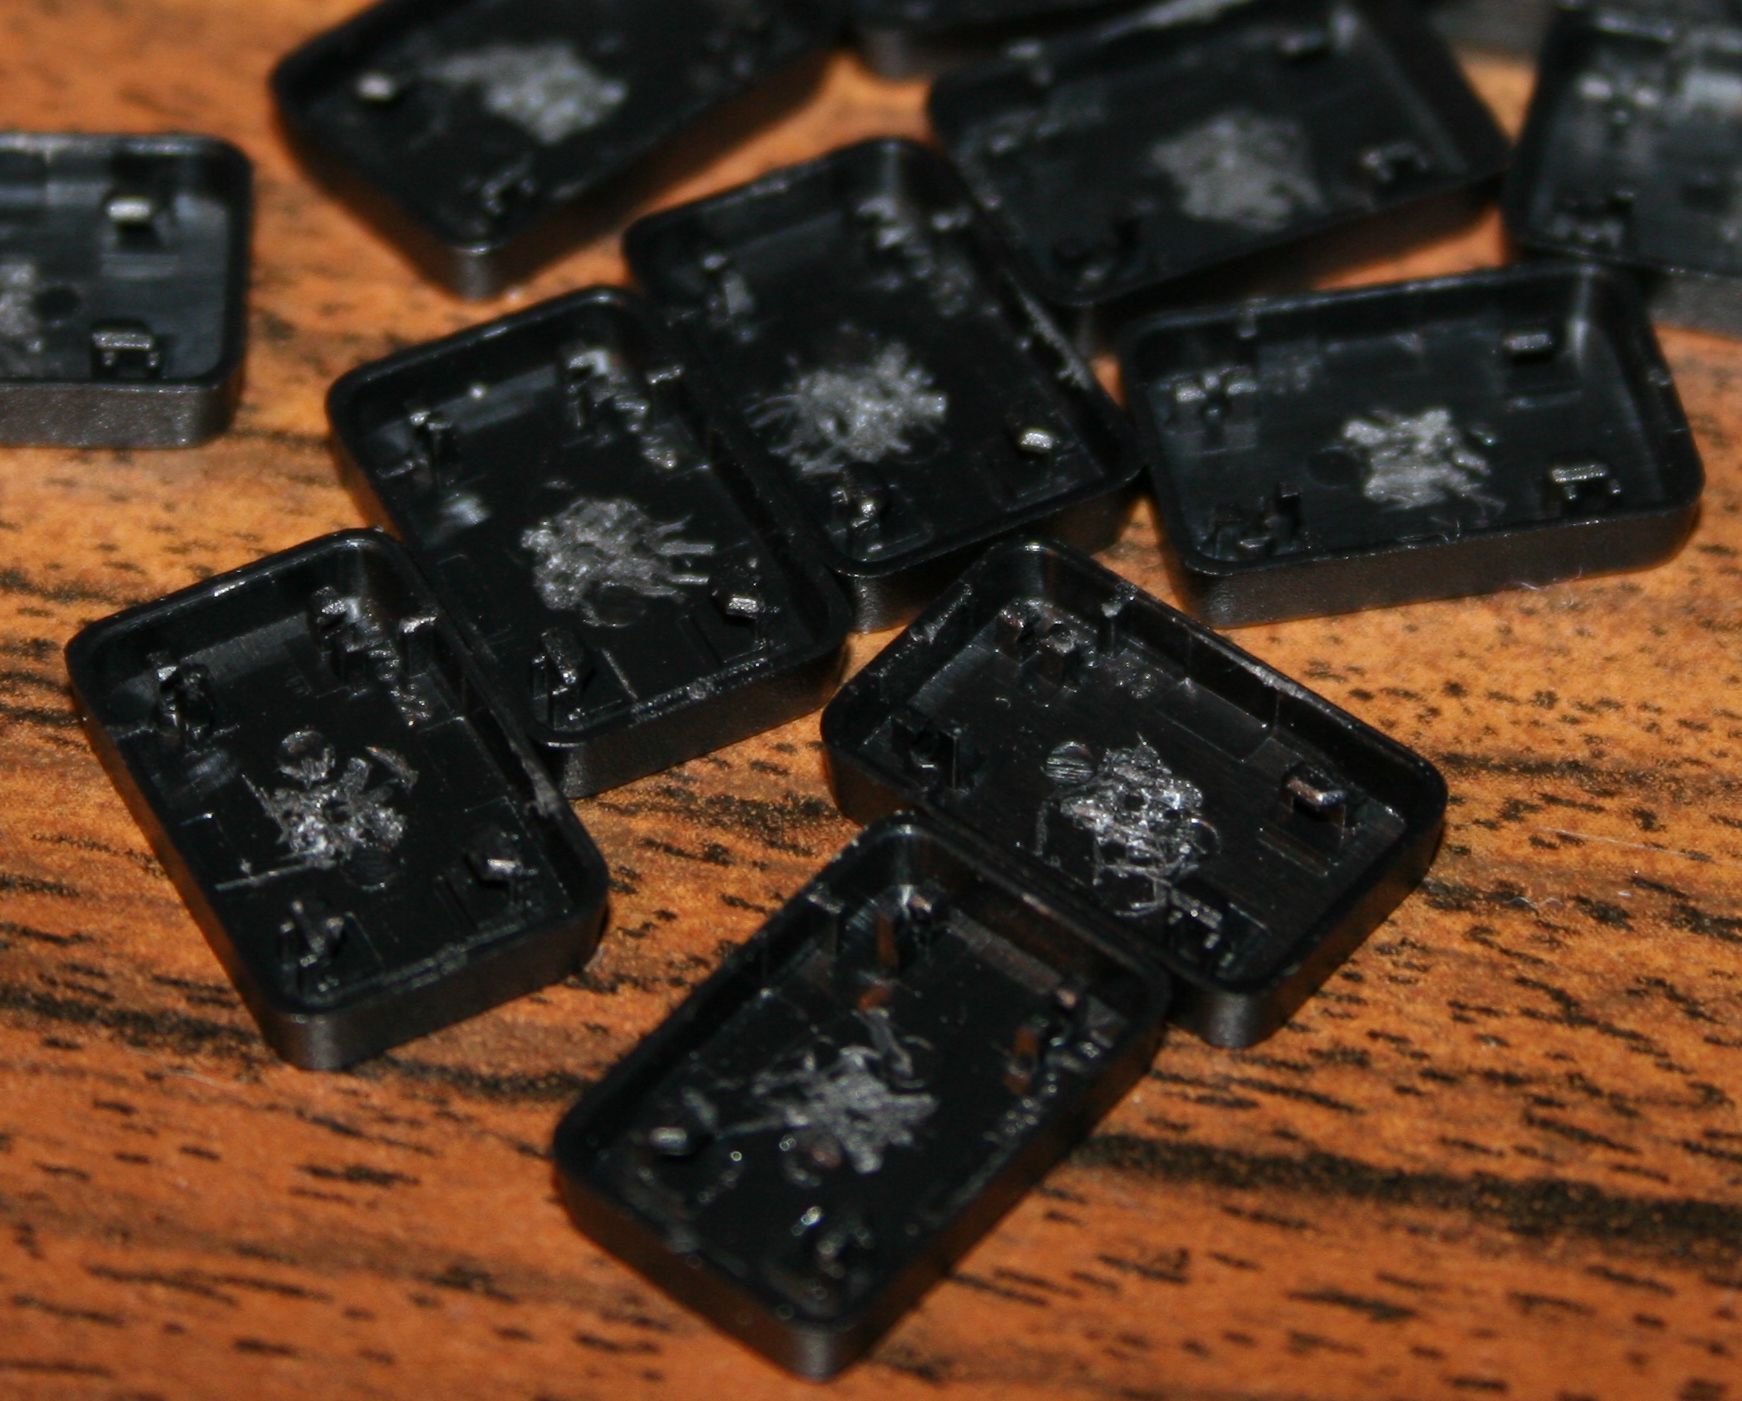
STM32F103C8T6 “Bluepill” MCU – cheap, but decent. It has many outputs (GPIO), still few left. No need for anything faster.
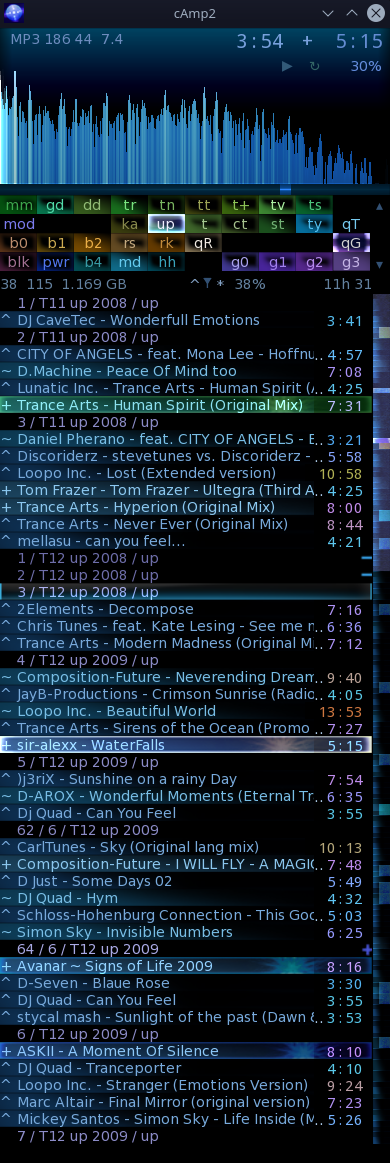
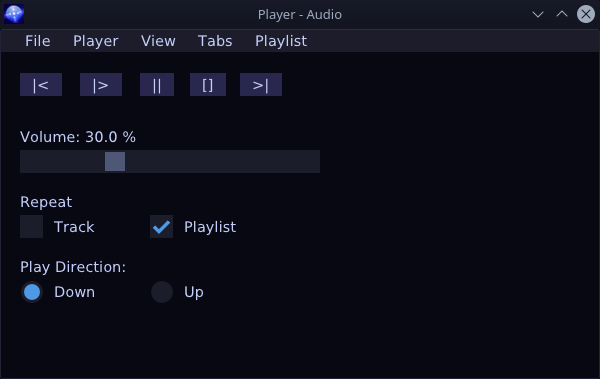
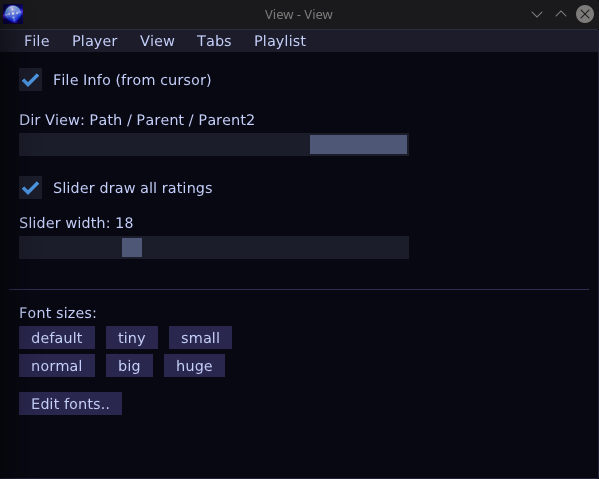
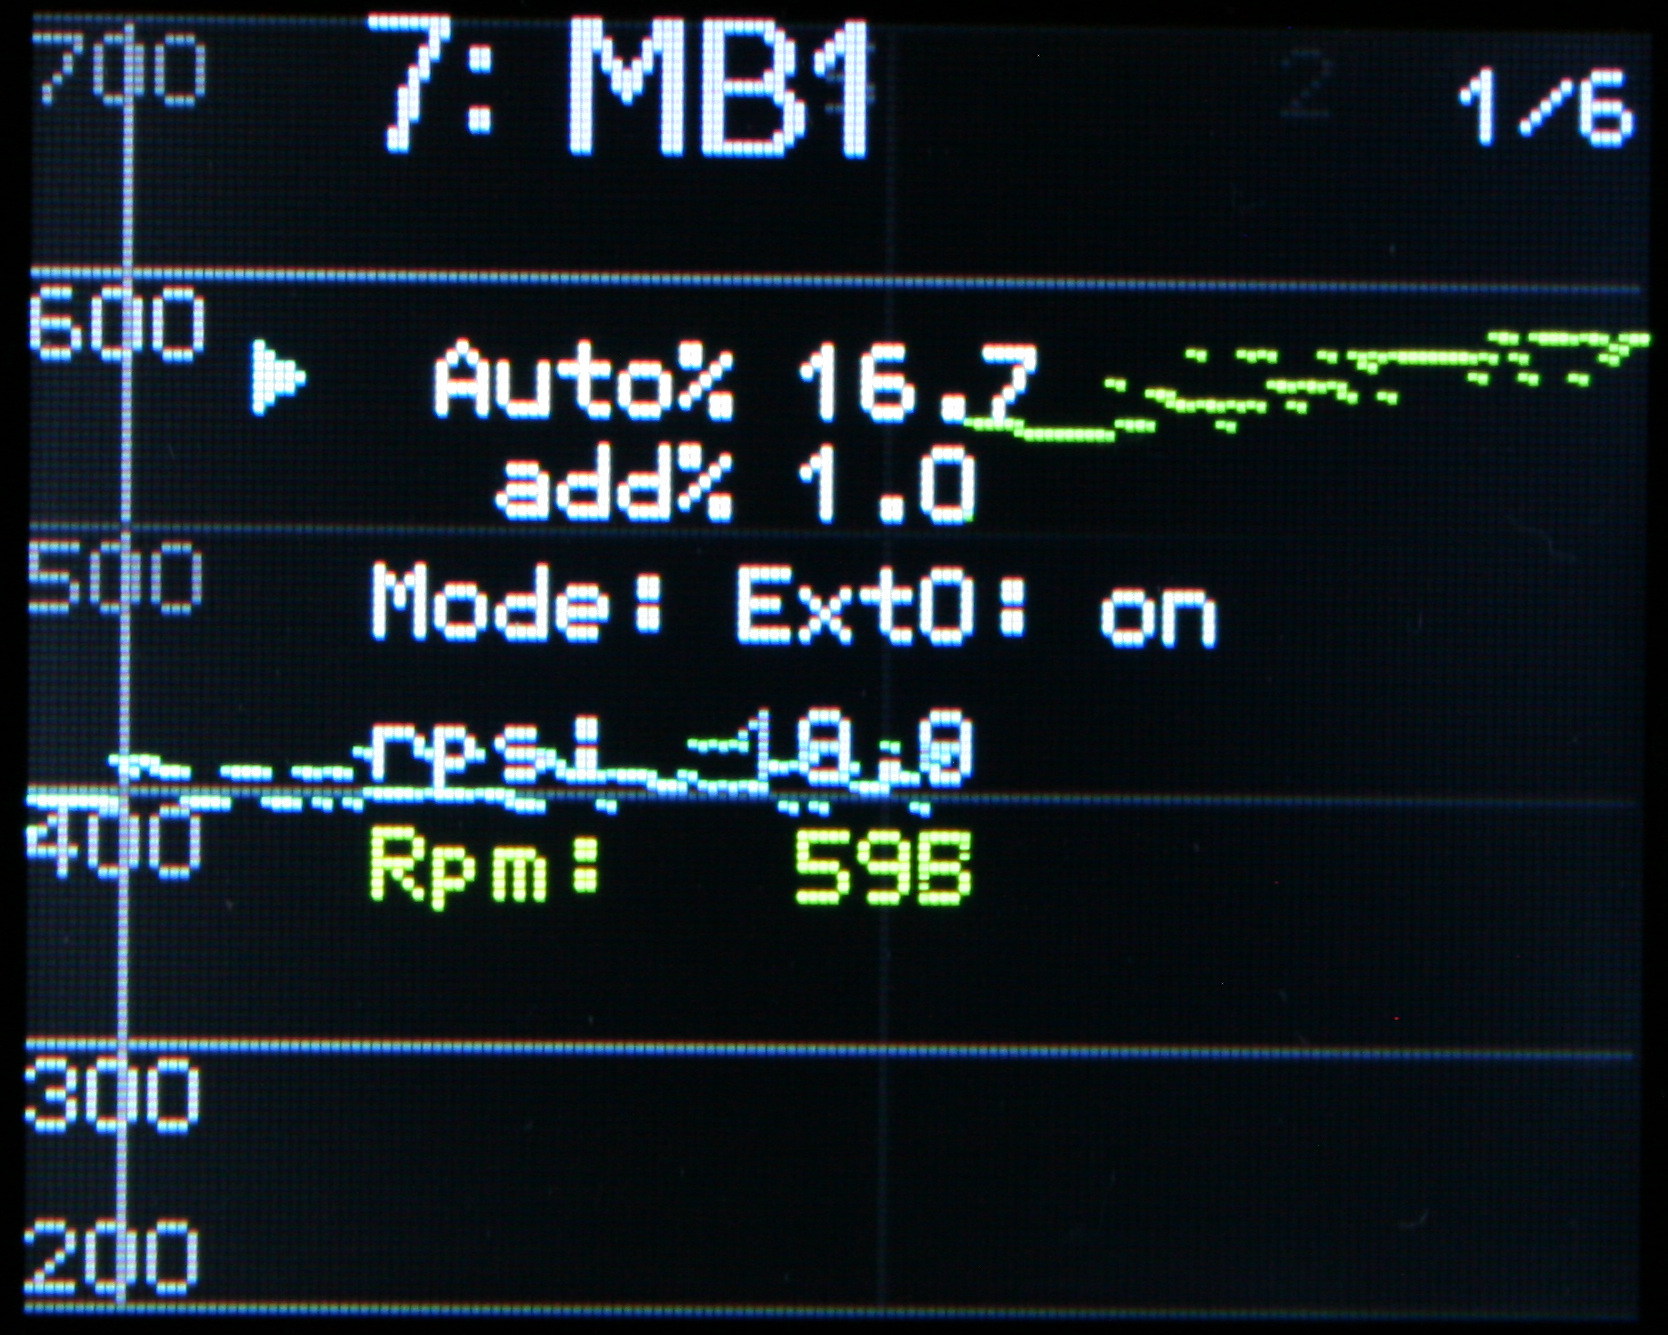
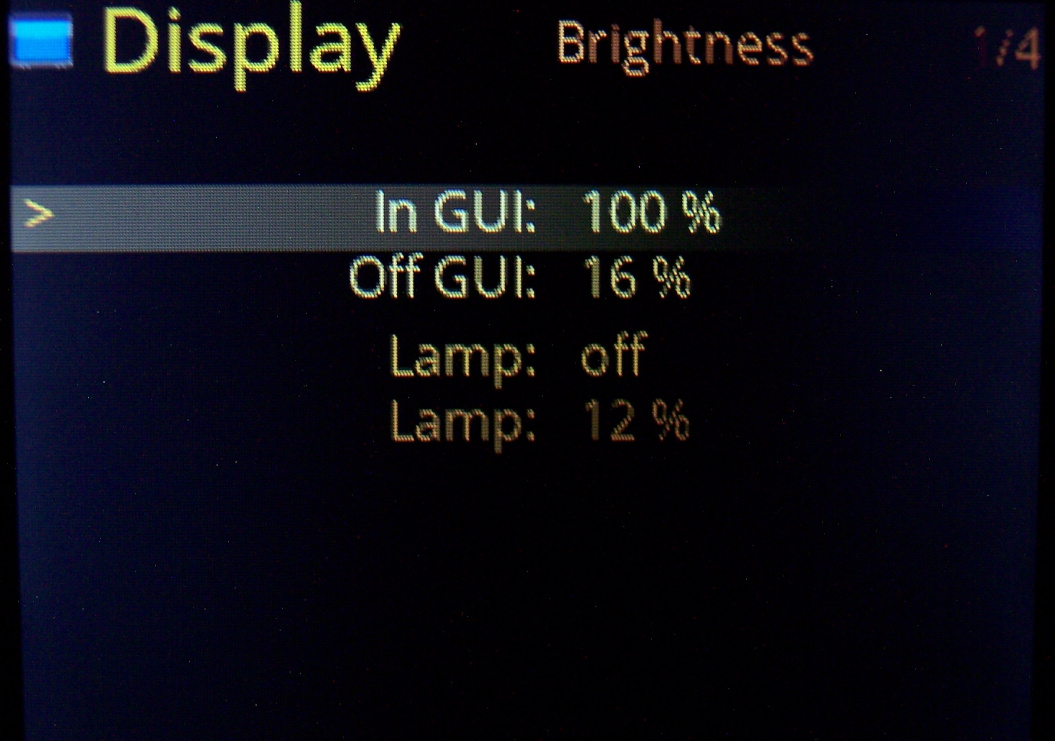
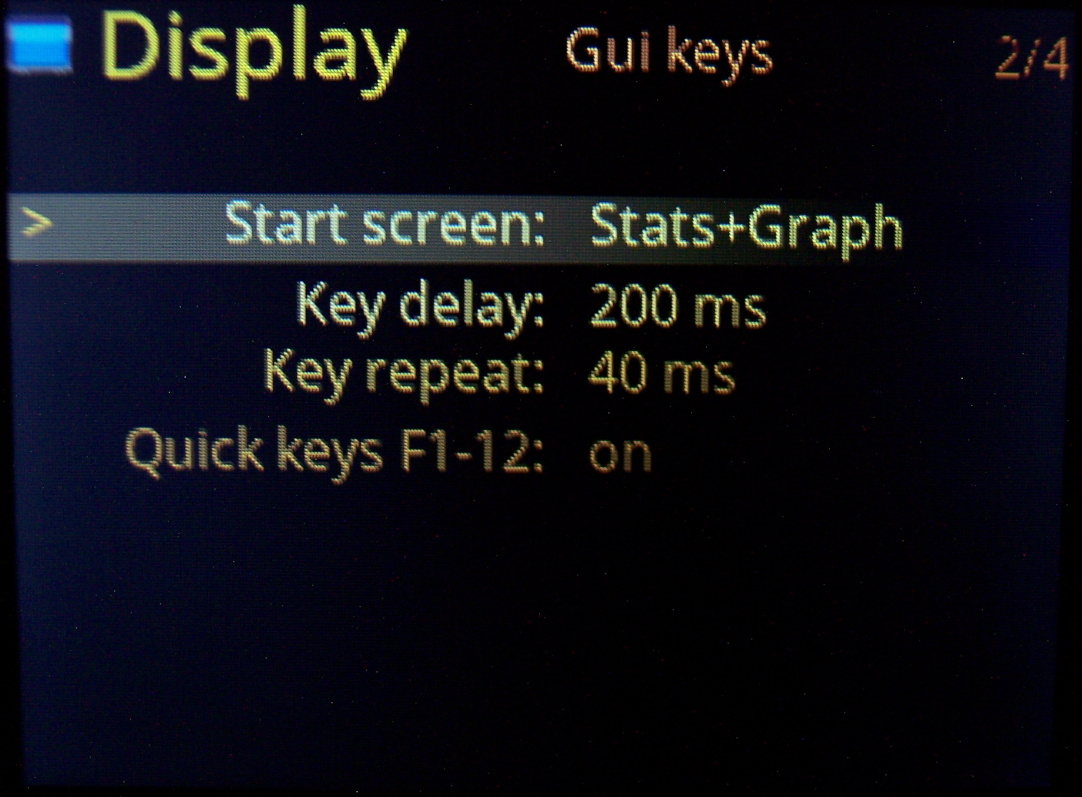
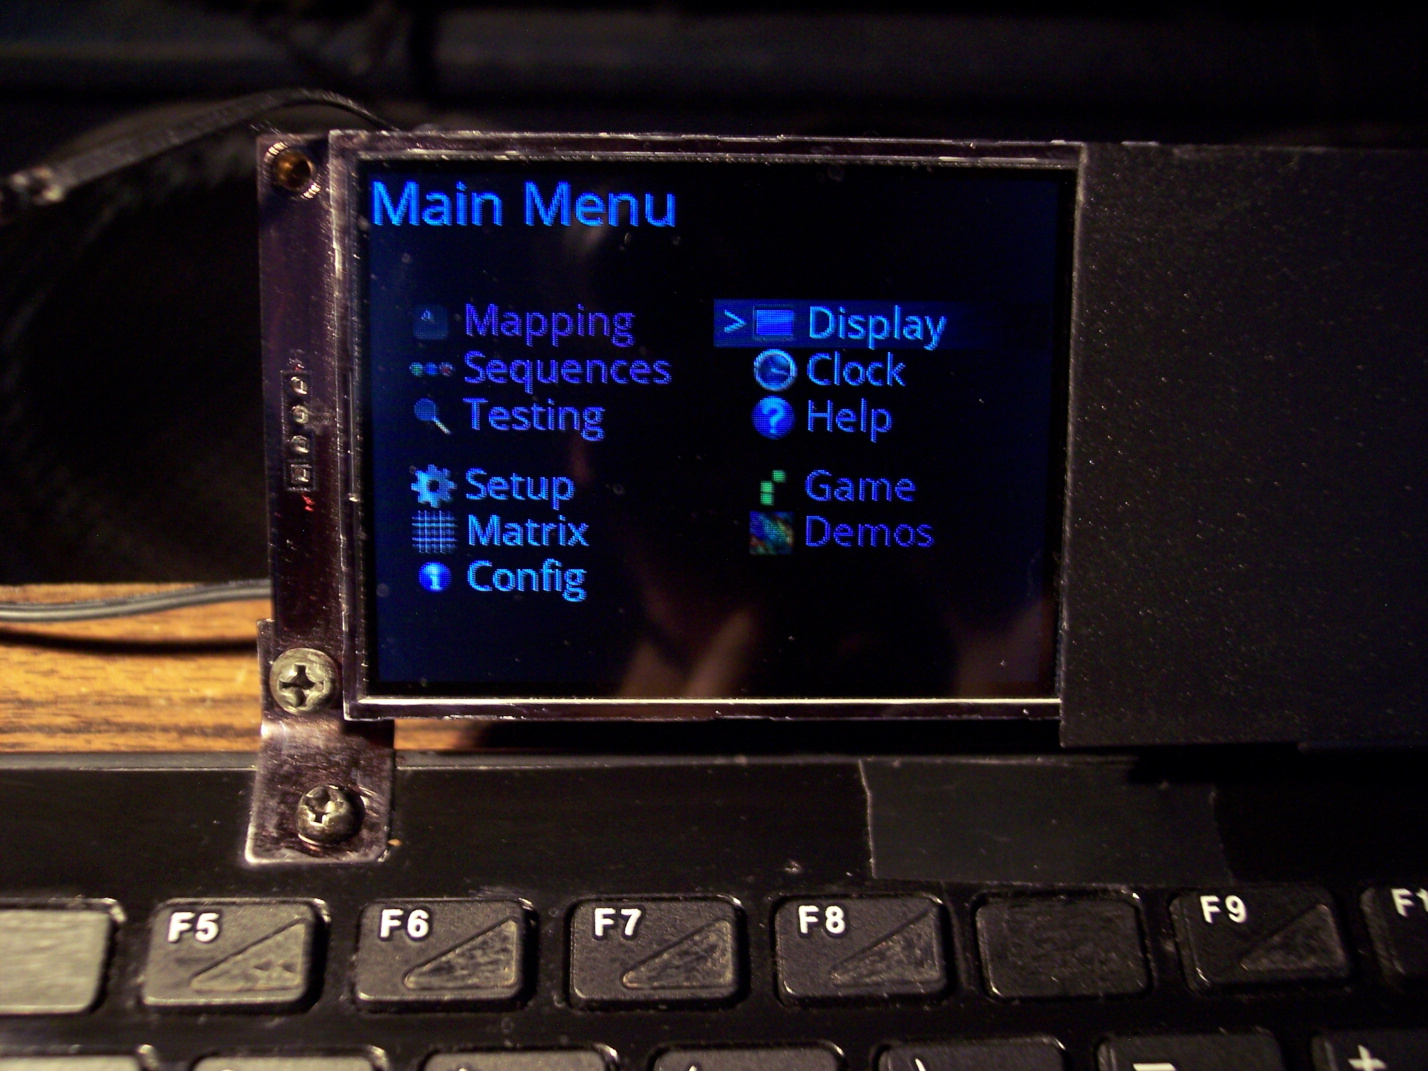
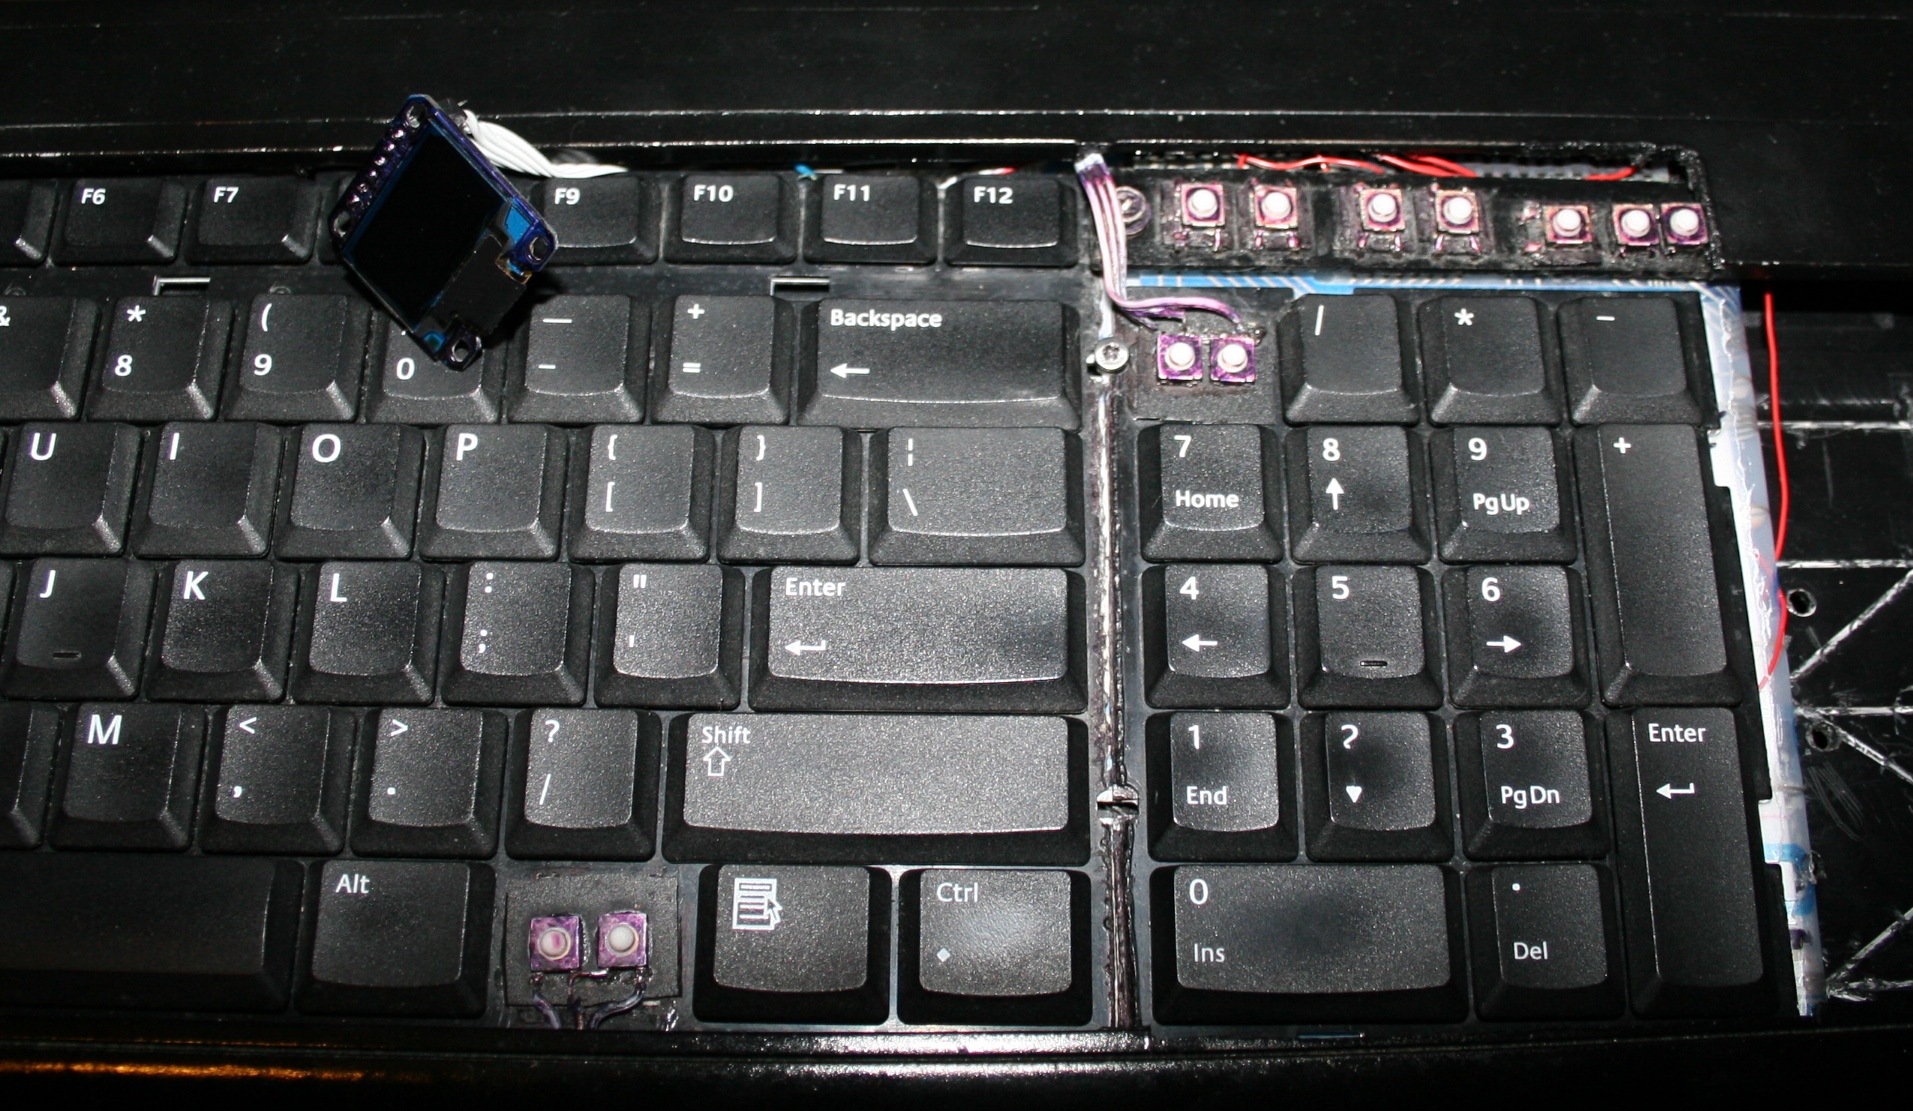
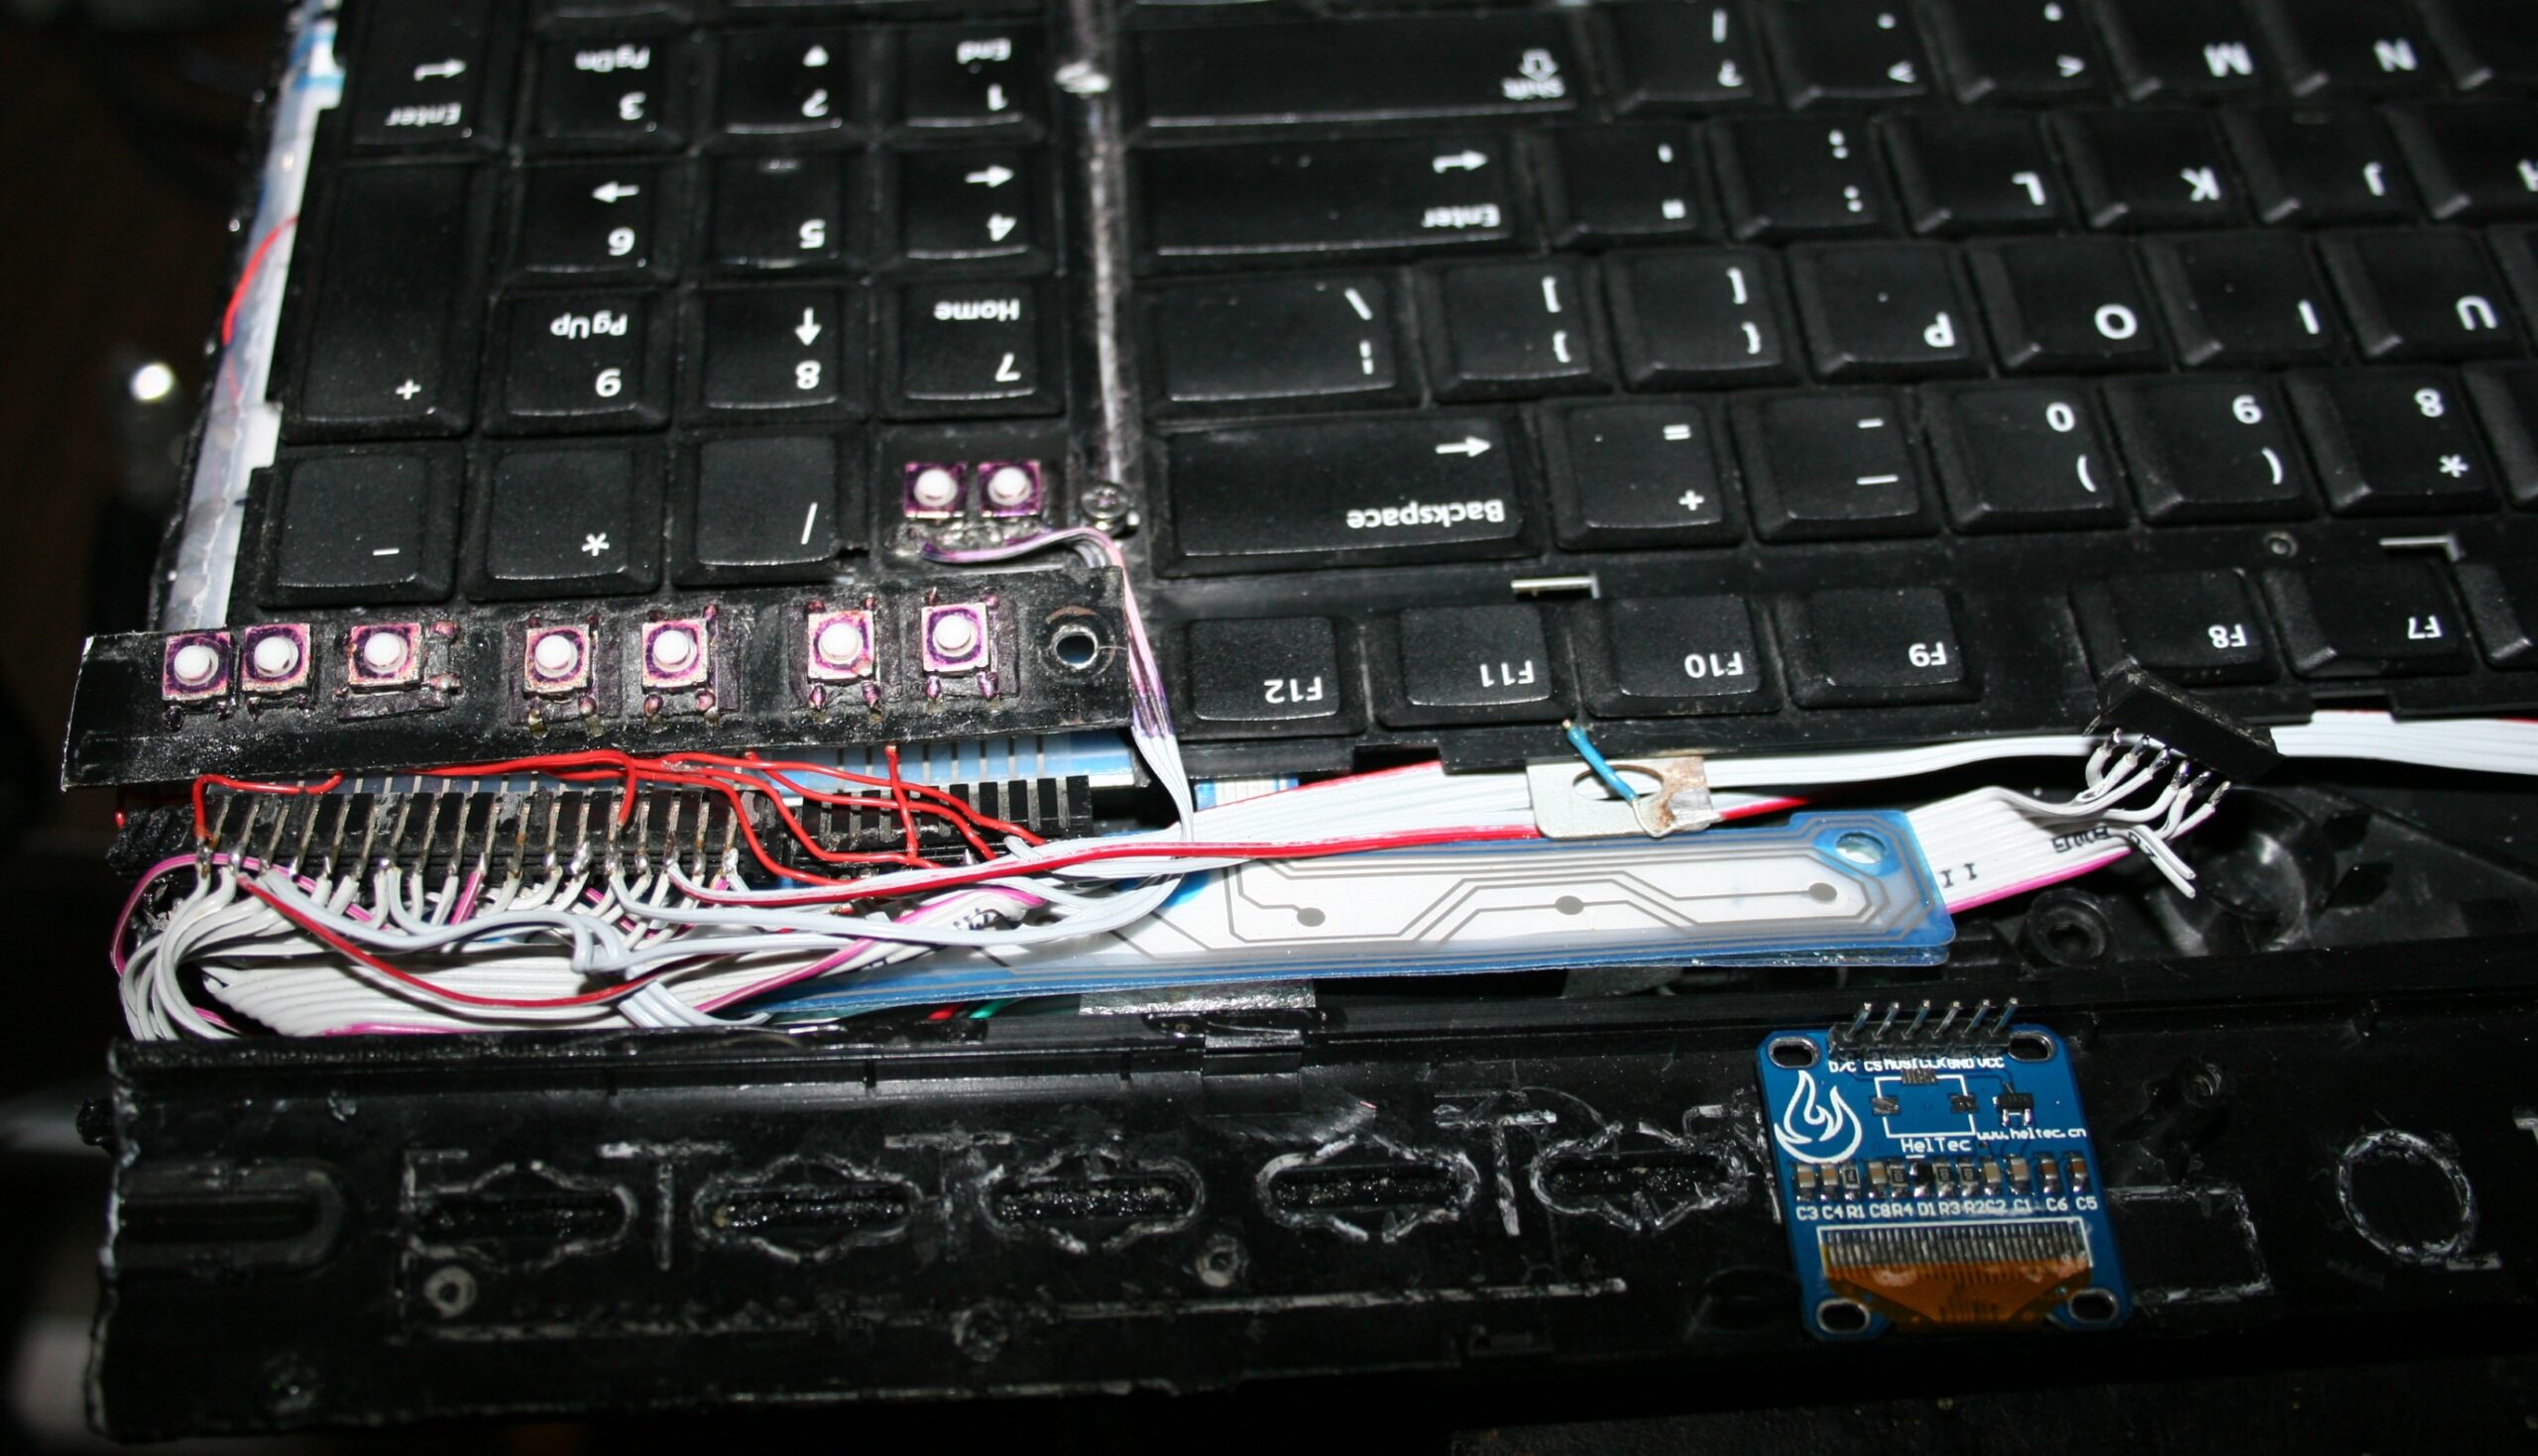
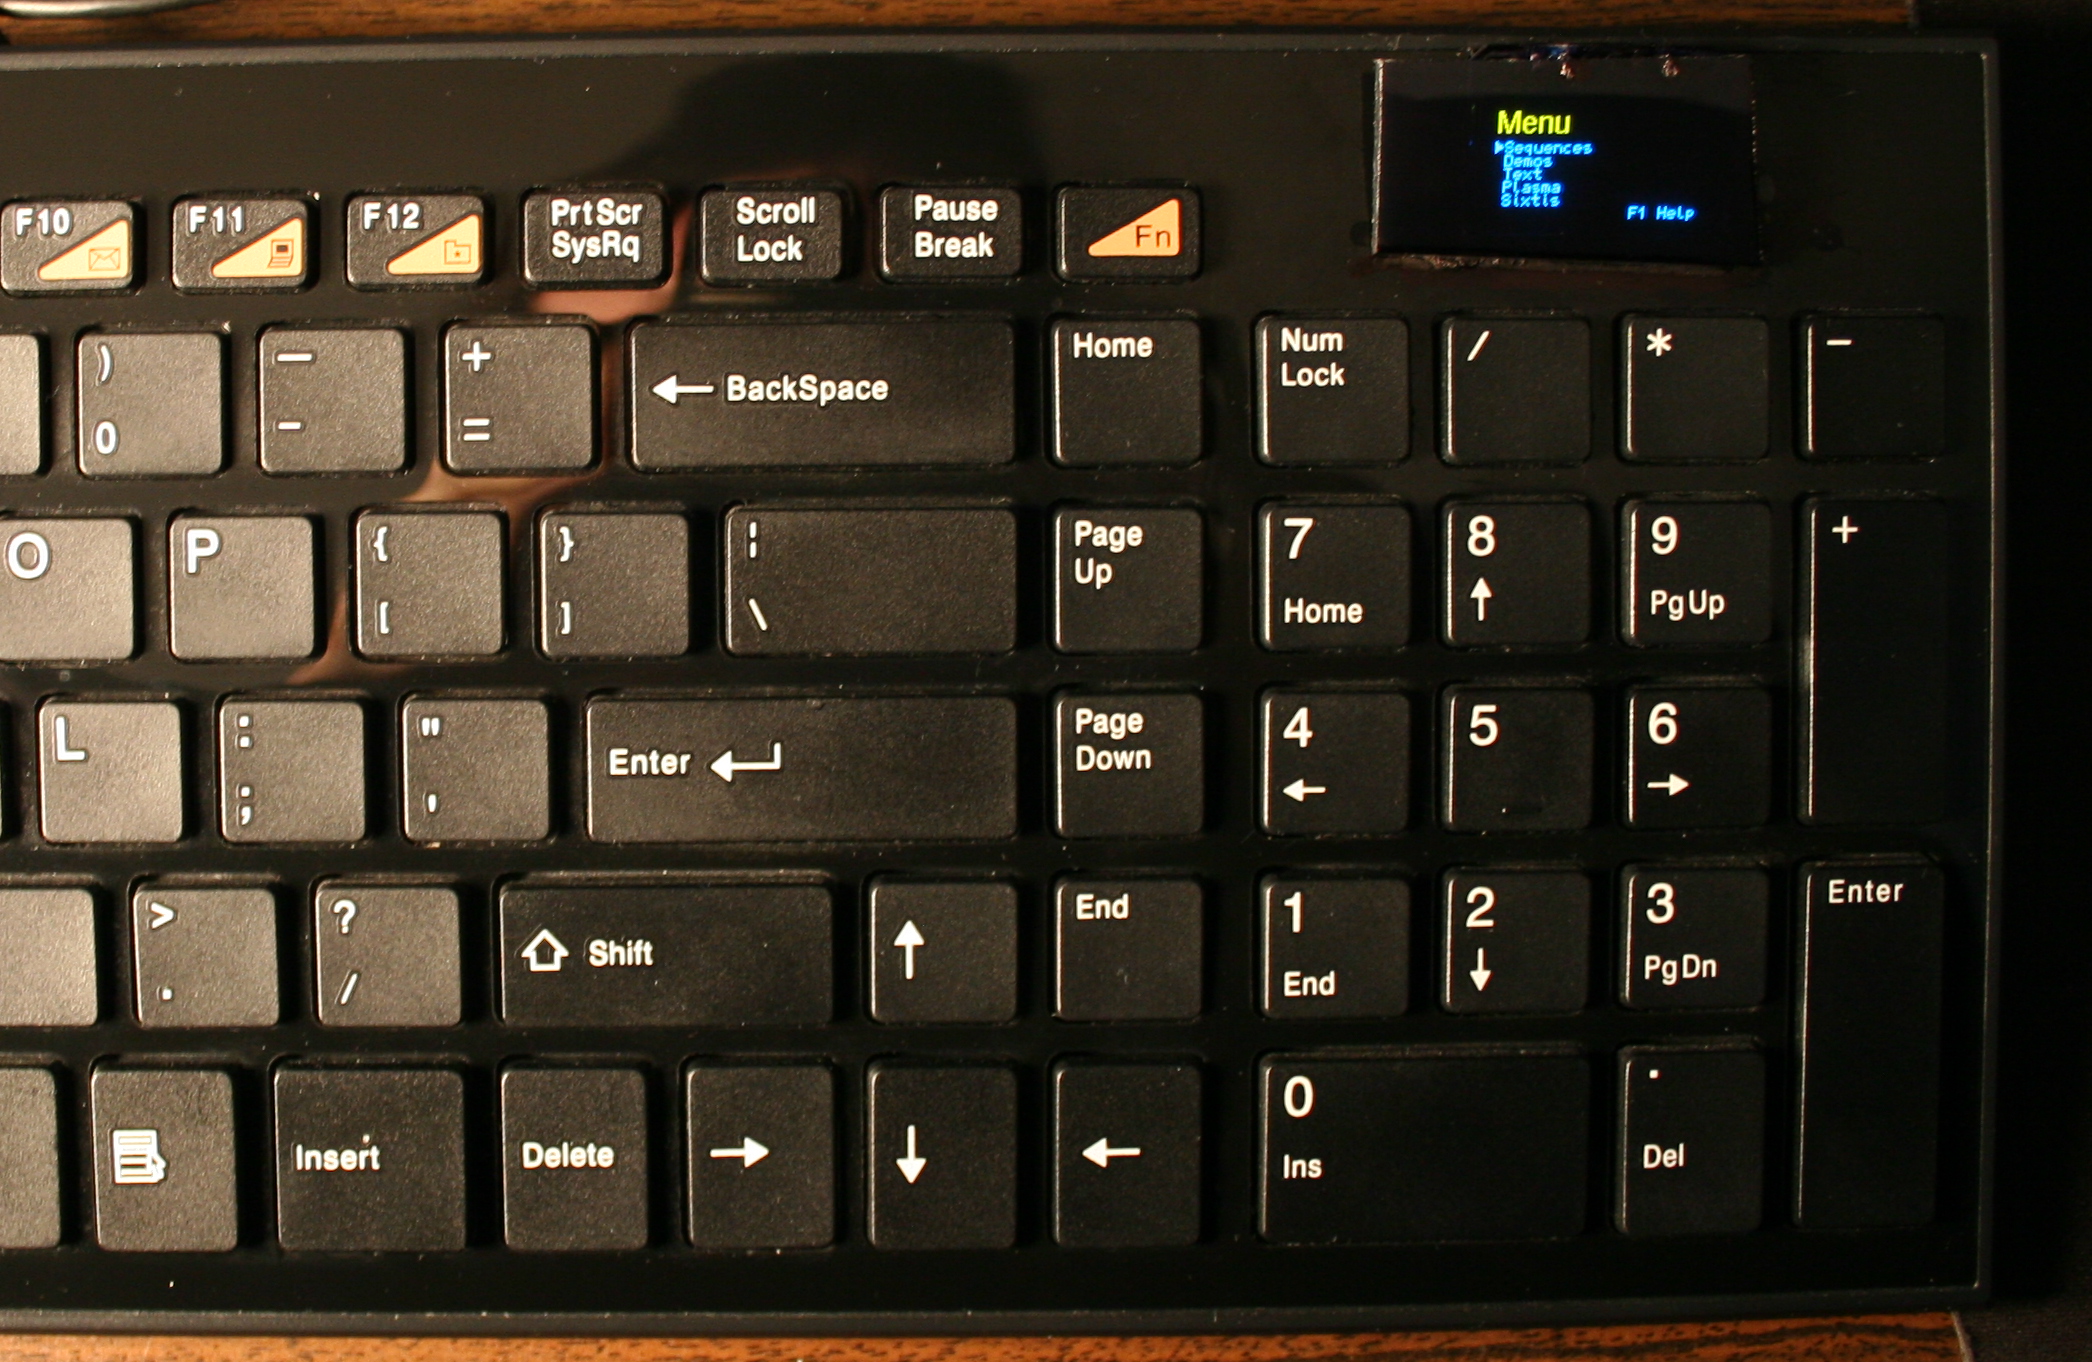
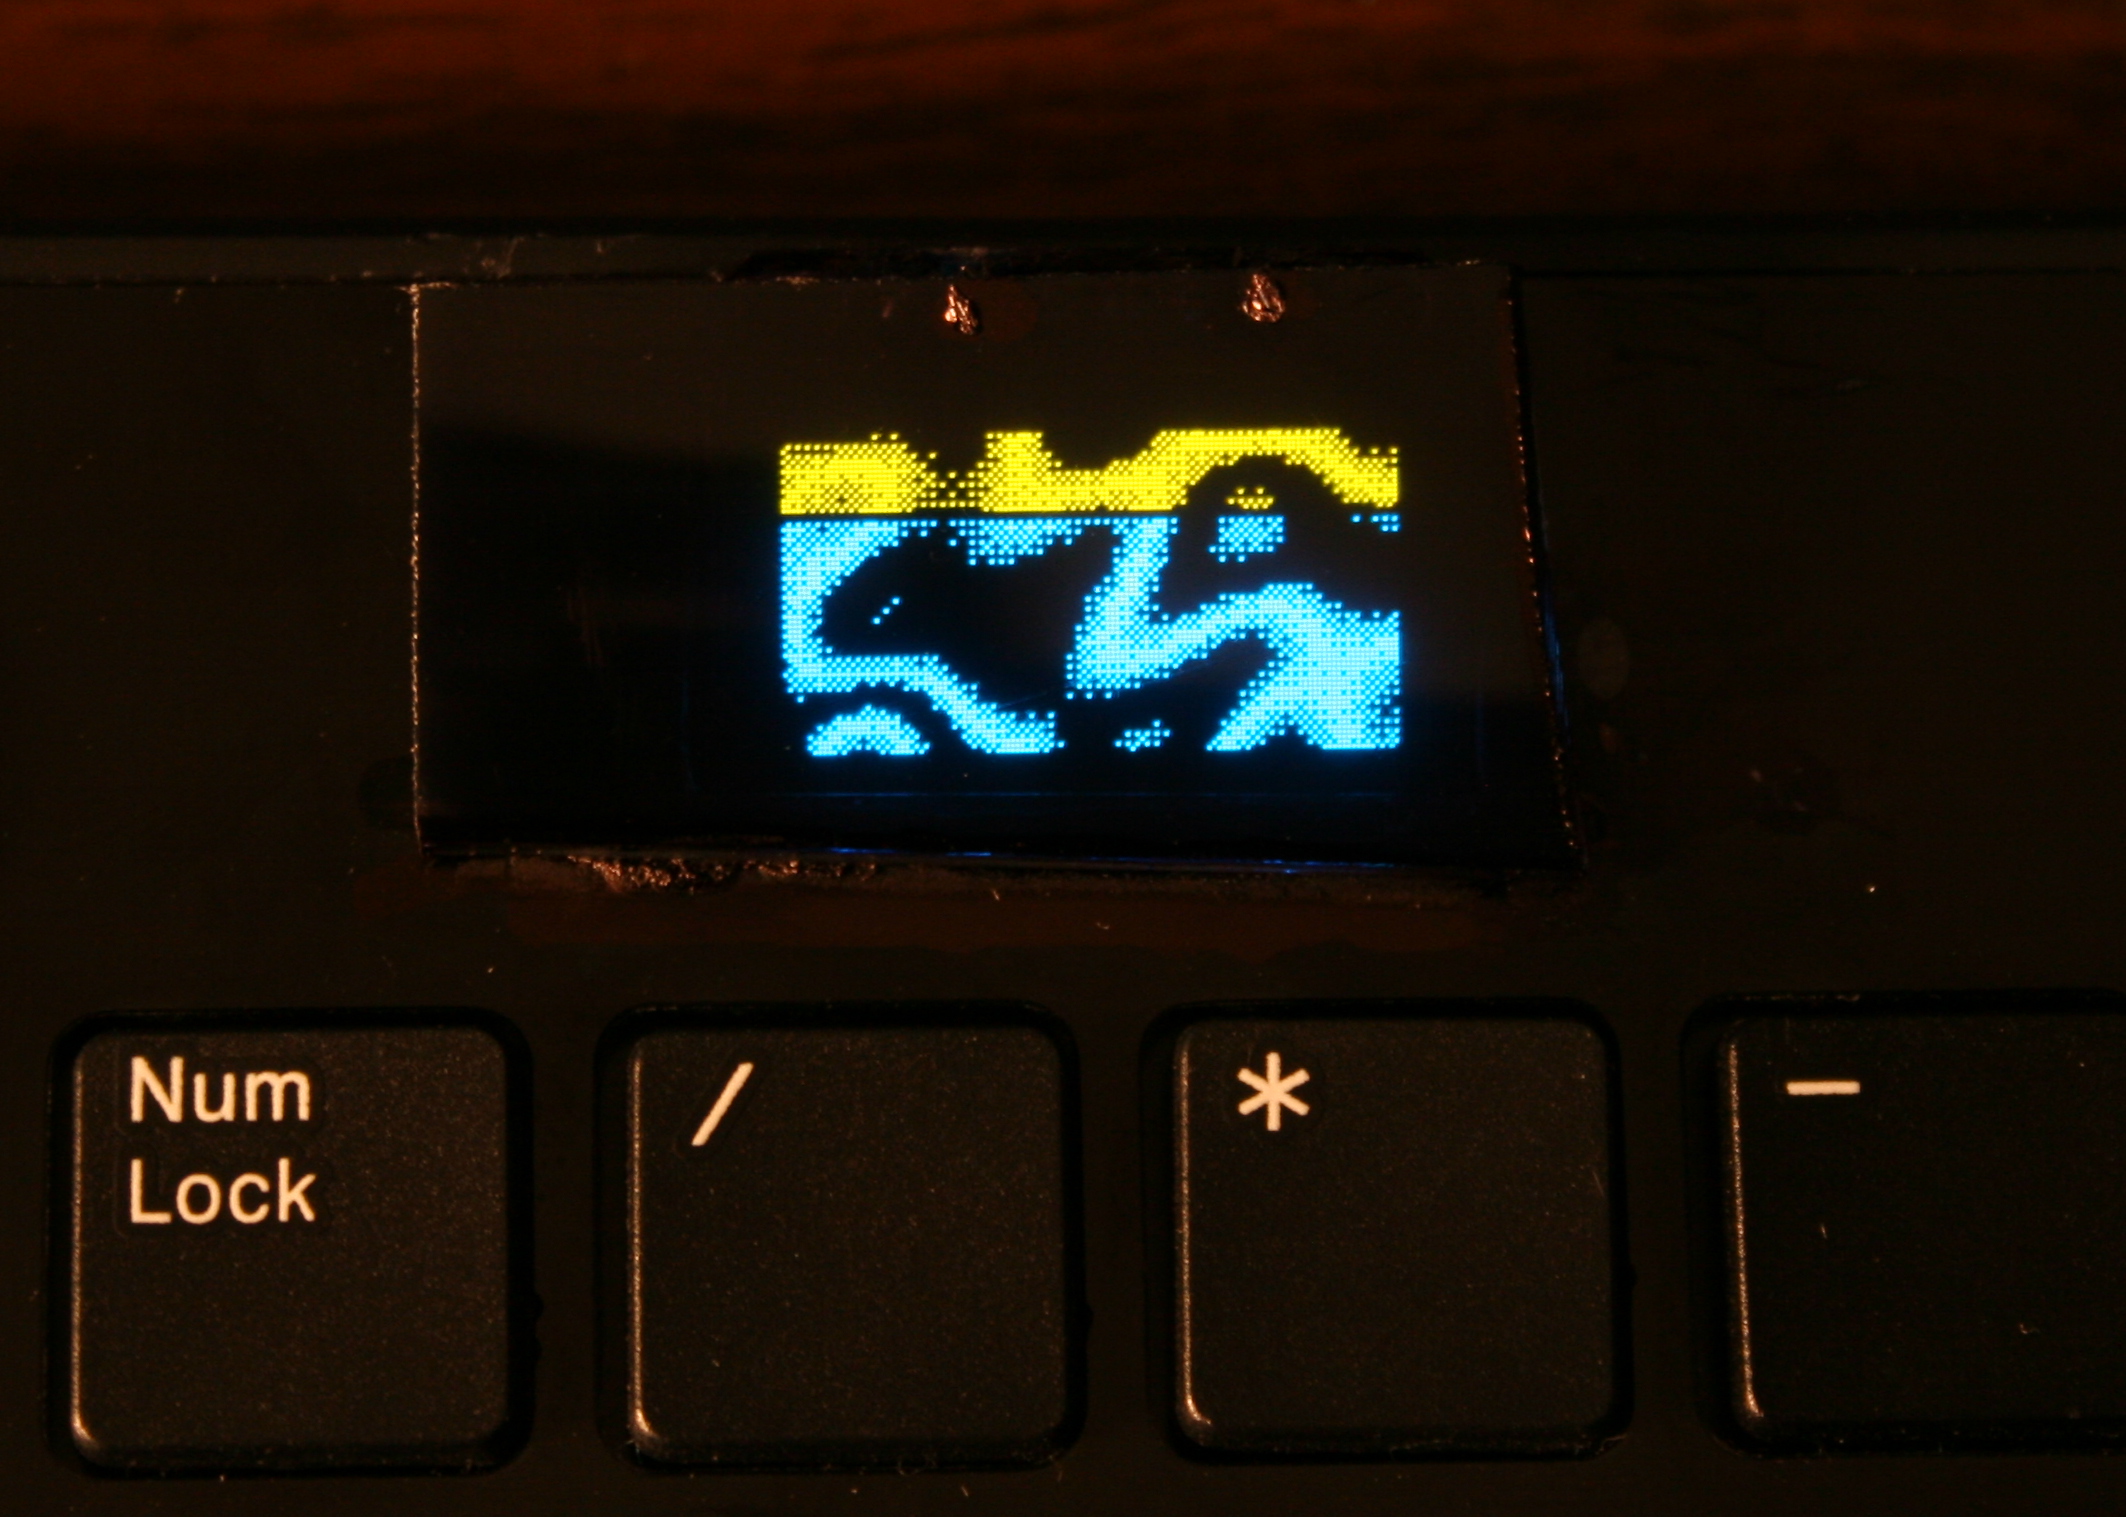
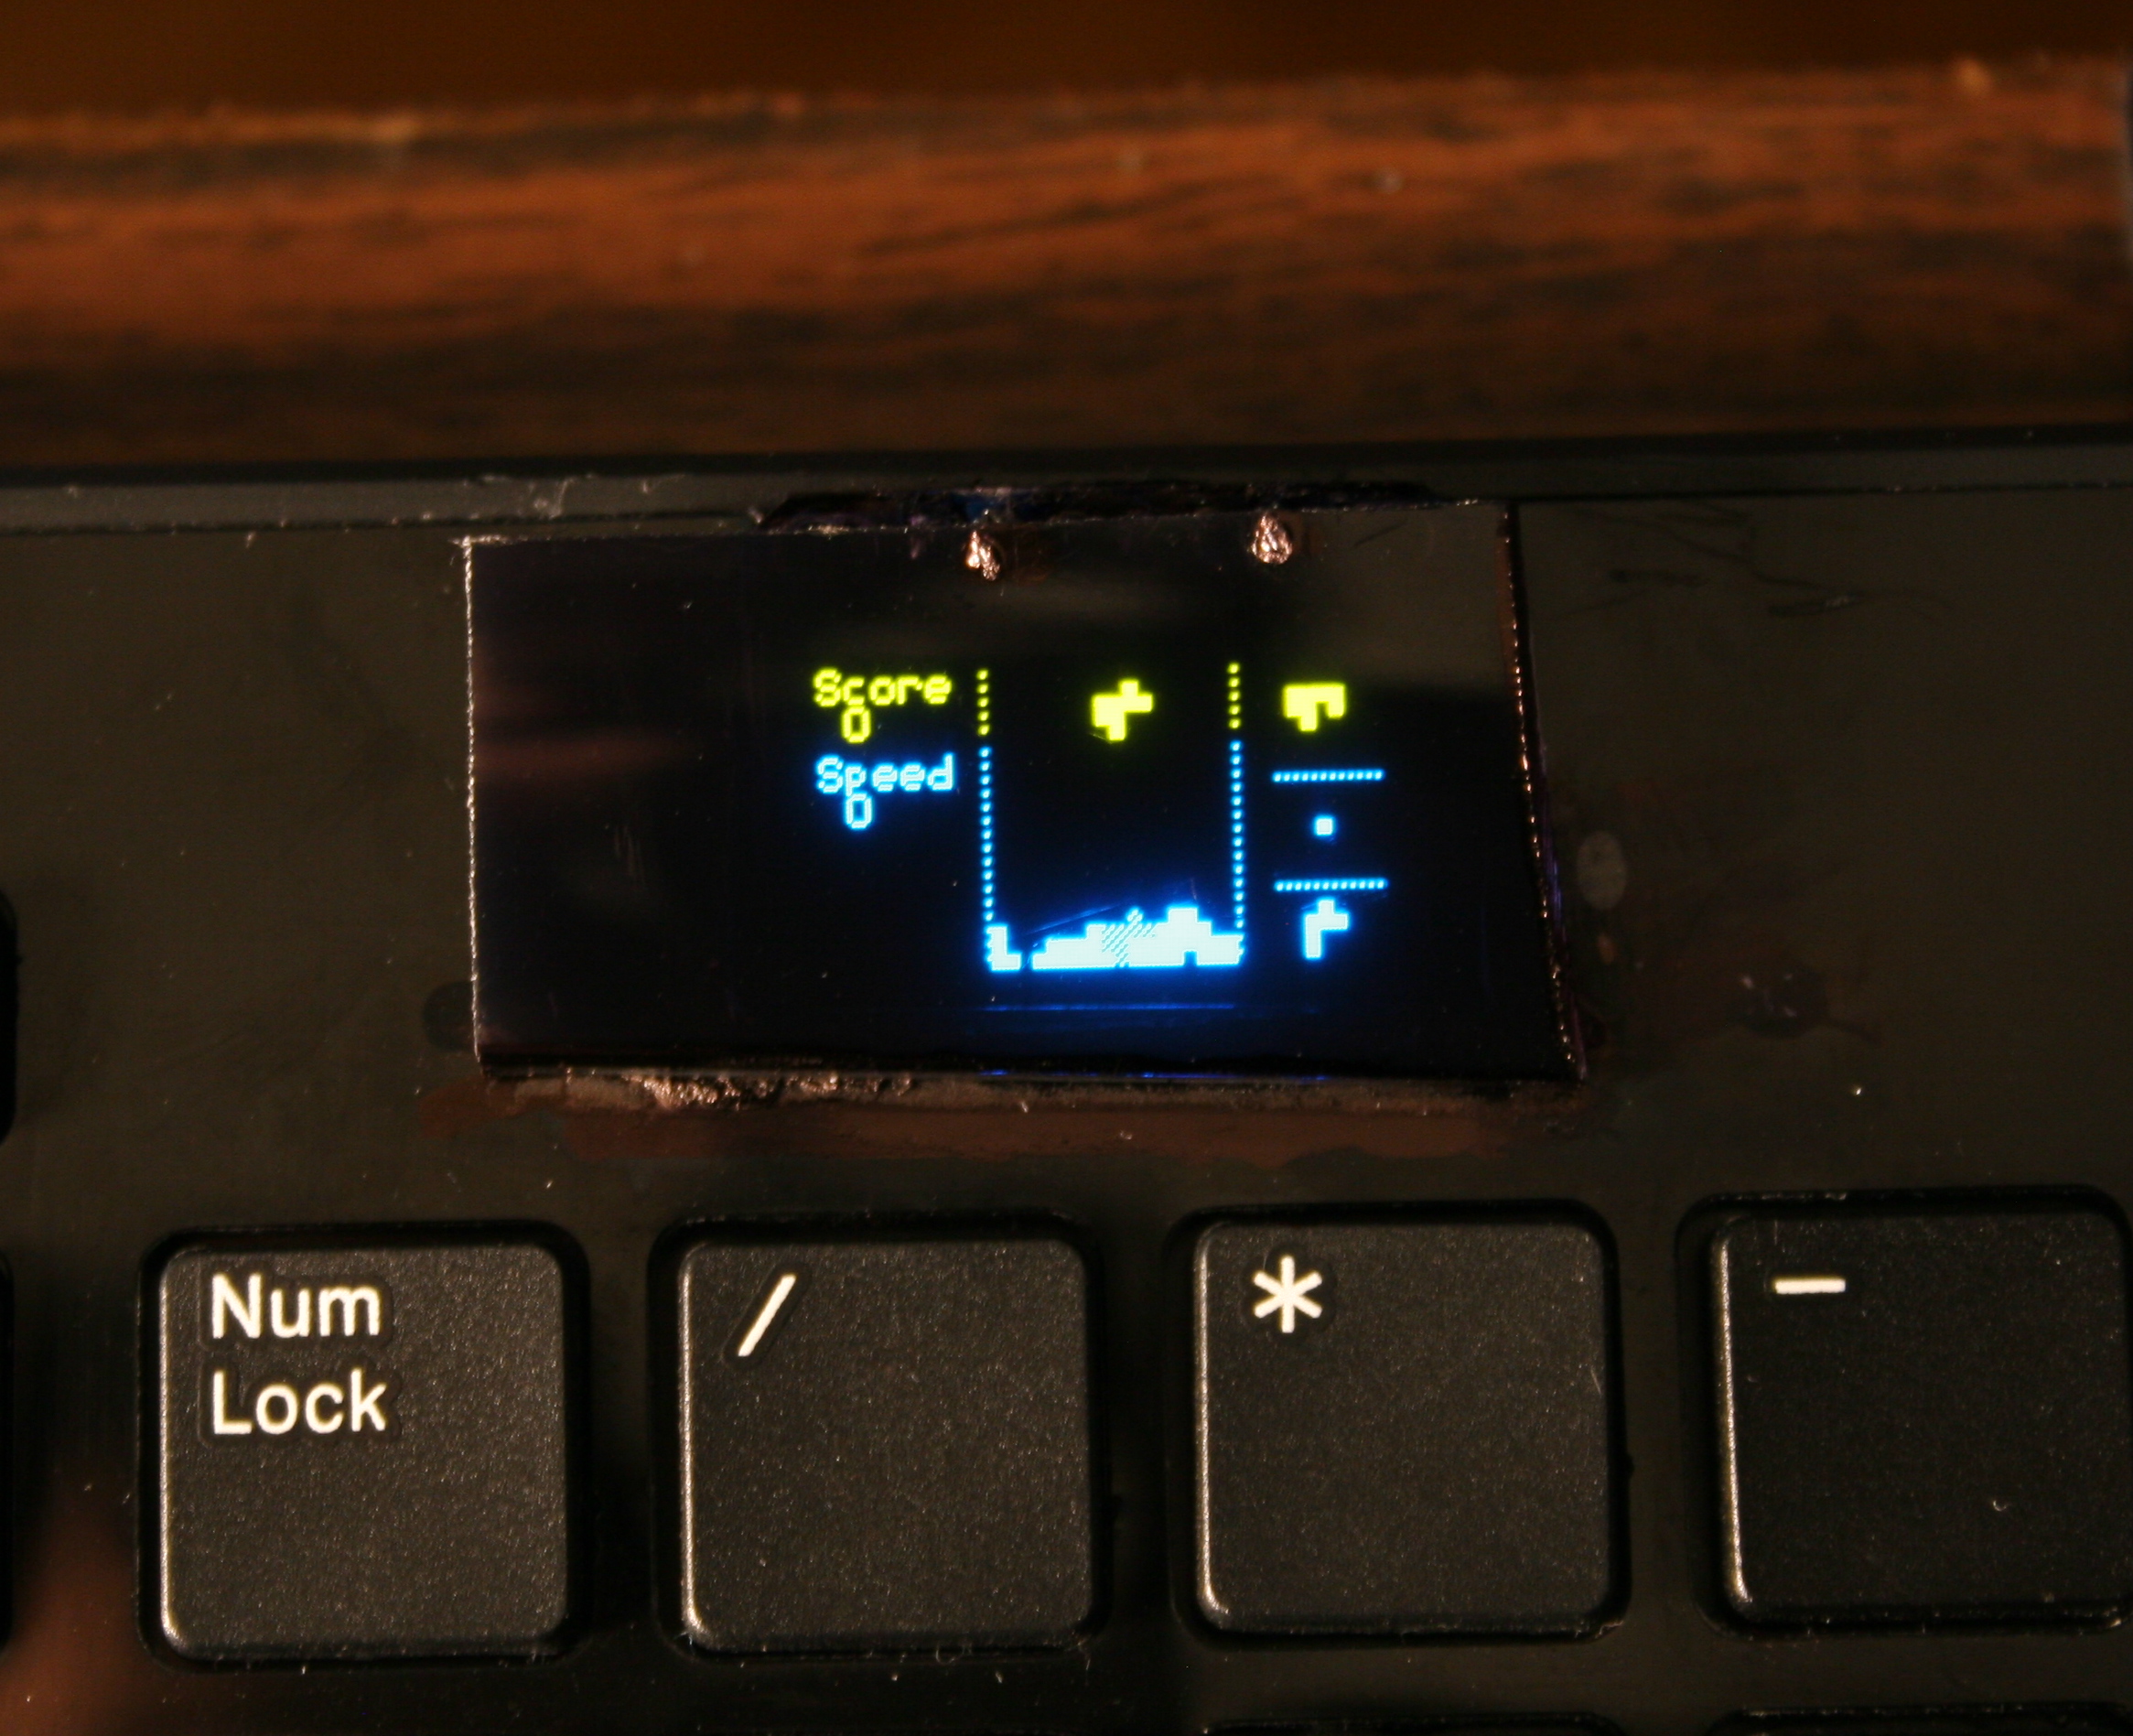
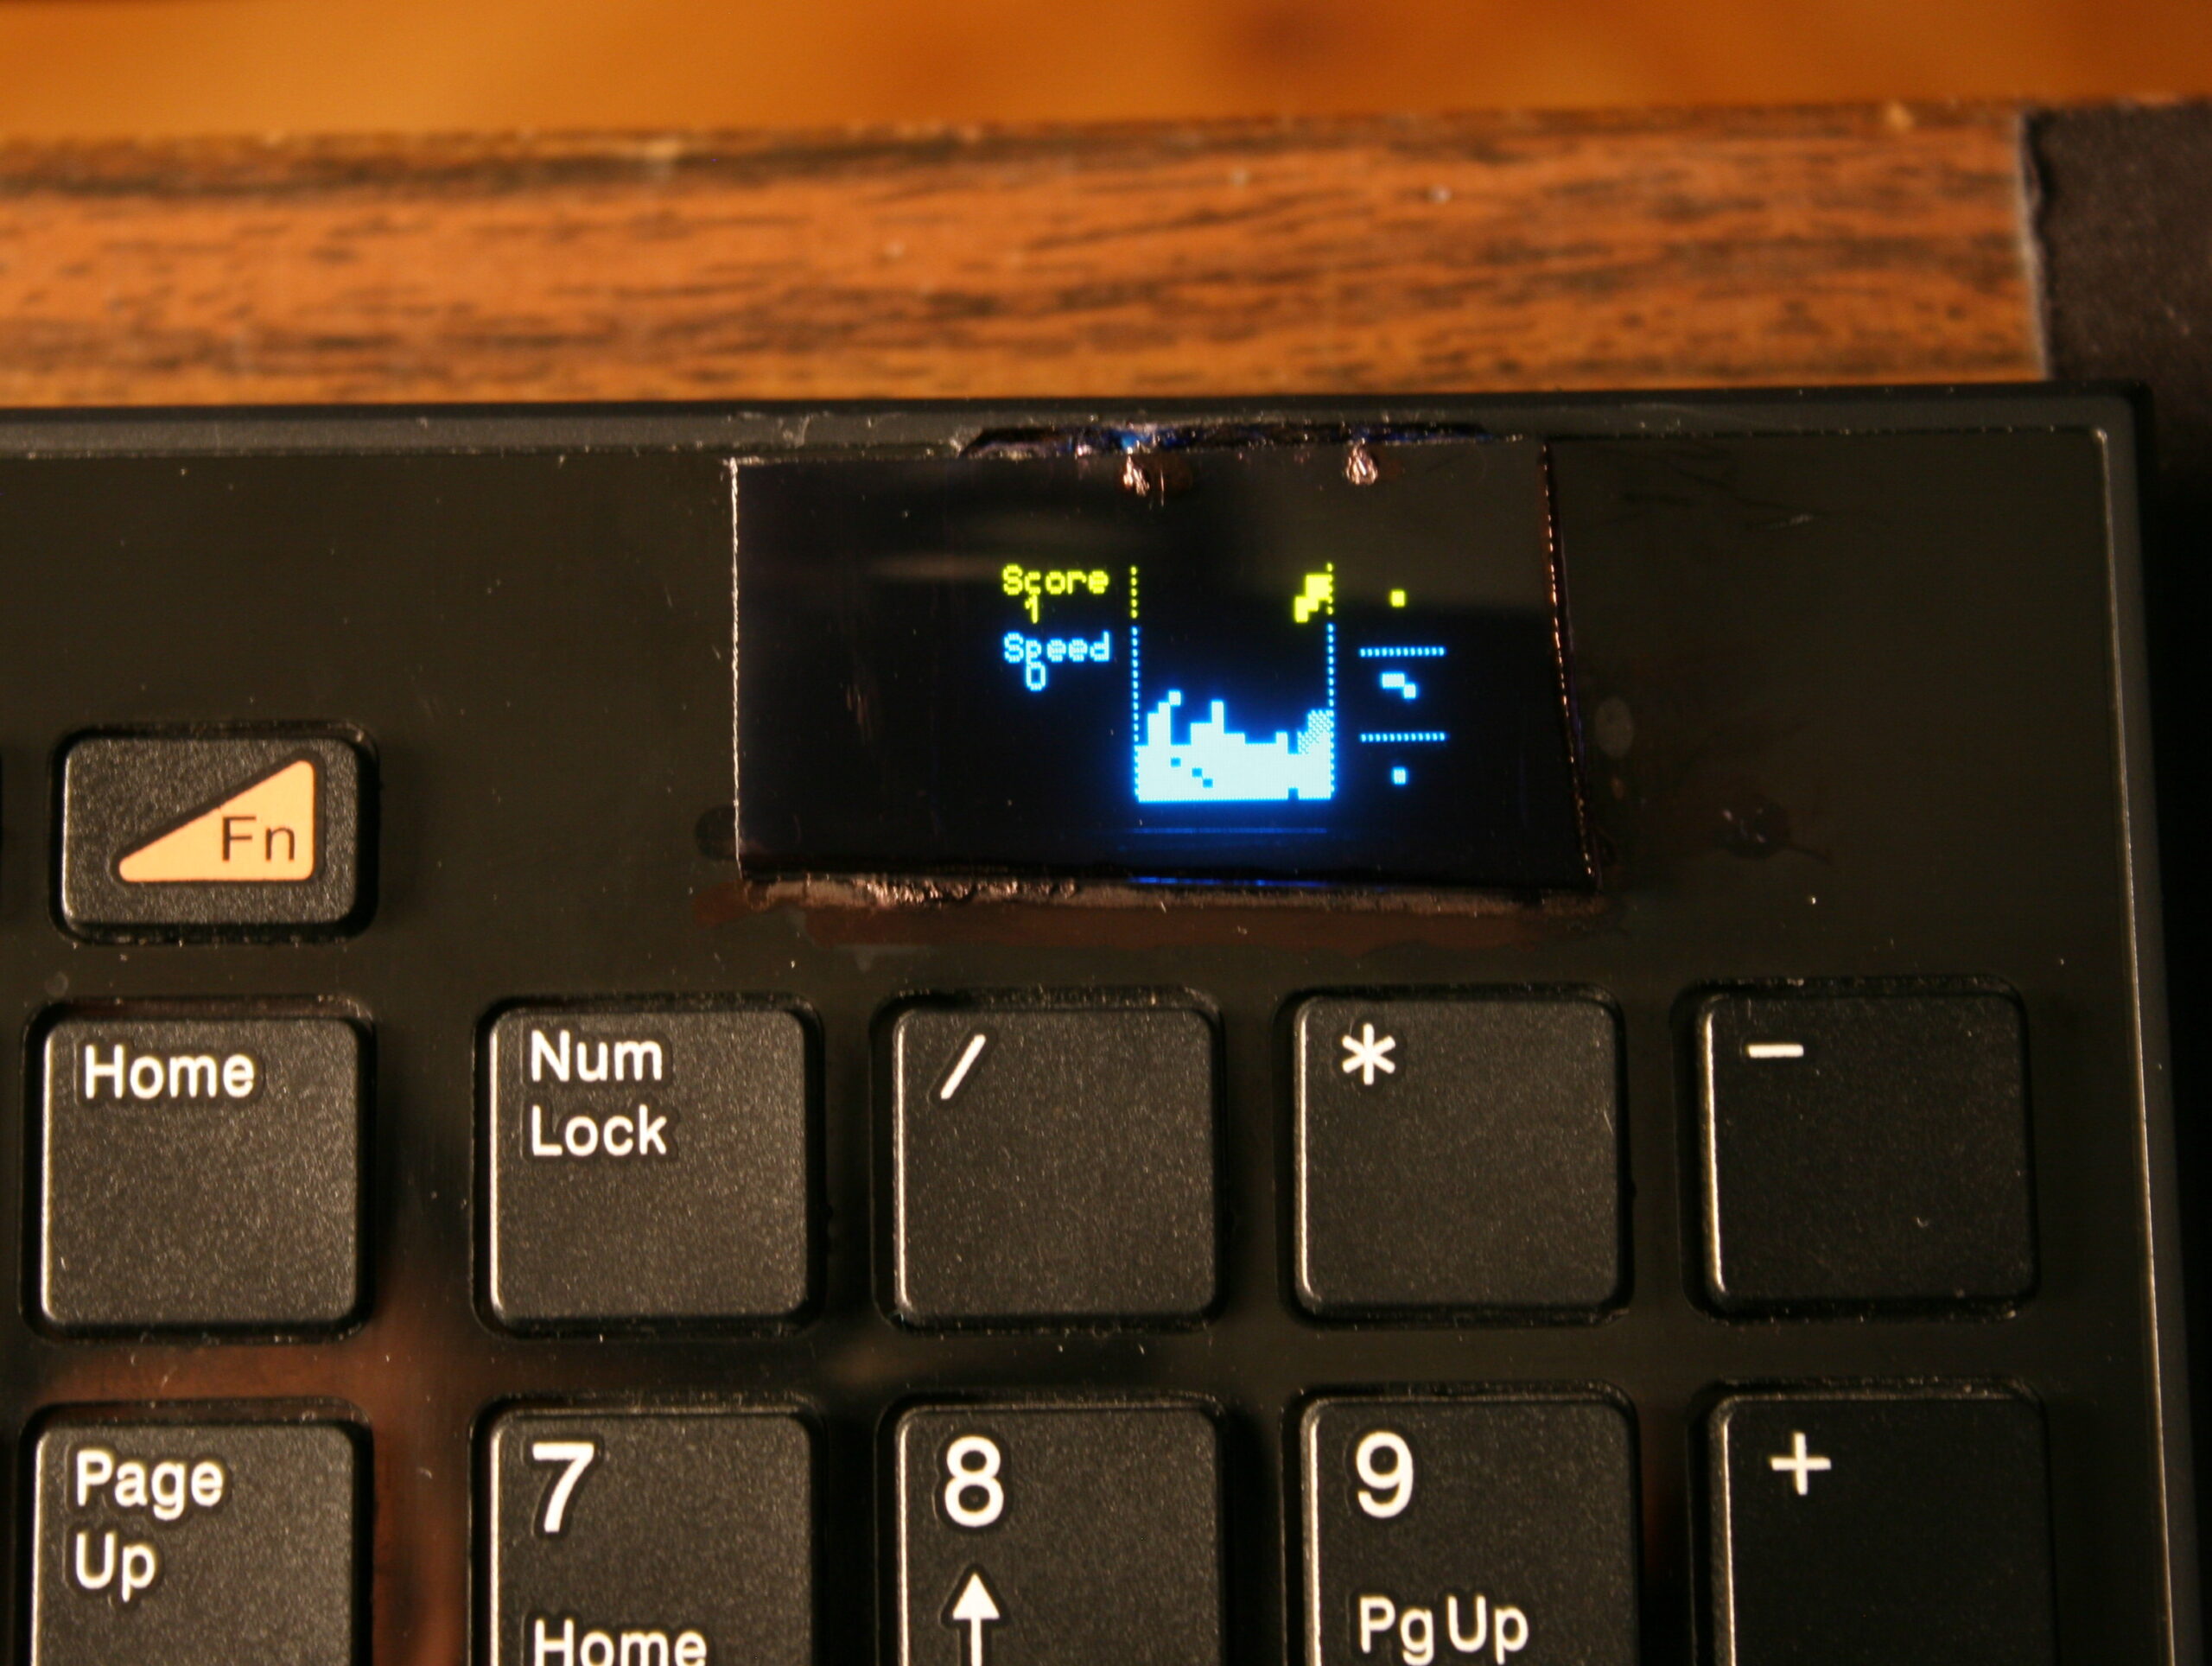
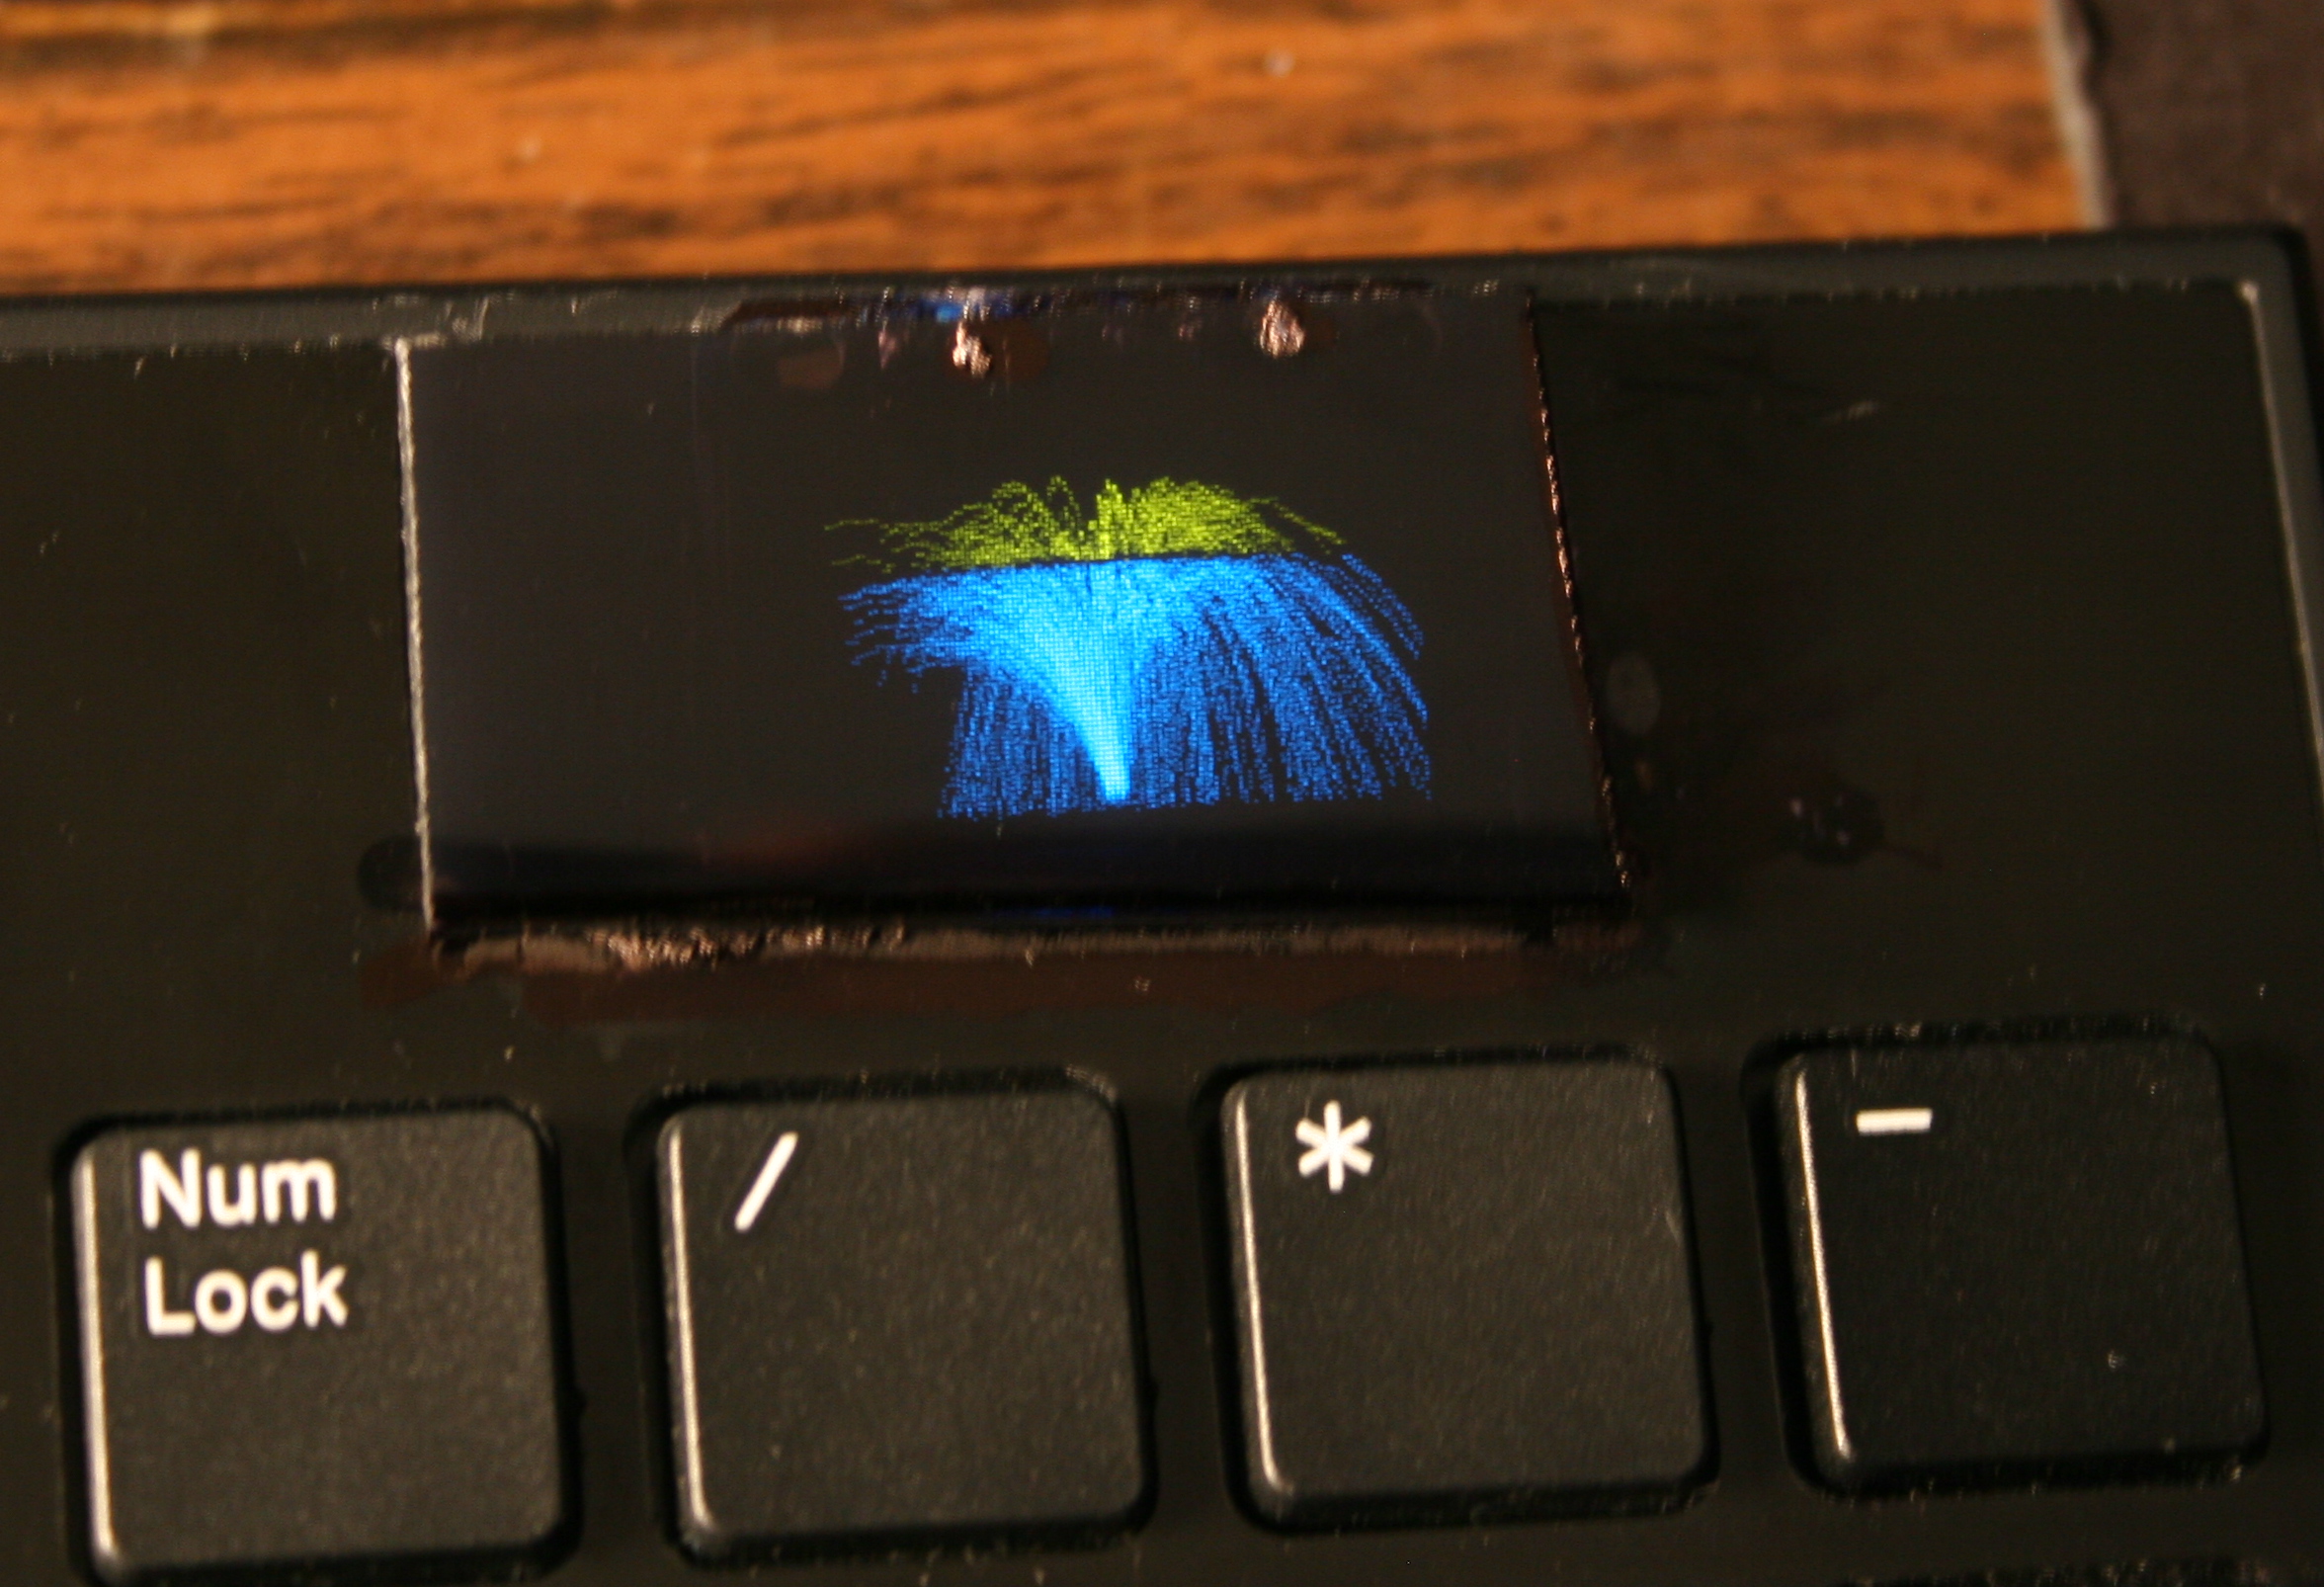
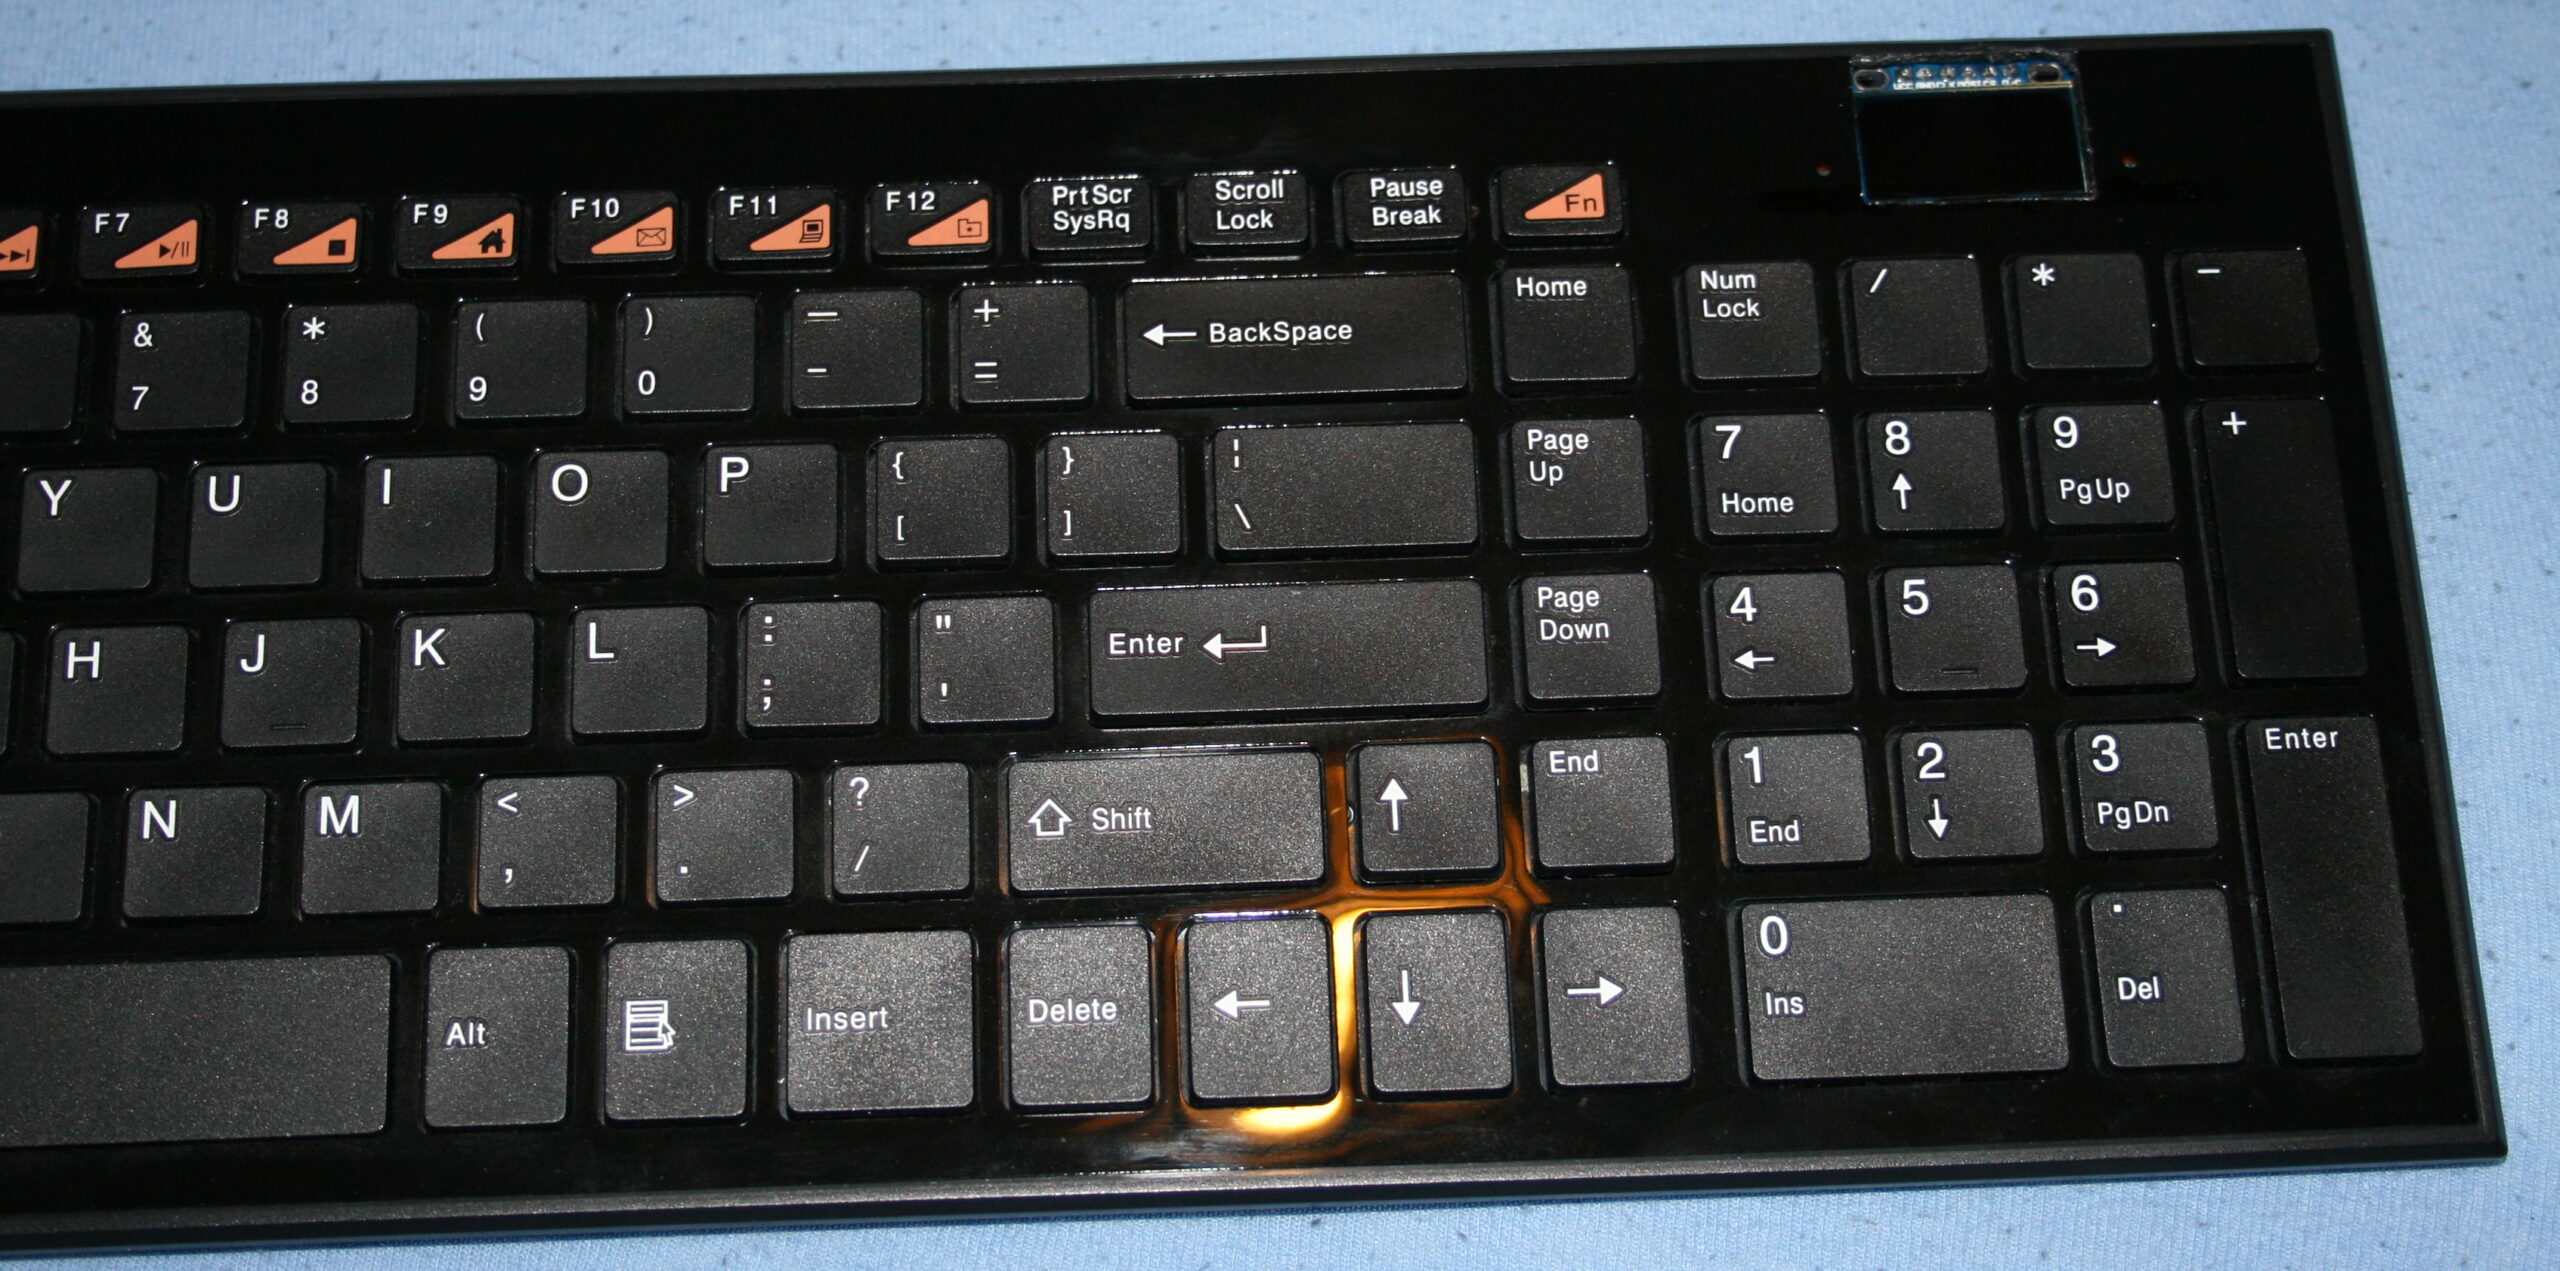
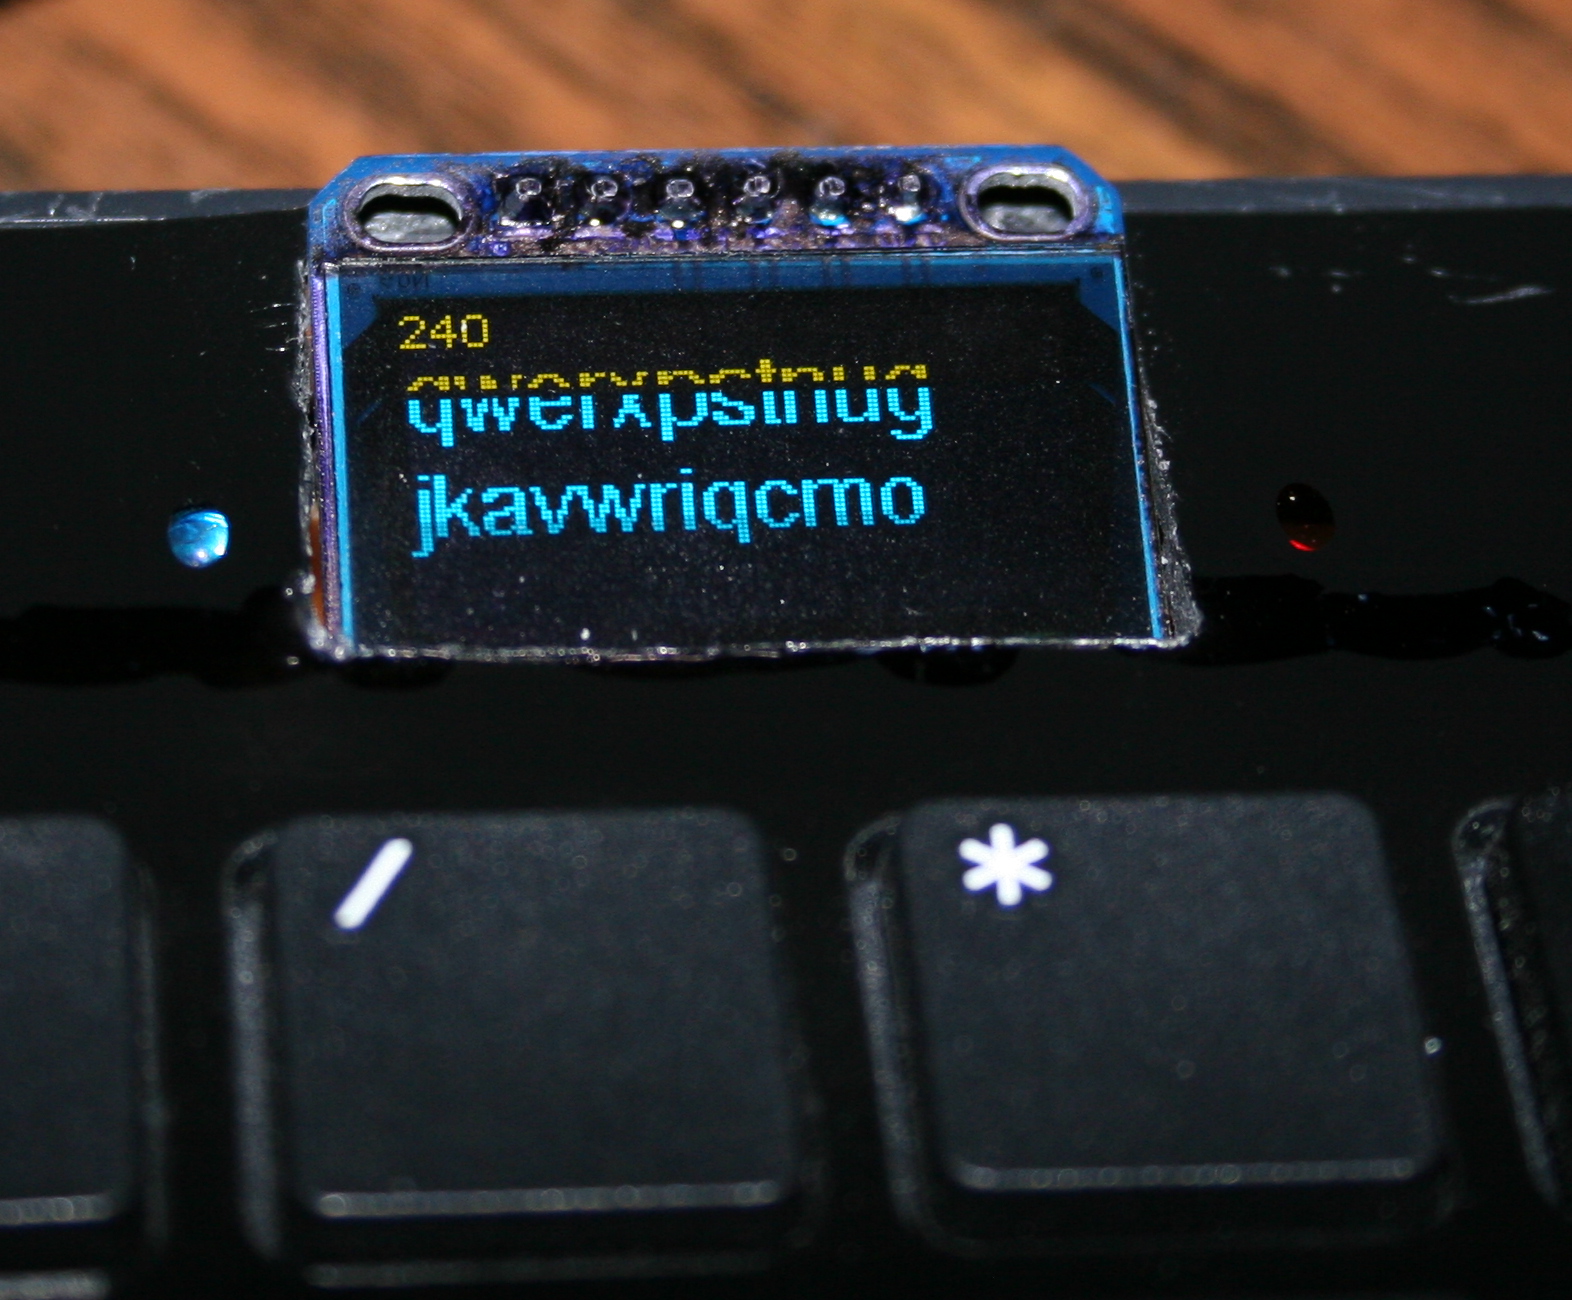
OLED display, 1 inch small, 128 x 64 mono (top yellow, rest blue, SSD1306, SPI). For Gui menu with list of all outputs, and details on top, for one selected.
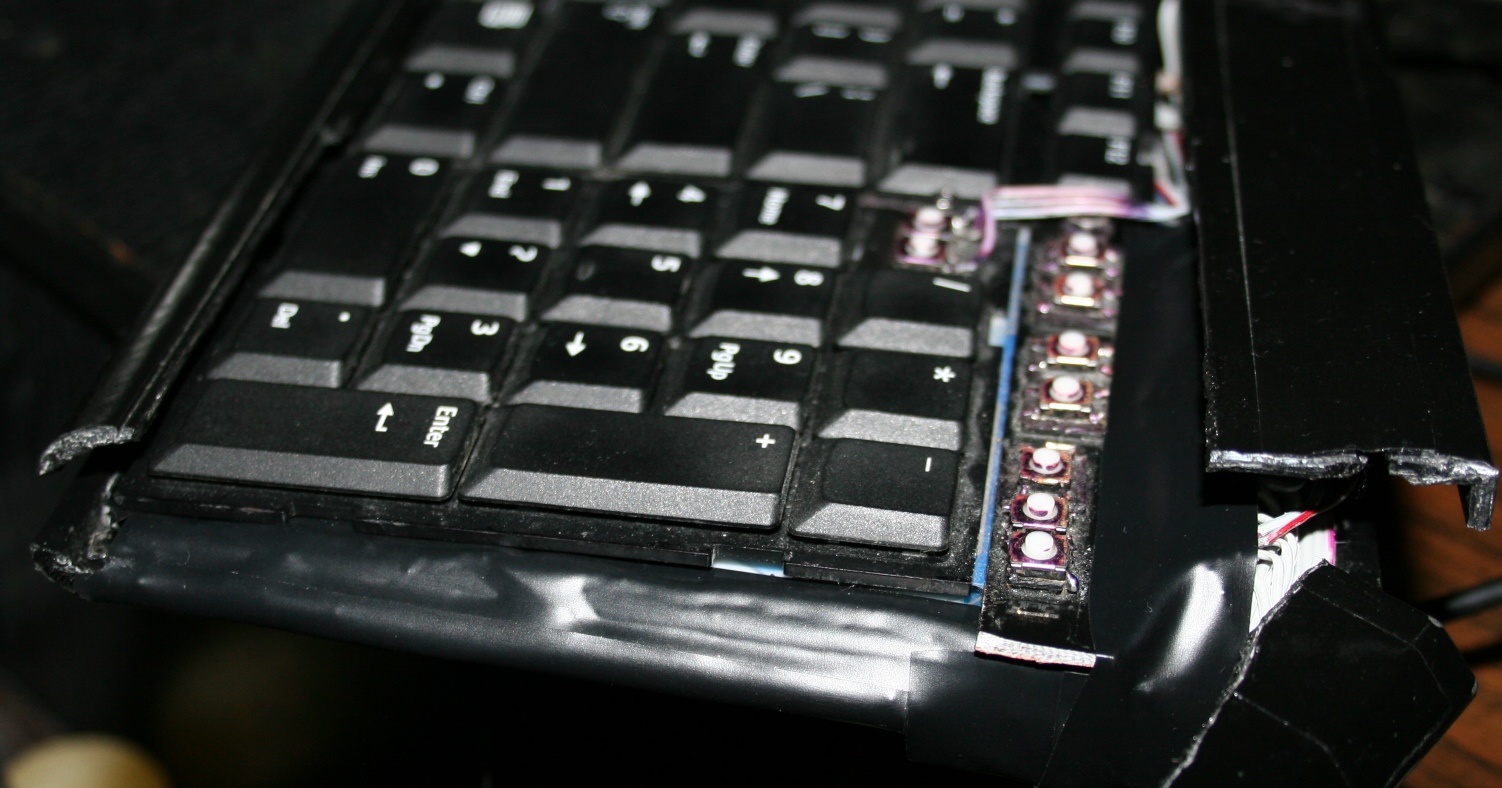
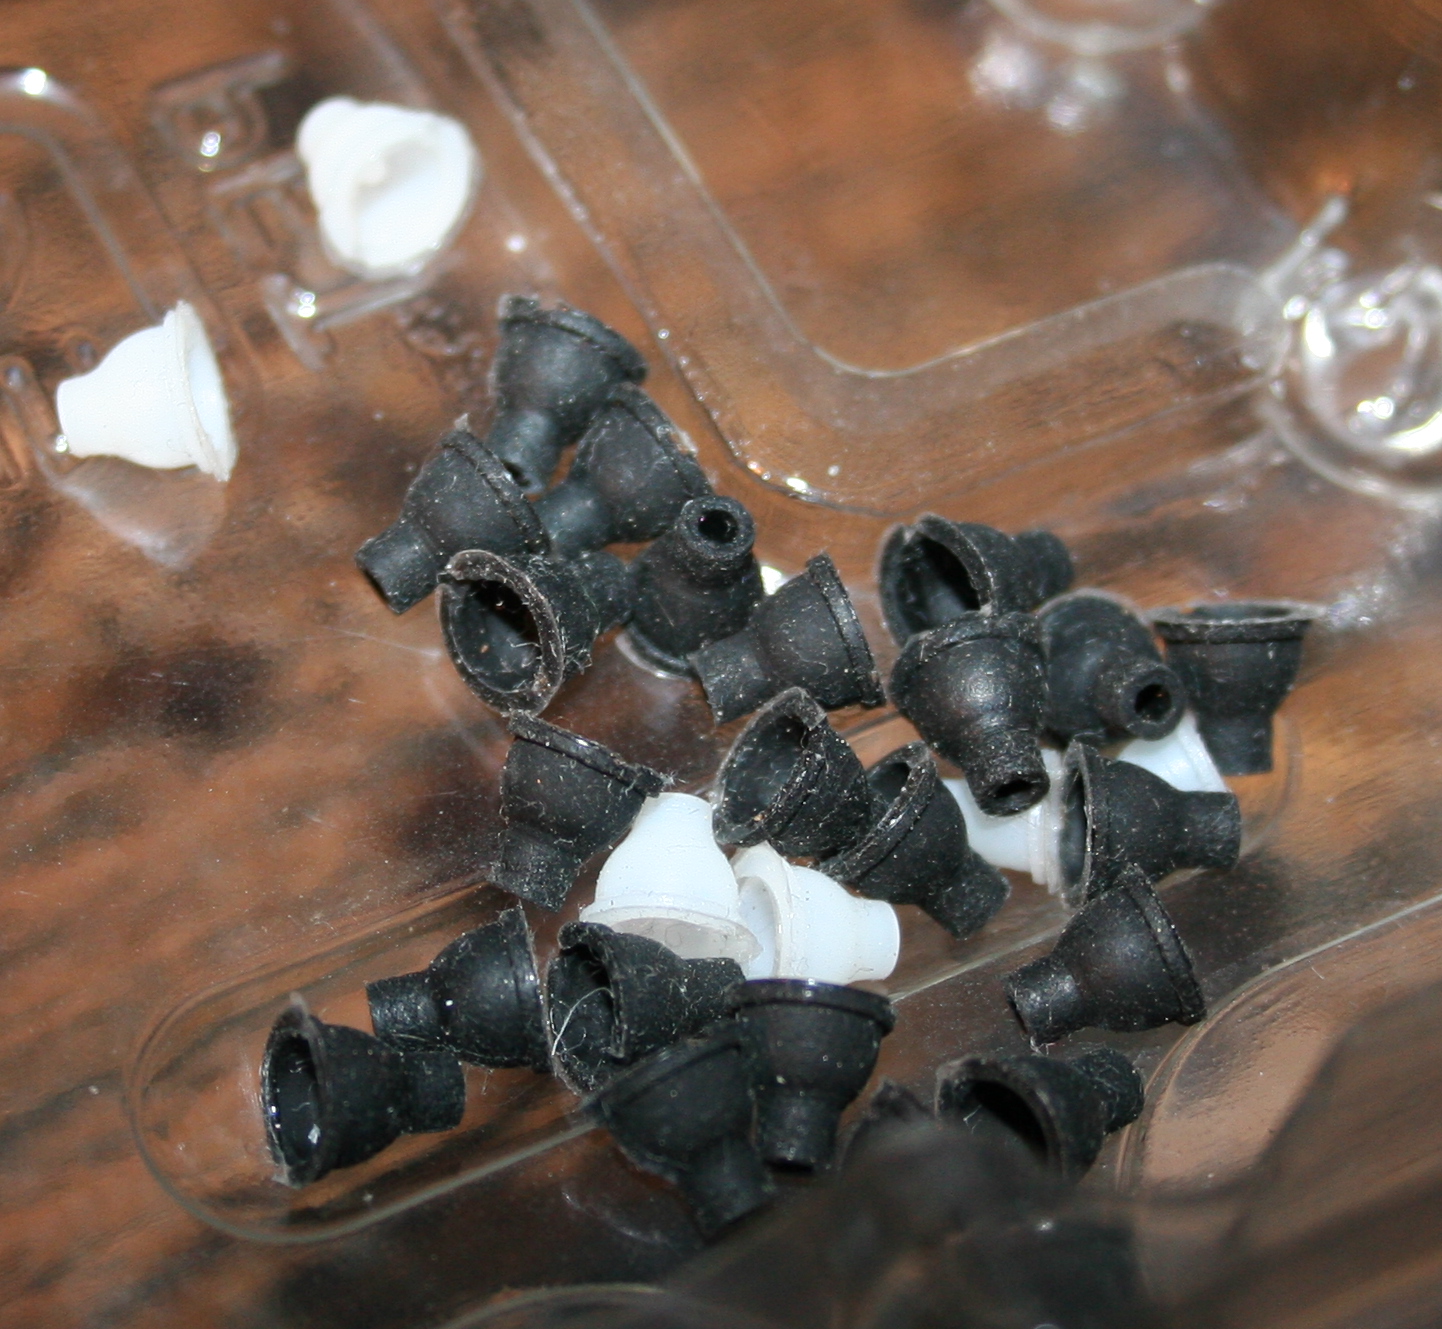
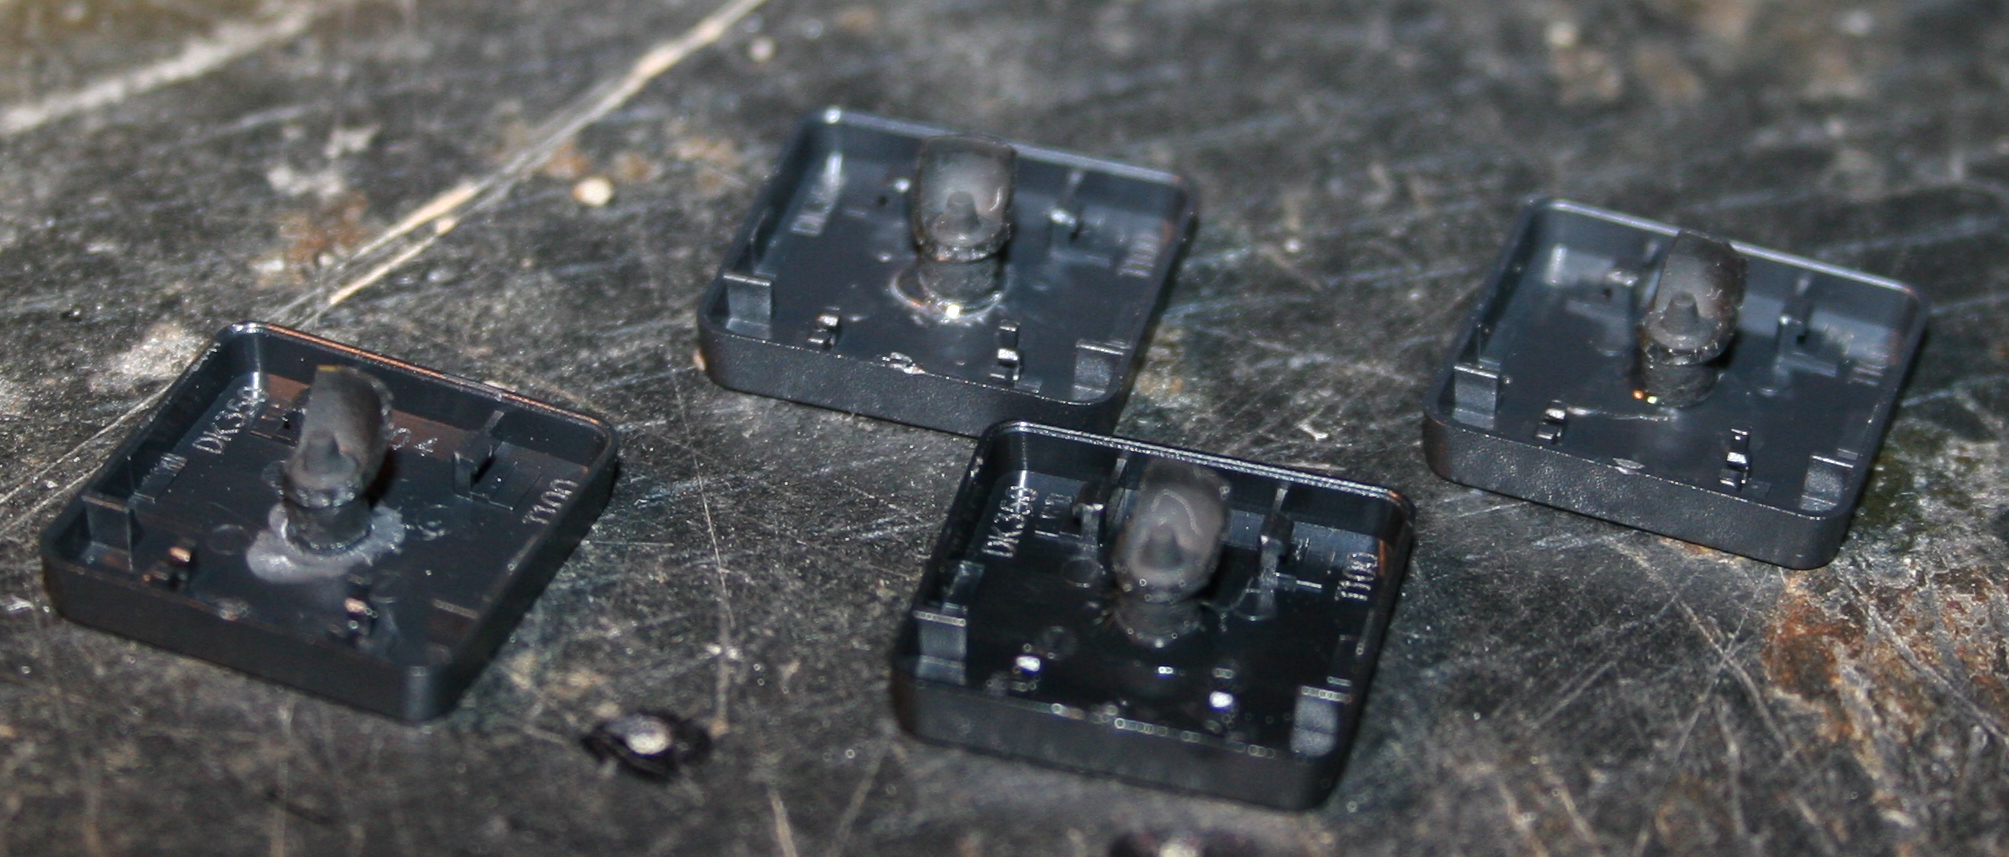
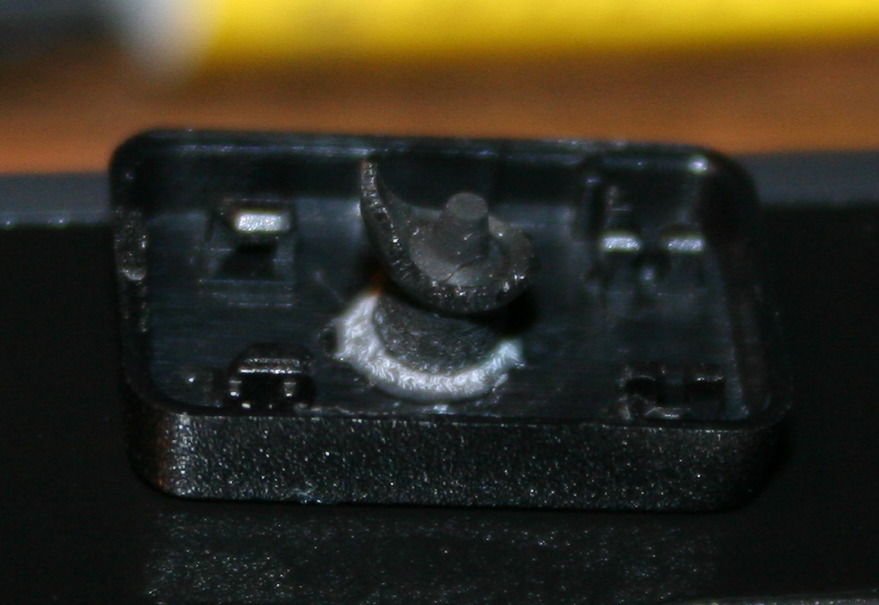
Few buttons, to navigate Gui and change values. Using 8 microswitches (lightest 0,5N press force). The 8 Keys are: Up, Down in list, On/Off toggle, Dec -, Inc + value, toggle Gui auto hide, toggle mode (bright or balance for lamp), toggle all lights.
Outputs:
🛋️LED lamp (has 2 pins yellowish and blueish) with balance value to adjust between warm white and cold.
💡3 LED lights (left, down and top) – on/off and adjusting their brightness (PWM outputs).
🔉Audio DAC output to: speakers / headphones / bathroom (using 2 double relays, and 12V from PC PSU).
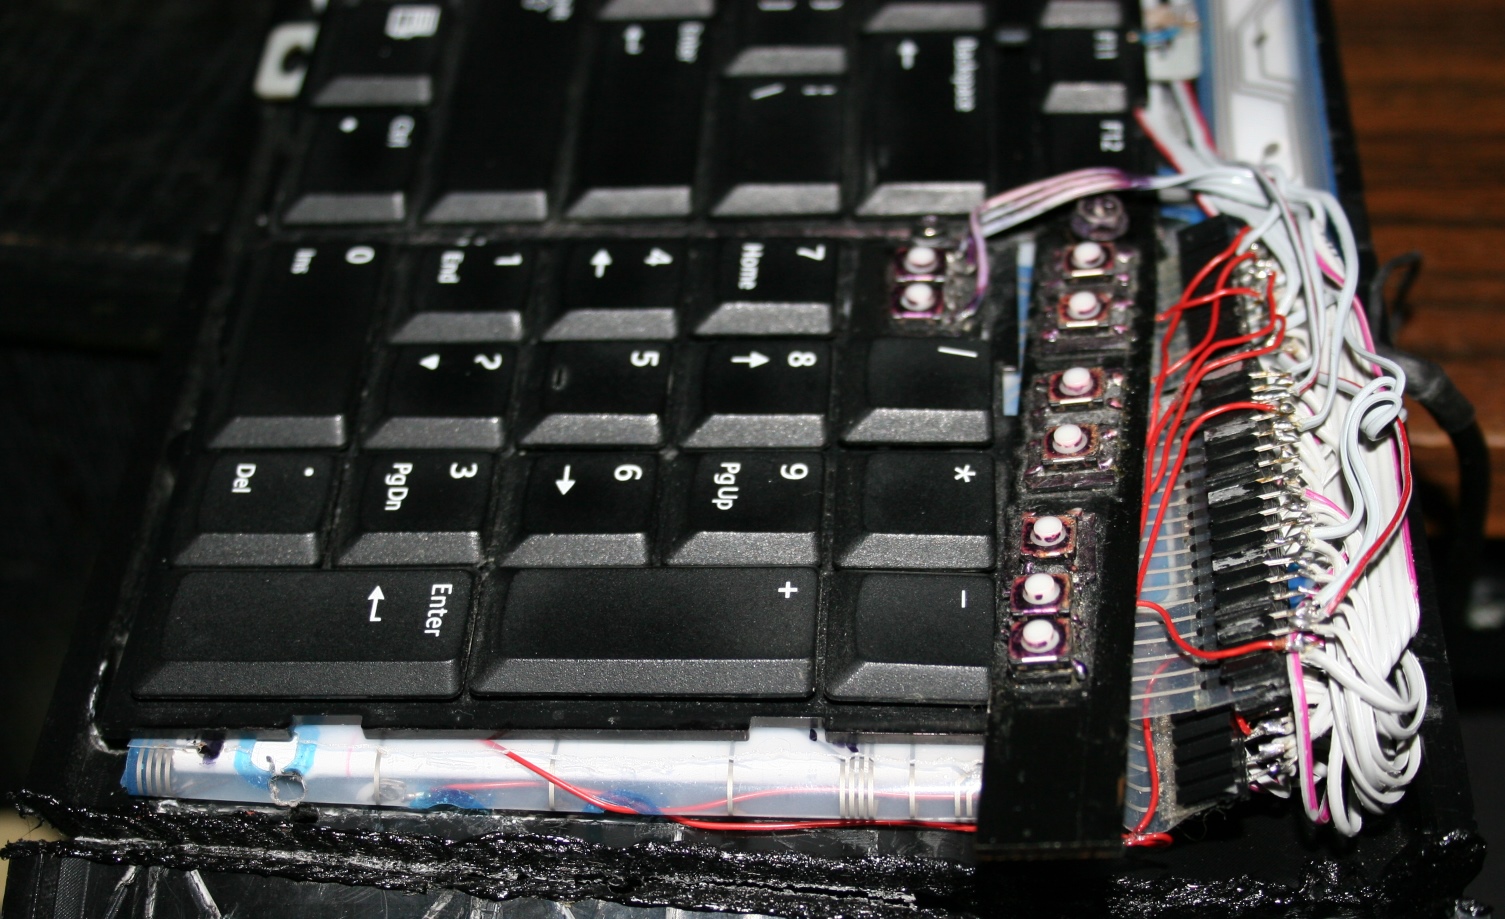
⌨️USB switch. A relay directs 5V from PC PSU to my own USB switch that directs 2 USB (keyboard and mouse) between either PC or laptop. The switch uses 6 relays (5V), not best, as it needs about 3W when on.
Just as a place to mount my 2 other important buttons:
LCD monitor input switch
PC power on/off
If I’m not using a 2nd PC (laptop) then LCD monitor input switch and USB switch aren’t needed.
📷Gallery
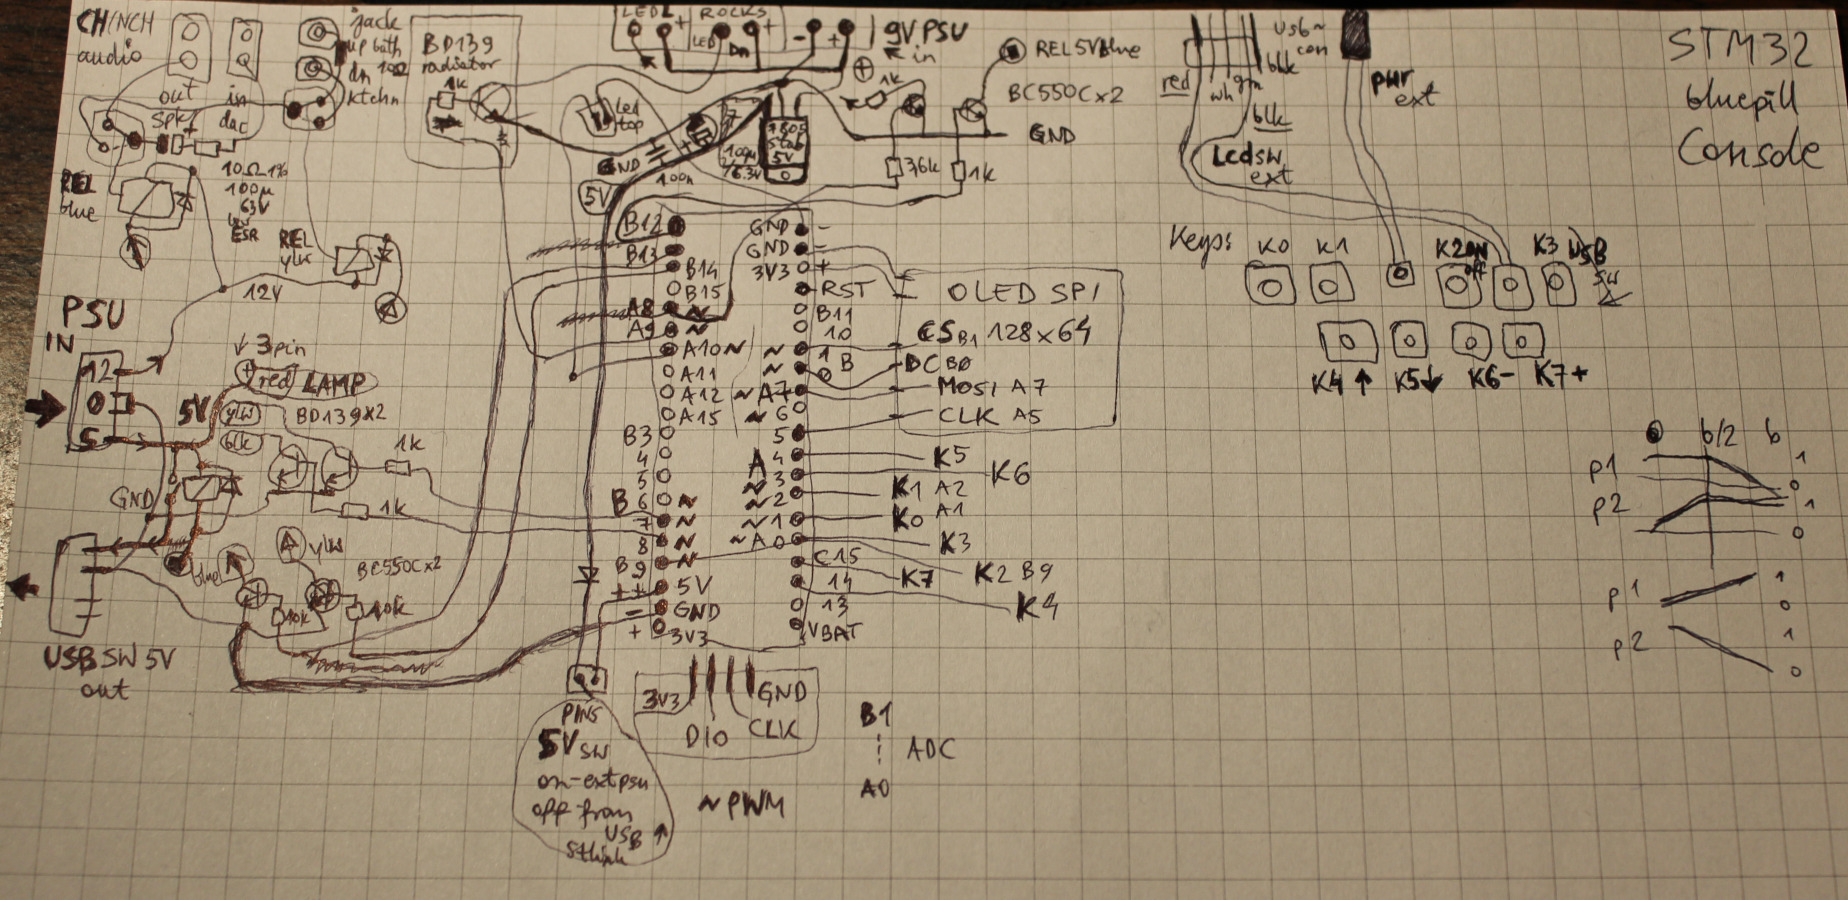
Including pictures with: rough schematic on paper, the cloth normally covering it, and its location left of my keyboard. At end also old version from 2022, very similar.
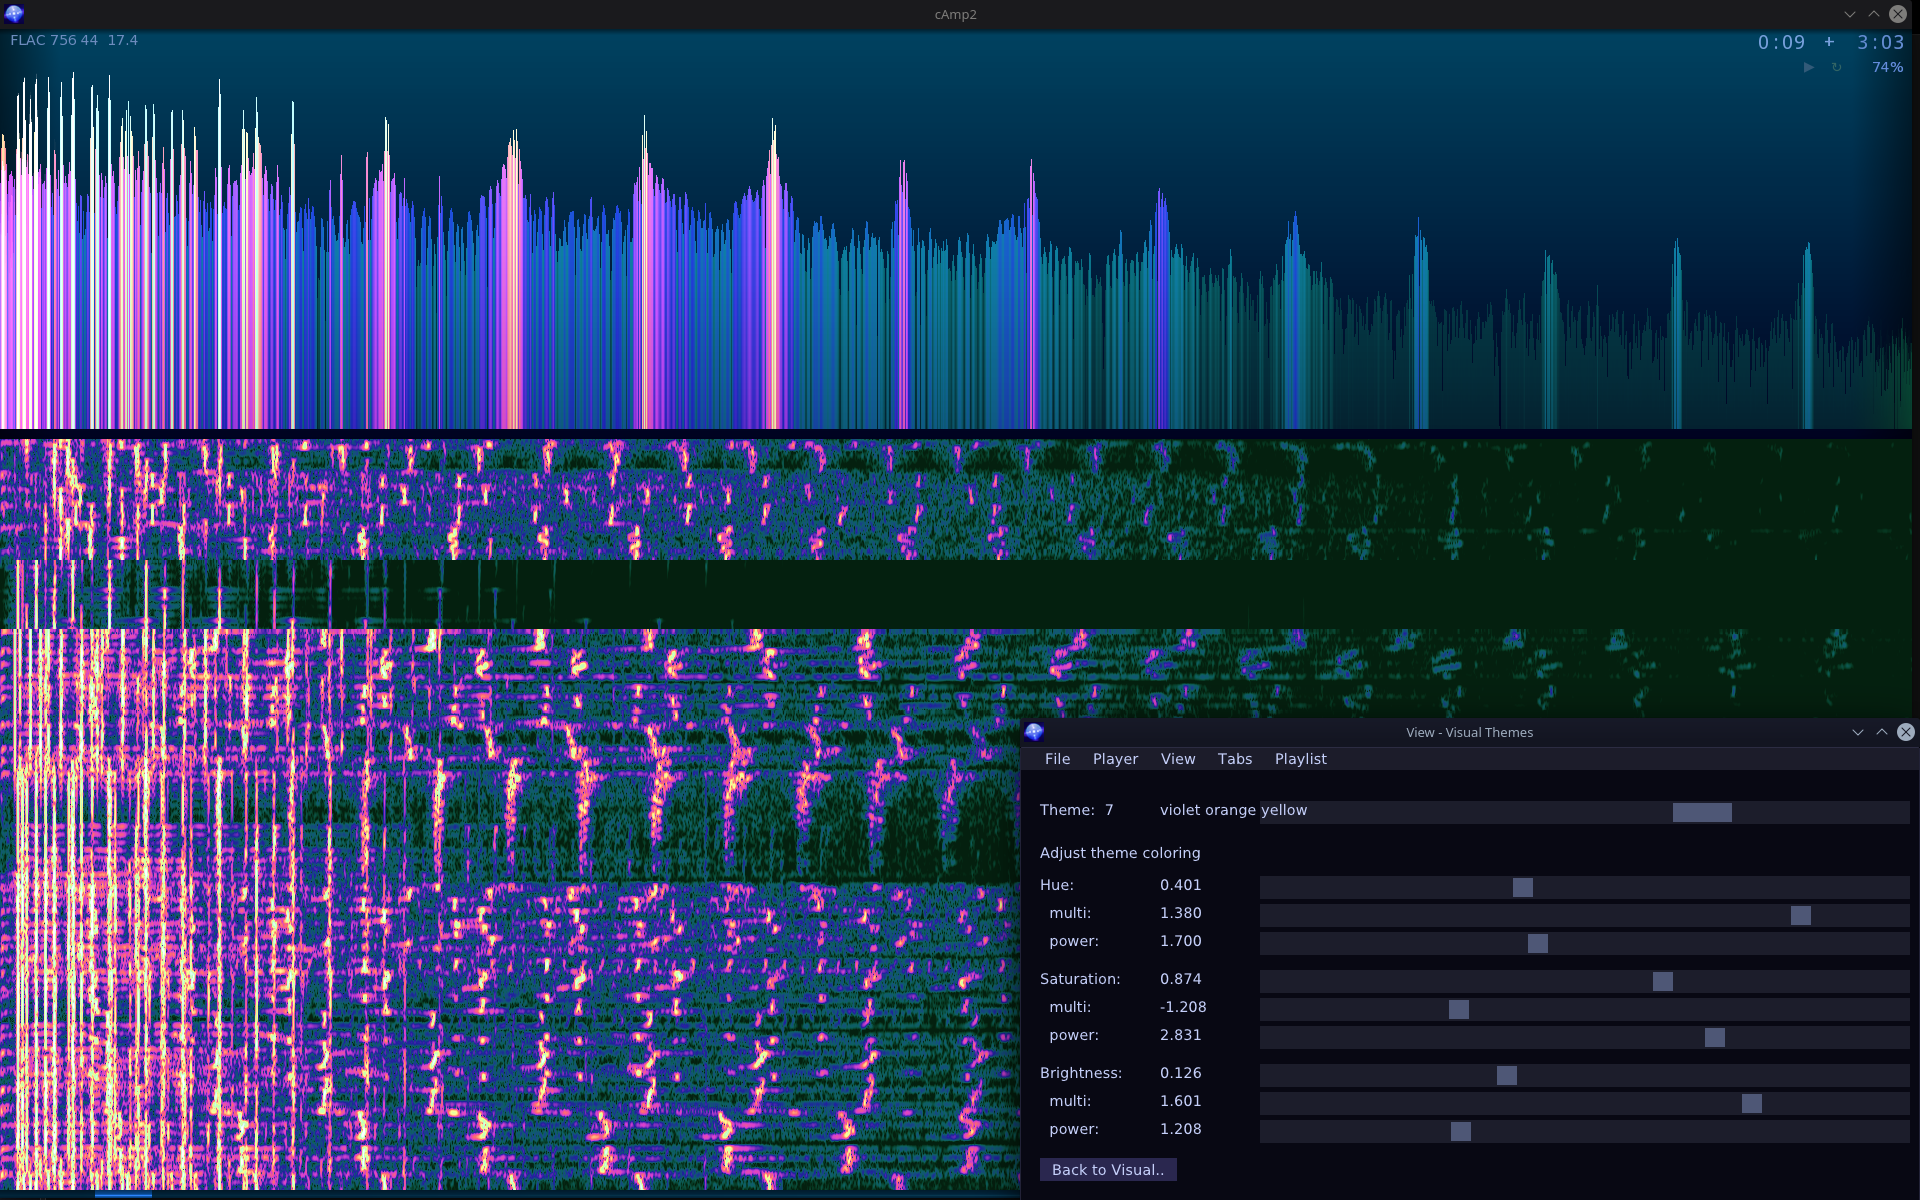
New implementation of my audio player, based on my older cAmp. Works on GNU/Linux (and should on Windows). Now using SFML for graphics, and ImGui for the new GUI. Still using (not FOSS) bass for audio.
📂Sources
Available here. Now with CMake and newer C++17 syntax.
✍️Motivation
Old cAmp was WinAPI and DirectX only and had bad style, old C++03 too. It was still one of my last college projects. I did once try moving it to SFML, and almost succeeded. I had no pressing motivation until I started moving to Debian GNU/Linux instead of Windows which required this new version. I made things differently this time and with more experience, hence the Gui and visible options.
Missing Features
The old cAmp was using GPU shaders and cAmp2 doesn’t use them yet. Seems not that needed. And it doesn’t even have hotkeys or threads implemented here. Well there is always something on my “to do” list for this project, like for any other.
📊New Features
Apart from most of the old features (with few important missing) it has some new ones too.
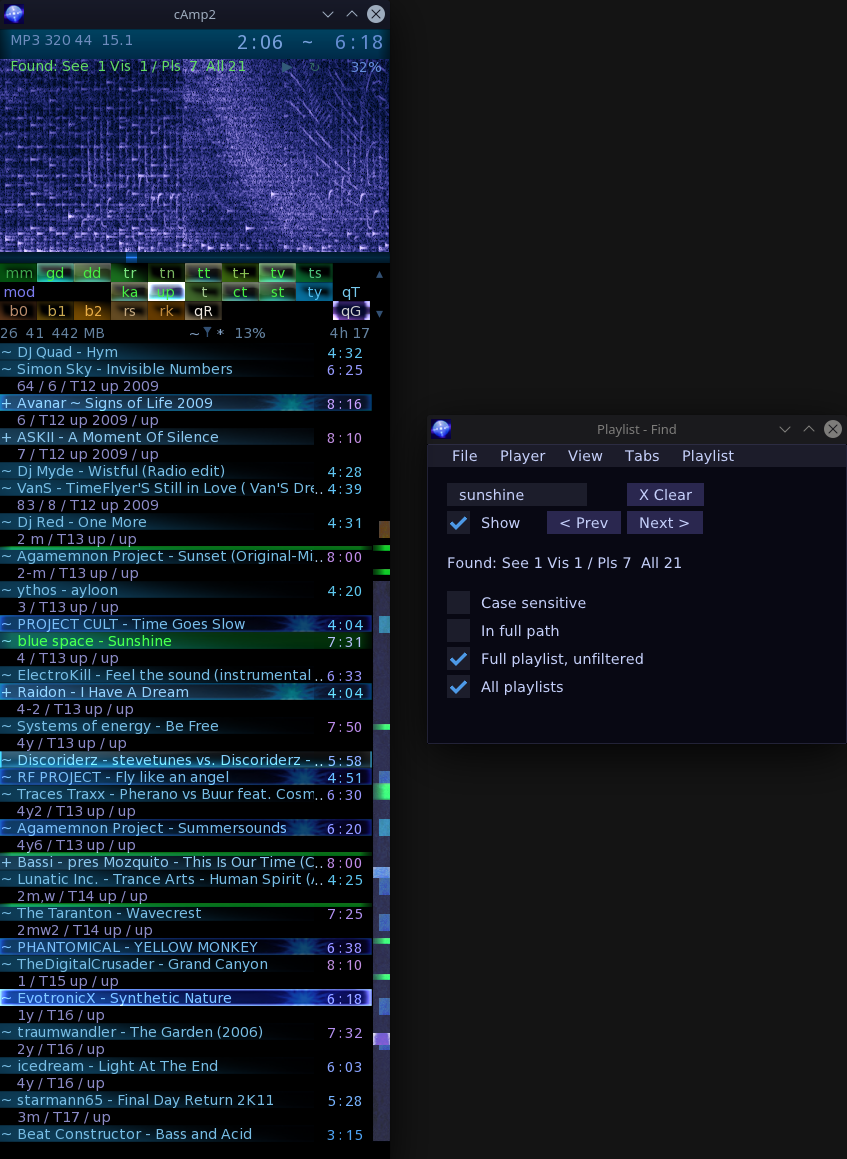
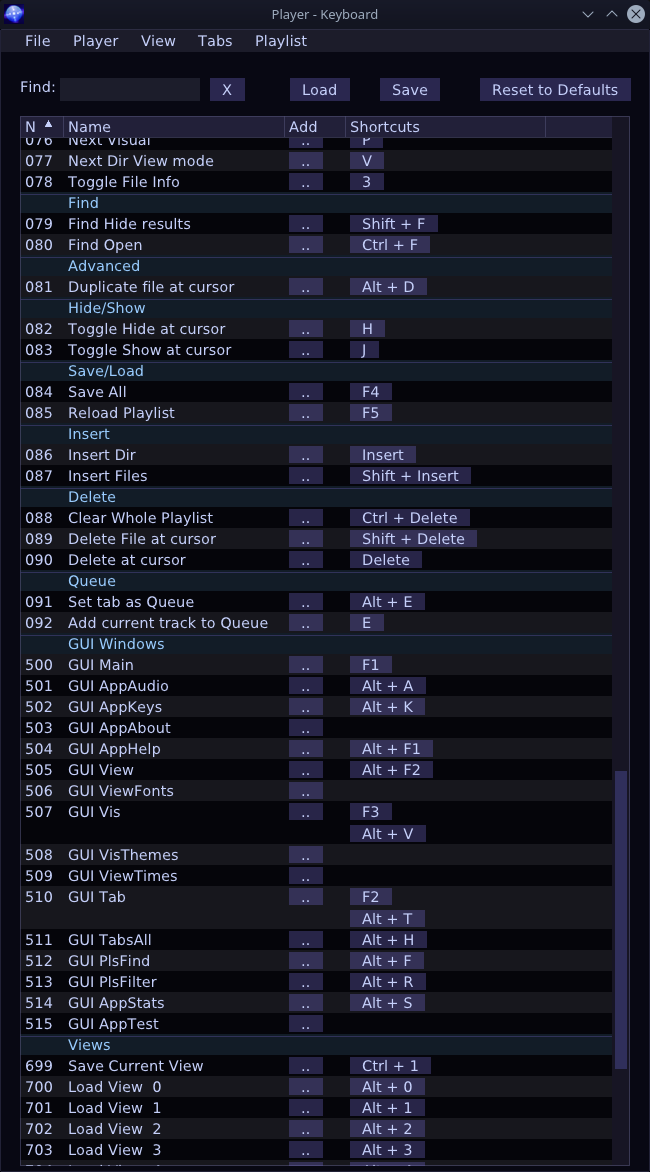
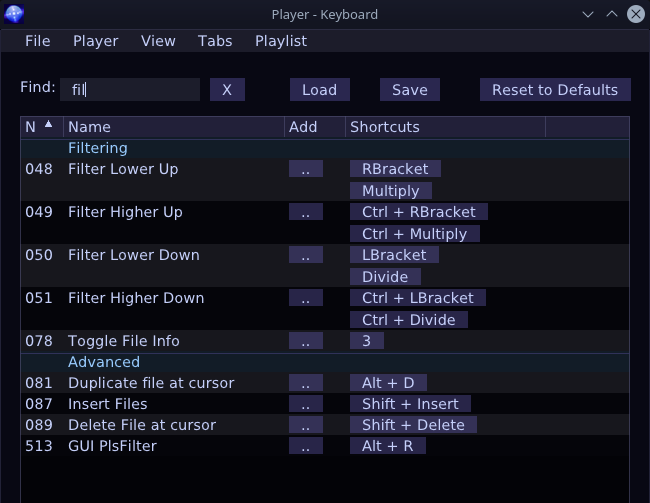
Most notable addition is the Gui with few windows having controls for changing view parameters, adjusting with sliders or showing info. Since ImGui is such a joy to use it was also easy to implement bindable all program keys list and move all options to Gui.
Other new features:
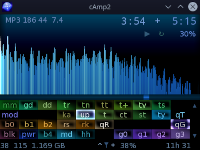
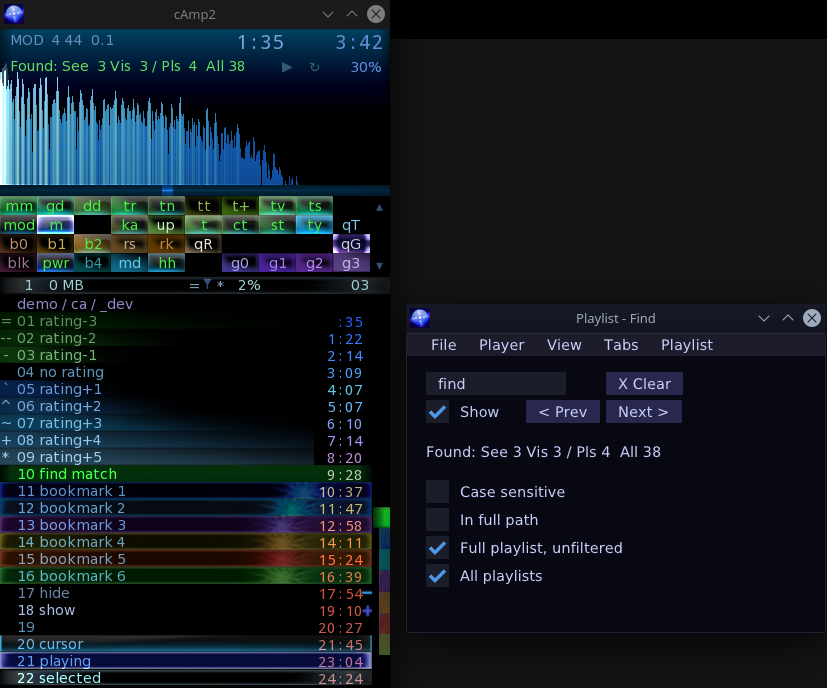
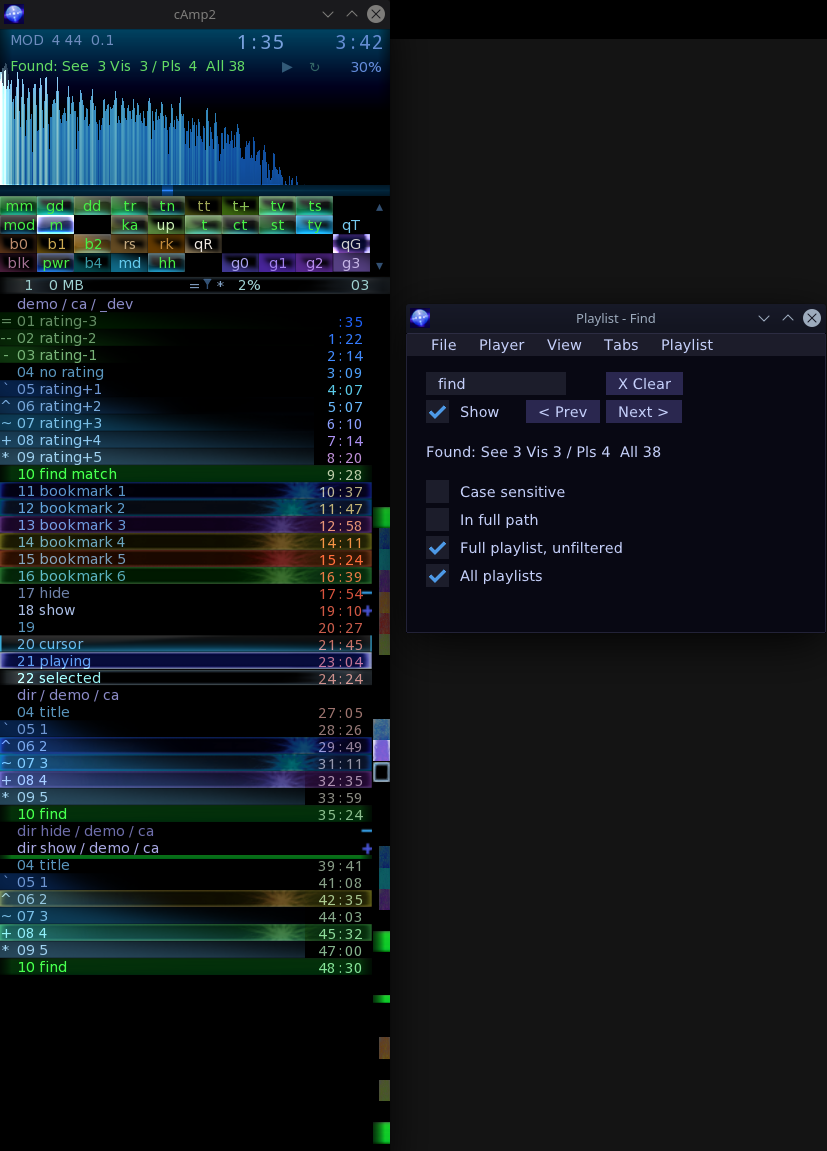
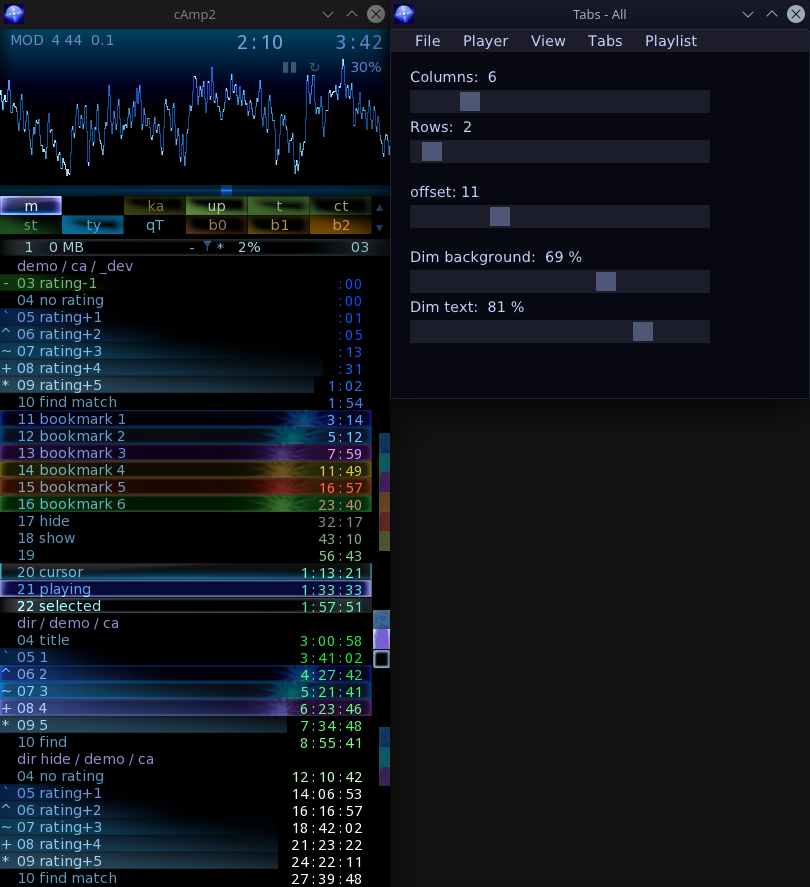
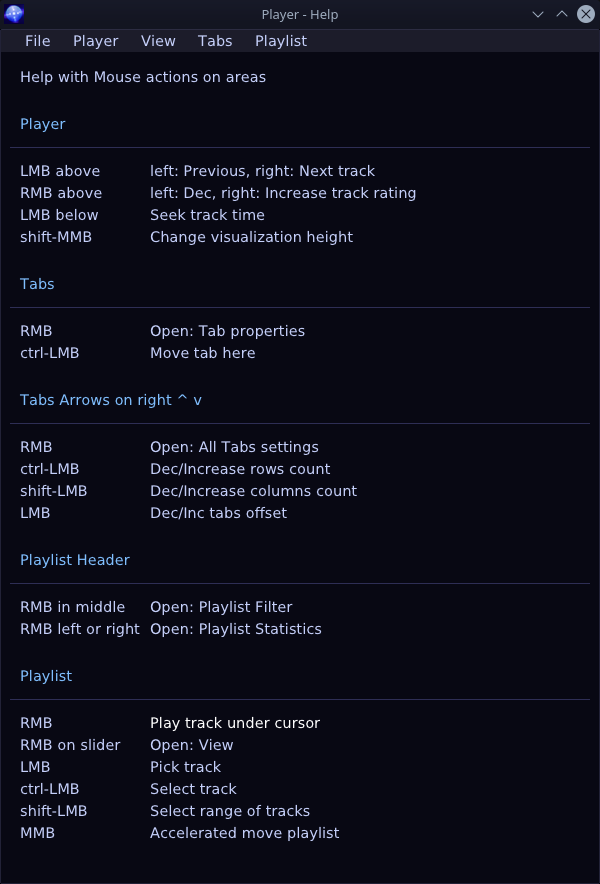
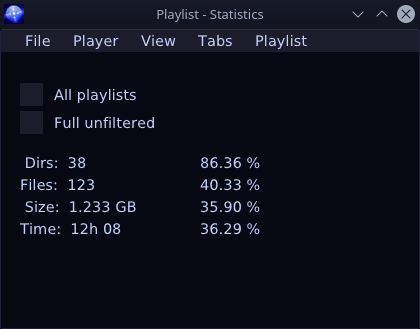
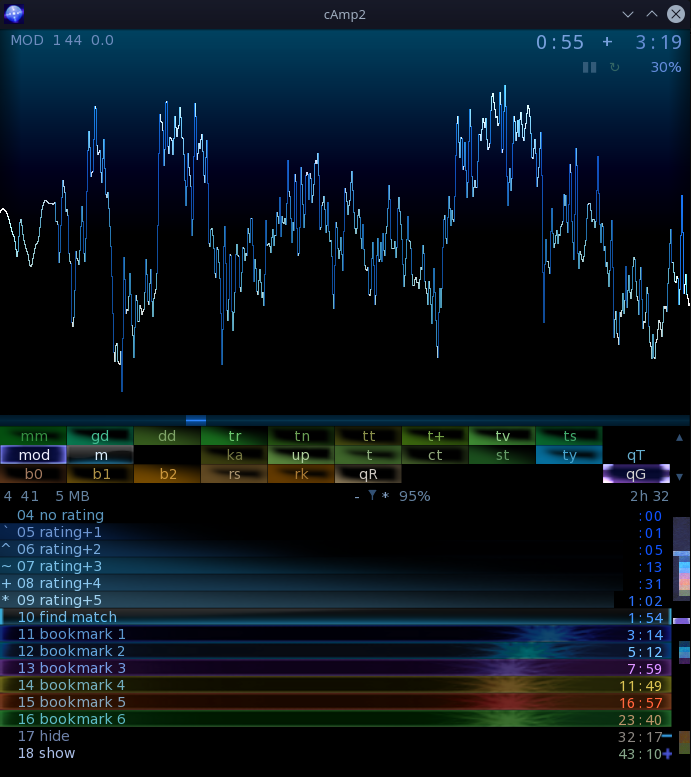
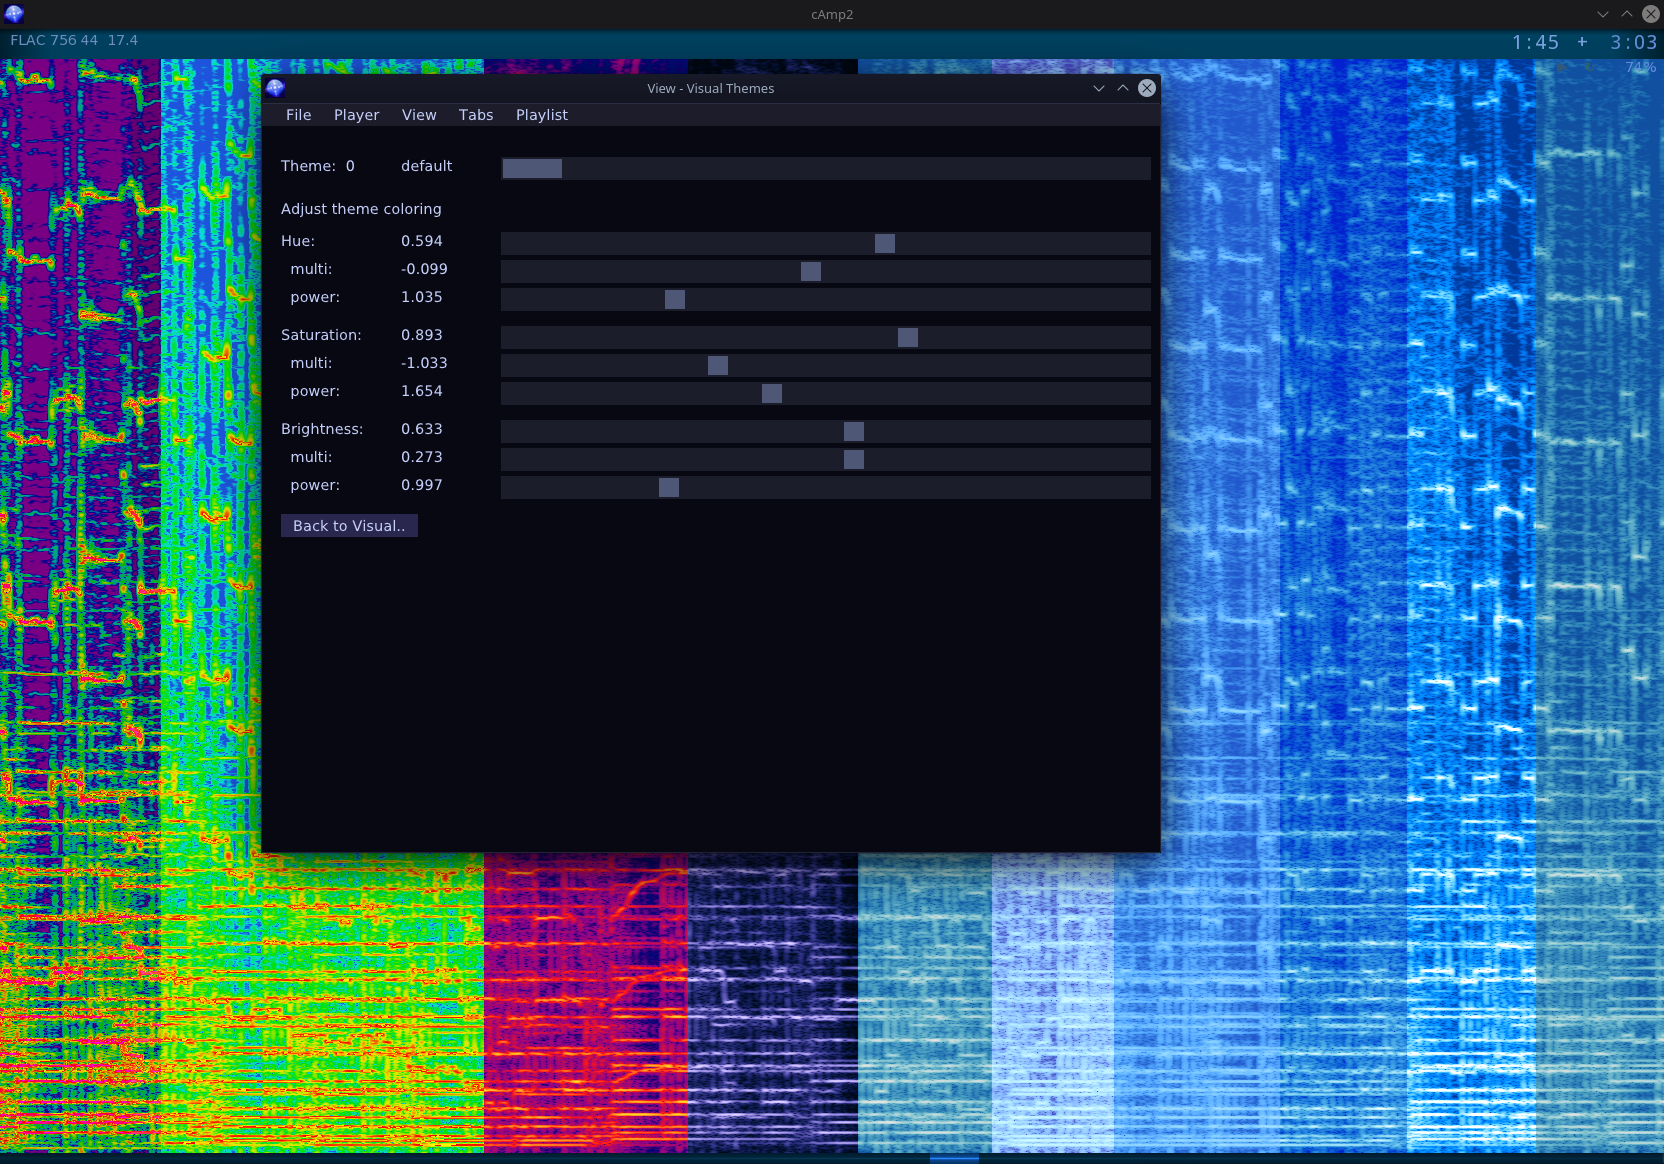
Colored tabs, sliders for their background and text brightness. Empty tabs as separators. Can be seen on screens. I find it quite useful, e.g. for now I have 4 rows, first is for Trance style, 2nd for older trance, 3rd for rock, 4th for metal genres (about 31 playlists total).
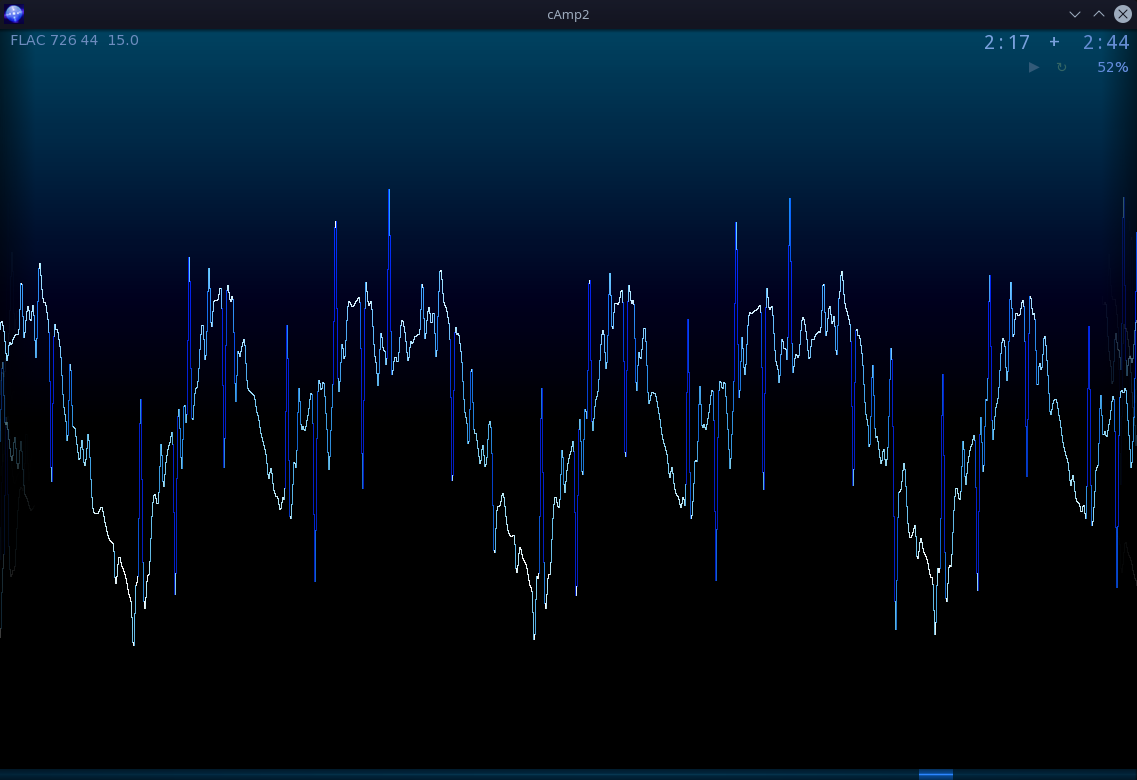
In between markers. E.g. if I filter tracks so that playing cursor or find matches become not visible then it draws a shorter marker still, to show they are between those visible. (It’s best shown on 2nd screenshot also 3rd and this).
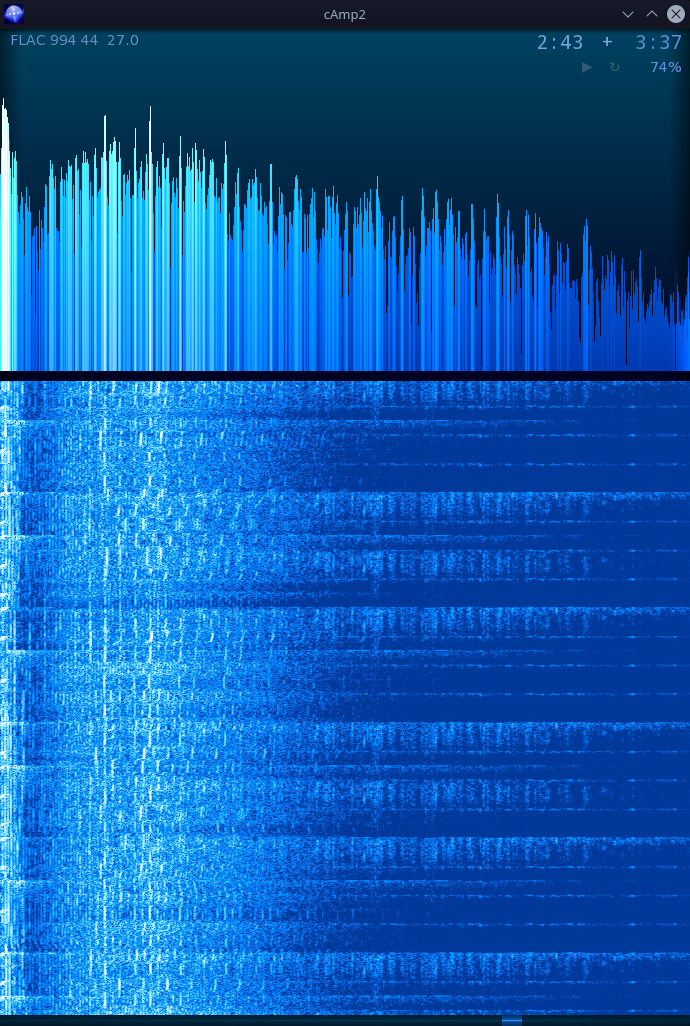
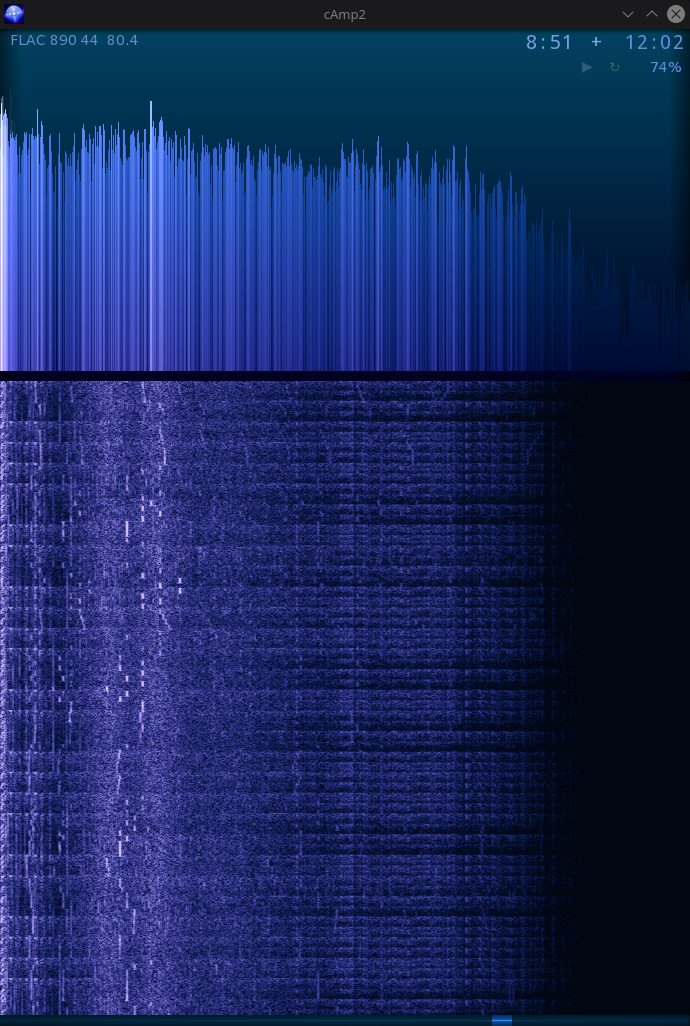
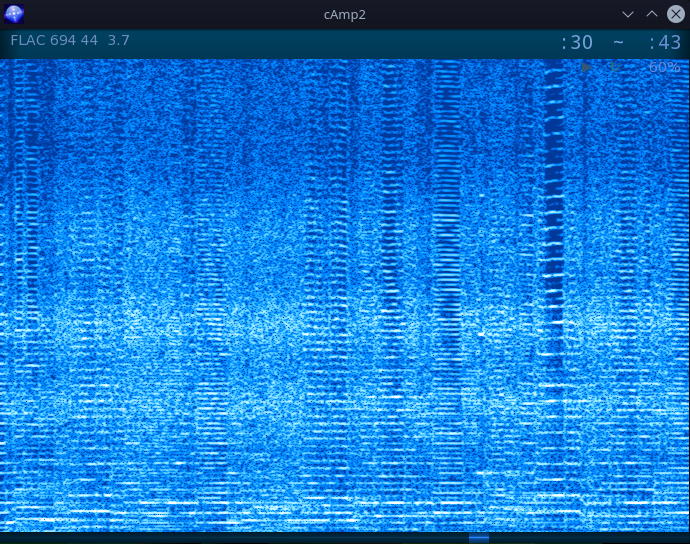
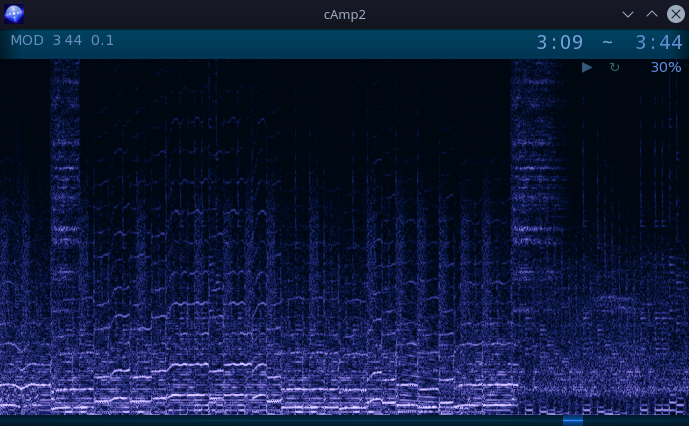
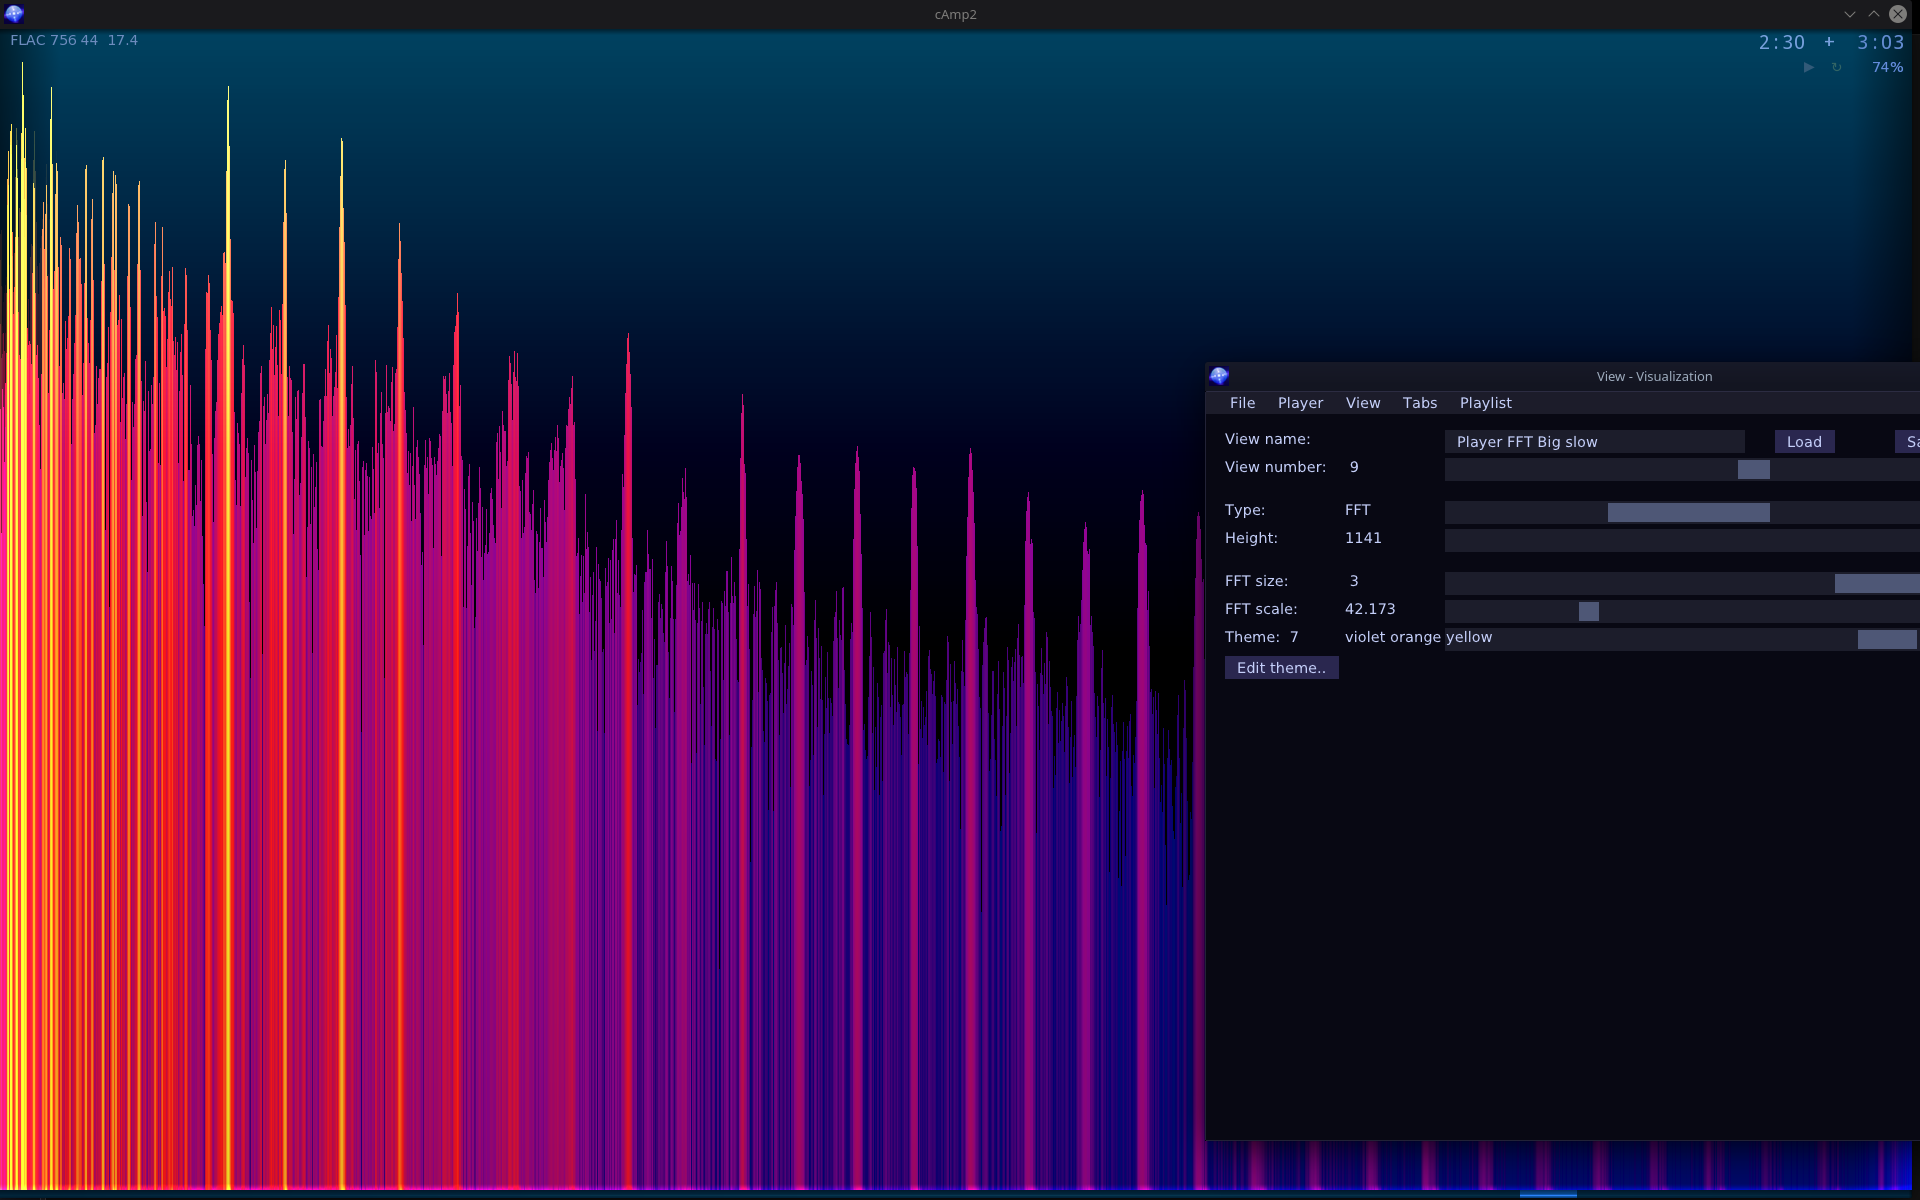
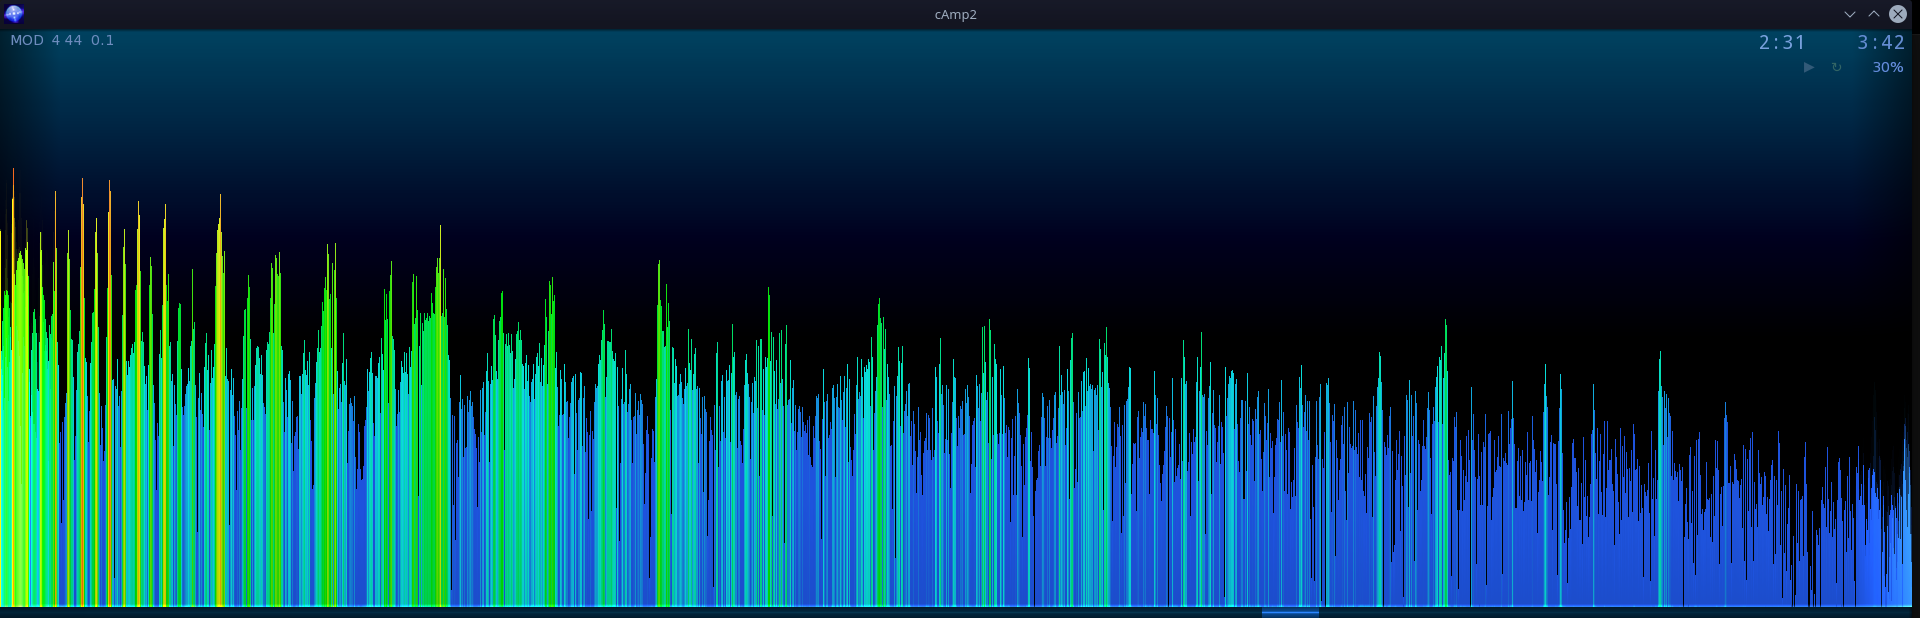
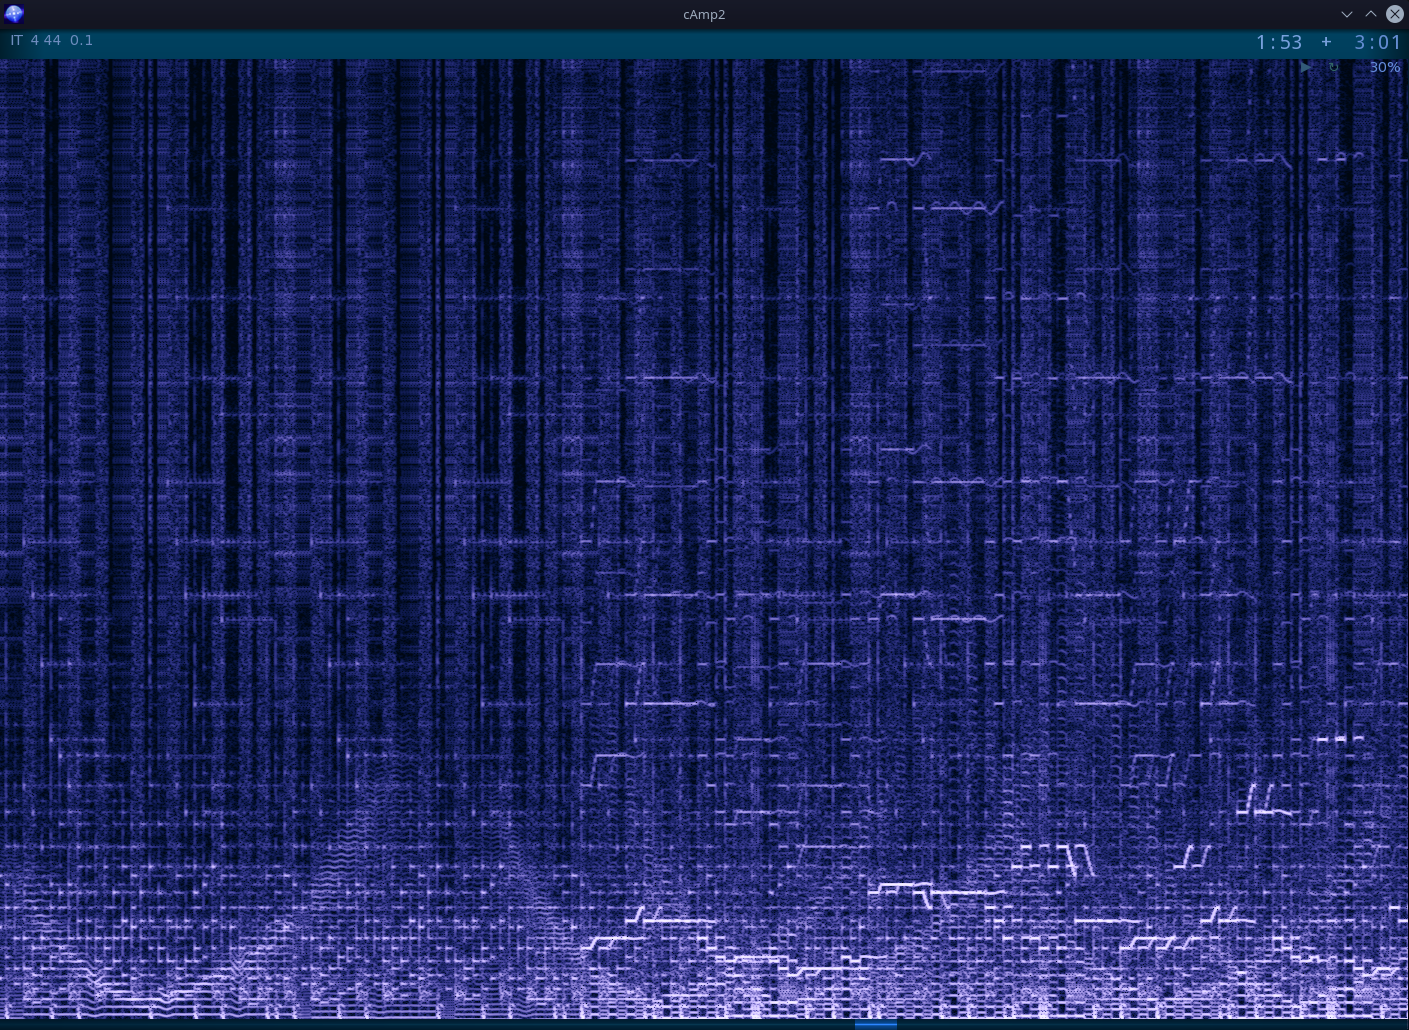
New visualization type (screens, parameters): FFT above and spectrogram below.
Queue tab(s). Any tab can be set as queue. It will be marked in 4 corners. Then you can add tracks with one key (E) to queue end. Good for temporary playlists or “best of” ones.
⌛Conclusions
Well it is definitely useful. It’s one of those key programs I need to have at start of any OS (first is my DoubleCmd fork, then this player, 3rd is Firefox with many add-ons). Yet it’s still missing one crucial feature like moving (reordering) tracks. Kind of funny, but I still don’t need it that much. I just delete whole playlist and add its main folder again to refresh once a while, and keep order in my filenames and subdirs. There are few other features missing too from previous version. But if I’m doing bigger projects (like Stunt Rally 3) or smaller and more interesting ones, then I don’t have time for this nice useful program which I still use every day. If we count the older one too, made in 2009, this would be the longest used program I made.
📷Gallery
Screenshots start with normal playlist, find, track backgrounds explanation with time coloring, tabs adjust, later 3 visualizations, their themes, and rest of Gui windows.
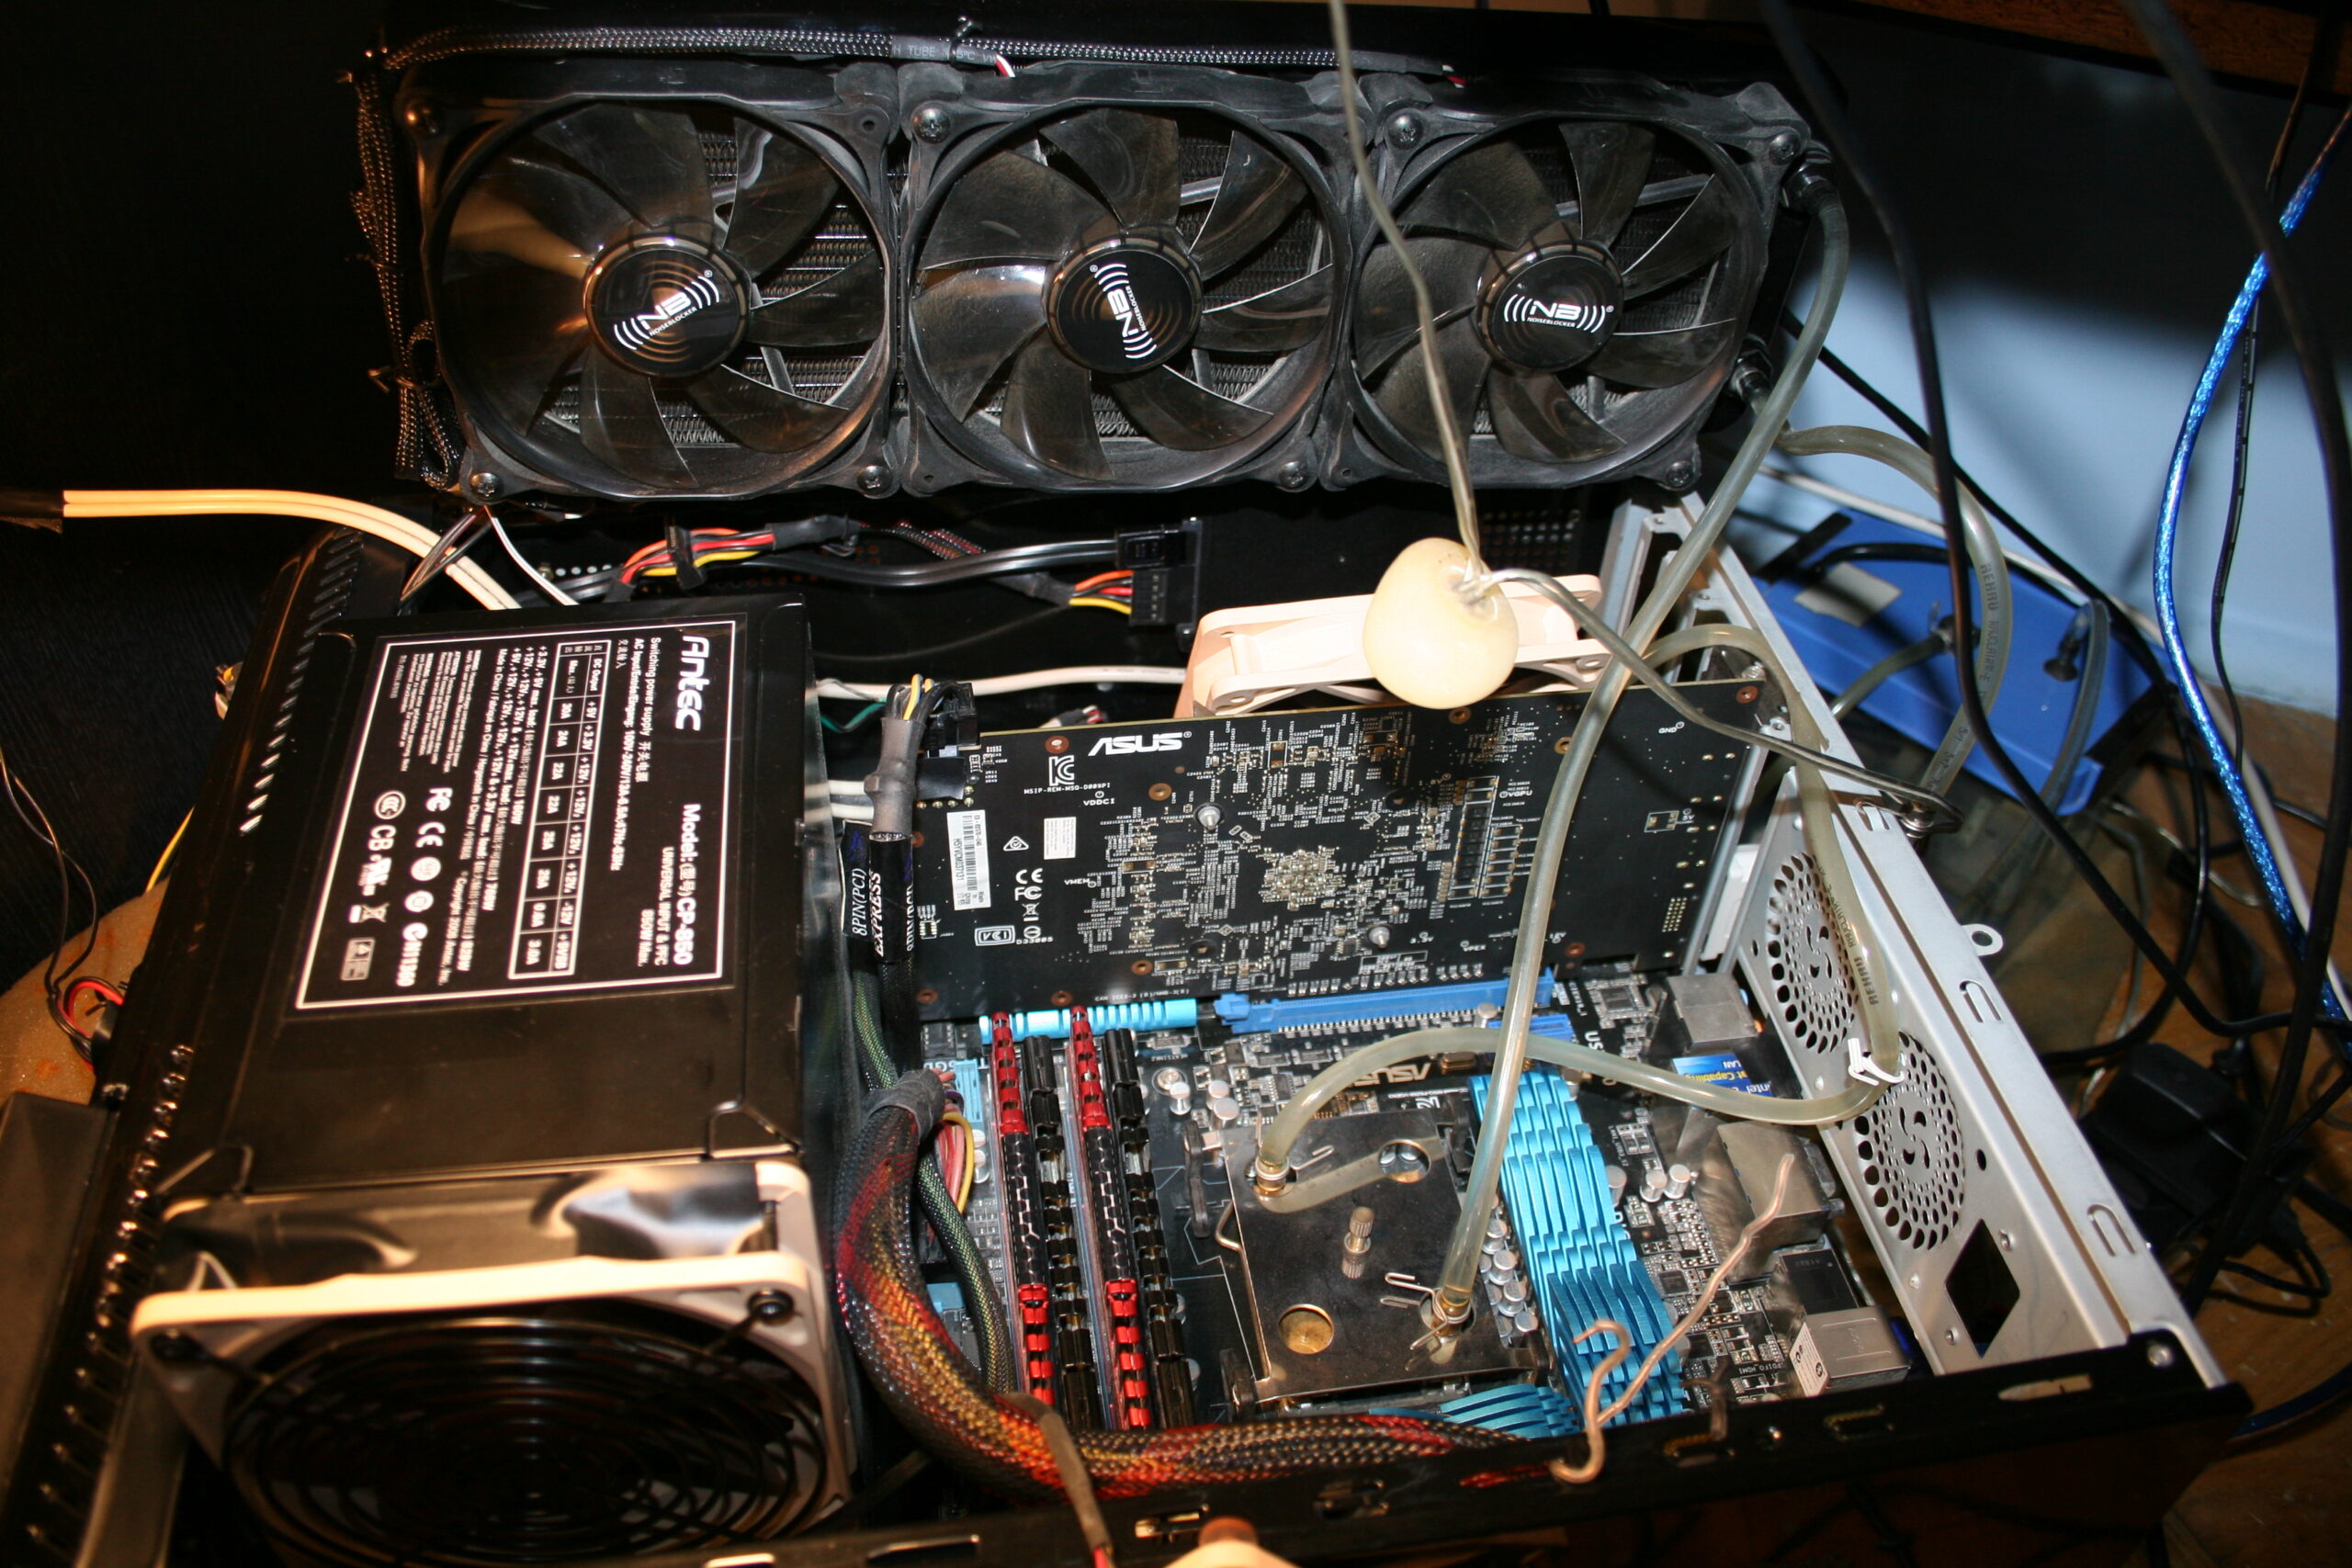
I described here my old PC and its Water Cooling (WC). Newest is here. It also features my own fan controller, which motivated me to finally create this page. Obviously, I’m using my own firmware in heavily modded keyboard with my PCs.
💧Water cooling history and observations
History intro
I got my first PC in 1992, as seen in my very first post here. I had many more since then. I’ve put my full PC history in last chapter, at bottom.
Until 2004 I had no big issues with PCs and their noise. Those had 2 medium fans (about 9cm), one on CPU other in PSU. Surely those weren’t quiet (just cheap) and were mounted firmly so their vibrations were even amplified.
Before WC
In 2004 I bought a new Pentium 4 and decided that I had enough of that noise, “a PC should not be heard” I said. So I first started buying “quiet” fans:
Well the small 9cm: Zalman CNPS7000A-Cu wasn’t that great, was full copper (whatever, too heavy), and with so little space between fins it was great at gathering a lot of dust, but it had a nice knob regulator.
Years later I found a good one: Scythe Grand Kama Cross 2 for next CPU. It’s big but not very heavy, and has a 14cm fan which actually makes it way quieter. It’s still used in my mother’s PC.
Well that was rather a waste of money. Not very expensive, but not very quiet either. Yes until now, I’ve spent much more for WC in total, but it was used in 3 PCs already. I’d even say it was more universal than those “quiet” PC fans dedicated to some socket or one GPU type only.
WC Kit
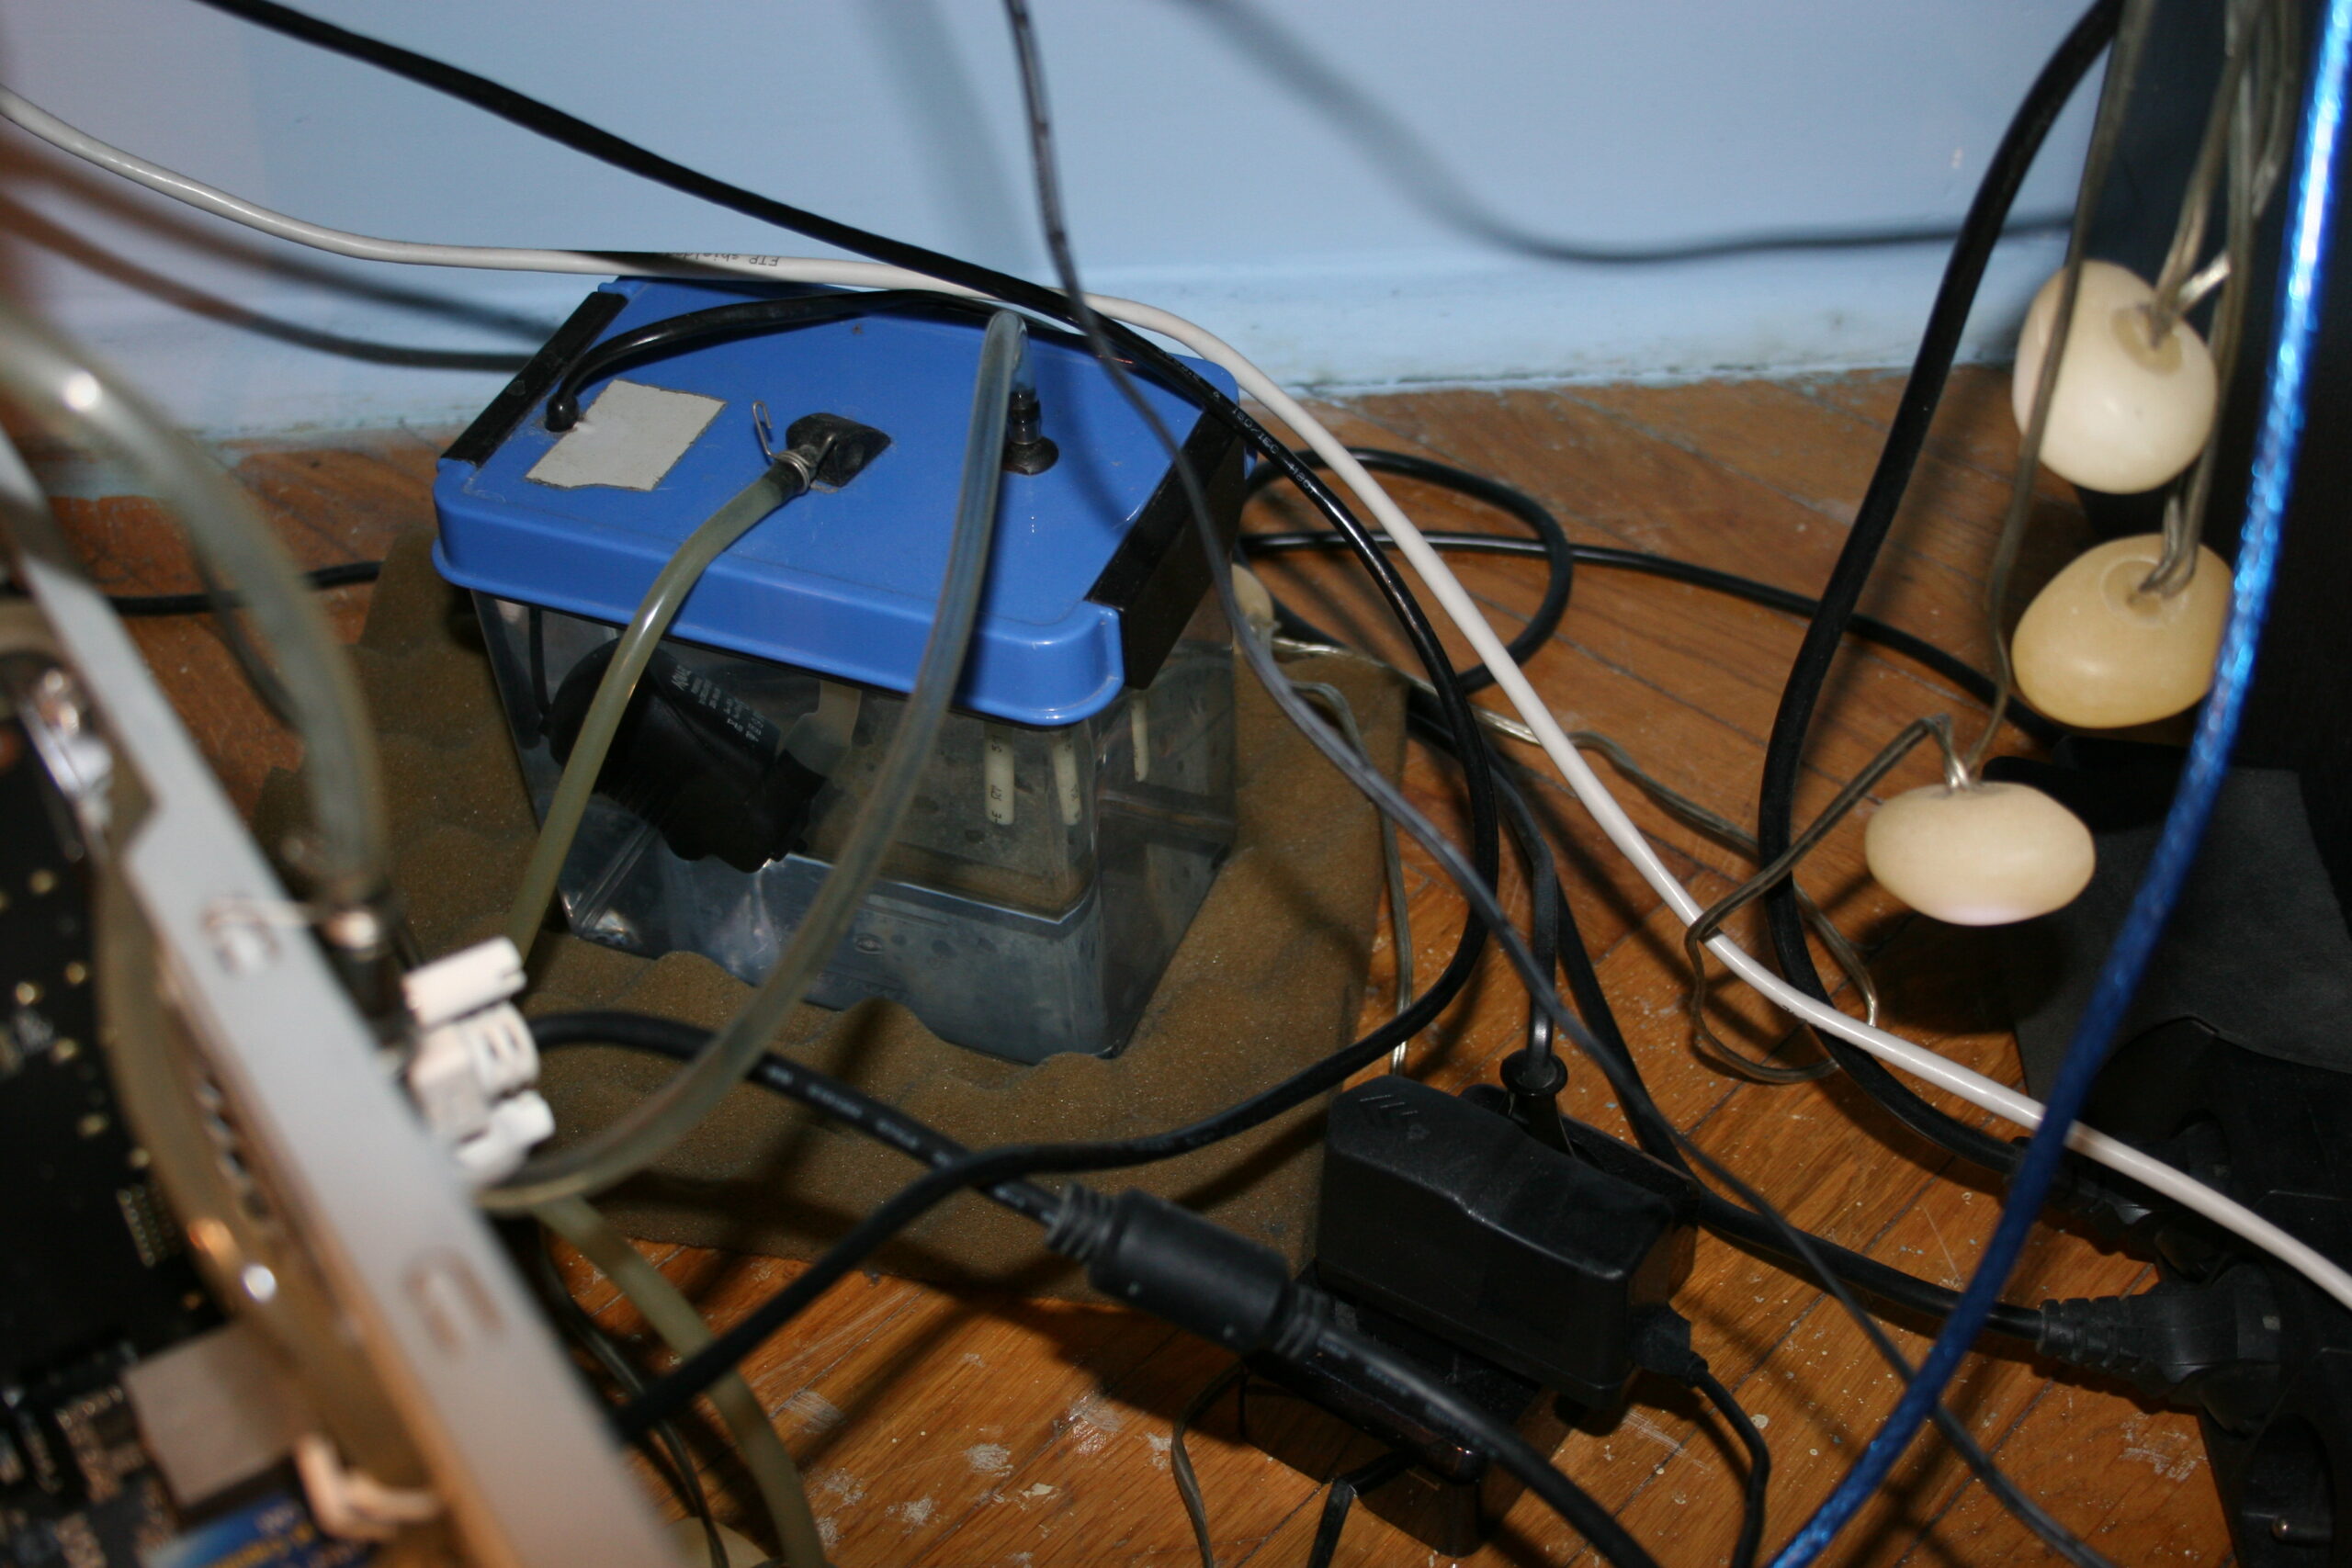
I bought a WC (not to confuse with 🚾🚽) kit from a local company Cpc/Hydrox. Needless to say they changed company name like 3 times, didn’t last long etc. But sometimes their parts still appear on auctions. I even sold my surplus once this way. To put it short, their cooler was crap, their WC PSU plain garbage (cheapest and also had a loud fan), water pump was just a cheapo for aquarium. So a kit was really a bad way. But water blocks were cheap and very good.
My PC evolved the most since 2004, when I bought that Pentium 4 and started water cooling it. My current PC still has most of the WC parts from that time (water blocks, 6mm (~1/4″) tubes, water reservoir and pump).
My choice for that kit and 6mm was its low price. Seriously, whenever I tried looking at other water blocks after (thinking I could maybe improve mine), all were 10 or 12mm (~1/2″) diameter and literally 3x more expensive.
PC WC Modding Rant
Back then, once a while, I was looking at pics of modded water cooled PCs, with “style” and plenty of lights too. How do I put it, just IMO OFC, let’s just say that’s the most illogical (retarded) thing to do with a PC. It’s the same approach as in modding cars. It’s a huge profiting business, a hype and really nothing more IMHO. Apart from water cooling, which is the most logical way of cooling, but for PCs it is way overpriced. Modded PCs are the culmination of commercial stupidity, visible from a distance and eye catching (i.e. self promotion).
For me it was a matter of how loud my PC still is, best measured in acoustic dB. Just like I said: “a PC should not be heard”, I also add: “and should not emit any light” or otherwise be visible even. Of course, since my PC is on floor under own desk, I do have some white lights to make it visible when needed.
And it also mattered a lot more for me to have other modifications. as described in next chapter.
Radiator
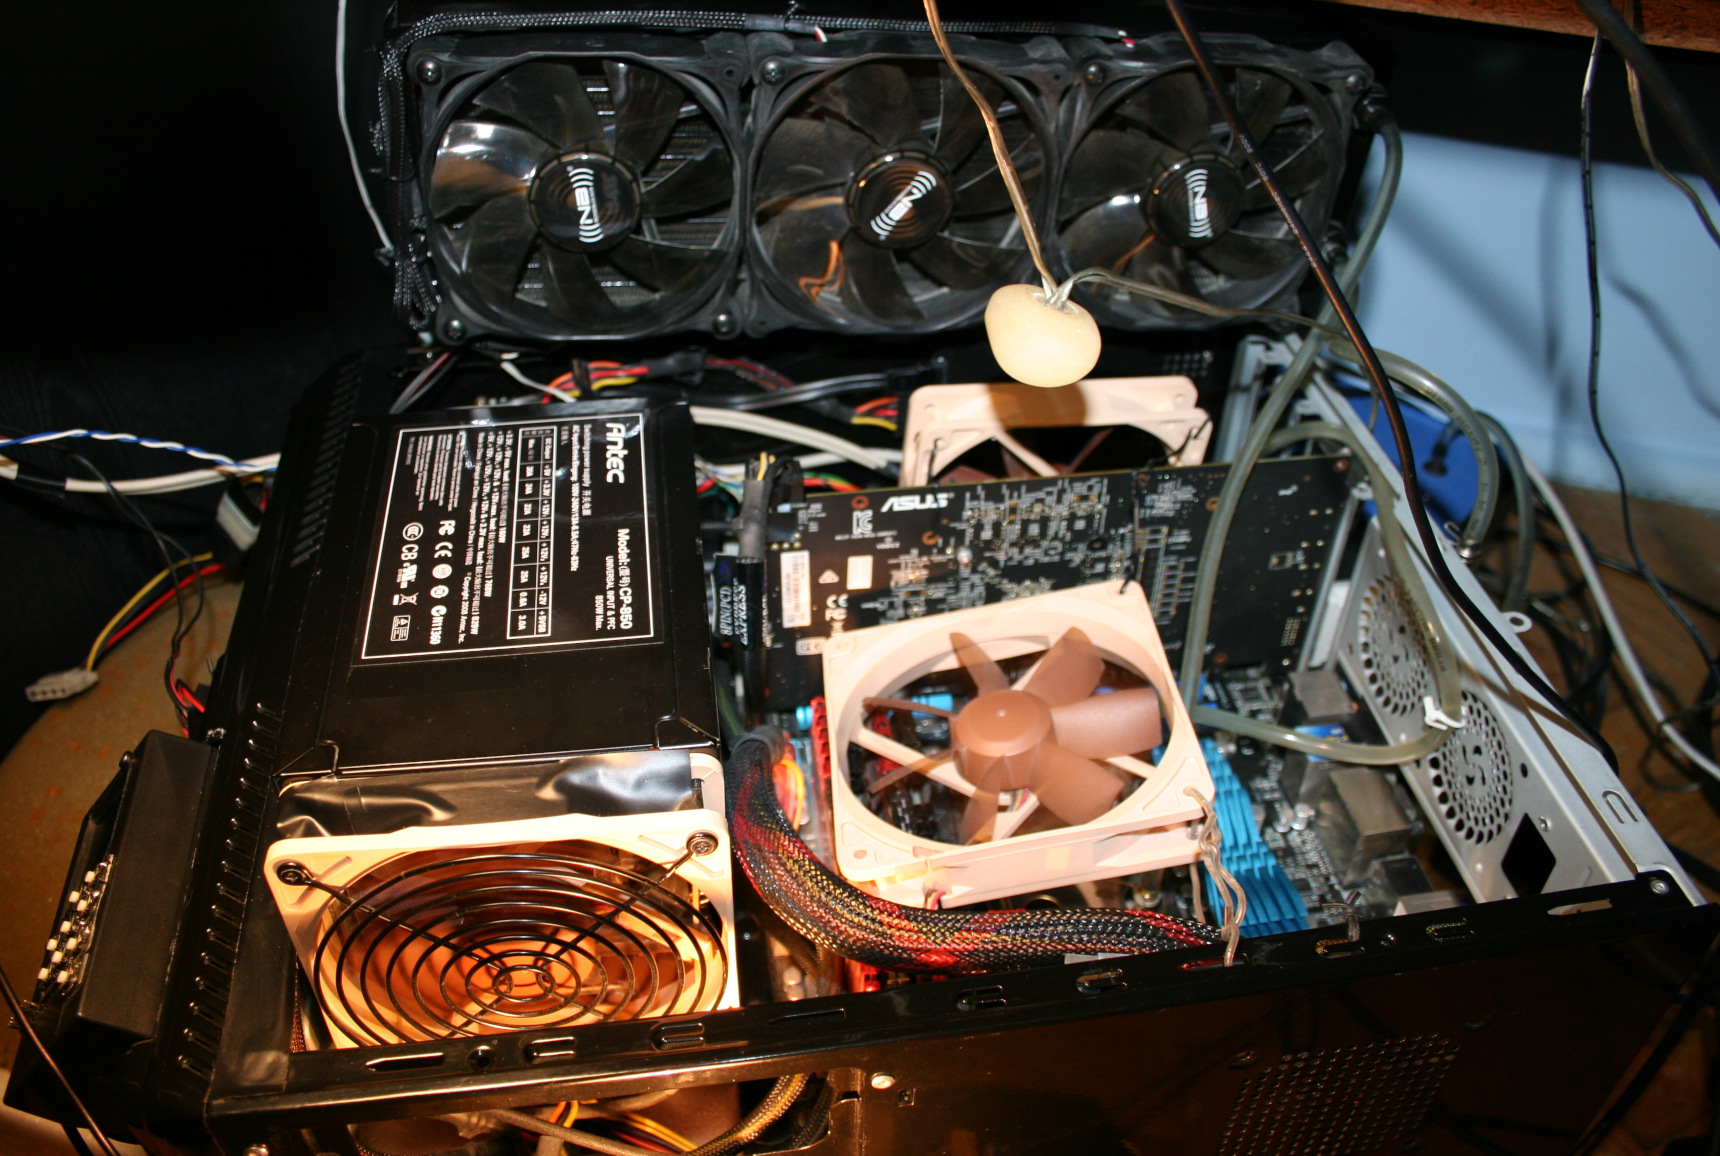
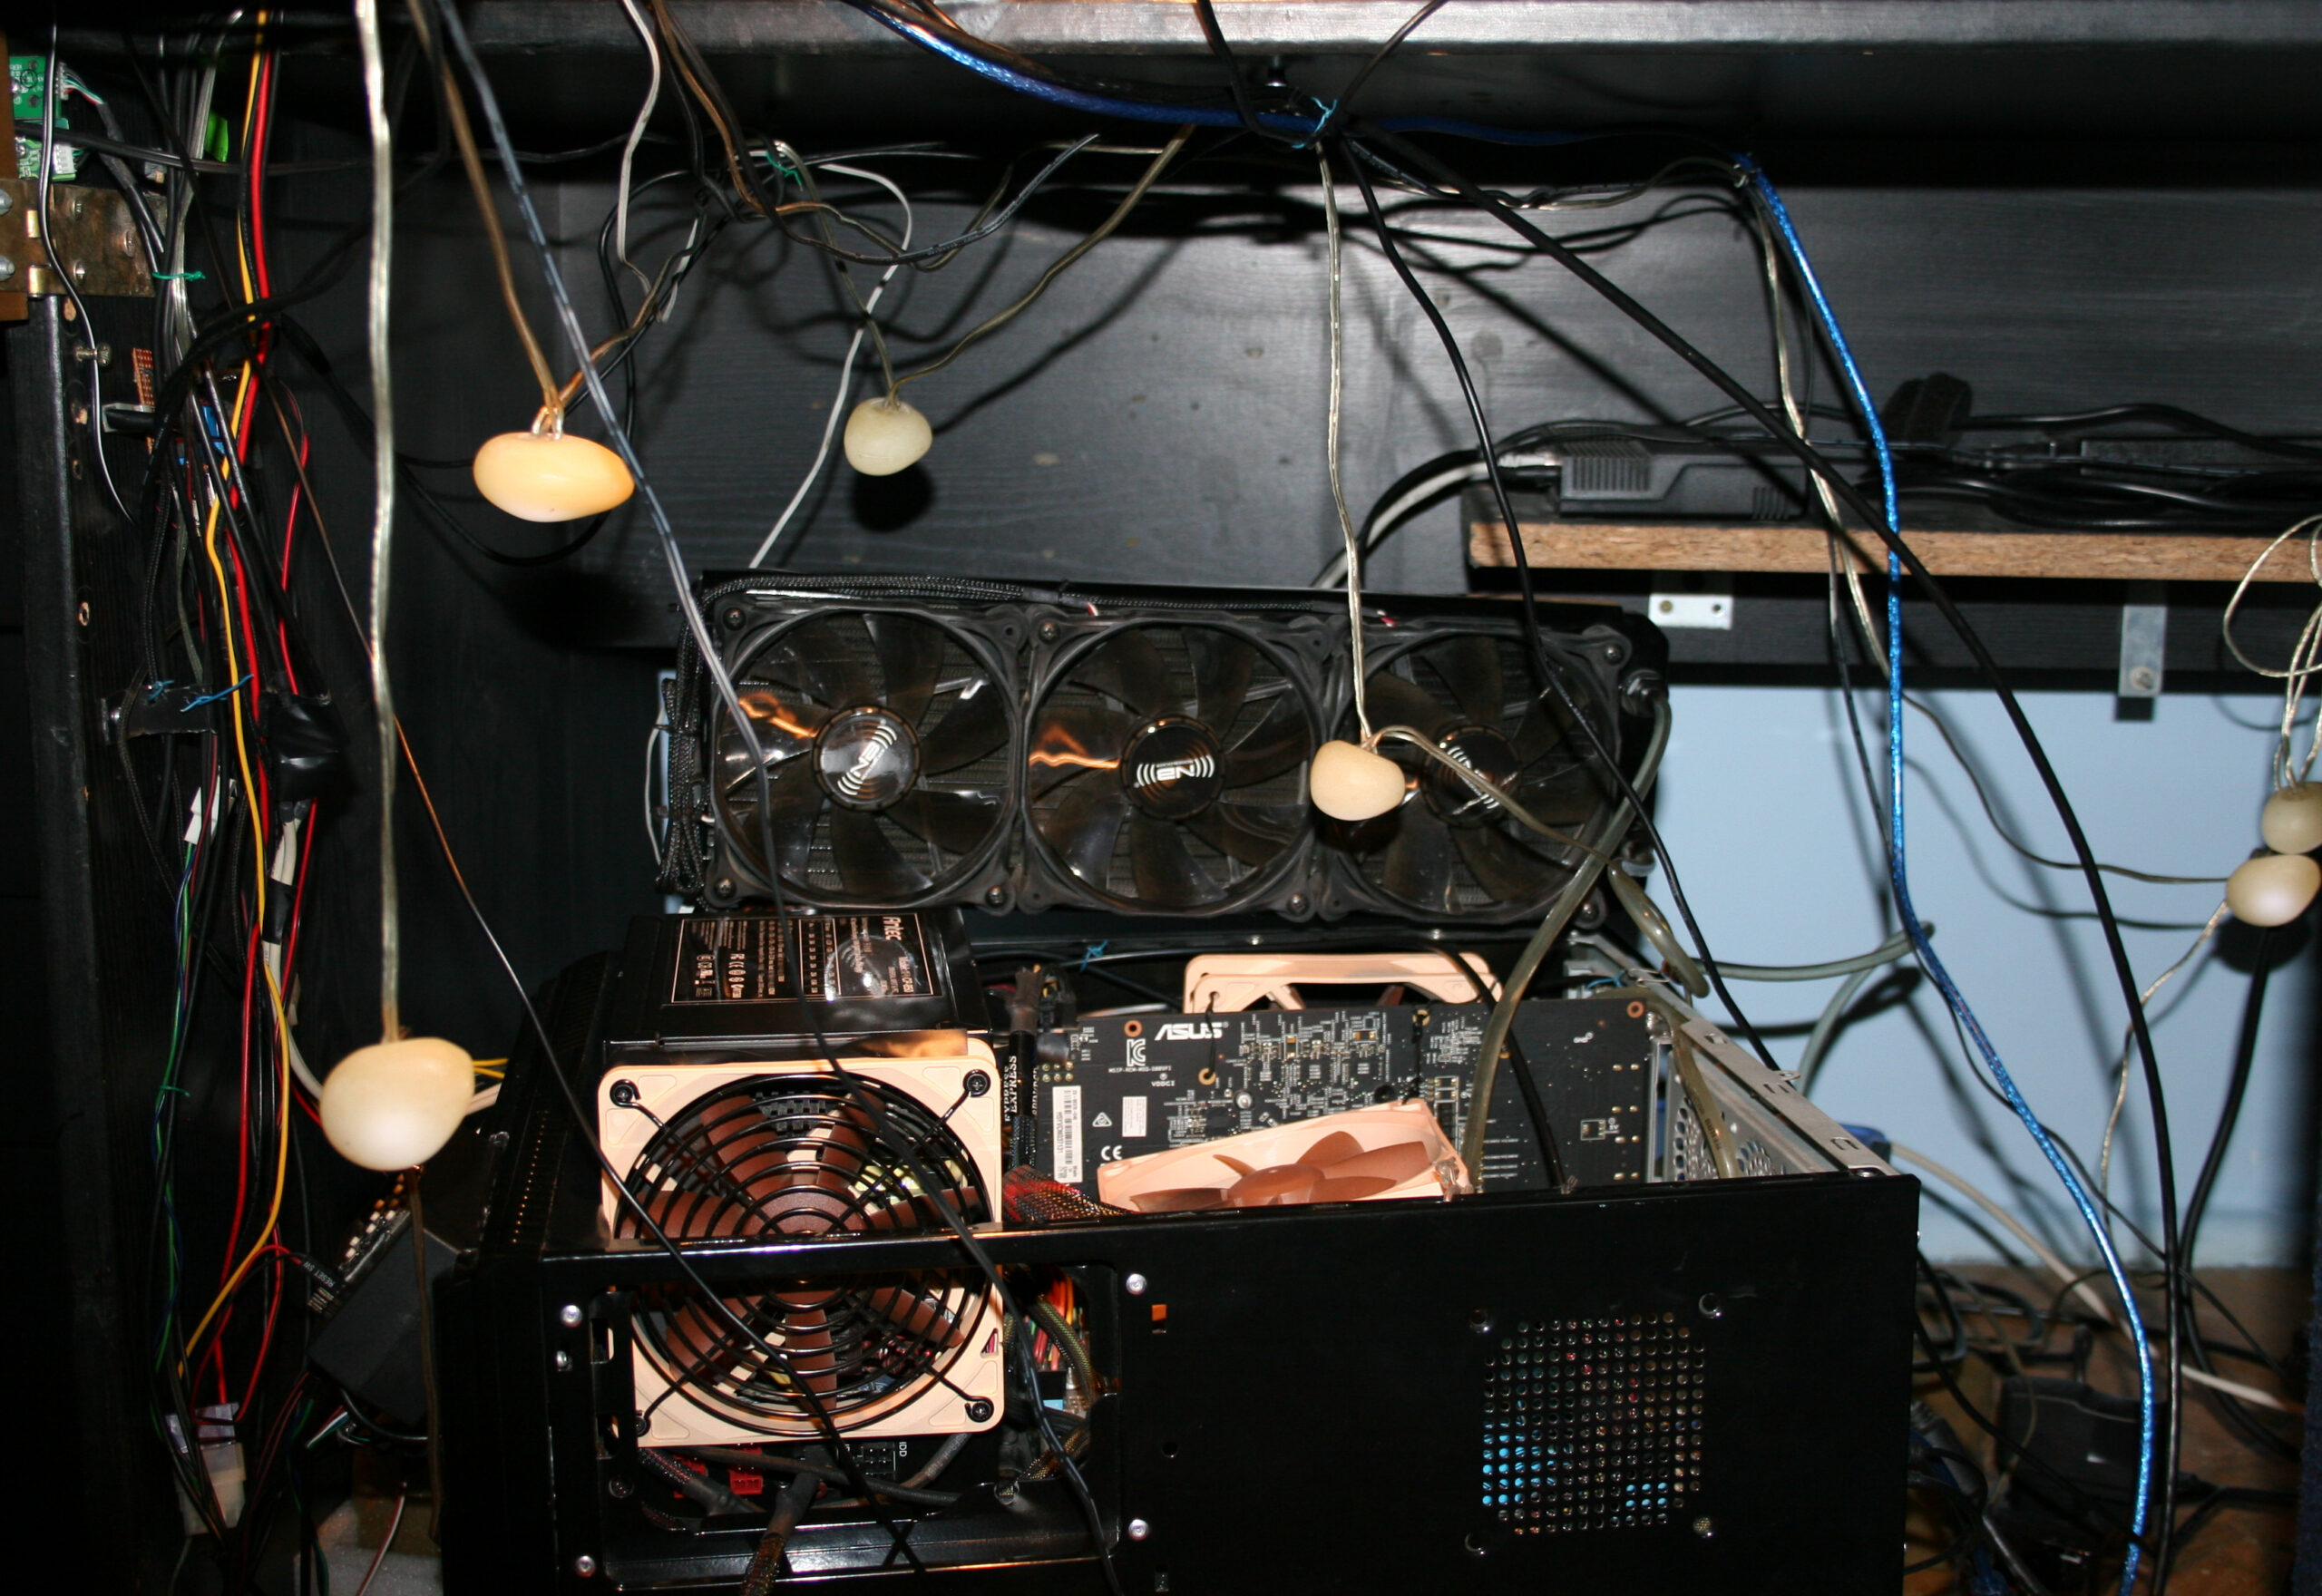
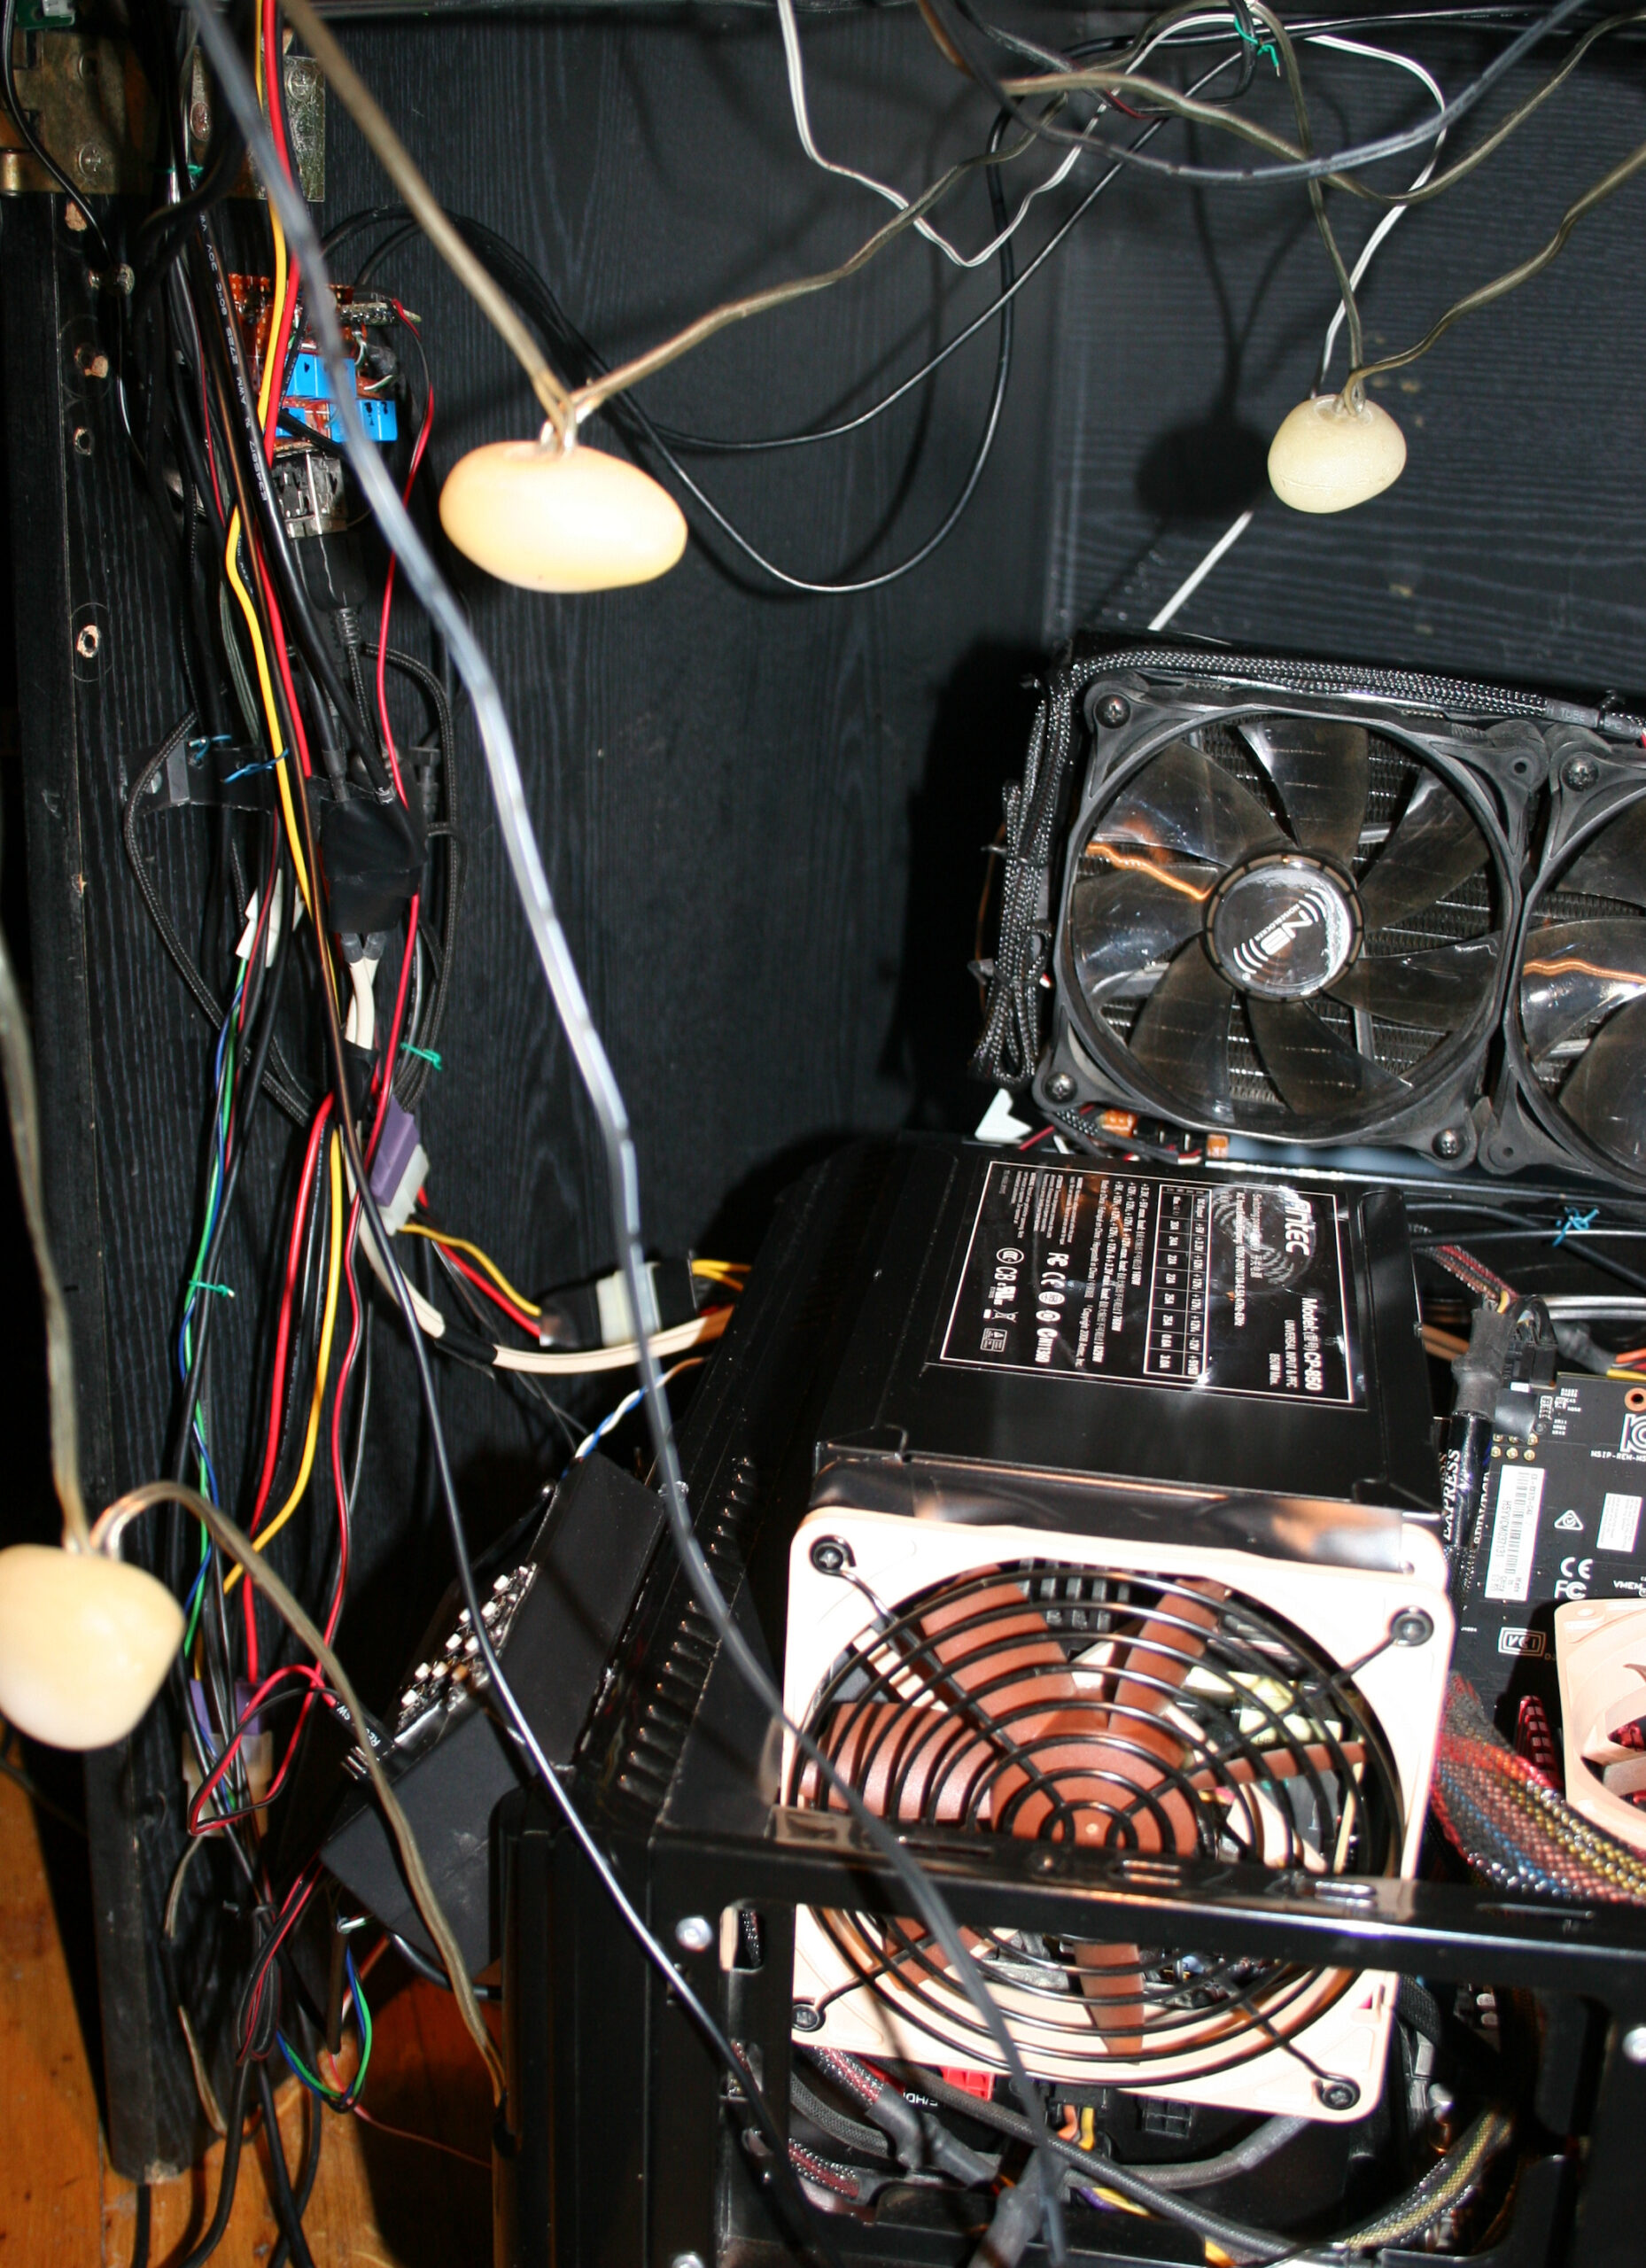
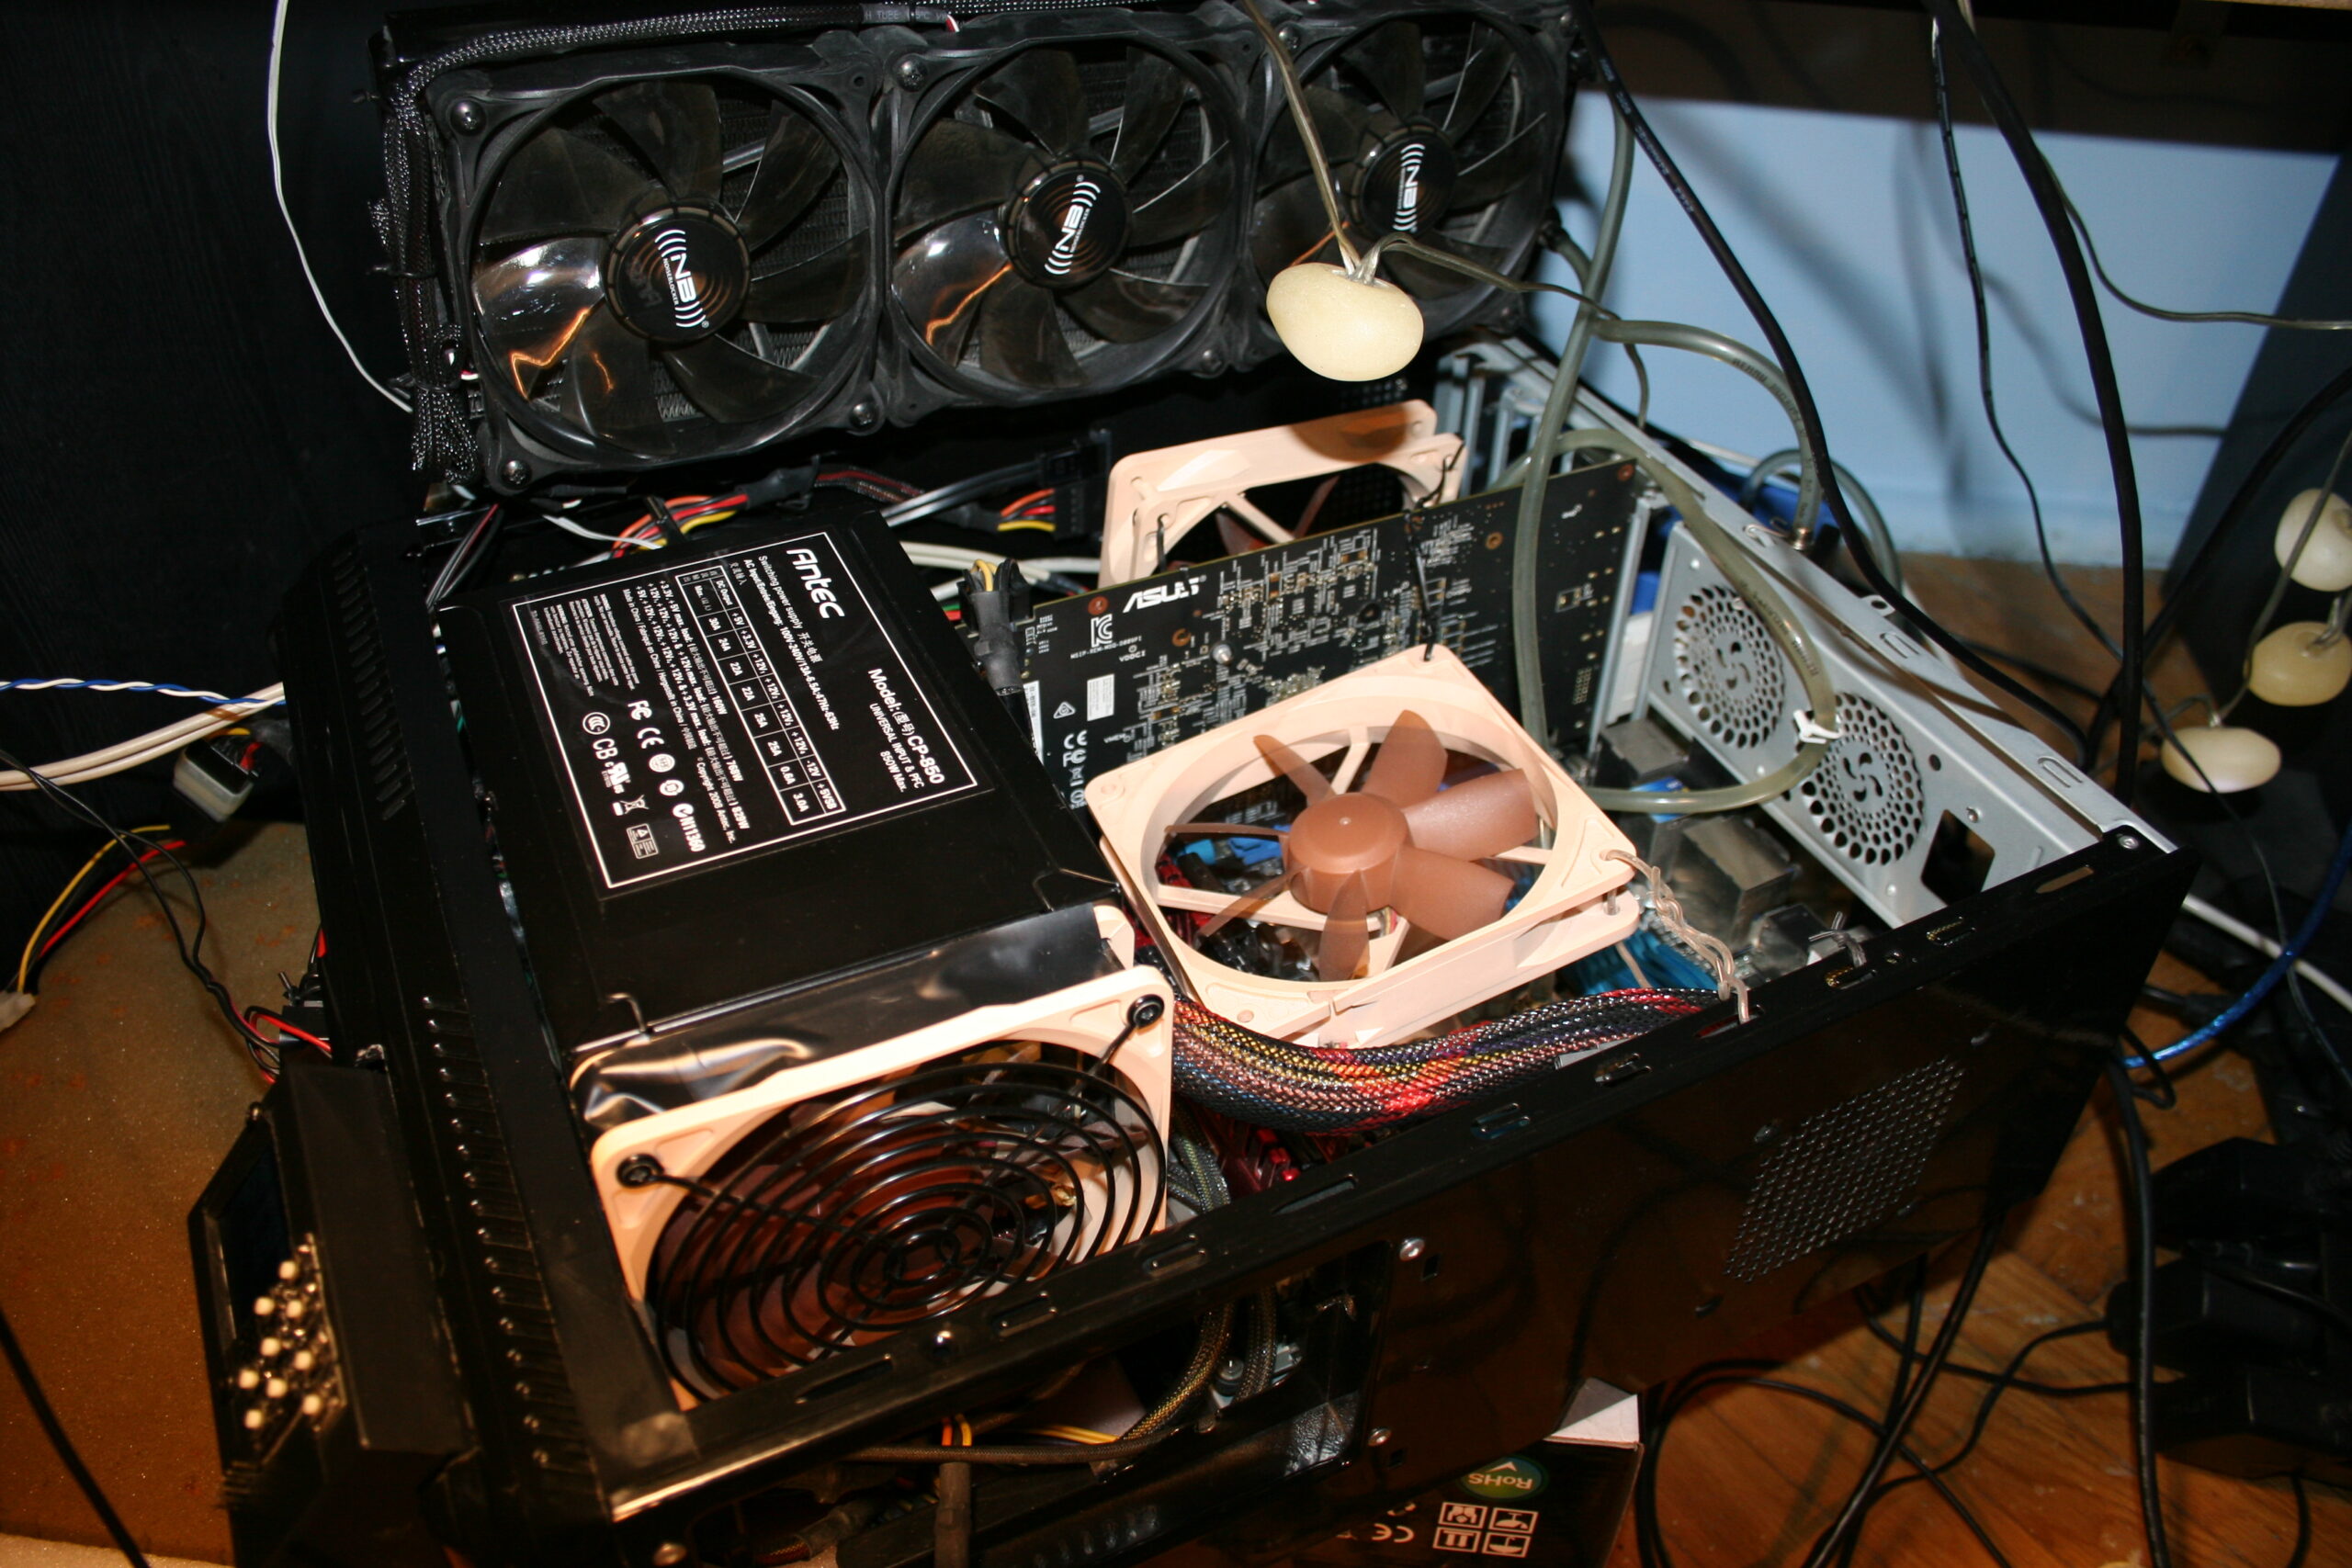
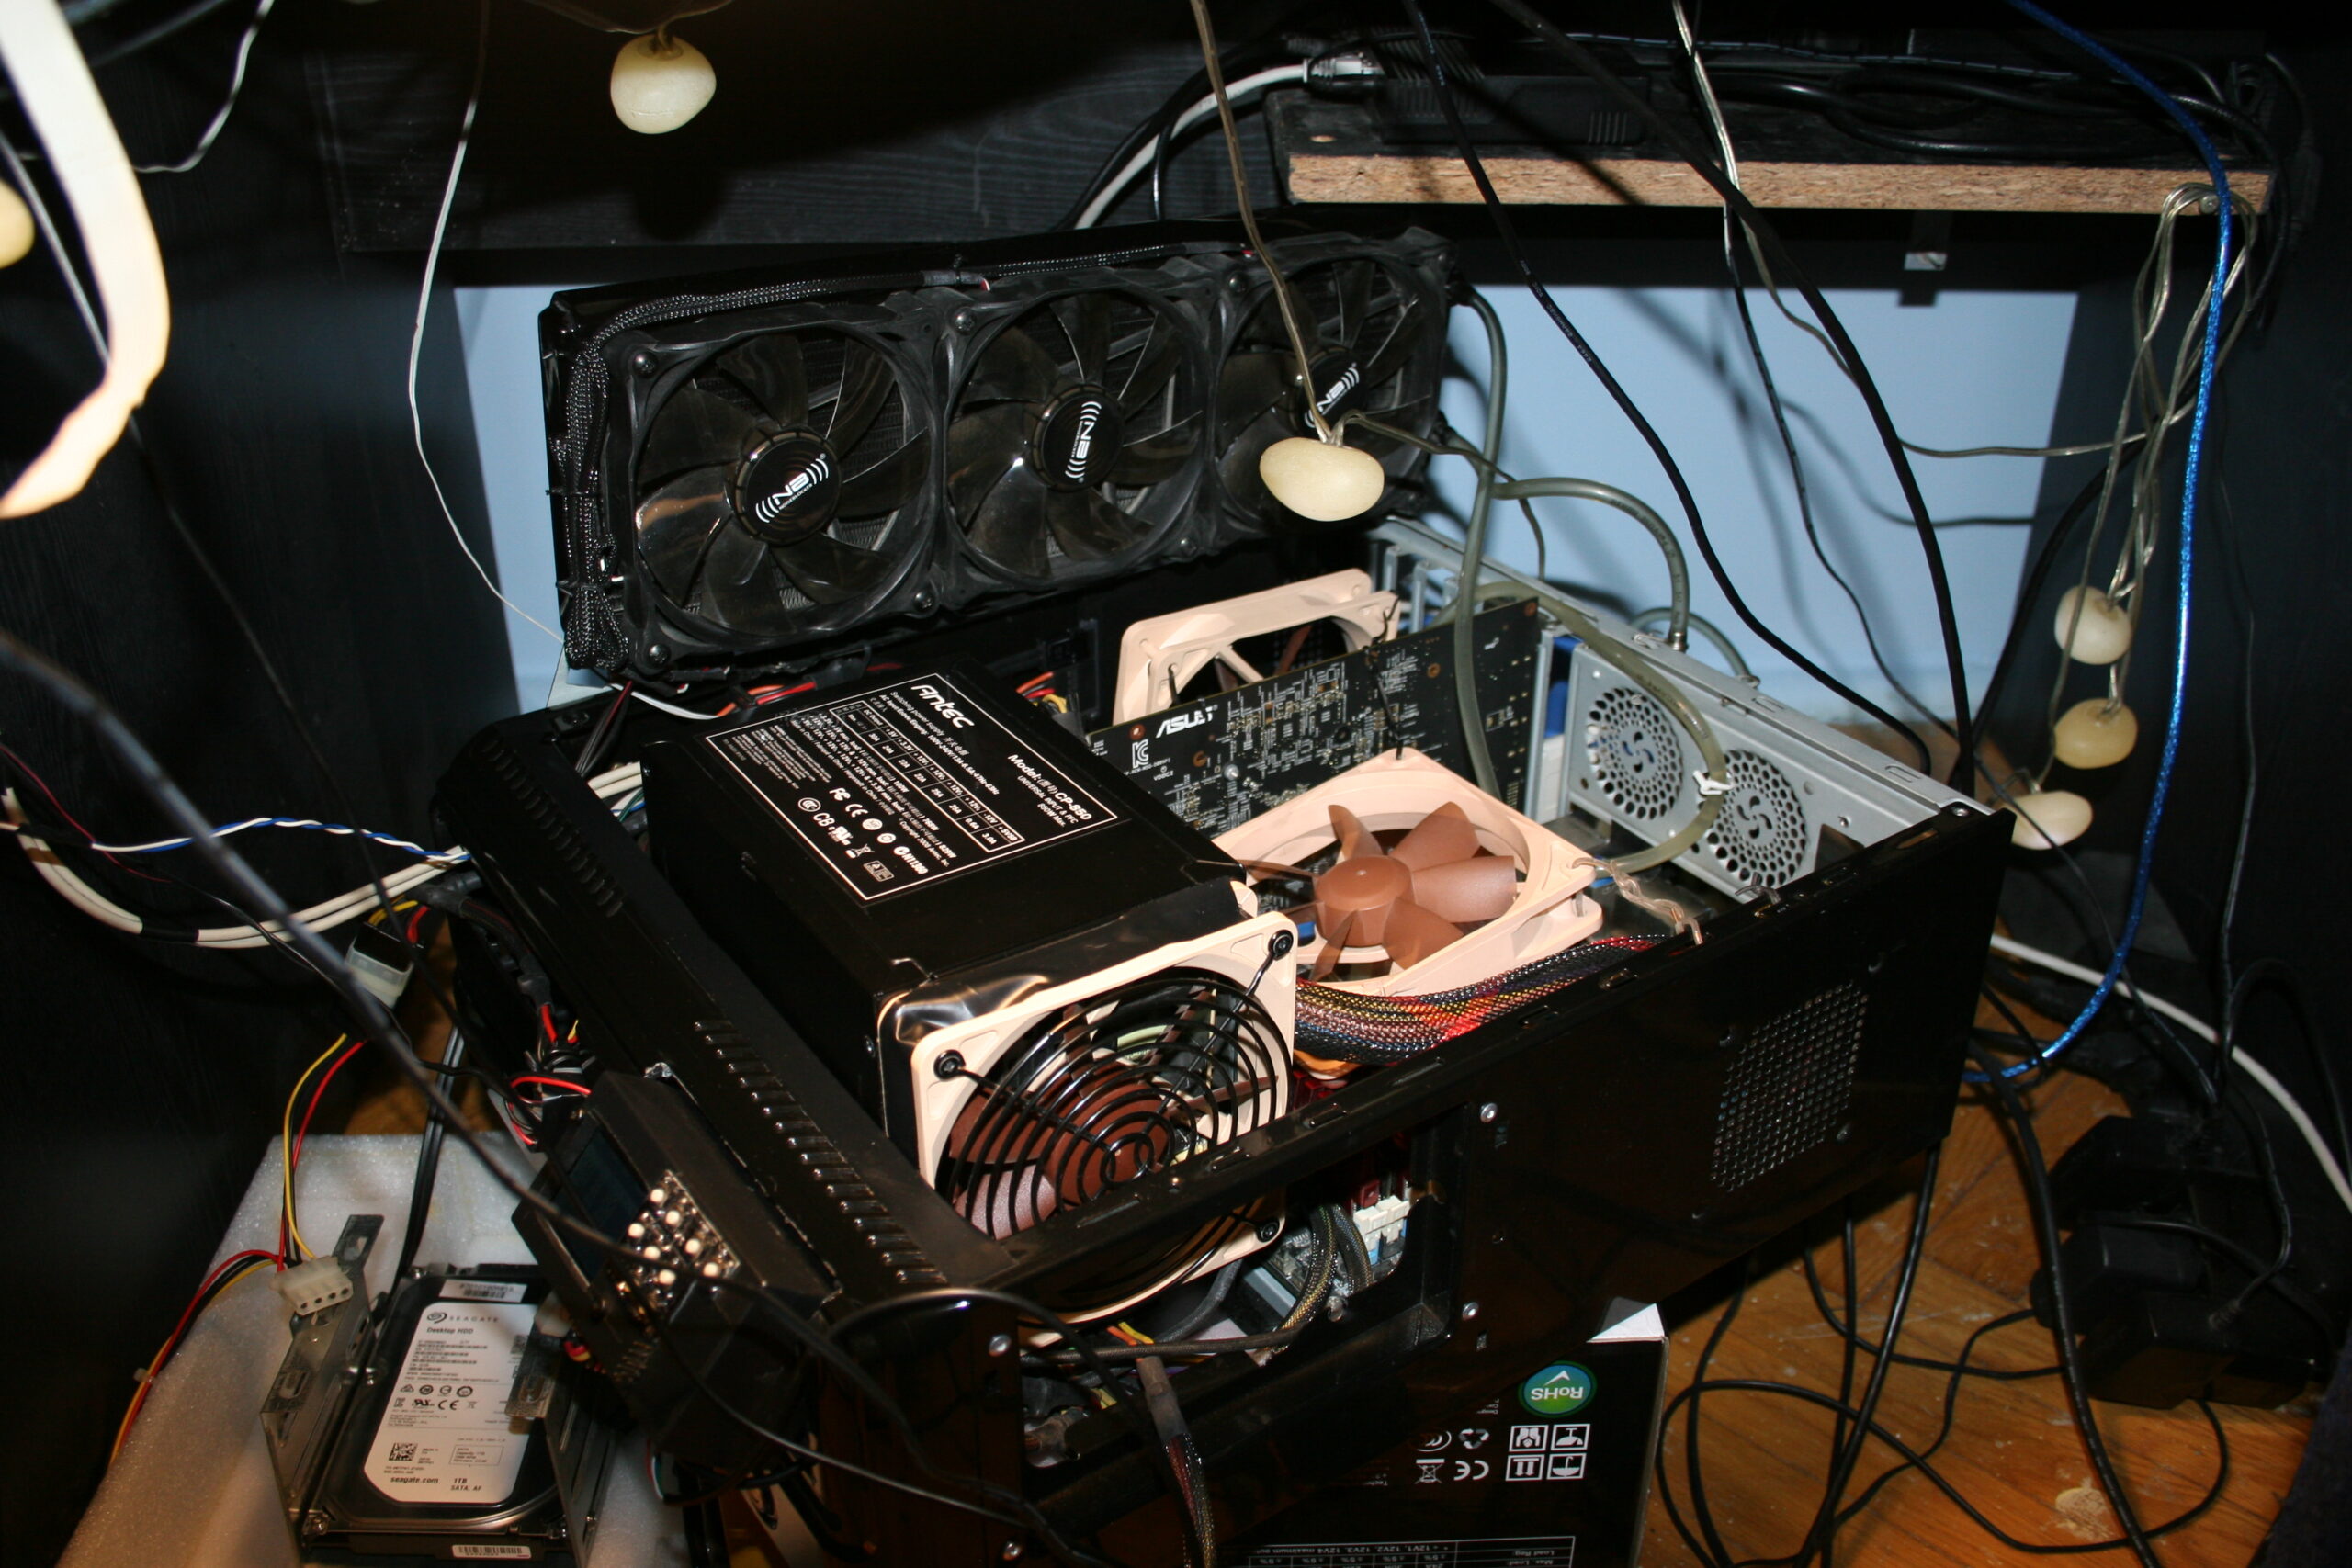
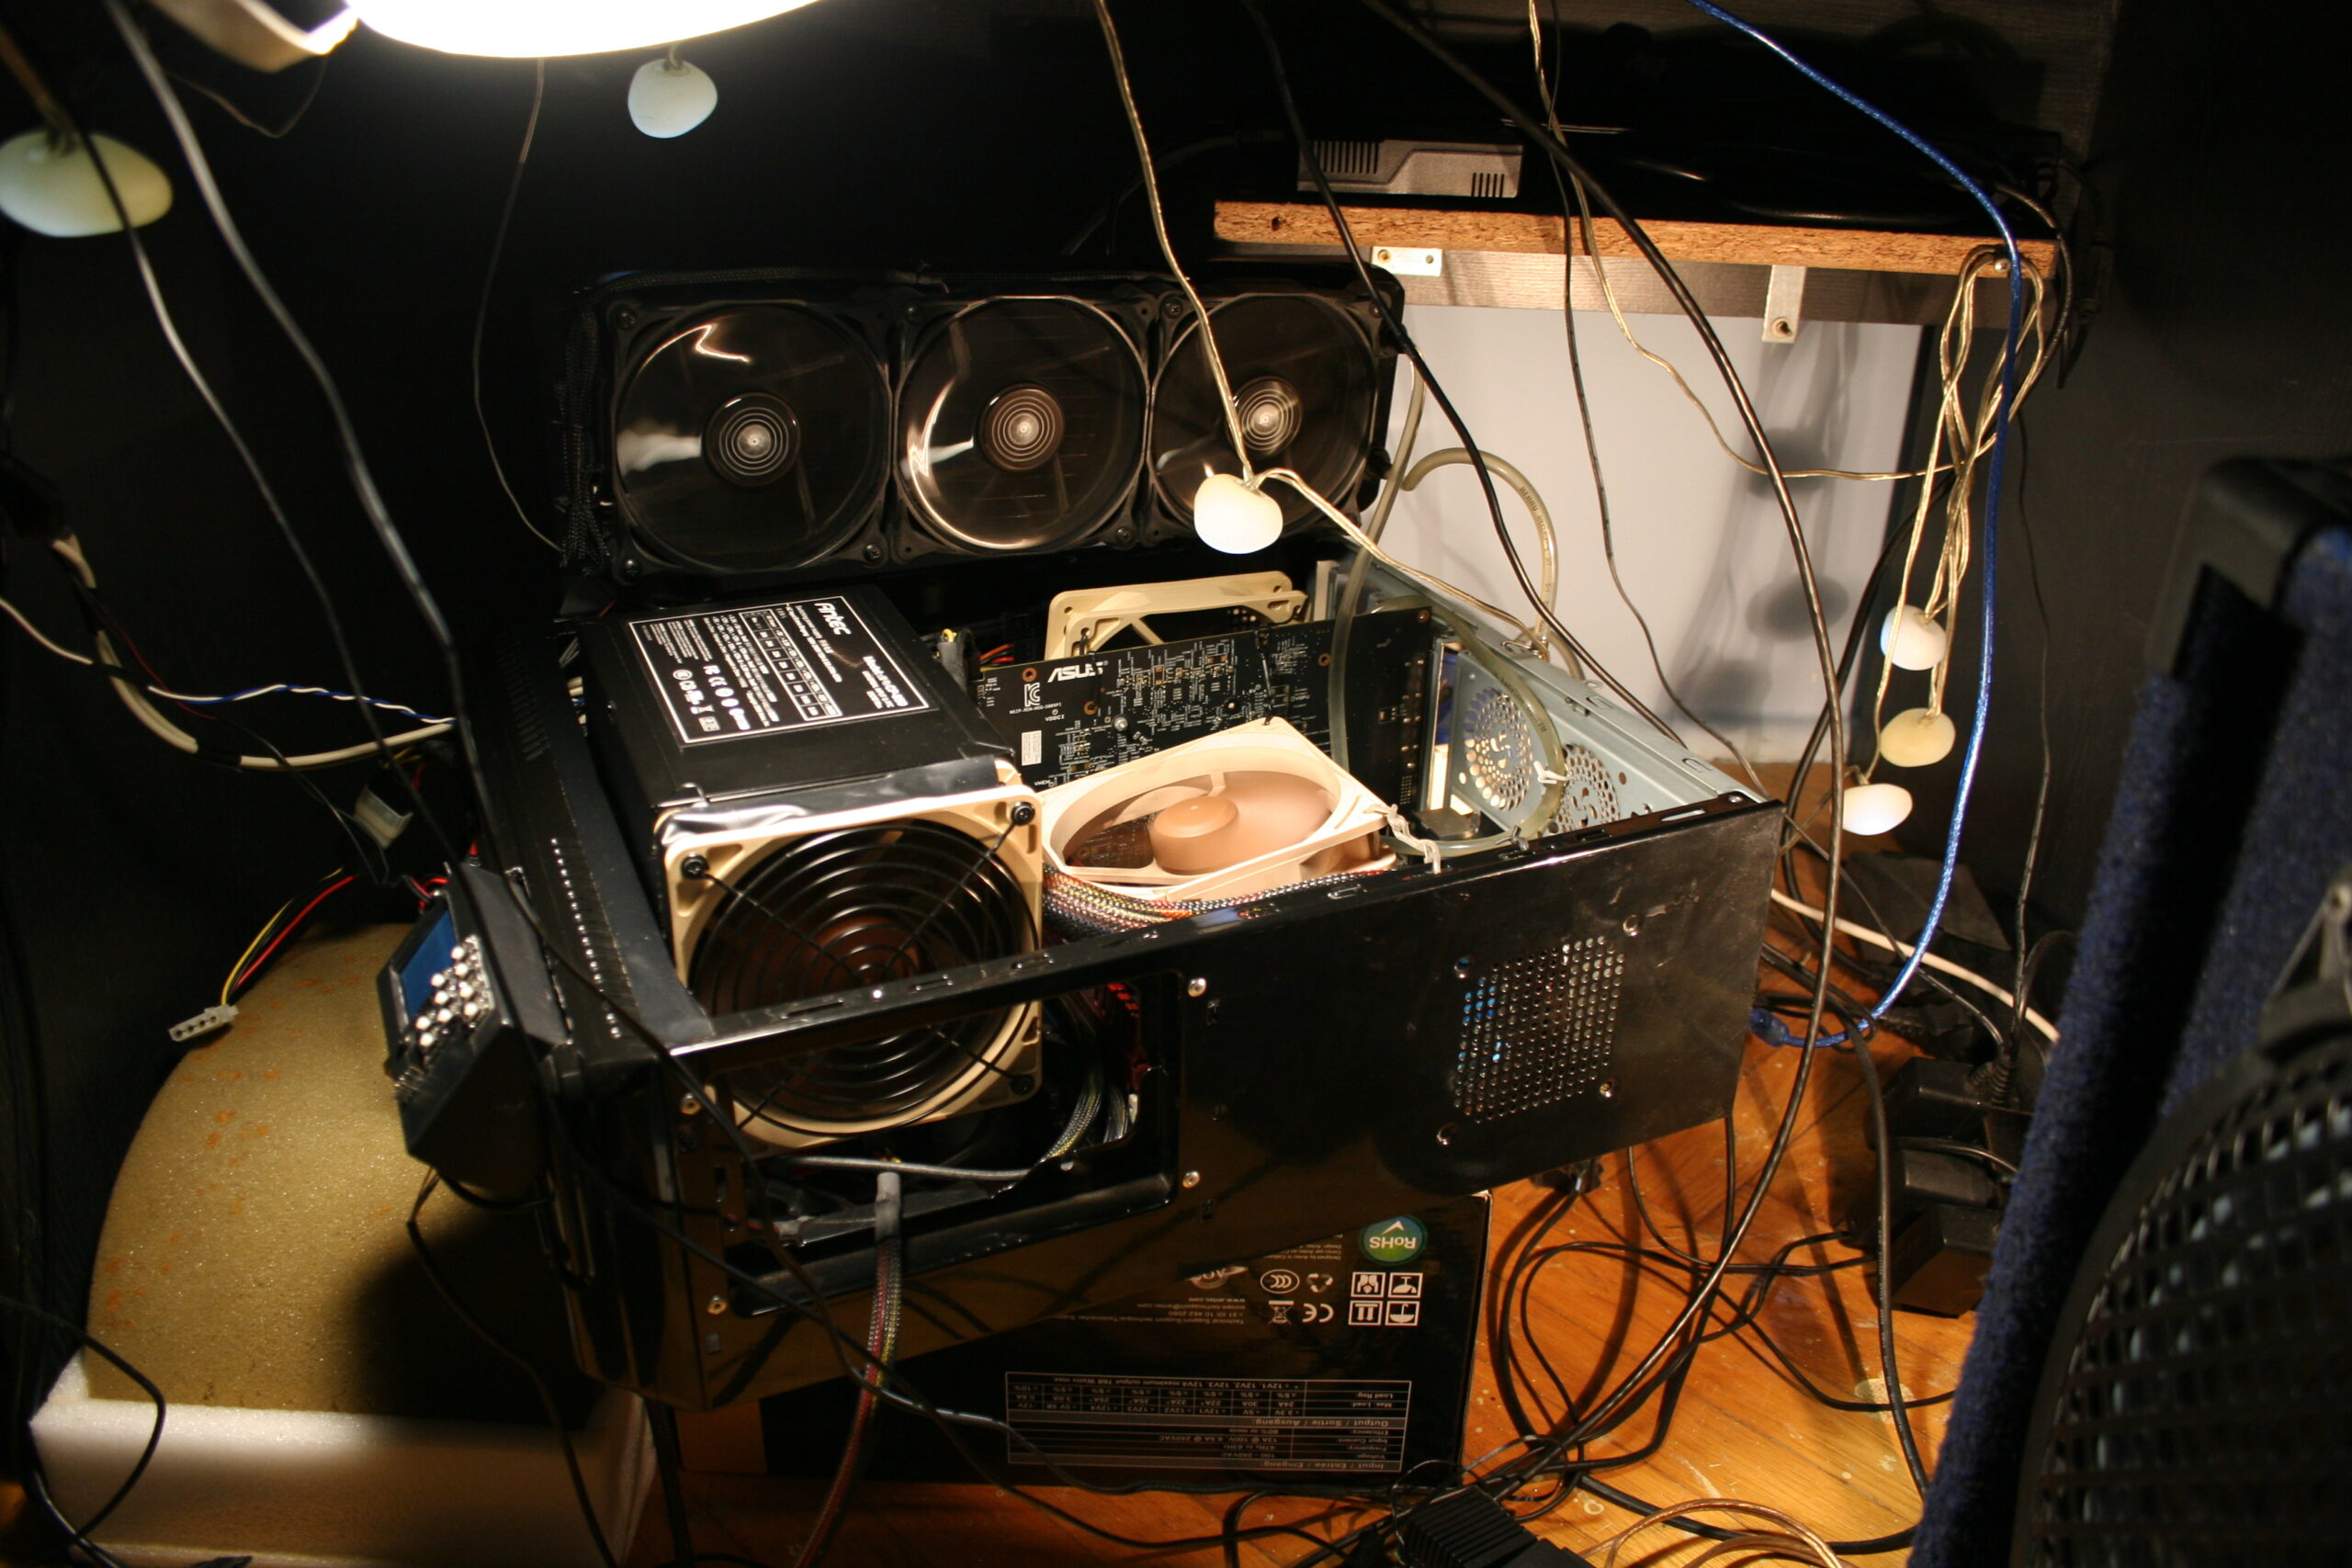
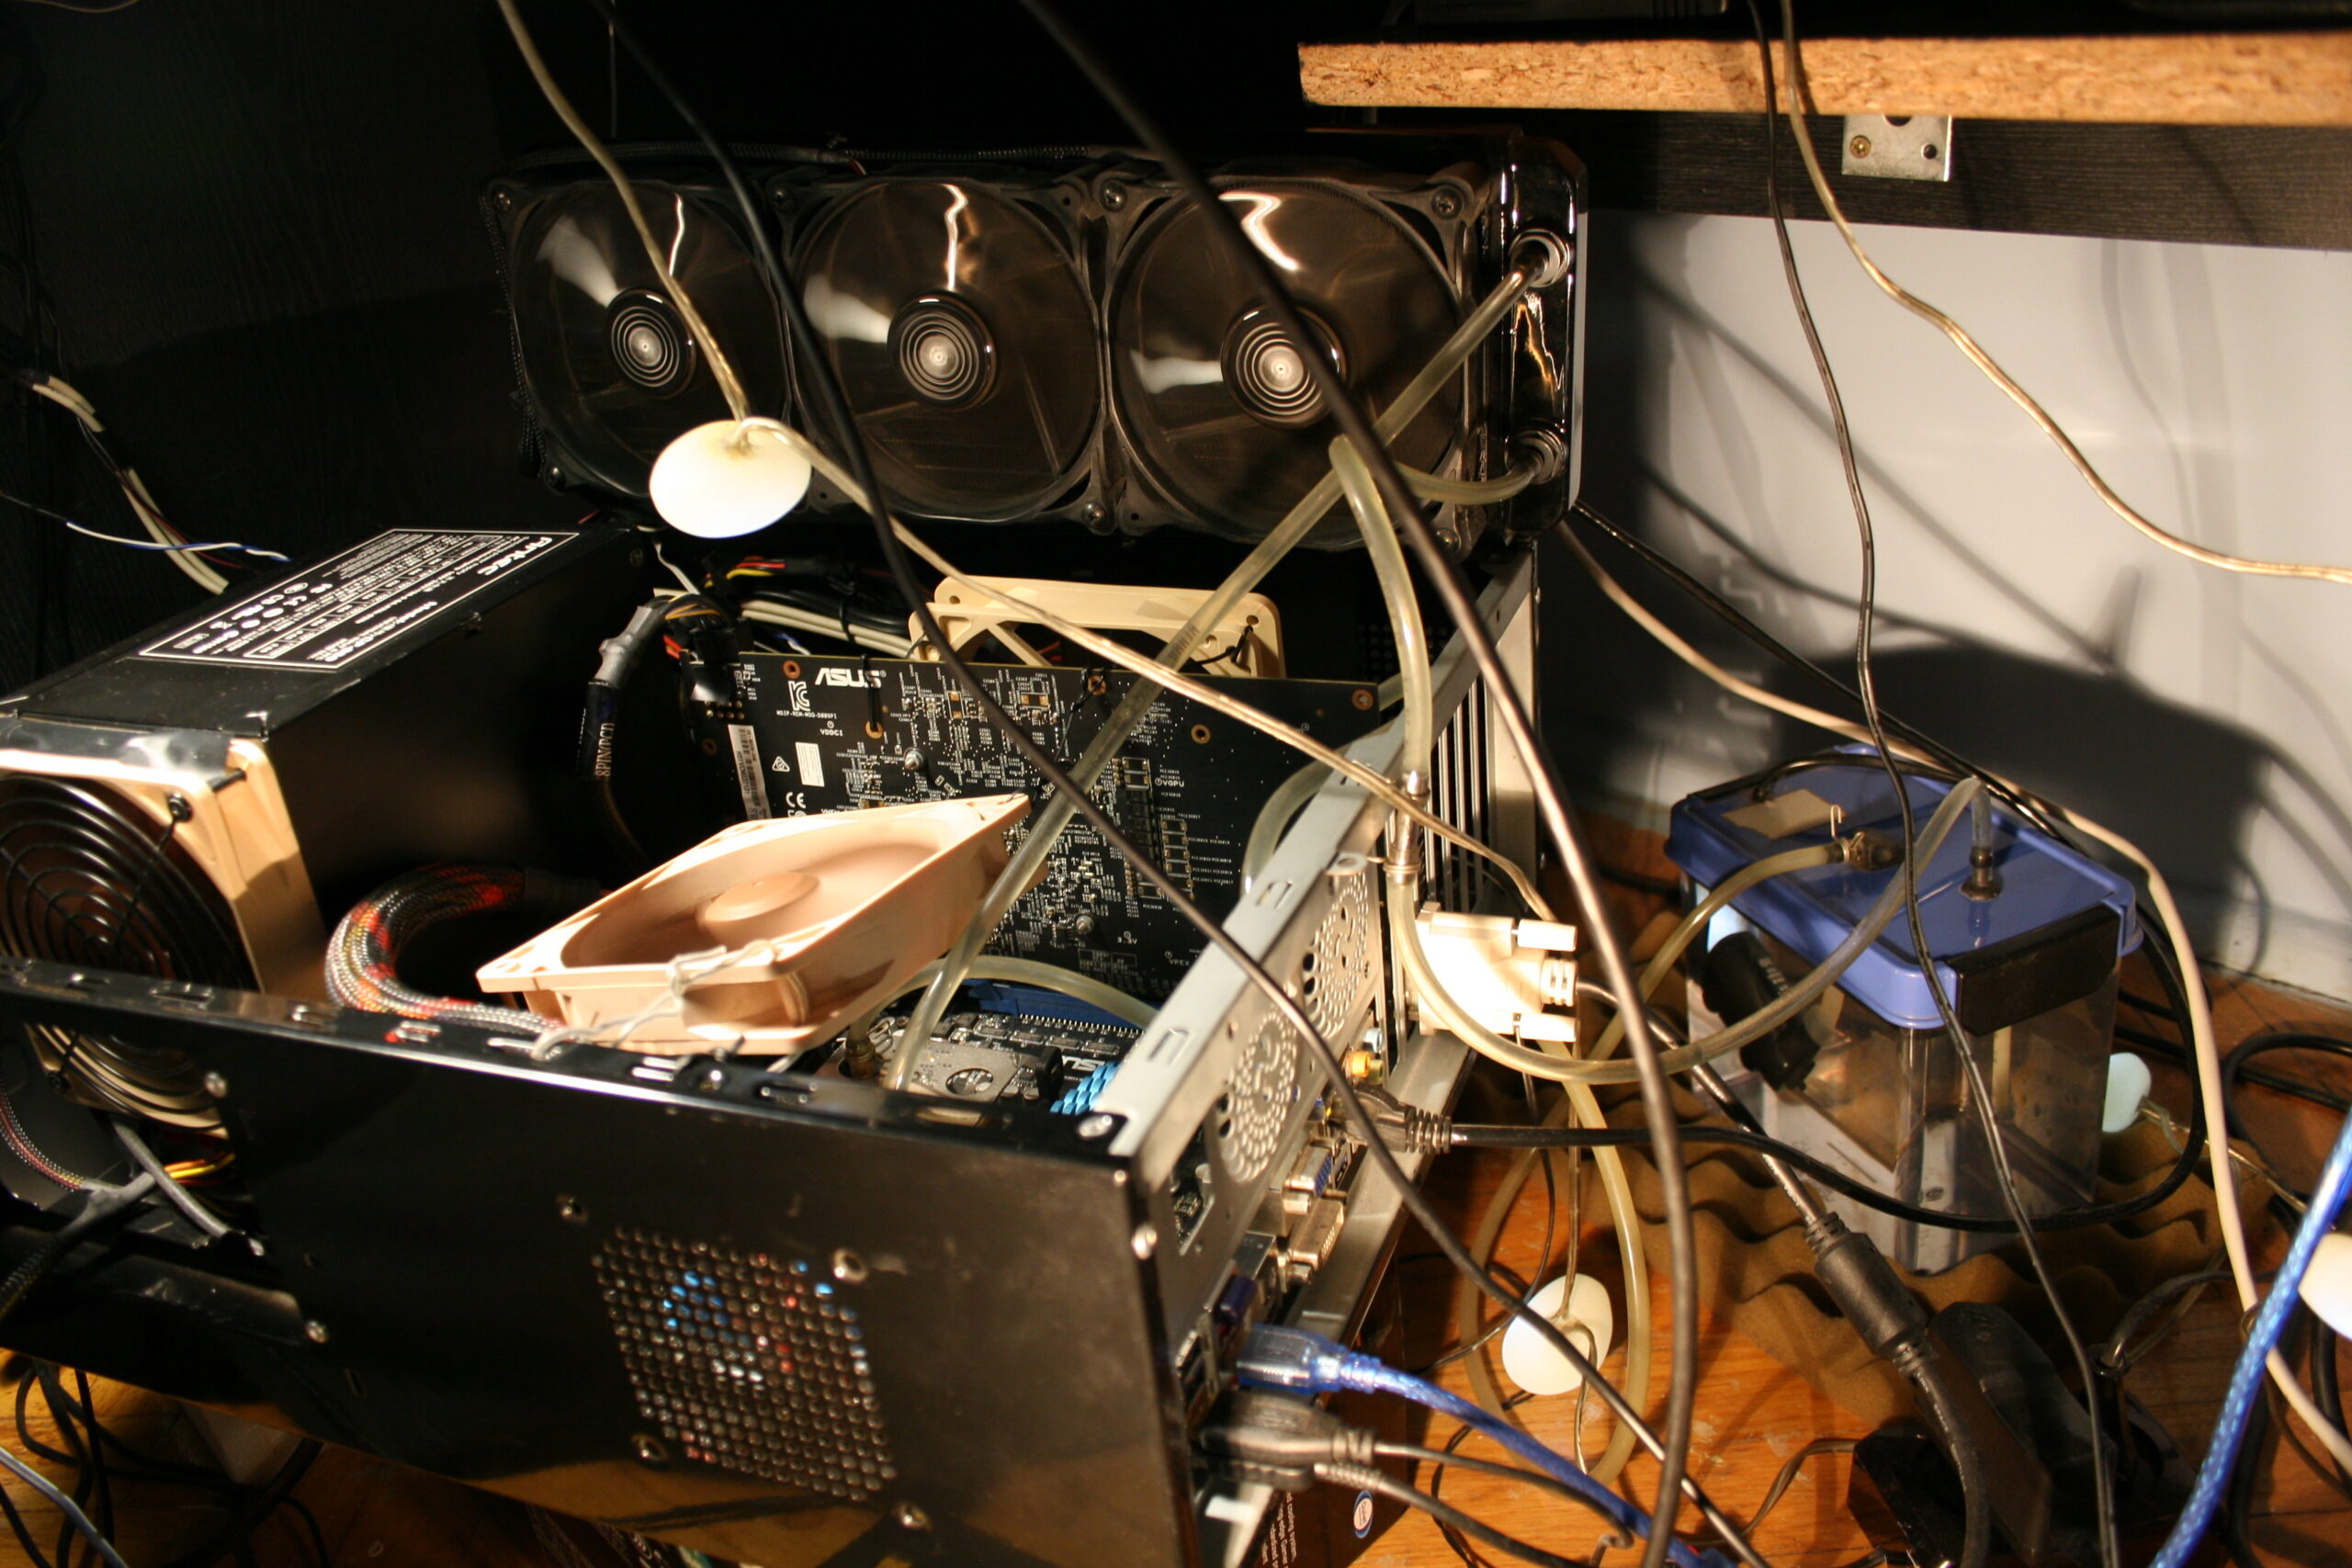
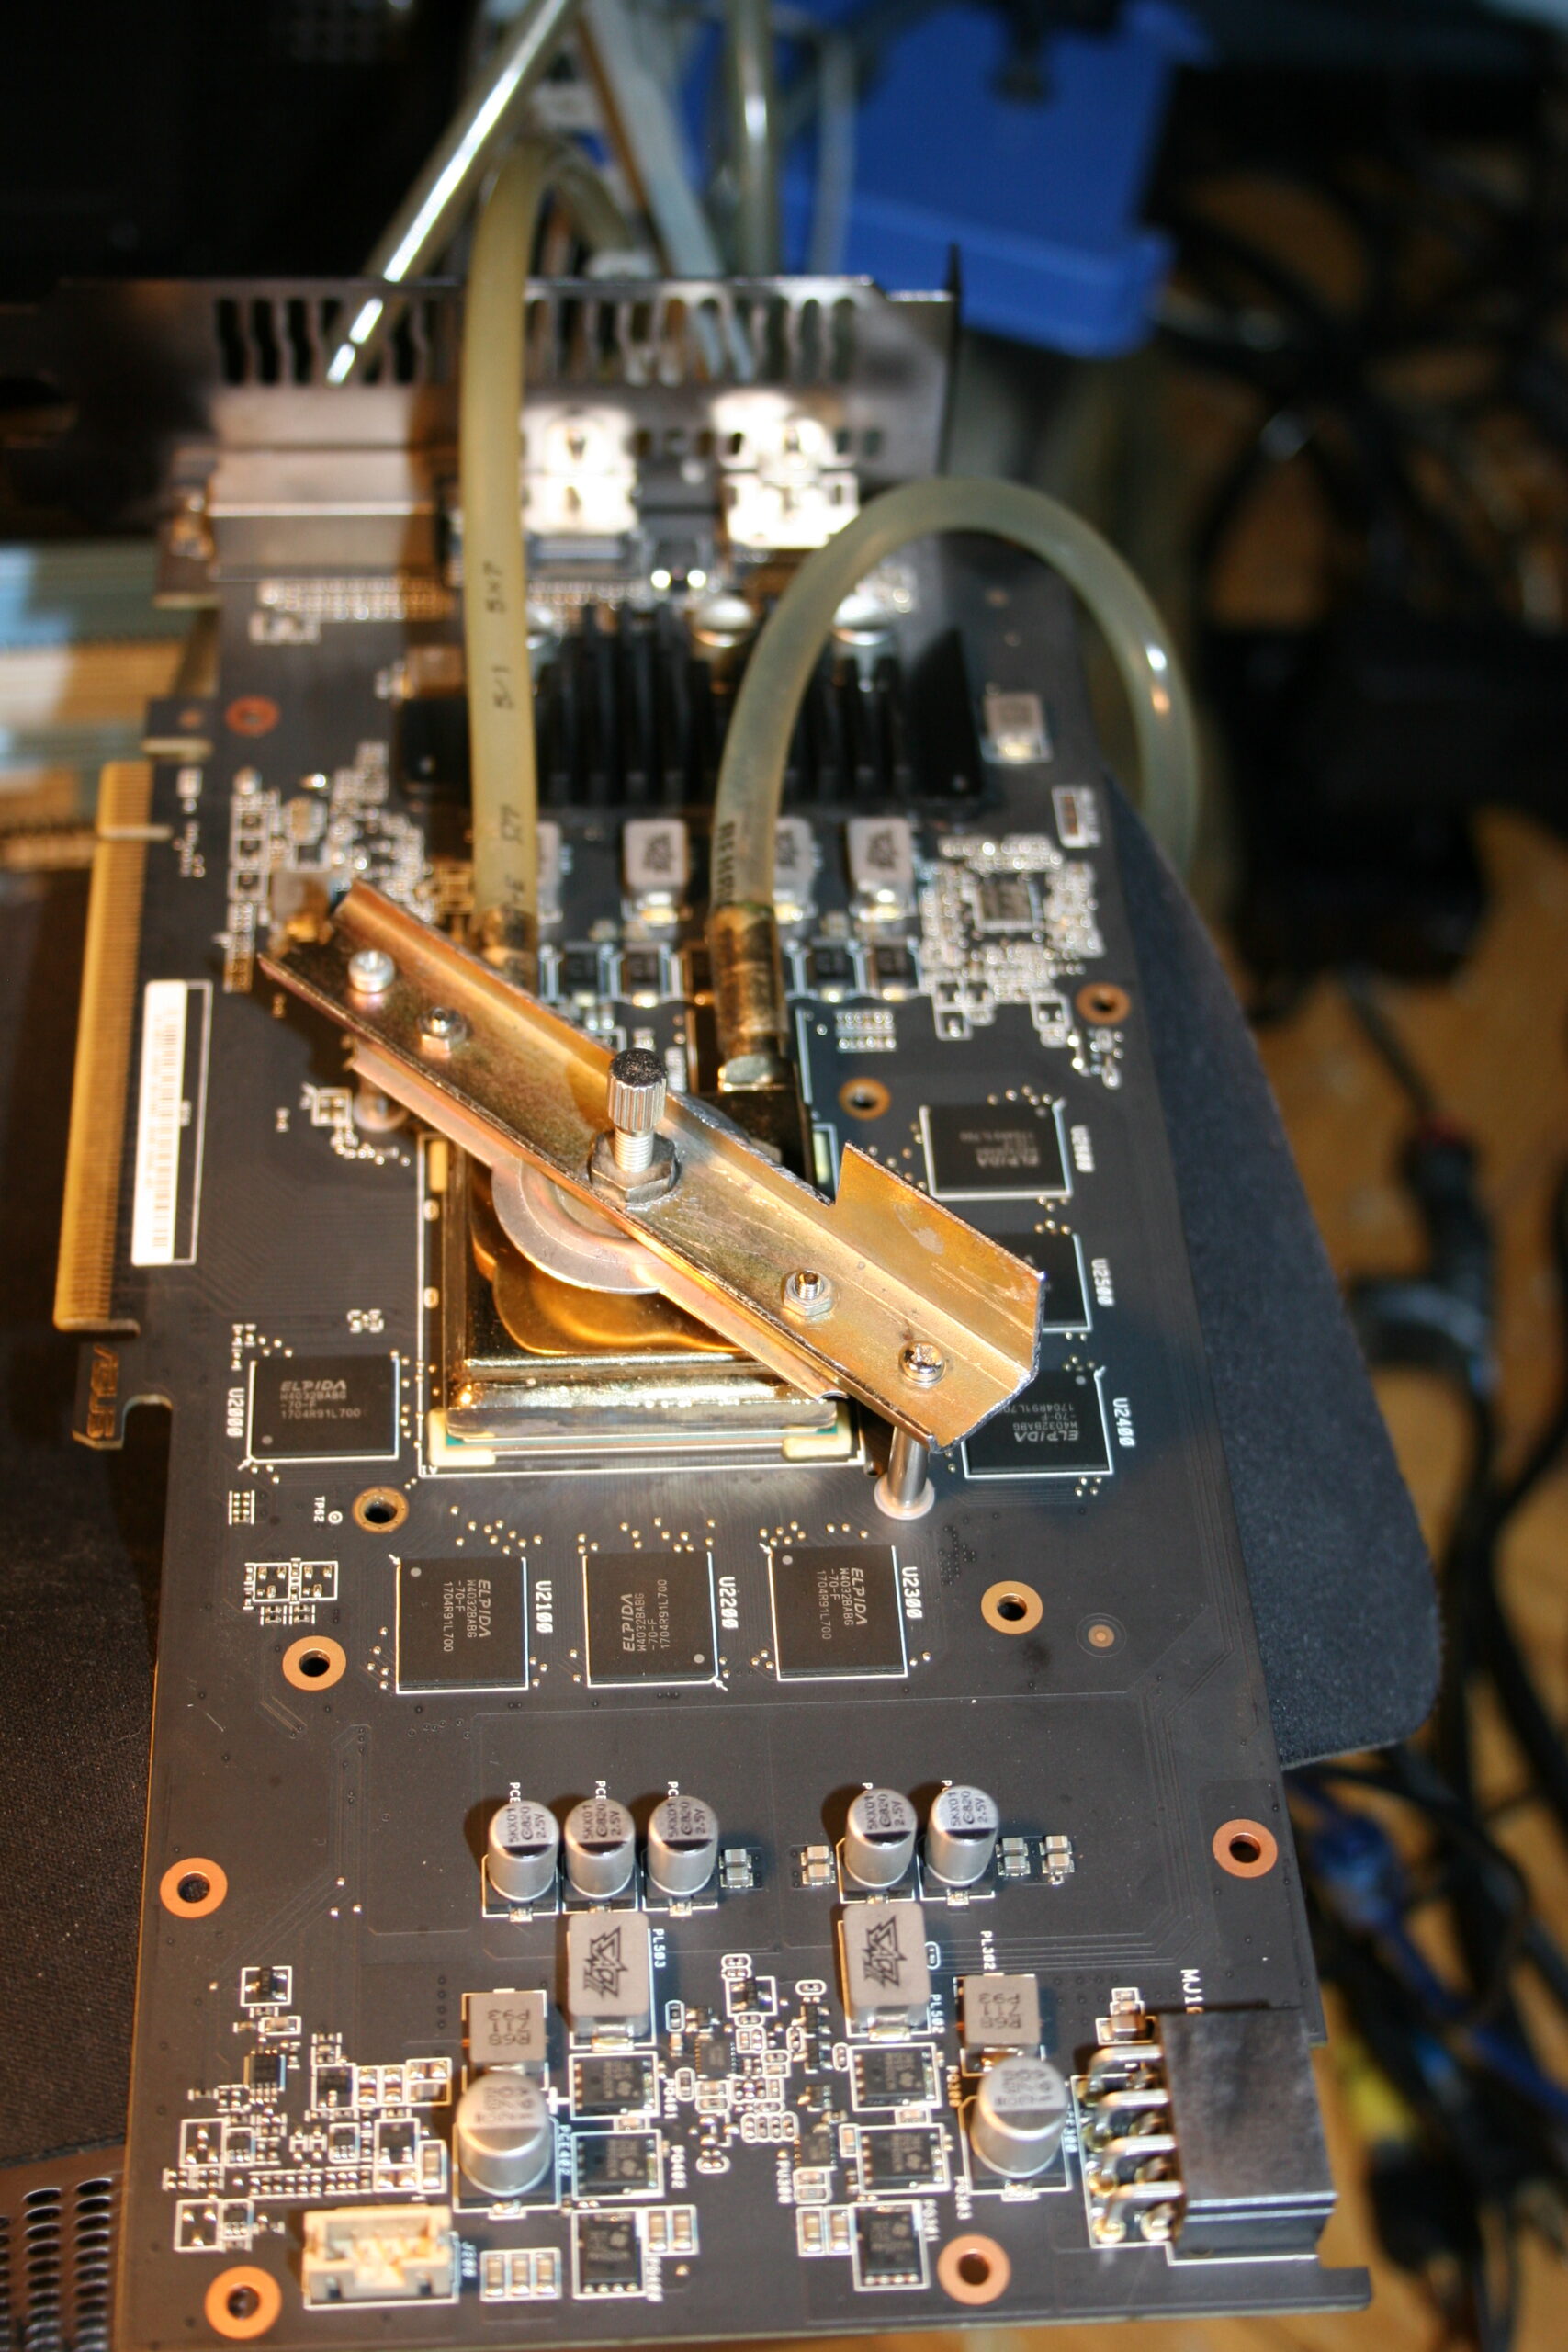
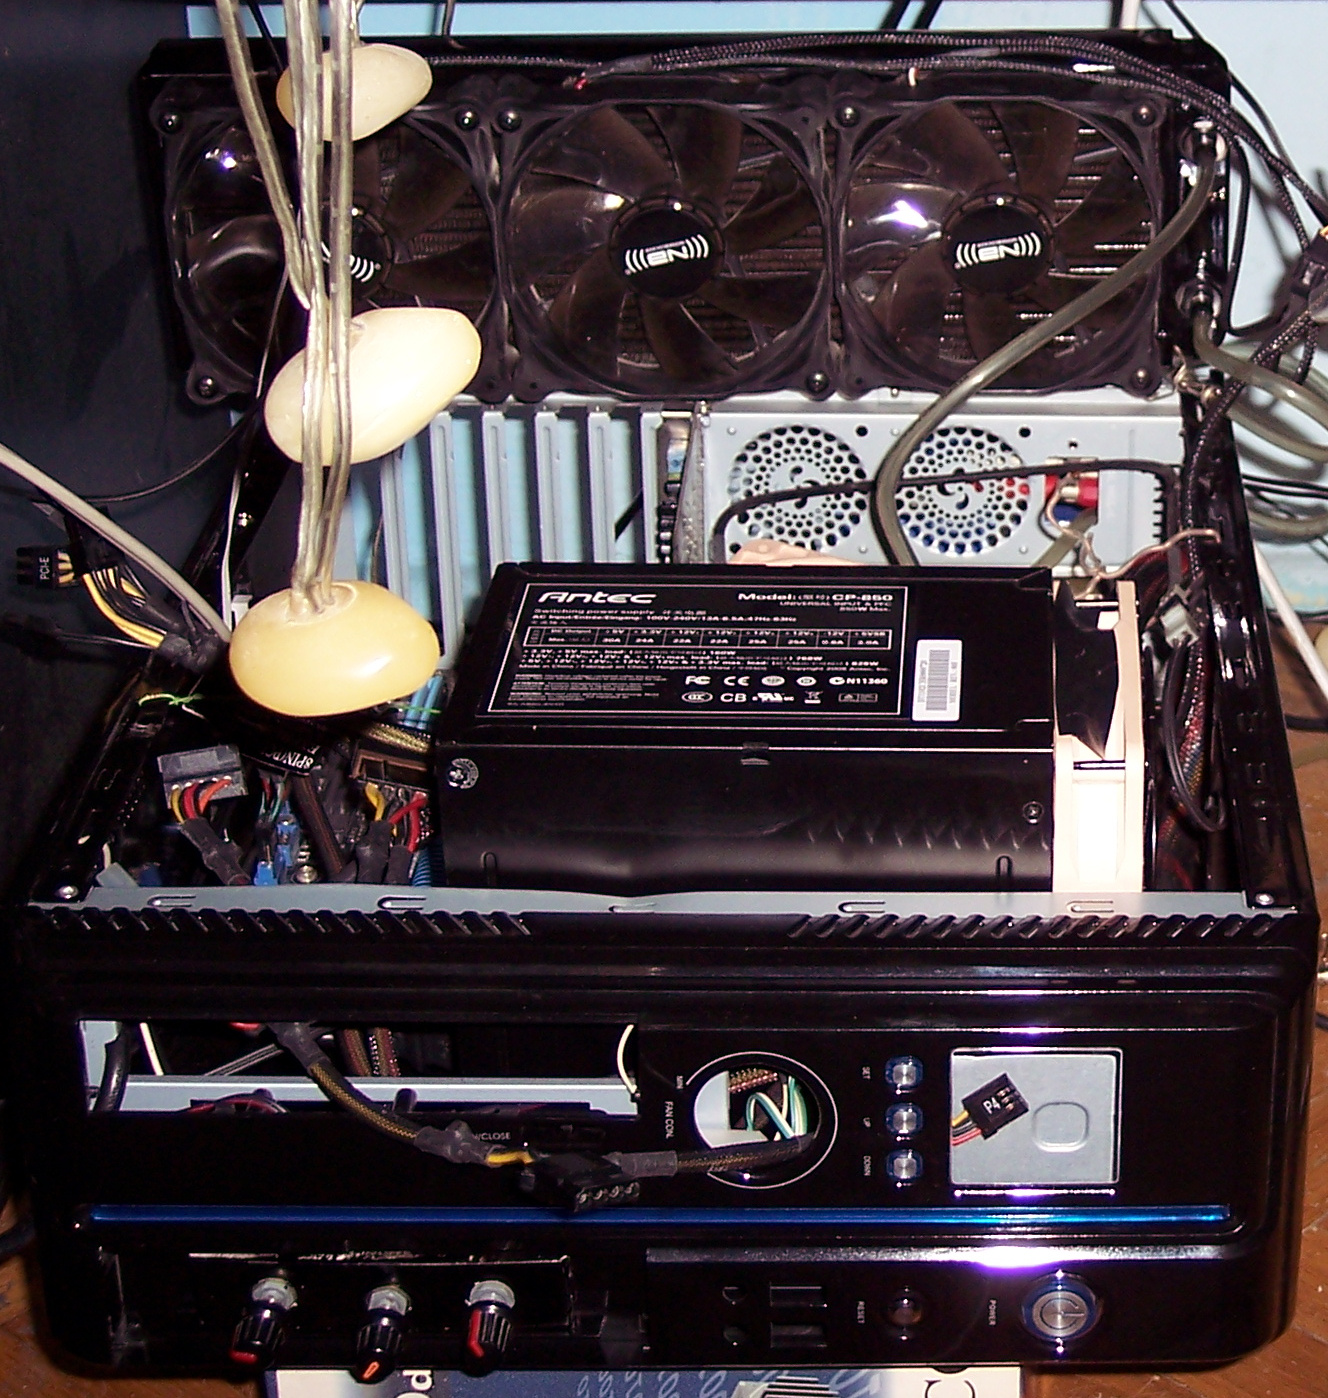
I changed the radiator from kit, to a decent (got it used) copper for one 12cm fan. It was too small as it turned out. Water was heating up, fan didn’t manage to cool it when CPU was at maximum. At some point I had two such one fan coolers. I think it still wasn’t enough, definitely not for CPU and GPU, and too much tubing trouble. So at that point I bought a 3 fan radiator Black ICE GT Stealth 360 and I’m still using it today. It isn’t very deep and it’s easy to vacuum clean the dust from it. I do this like once in 6 months.
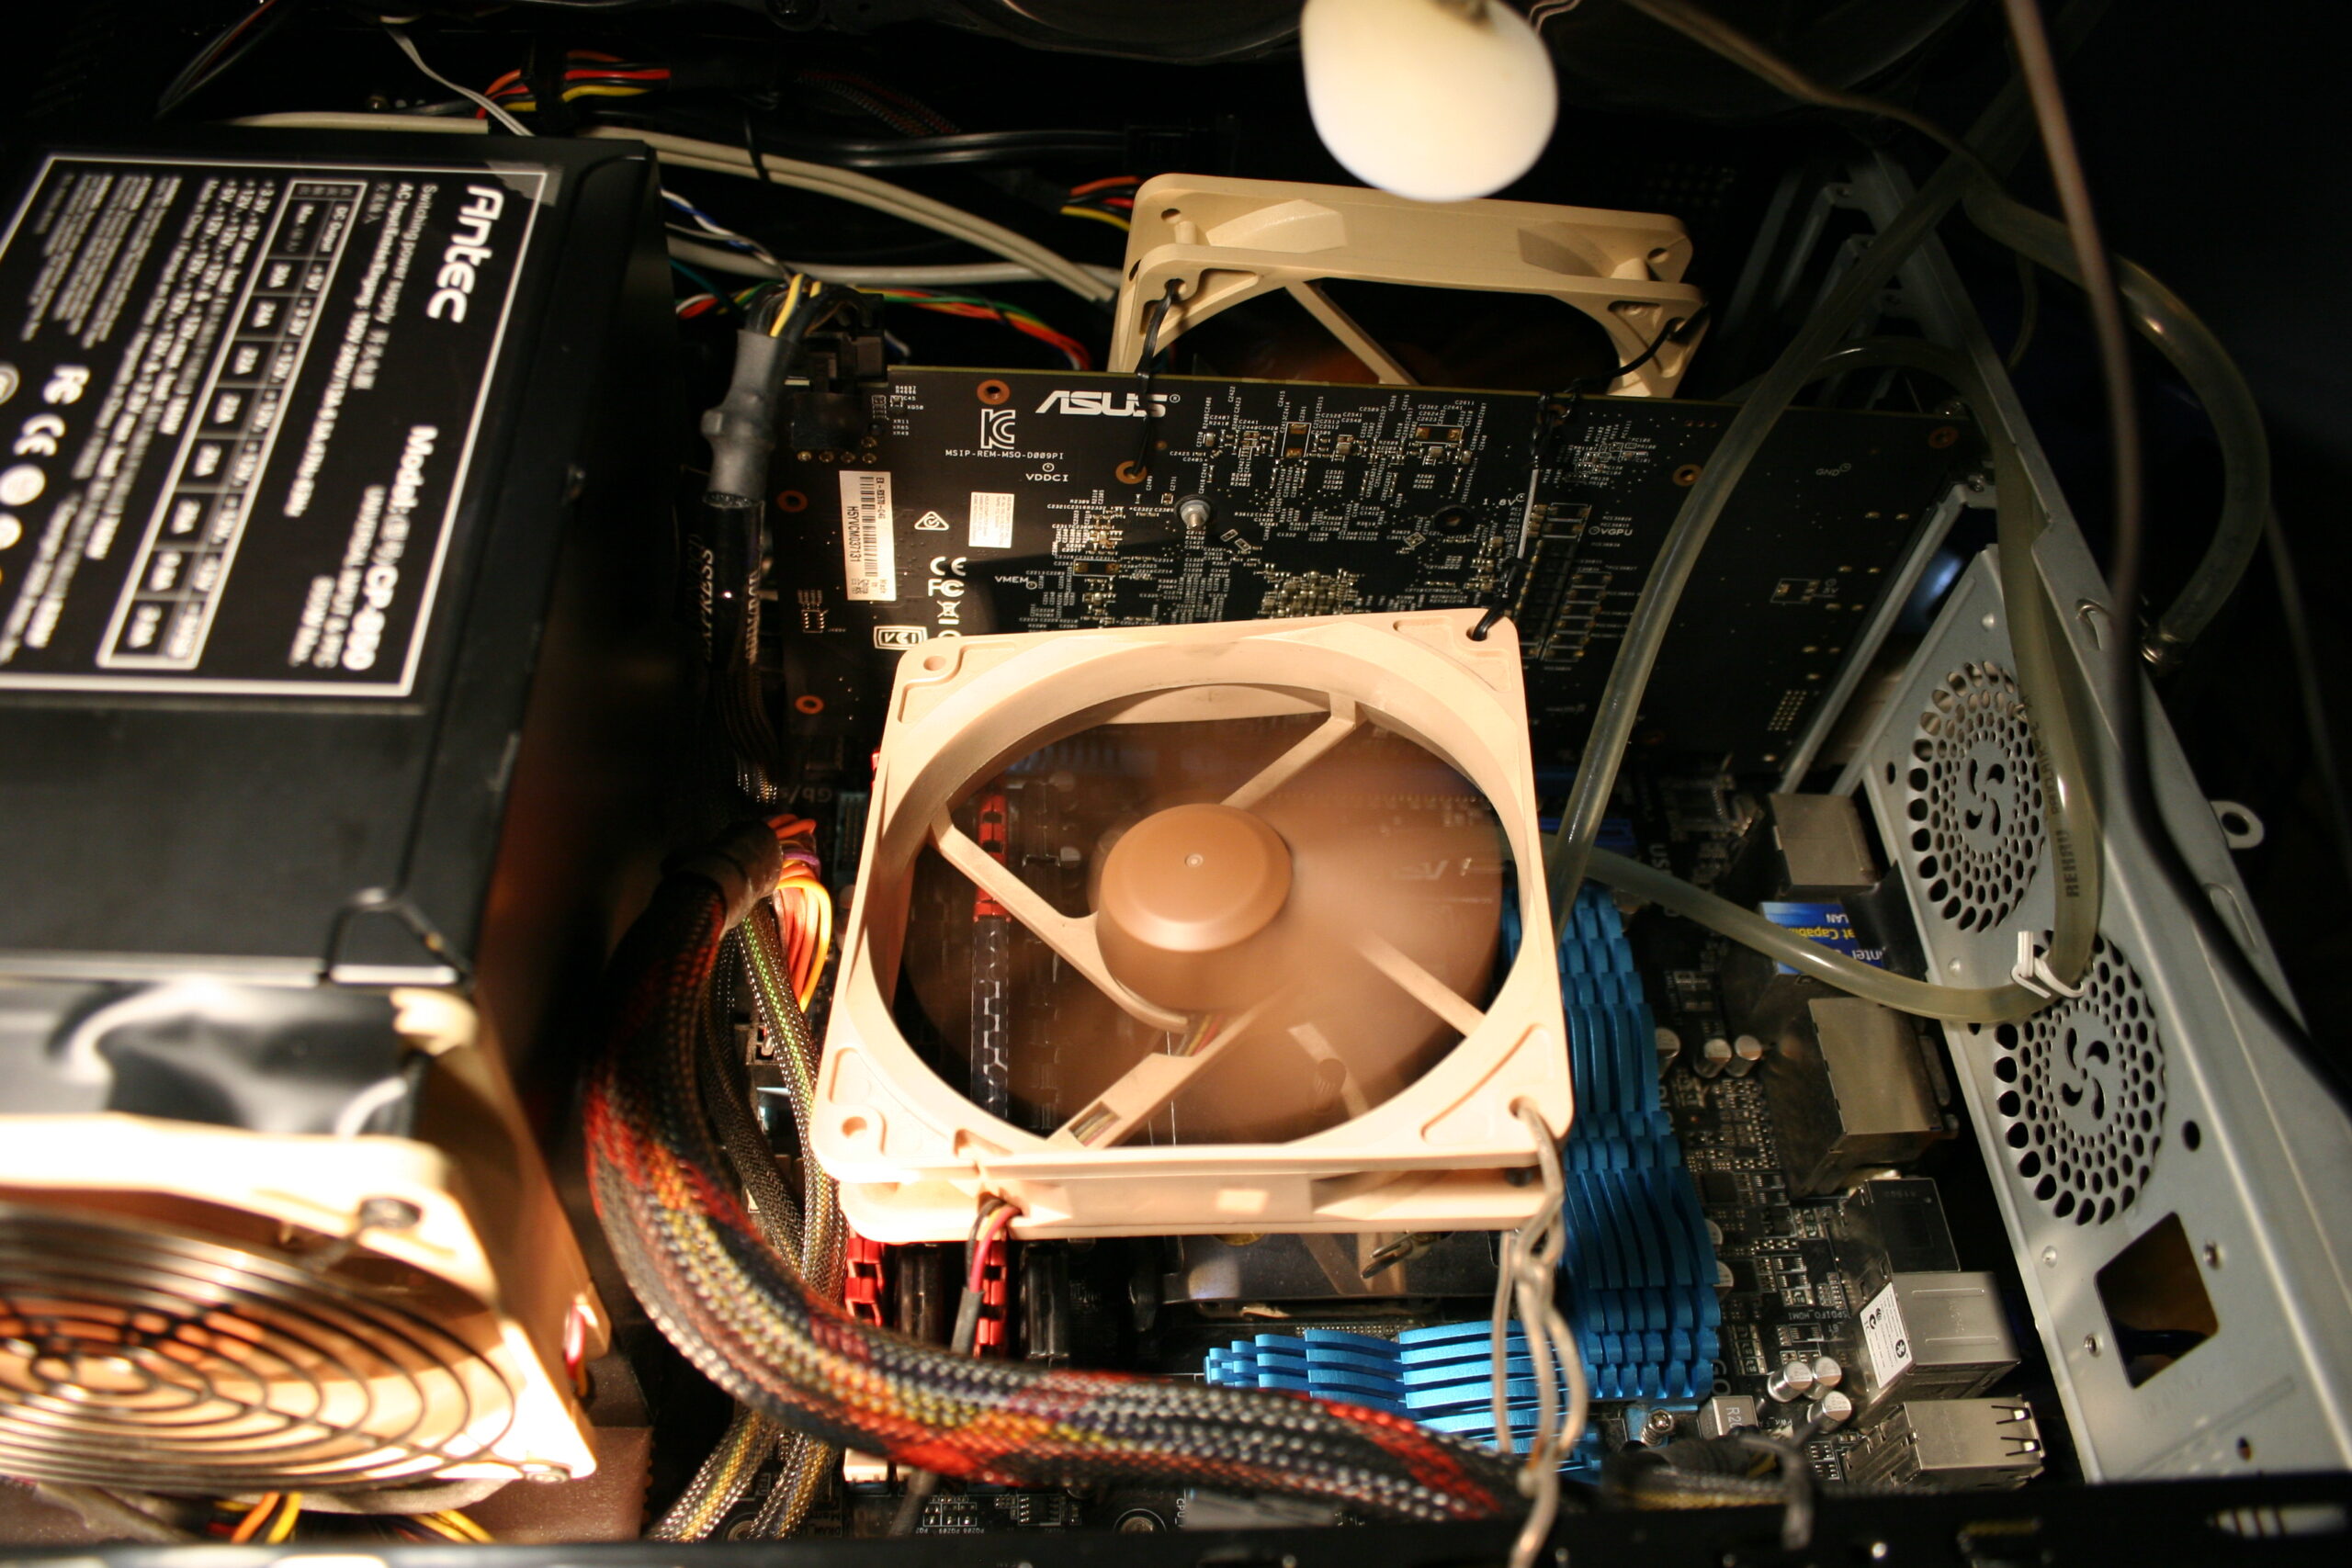
After moving my PC to WC (water cooling, right), I surely hated every CPU stock fan, especially those loud, stupid, cheapest Intel vibrating fans. I once even just cut off that fan of radiator and mounted a quiet Noctua 9cm fan above it, this worked well and was way quieter.
Fans
At some point I searched for quietest fans. After I think 4 tries I settled for Noctua. It actually varies from model to model. And the downside is they are ugly, have distinct color, which I didn’t spray black, to not risk damage.
For the radiator I bought 3 Noiseblocker fans (to be cheaper than Noctua and black already). They also have those rubbers good for mounting on radiator. I’d say they’re okay at low RPM, but not when higher, I can hear some motor noise.
HDD
Naturally after having CPU and GPU water cooled and quiet, the next thing is PSU and HDD.
HDD is easier. I used to wrap it in cloth, but this makes them too hot. So now I have one in some foam, covered by some old noise reduction foam, with the back being open to air.
PSU
I did try 2 noiseless fanless PSUs in 2004 or 5:
Yesico FL-550ATX, a heavy tank (big parts) that was always hot, but quiet
and Seasonic X-460FL, a light empty, too expensive, low power PSU, that wasn’t 0dB quiet, it had some high frequency hiss noise.
After Pentium 4 for better GPUs, I needed more power but there were no such fanless PSUs. I made a very stupid thing and tried using both fanless PSUs in 1 PC. Just connected their grounds and I killed Yesico this way?☠️.
Finally, some time later I found an awesome PSU: Antec CP-850. I even bought a 2nd one for my other PC, a year after. It is bigger then most though. Inside, it wasn’t freaking all cramped to still fit the old retarded dimensions from very first PC ATX PSUs. It is just stupid: airflow is chaotic, no space left, all big hot inductors are nearby big capacitors (which don’t like heat) etc.
Bigger PSU is spacious inside and its design with components in lines is good for airflow, thus the 12cm fan is rotating very slow. BTW I eventually replaced it to a quieter one. There is a big surplus of power 850W, I’m probably using 130W to 300W. So it won’t heat up and suffer from it and/or make noise.
Case
Yes the Antec PSU is bigger and won’t fit most PC cases, at the time there were only 3 available for it, but that was just a stupid commercial for their products. PC cases are likely my last concern and I buy them as rarely as possible. I used this PSU outside of my PC case from 2008 for 15 years now. My other PC has it on top. Eventually I moved to even smaller PC case and I placed it inside, thus making it look like it does now, sticking out.
🛠️Modifications
Apart from water cooling things, I have many utility mods for (or in) my PC:
external relay 220V to power water pump, and DAC (earlier audio amplifier) when PC is on
for years I had just a simple analog knobs for PC fans, now I have my own fan controller
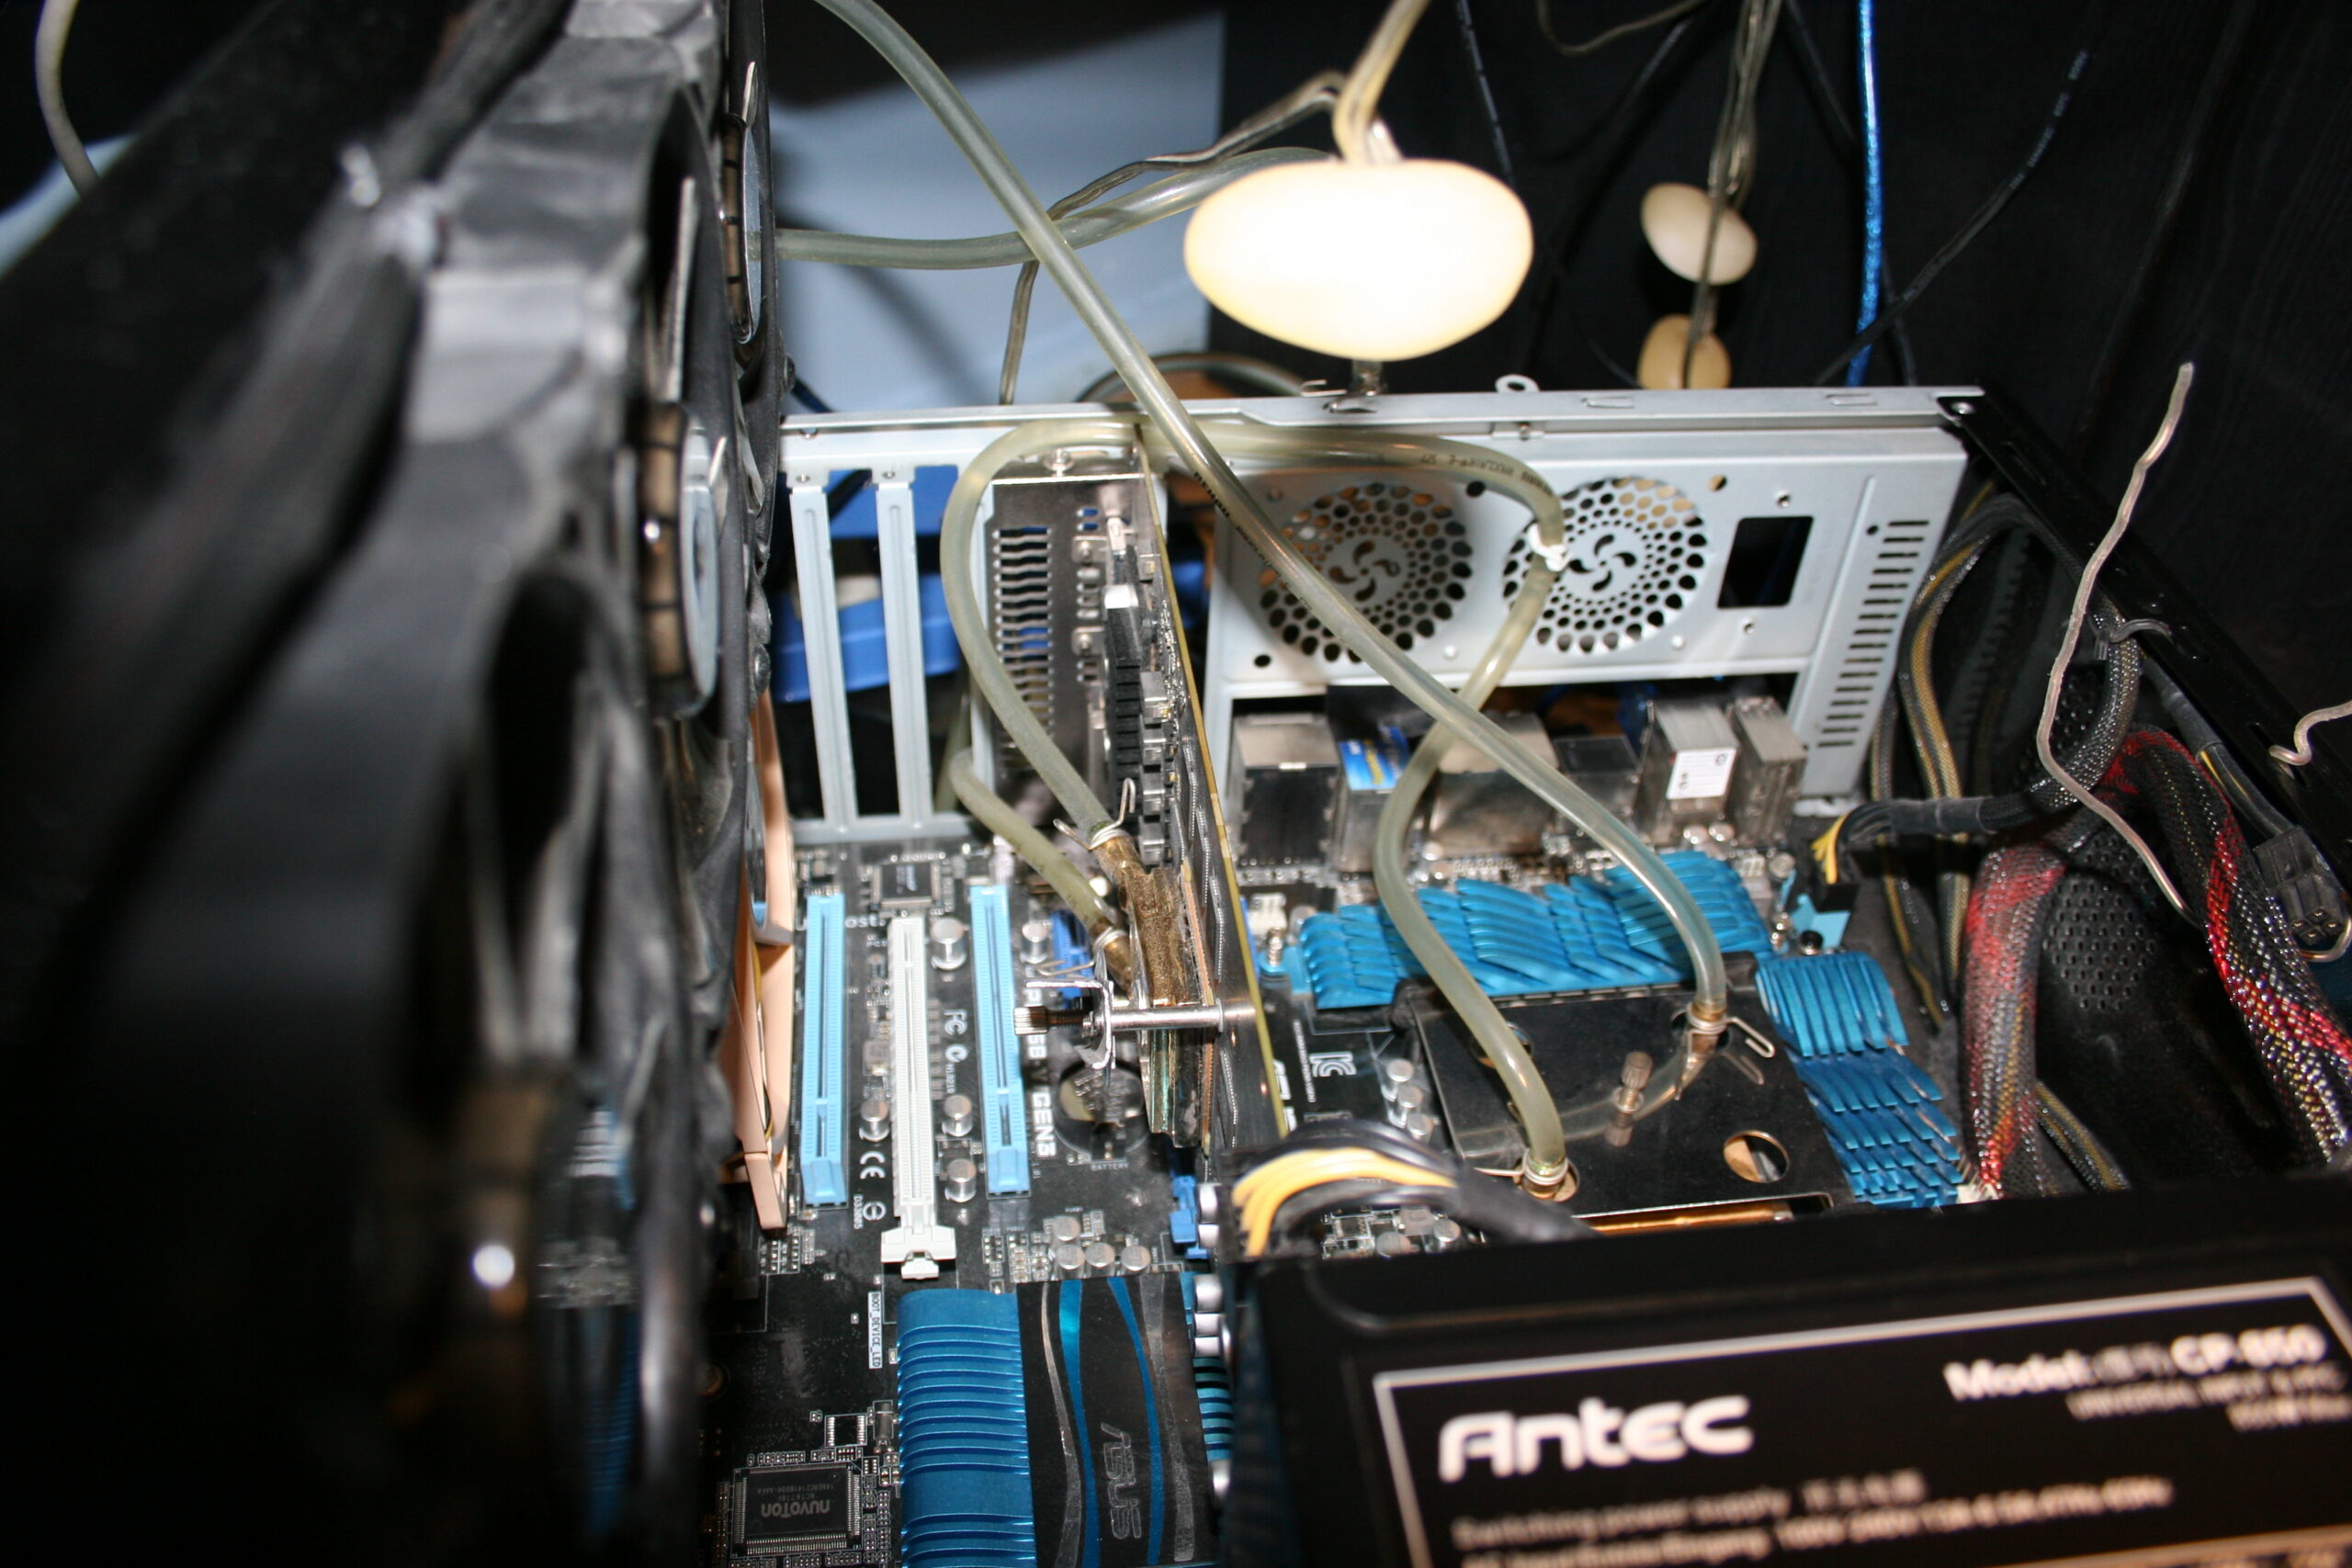
2 USB switch I use it to switch my keyboard and mouse between my PC and a laptop. Works like a charm, I can’t imagine not having this now. I did it on a universal PCB with relays, since I had them available, but they do use 2,5W when on. There are 2 USB input ports and 4 output USB cables: one pair to PC and other to laptop. There are 6 relays, for 5V, D+, D-, and GND is common.
external switch for monitor input, near keyboard This was a bit tricky. I had to disassemble my decent LCD monitor, get to the switch, solder some wires, and add a long 2m cable with external switch. It is extremely useful, I don’t have to lean to press and wait like that too.
📜All my PCs, history table
I list all my PCs and parts so far. Yeah, it’s over 30 years since my first PC. This chapter is very optional, since it has quite nostalgic value for me, but otherwise it’s just mostly (ancient) history.
Legend for the below table:
? – I’m not sure about exact amount or date 💀 – Dead, it broke by itself. Obviously very undesired. 🔨 – I killed it, so my fault. By bad overclocking @, or by accident otherwise. ♻️ – Sold it, eventually. 🗑️ – It became electronic garbage. ☑️ – Still using it.
As a kid I didn’t have new PCs too often, they were also getting faster and obsolete quite often. Then after a brief period of having newer hardware (mostly GPUs) somewhat often, while most of them died too early I think I realized it’s not good to buy (they’re soon to be garbage anyway).
Later I realized that since years CPUs don’t really get much better, yet they do cost same or more. Thus my CPU and MB is still from 2012 (happy 10 years man). I did have them overclocked for few years, but now I even don’t. It gets 30% faster, but uses 30% more power. So I’d rather have 100W (not 130W) at idle, when I just listen to music or watch something. I don’t need that extra 30% like I did when I was building C++ often, for Stunt Rally.
After all PCs are just tools (and not just gaming like consoles) but for learning, creating and entertainment too. So naturally buying a PC is an investment, that has to be done rationally.
Some time later I decided it will be better to buy (instead of new PC) a new ergonomic chair (for PC) and a bed. Those are similar priced but much better for health.
➡️End
Well in Sep 2023 I bought a new PC, even with case, only PSU still same. Added it to history table. It feels way faster than my previous, like 3 to 5 times. It seems I’ve skipped a new PC (CPU+MB) somewhere along the last 11 years. I always aimed for new PC to be at least 2 times faster to not waste money and time for updating. It needs some time to update, like a week to choose right components, move OS setup, etc. I cleaned dust in this now old PC and moved to air cooling again, then set it up and gave to my mother. Replacing previous one, which was way too slow, nowadays even movies were not smooth. Yet still almost all PCs of mine drain above 100W at idle. Well it’s good to update and do stuff faster, but of course still a high cost to get new technologies. I did move to water cooling with my new PC too, just a couple of years later in 2026.
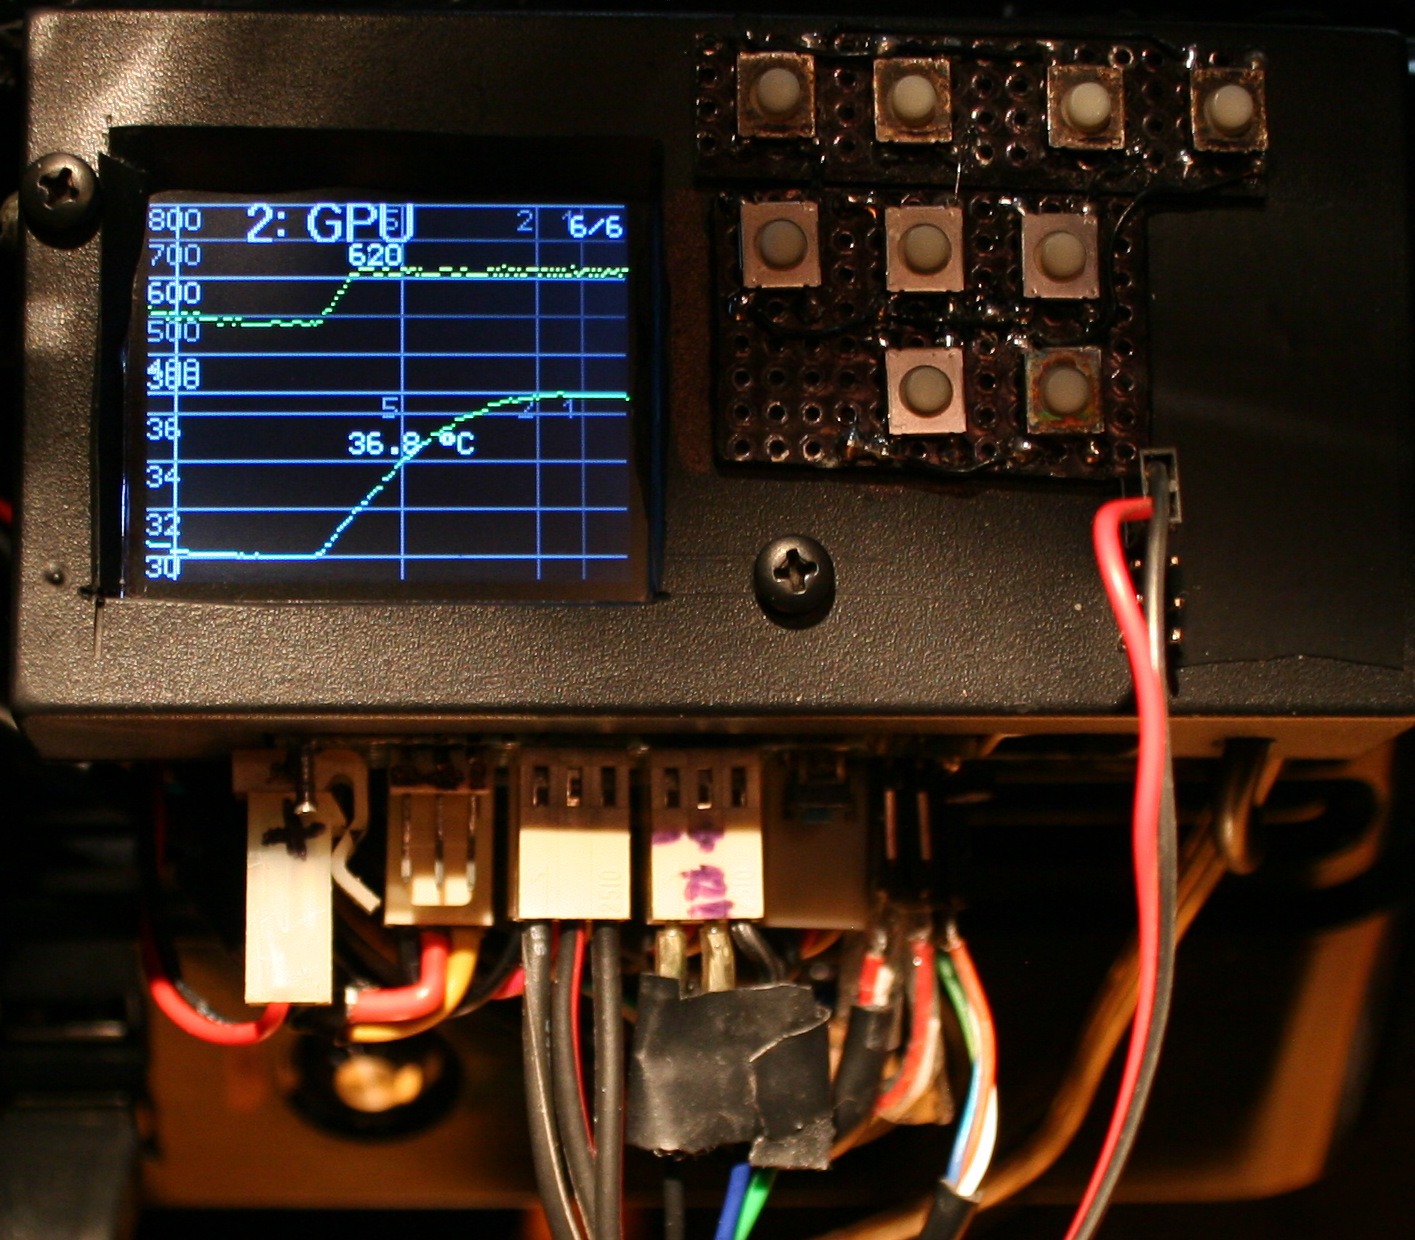
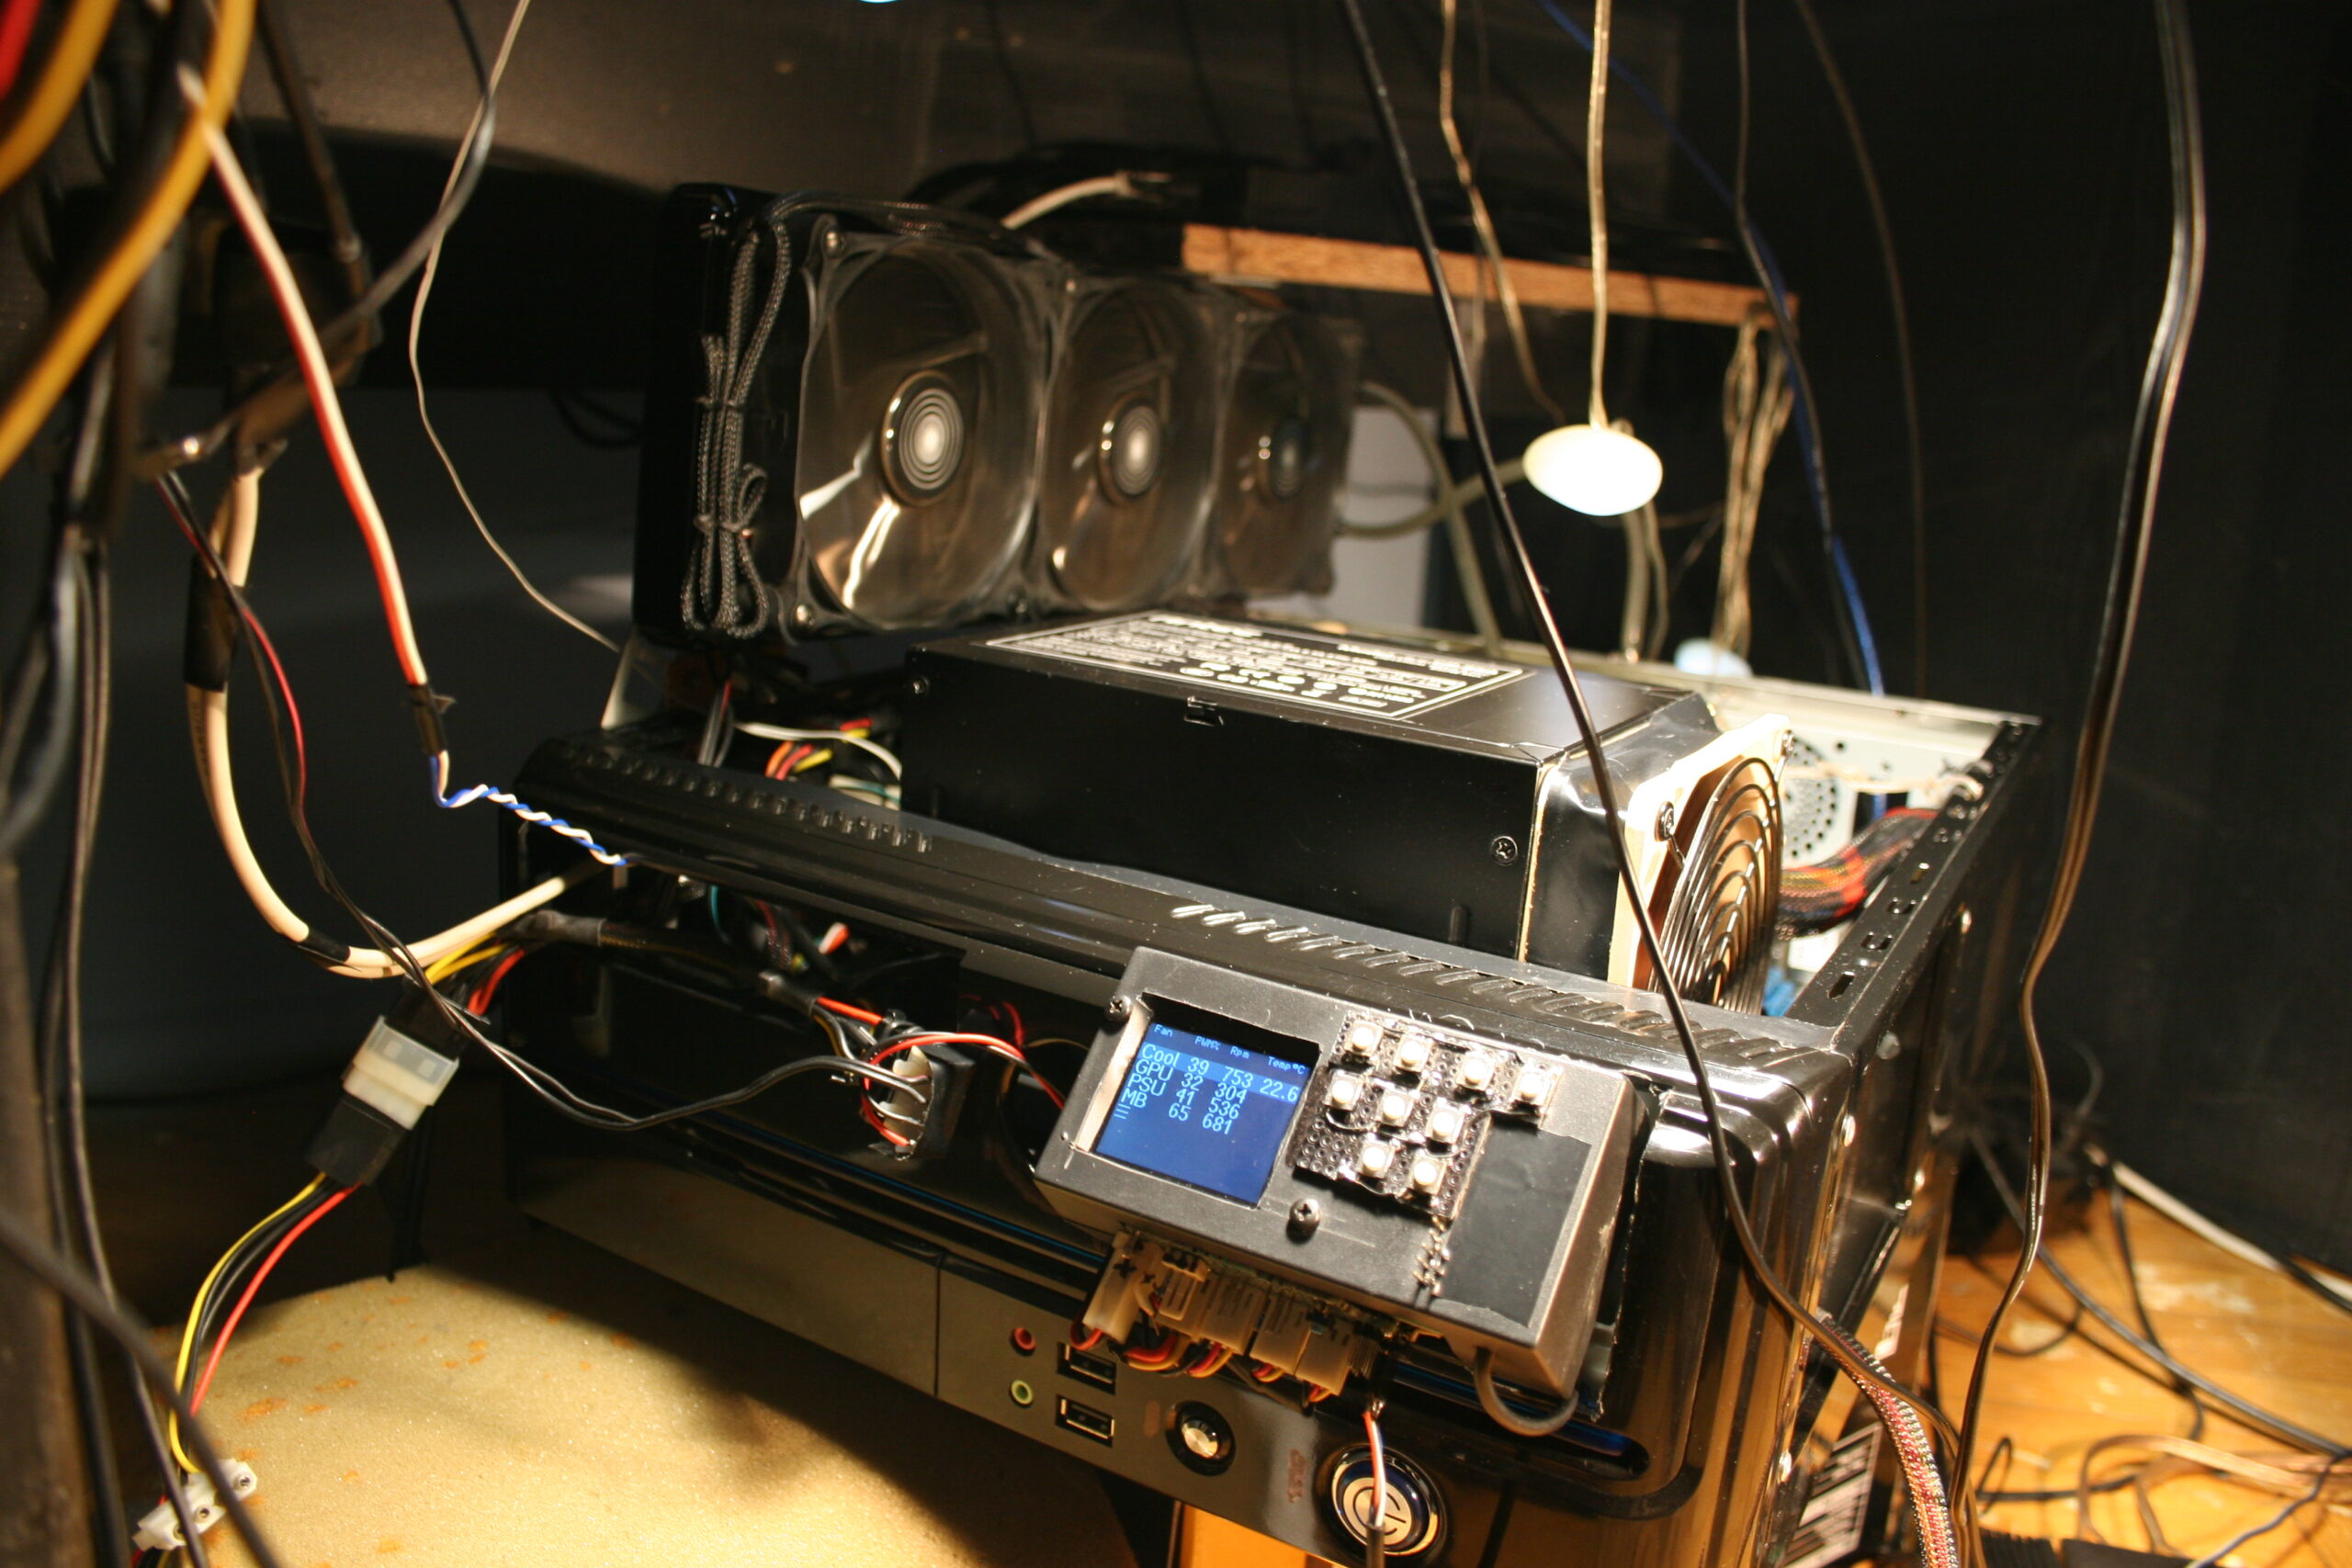
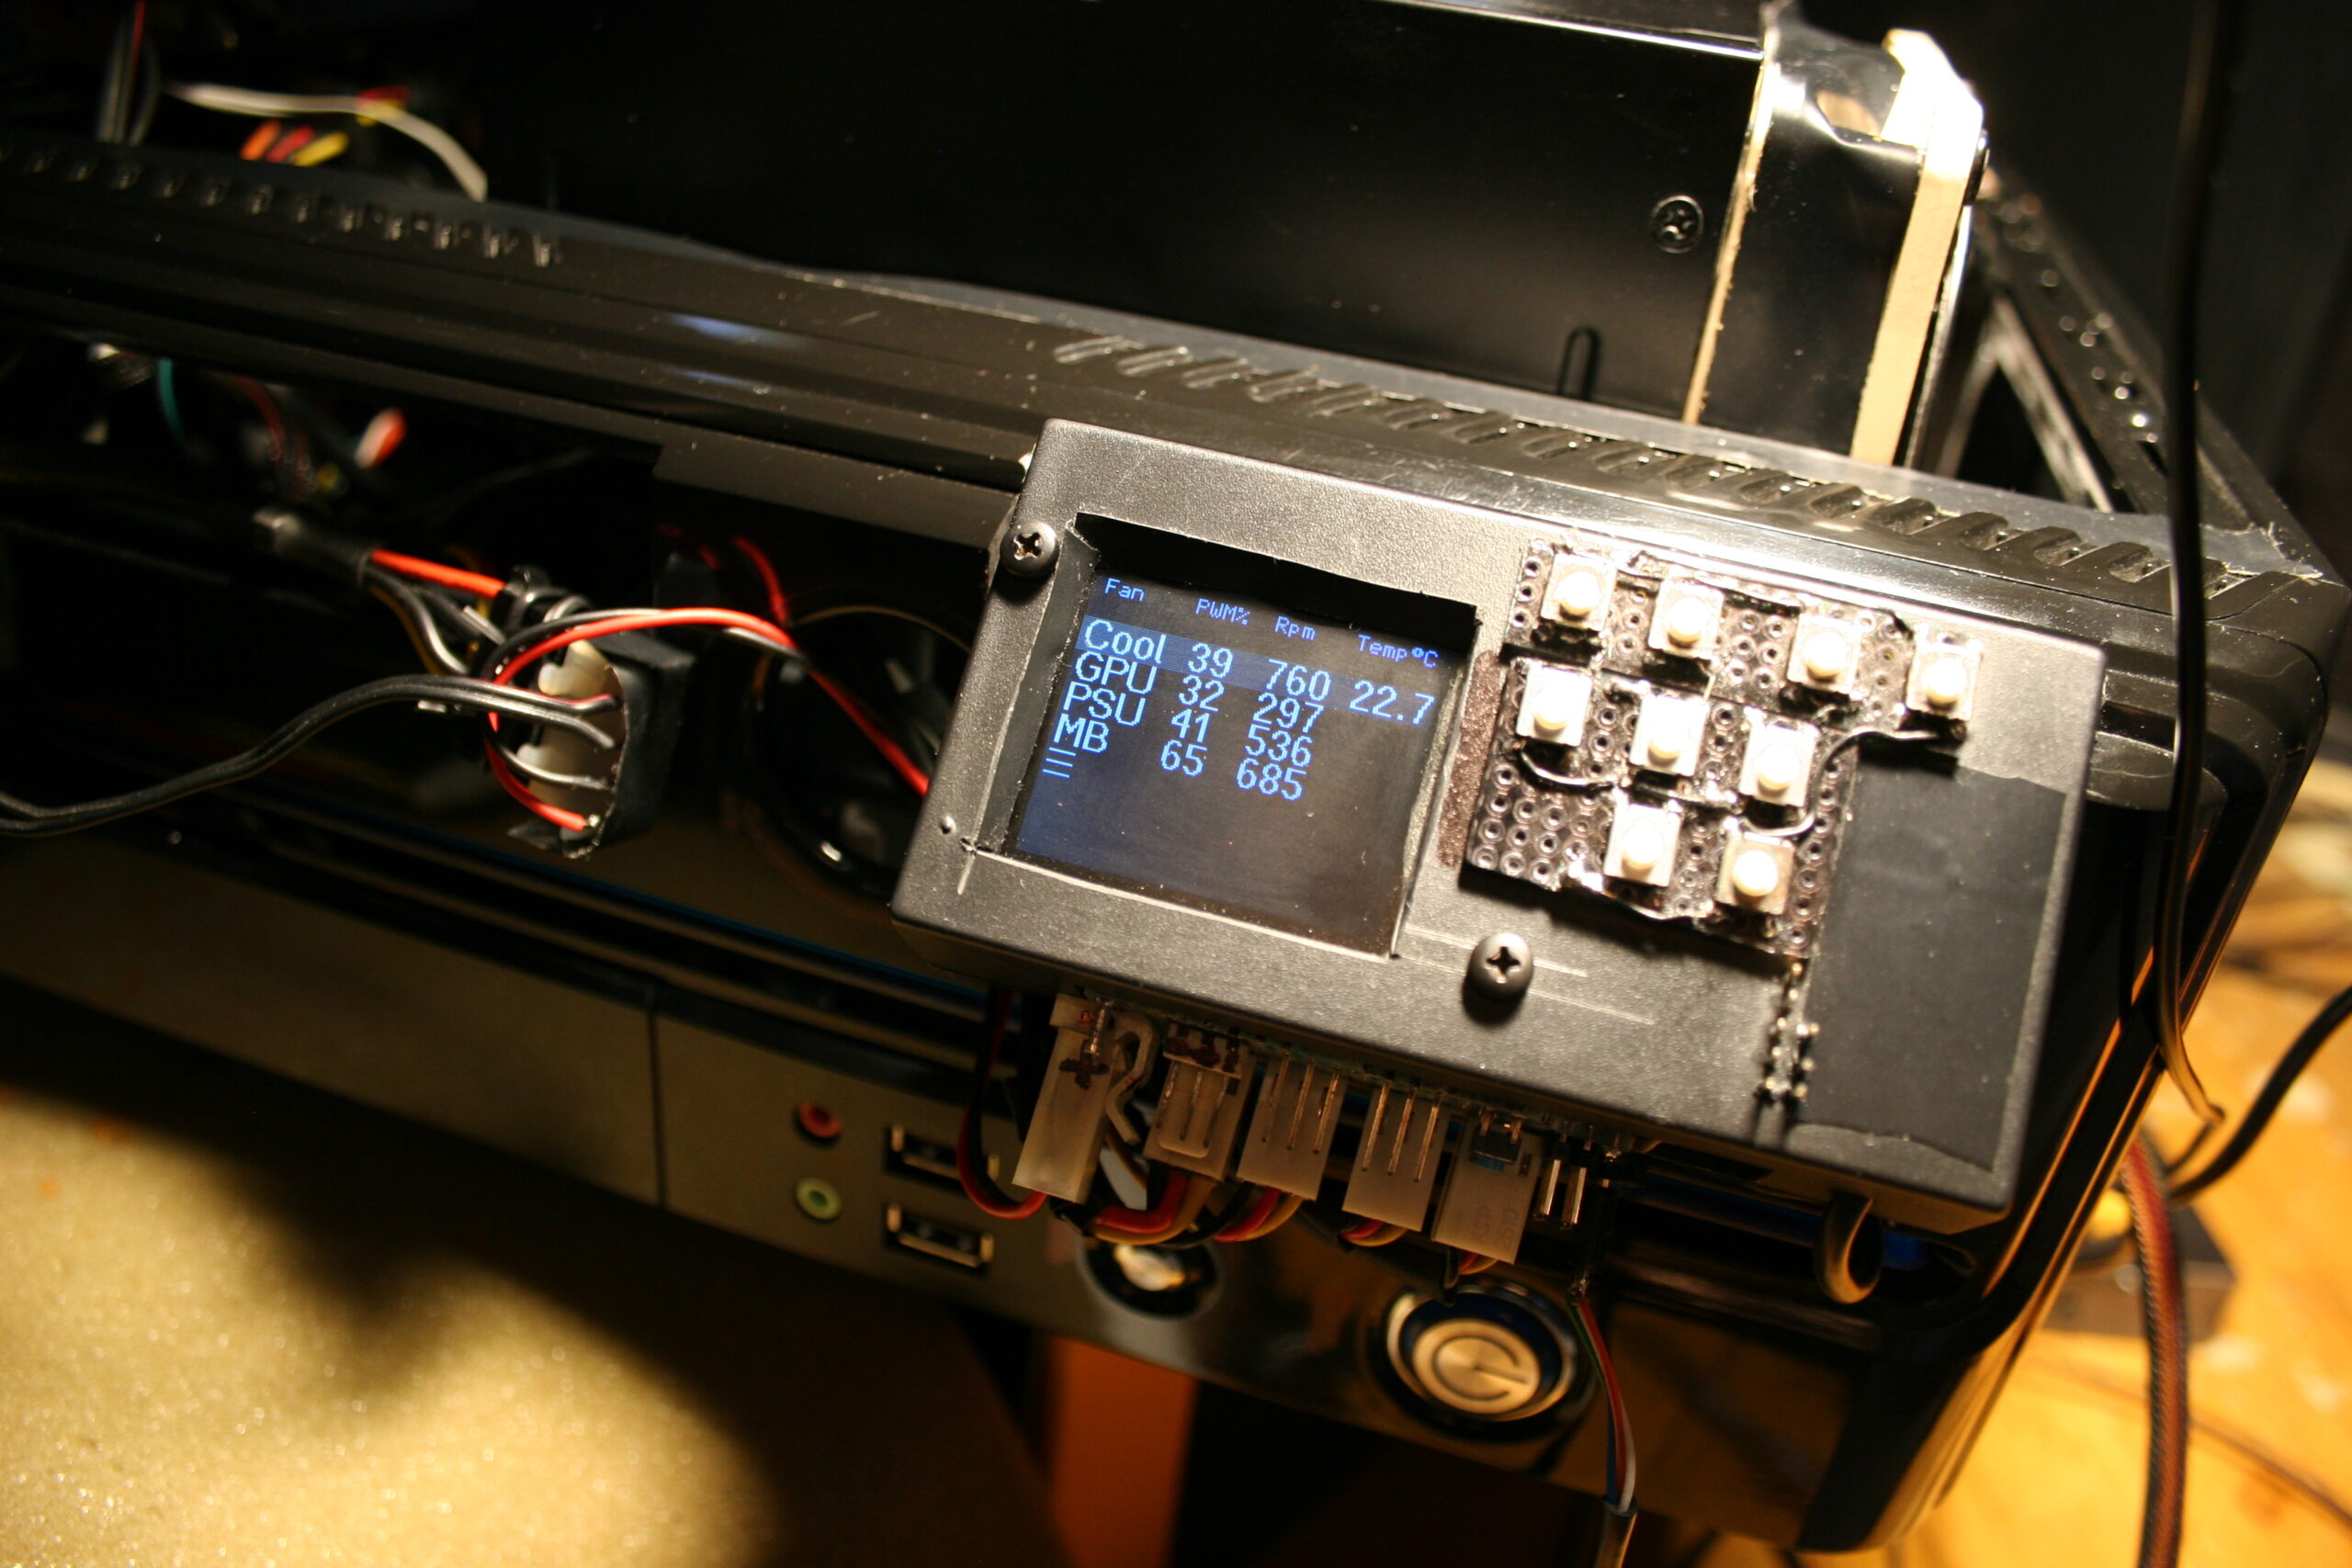
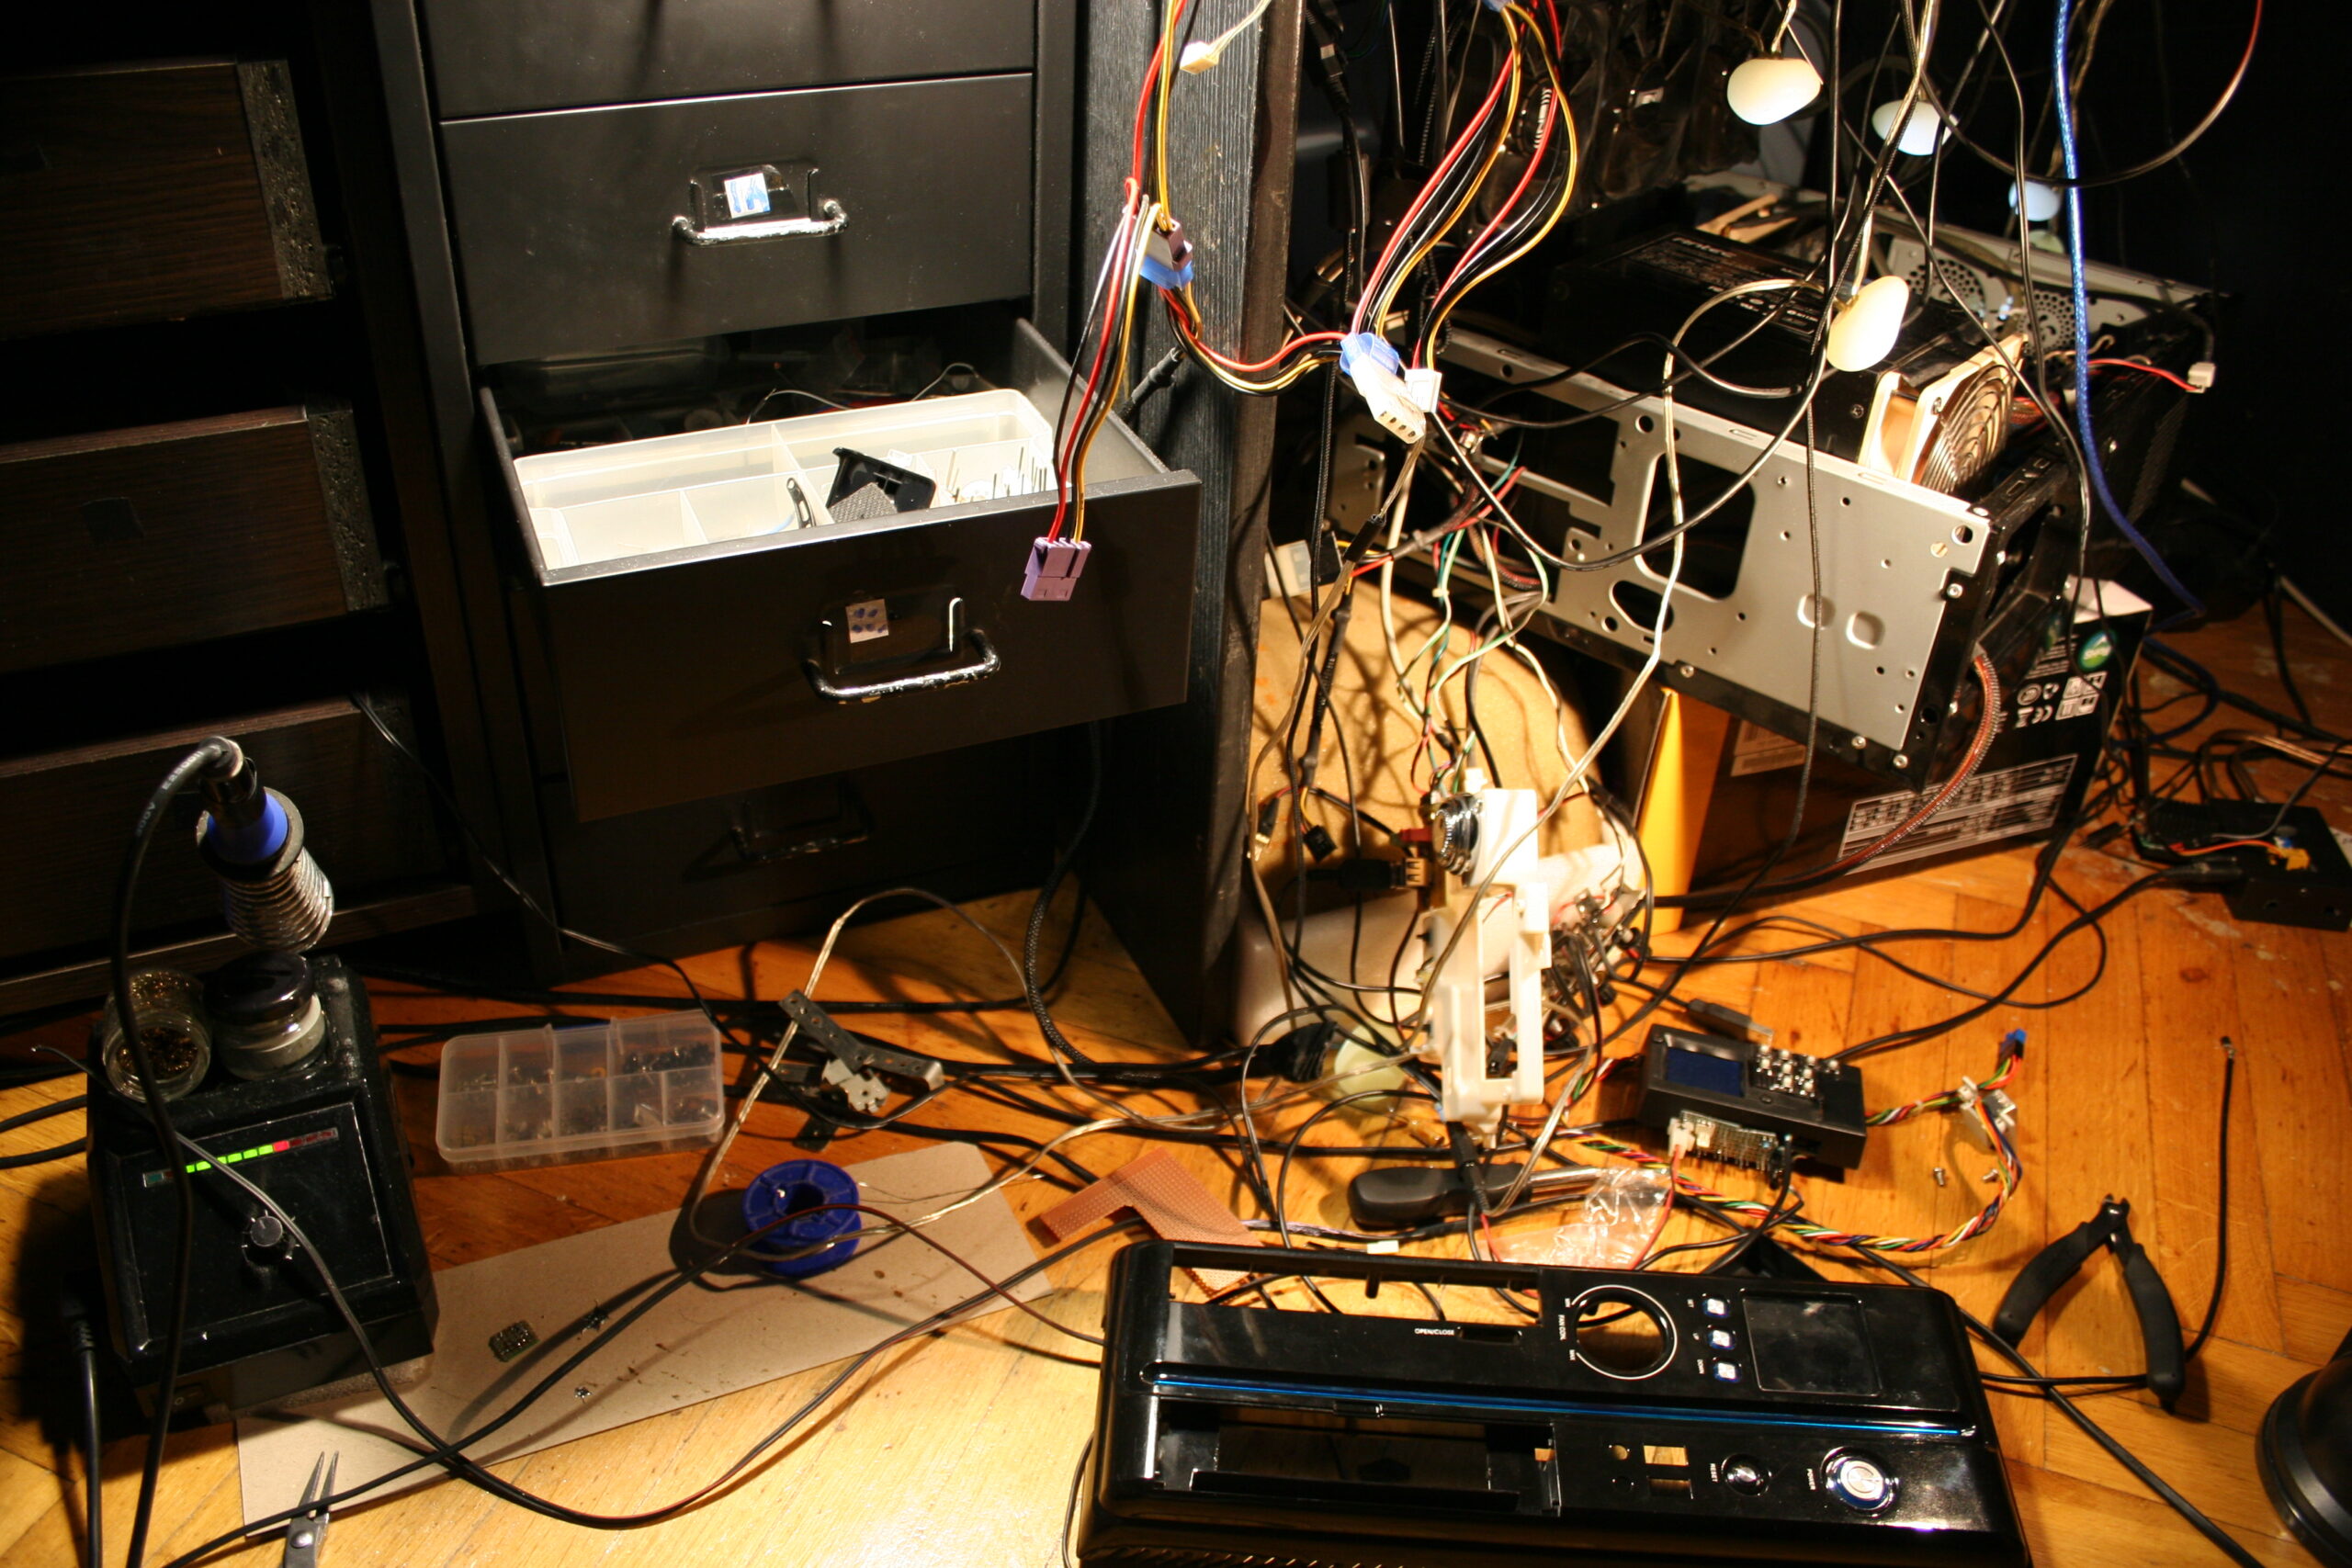
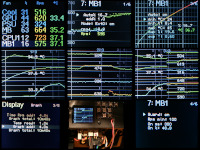
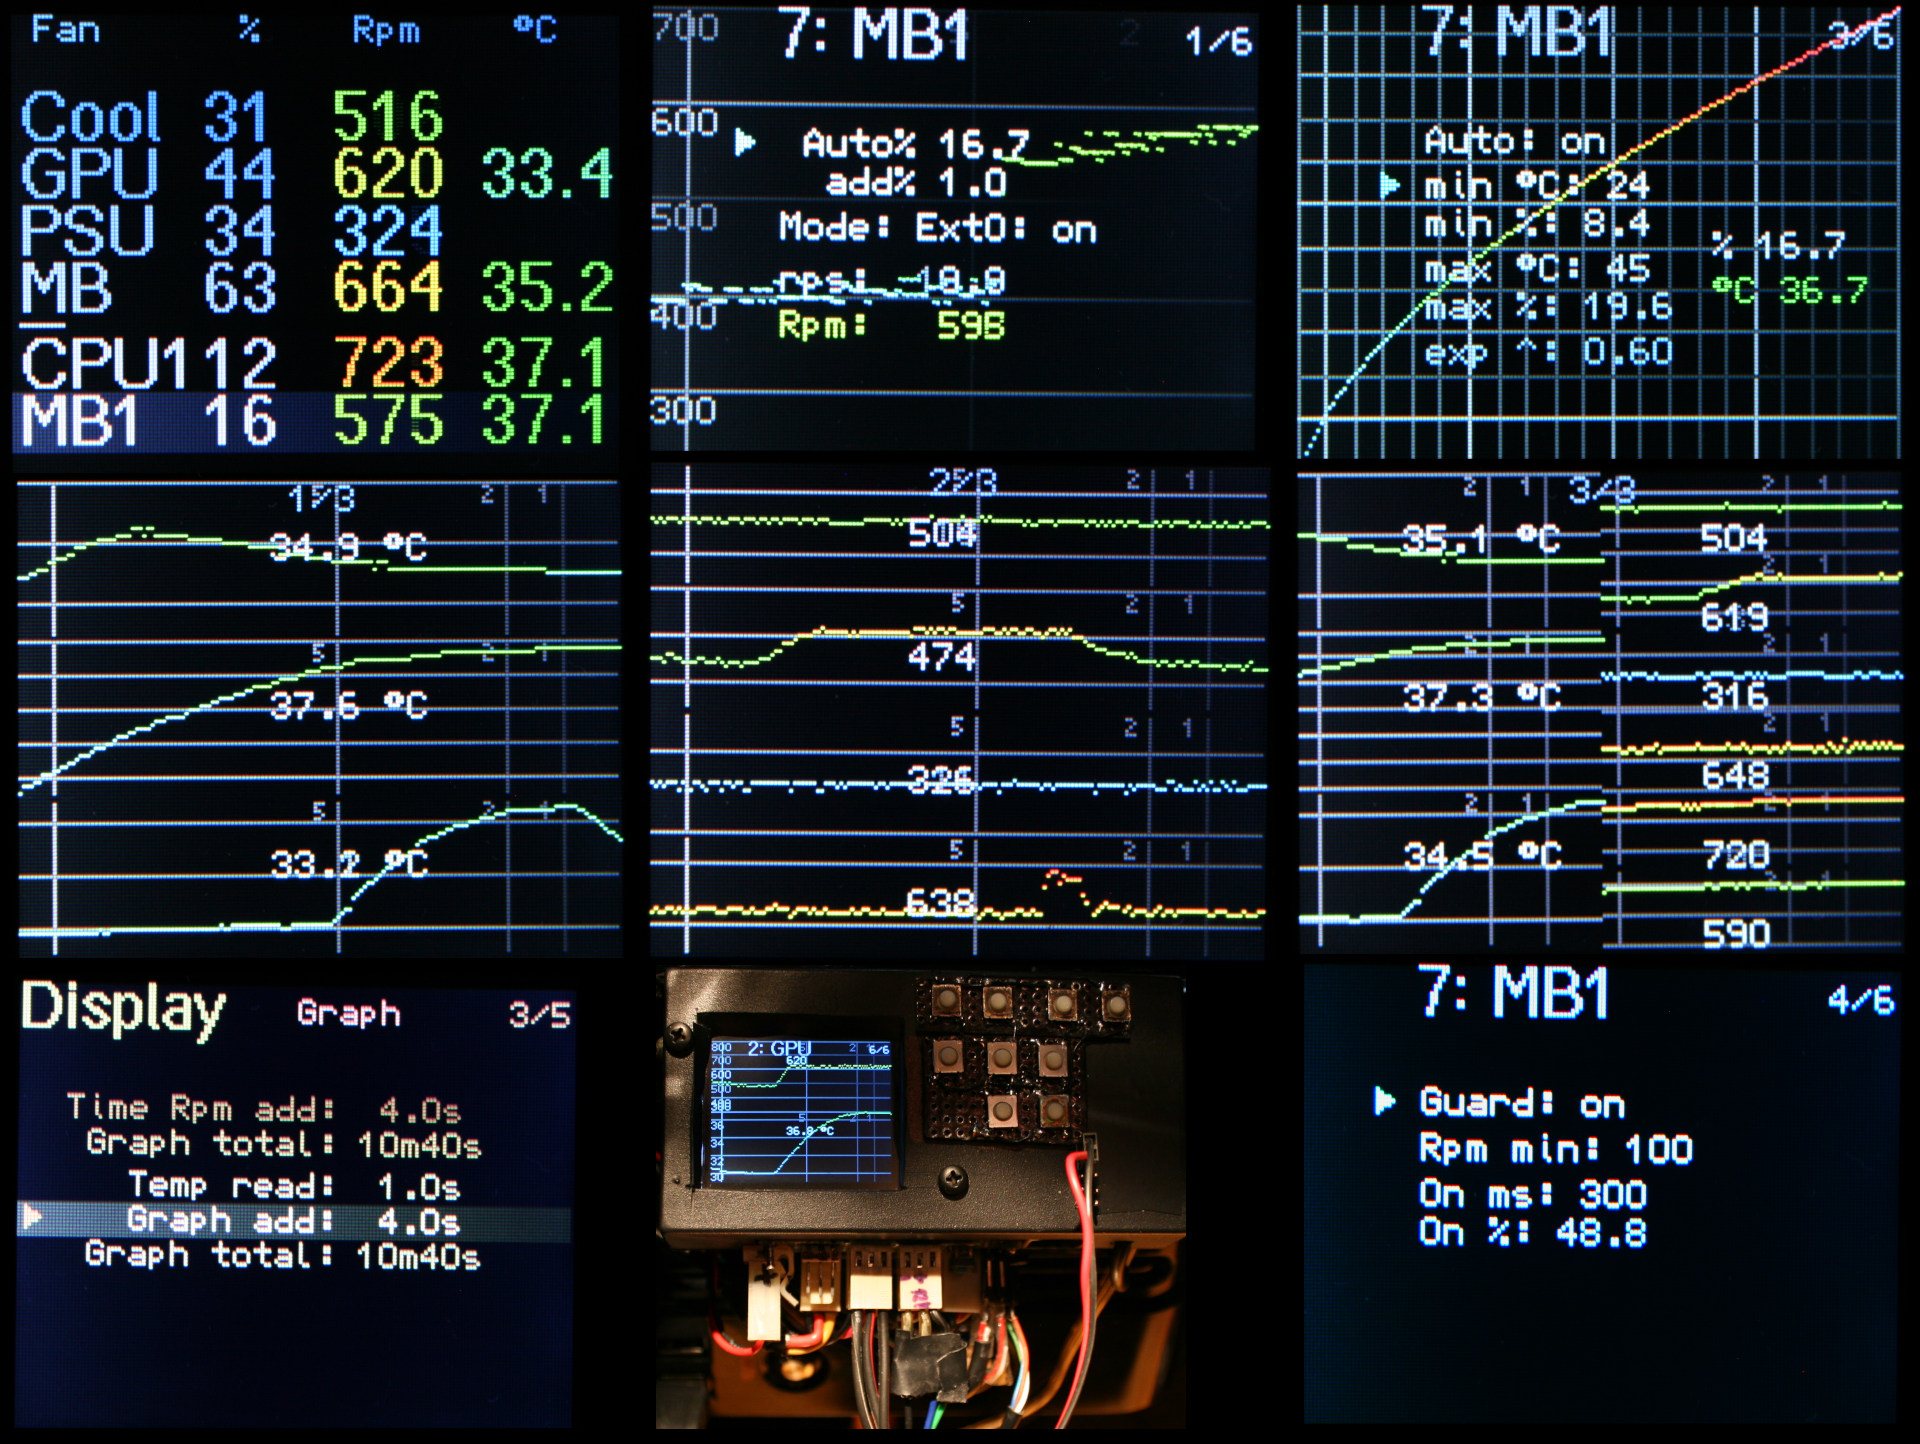
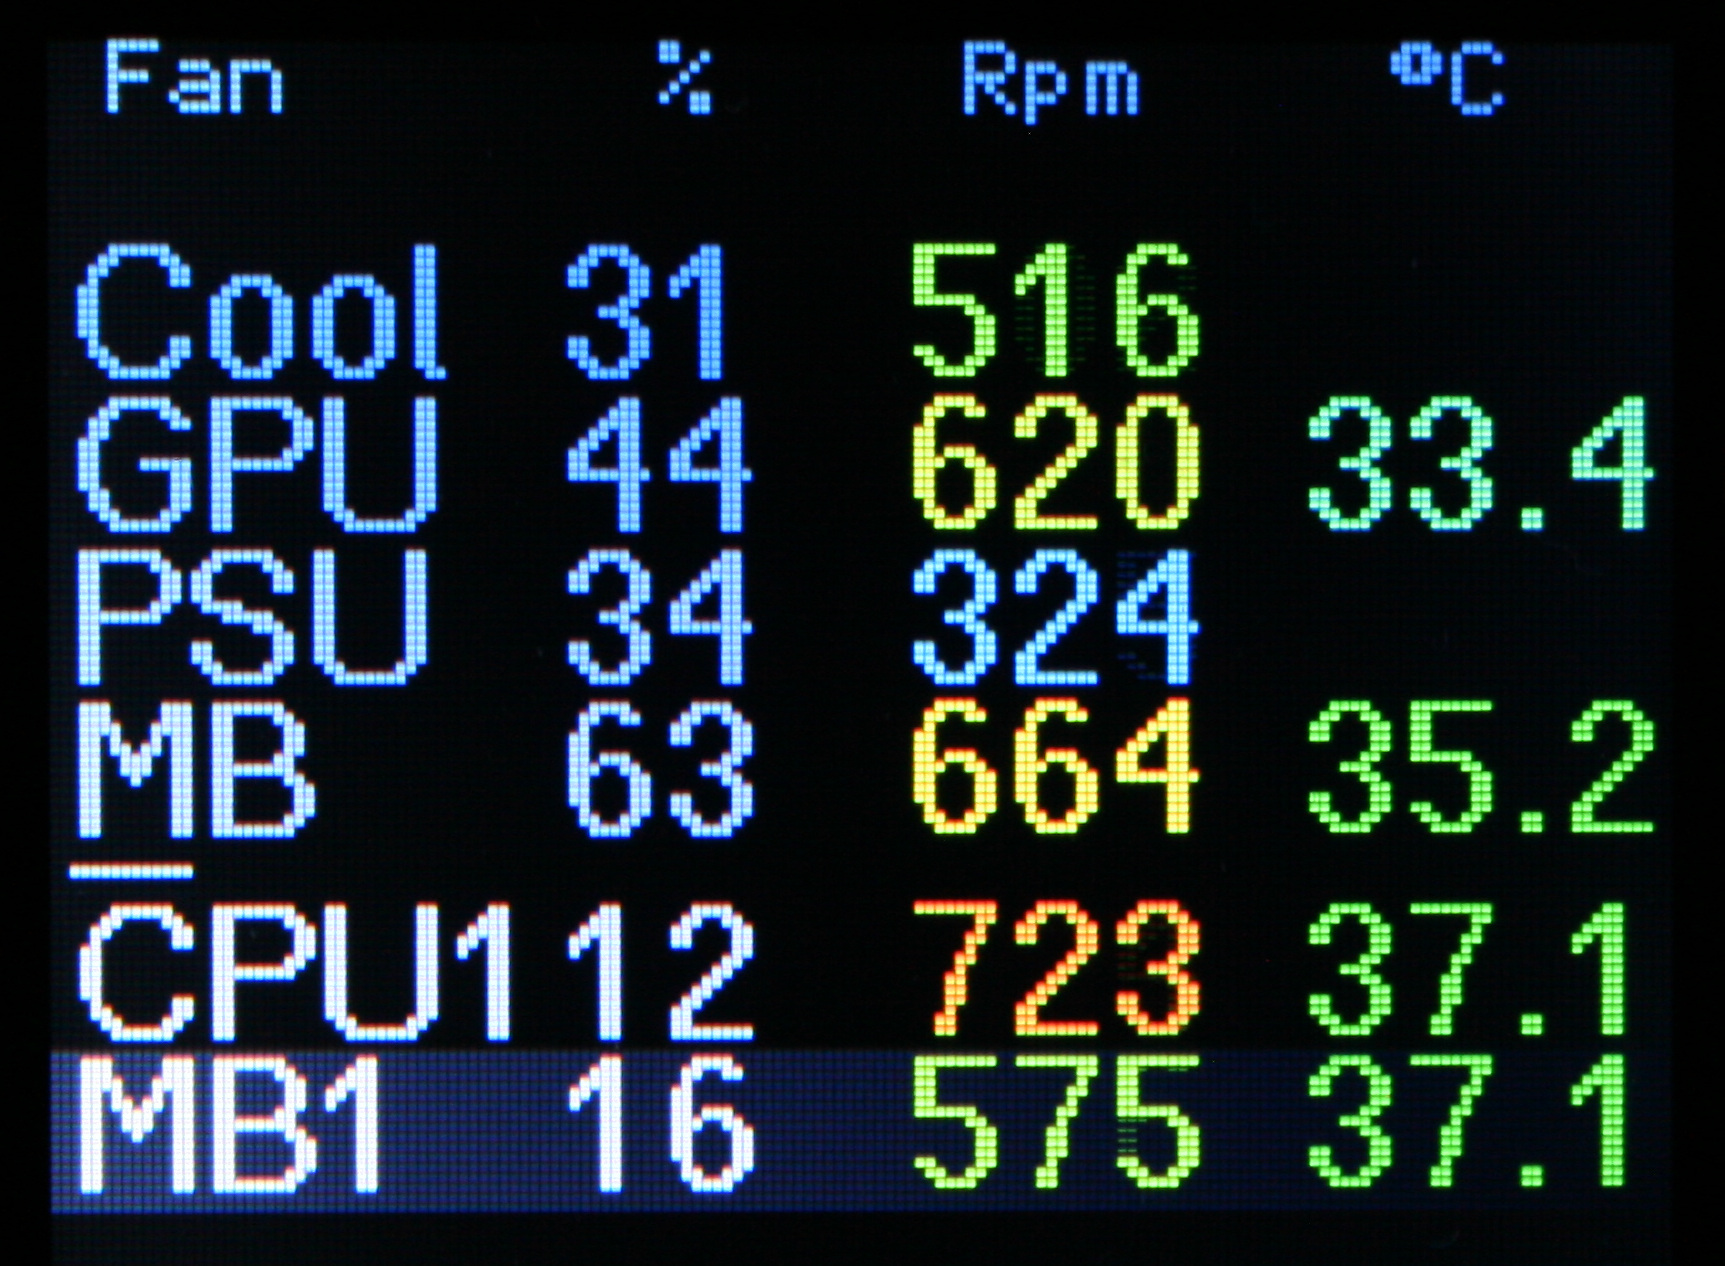
This is a nice gadget I made recently for controlling speed / power of my PC fans (all are 12cm, 12V, 3 pin, with RPM output). It has way more features than my old & basic 3 knob regulator which I used for over 15 years. And since this is open source (and I wrote it), it surely has and can have any feature (commercially unavailable, not even thought of, or way too expensive). Obviously it isn’t badly needed, that’s why I made it after so long.
I do not recommend Teensy 3 at all. All Teensy boards are quite expensive and aren’t that needed for a fan controller. I think a bluepill or blackpill would suffice and be much cheaper. More info and detail in my MCU tutorial. I simply used Teensy 3 since I had it available, doing nothing and I had code for it from my older keyboard firmware, so it was faster to adapt it.
✍️Motivation
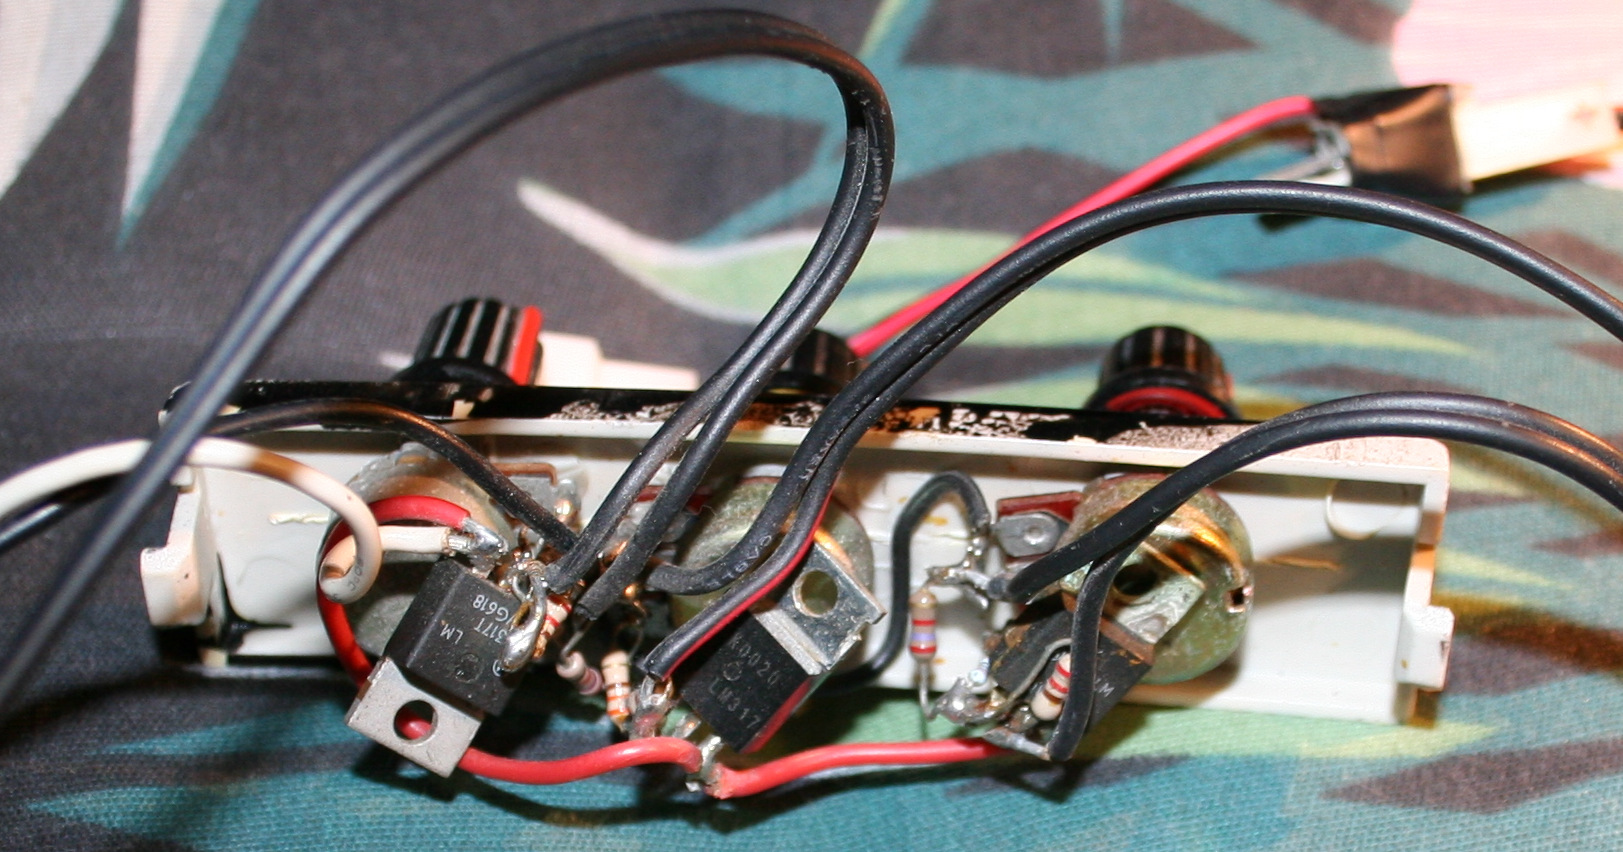
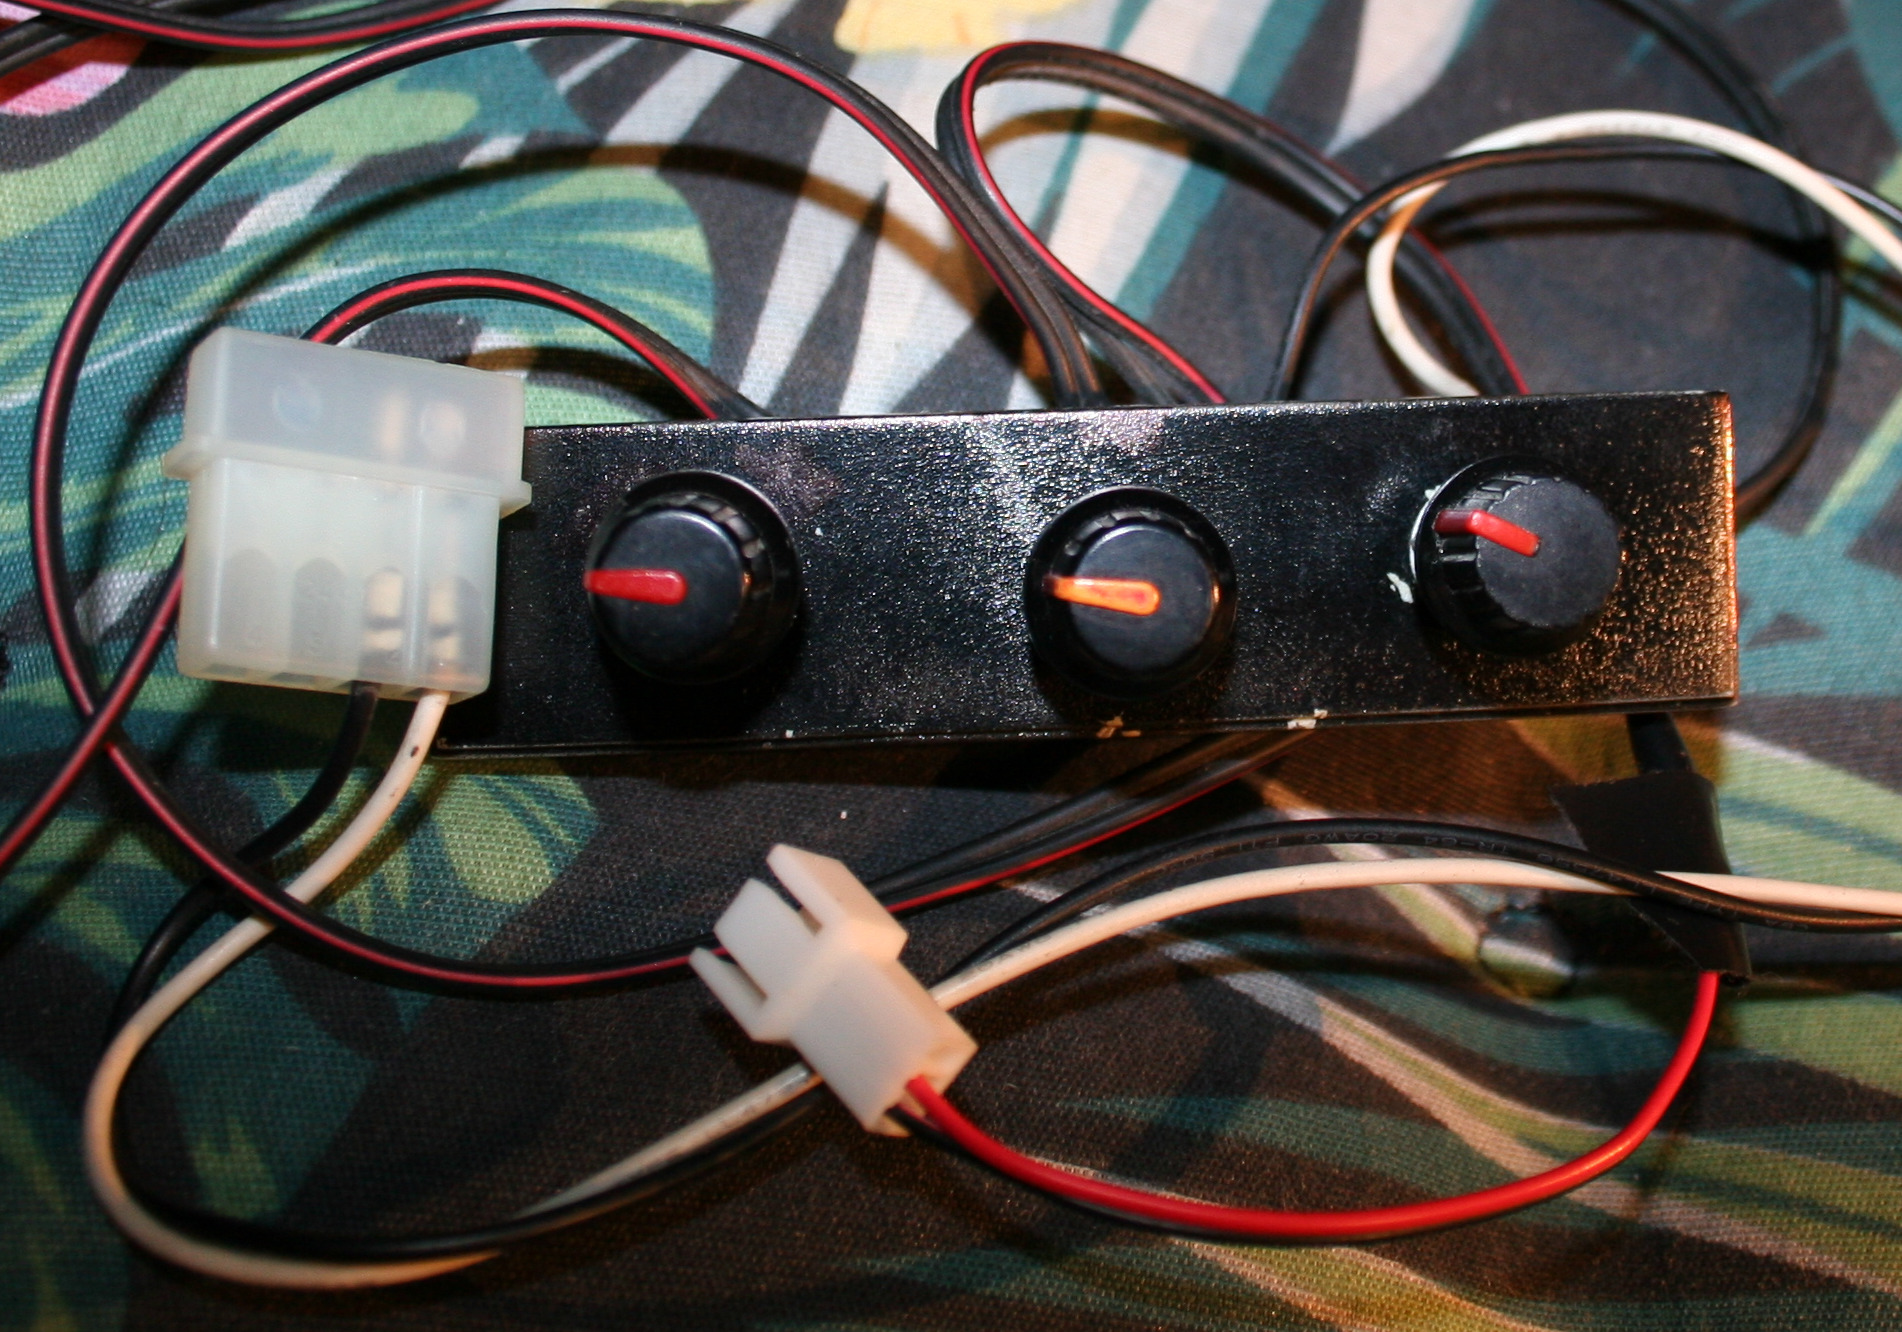
For many years I was using just the simplest LM317T voltage regulators with 3 knobs (for 3 fan sets).
Obviously a basic analog fan controller is very simple and extremely useful. I had 3 knobs (5k logarithmic potentiometers) with LM317T (even with no capacitors or radiators), mounted in the 3½” floppy disk bay. It was working very well for years and I could still use it. It only works for analog, not PWM fans.
I did try once a Gelid Speedtouch 6, wasn’t very cheap, and it was hopeless. Even worse, when I realized that I can make a better one myself, like usually. Additionally, after being rather finished with my keyboard features, I had some Teensy 3.2 boards left, lying around, doing nothing, simply asking to be used for something. Even better, I could use my older keyboard firmware for Teensy 3.2 and adapt it fast for this controller.
So I finally got to creating it. I called it “Fancy” from Fan C(ontroller). There was something new to learn too. I even used a cool circuit simulator to find out resistors around transistor, wasn’t exactly the real value later though.
And of course not everything went as planned.
For example: I wanted to use thermocouples for temperature which I had few of already. I tried an op-amp with differential amplifier for them and used ADC to read voltage which seemed working on breadboard. But after doing that for real (and using bigger resistor values) something didn’t work and I saw noise. So after few days trying I dropped it and just used DS18B20. They are bigger (3pin package) but have more precise measurement (at higher cost too).
Unfortunately I also killed one Teensy 3.2 board by accident. I’m not even sure how. I’m guessing some 12V was still left on capacitors and I could touch 3.3V pins with it.
📊Features
A shorter, bulleted list of all features can be seen in sources readme with more detail on electronic parts and schematic image here.
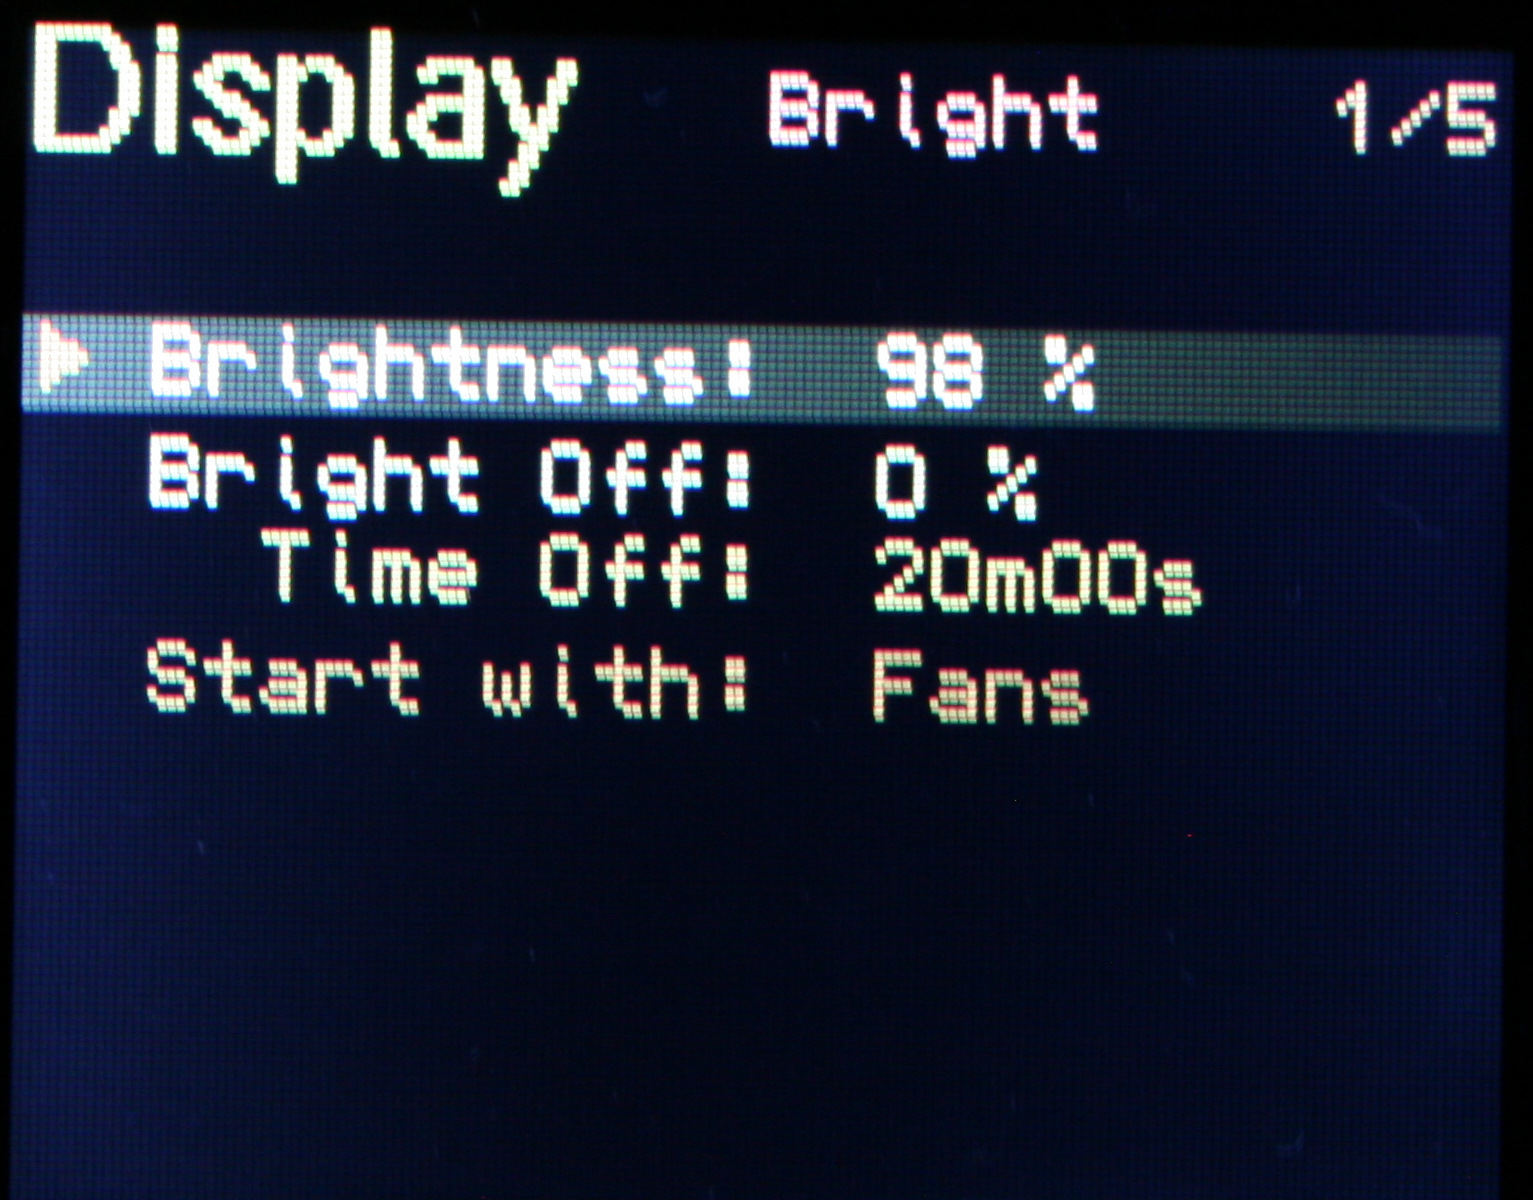
GUI
It has a 3×3 keyboard and a LCD color display (diagonal is 1.8″, 4.5 cm). I did years ago my keyboards this way, so it also came with 3 levels menu (GUI), many options and even full screen demos (why not). Of course it permanently saves all settings, in EEPROM.
📈Regulating
The main advantage of my digital fan controller is that it allows lower RPM than analog, which then makes PC slightly quieter. This is because a fan needs shortly higher power (voltage or PWM) to start, but can have it lower after it started rotating (I don’t mean the power started rotating 🙂).
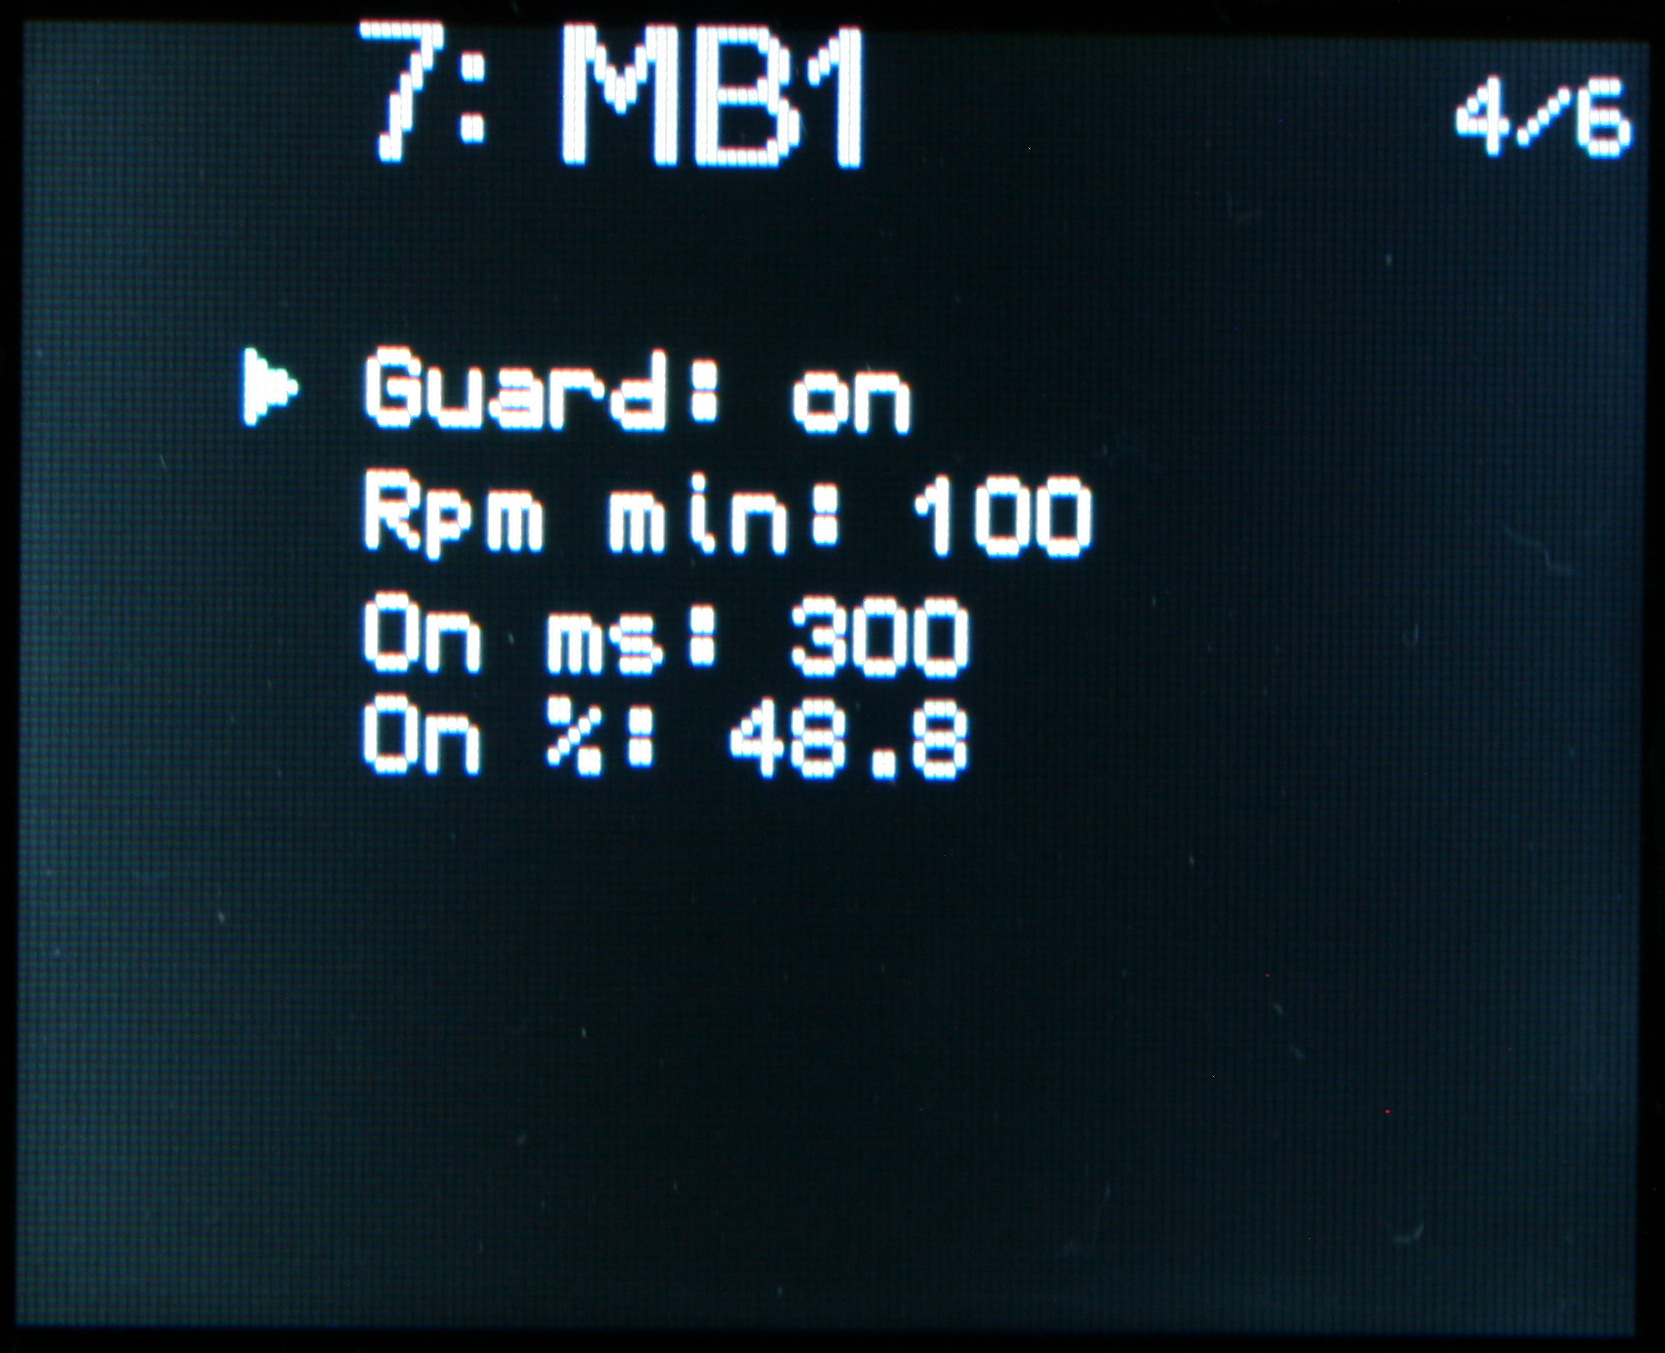
Next, it monitors RPM (revolutions per minute). So a natural safety feature here is: stop prevention (or in general RPM guard). It can increase power shortly to start again, even if user picked too little power to spin, or something stopped the fan.
Additionally PWM outputs can be used, for fans that allow it. Actually all of my old PC fans didn’t work with PWM, so I had to also make analog outputs (channels) for them at some point. I don’t know if it could be more universal, these channels require some other parts. So it can control analog fans (changing constant voltage) and PWM fans (changing modulated pulse width at medium frequency).
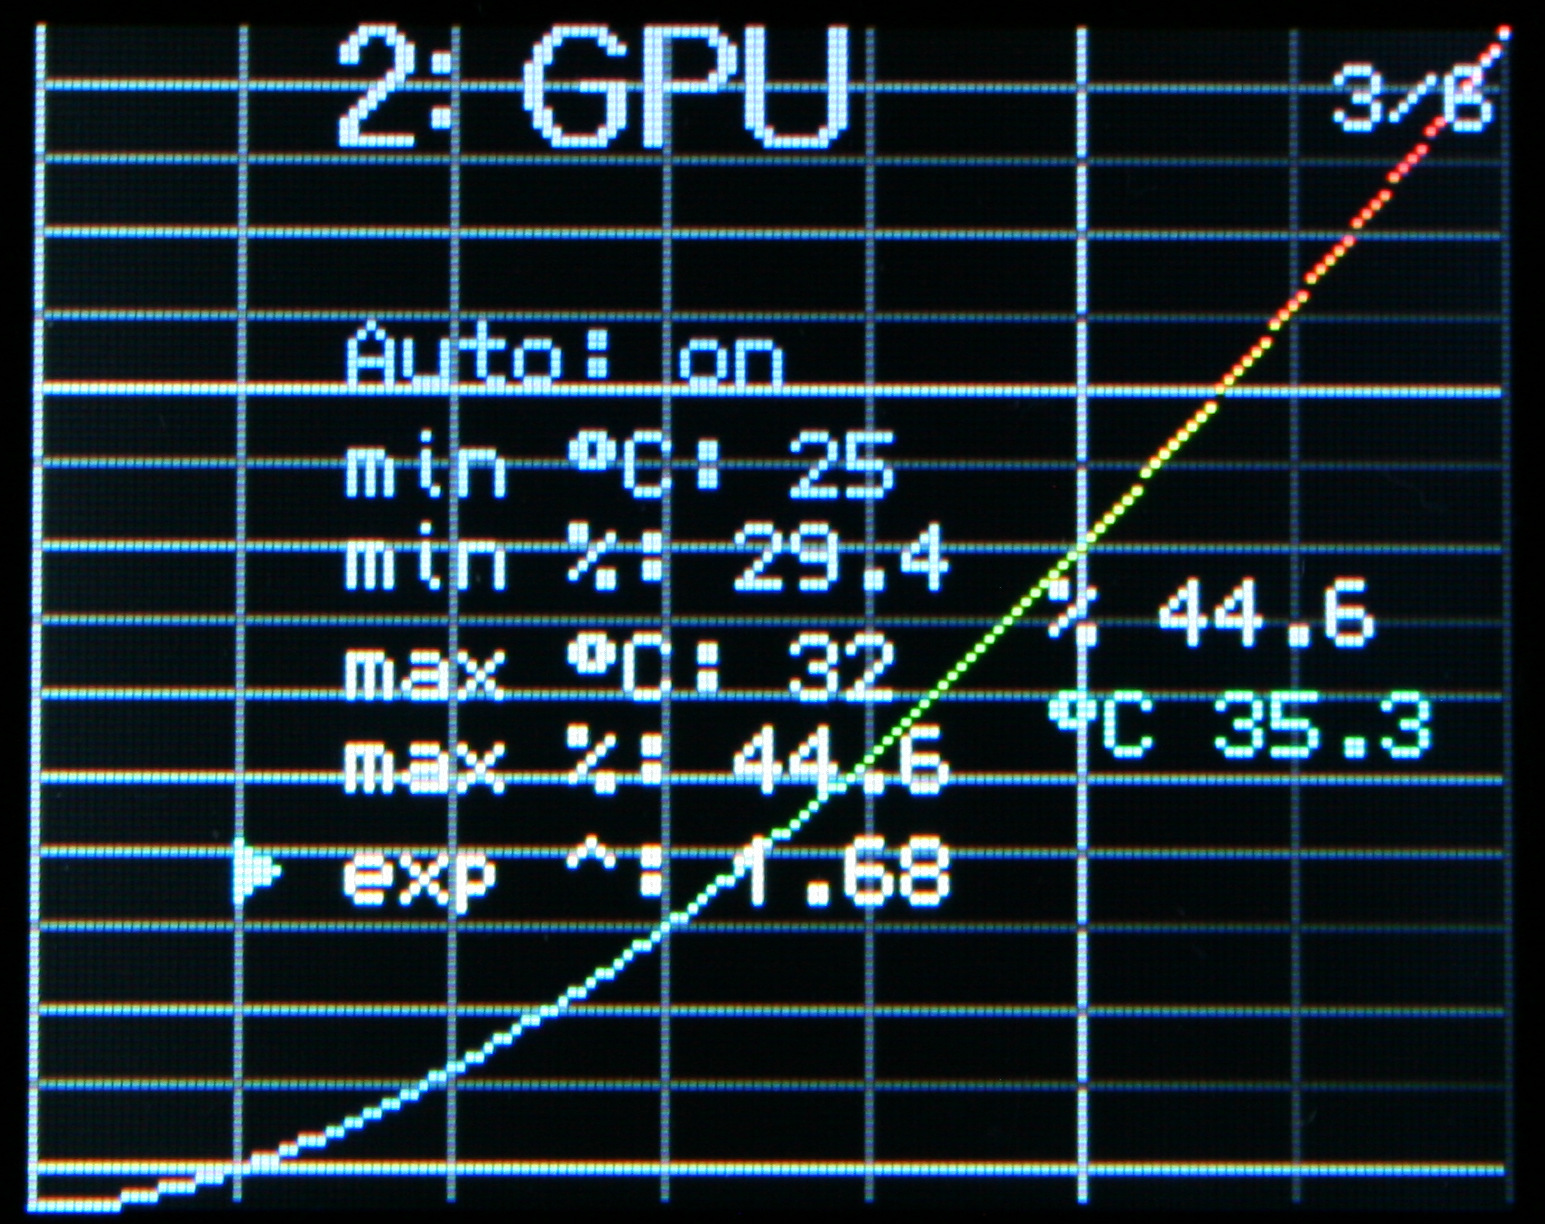
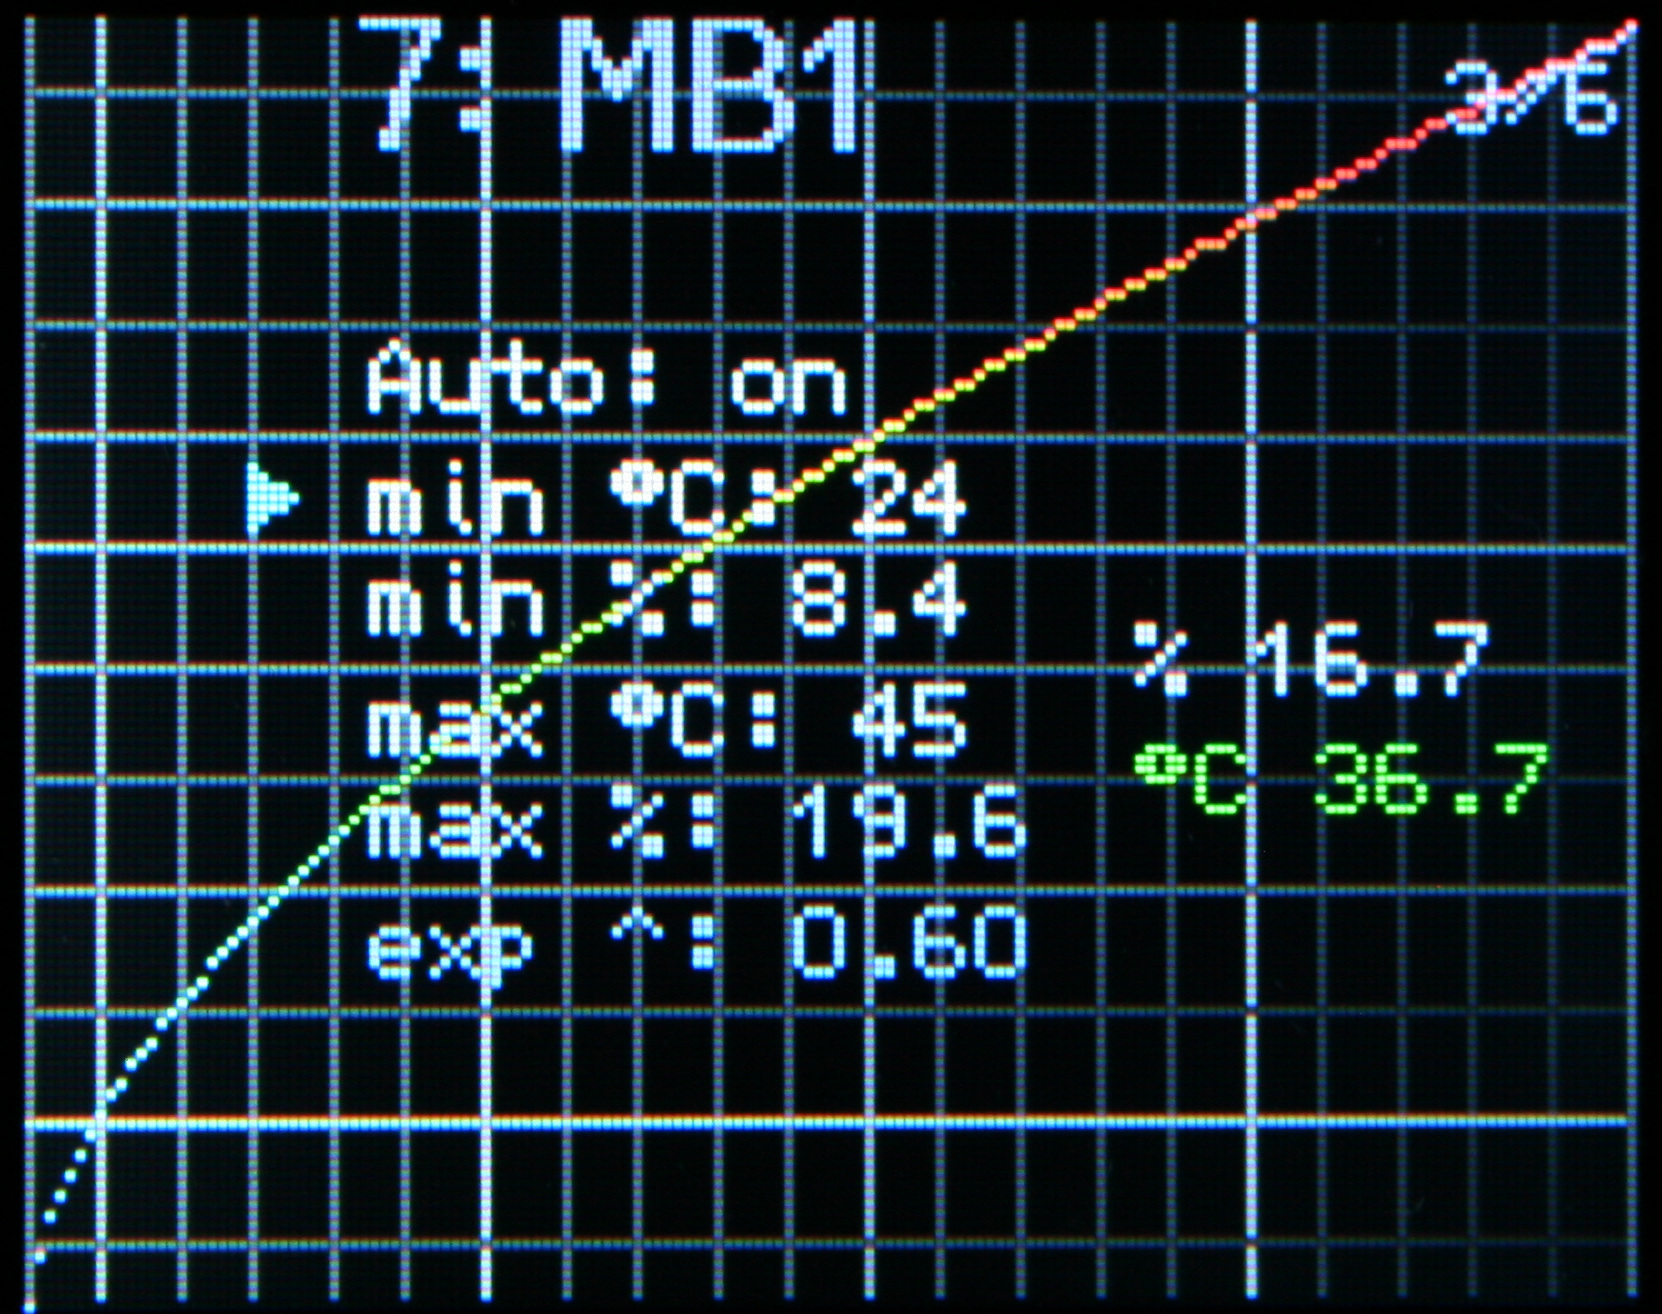
Optionally, temperature is measured. It can be used as feedback to automatically set fan power. This is naturally useful if sensor is on (or near) the heating part which fan is cooling. Sure, this can be possible to do with some software, that came with PC motherboard, GPU or a separate program. But it may not work on Linux or have all of my custom features. During summer I had my fans set higher, also even did set them lower when I wasn’t using much CPU (e.g. playing games or building C++). So hopefully this feature will make controller do it now, not me.
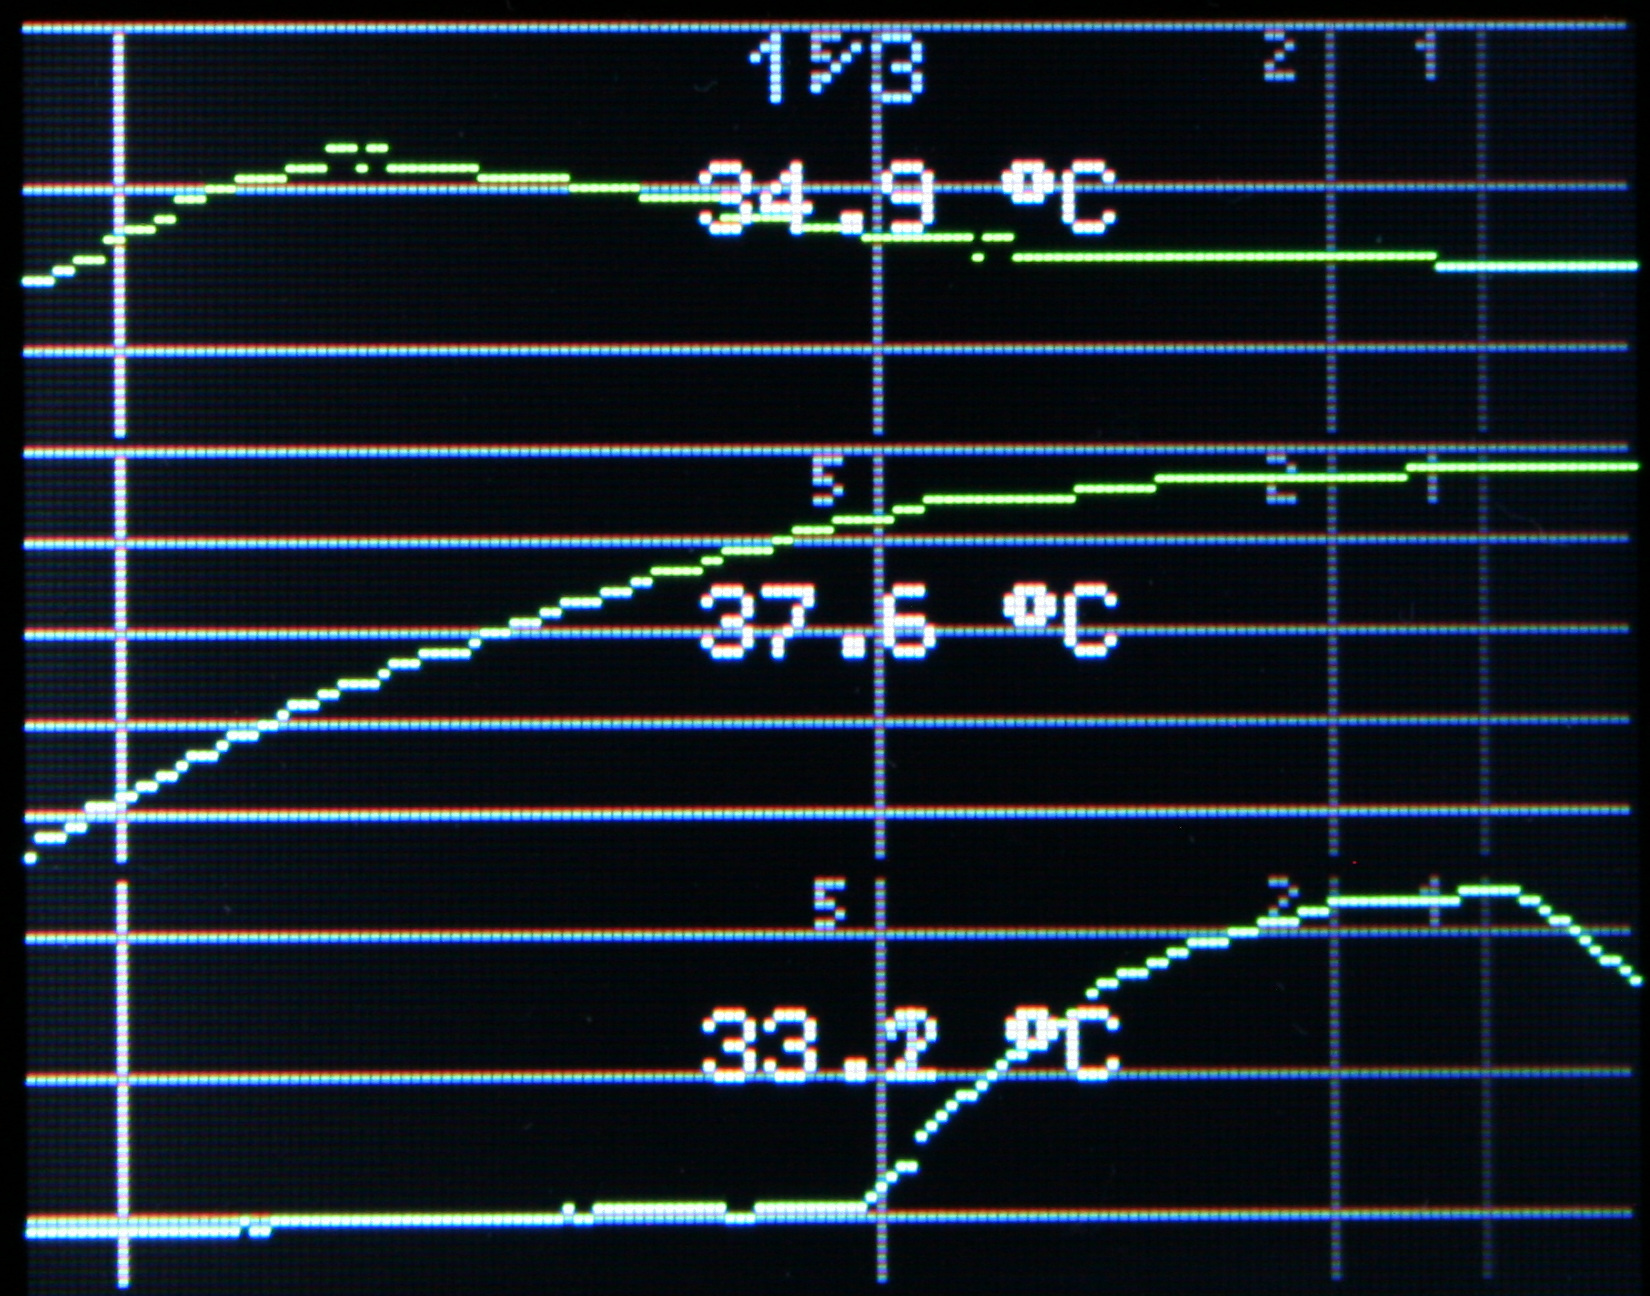
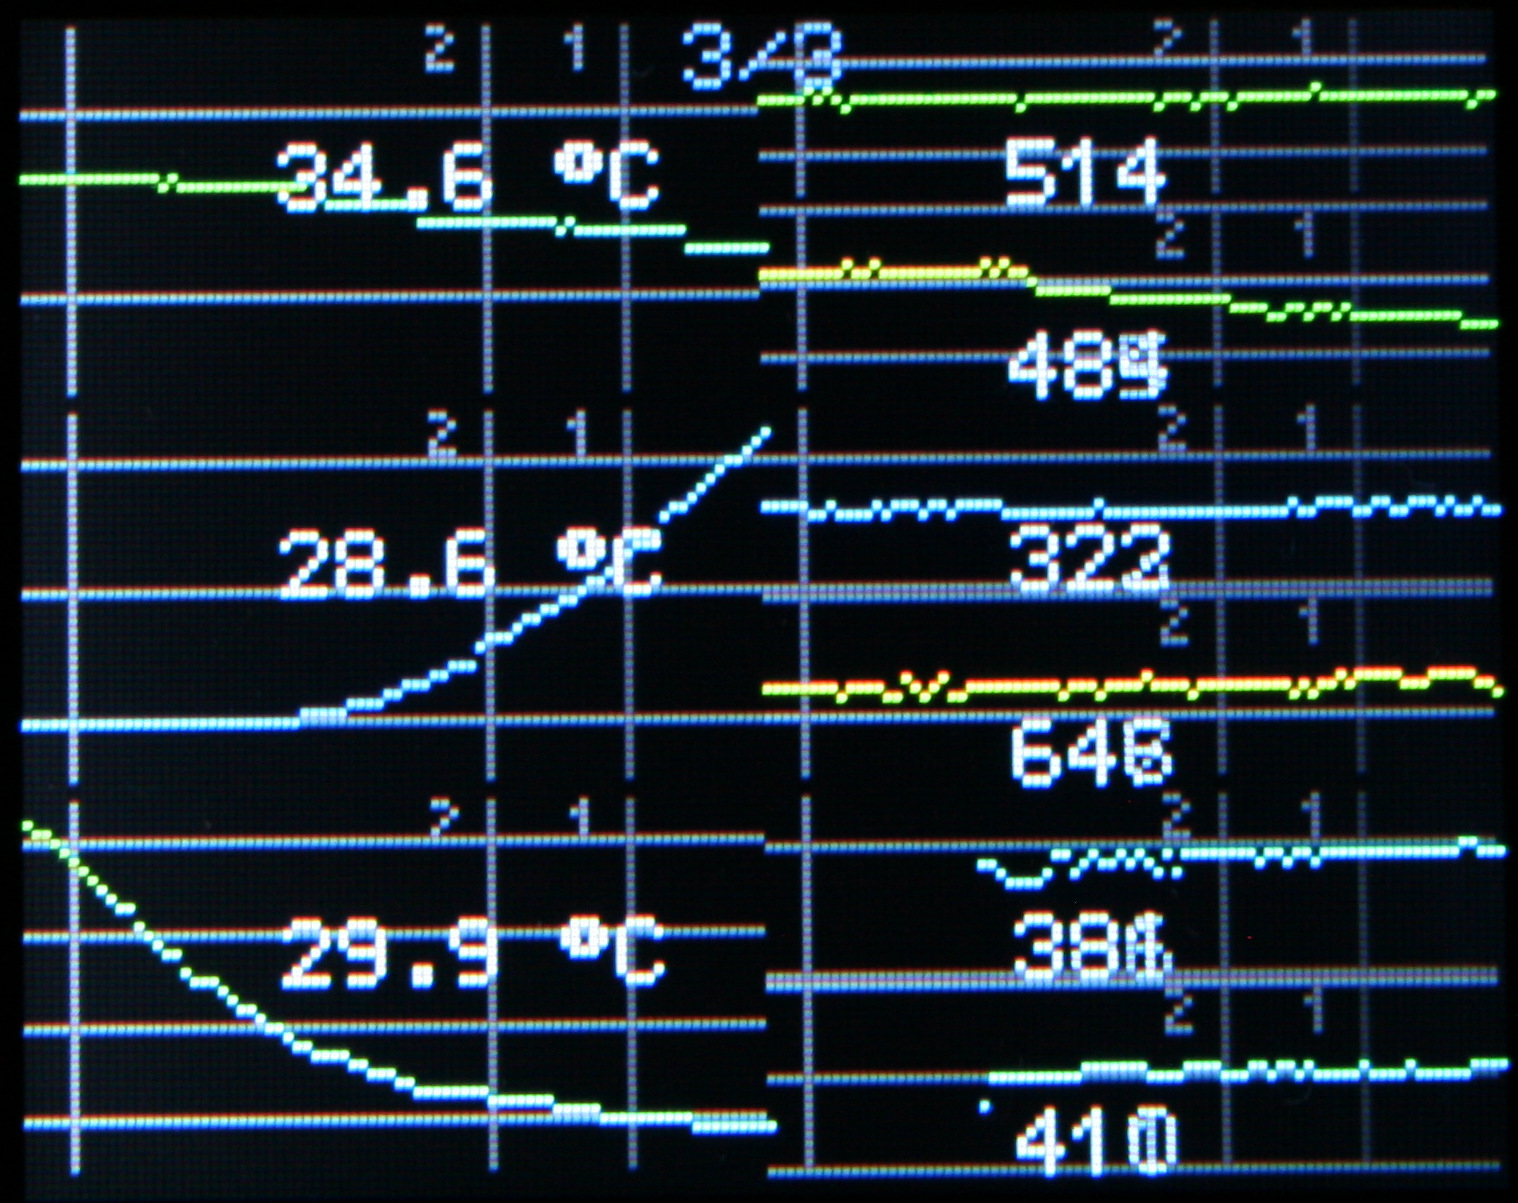
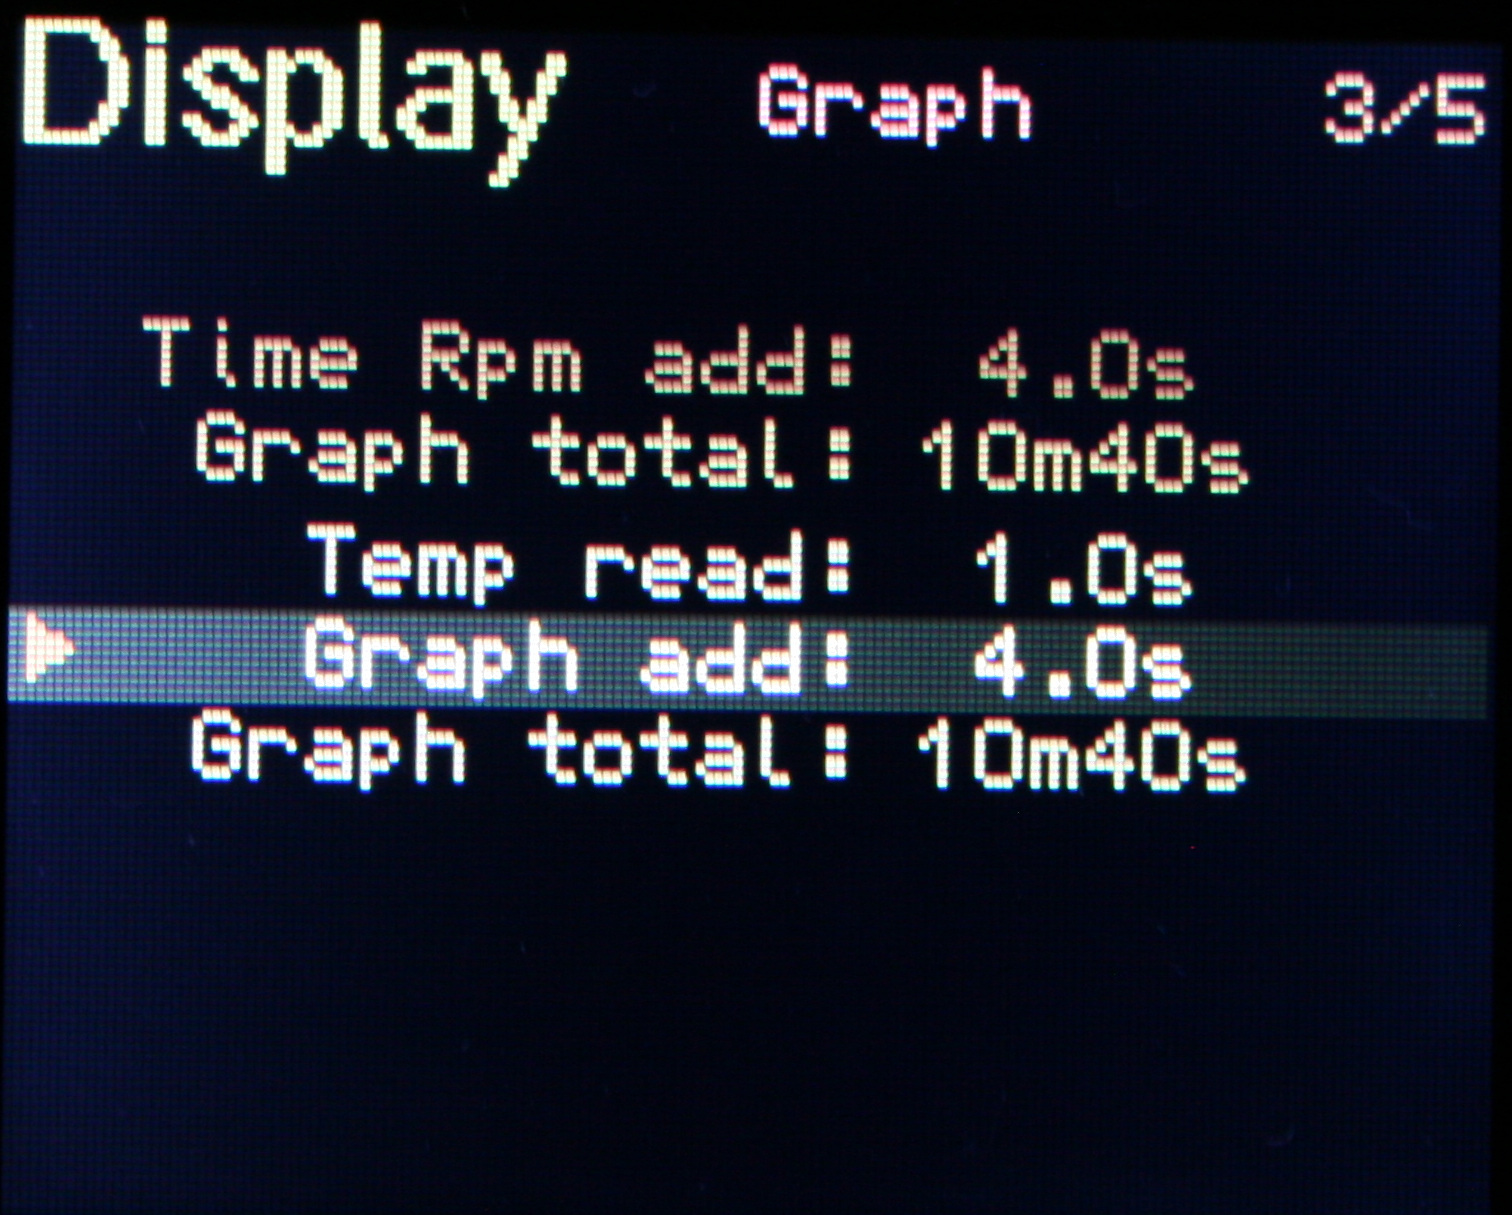
Since the display is 160×128 pixels, it can show graphs of RPM or Temperature over time. Even few smaller at once, but with less detail.
⌛Conclusions
Well it was a cool project, not just with digital chips, I had to use transistors with other parts too. I’m glad that one of the boards I have unused got to do something everyday. I hope it will last long. After all, my old regulators were really basic and much easier to repair (which wasn’t needed). Surely this thing is heavy, probably has too many parts too, but it doesn’t matter. It’s not like my PC weight matters at all.
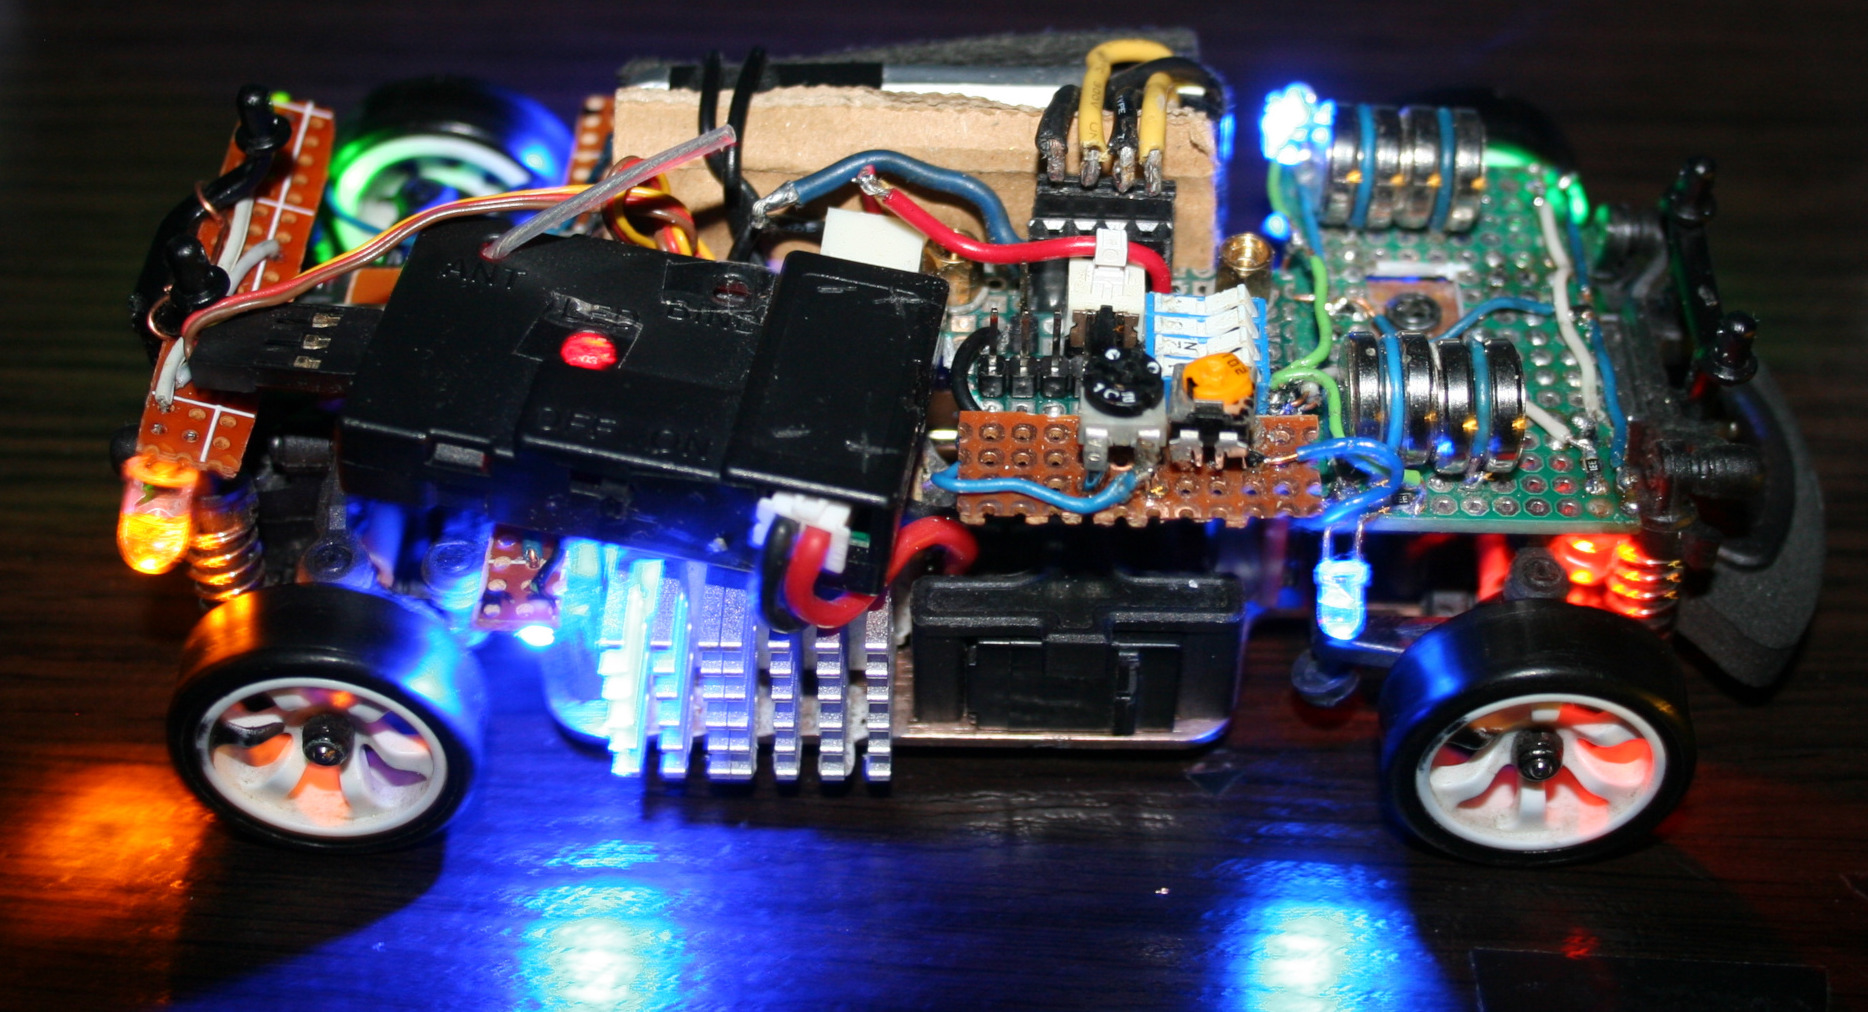
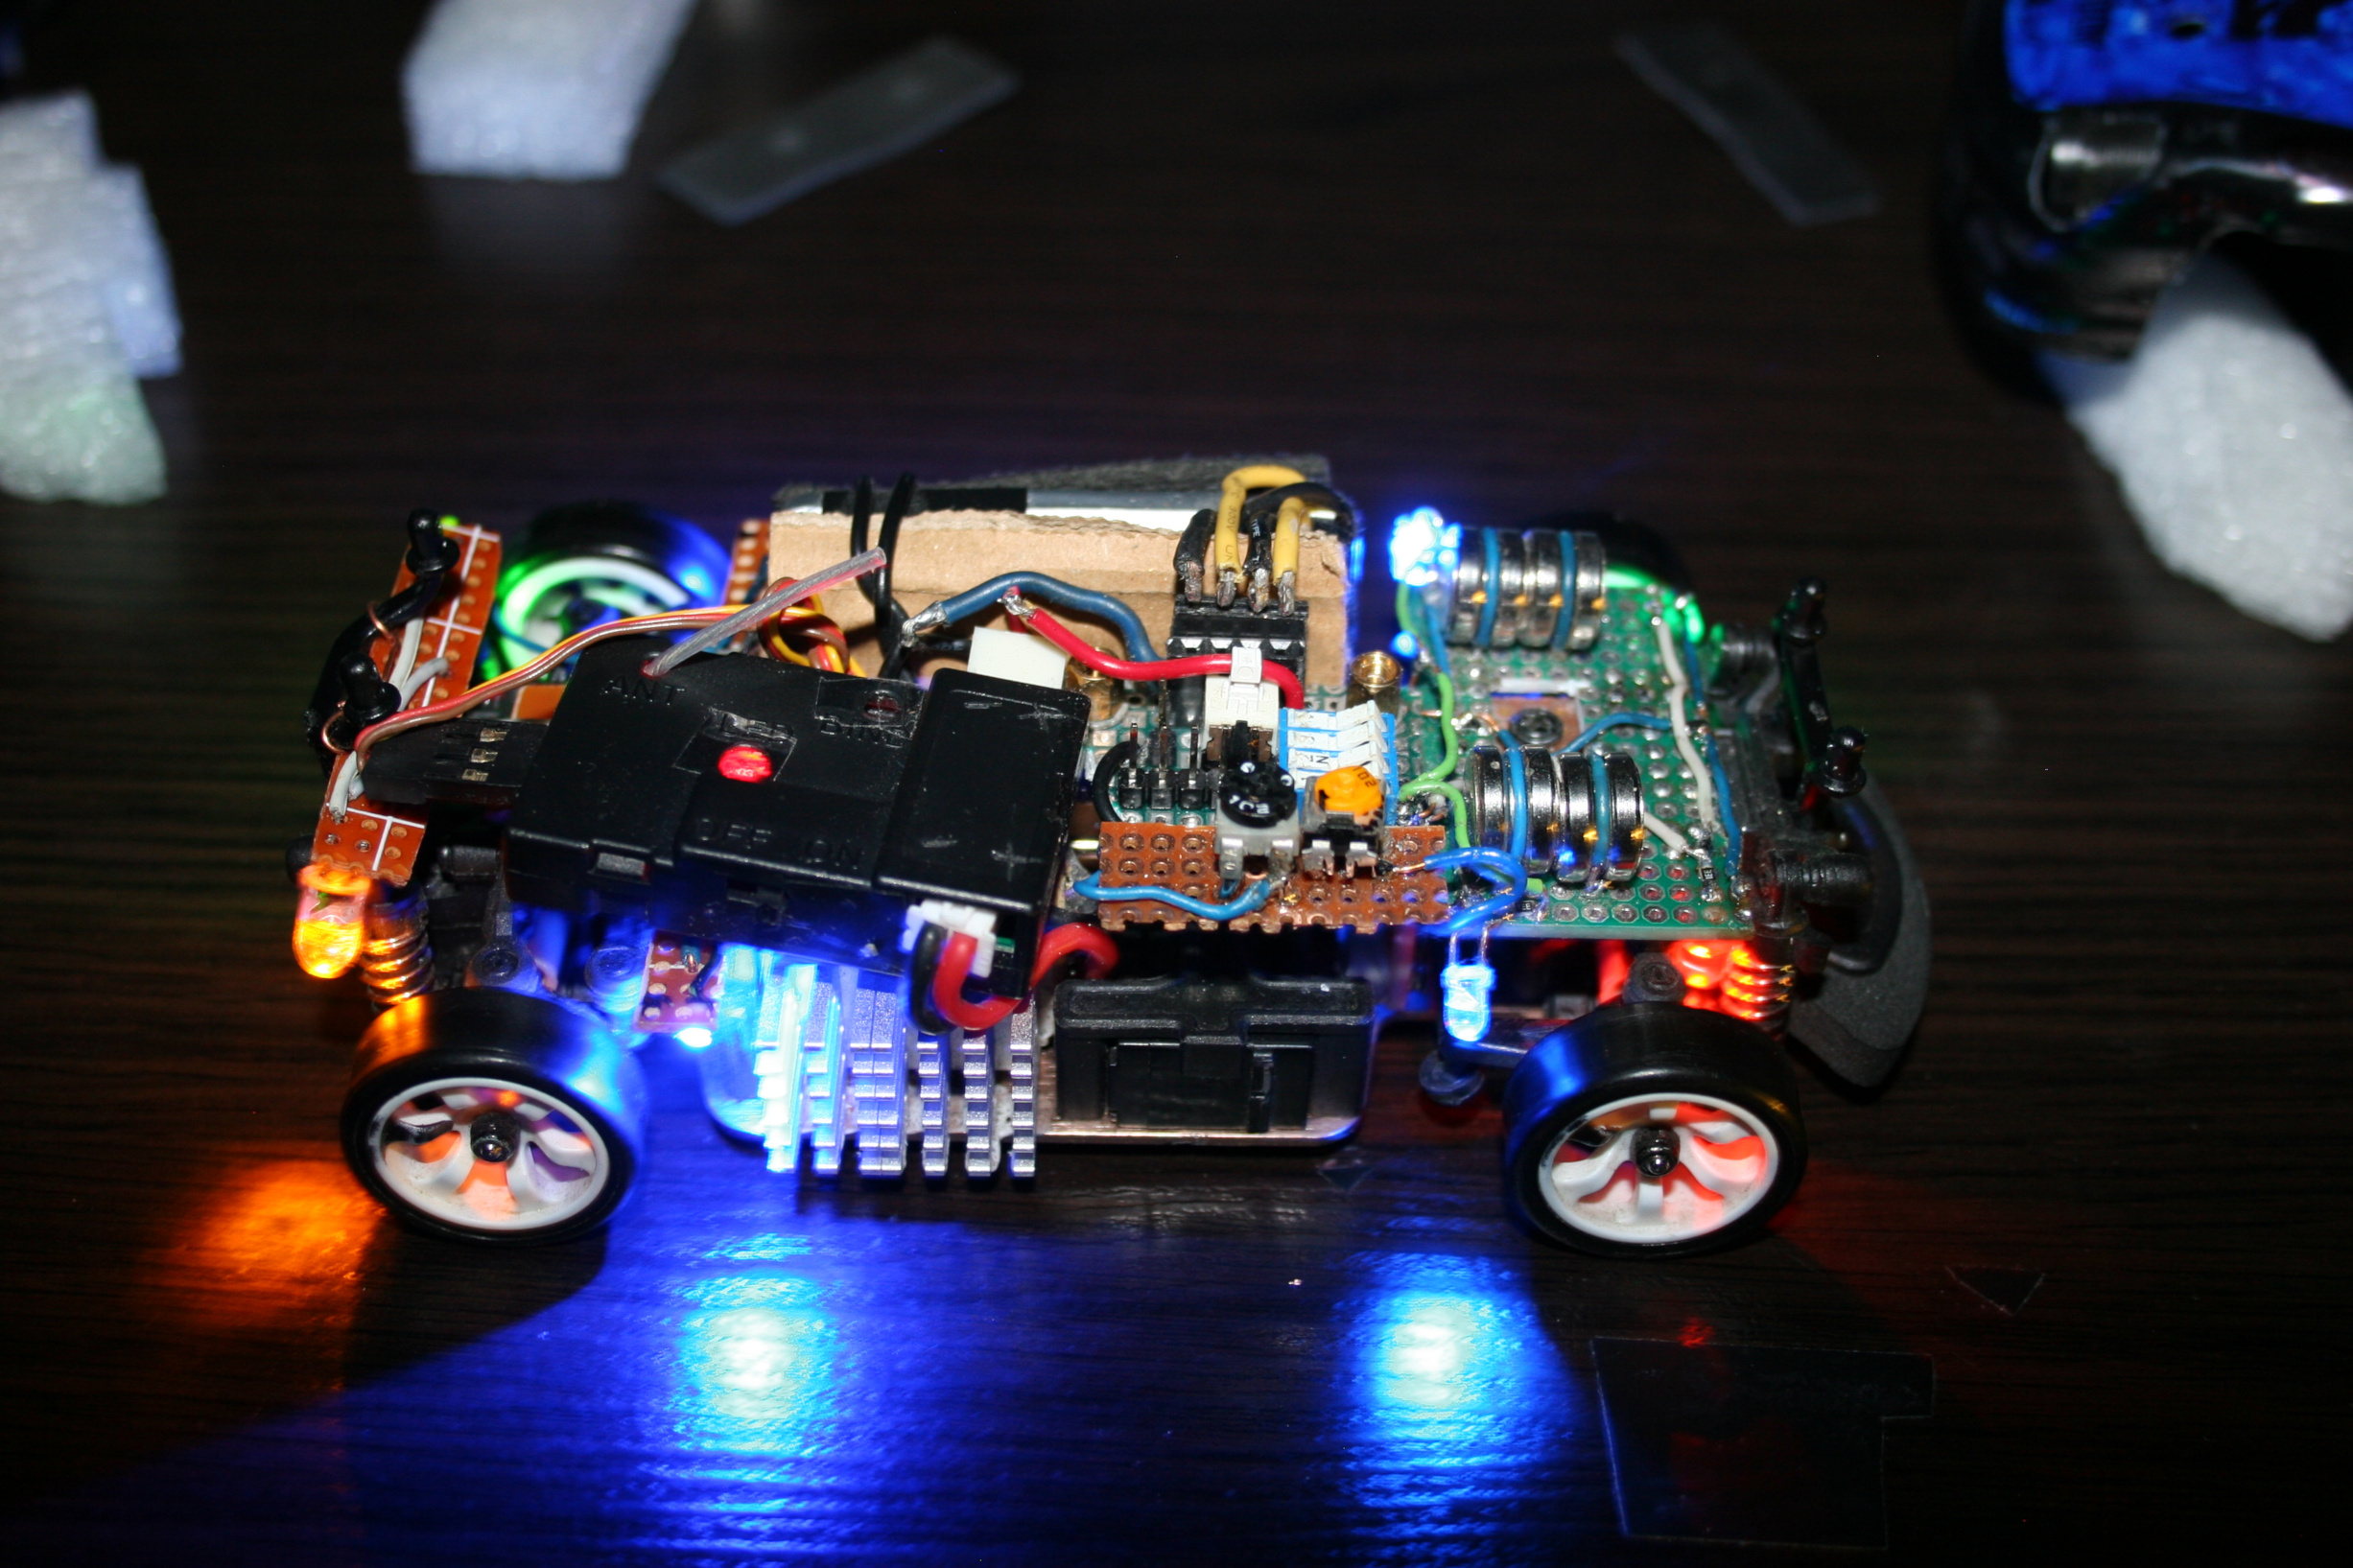
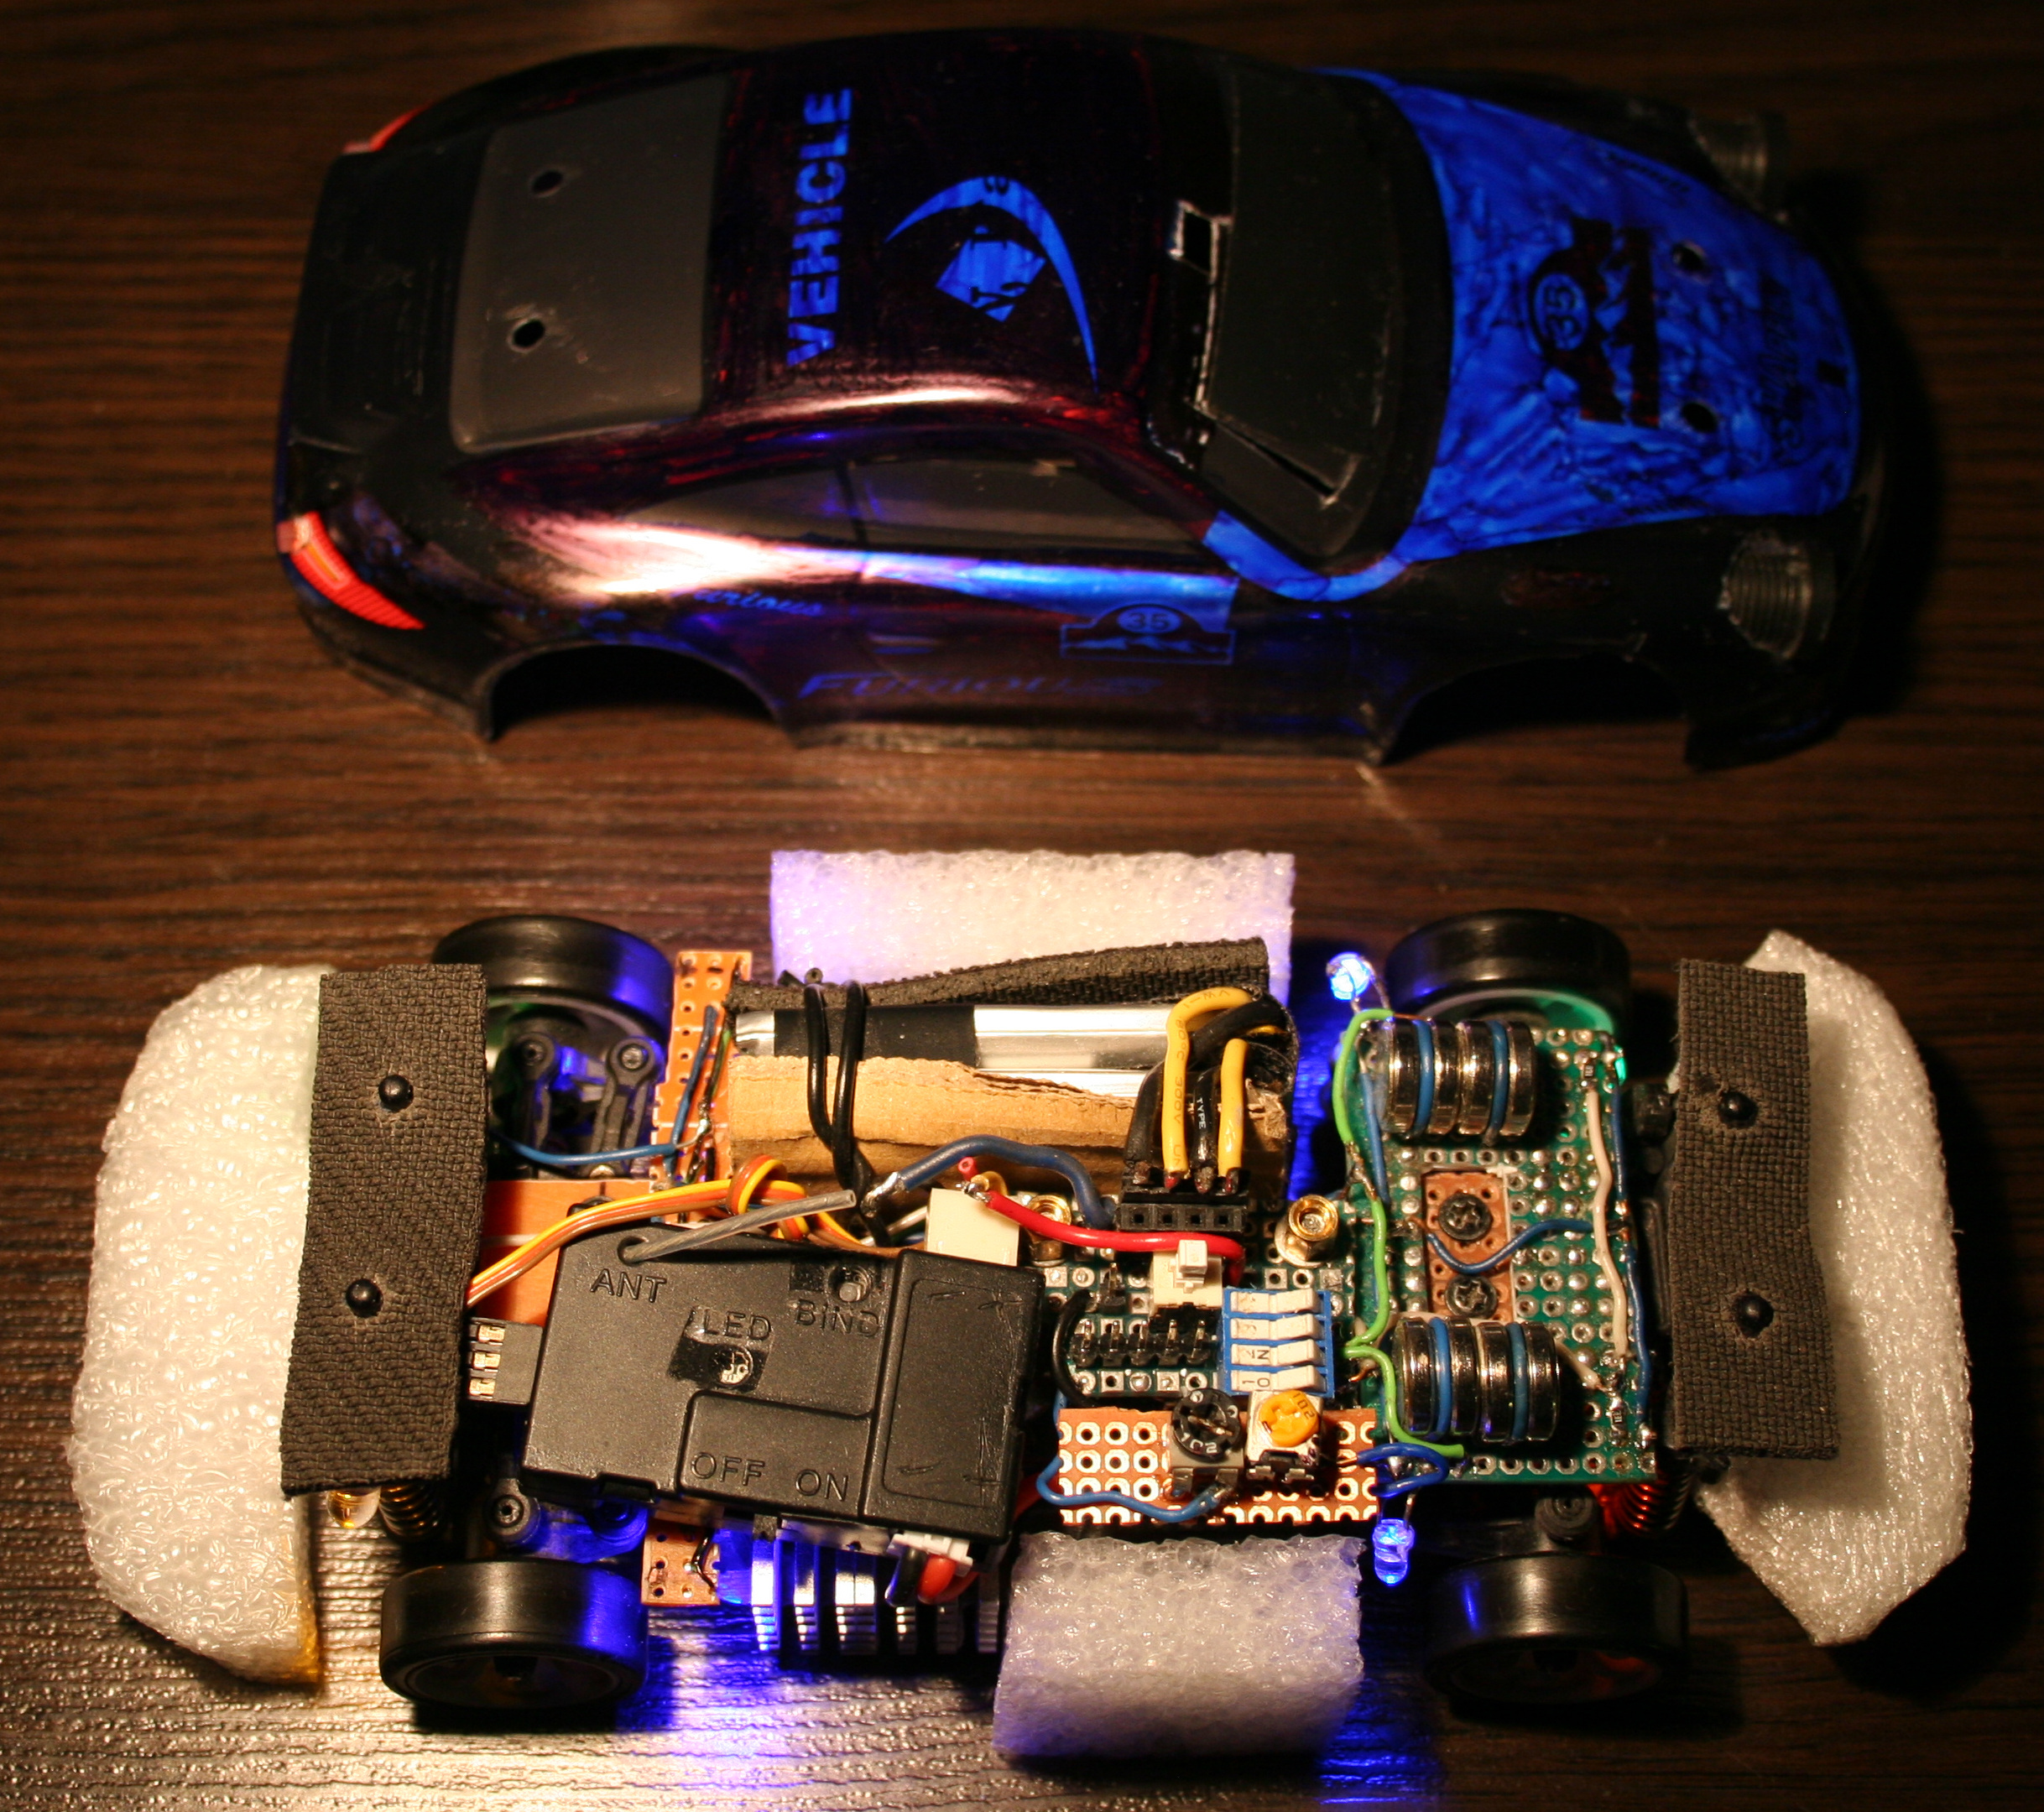
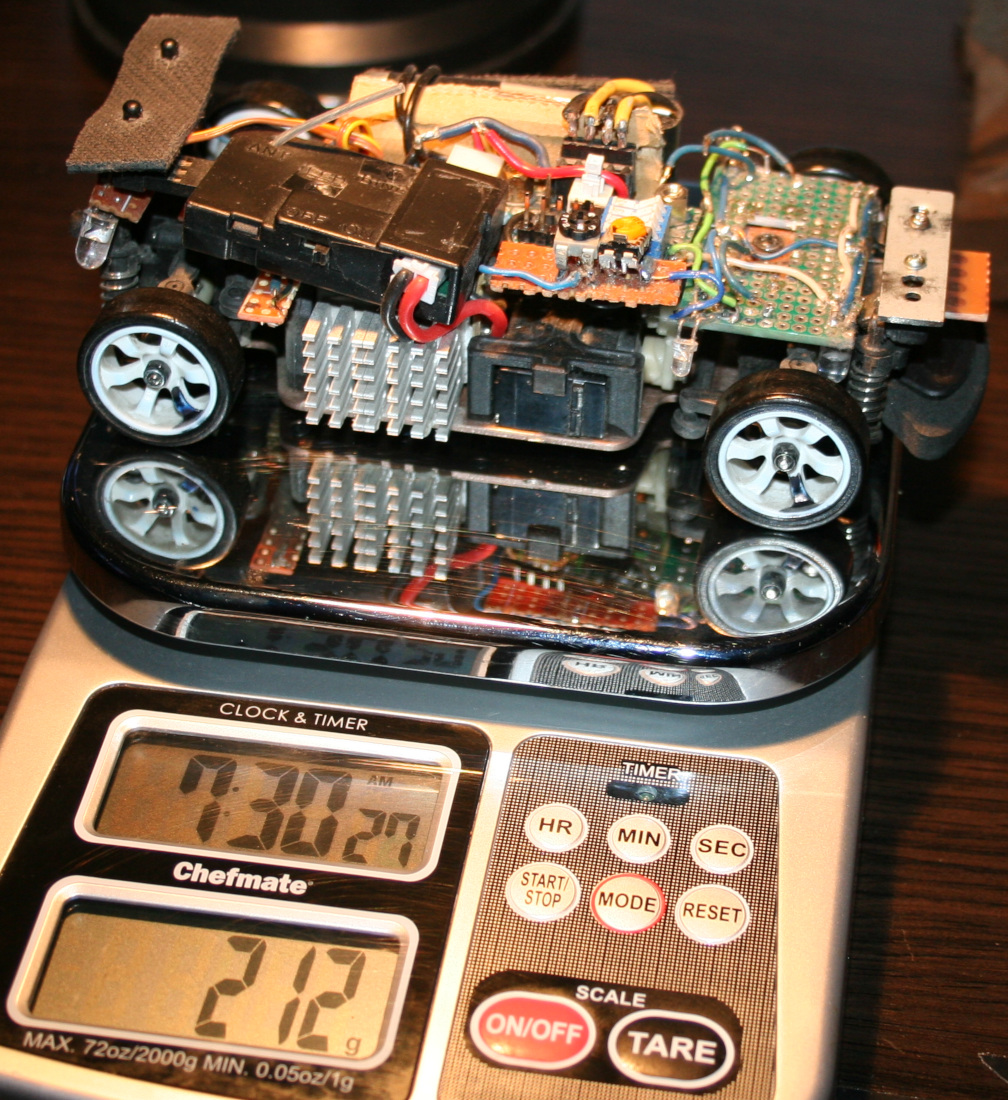
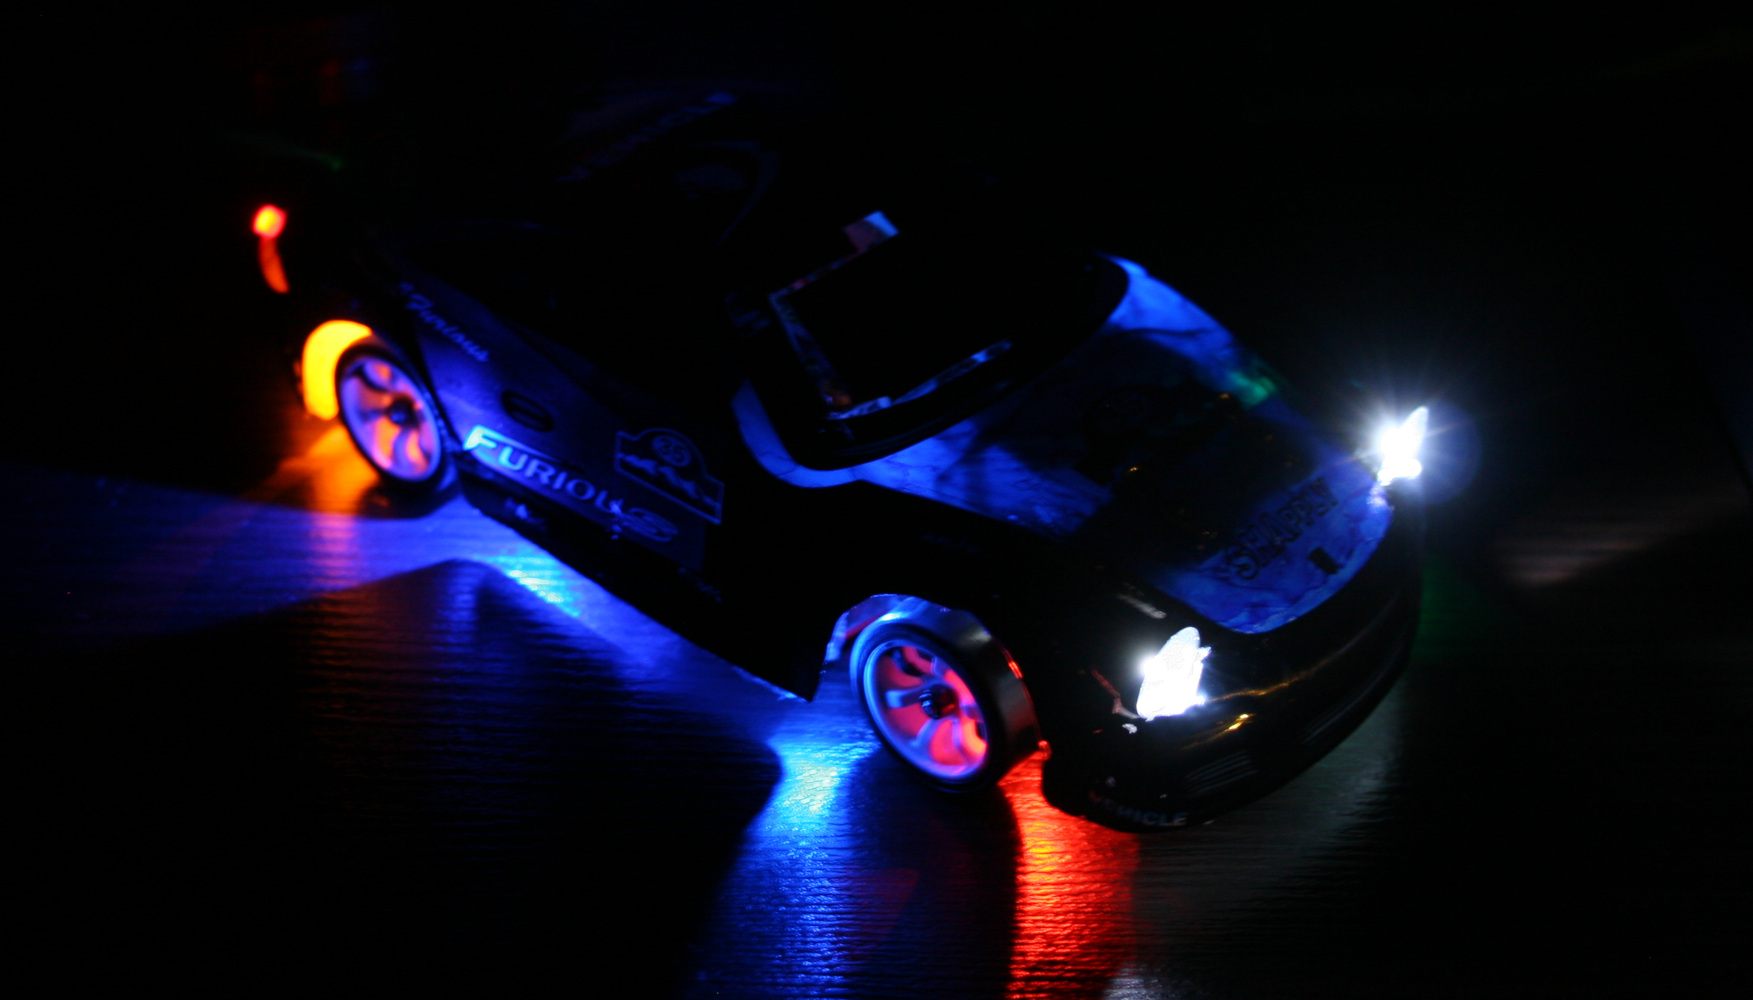
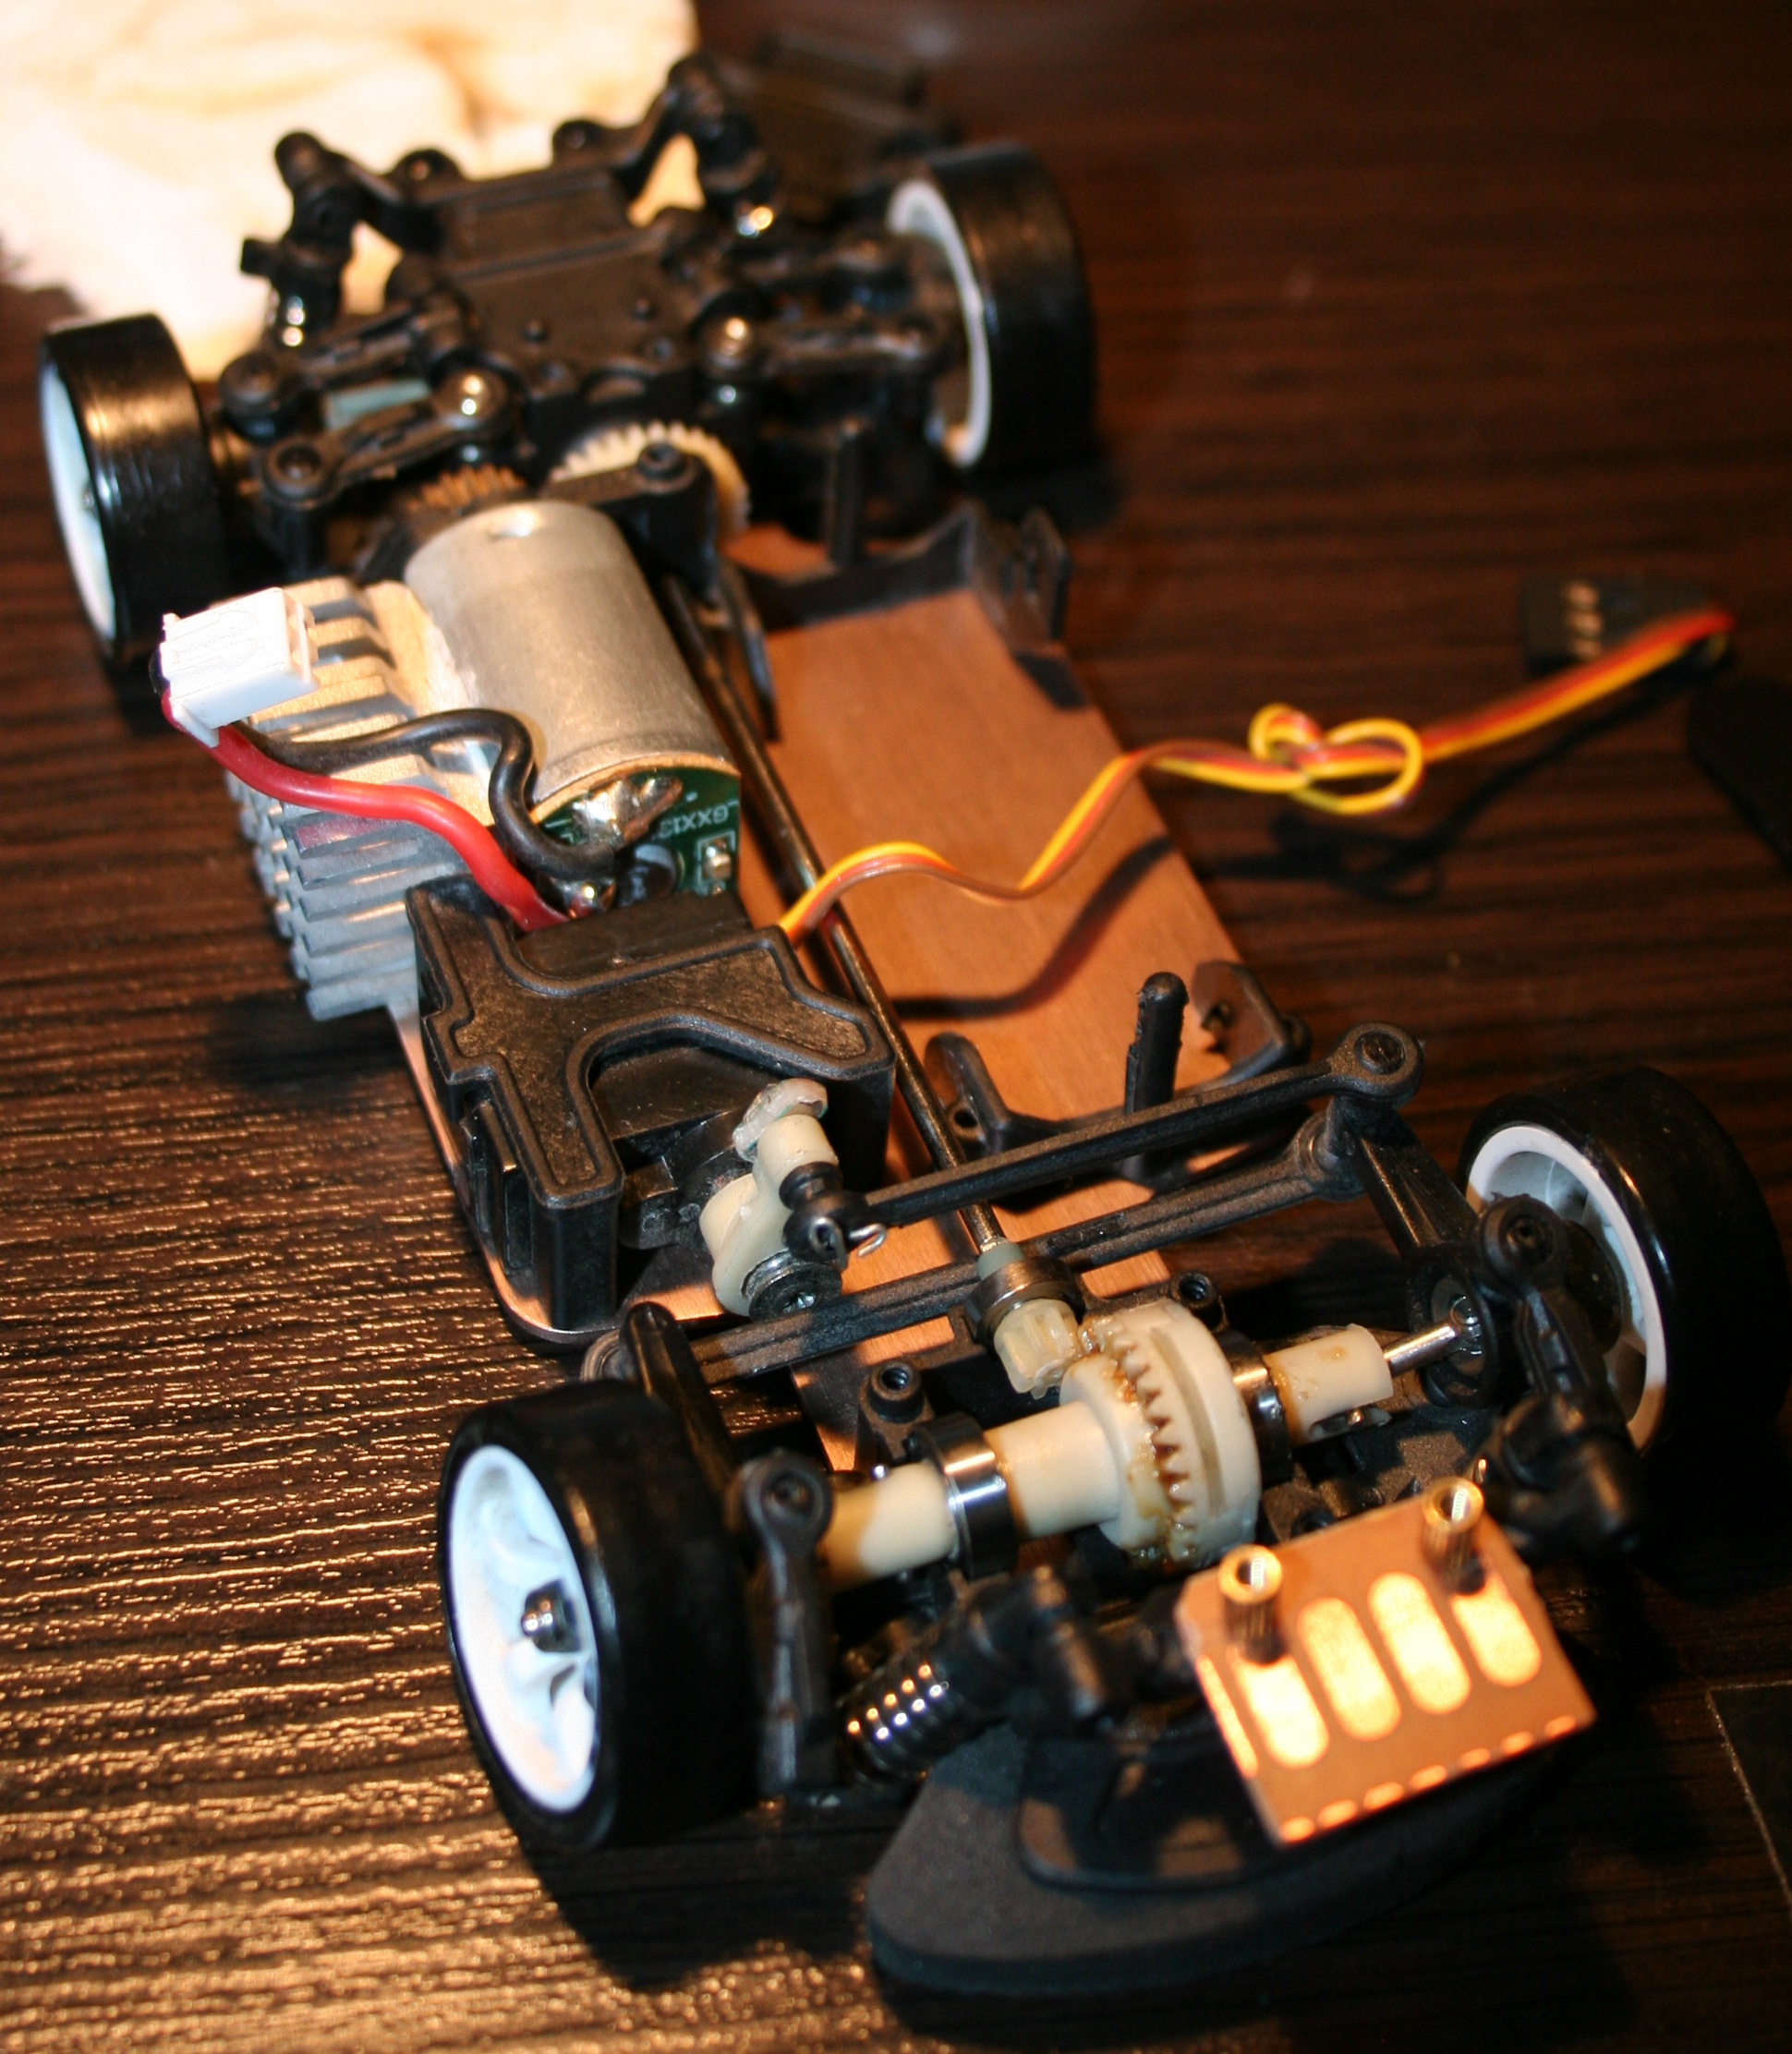
At end of 2021 I bought a WLtoys K969 RC drift car. I will describe here all the modifications I made to it. Also with few review remarks about it, less important comments and rants are italic.
▶️Video
Video here. Drifting in empty office on carpet and kitchen floor (best of montage). Camera was just from old phone: LG K10 2017 Car camera: Ion Snapcam LE, like mentioned below Software used to for video editing: Kdenlive on Debian GNU/Linux with KDE Picture gallery at end of page.
📜History
I guess I should write this chapter here, since being almost 40 requires (an attempt for) an explanation🙂. Well, as a child I only had a few (probably Russian) cars from 80s, Two did have a cable from controller, and the one that was radio controlled had only 1 button to go backward, which also made it turn. Yeah I also can’t even. As a teenager, at some point I got an RC car. It had rear wheel drive and used 27MHz. I think I drove it only 2 times. It was fast and meant to drive outside. It had rubber tires so it stuck to asphalt and would rather flip over instead of sliding. It seemed kind of hopeless (compared to today RC toys) and felt like something is missing.
✍️Motivation
In the mean time I got interested in WRC and 4WD on gravel, played a couple of such games too. And finally made my own Stunt Rally. There was a time when I was a lot interested in tires and car simulation.
Recently, once a while I was watching various videos about RC toys. Technology moved forwards a lot in them too. This way, I found out about RC drift cars of 1:28 scale, and after days of watching videos and researching what would be cheap, but still good for drifting at home (or office) I found this WLtoys K969 and saw how it drifts at home. I think I watched later other 1:28 cars (like Mini-Z, Mini-Q etc.), and realized that even thought they are much more expensive they aren’t much better. At least for me as a first car, I don’t intend to drive RC professionally or on tracks. There are also cars and people who prefer RWD only drifting (front wheels move freely), but I was never a fan of that.
So I think this RC is a nice, real life example, even if in smaller scale. It surely reacts and changes direction much faster than real cars. But is certainly less complicated, has no: LSDiffs, torque curve, gearbox, central differential, etc. In this RC all wheels rotate the same, electric motors don’t even need gearbox, suspension has only stiff springs, and there is no flexibility in tires, since those are from hard plastic here.
🛠️Modifications
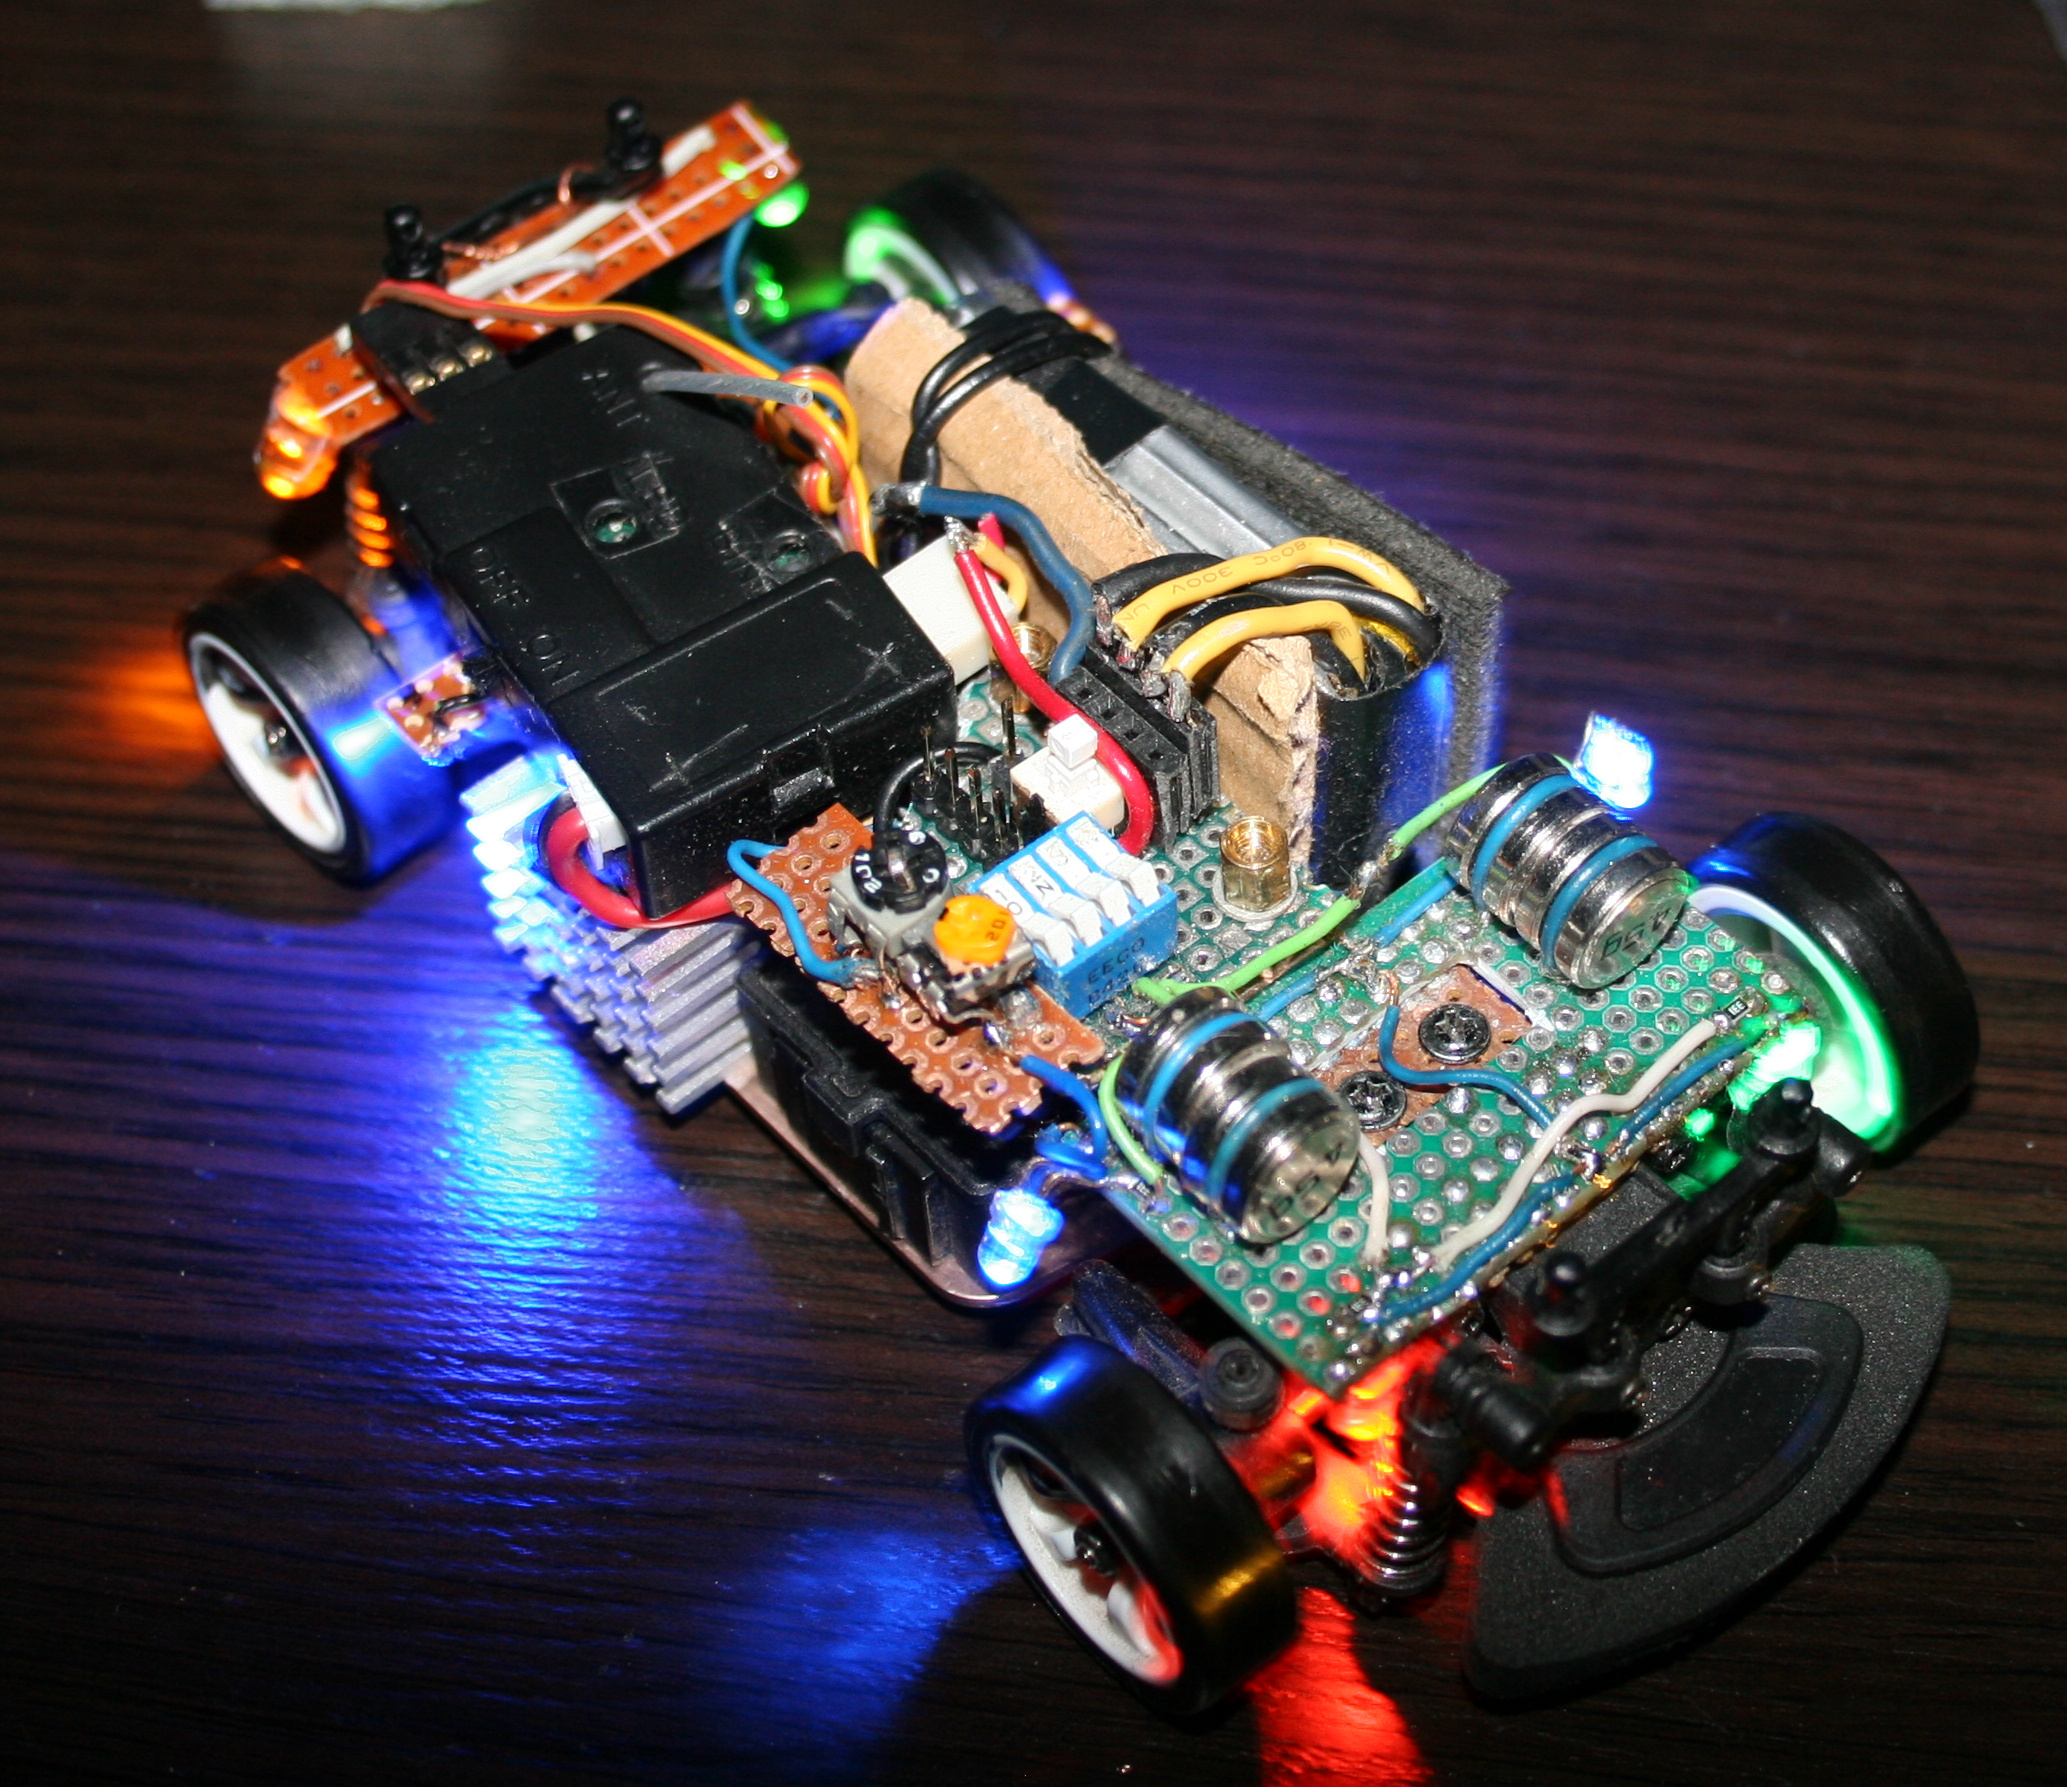
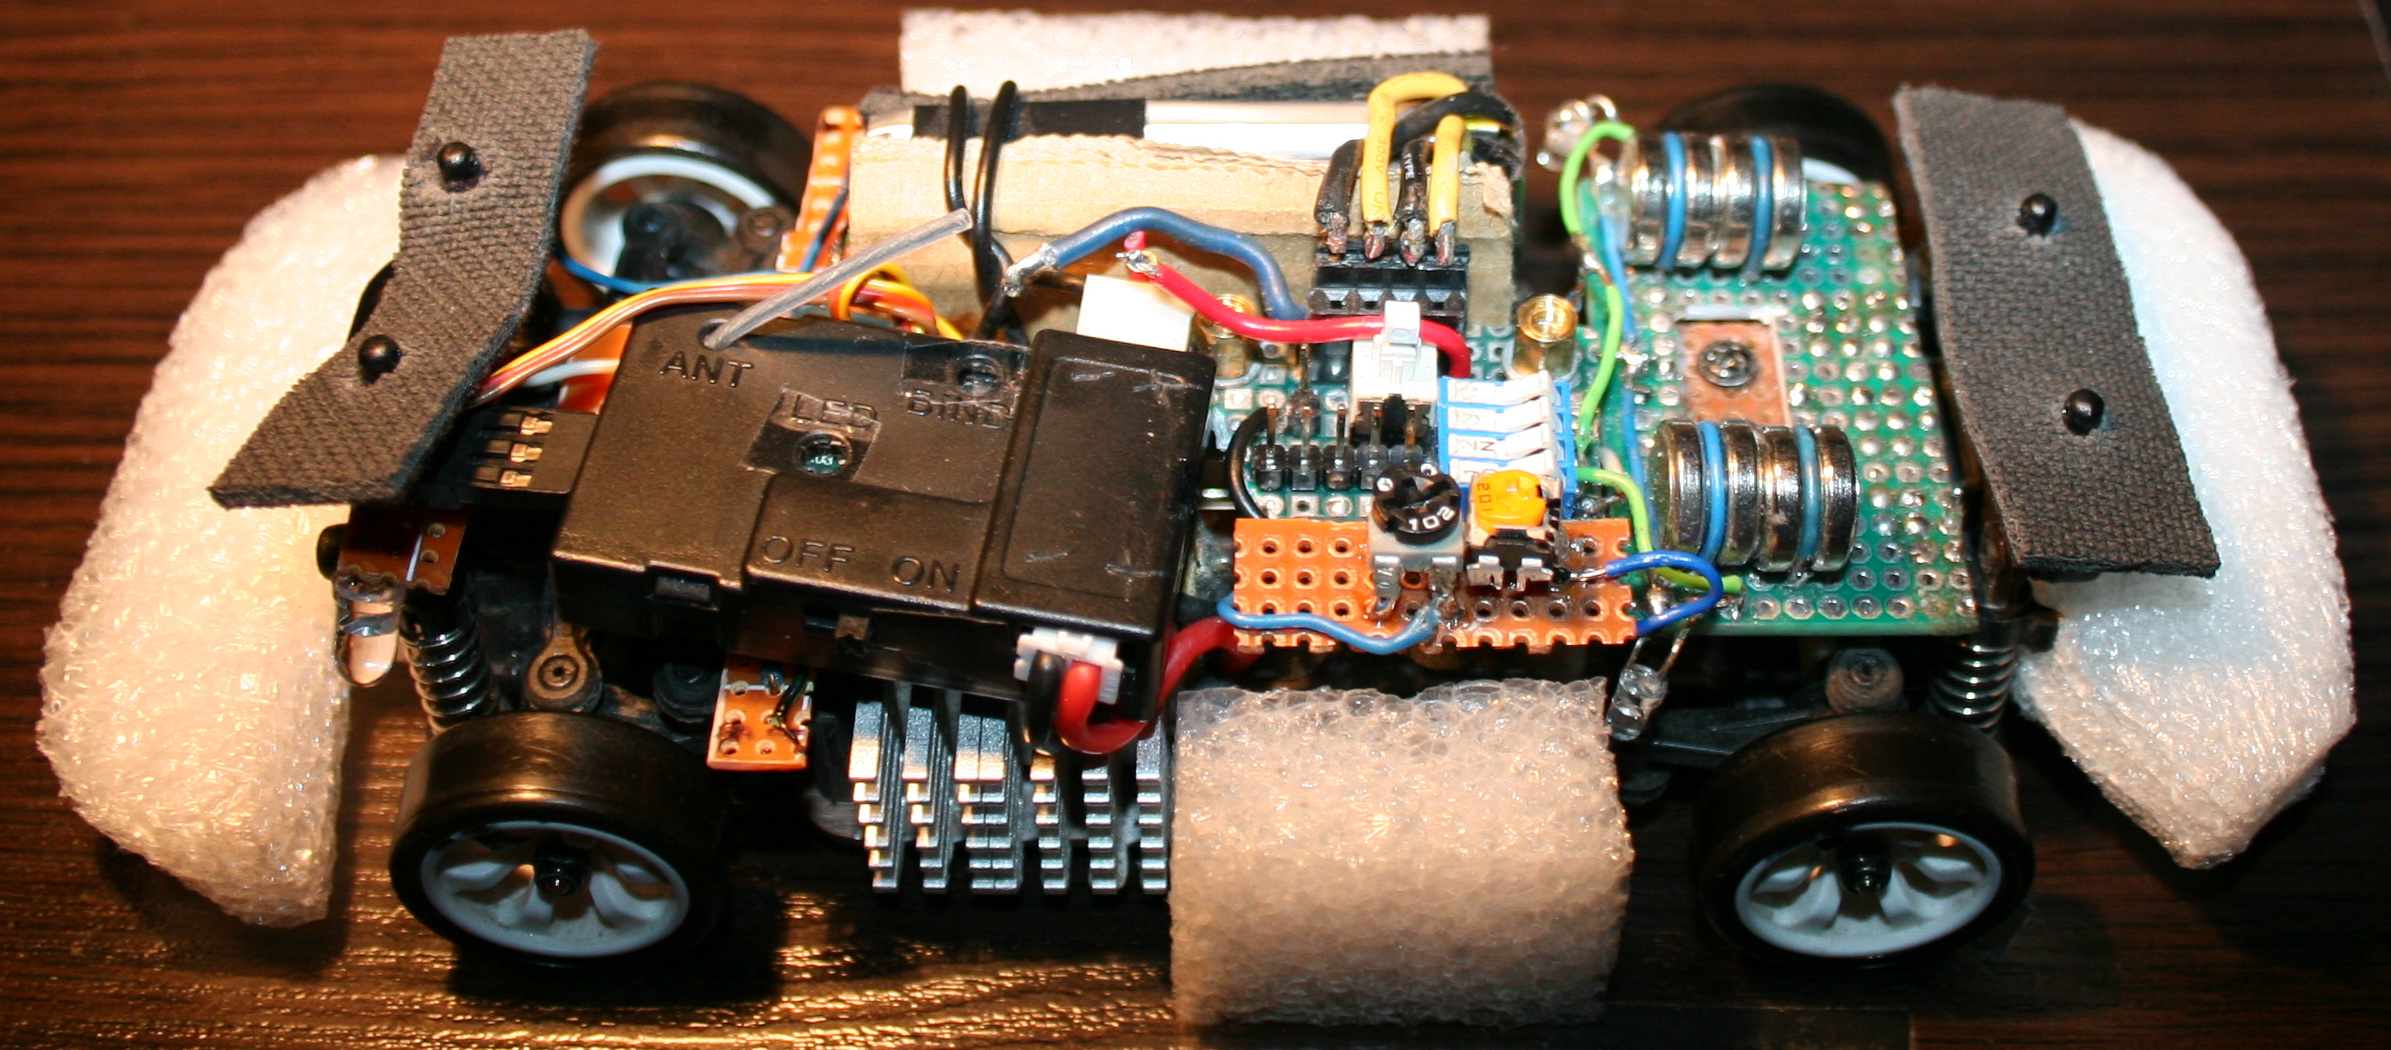
So the things that I changed and added first to last are as follows:
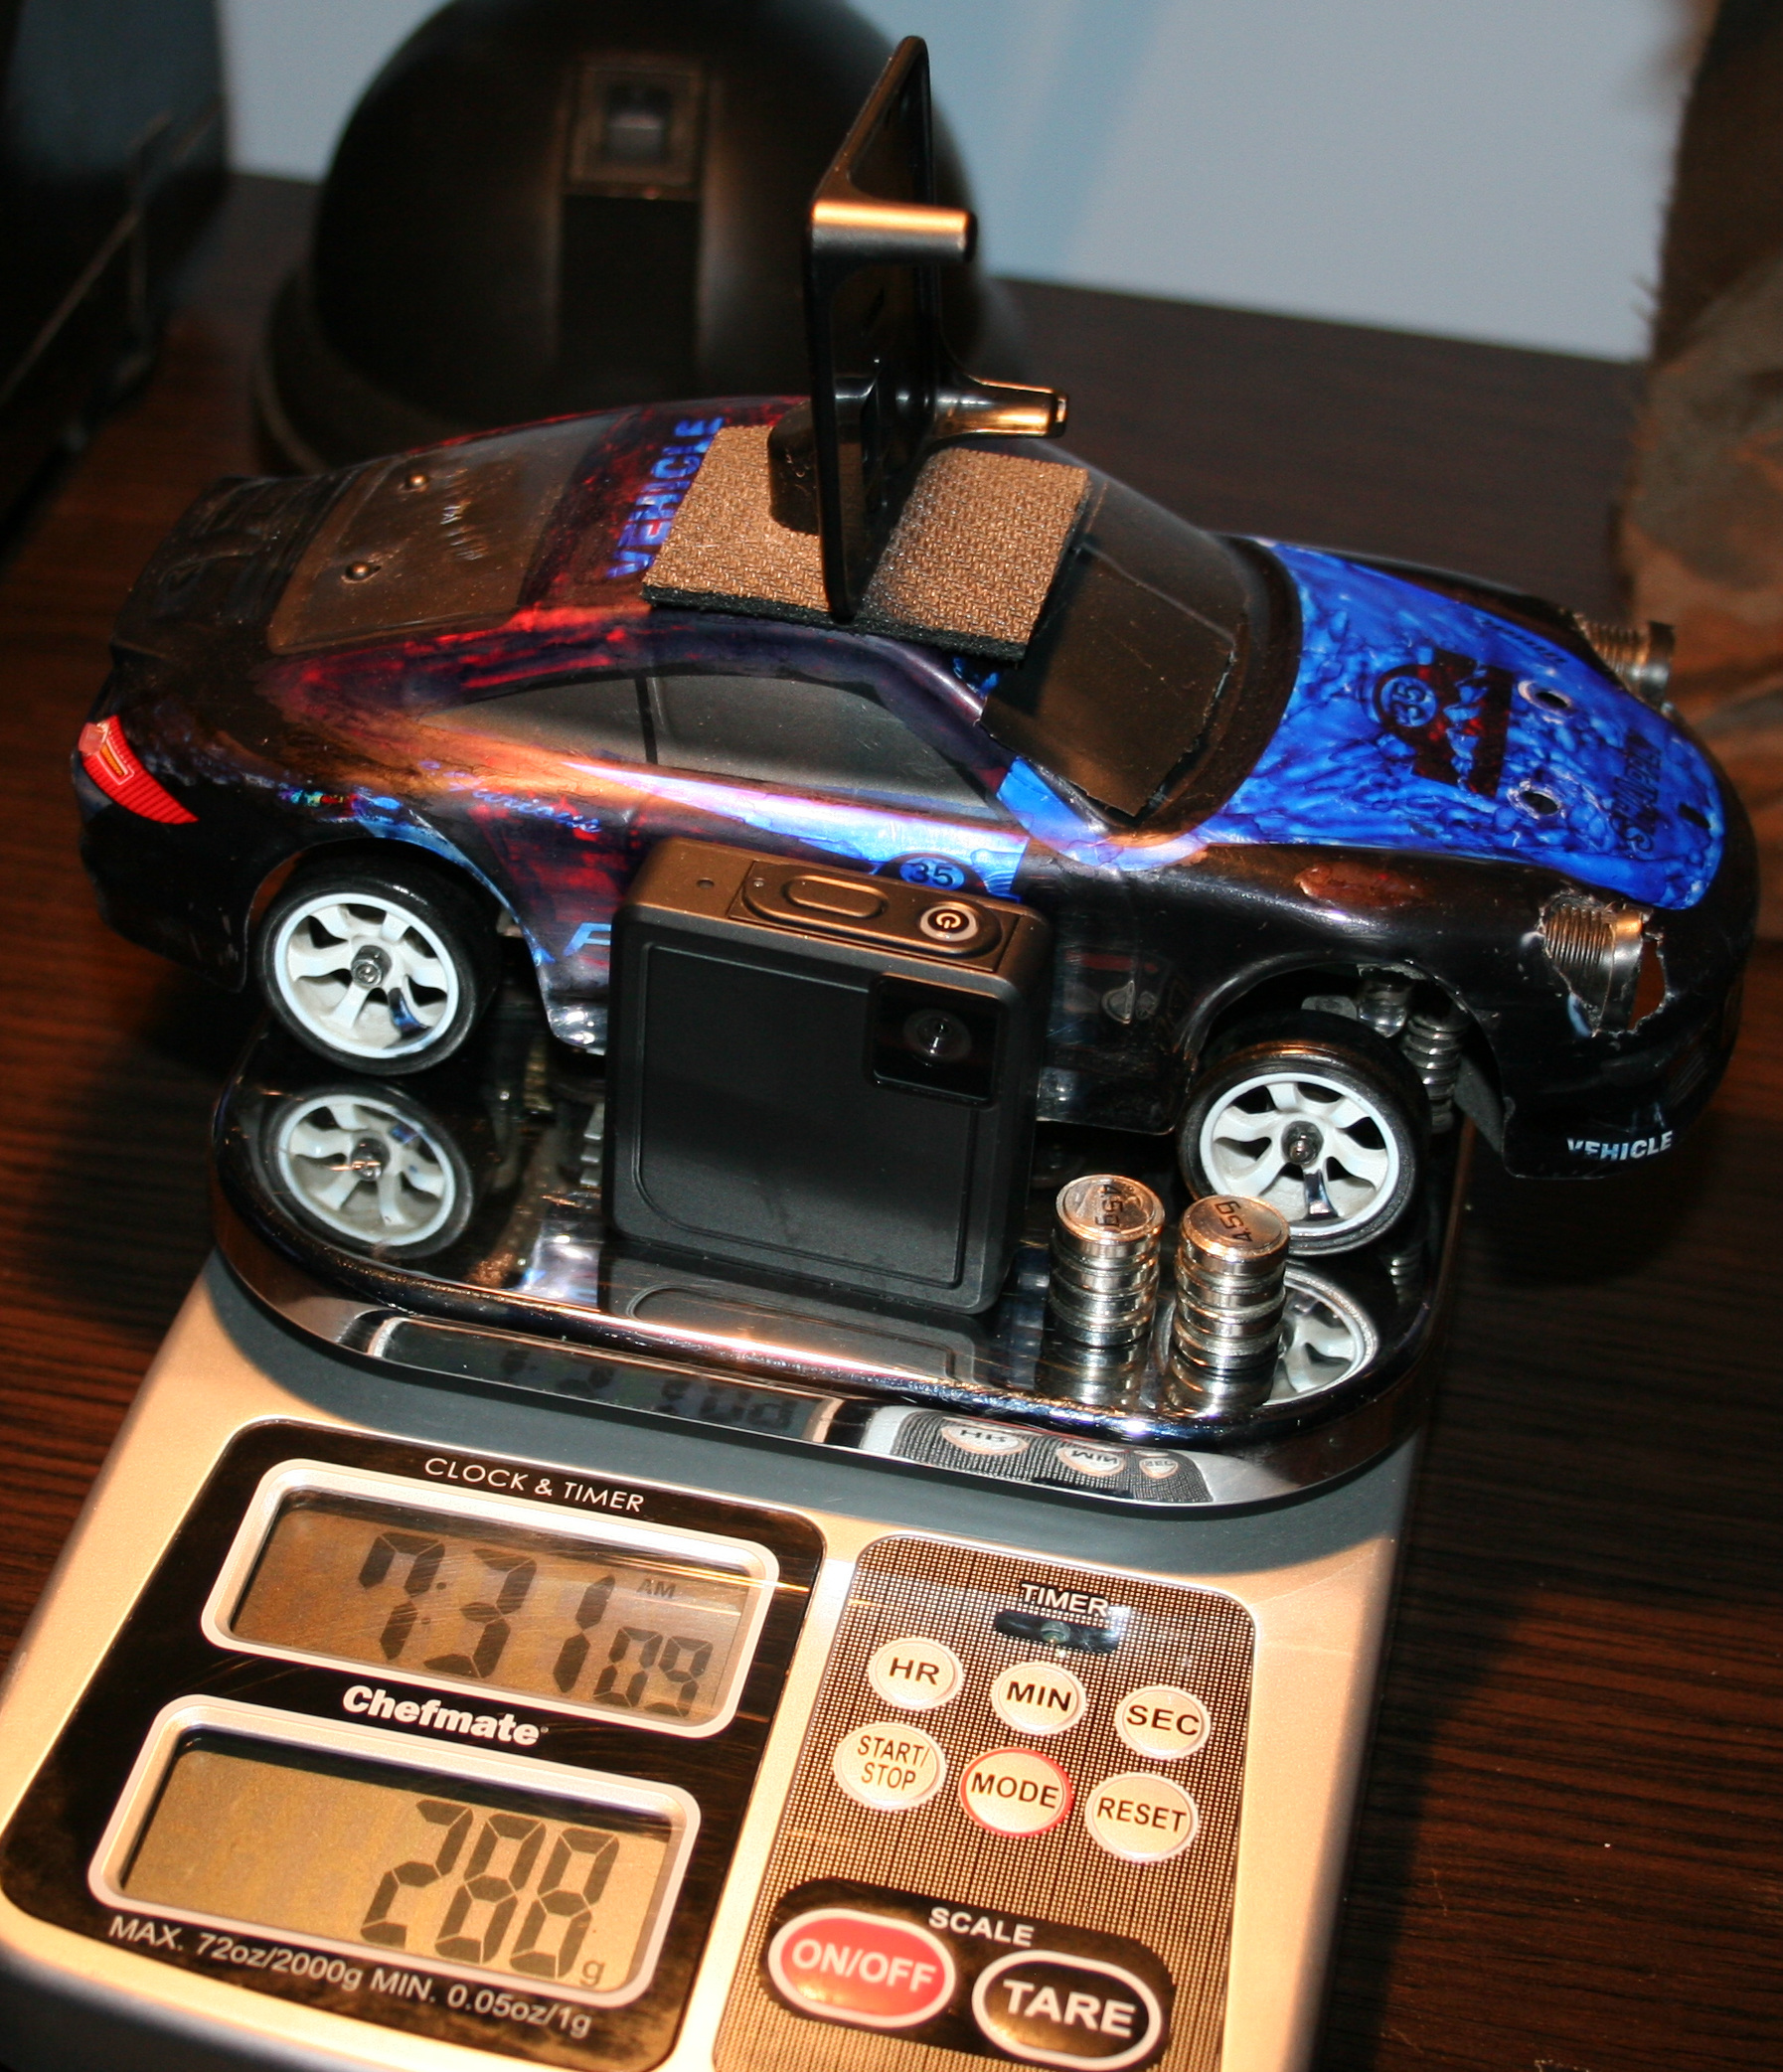
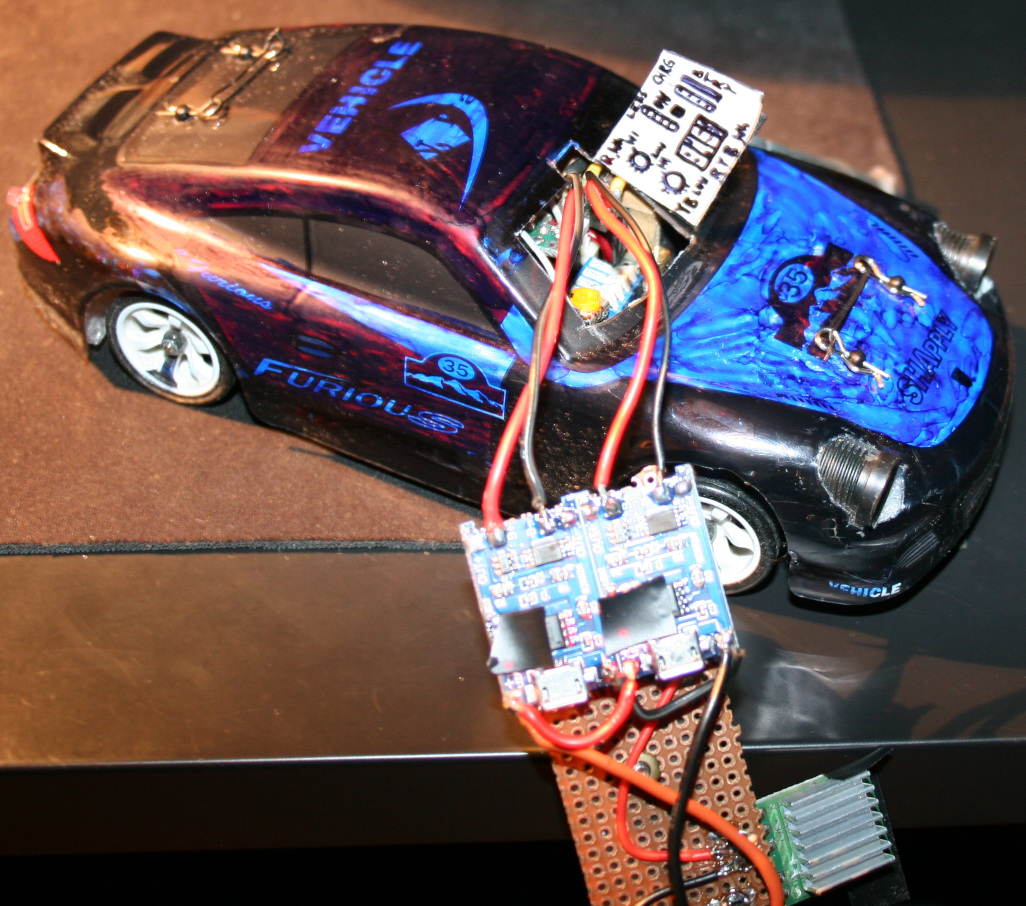
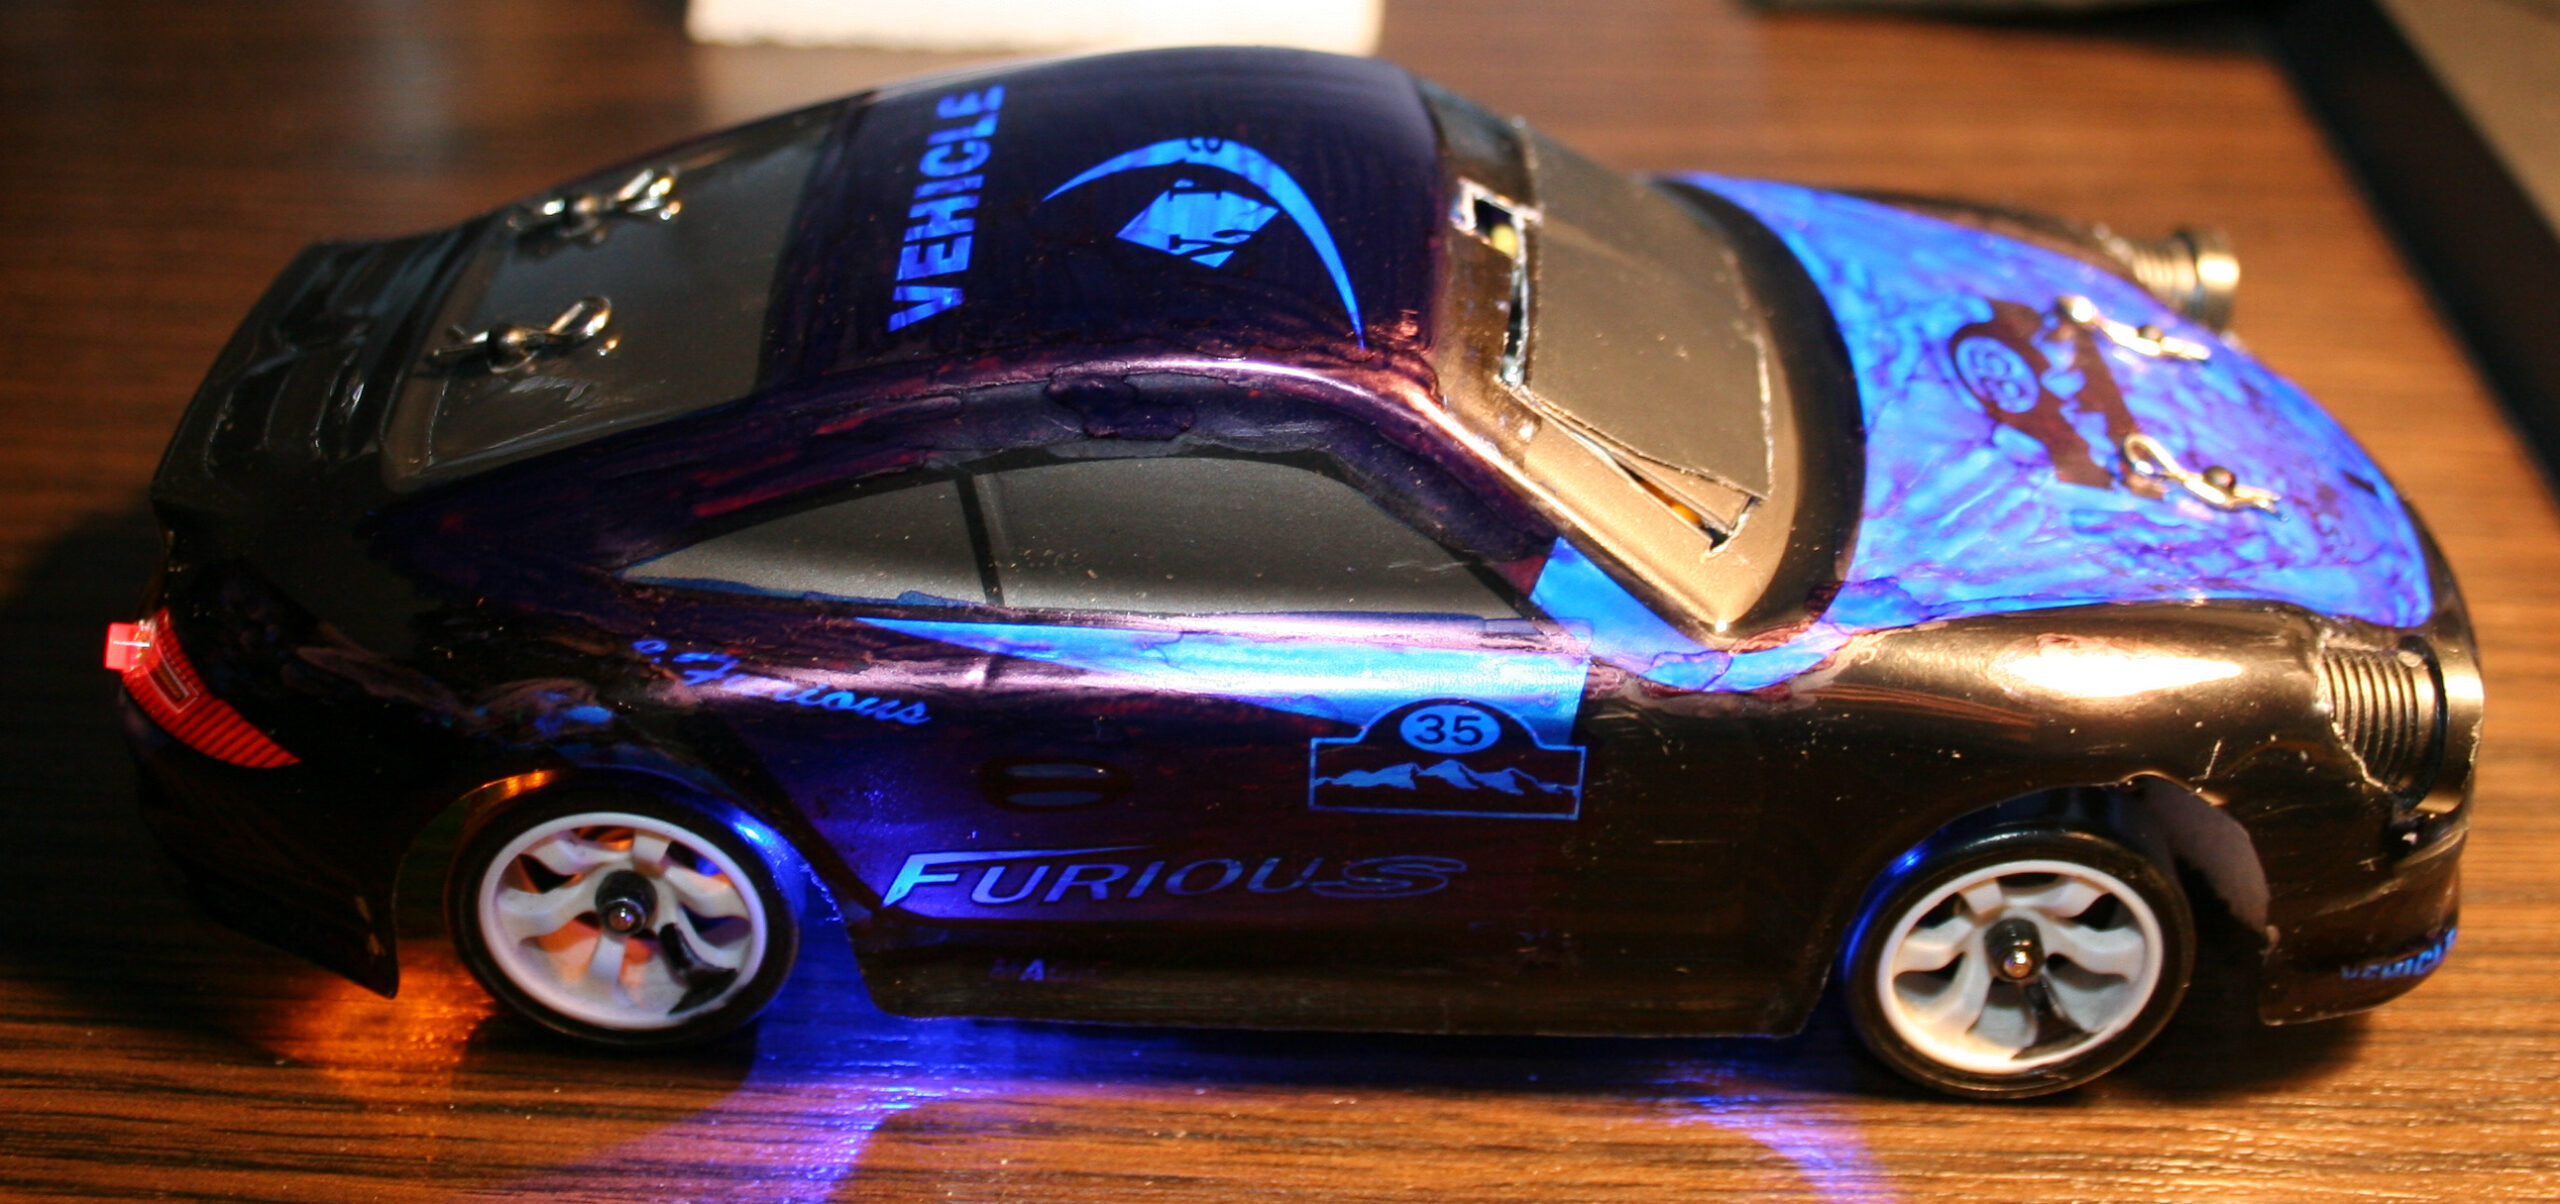
Moved the pin from servo‘s steering arm higher for more steering angle range. There is a video here where it was easy.. But, a huge but here, as it turned out (for me) the upper hole for this screw is wider and I couldn’t just simply use the same screw from lower hole. Thus I had to go creative to achieve this. Since I soldered a lot, I came out with a solution of putting few wires together for right diameter, then soldering one end to a tiny PCB part (with 1 hole), and just bending 2 wires out of the other end. It still holds well. Visible on my last picture. I guess this isn’t that important but is very good to have. Without this, steering angle is lower, making wider turns, but you still can make tight turns by drifting with quickly spinning wheels to oversteer (lose grip on car rear).
Made throttle range adjustable. How to video here. BTW I recommend that channel, it has many good videos including for this RC car. This is actually the most important one. Without this it will be difficult to not spin out wheels all the time. For small rooms, throttle range needs to be even lower. Of course they made the car to be cheapest, and even didn’t add the most important adjustment to it, I didn’t need those side buttons, so why not having this instead. Meh, always have to make things usable myself.
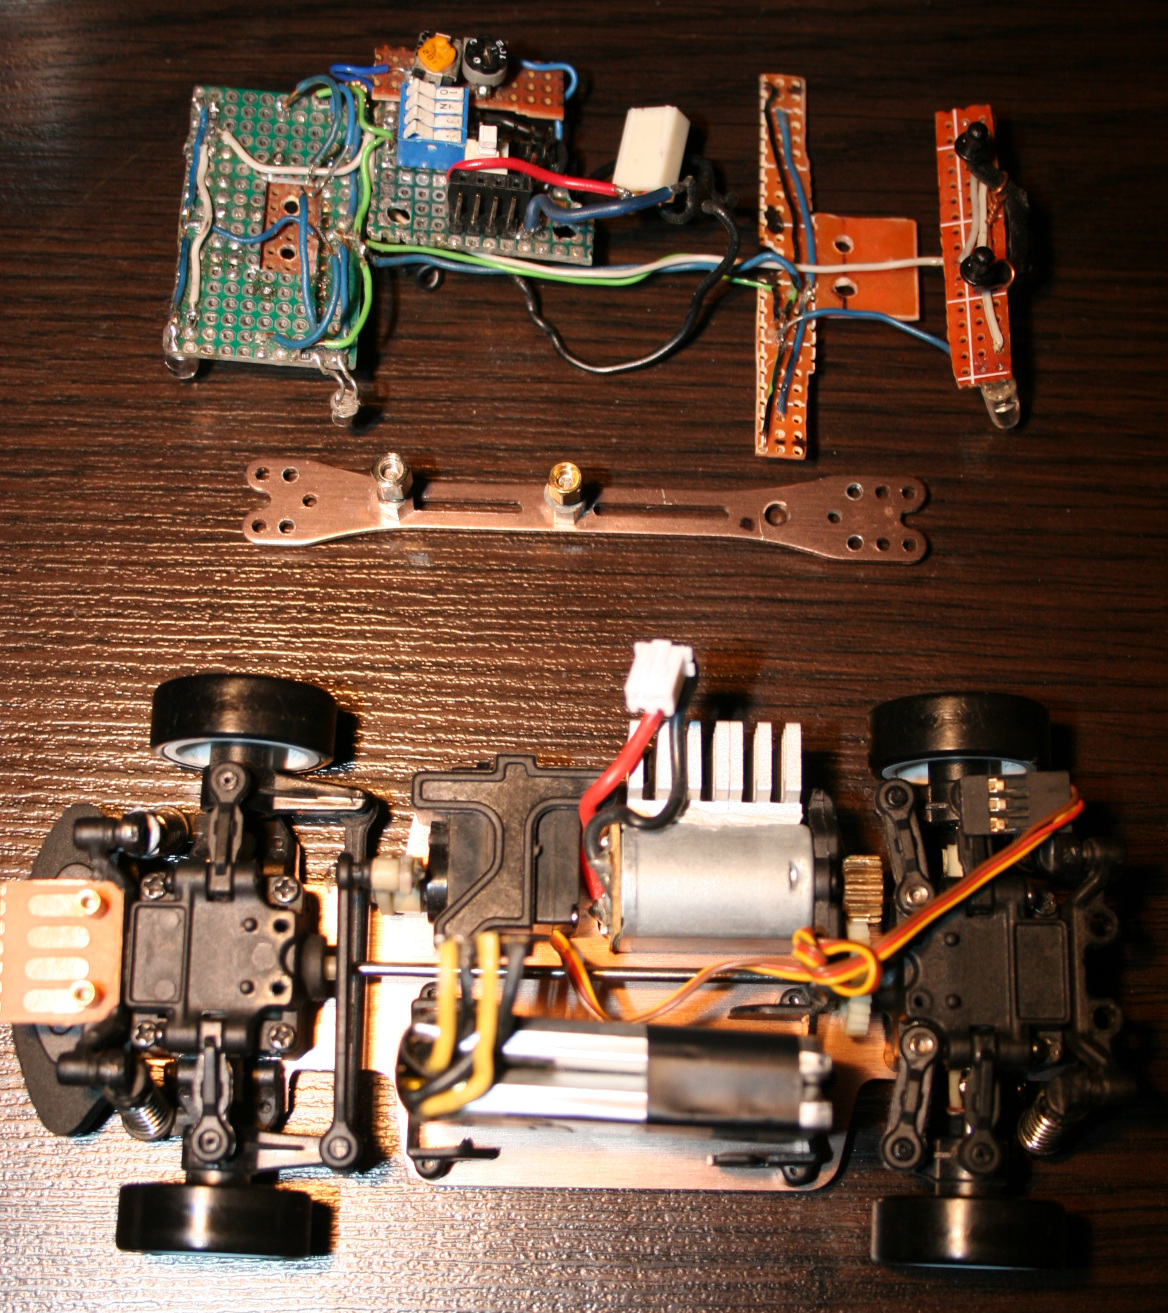
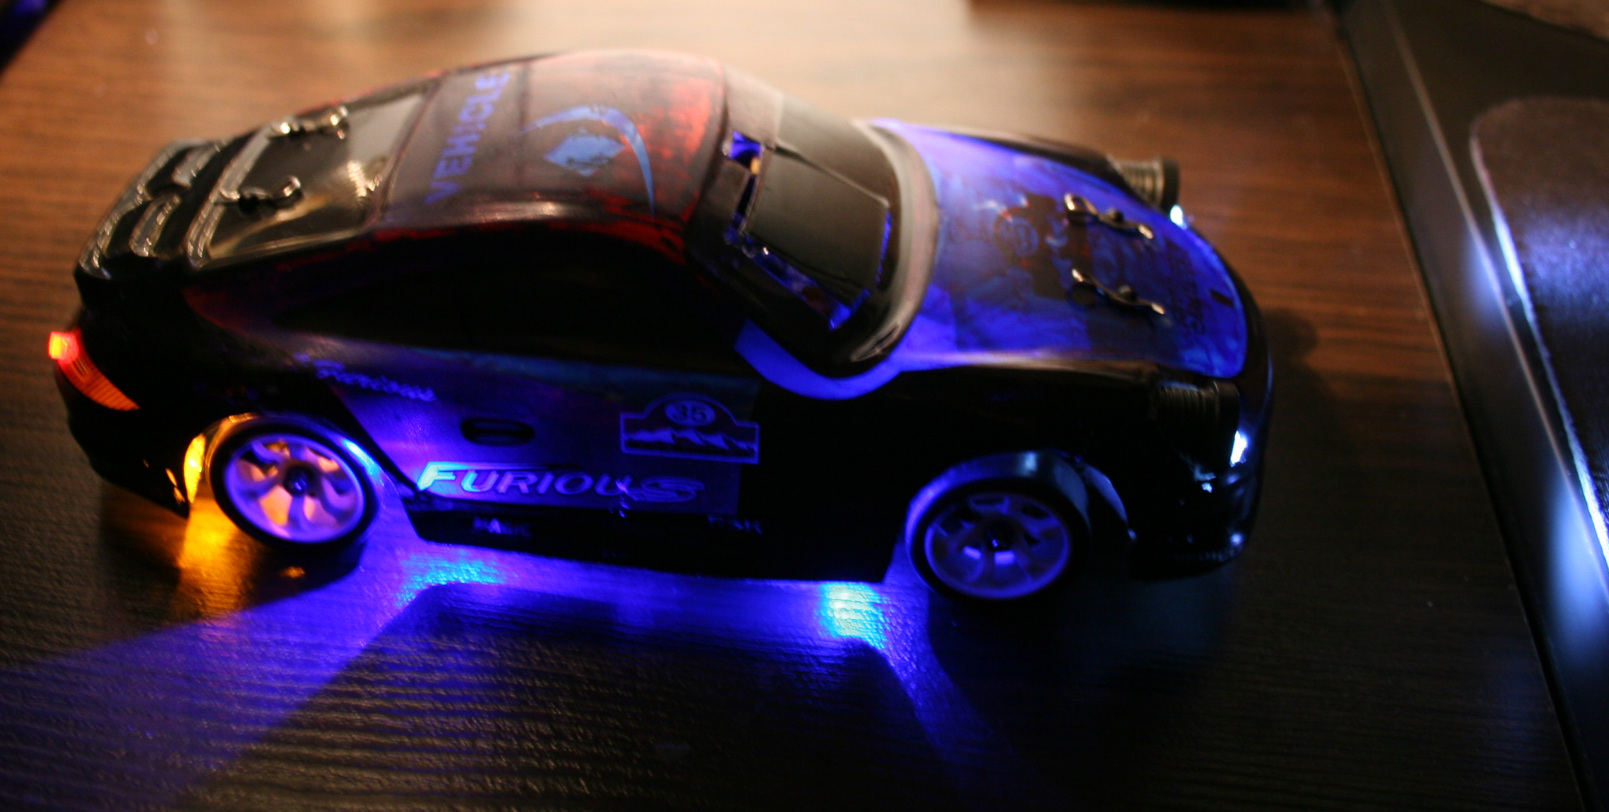
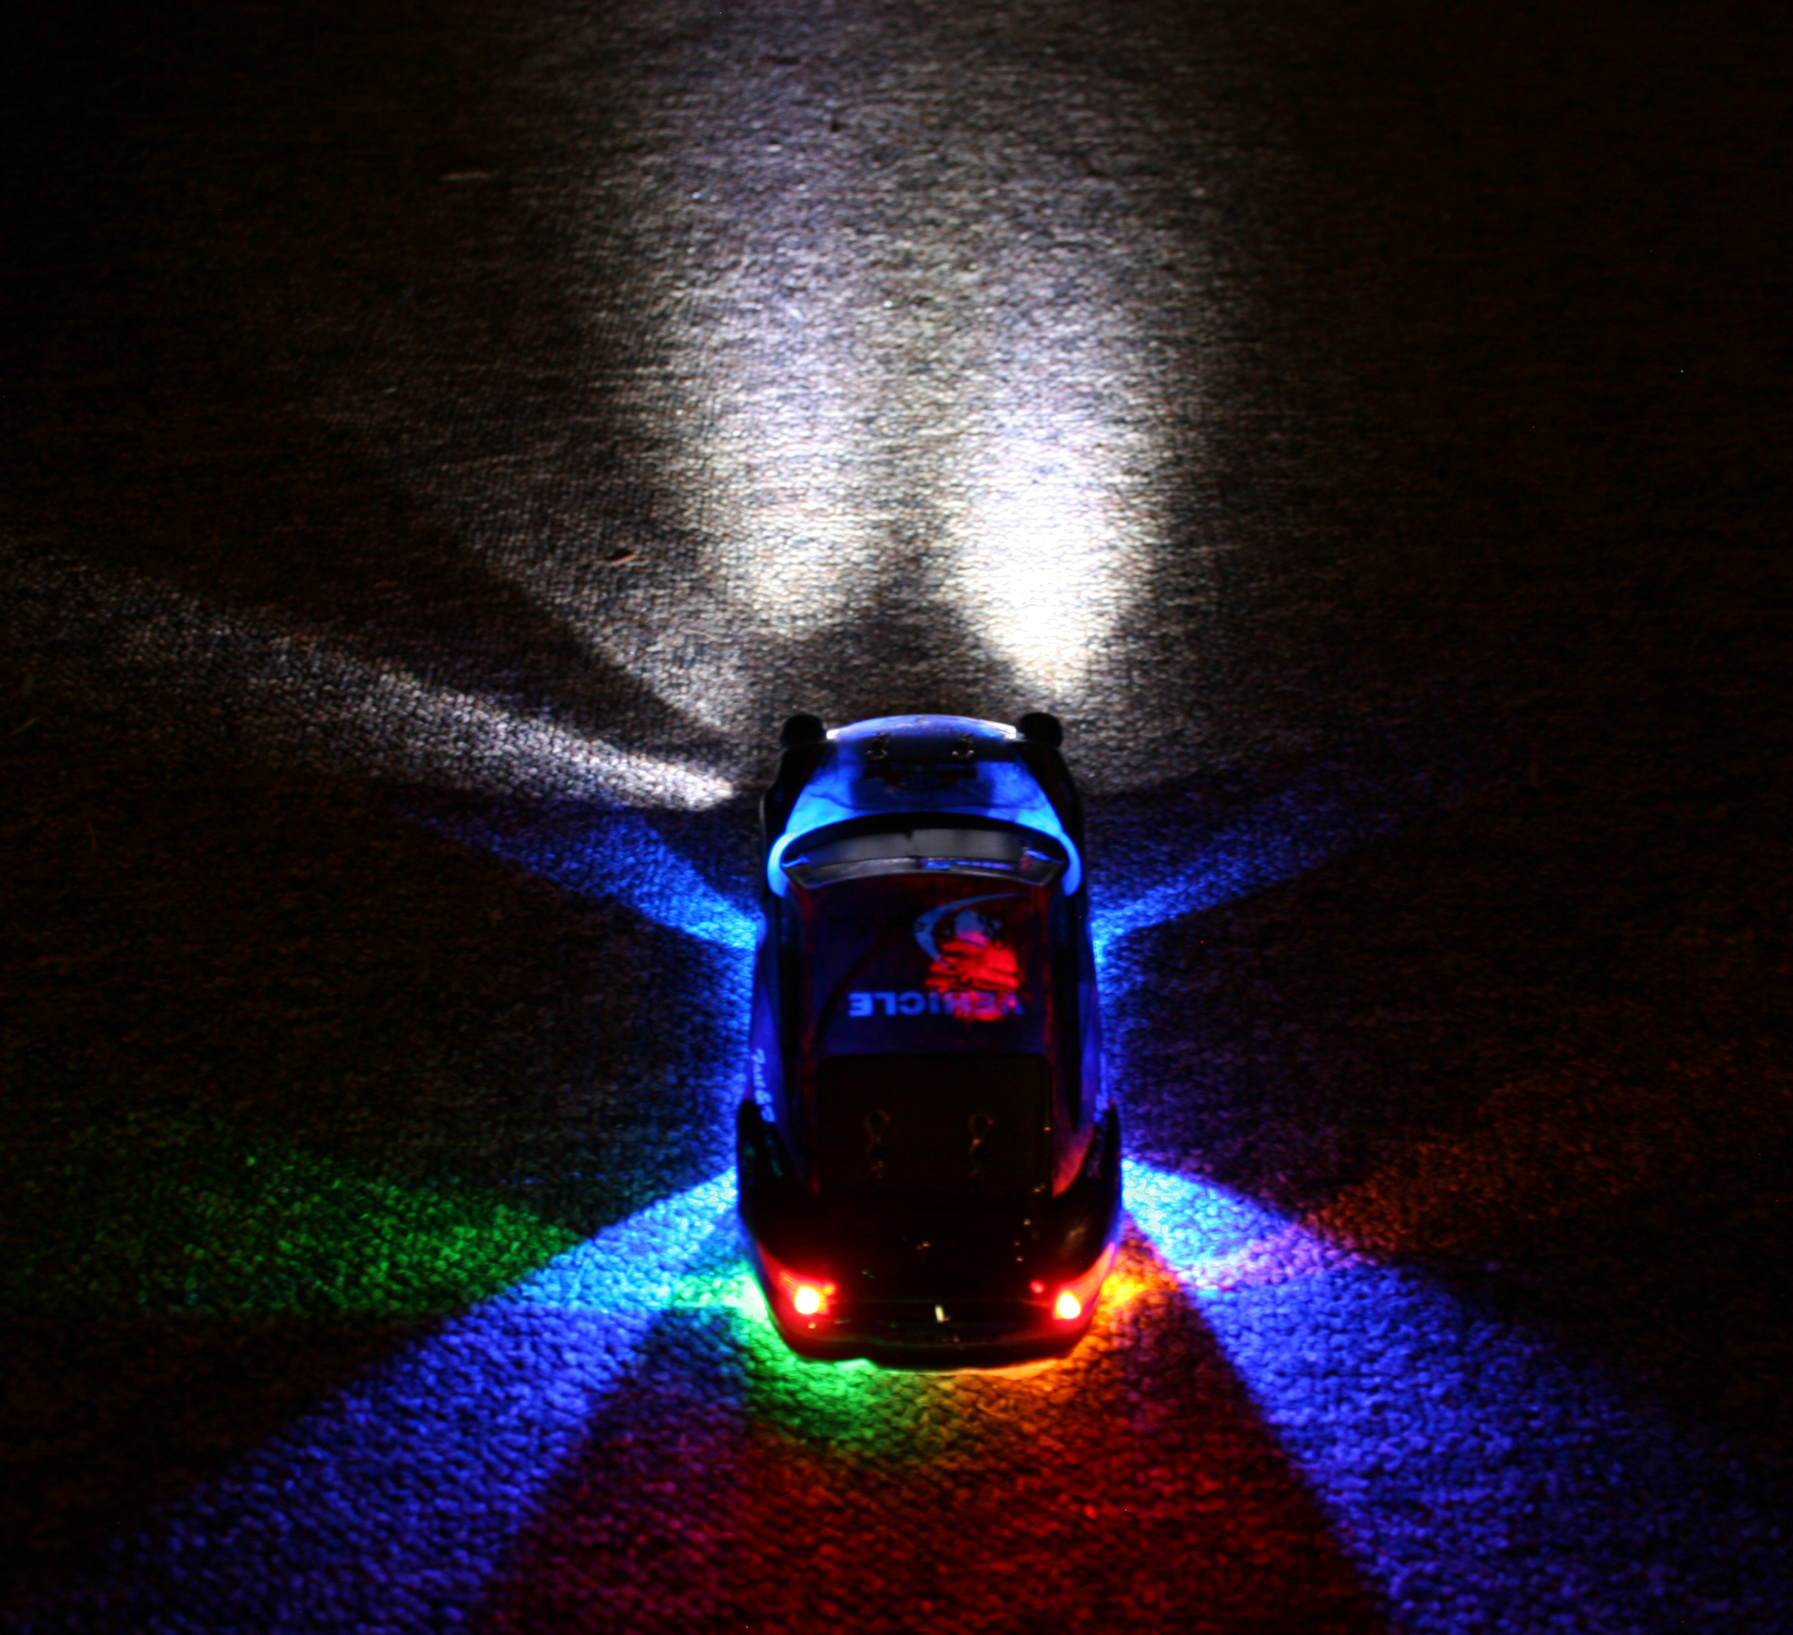
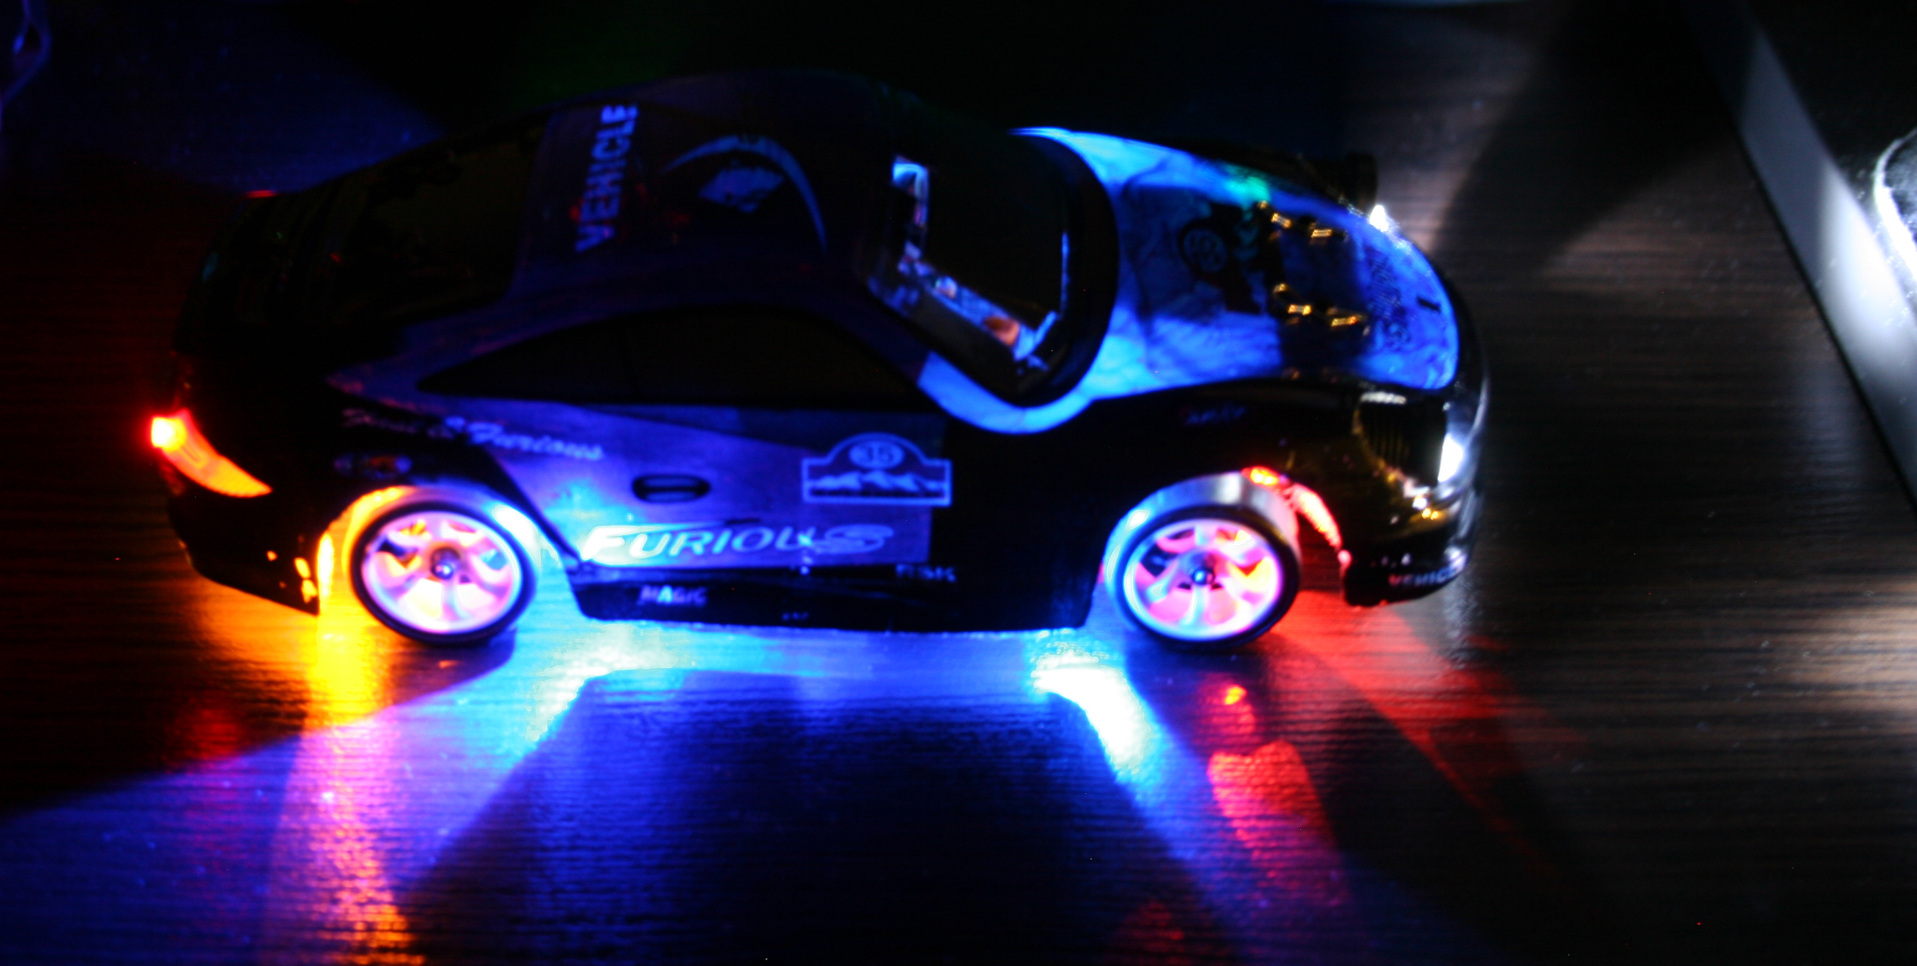
Added more weight on front. I cut out a universal PCB (my favourite kind) and made a place to solder down wires holding extra weights, they fit well. I used 4 in total, 2 on each side. One weights 4.5g, so this is 18g added on front wheels. This made center of gravity to shift (like 6mm or so) towards front and made the car oversteer even more, it drives better. There were some videos on doing that, just gluing 10g weight. Isn’t crucial though, still can drift without this. My front PCB is also used for lights and wires.
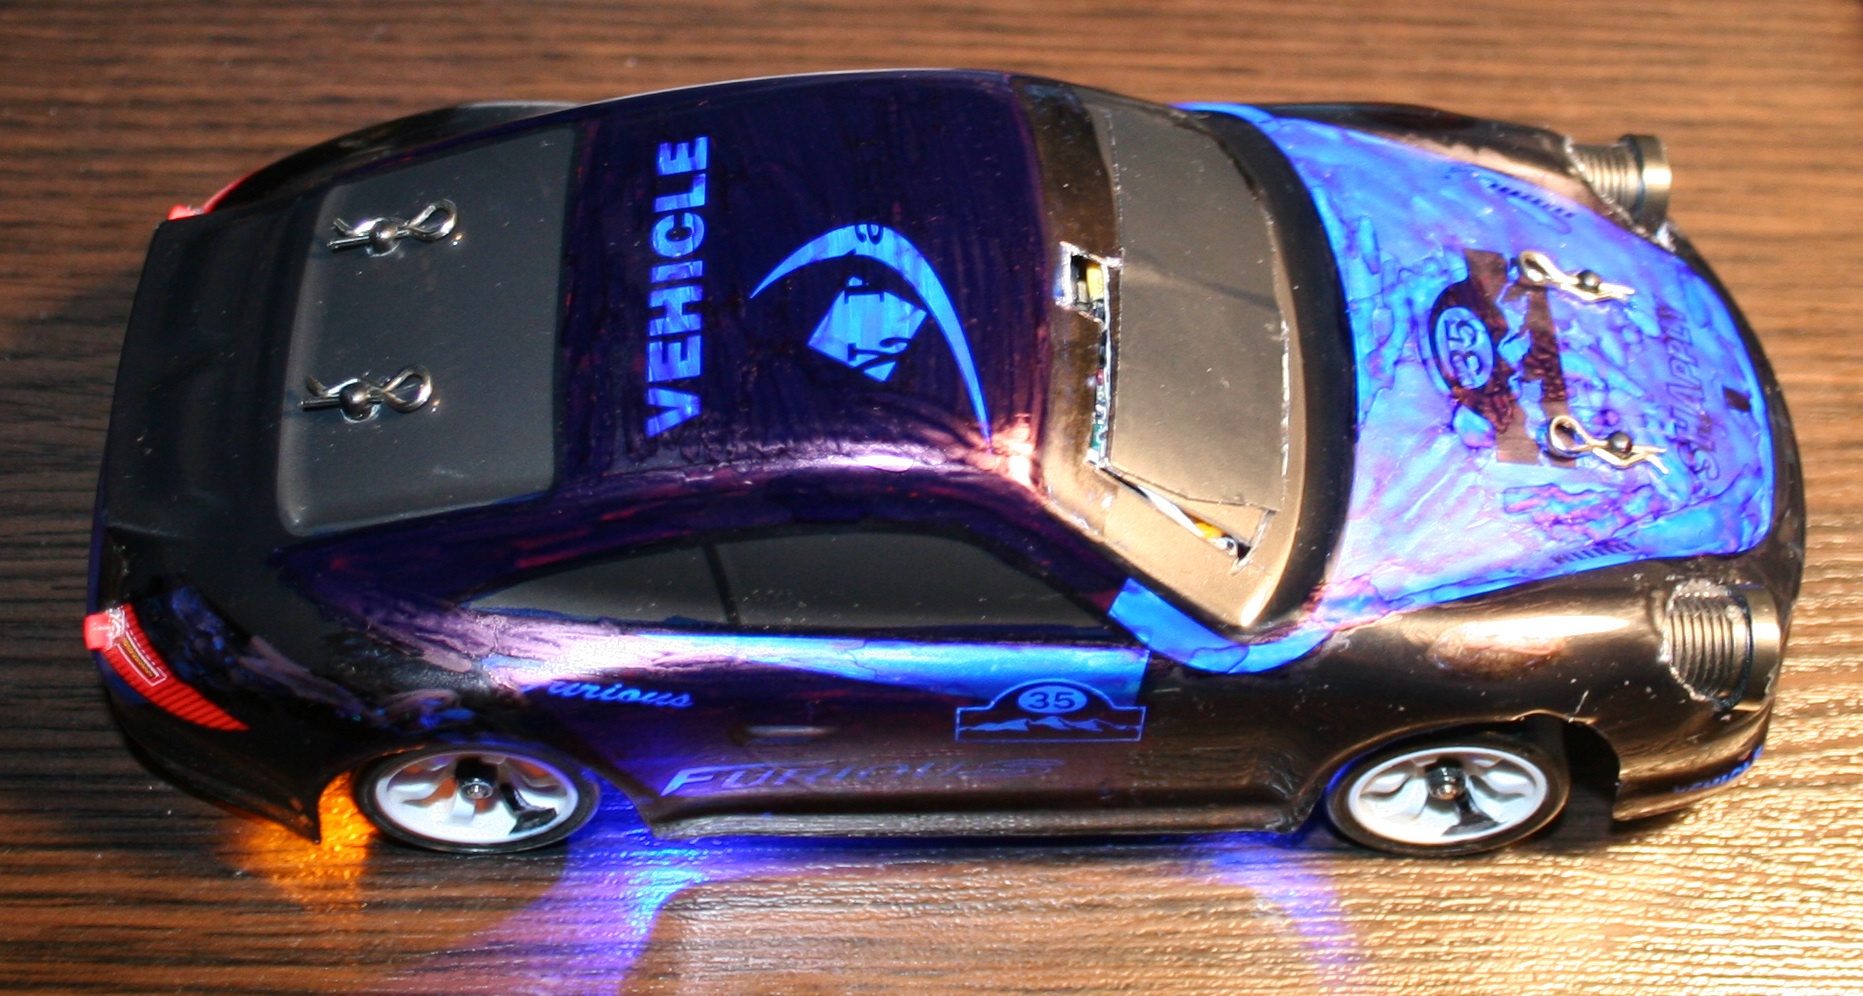
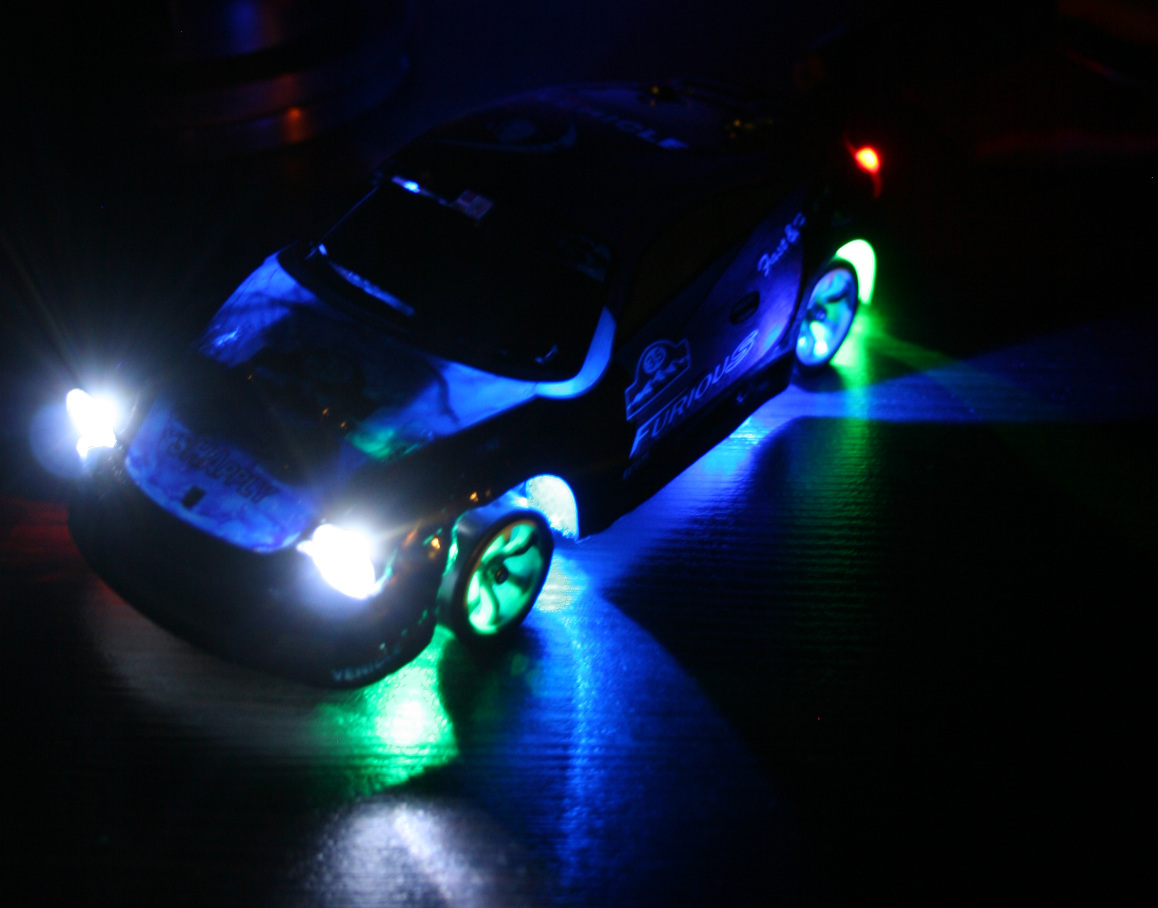
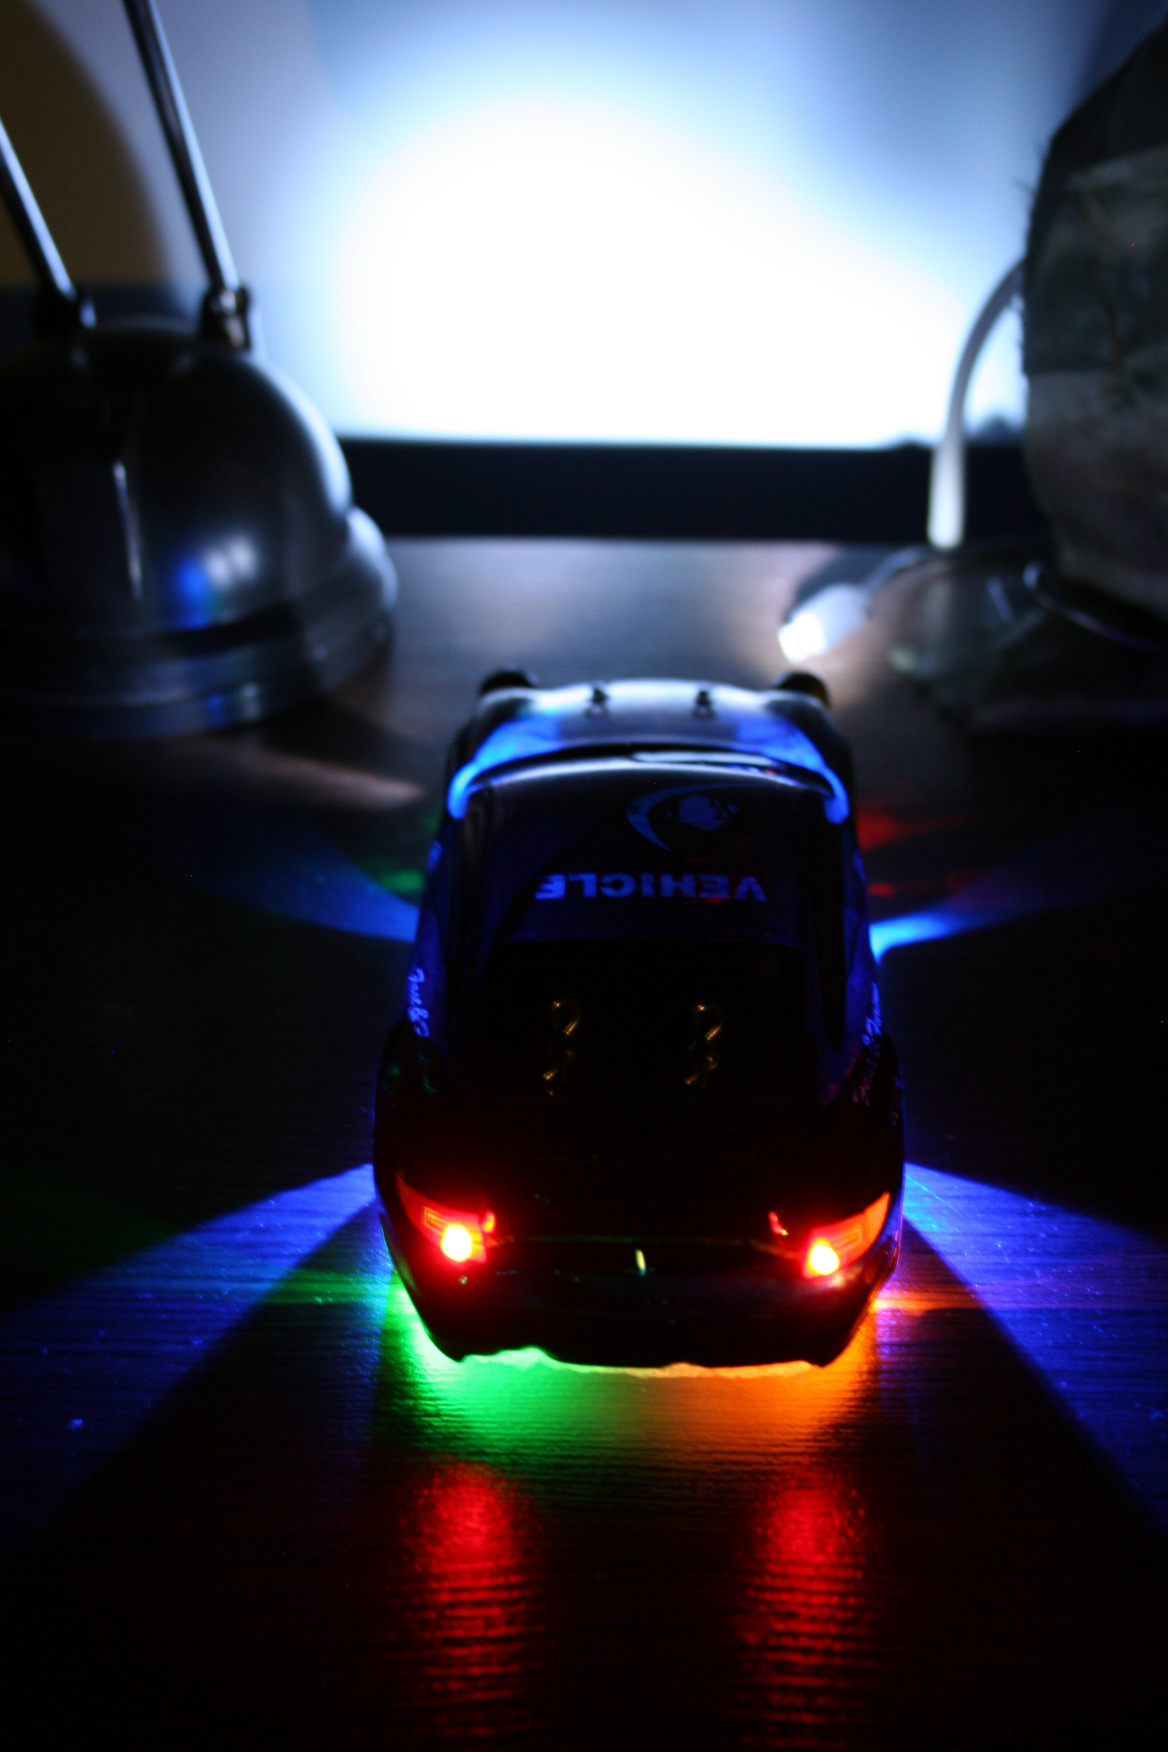
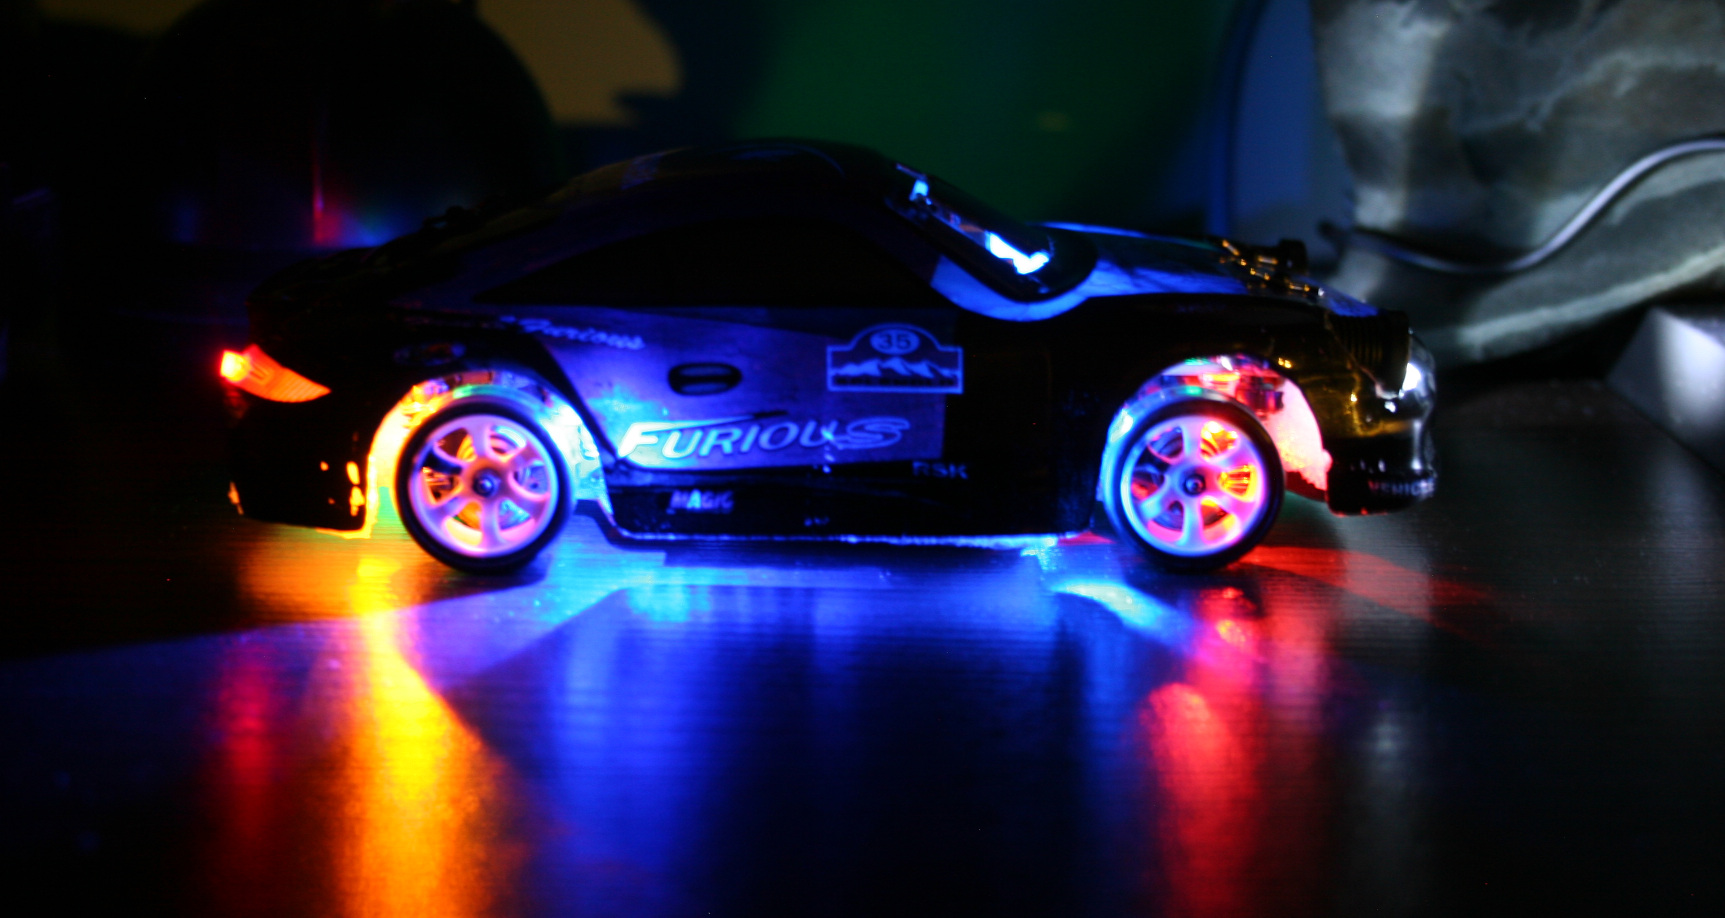
Added front and rear car lights. They are good for better orientation of how the car is rotating and what’s its direction. I mean it is actually easier (for me) to tell this by seeing those lights on floor, especially if car is far. The only way of doing this is making holes in chassis and hot gluing LEDs to it. I’ve spent too much time with lights, first making them in car. This way anytime I hit something harder they would change angle, go loose or break off. I also made a second mistake and made holes bigger to have LEDs with cases. It turned out the cases were too big and so long that made wheels hit them, if chassis is low. I will cut them to minimum and glue again. Good thing about that hot glue is that I can actually melt it with soldering iron again when I change my mind.
Made the RF sender battery use a 18650 LiPo. I don’t get why they didn’t already (was probably cheaper). When full, 4 AAs give 6V, LiPo is 4.2V, but RF sender still works. I thought it would be more difficult, but it was really easy. Just throw out 4AAs compartment and place the 18650 or any other LiPo here. Doesn’t seem to use much power, I didn’t charge it for a month or more. I only don’t know if it maybe decreases range? But with all being digital it may not be affected.
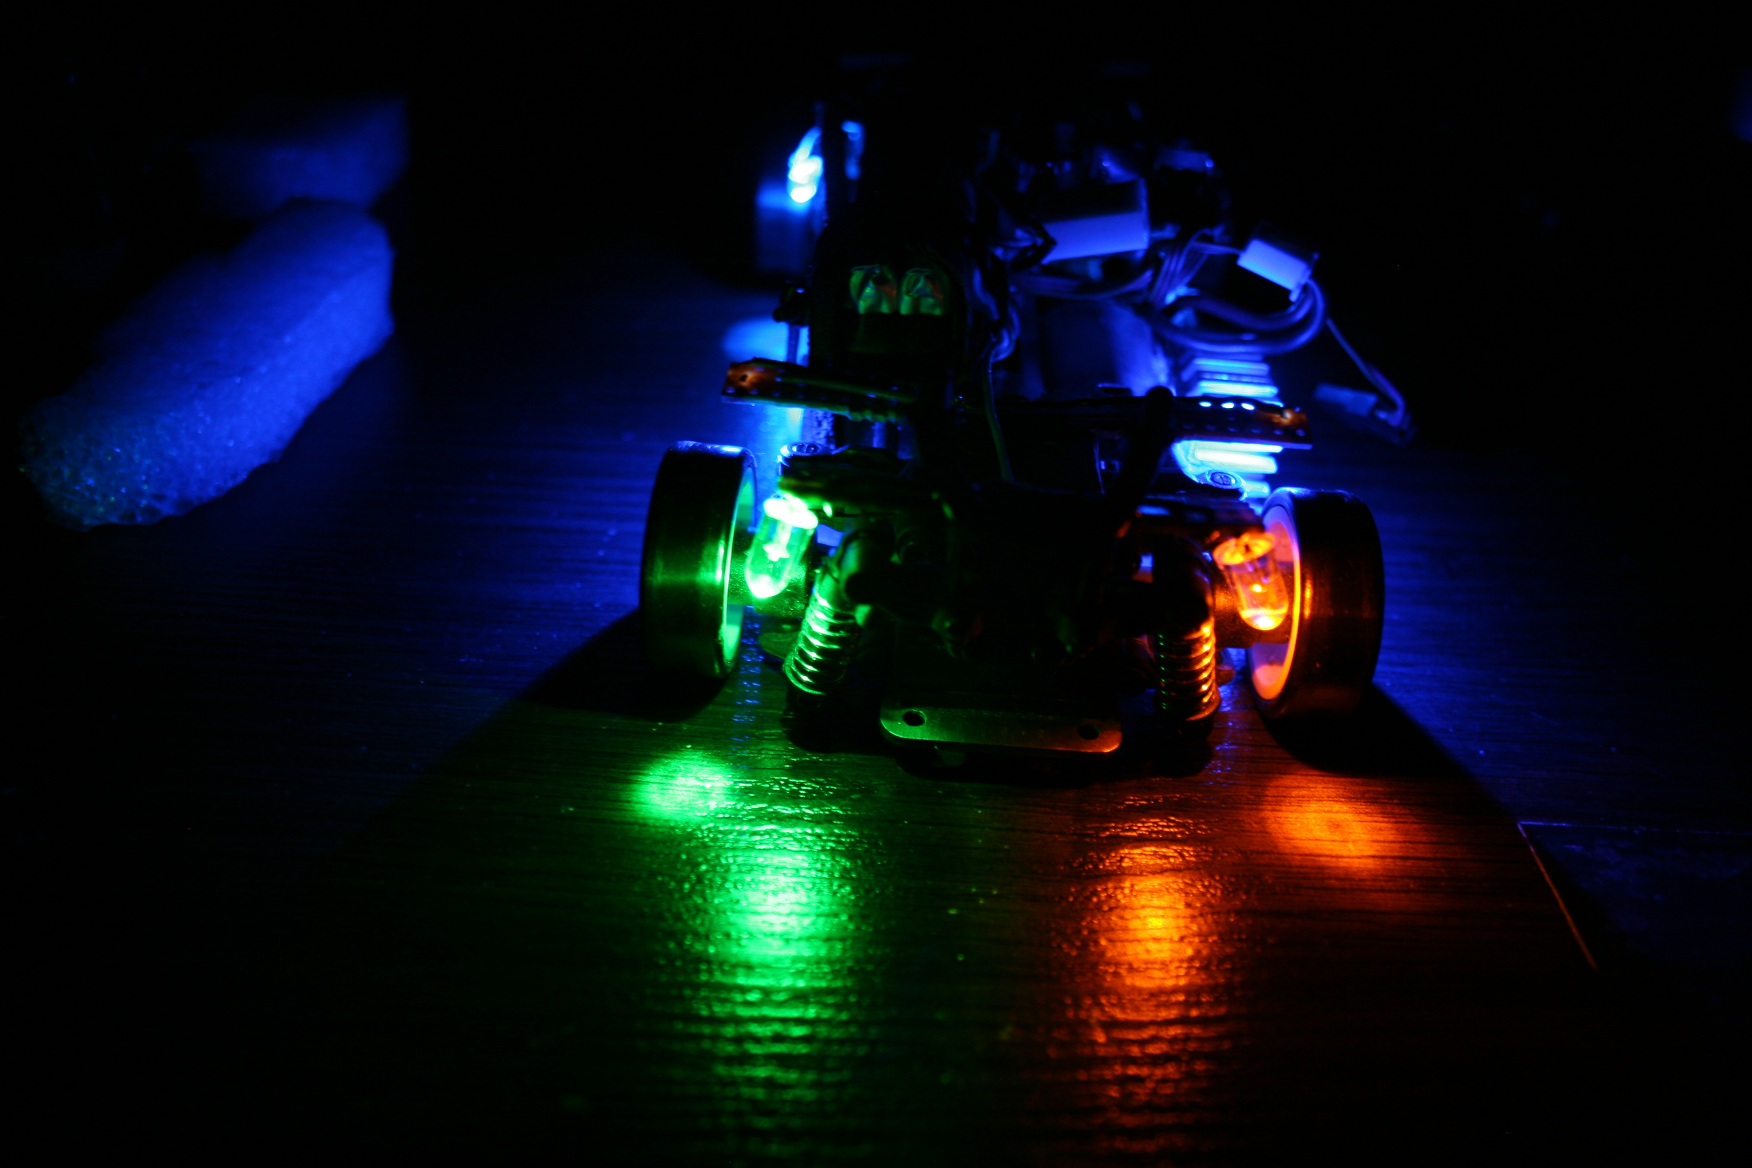
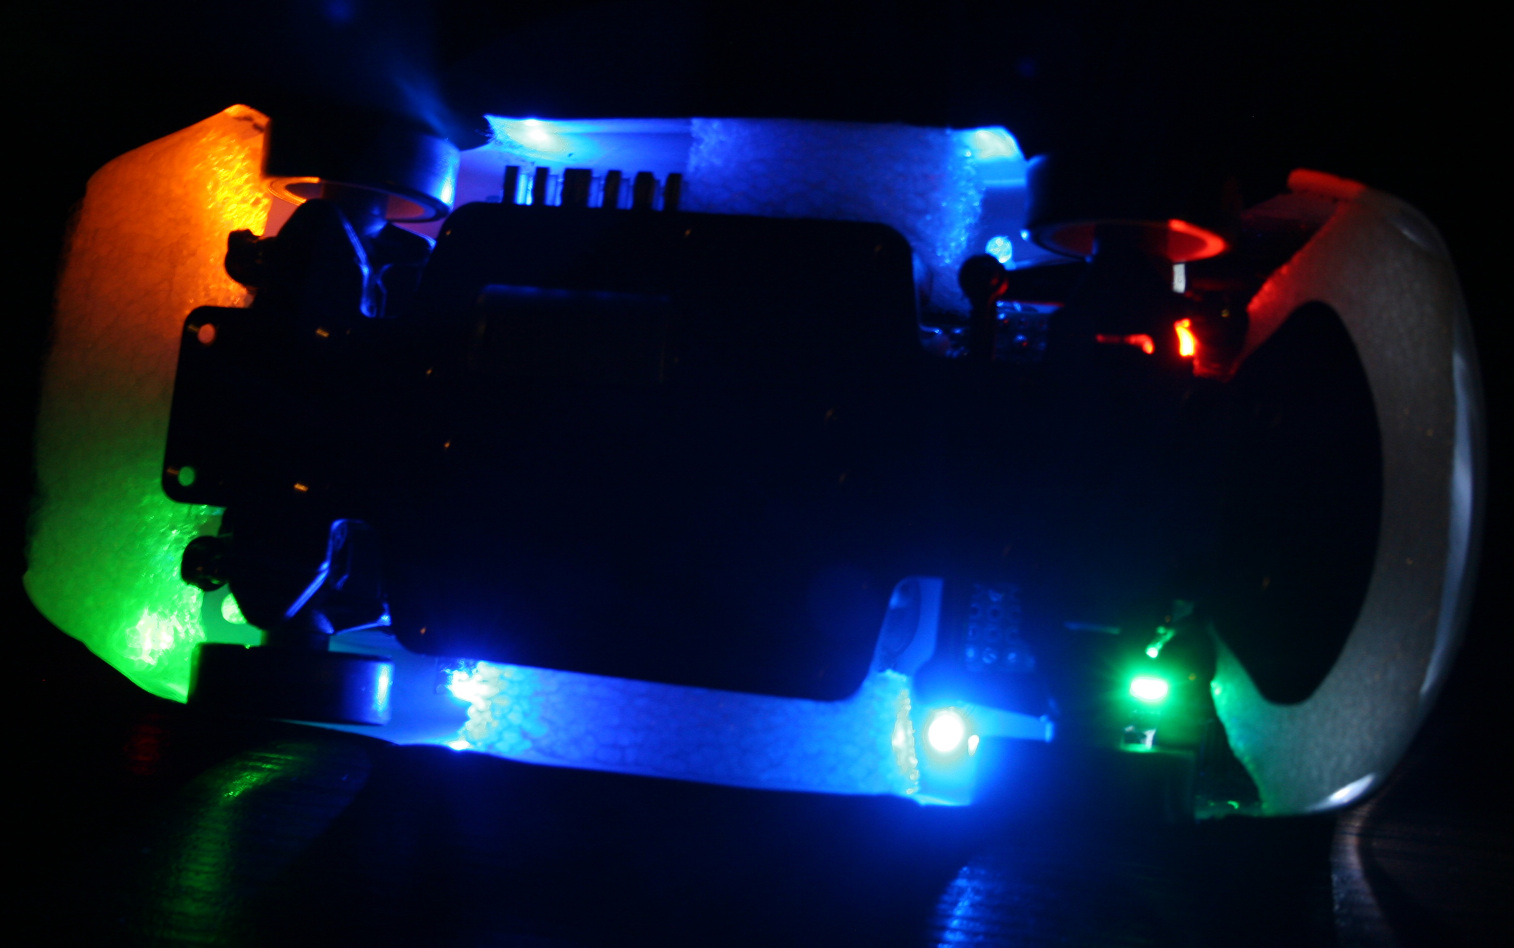
Added bottom lights. I had some old LEDs lying around, now 2 are on rear before wheels and 2 on front before wheels. Their location with chassis holes makes this cool blue X on floor now. I had only two 3mm LEDs so I also used 2 SMD LEDs, which I soldered out from those LiPo chargers (who needs them, red when charging is enough, and were so bright that I couldn’t even?). Then I added two 5mm LEDs (too big, SMD are better) green on left side, yellow-orange on right, located right after and above wheels. This turned out to be useful to know even better how the car is rotated from distance. So later I added same (close) colors to front, behind wheels. I soldered all on small cuts of universal PCBs.
Changed to a bigger car battery. The included 400mAh battery allowing 30 min runtime is laughable. Yeah I can’t imagine drones with 15 or less minutes at all. It was cheap and light, which is why they made it, right. After all, the freaking top speed has to be highest, like it was important at all. It drifts at much lower speed already. My new battery is 1200mAh and allows 1h 30 min drive time (so 3x more). It was made from two LiPo 603450 batteries, each size: 50x34x6mm. Glued with tape, fits nicely in same place, is just much higher and it weighs 45g. Secured it with some cardboard and mouse pad fragments on sides and wire (with thick insulation). I just had to remove their protection, because with it, it would stop for few seconds when pressing throttle too rapidly (very annoying).
With new battery I’ve also done new electrics in car. namely:
4 pin socket for battery, normally plugged in.
ON-OFF switch. I used a 6 pin Tactile Power Micro Switch (self lock on) 7*7mm to switch + from both LiPo batteries.
4 pin socket for charger, plugged in when charging.
4 micro switches for lights (on-off, one small package). I added 47Ω resistors at end of each. I call this a fuse box, their purpose is prevent battery short circuit if by accident some wires connect.
5 pin socket (3 used now) to connect chassis lights.
2 trimmer potentiometers 1kΩ, for dimming car lights and bottom lights.
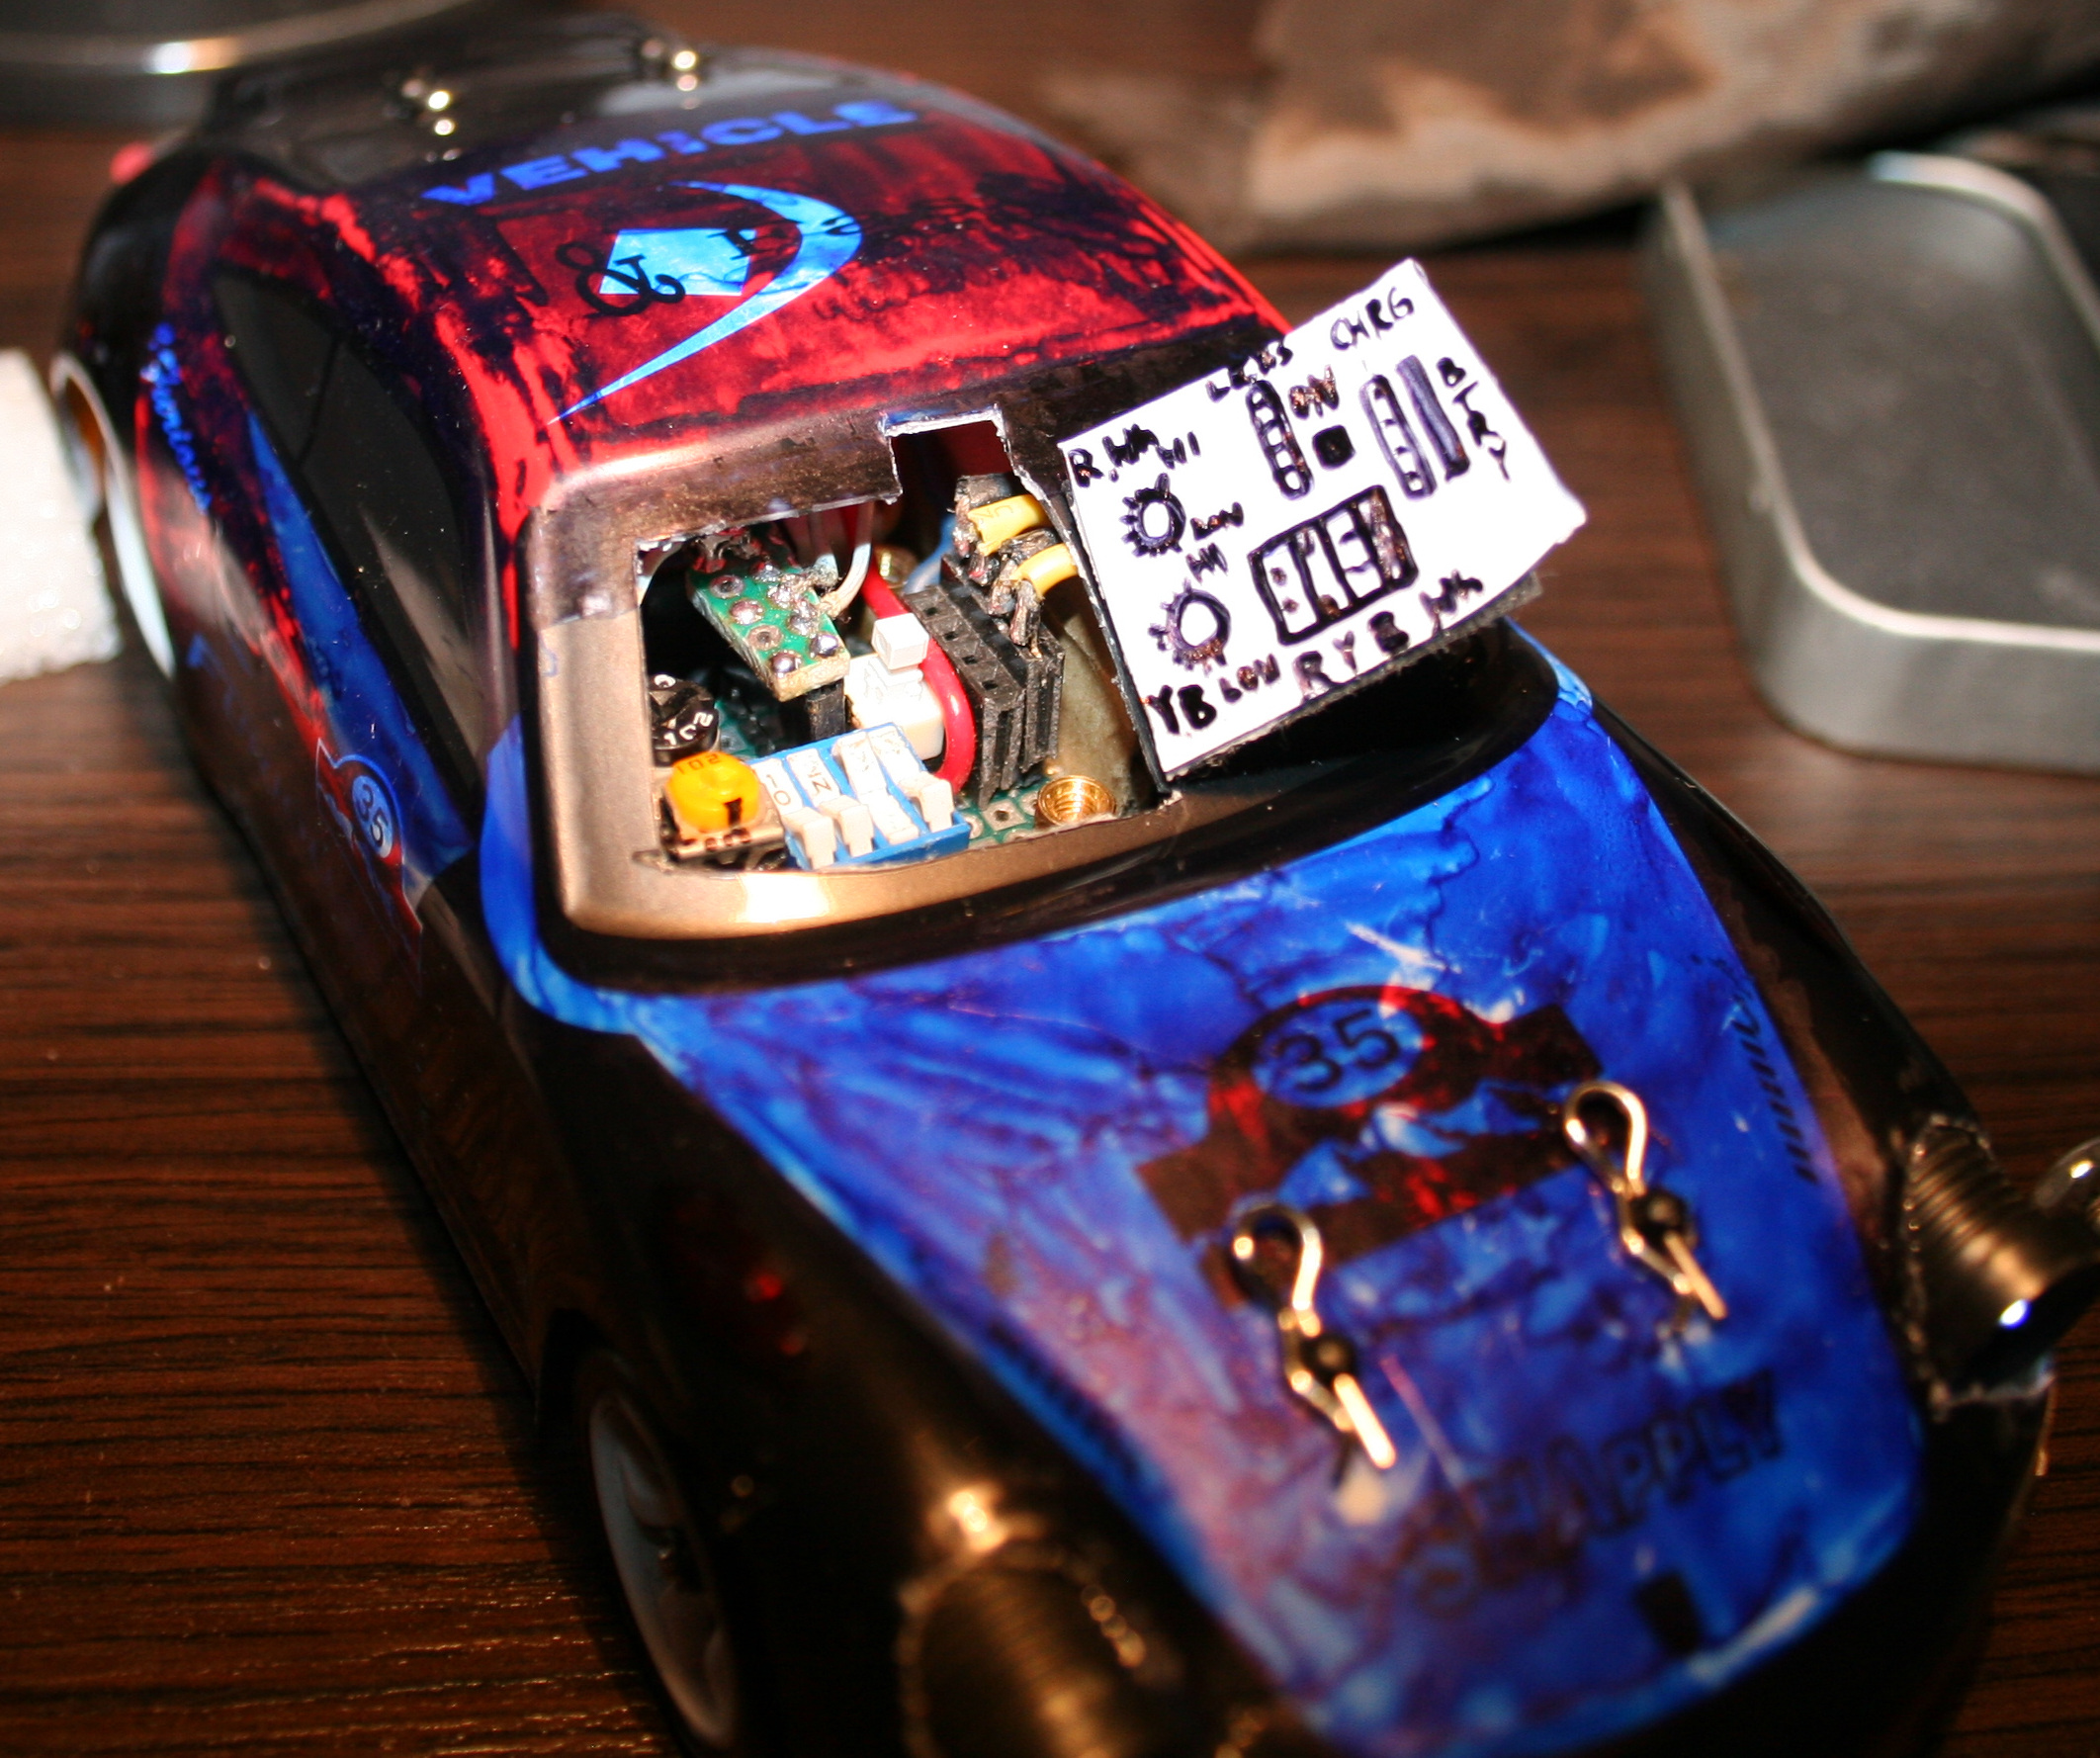
All this required access, so I made a “door” in half of car’s front windshield.
In total, the boards with bottom LEDs and all electrics weight 27g. Seems too much, but whatever?♂️. Each LED has a 330Ω resistor before. LED calc can be used if needed.
Charger Made using 2 popular modules: TP4056 / TC4056A Lithium Battery Charger and Protection Module. Just added 4 goldpin connector for car socket and that standard 4 pin PC connector for 5V. It does charge the battery in about 1h 30min. I’m not sure if it’s too fast or okay. The 4056 chips are heating a bit too much (at start), so I’m using a small copper radiator on them. Besides of removing blue LEDs from chargers (mentioned earlier) I also reduced the red LEDs brightness, resistors are now 20kΩ (way more). I hate this approach of adding LEDs, even for “turned on” indication and making all LEDs as bright as it can be. I guess if they could they’d made them visible from space or neighboring countries, that would be the best commercial.
Radiator for main motor. Having more time to drive showed that it heats a lot, especially in smaller rooms. So I used thermal glue and glued some small aluminum radiators (1 cut to match motor length) bottom to motor and side to car bottom, which is aluminum, so good for cooling too. I’m guessing an even better way could be using copper tape around motor and gluing that to car bottom? Not sure. Either way some cooling is needed and would be better to have it done already.
Added some rubbers (cuts from mouse pad) below chassis mounting points (I saw something similar in a video). And later some foam around the car, better late than never. This is to soften hard hits, those happen a lot at start when first learning to drive, especially without reduced throttle. Additionally, at home I do jumps sometimes, banked and U turns (up to like 80 degrees, on a bent sheet of metal I had in cellar) and flip overs can happen this way etc.
At some point while reversing I almost broke one differential end (those, like all parts are plastic). I only noticed when one wheel wasn’t driven. But I managed to put it together with a wire soldered around it, so it doesn’t fall apart completely and works, a bit uneven though. Parts are freaking expensive, probably few times more than their worth. I hate this approach. If someone bought all parts separately it would cost like 2 or 3 times more than the car itself. Plus the waiting for shipment takes time.
After some bigger hit, I broke the thing that holds chassis on front. It is filled with holes and plastic, so no wonder. I made something stronger (and heavier like all I did) from a metal part, M2 and M3 screws. Is more difficult to use but should last longer, if I don’t break the plastic part that it’s mounted to.
Added a mount for camera on roof. Camera is Ion Snapcam LE, it weights 28g, with its own battery. It even lasted longer than car drive. I didn’t yet make it lighter by using car’s battery. Not sure if I will. Unfortunately, videos are horribly shaking when driving, because of uneven wheels.
In total the car with camera weights now 288g. So it is a lot more (was 160g at start) and the front suspension won’t allow more. Without camera and extra weights it is about 240g. I think it still drives well despite the extra weight. But surely when lighter it was quicker and more responsive (less mass and inertia).
Now I’m waiting for new wheels, with aluminum rims. The default wheels on this cars are cheap, all-plastic and uneven. Even like 1mm difference in height when rotating. This makes the car shake a bit. Surprisingly it doesn’t affect driving somehow, and it wasn’t easy to spot. Only slow time videos showed it and those from car camera, which are rather unusable.
Maybe for future (not sure if I’ll try/do any of these): I was thinking of making the controller use IR distance detection for throttle (instead of potentiometer which I already once cleaned since dust made it go chaotic). Using a MCU (Teensy 3.2 which I have lying around doing nothing) with LCD, buttons and rotary encoder for a GUI that allows adjusting all ranges and offsets without potentiometers. I also had an idea about having a light MCU in car to use RF (e.g. NRF24L01 2.4GHz modules) to send some measurements to controller MCU, like: battery voltage (for remaining drive time), motor temperature, car acceleration, rotation and direction (from those popular new accelerometer chips), and making all car lights toggleable and dimmable (with PWM) from controller. Lastly very doubtful, but maybe if I used PC mouse optics and chip I could get real velocity and position on some surface.
⌛Conclusions / Review
I personally can’t imagine having fun with an outdoor, fast / touring car, with rubber tires. Neither with a smaller car that doesn’t have 4WD and drift. And those big RC cars that can slide on gravel (and jump up few meters) are quite big, very expensive (I seriously would buy a new PC instead) and require a big area or a track. And outdoor and indoor tracks aren’t close, are likely paid per hour and have other people. Plus parts for more expensive cars are of course more expensive.
To summarize, I would recommend the WLtoys K969 car, especially as first RC car for indoor use, with more fun because of drifting. But with a few remarks.
I don’t really recommend driving this car without modification 2 (throttle range adjust). I did it at start and it was chaotic. Some say modification 1 (more steering) is also crucial.
Another thing that many say, is that the 2 smallest gears wear out rather fast. Those that drive each differential, both from plastic again. Why on earth aren’t all gears from metal.
Well as I mentioned few times already, nearly all parts are from plastic, which can be a problem. Surely is for small gears. Later if you drive on uneven surfaces or jump, etc. then mountings for suspension will wear out or break (since closest to floor and from plastic). Still (and maybe that’s why) there are many metal upgrade parts and kits, but I don’t recommend any, at all. I have seen too many negative comments from people who say that those don’t even fit together, are bigger, leave less clearance etc. So they just look cool, and that’s it.
The rest of my modifications were optional and just an easy hobby, that lets me spend some fun time, but not with my PC as usual.
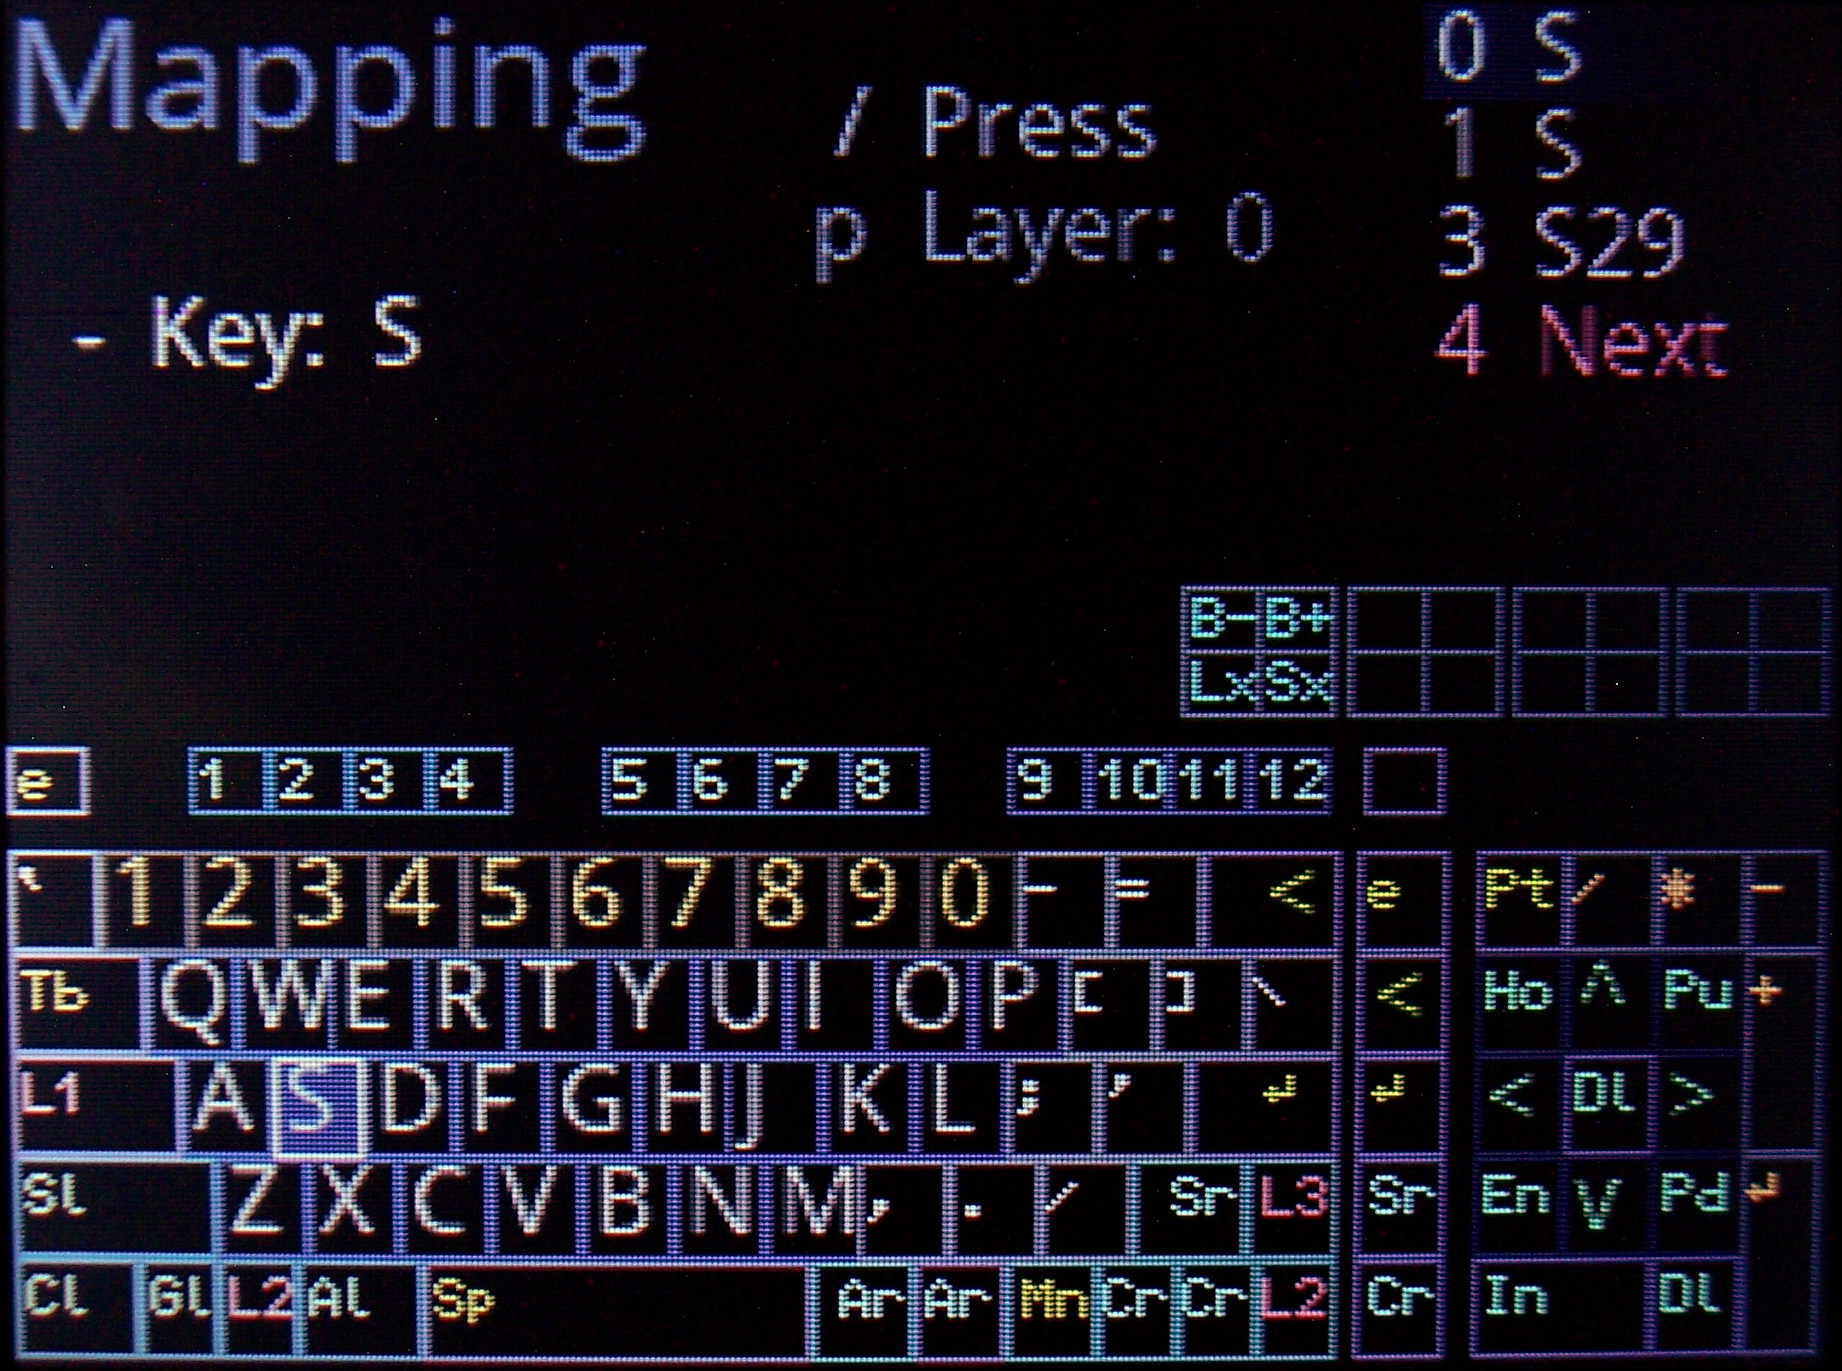
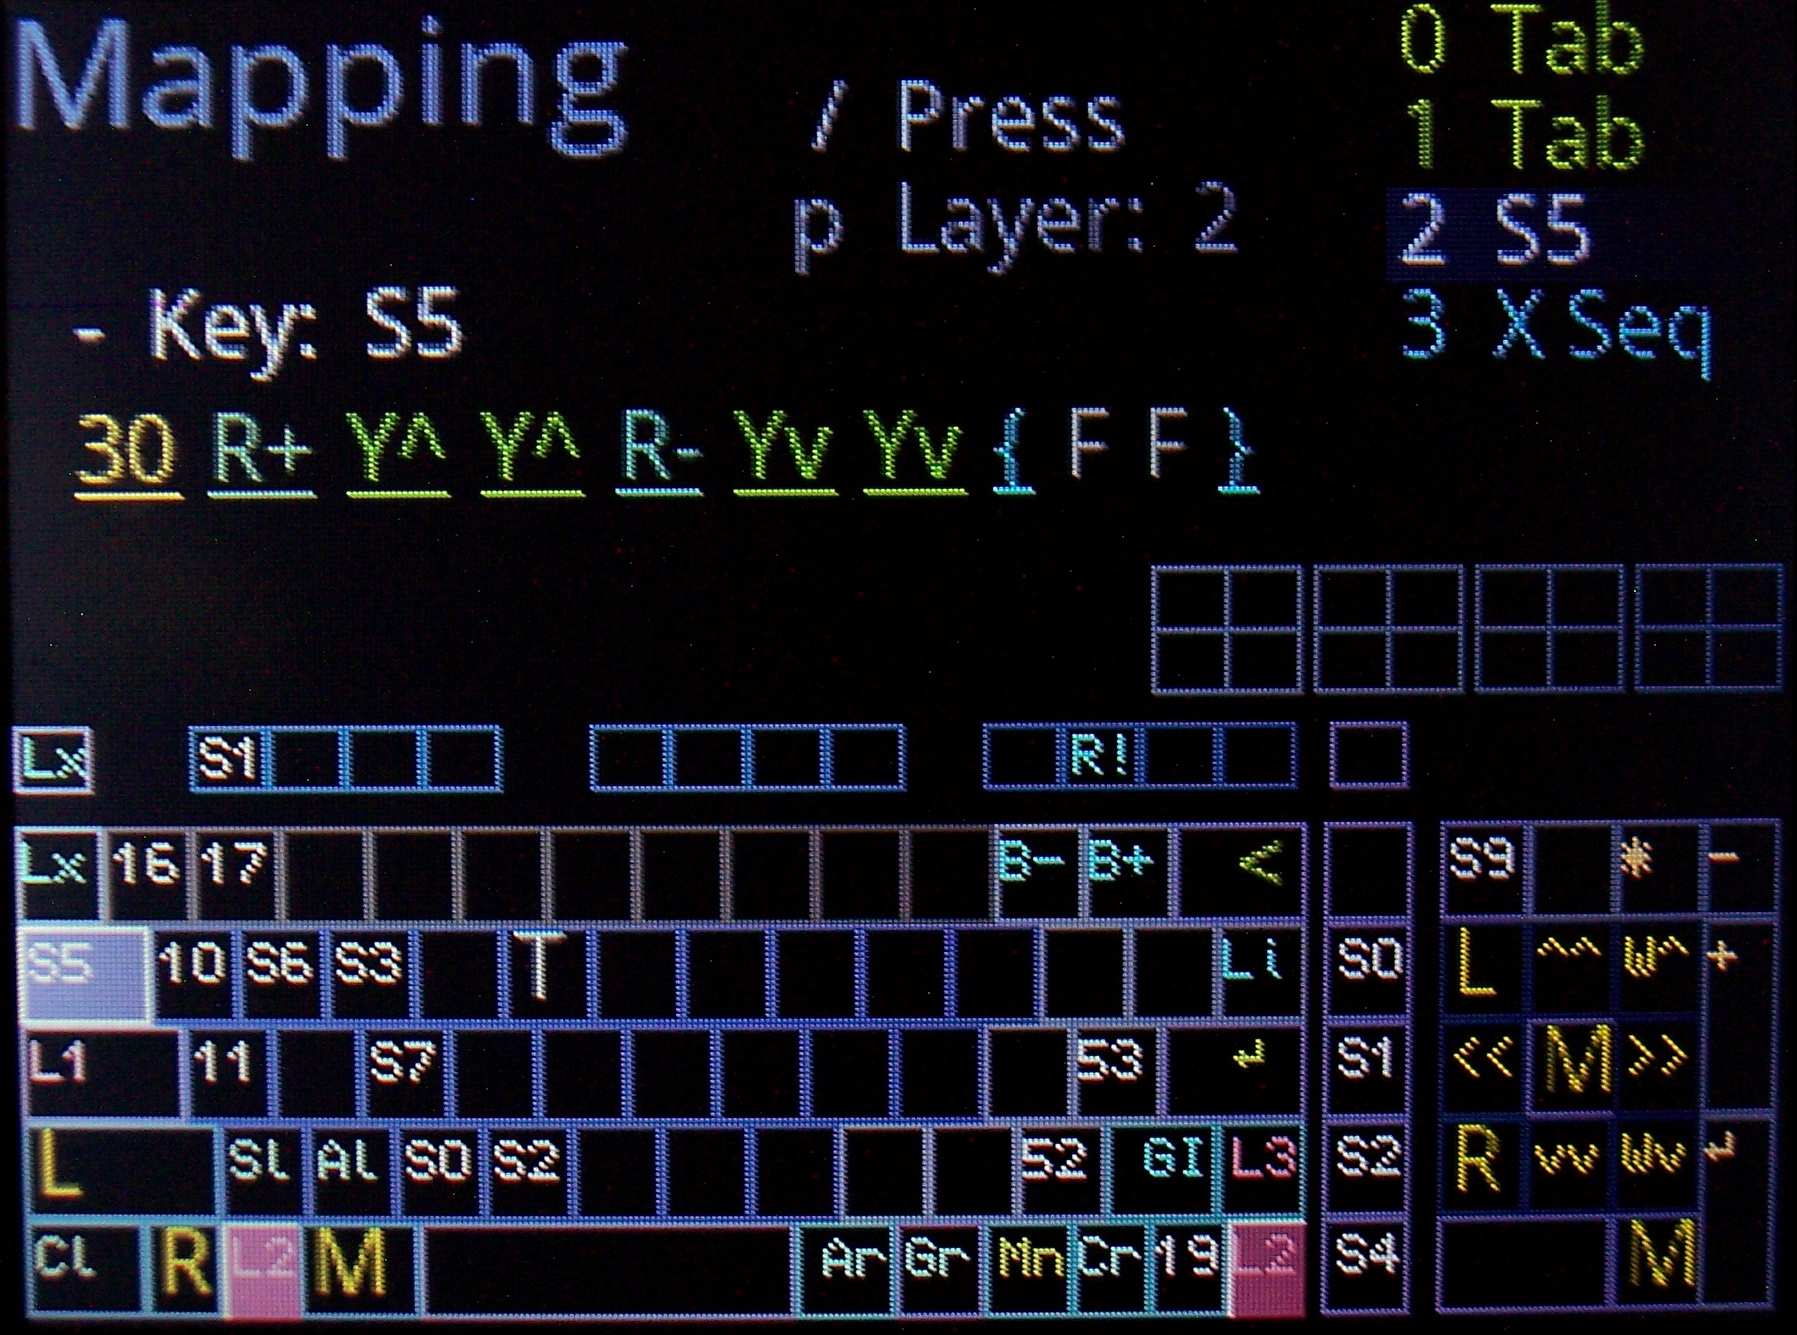
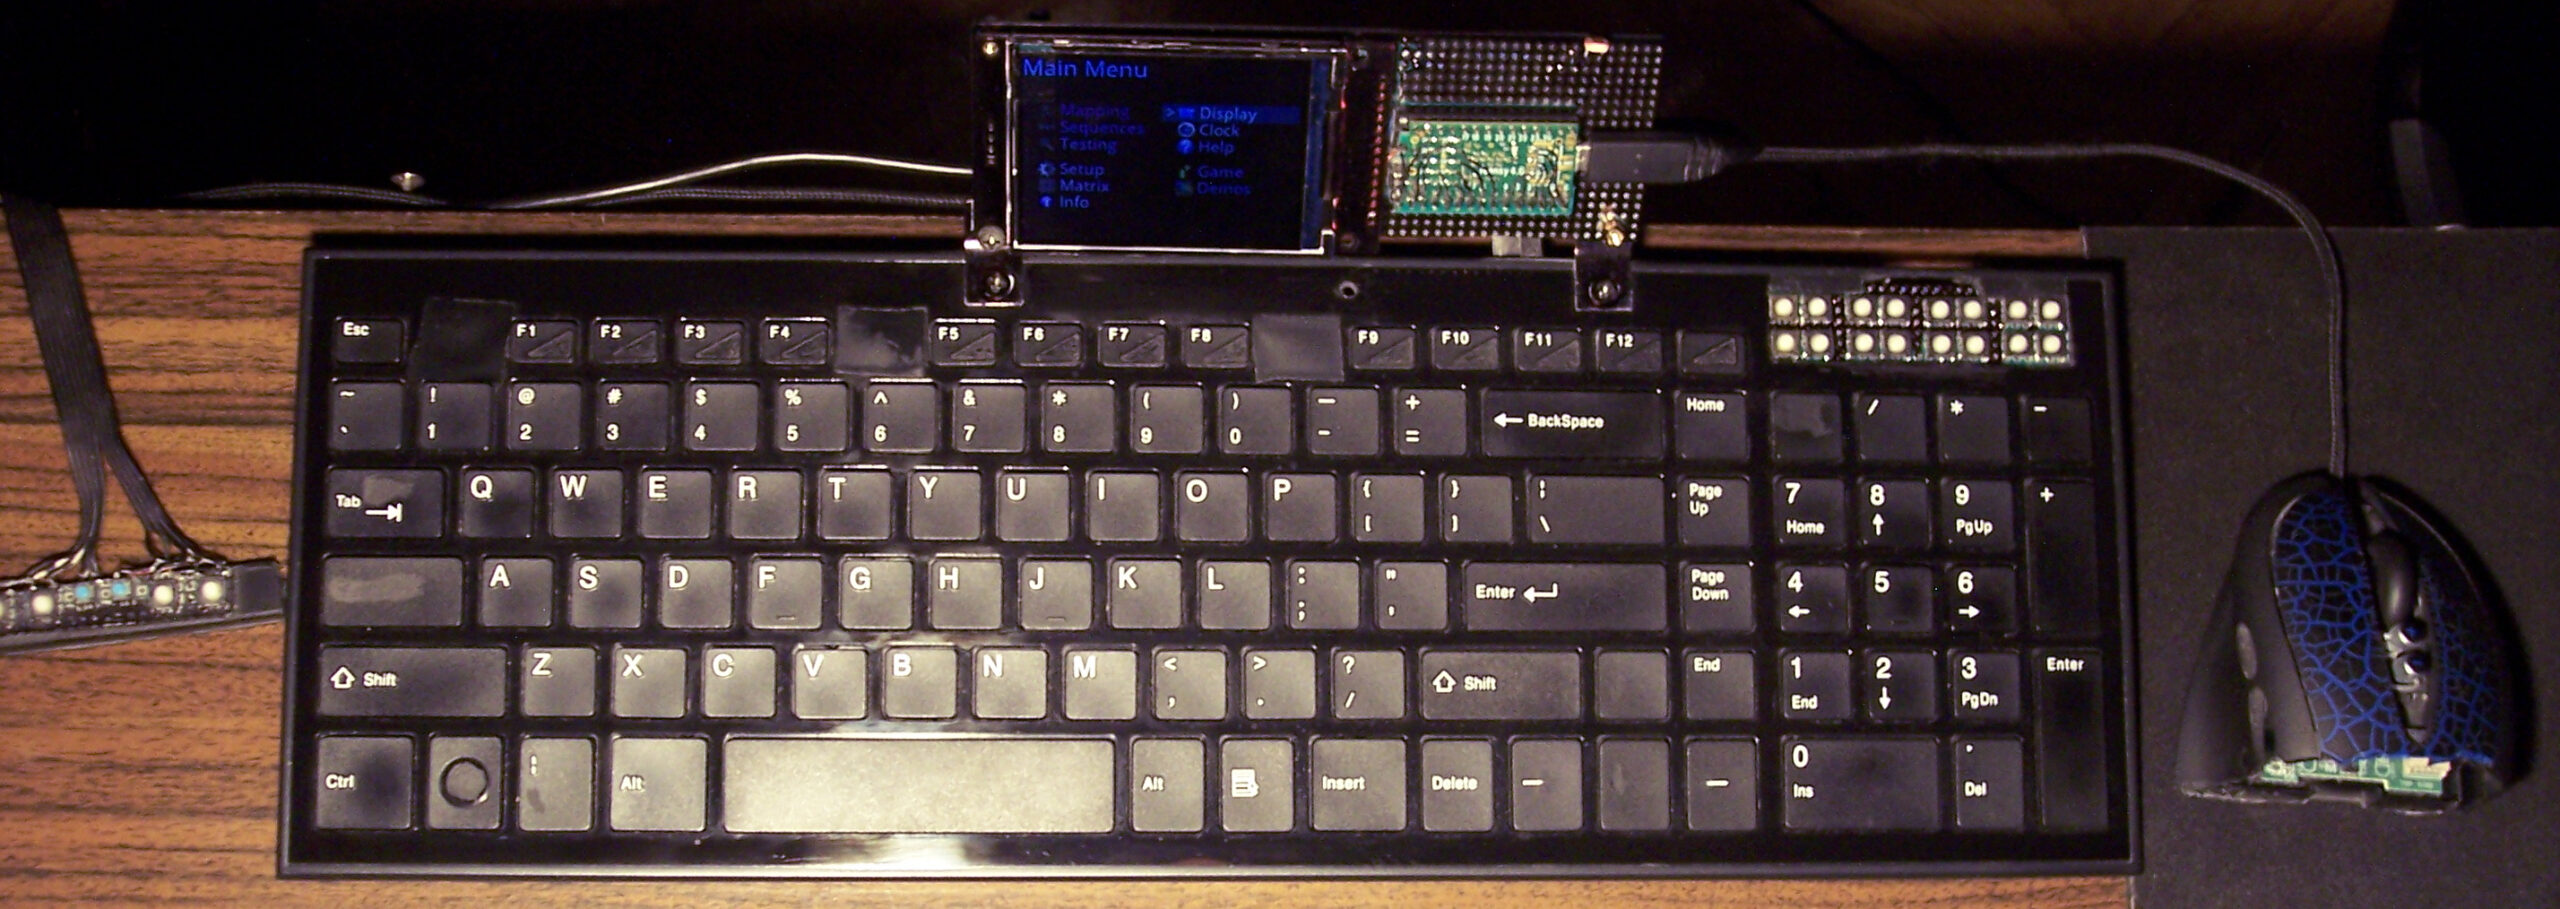
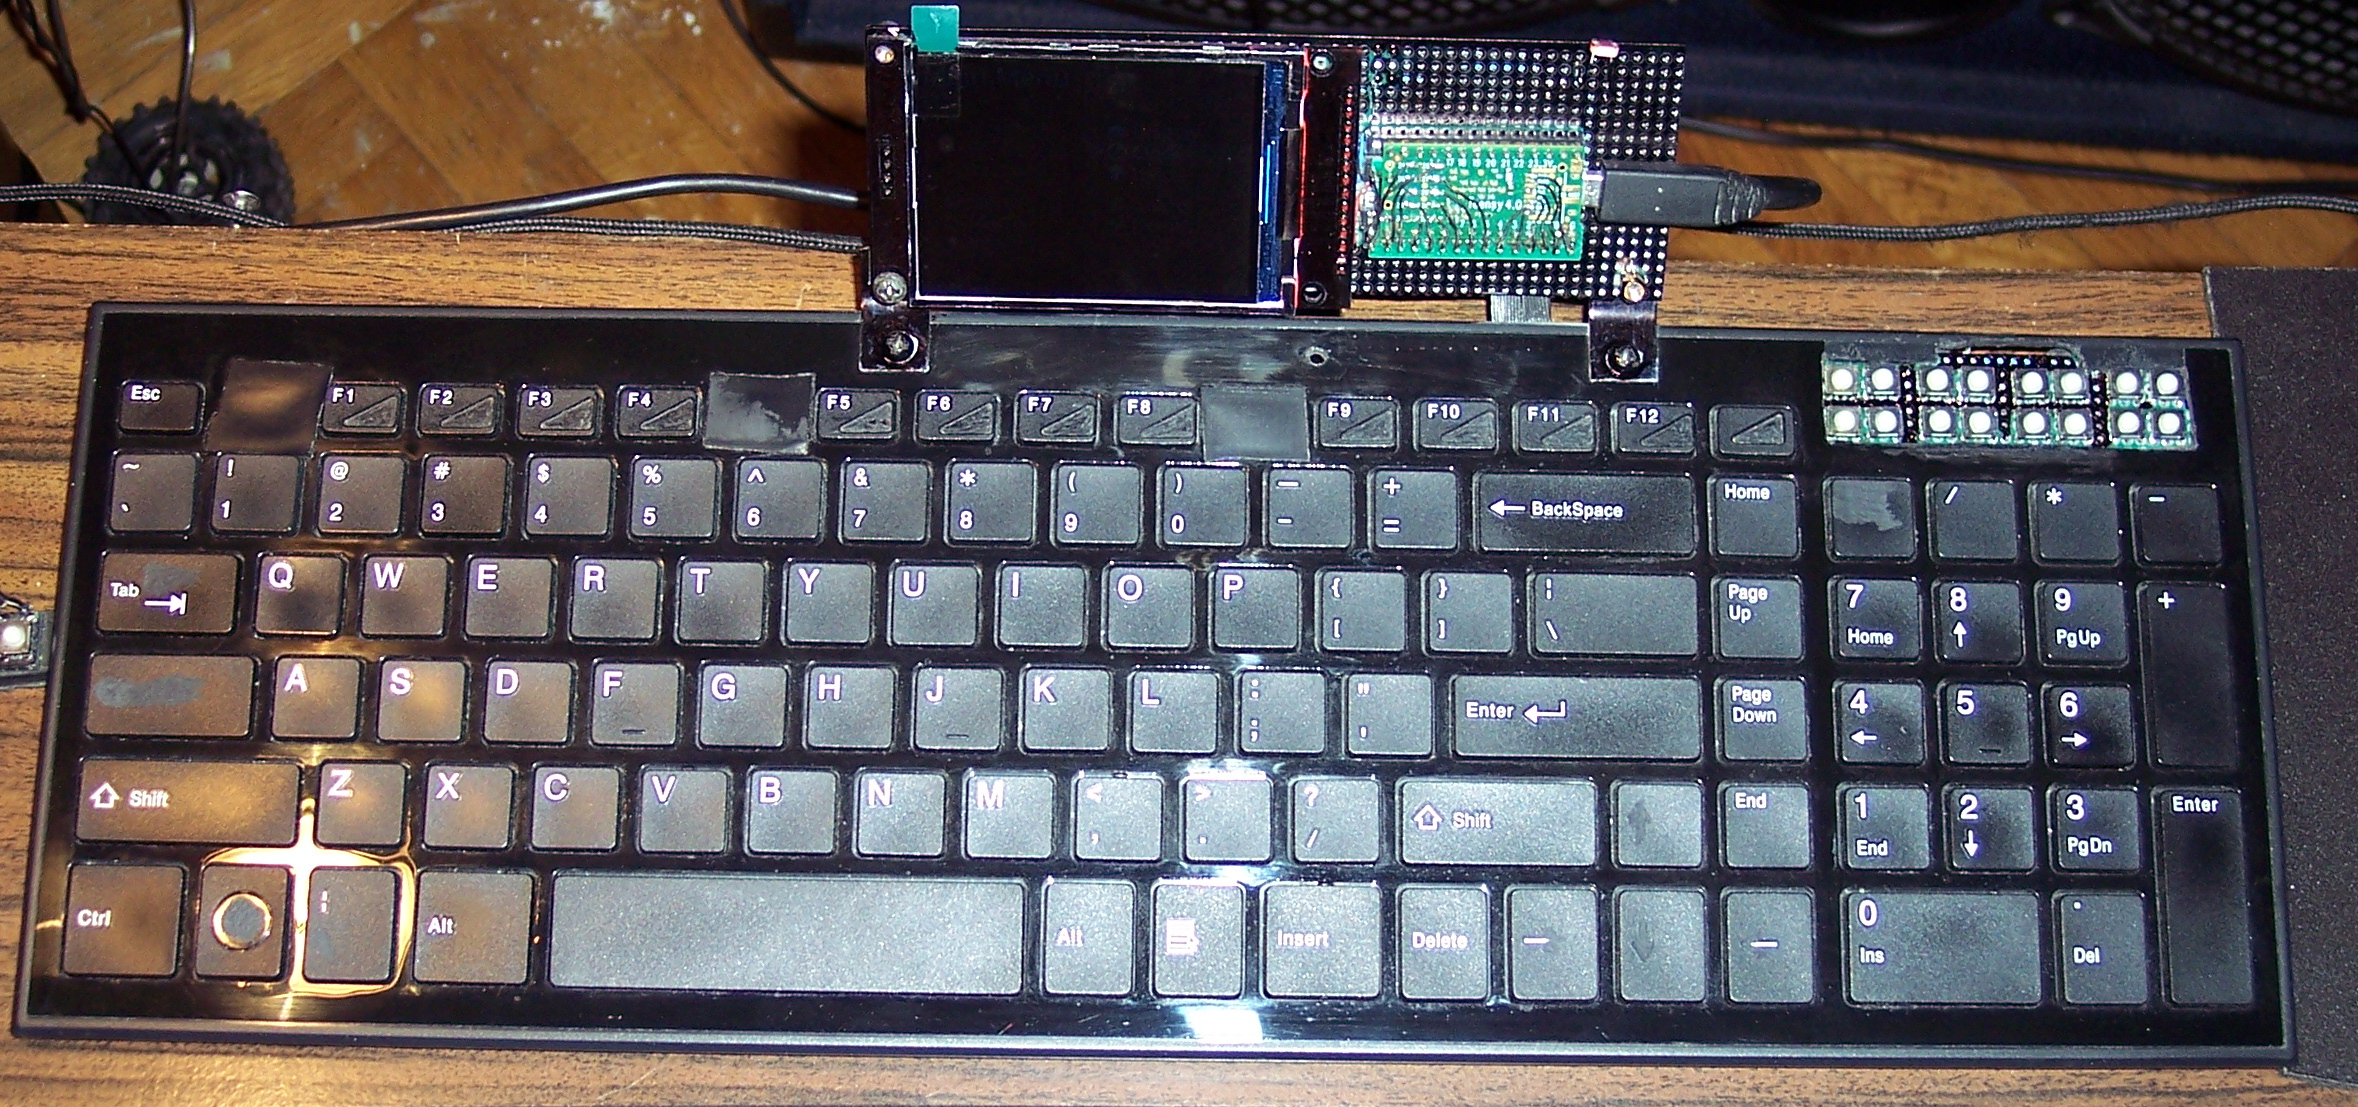
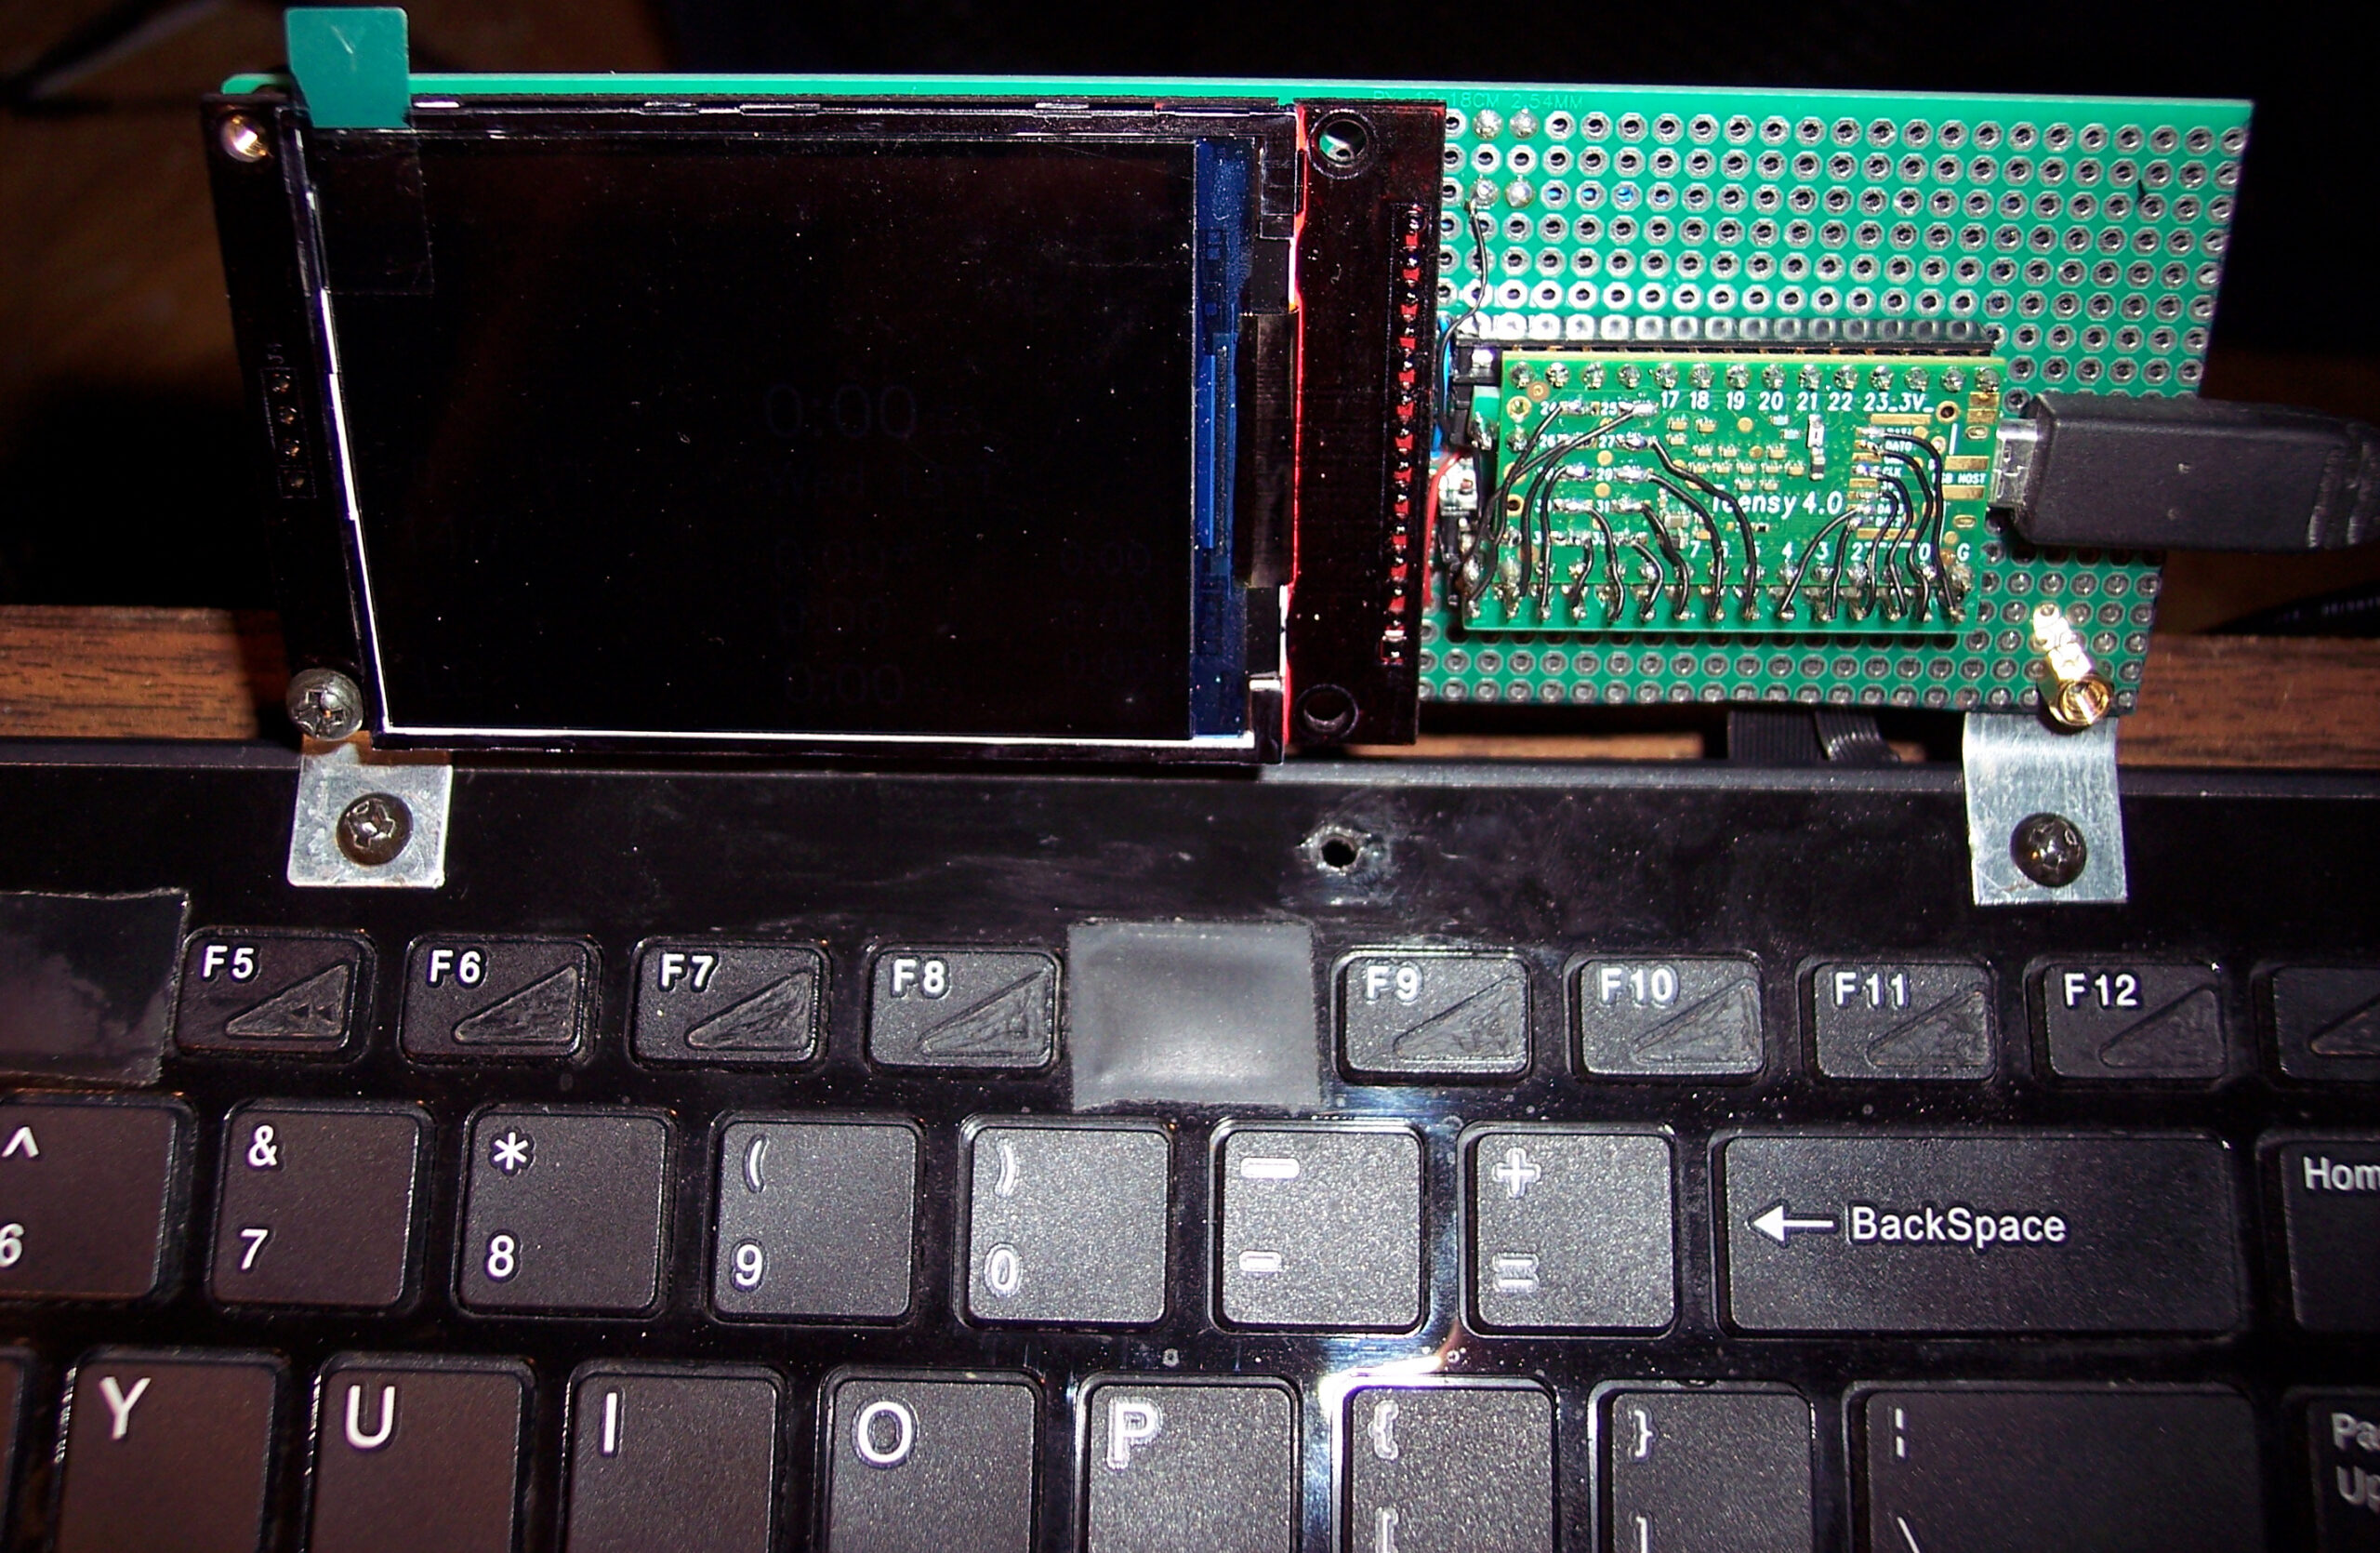
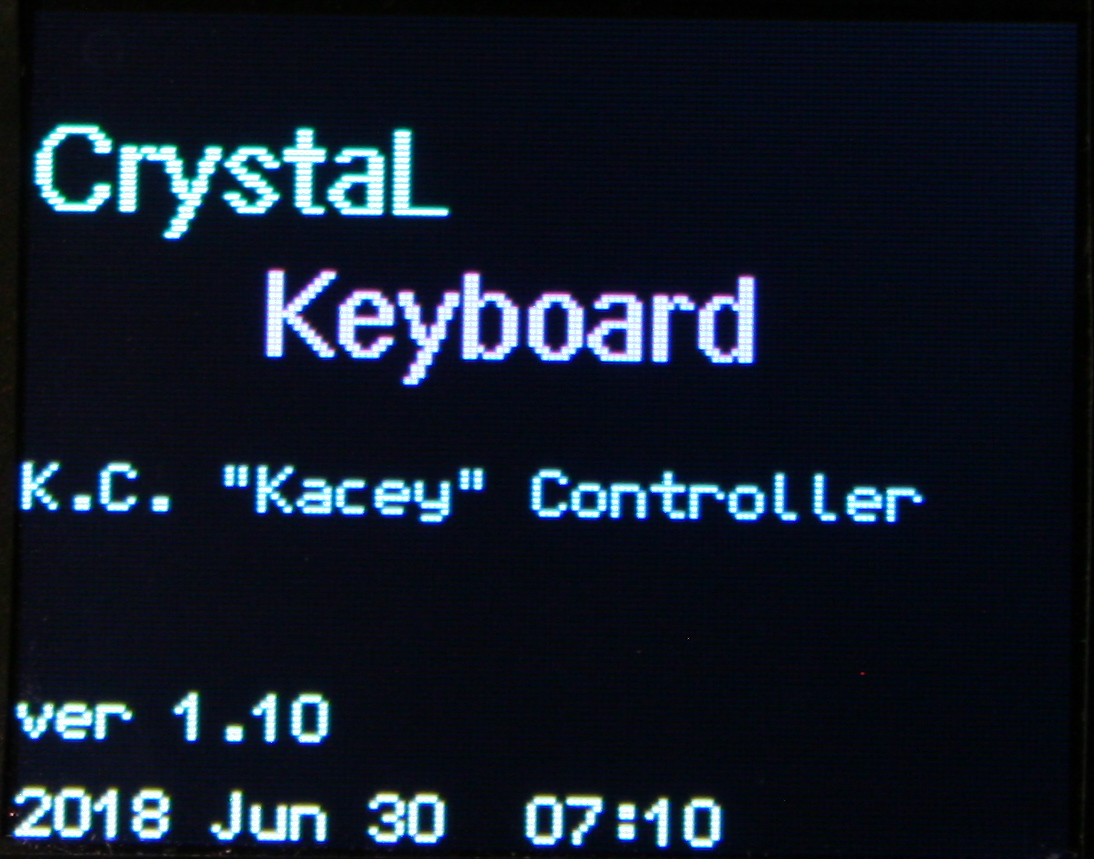
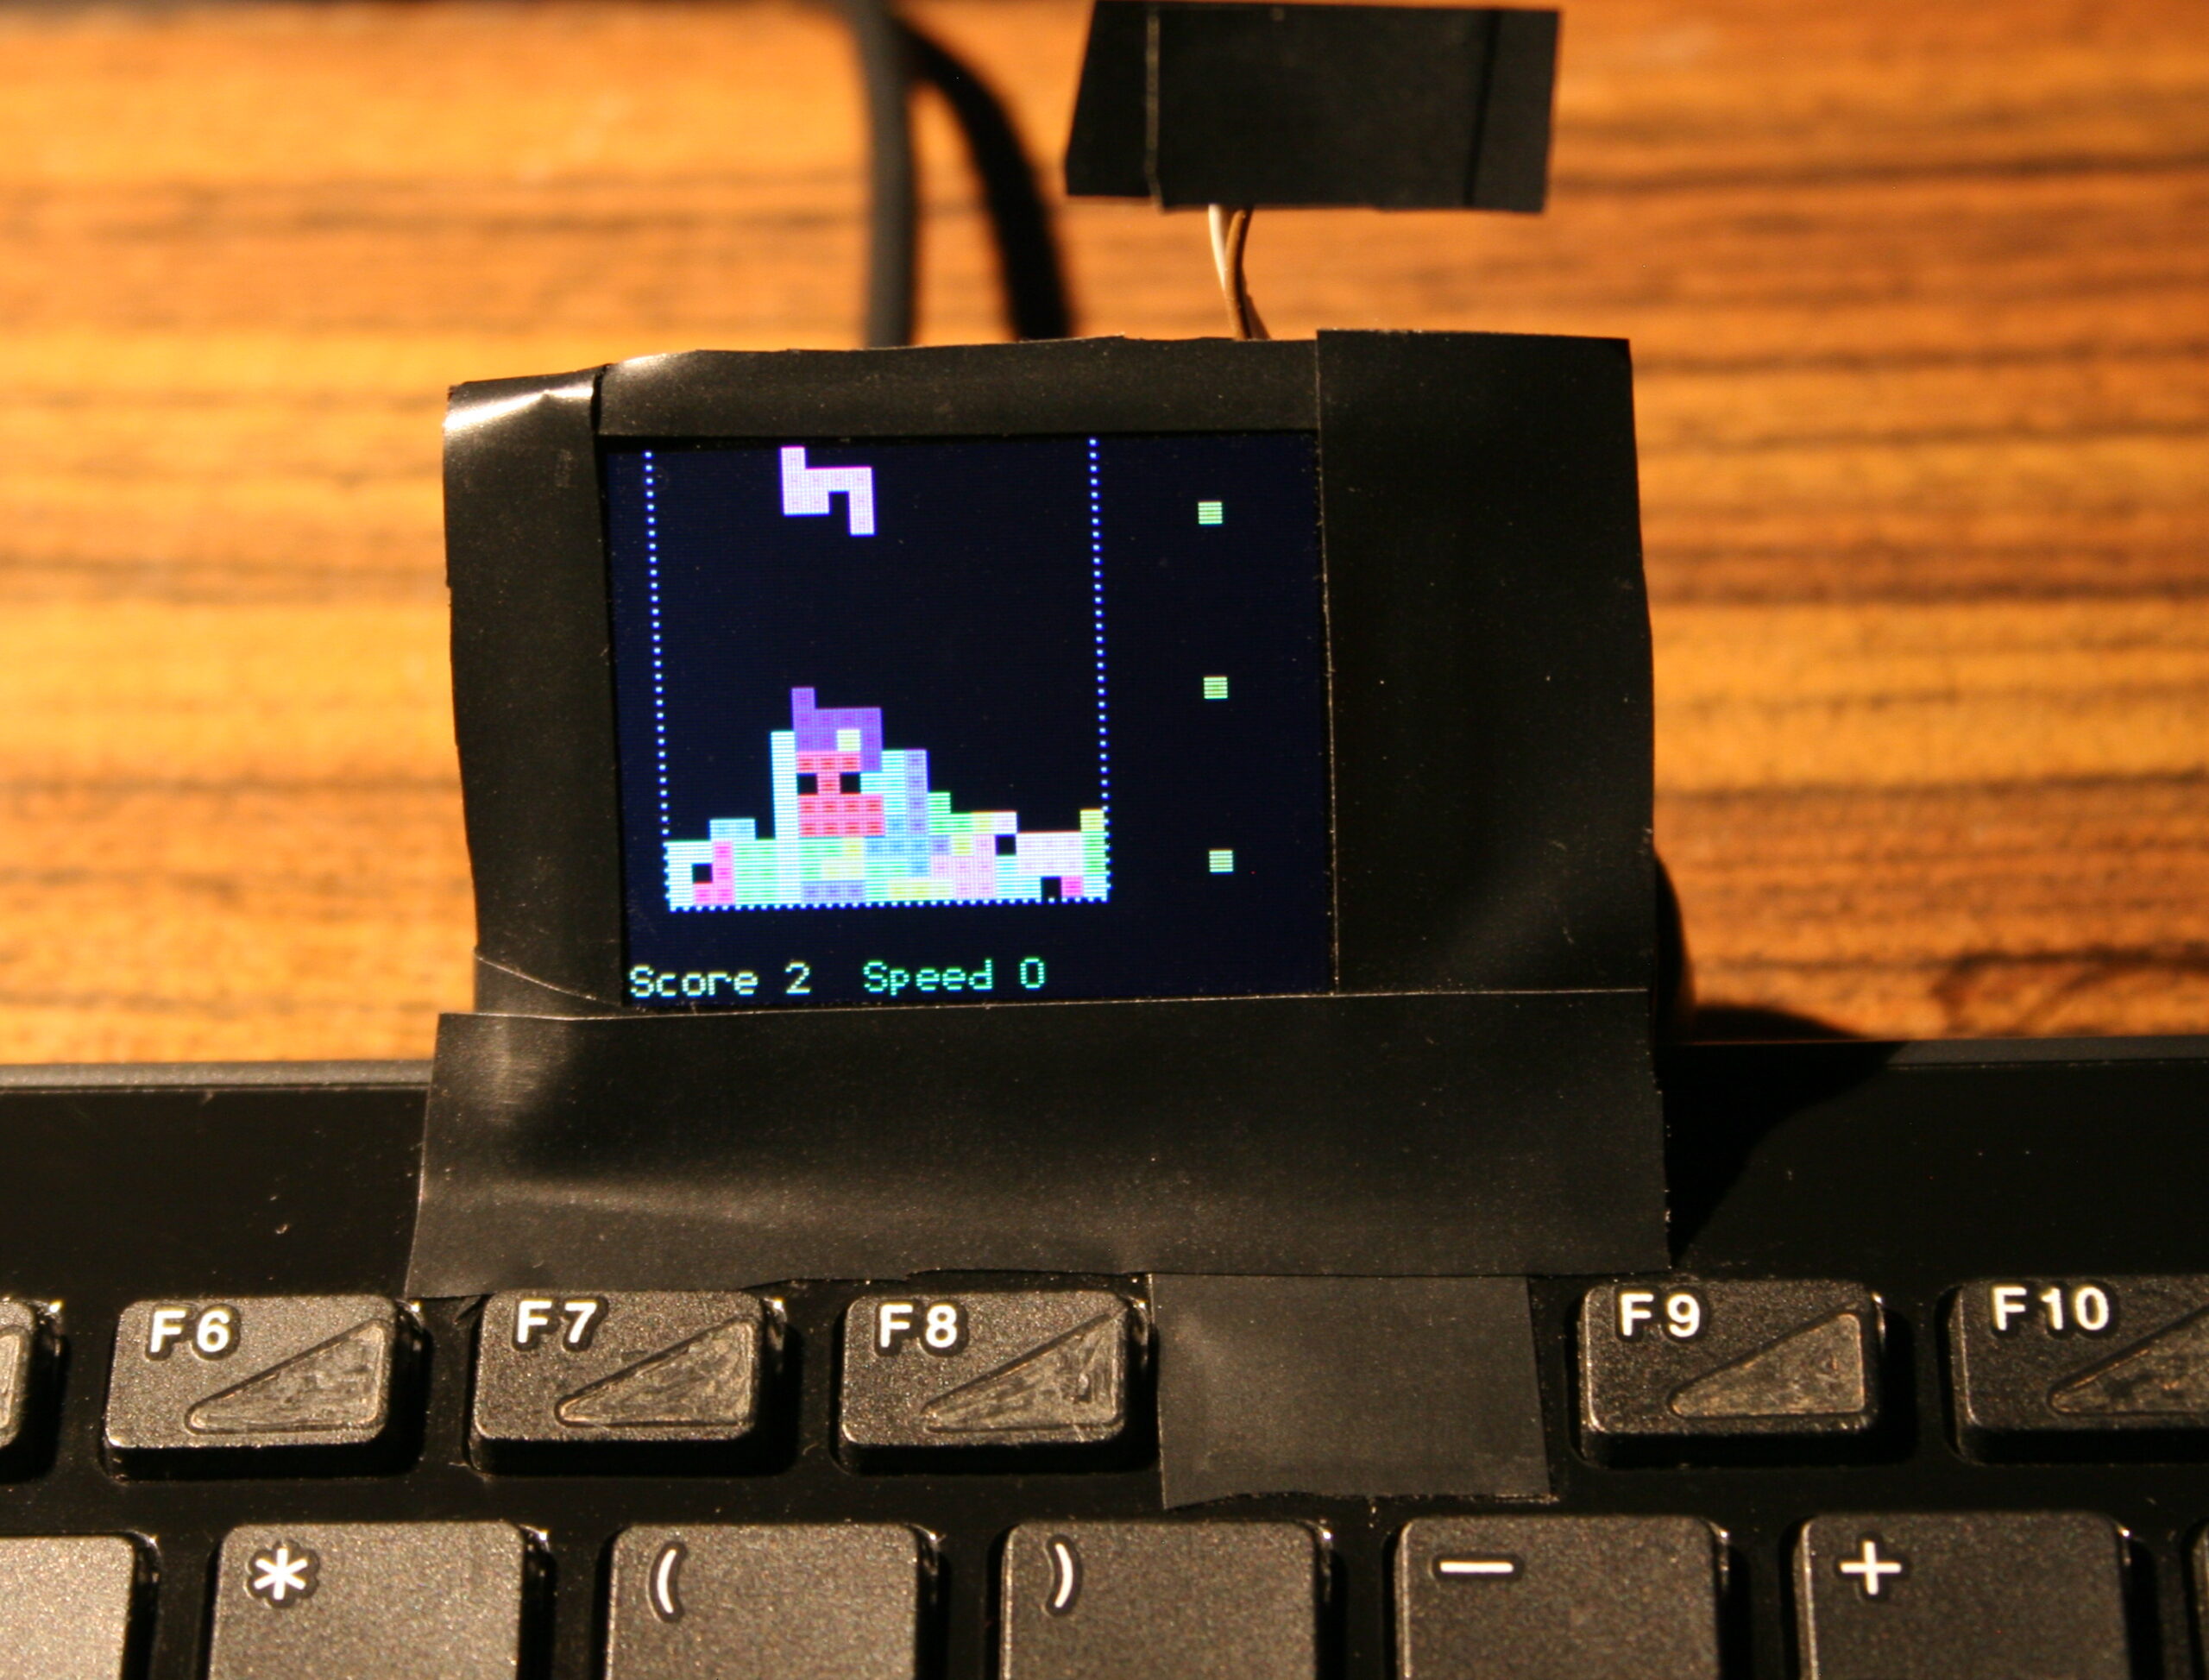
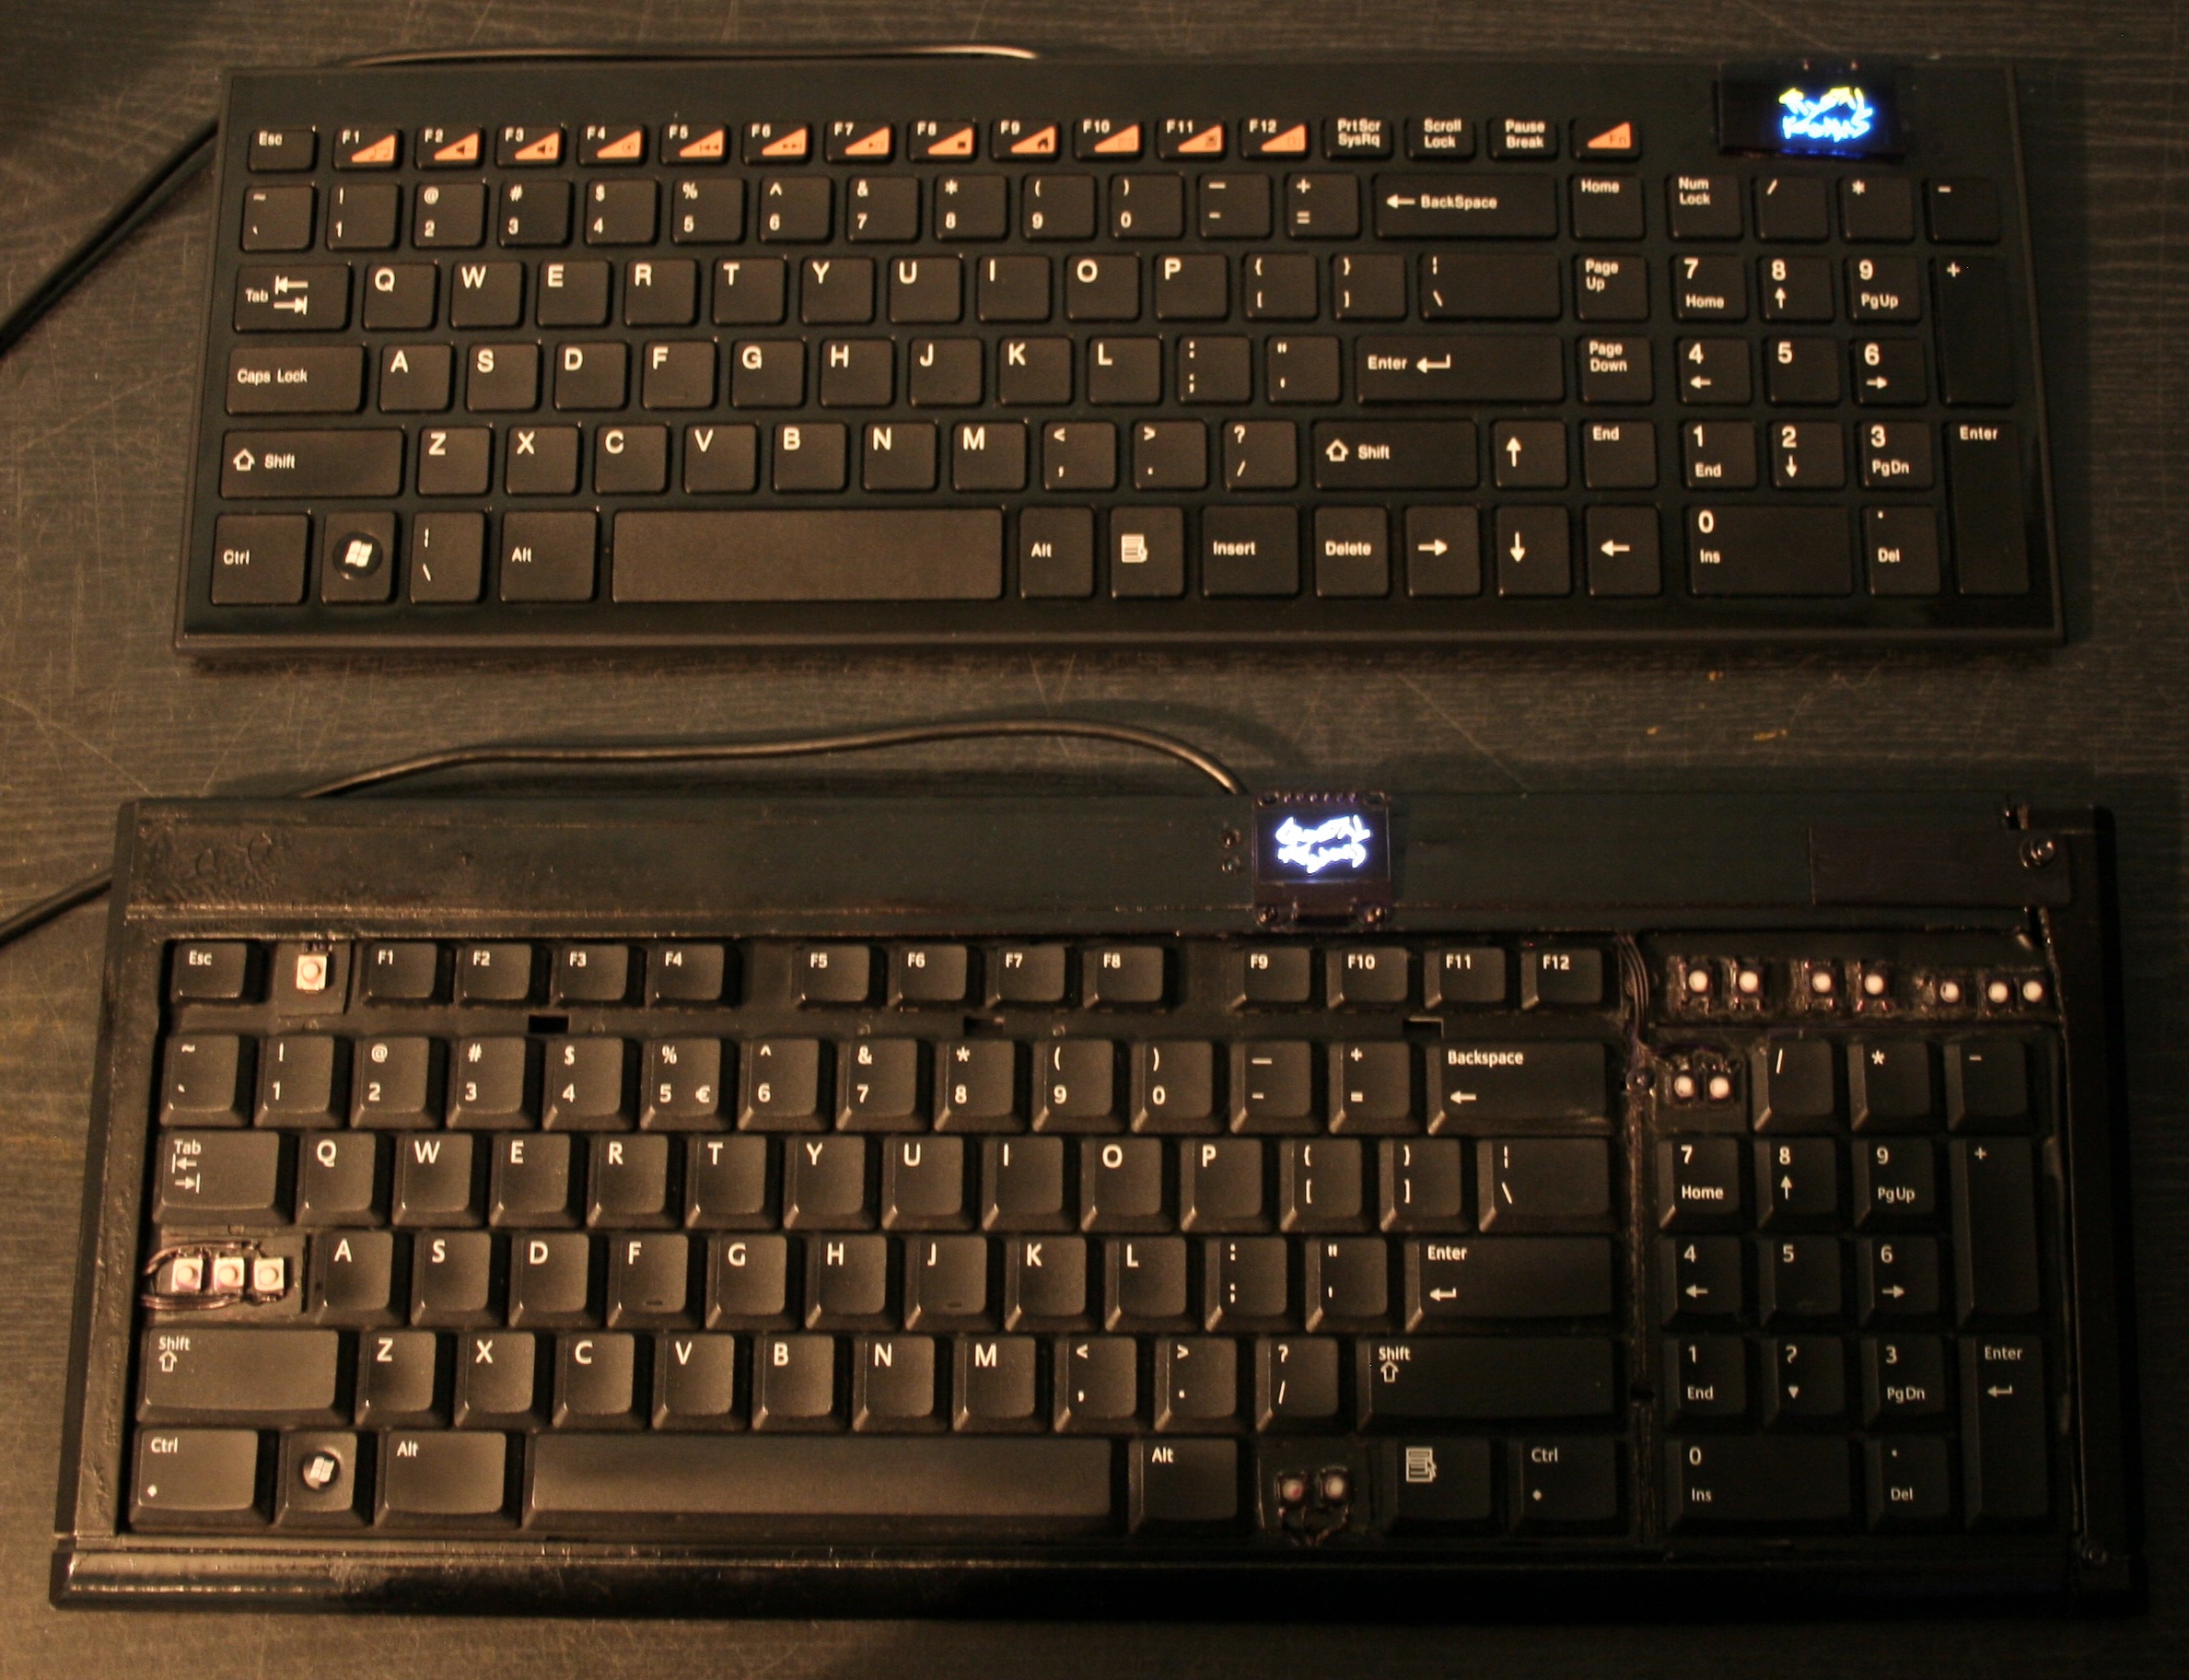
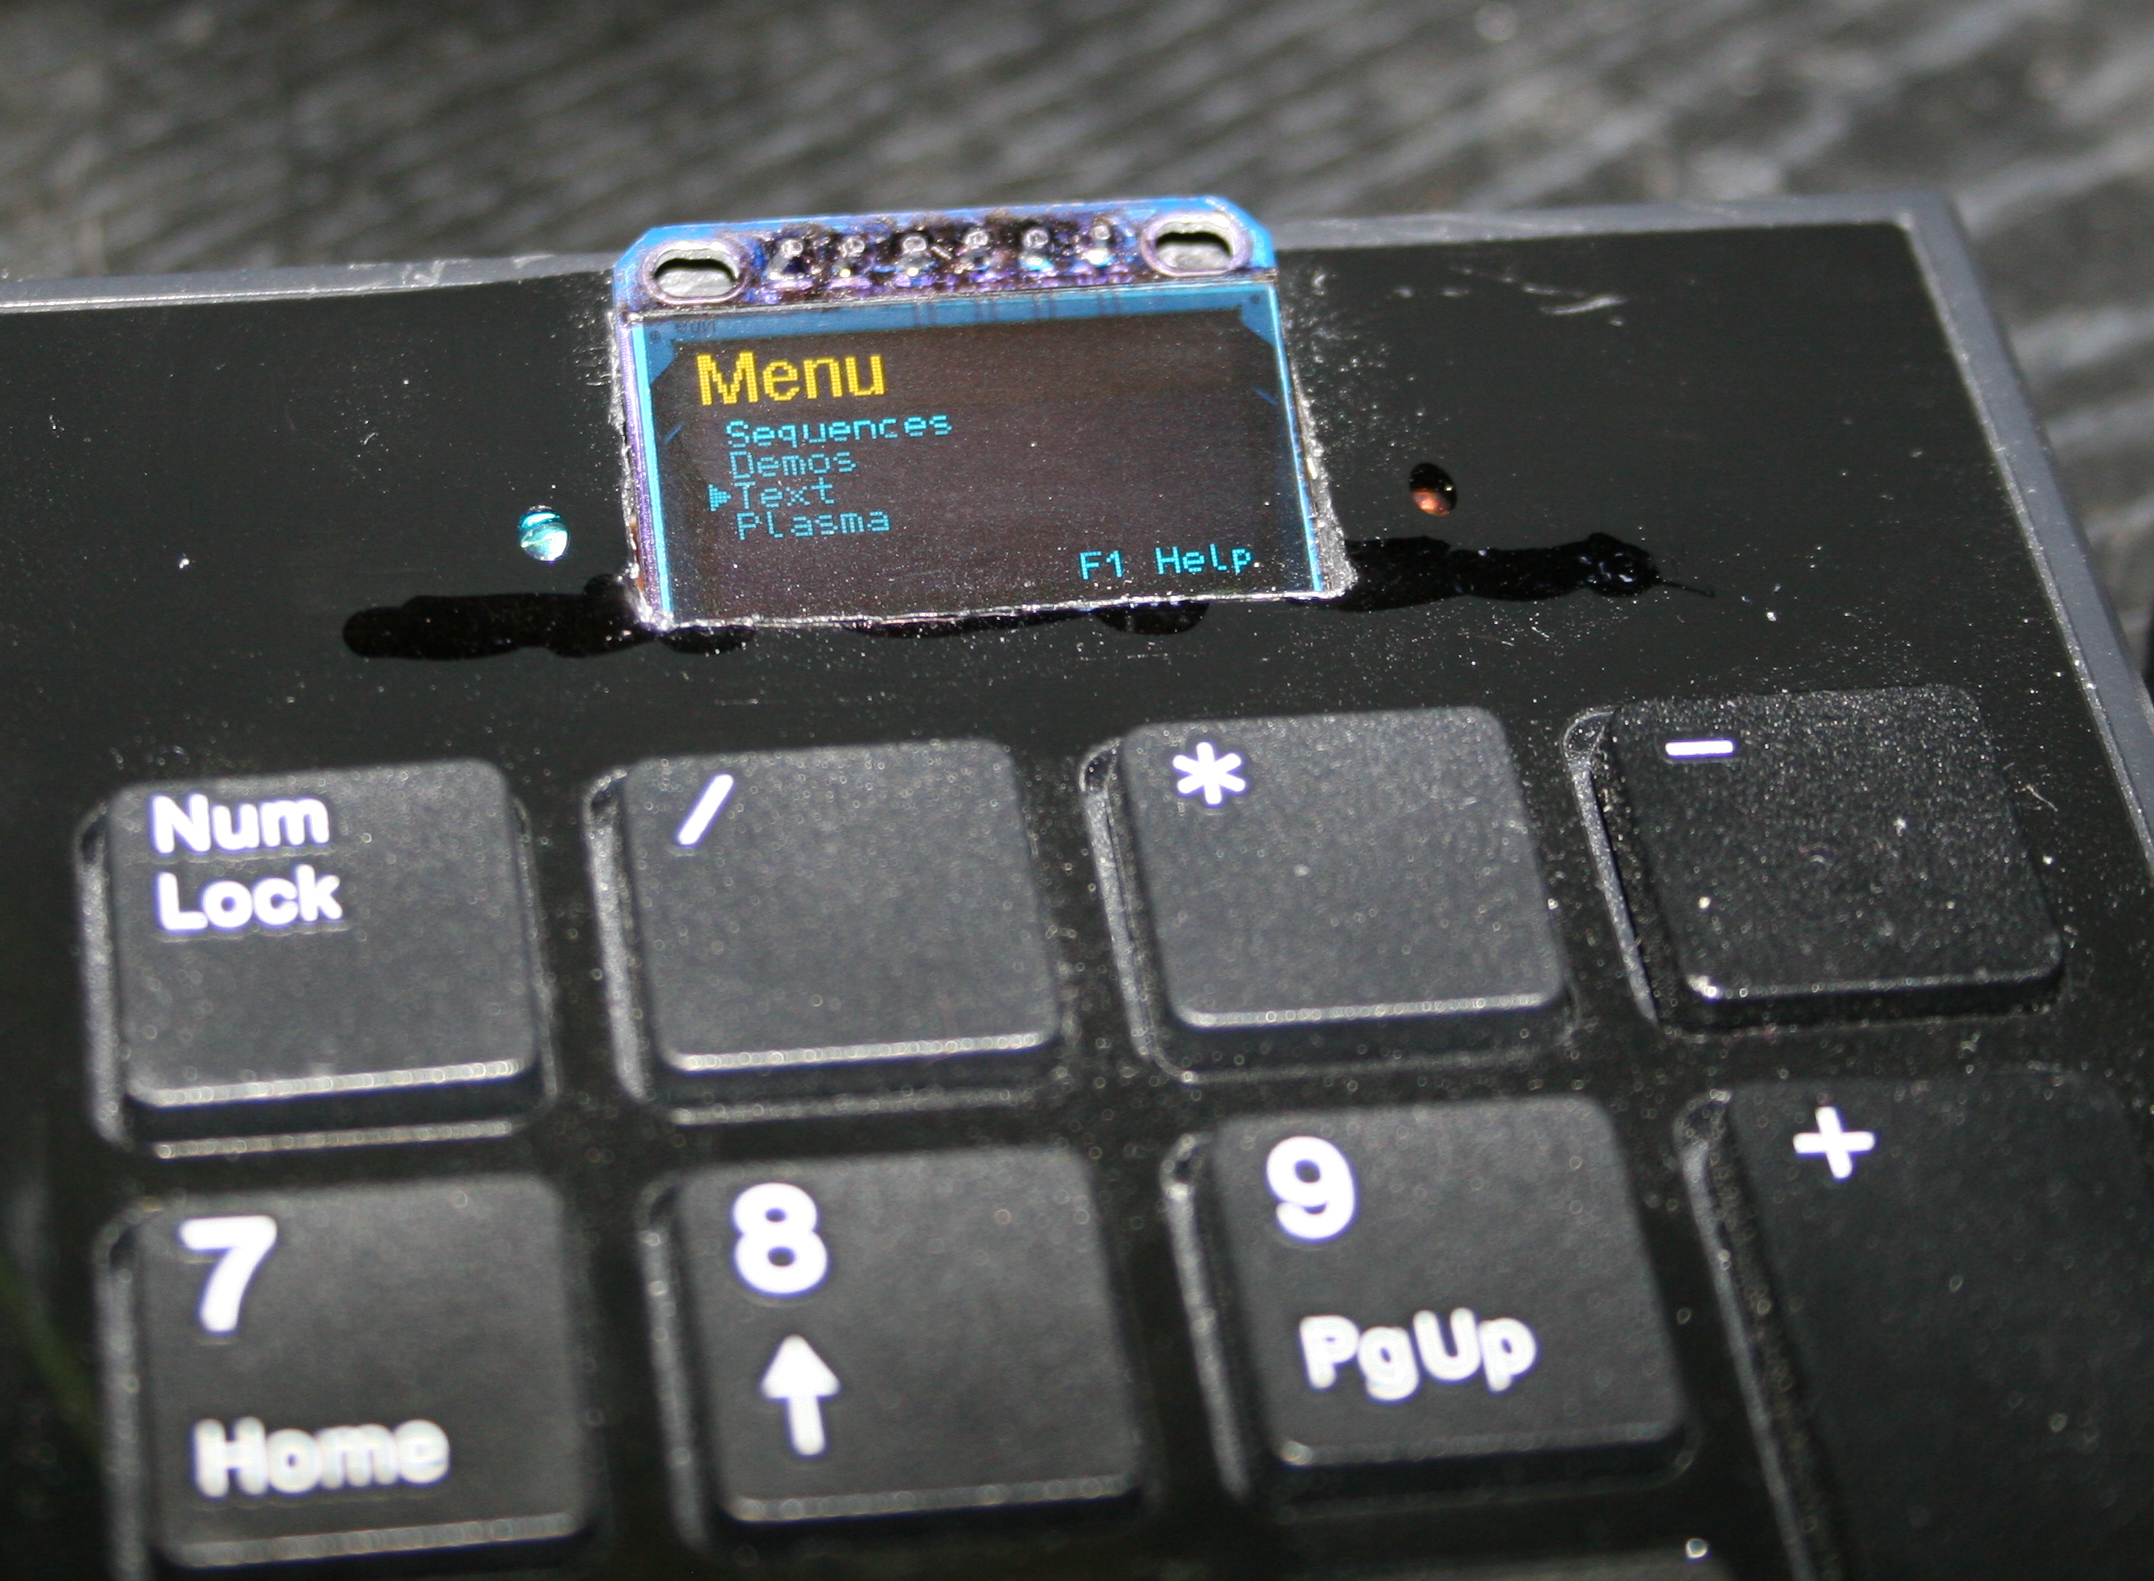
This is my newest keyboard controller software (based on my previous one) used in my keyboard CK9 (upgraded CK6), running on Teensy 4.0 with a 2.8″ color LCD display (320×240, ILI9341 chip). It allows editing everything like key mappings, layers, sequences/macros in real time on its display (was already in previous one).
▶️Videos
Here are videos of keyboard CK9, showing most of K.C.4 on its display:
View – Short video of keyboard and closeup at display.
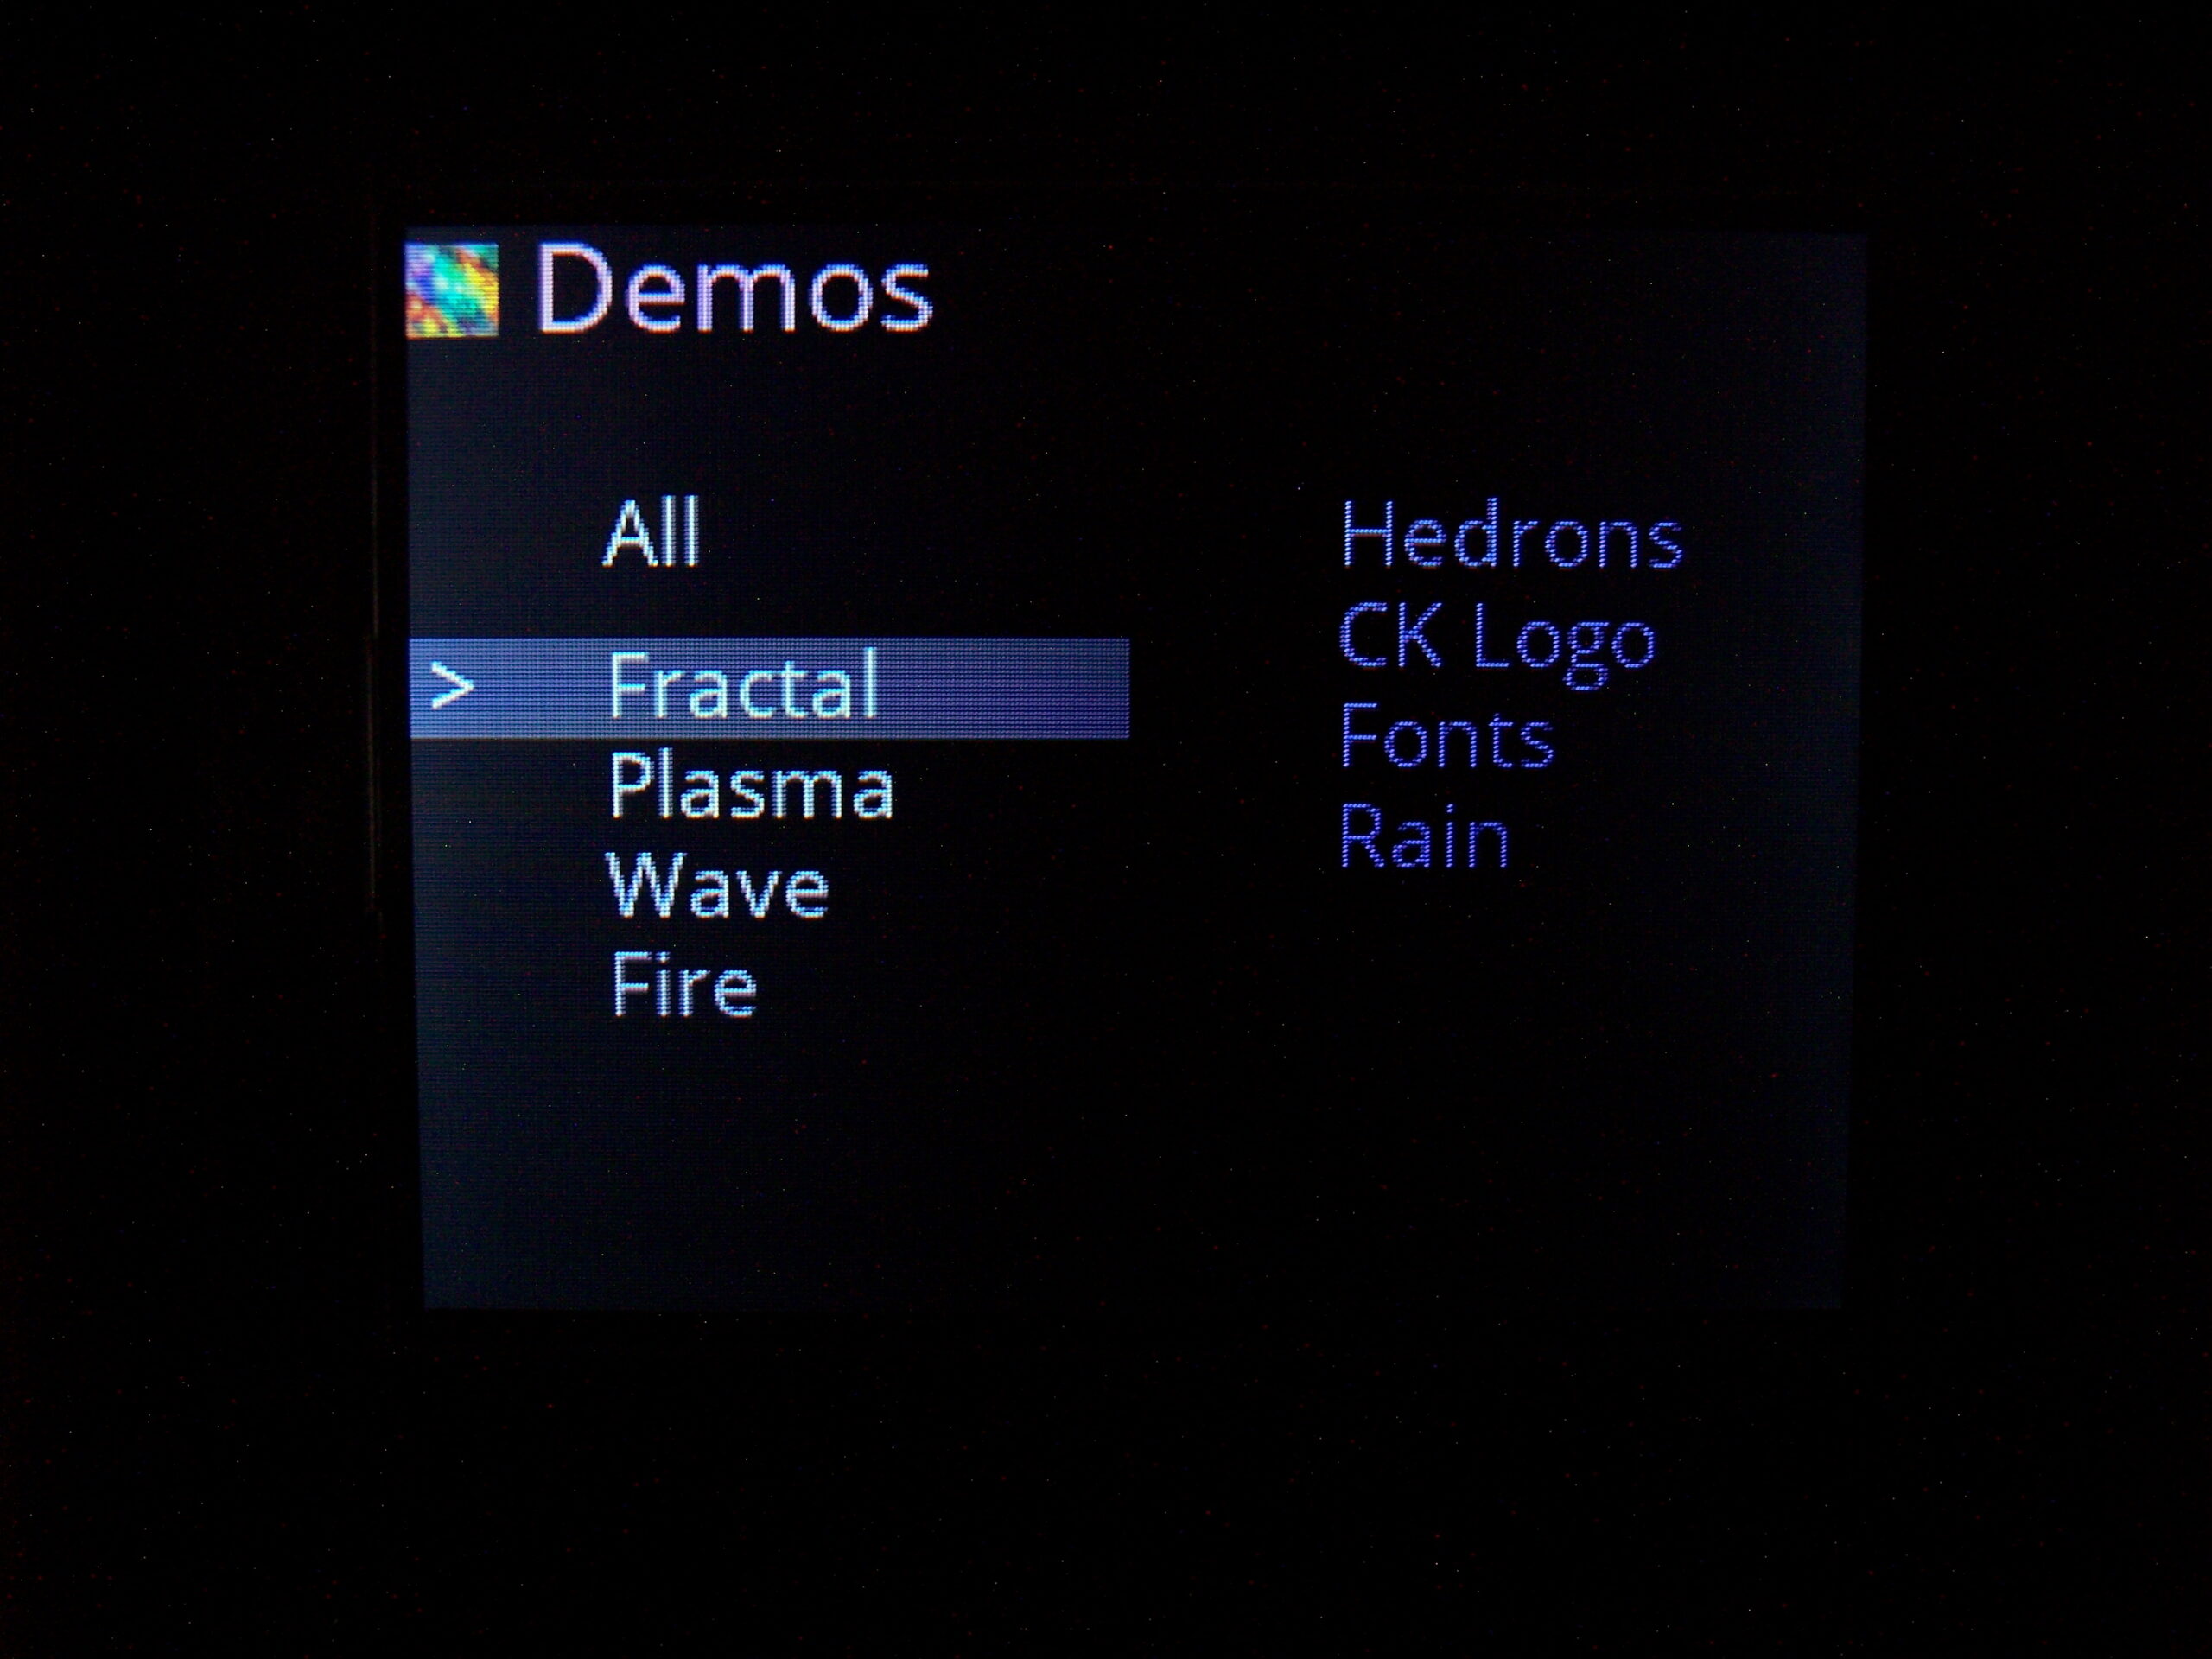
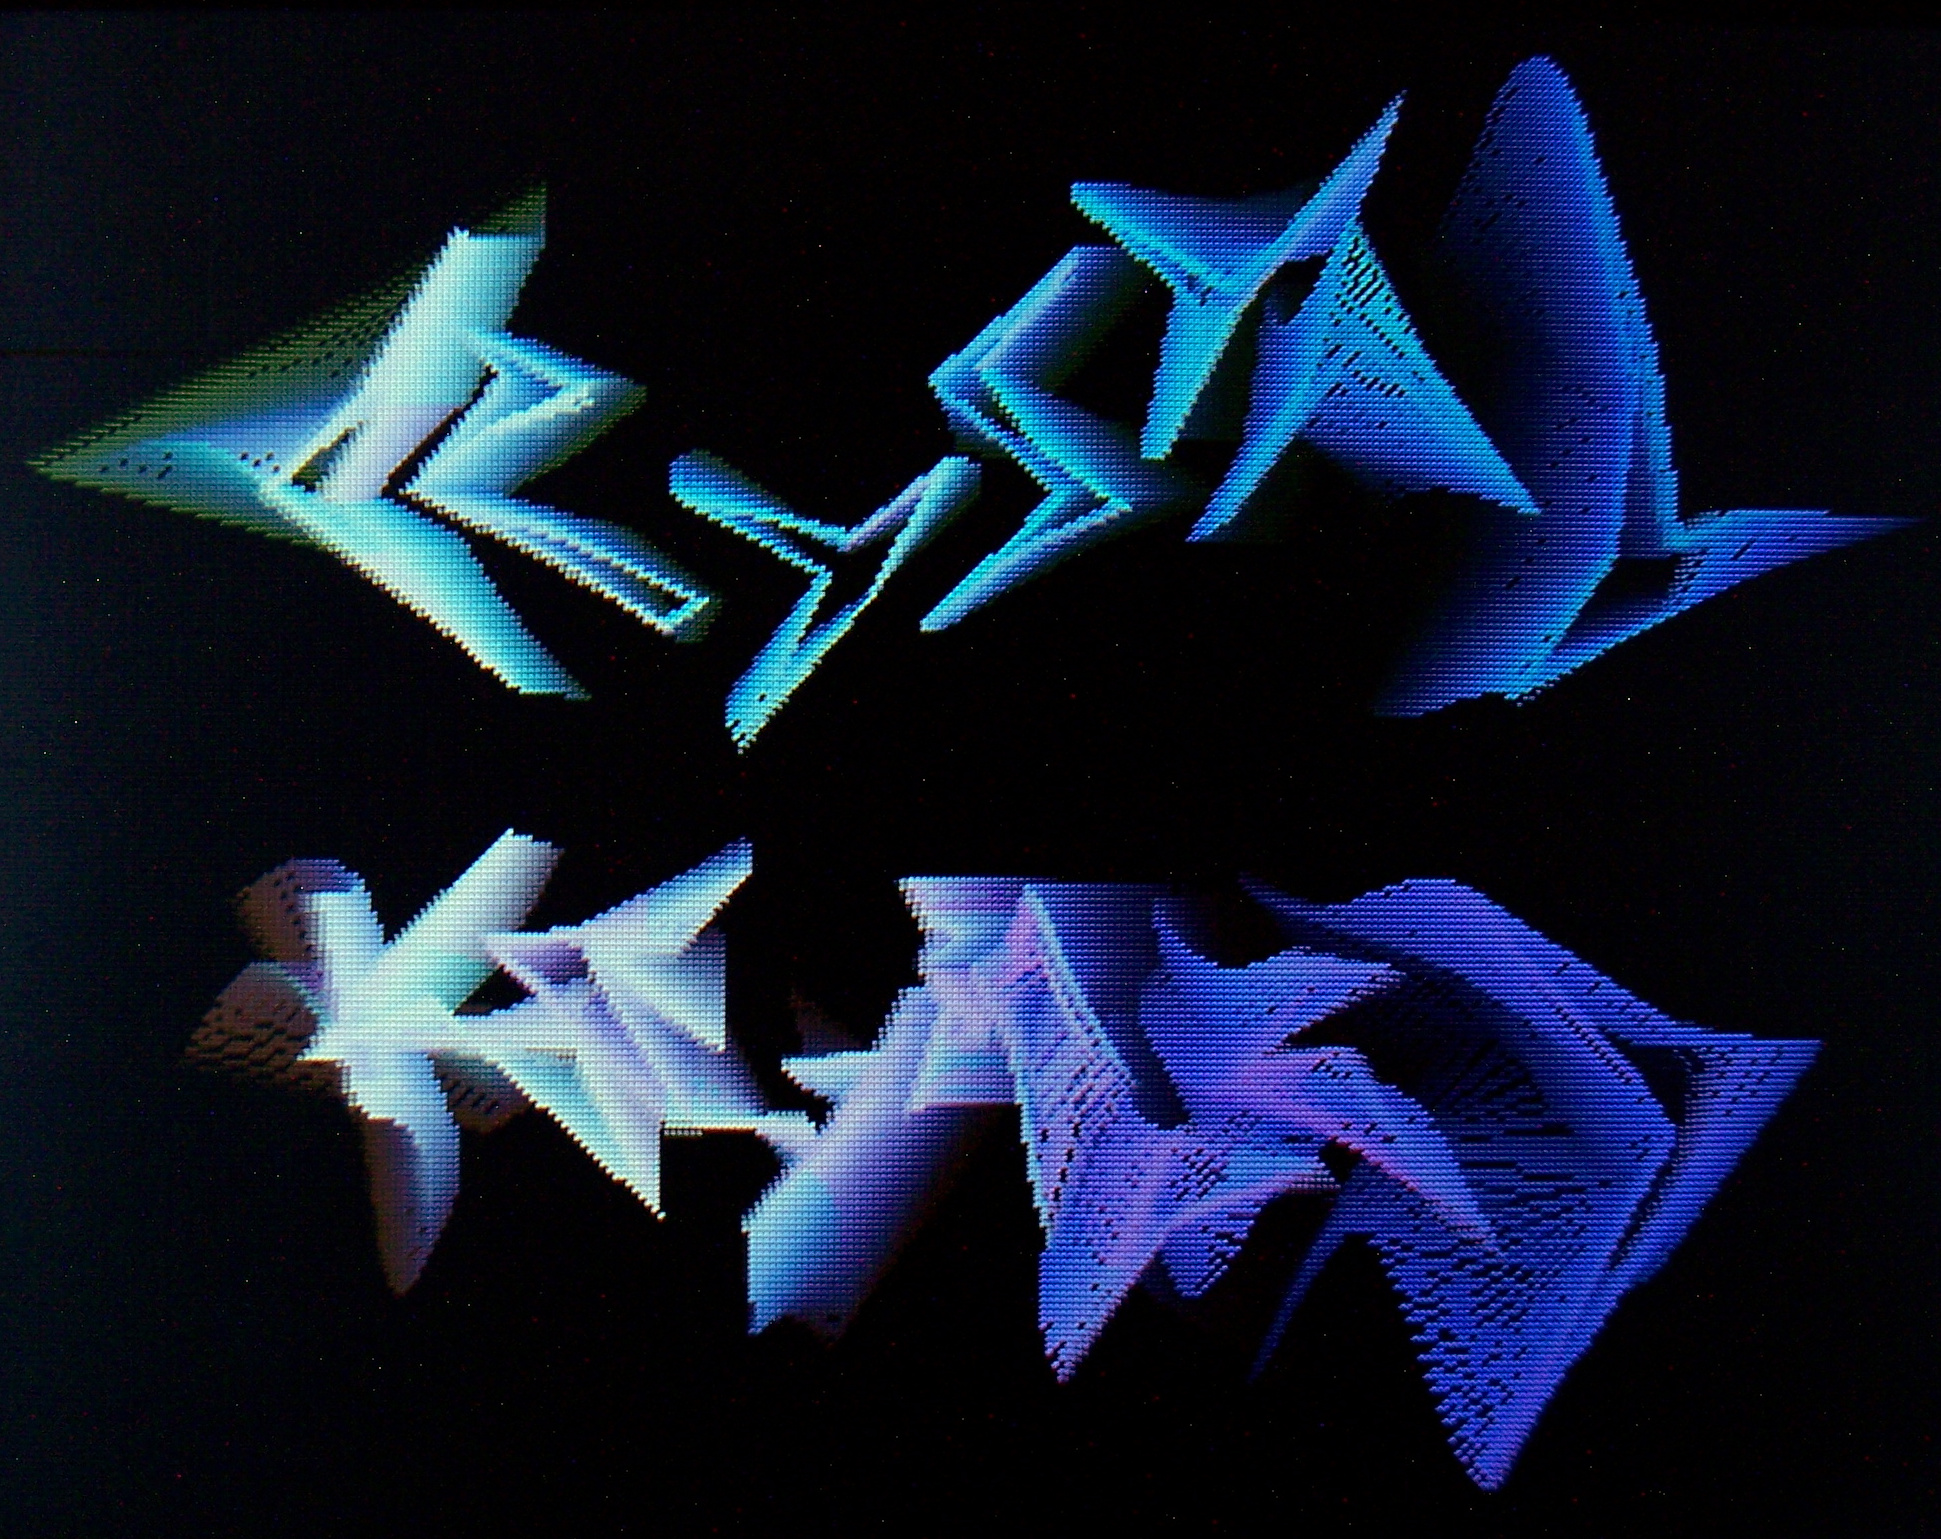
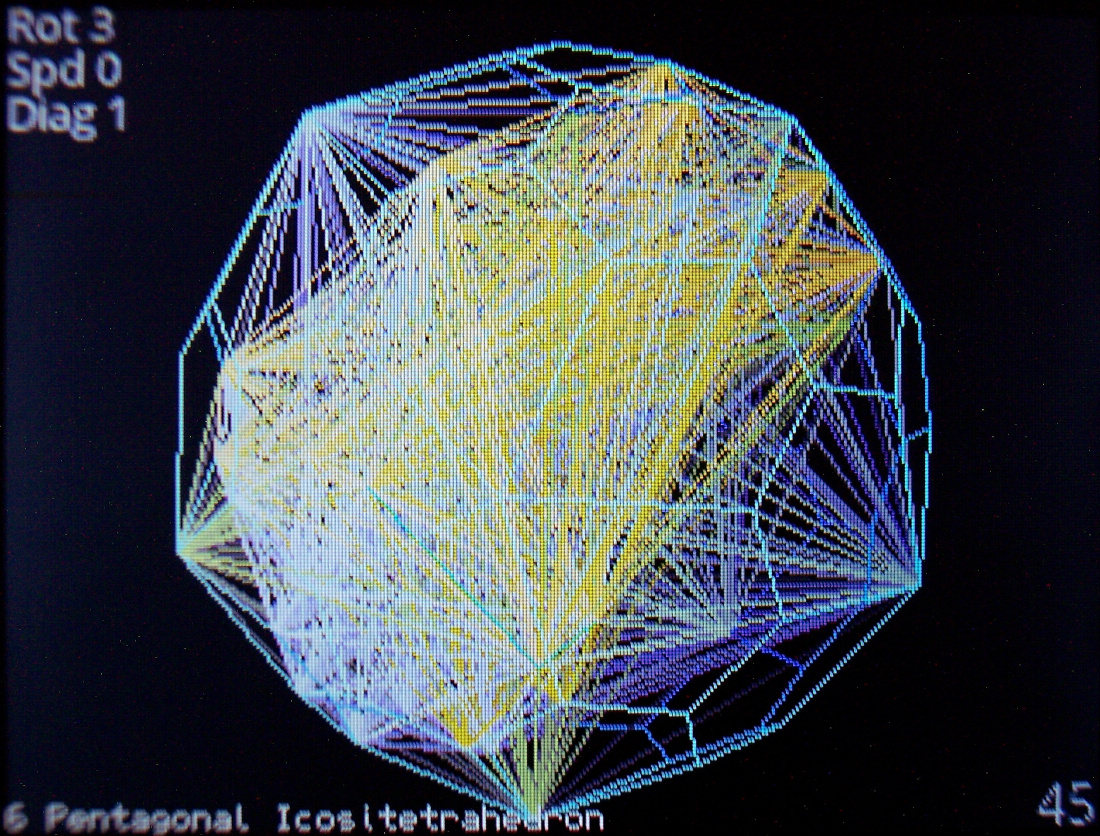
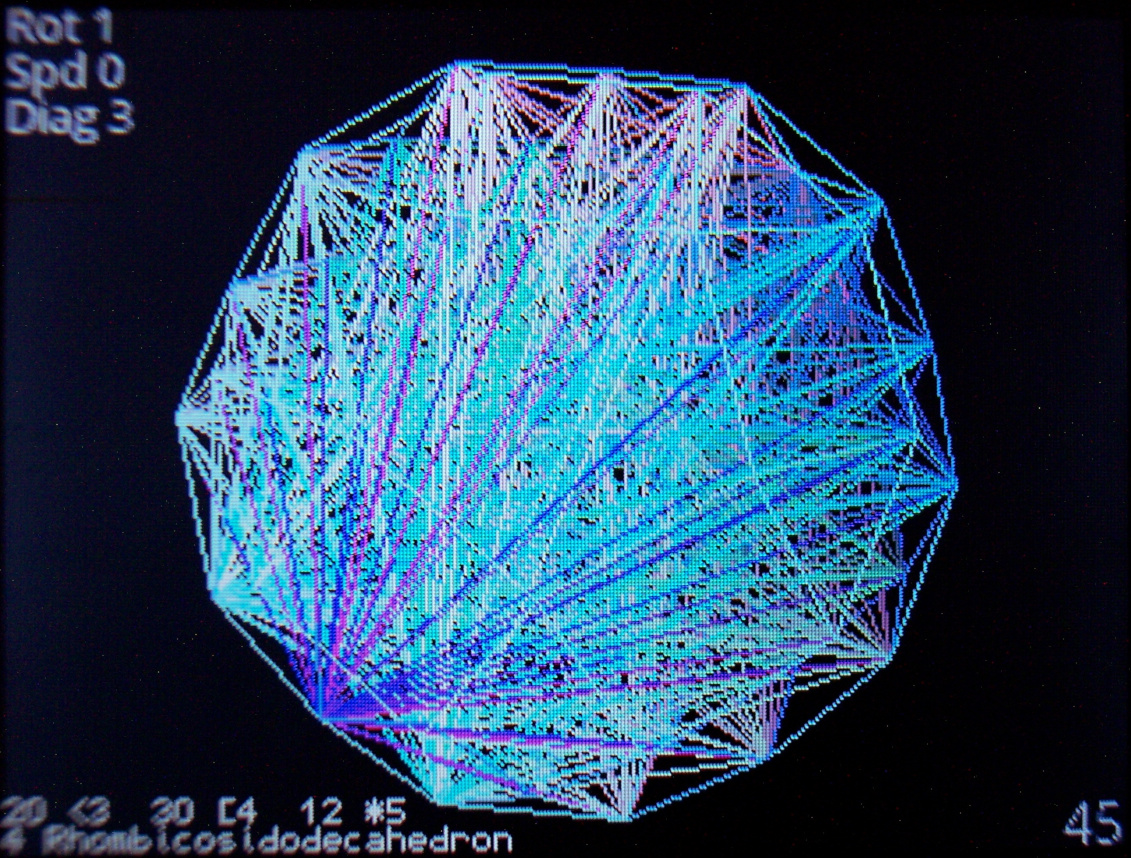
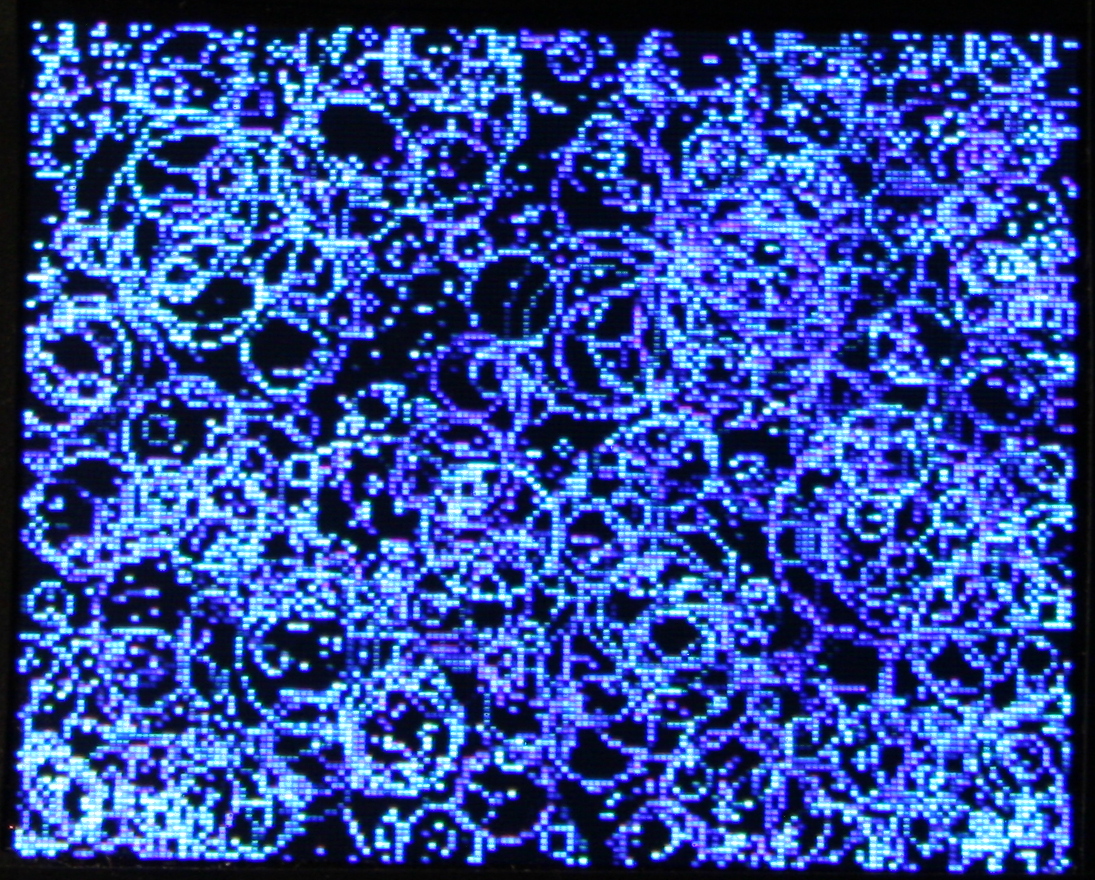
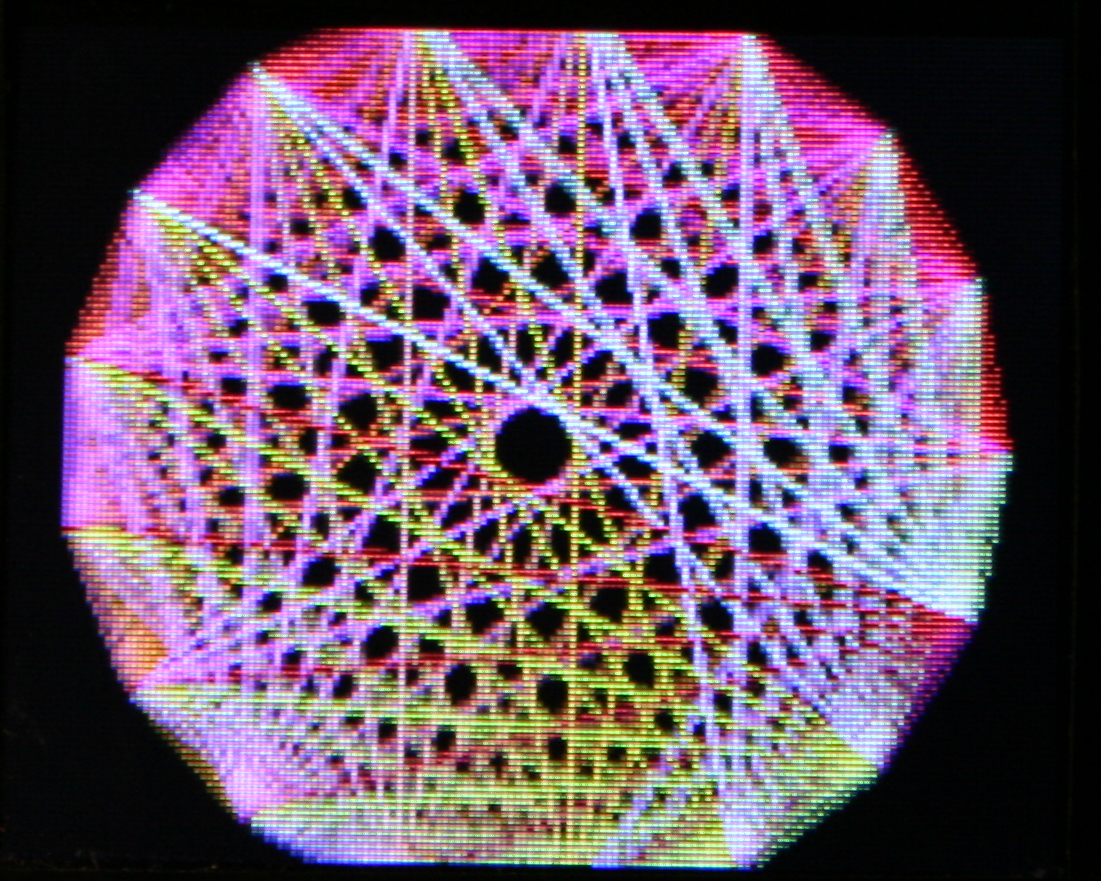
Demos – Showing all demos (in auto mode): Plasma, 3D Polyhedrons with diagonals, Wave, Fire (meh), 2D waving CK Logo with shadow, and old Rain.
Features – A detailed look at features, no voice or commentary though. Editing mappings, sequences, testing etc.
Link to my channel with all keyboard videos so far here.
📂Sources
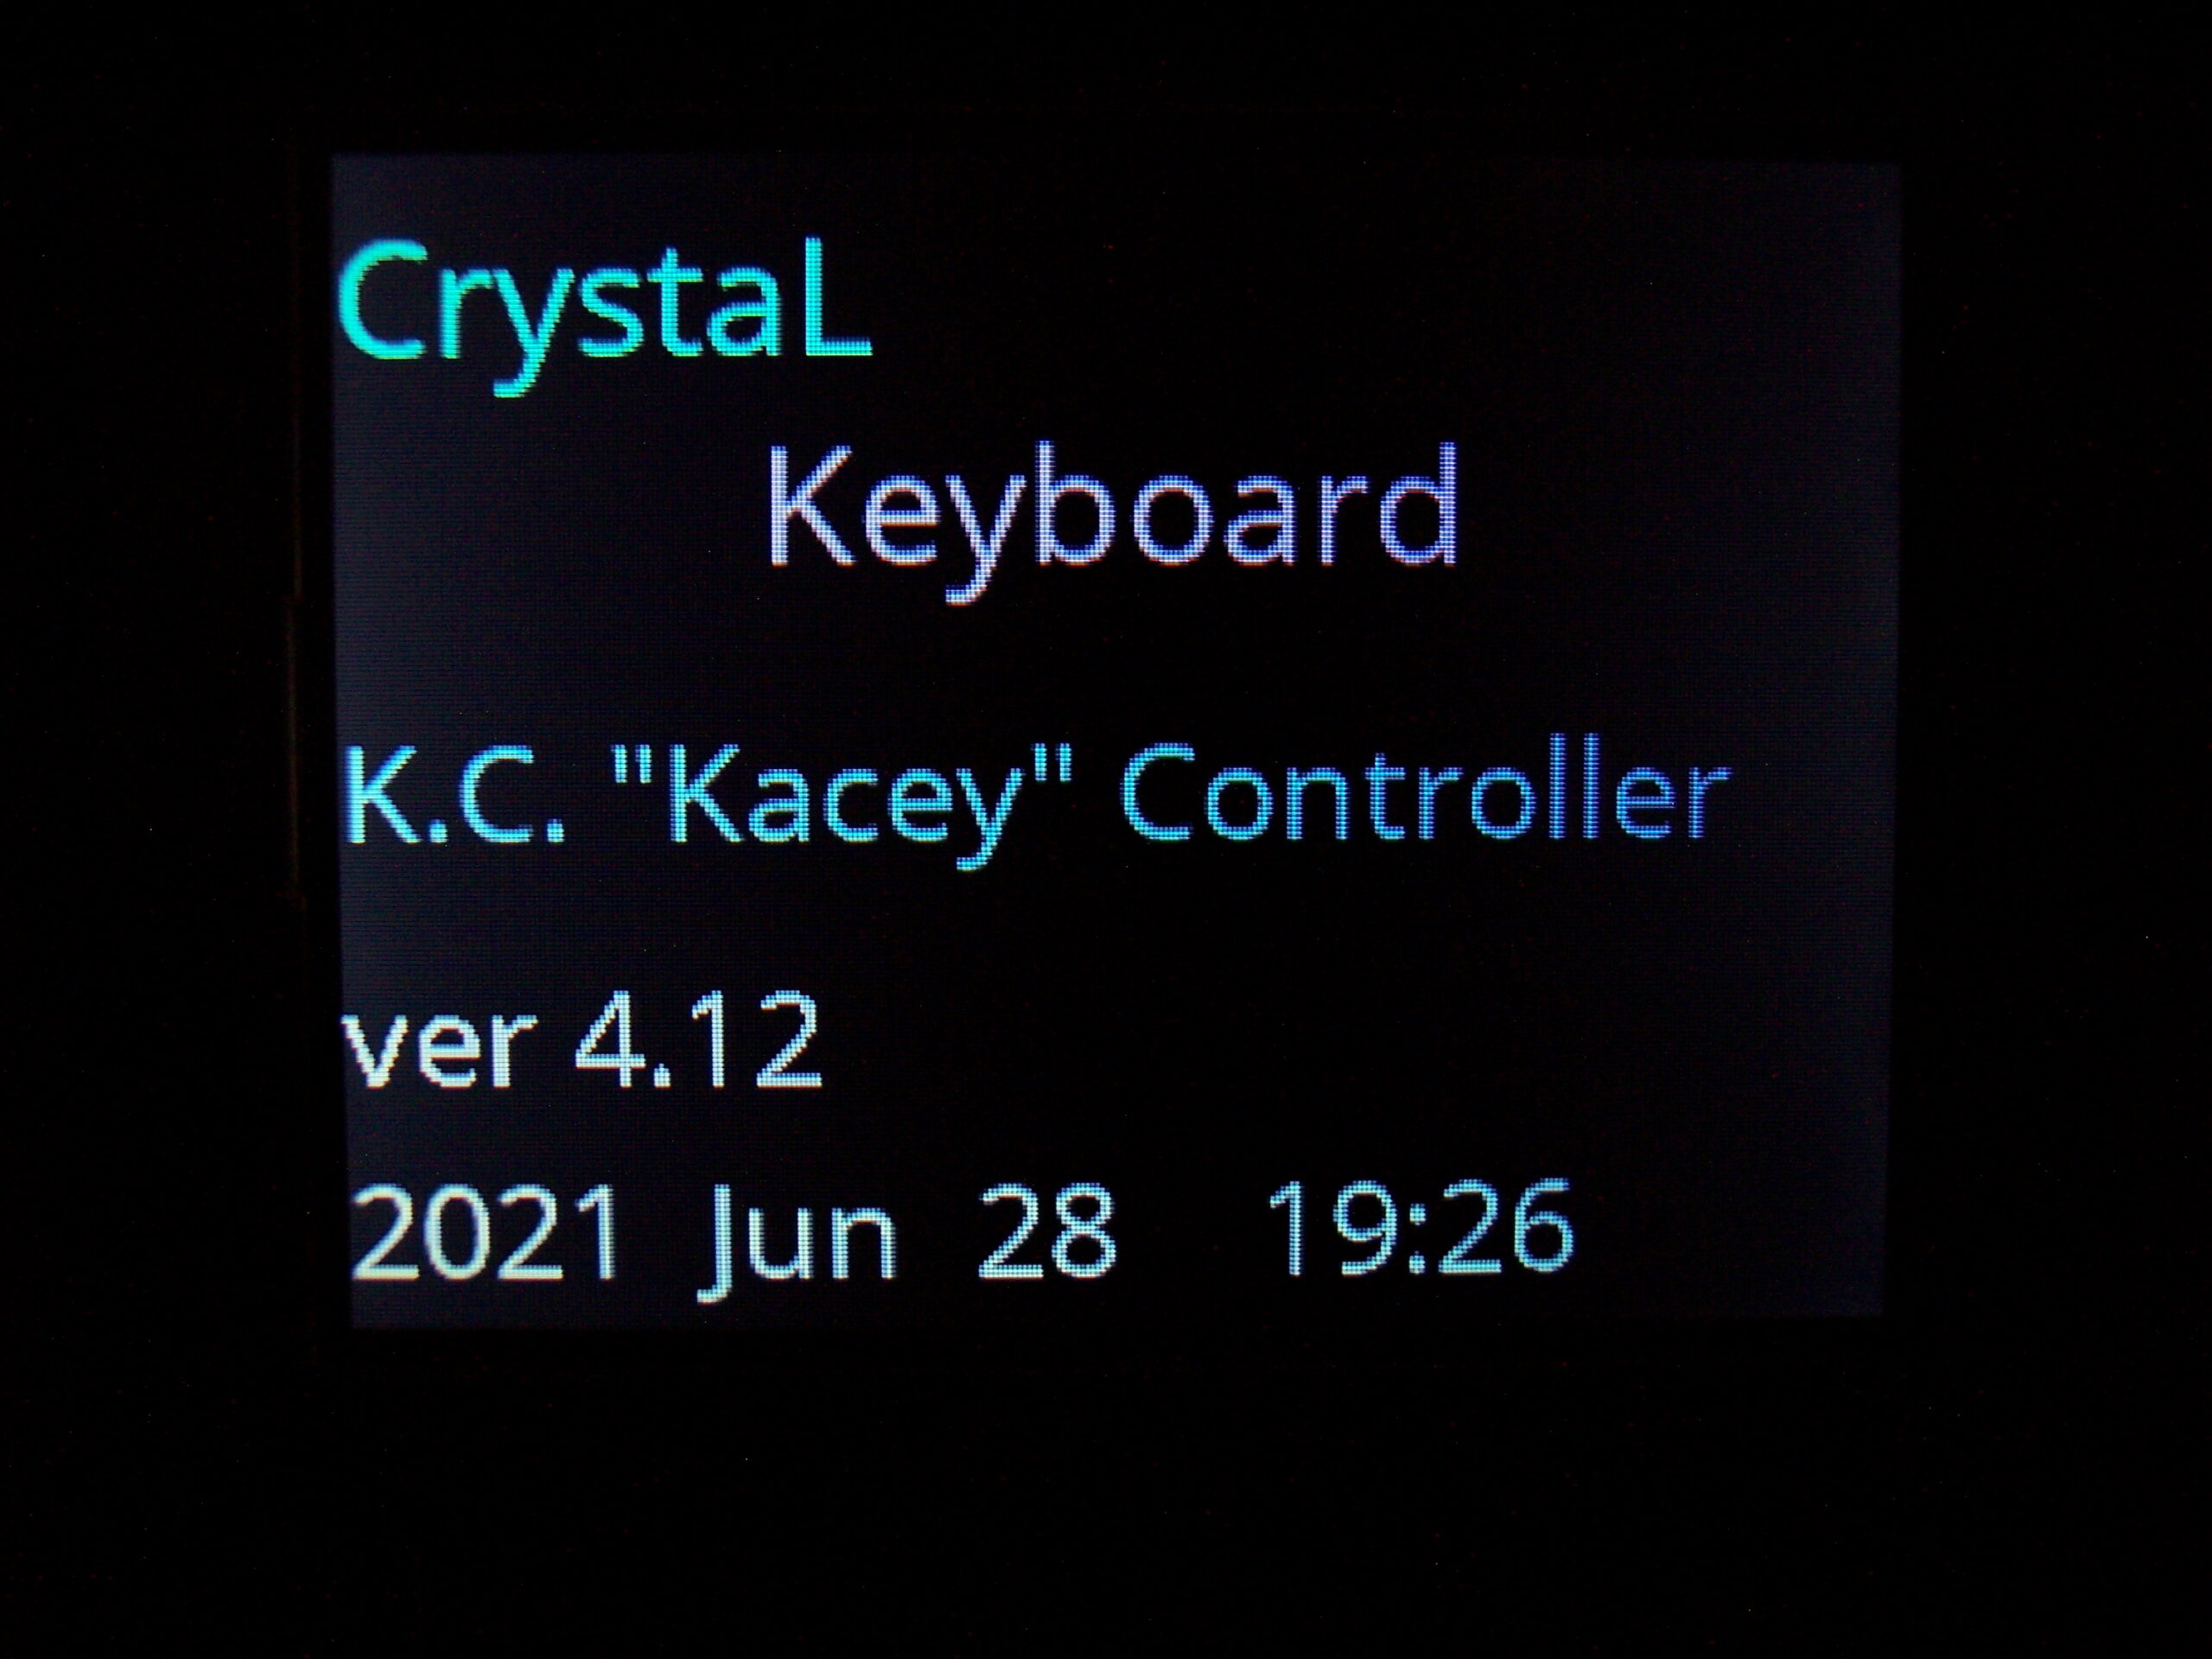
My firmware sources are here. It’s called K.C.4 (“Kacey”) simply from Keyboard Controller and 4 from Teensy version.
The readme with all key features is visible on github. Here is more practical description. At end of page I wrote a comparison from my previous version (for Teensy 3.2) and quickly with other controllers / keyboards.
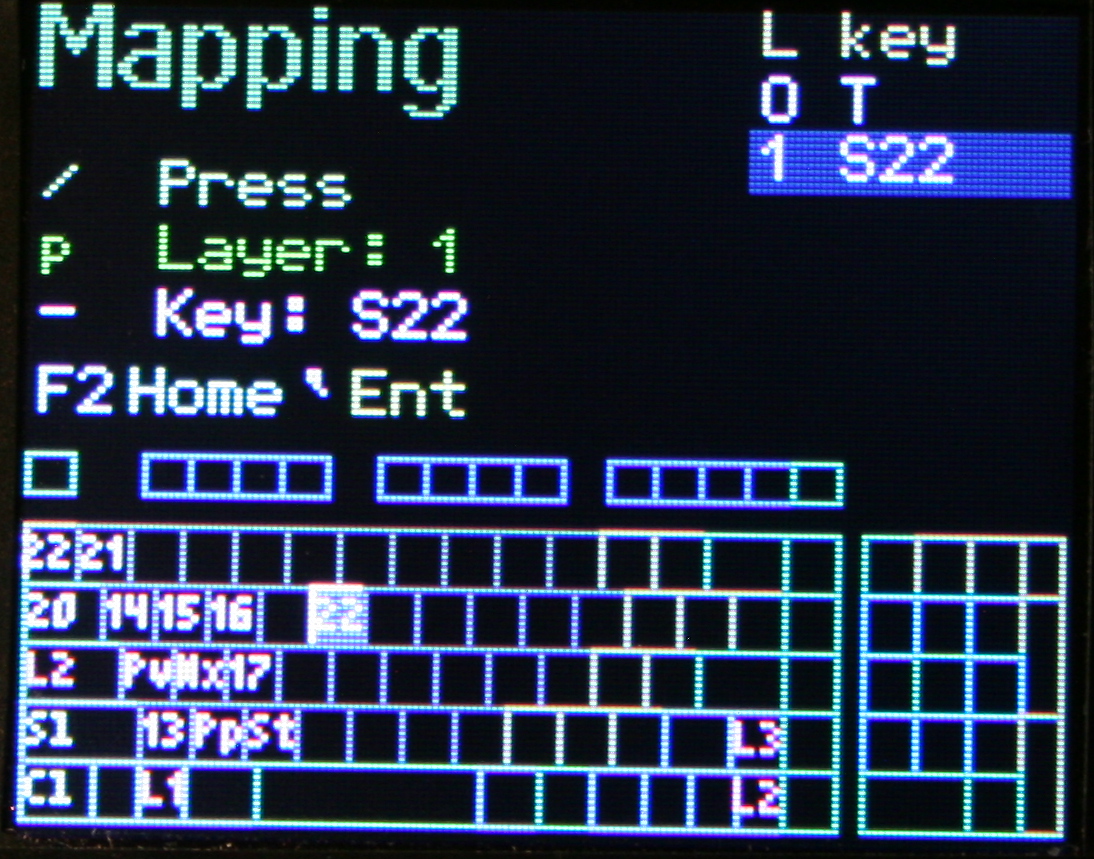
📊Features
The current code features are (and were mostly present in my previous K.C. version):
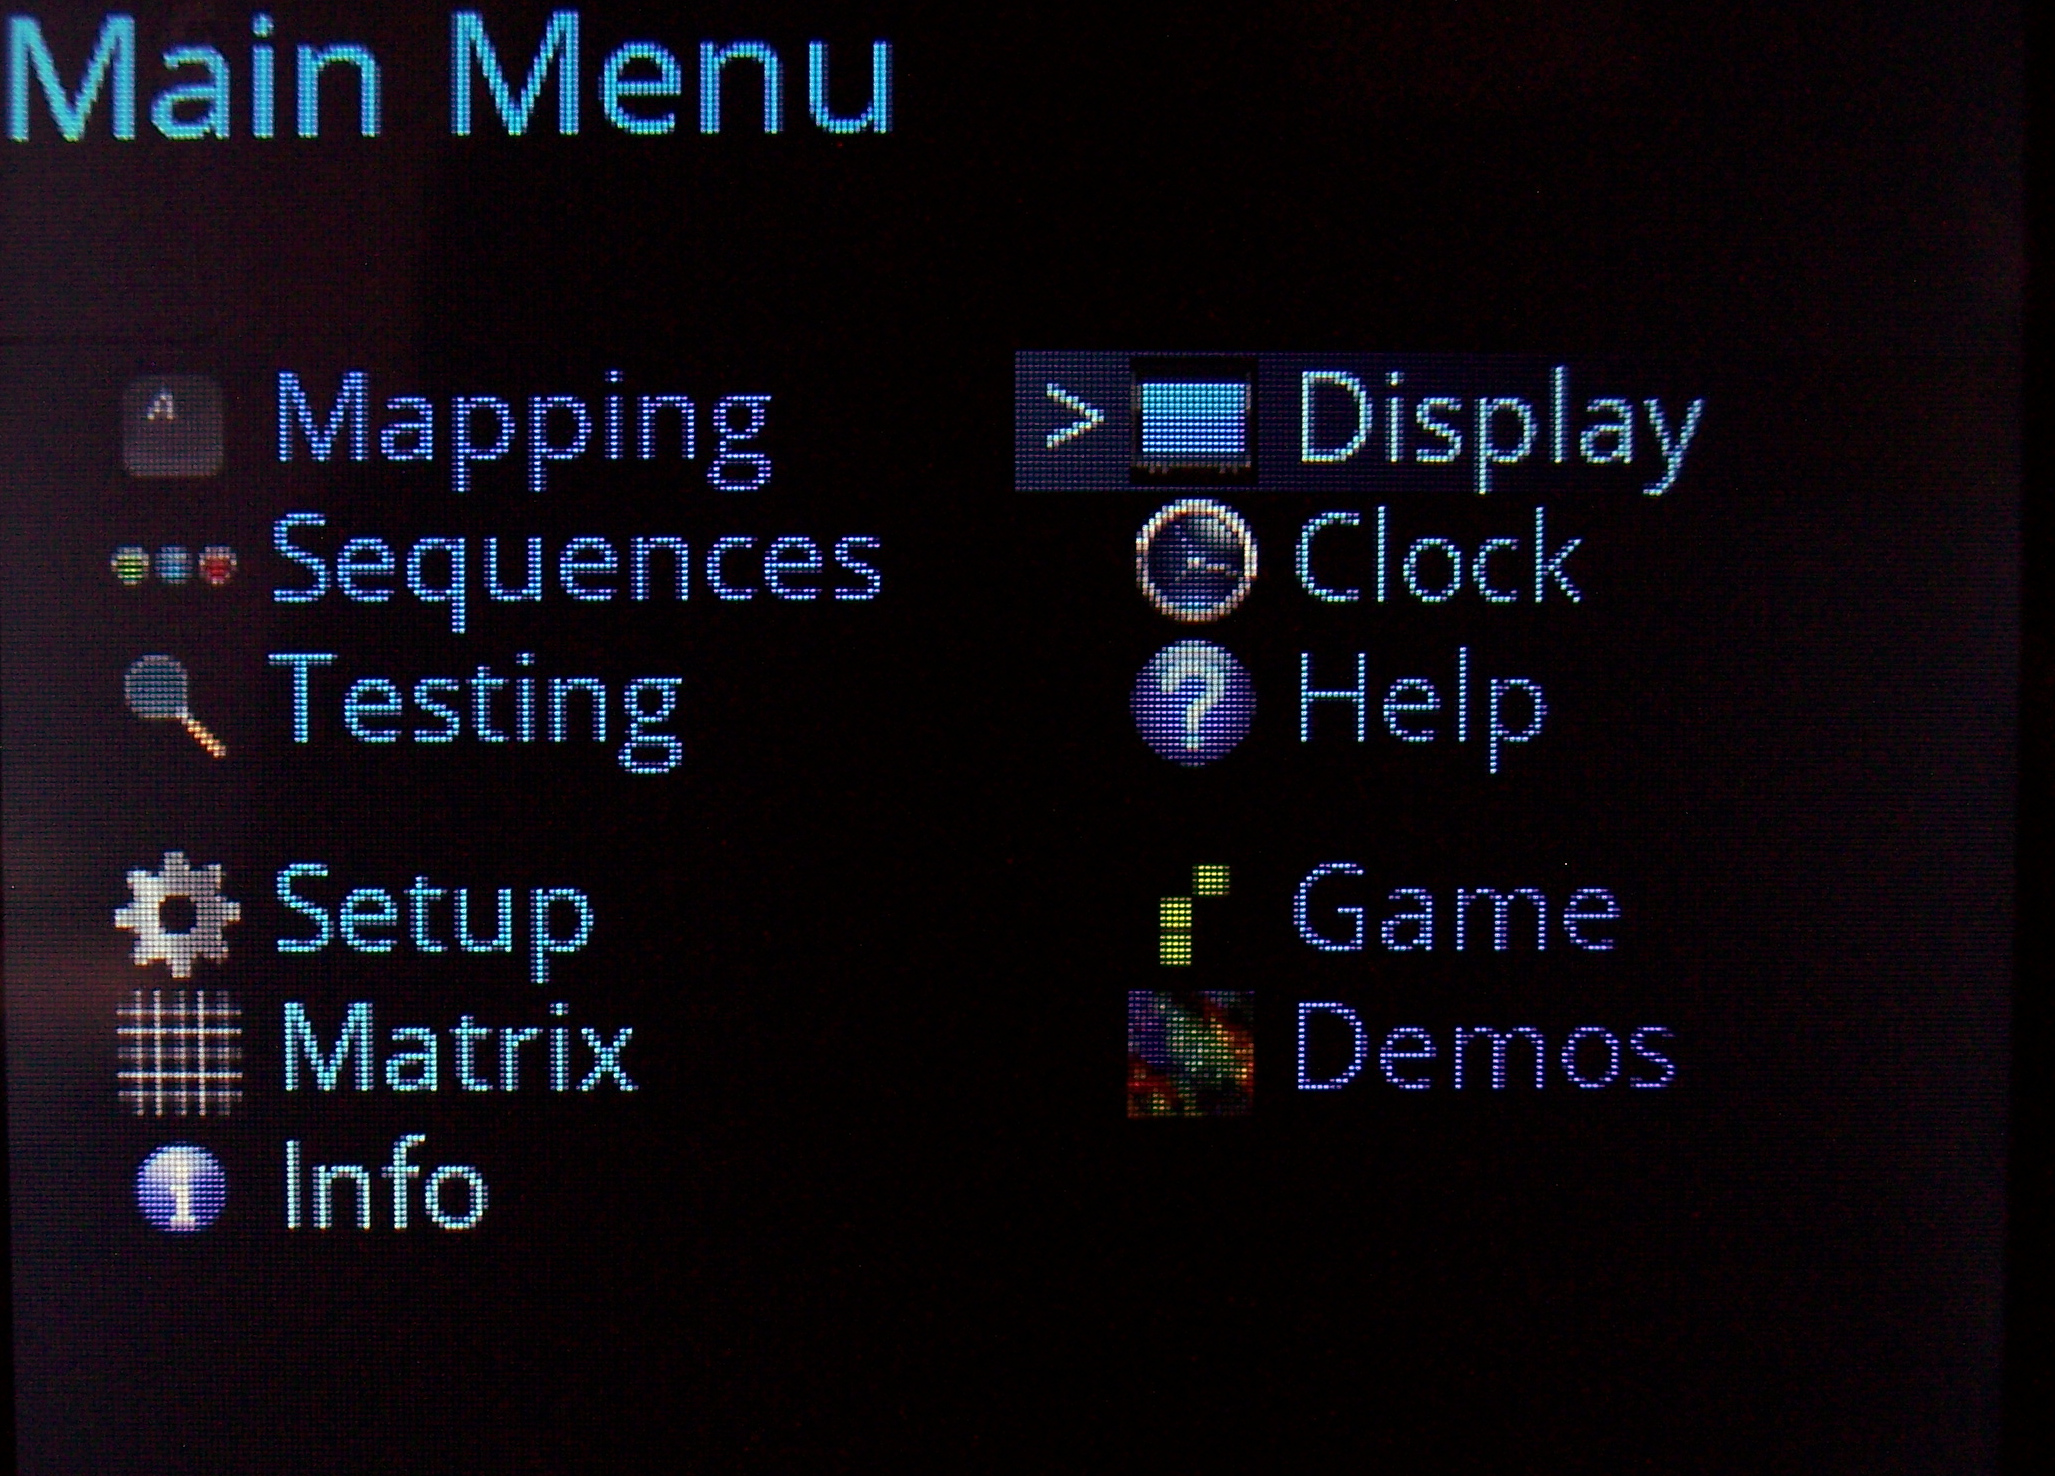
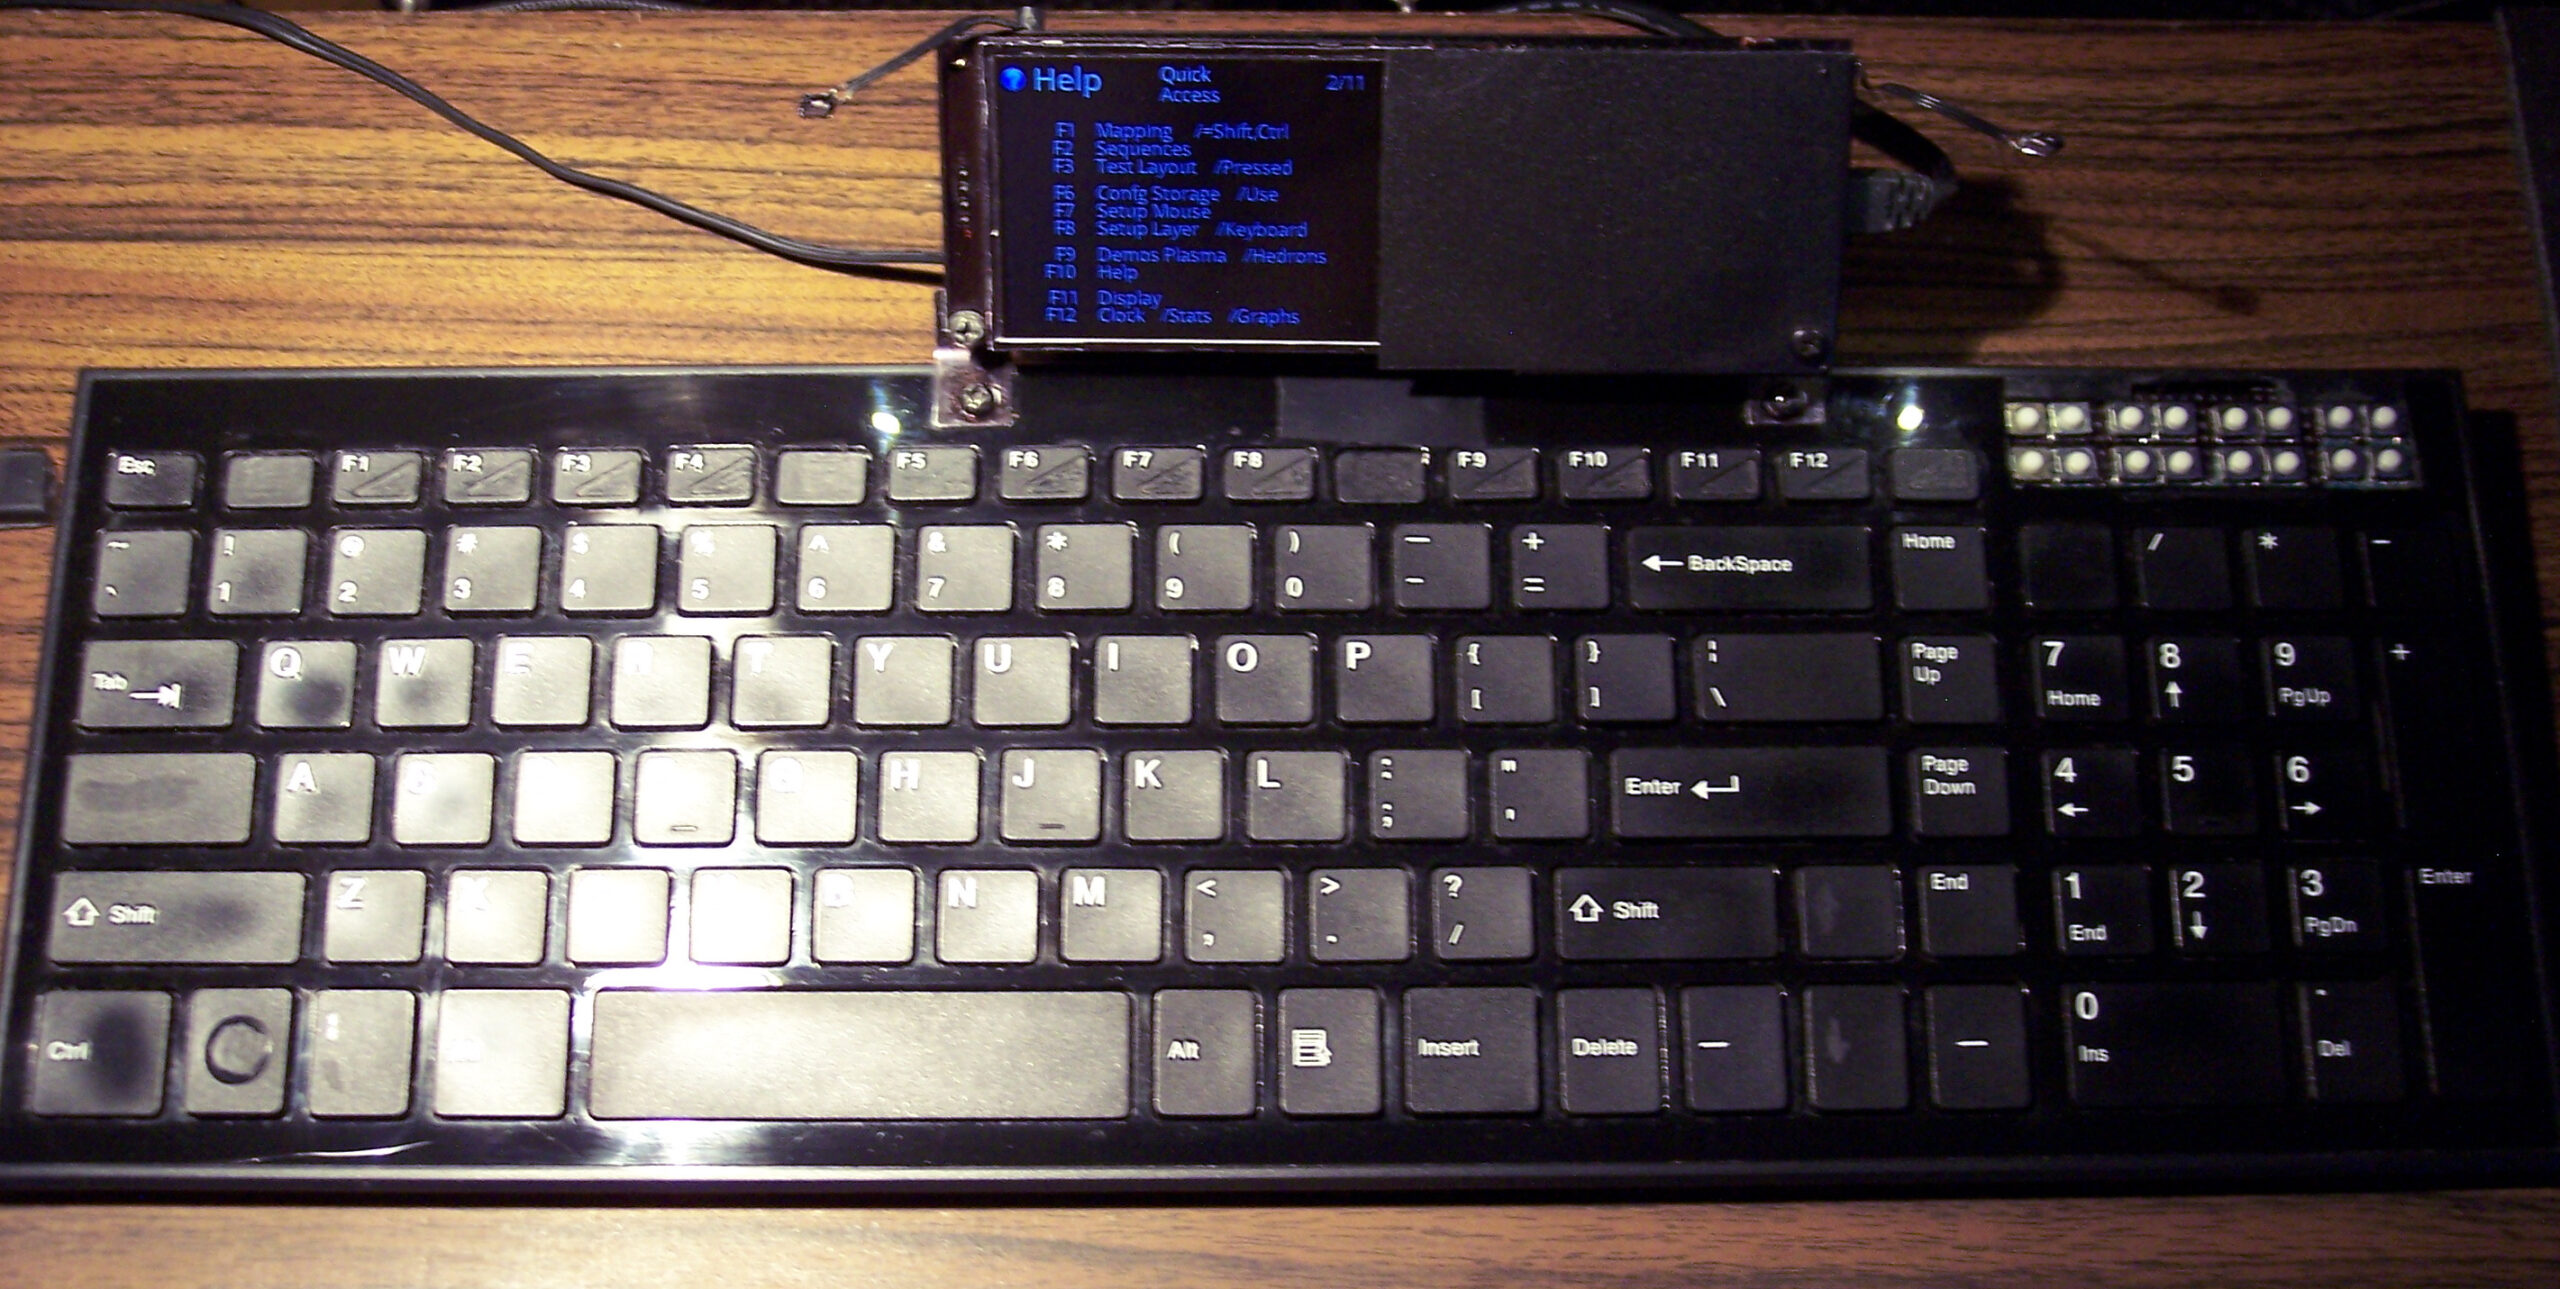
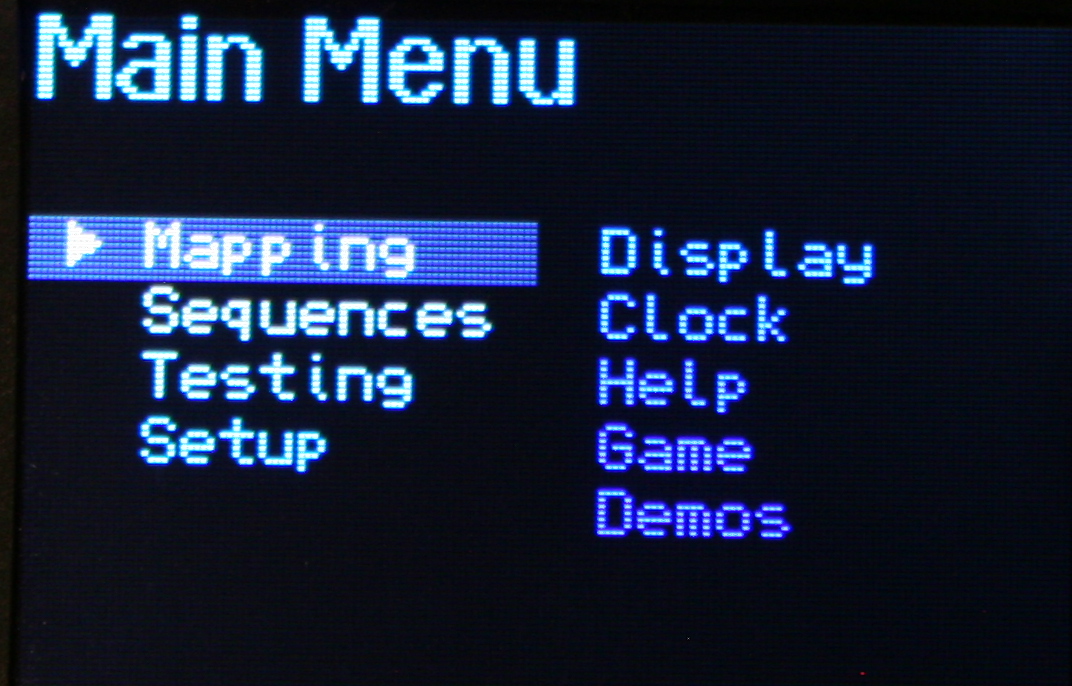
🪟Display
With menu, where you can edit everything possible.
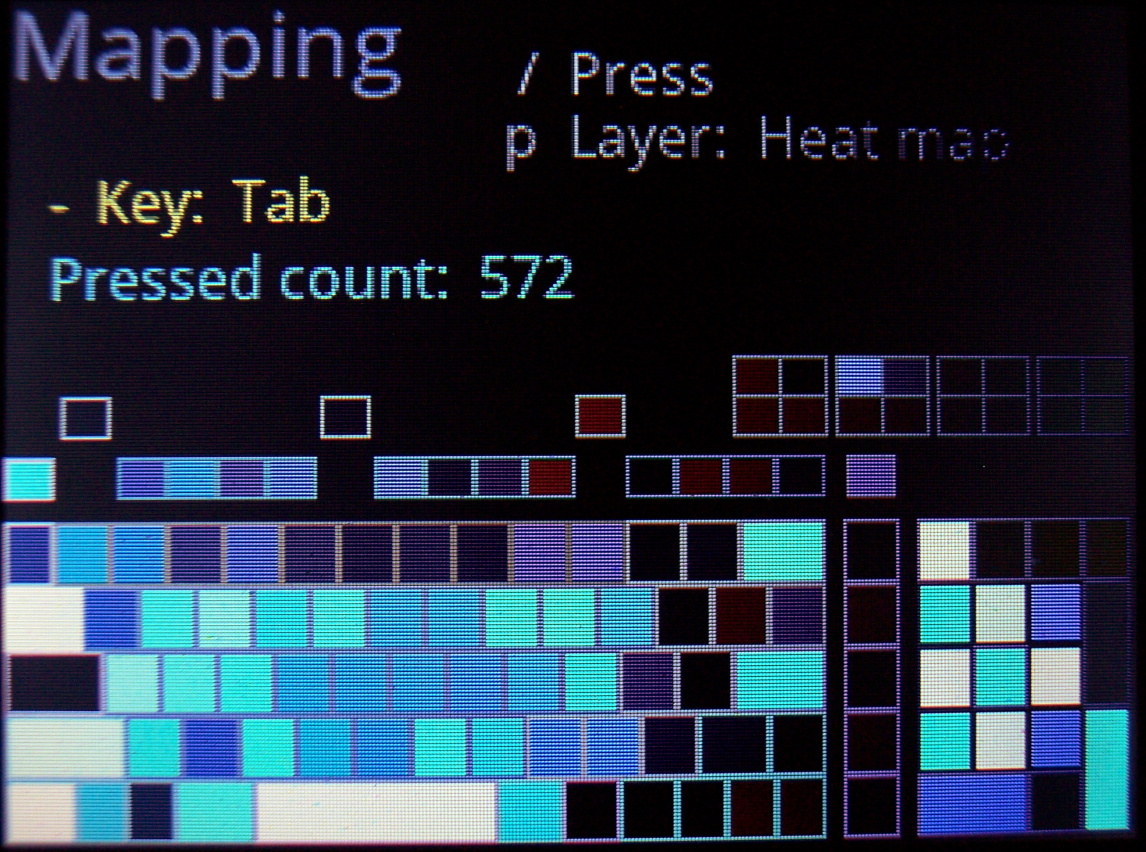
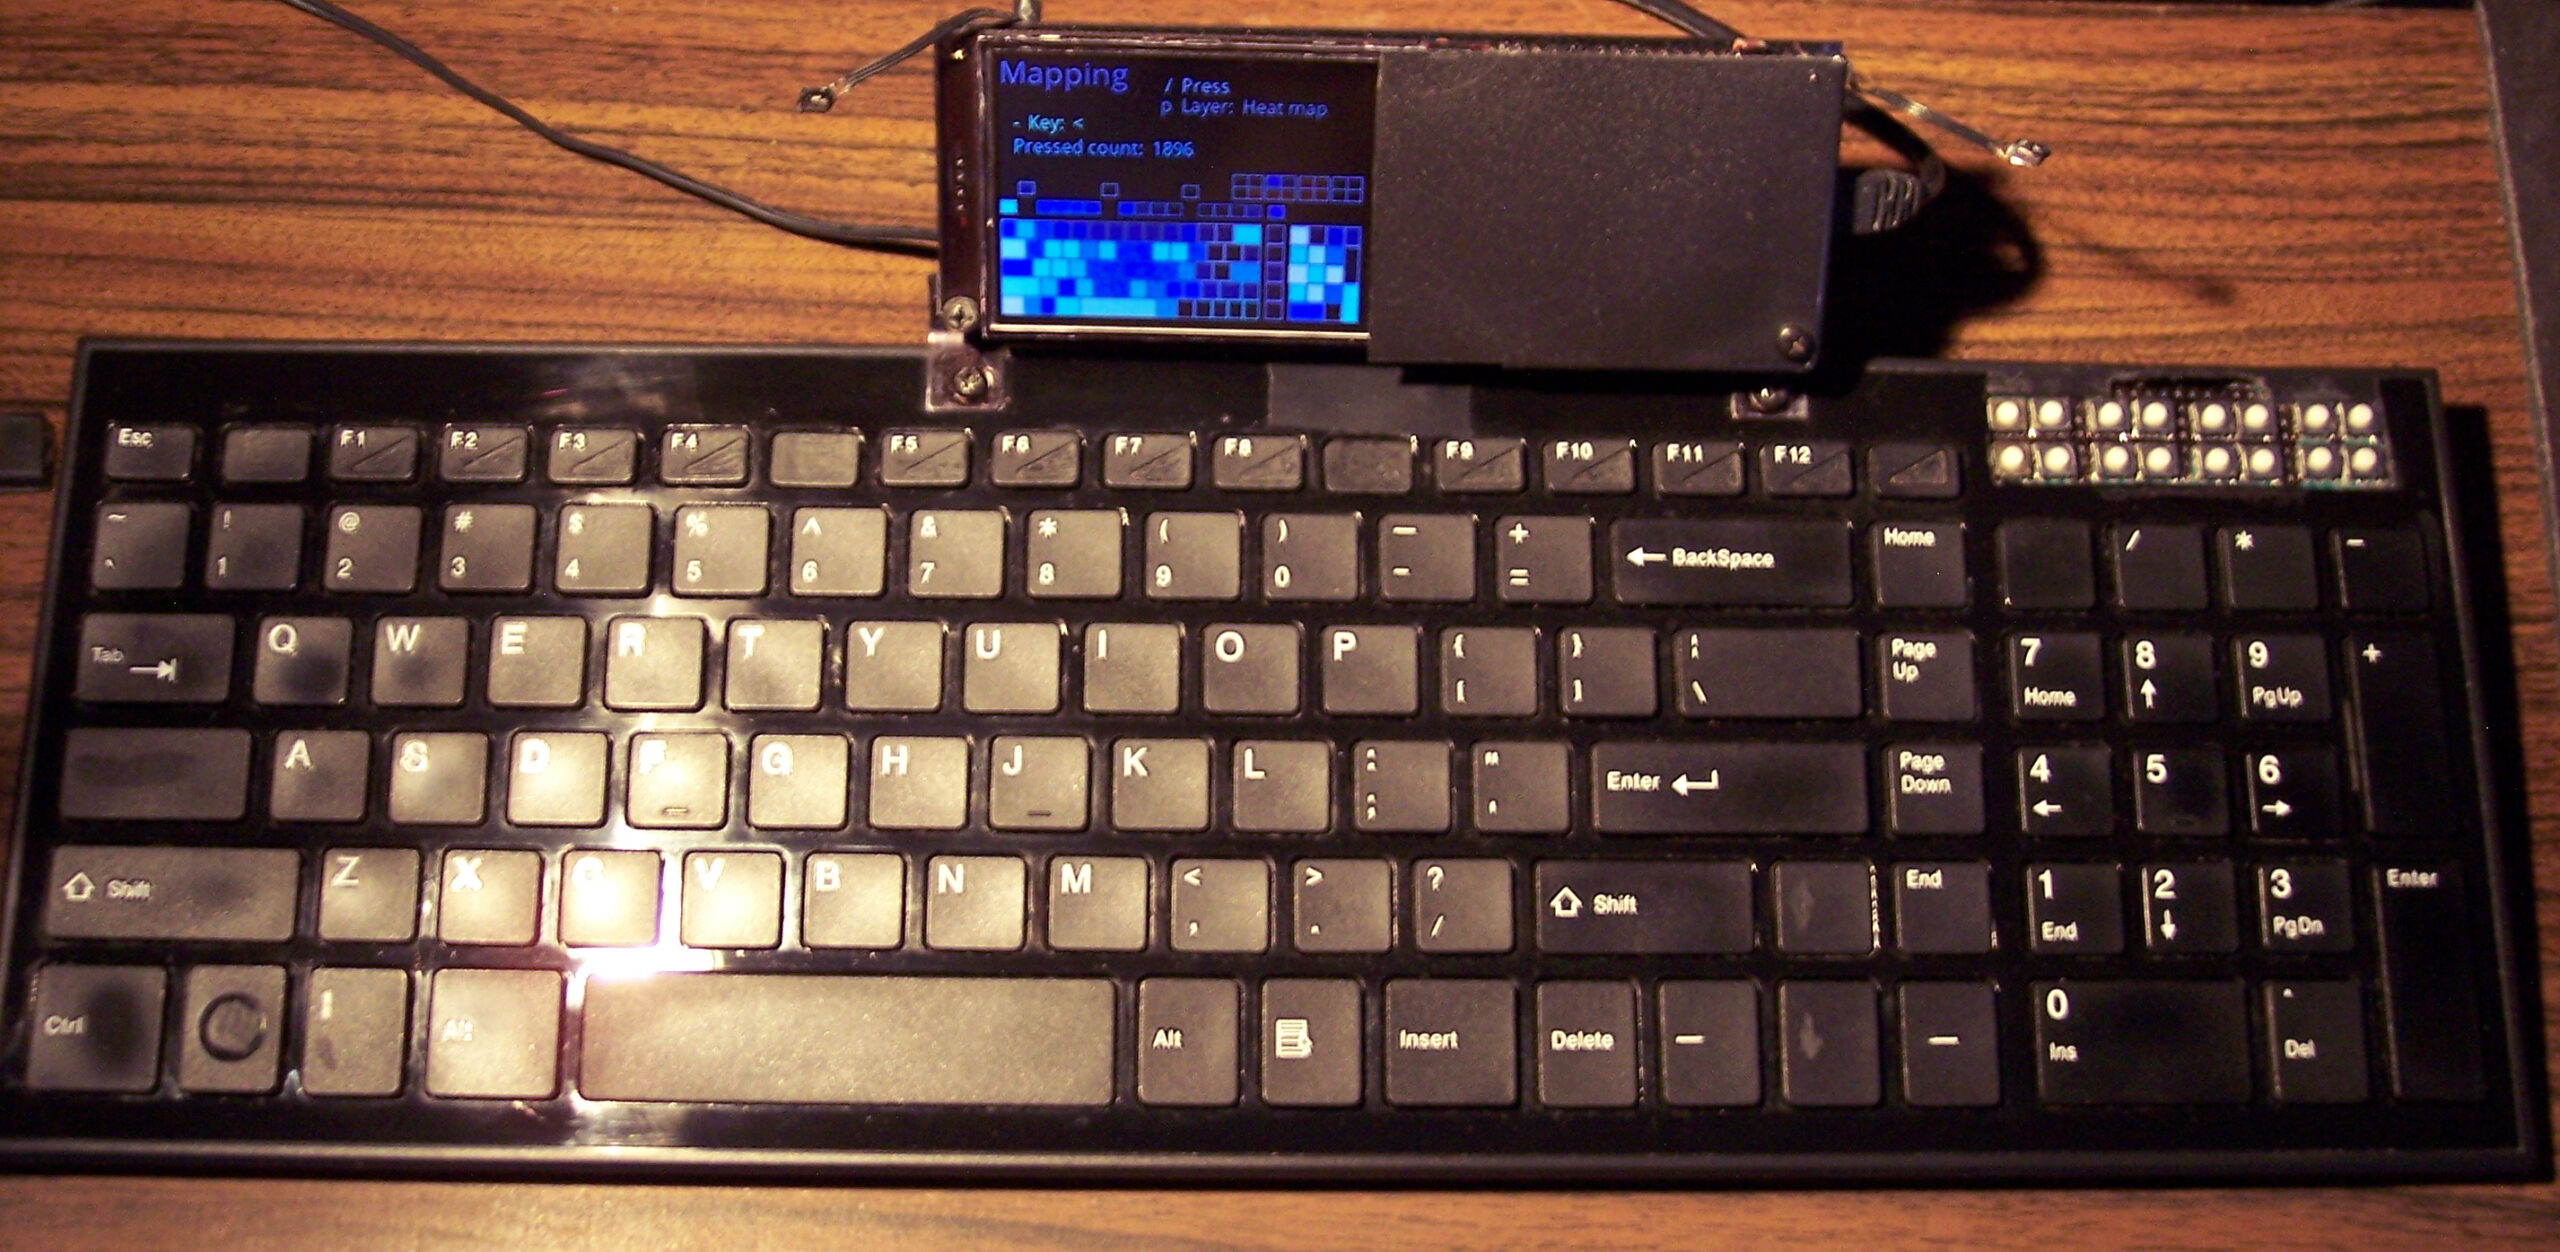
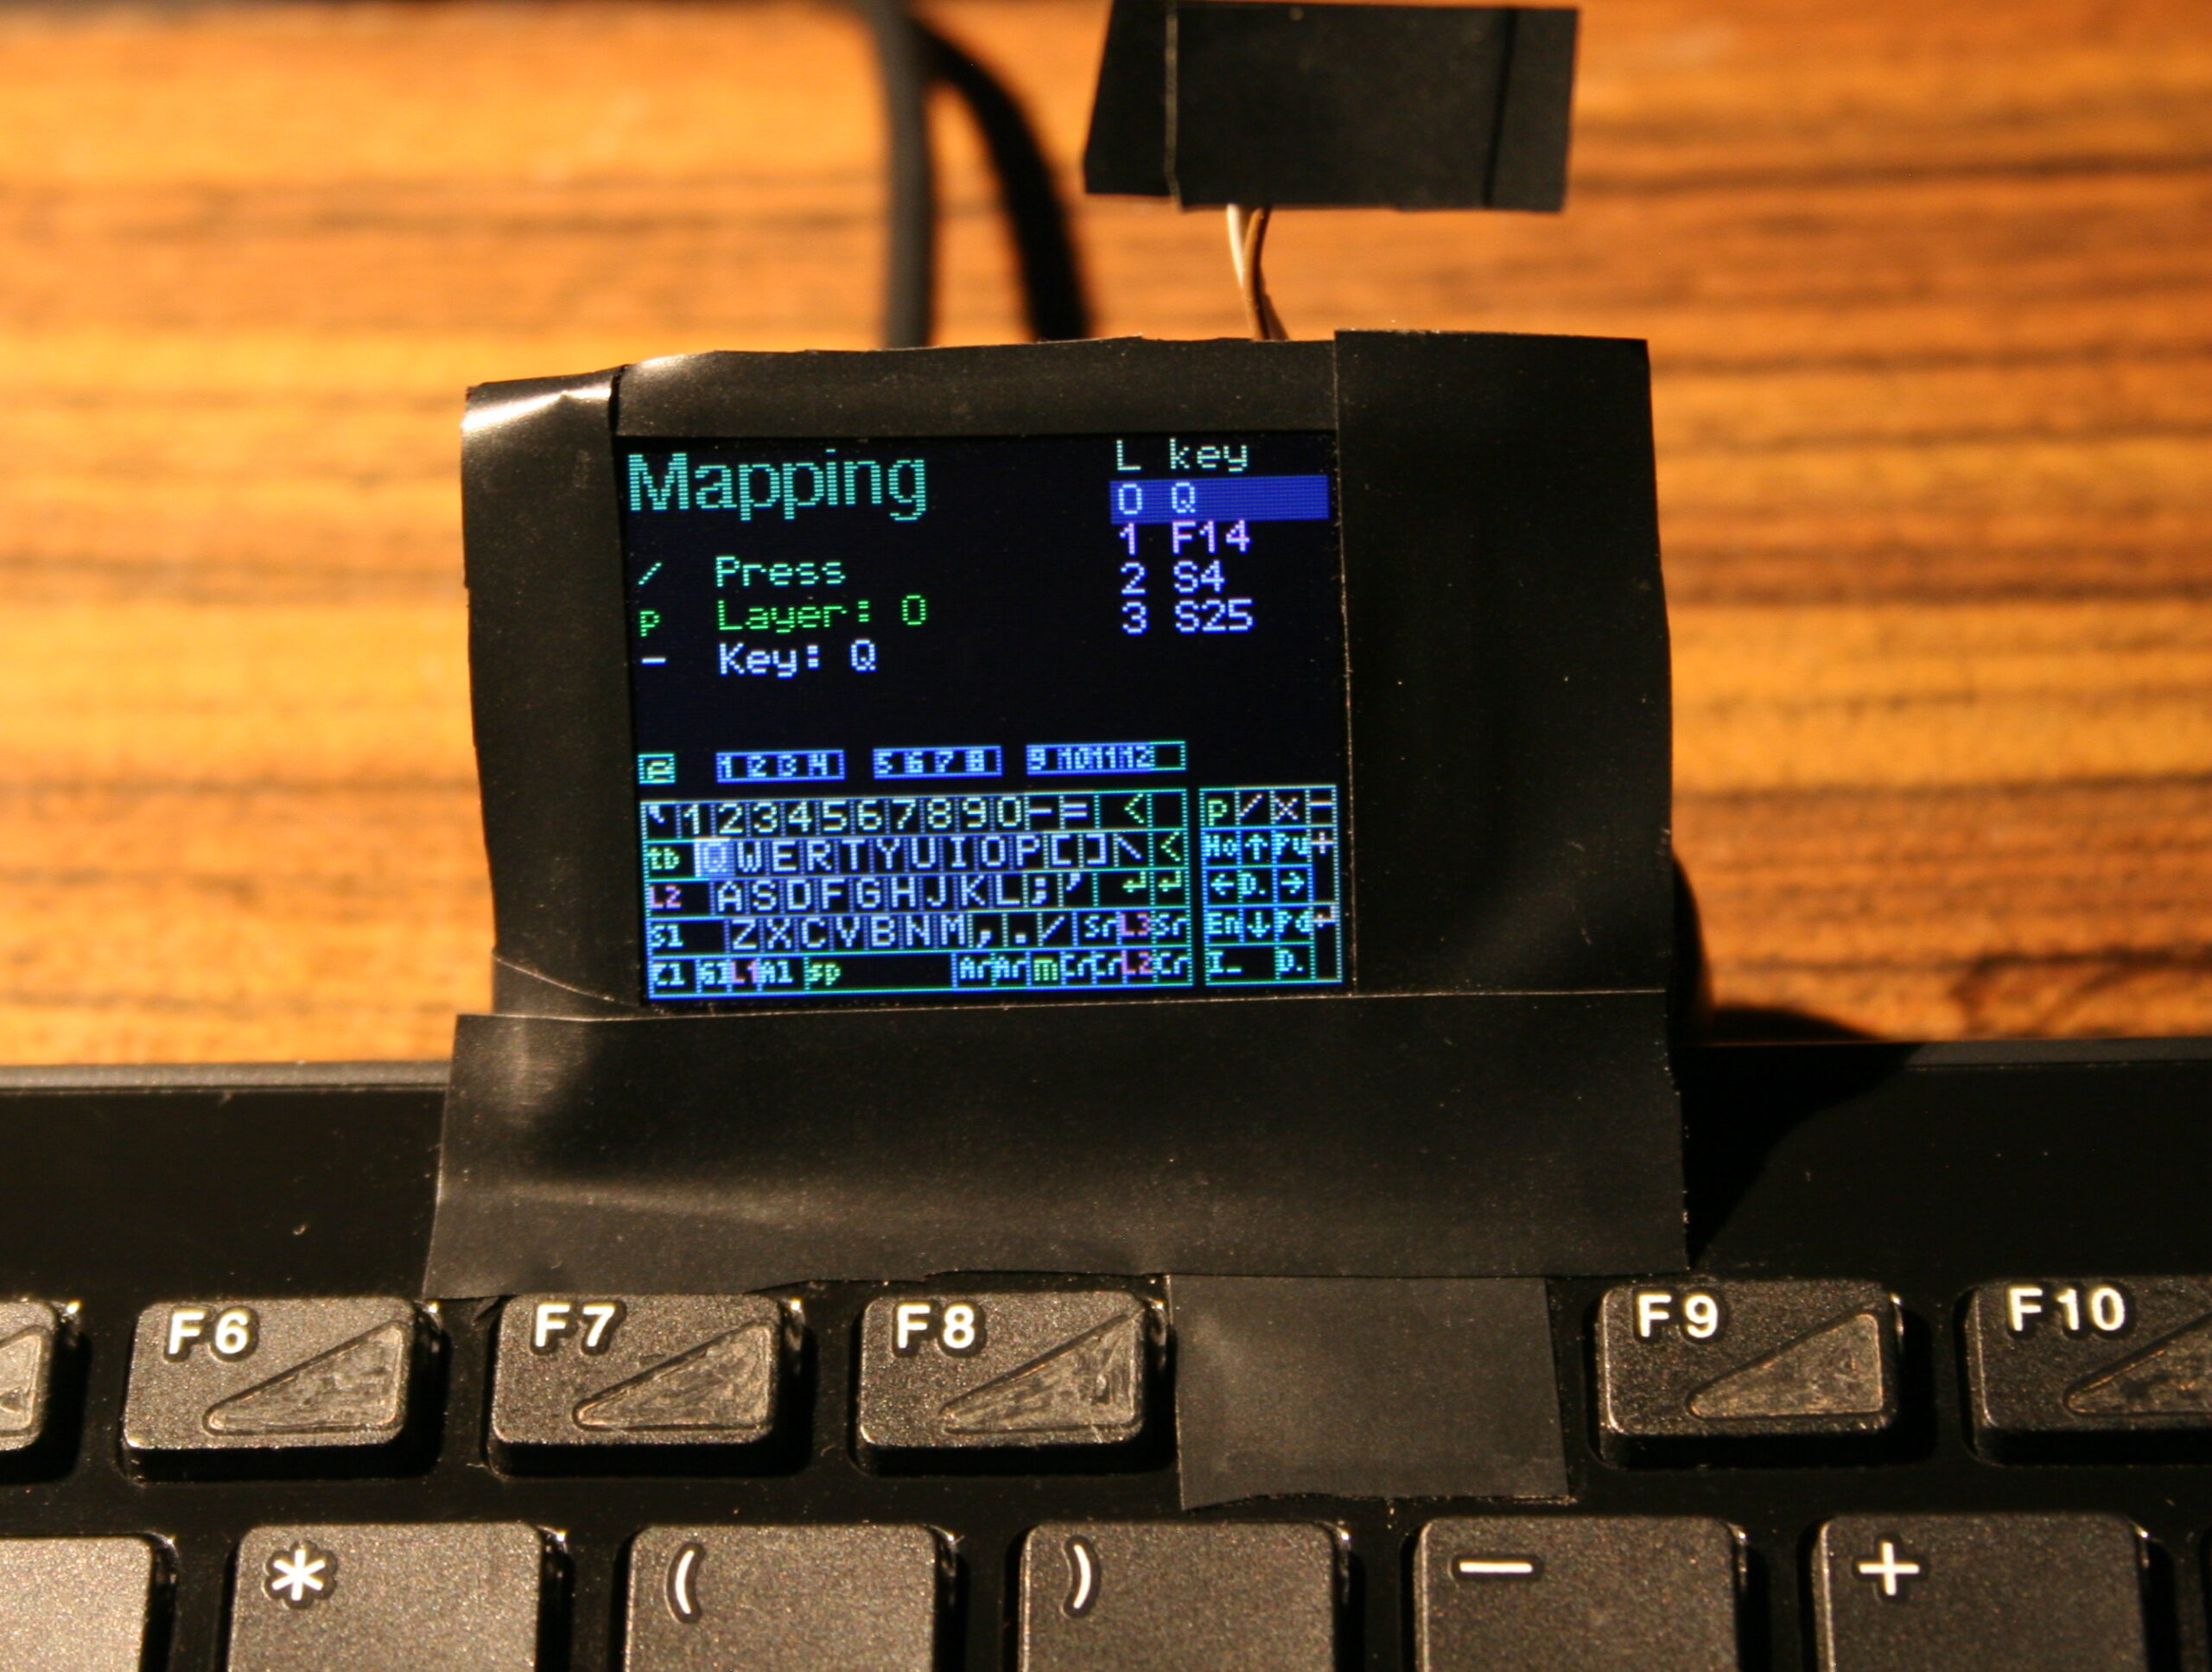
🔠Mapping (key binding)
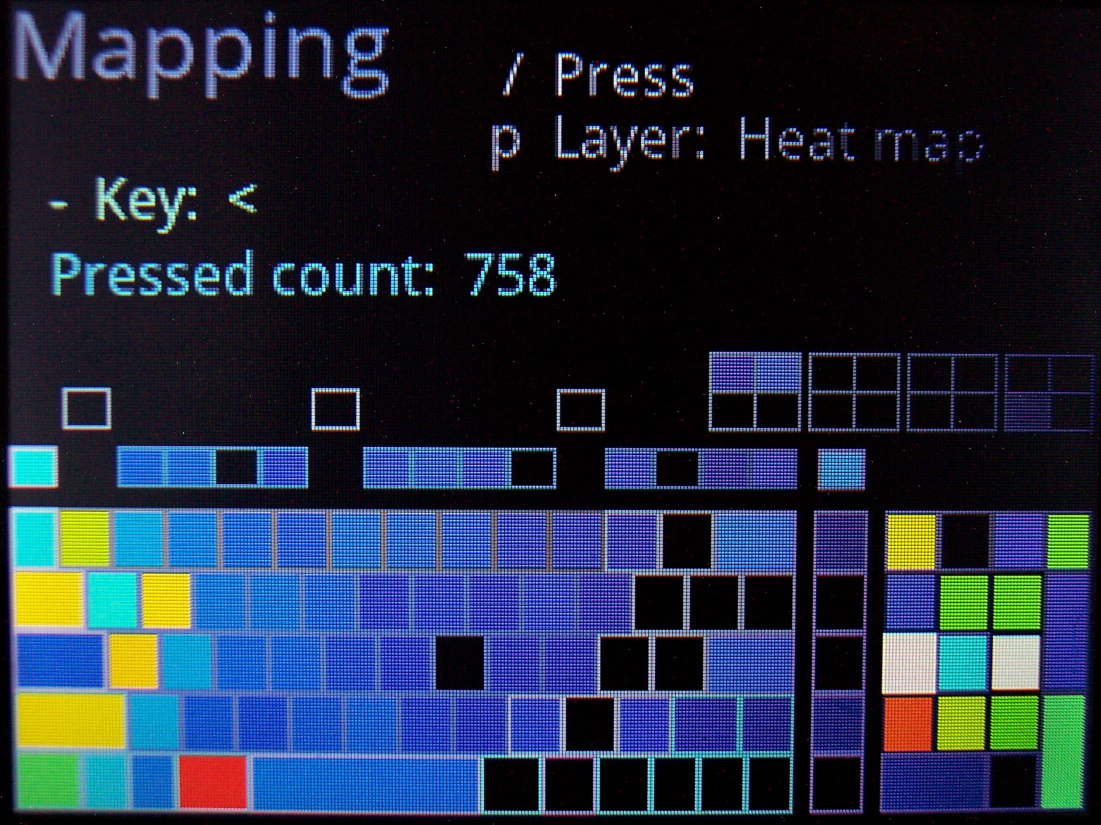
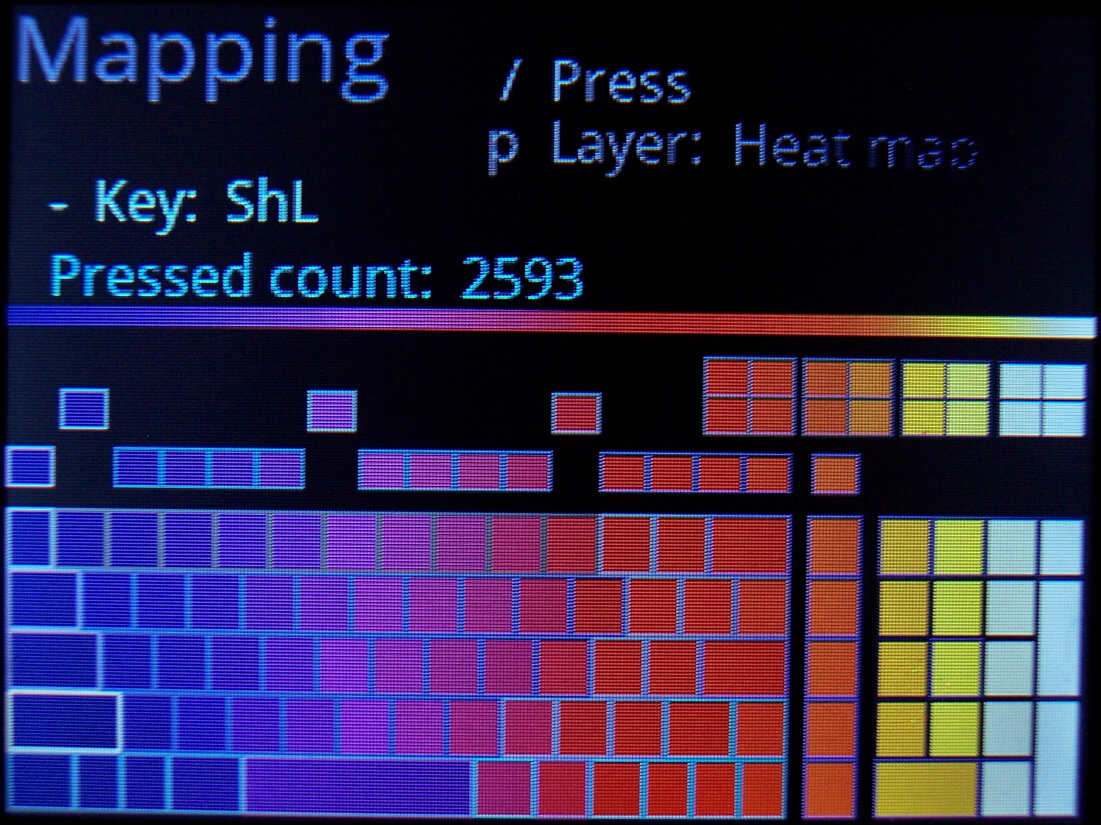
So which USB code will the physical key send to PC when pressed. There is a pick list with all common keys (and internal functions, sequences, etc) to choose from when binding. It has group colors and group filter for easier orientation.
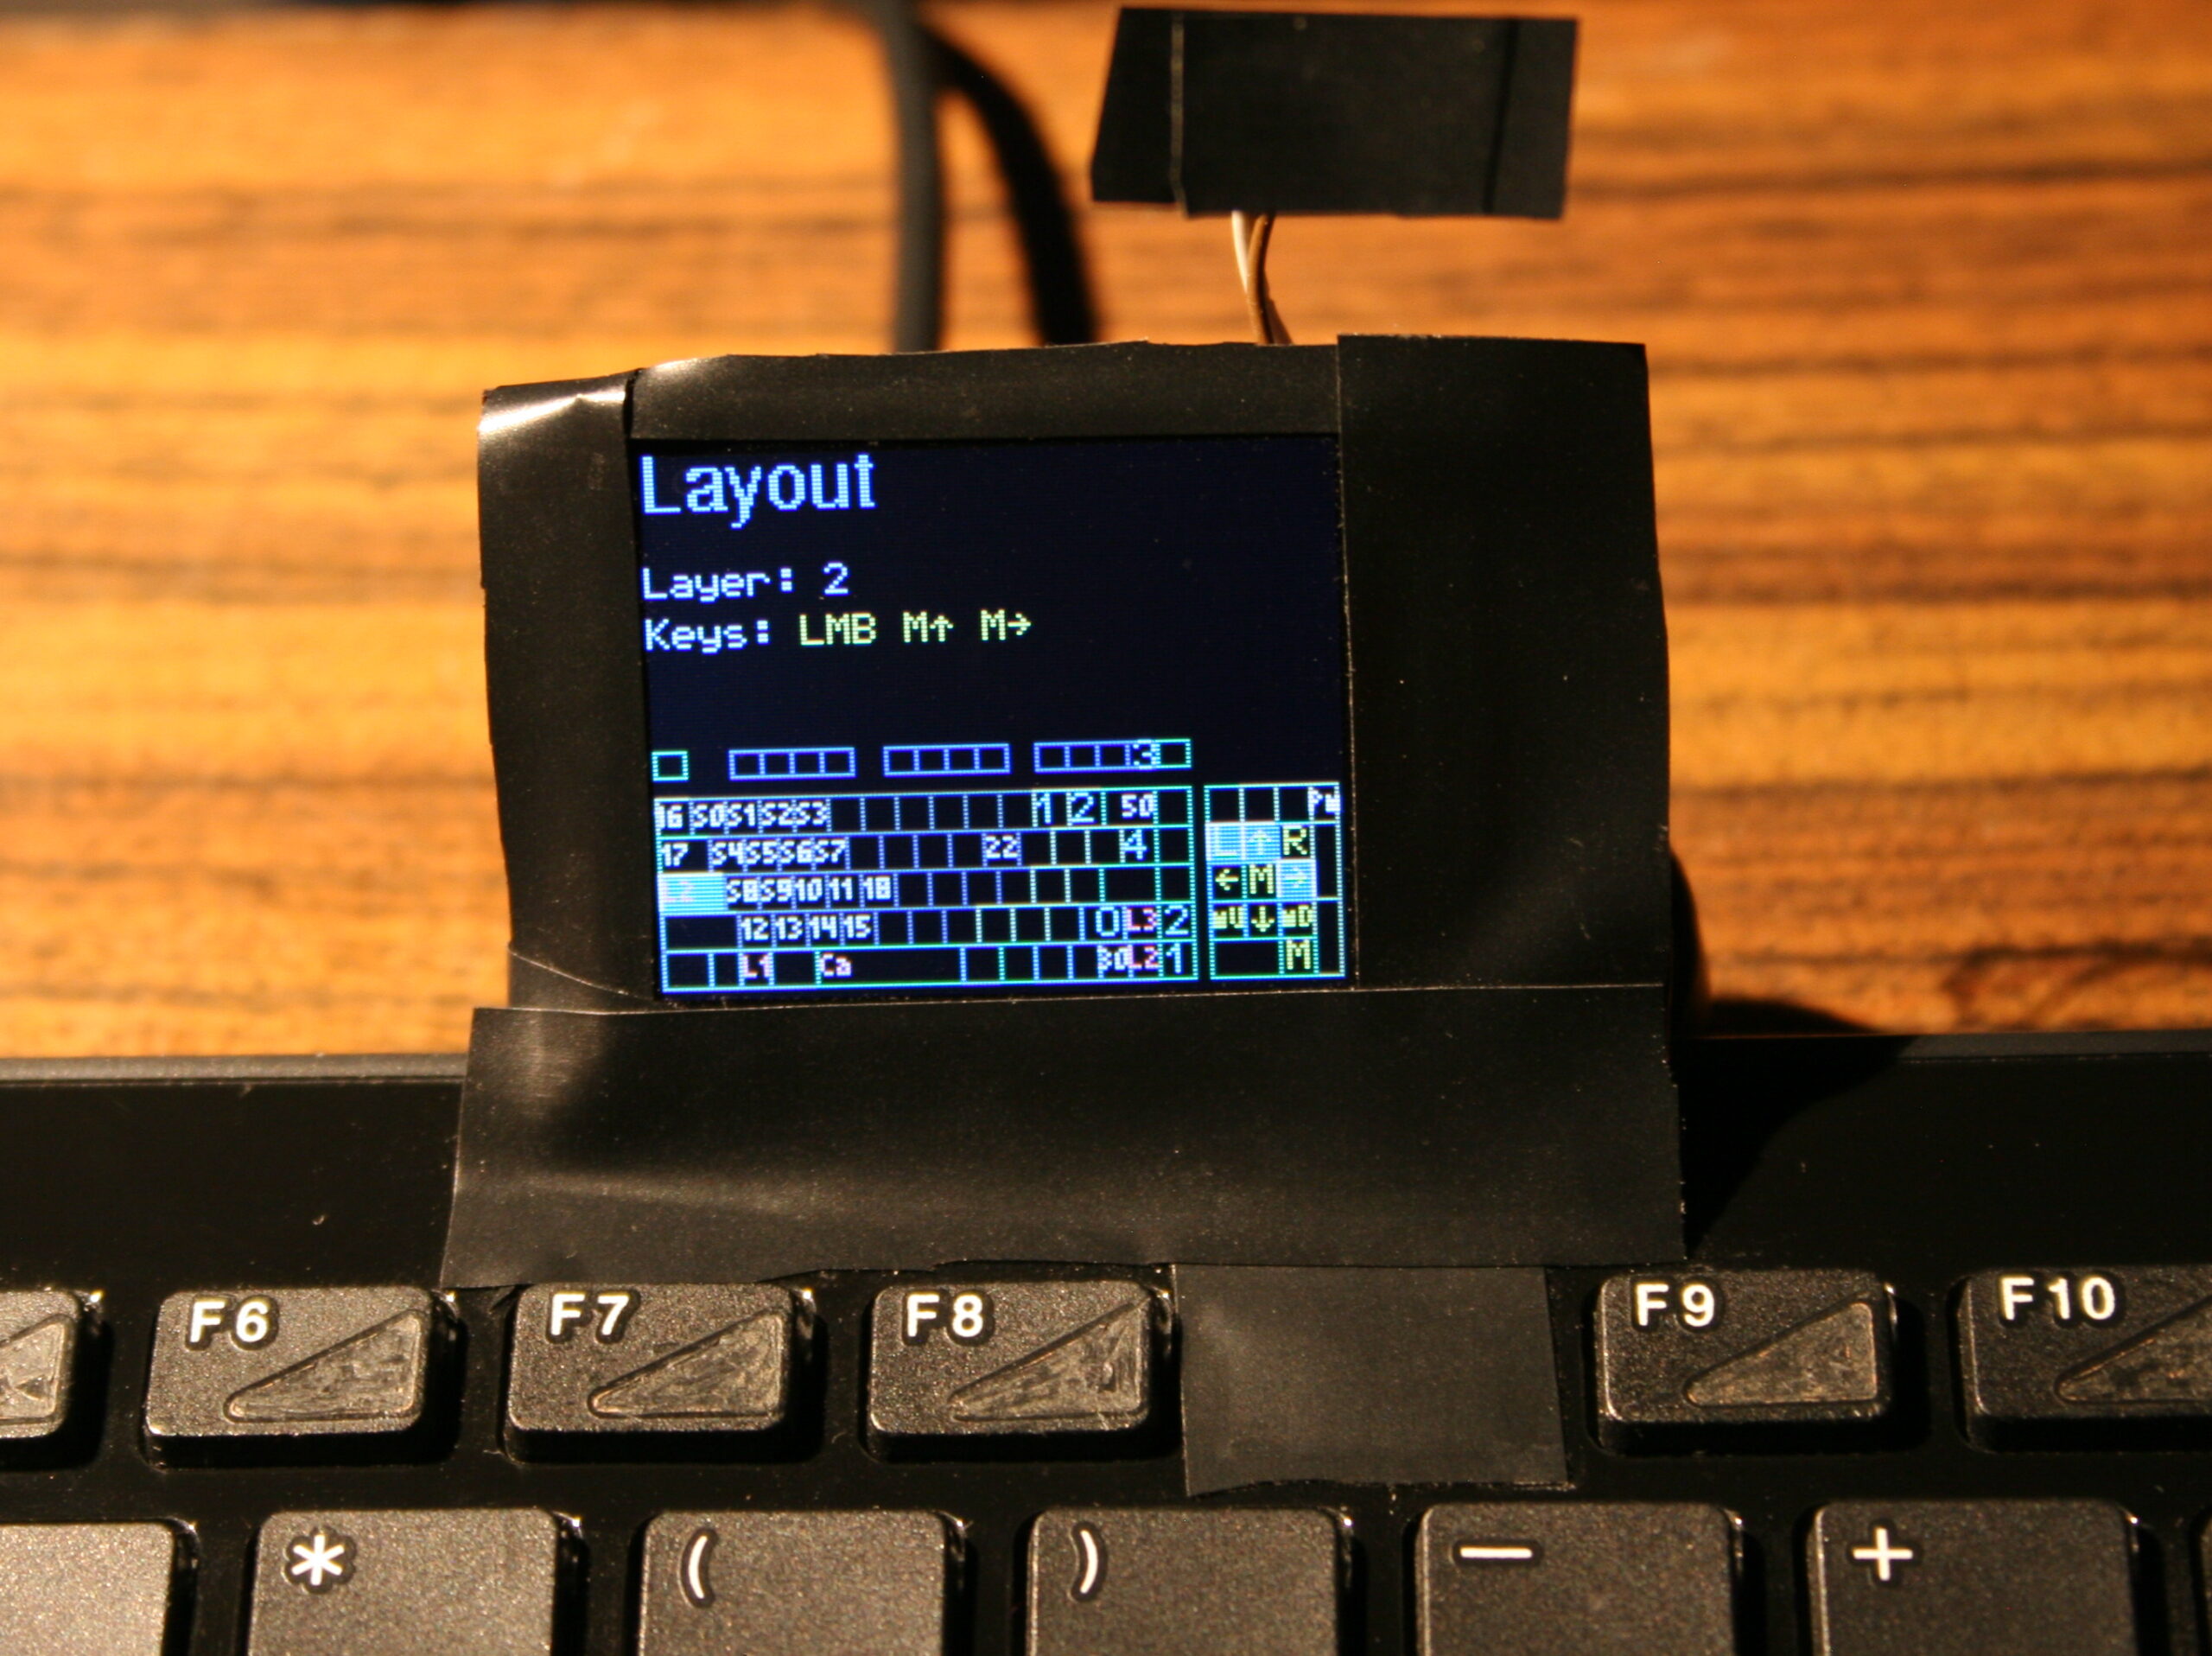
⌨️Keyboard layout
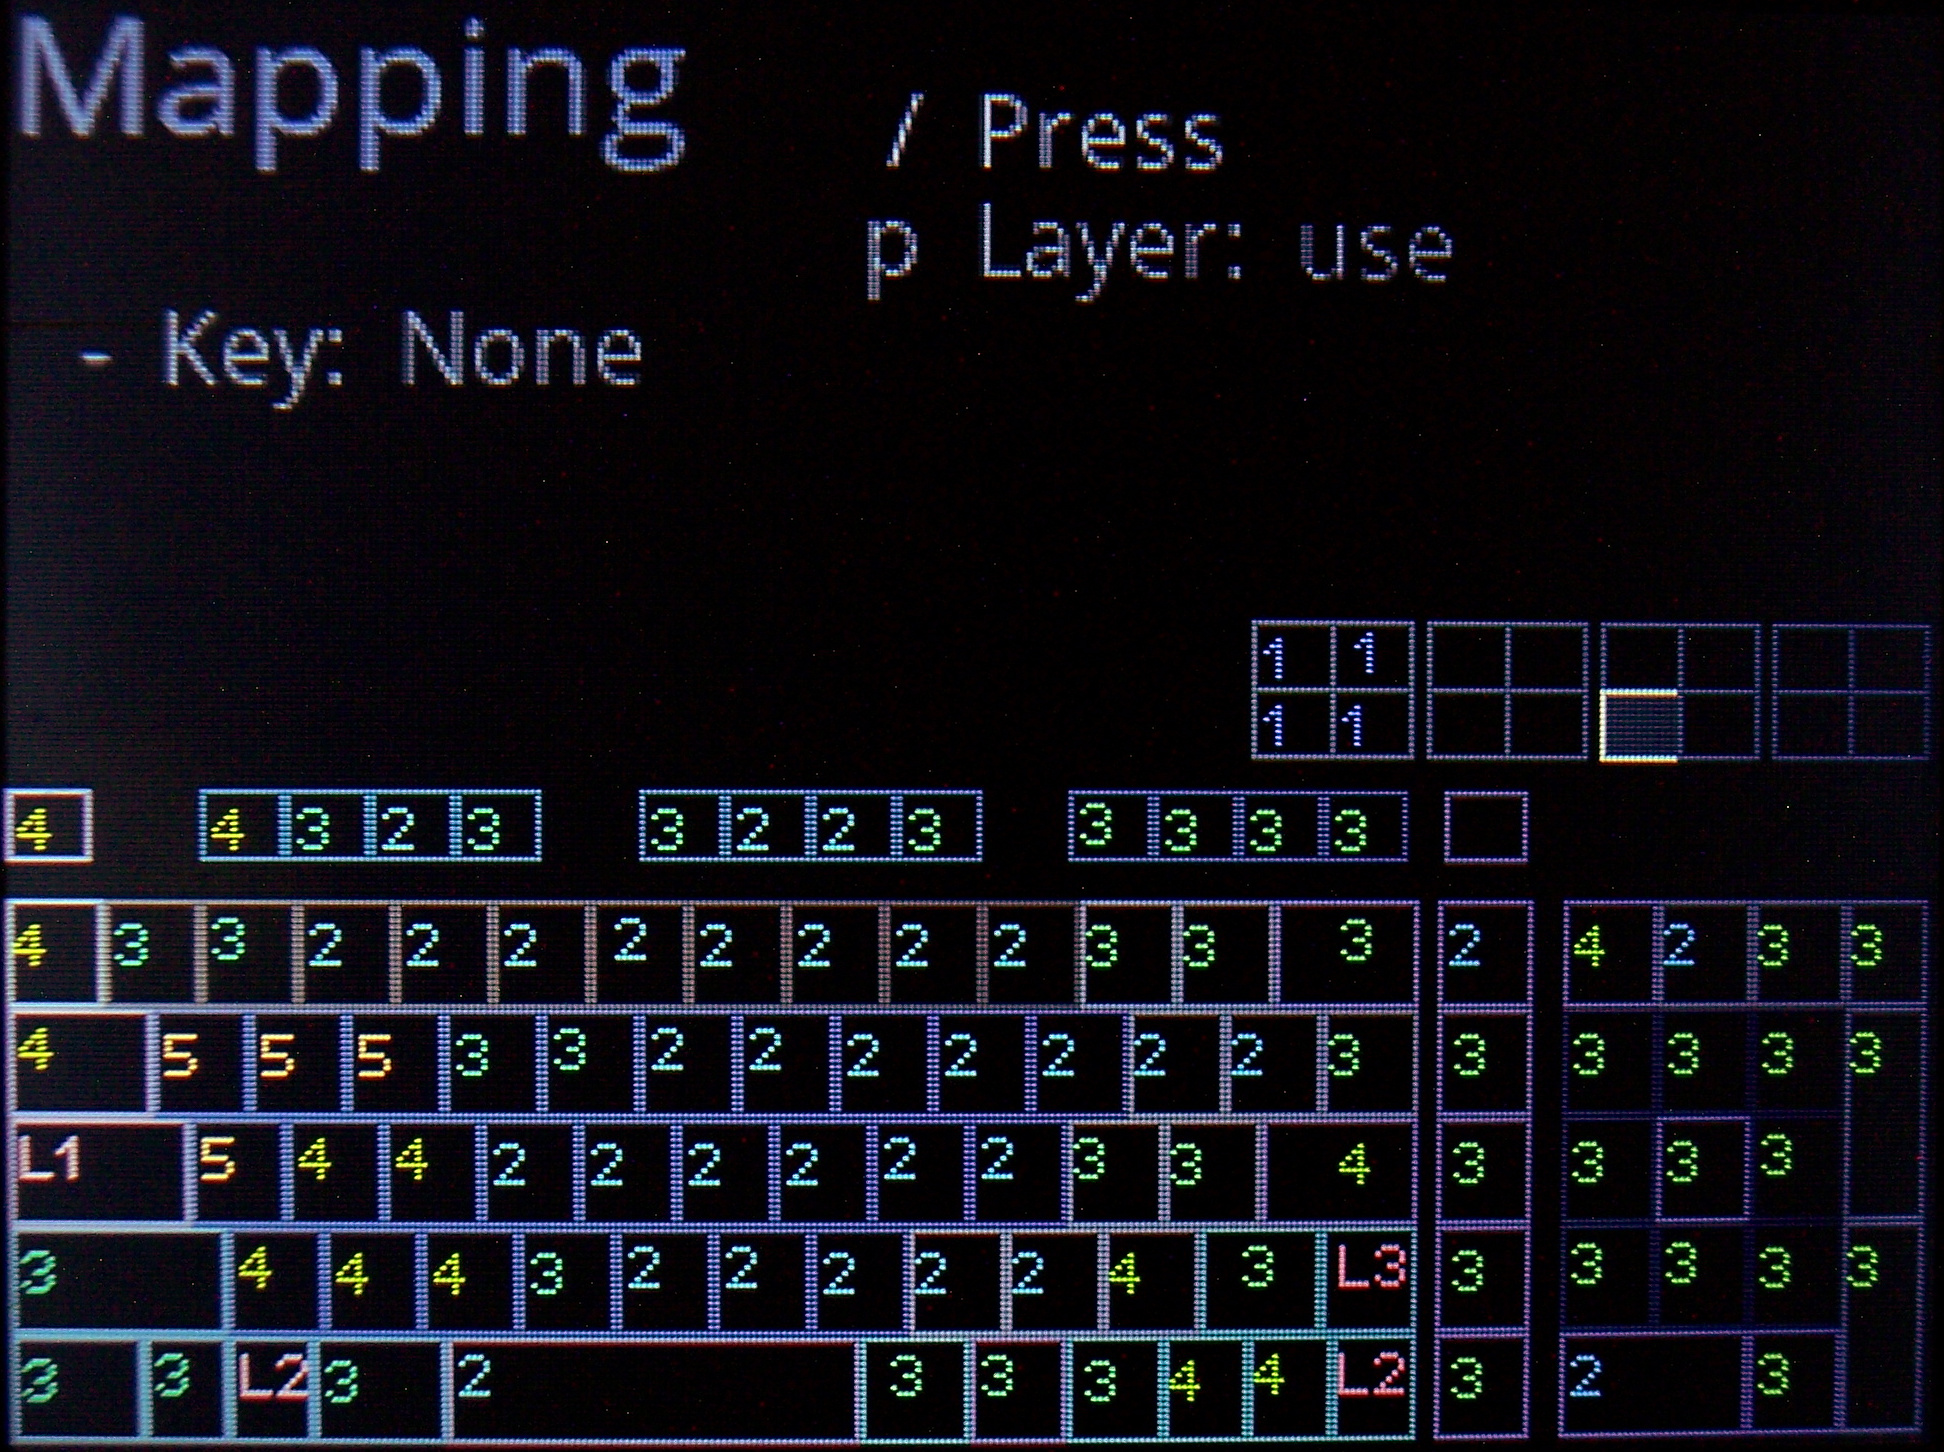
Drawn on display. Shown when editing mappings (for currently chosen layer). Has a cursor to move around between keys. It’s also possible to jump to a key by pressing it.
🧮Layers
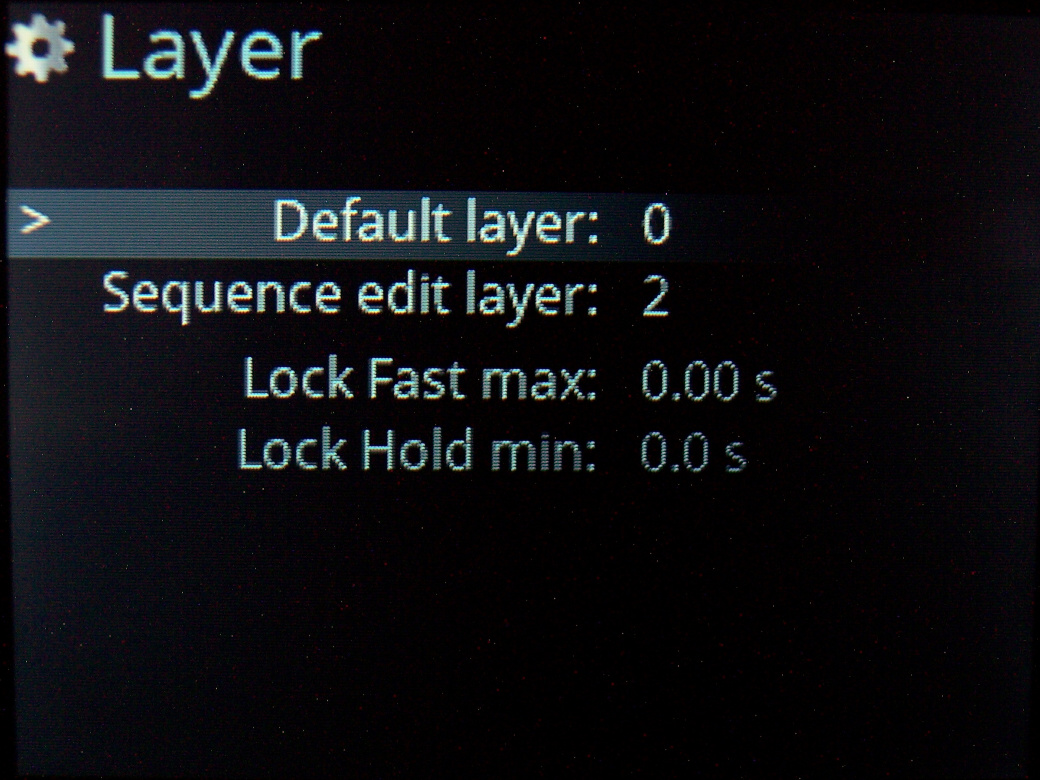
If you hold a key, whole keyboard layout changes giving you other keys. Kind of like the Fn keys on laptop but much more useful and customizable. A common feature of custom controllers. Locking layers is also possible, either by lock/unlock key, tapping layer key fast or holding it for longer. Of course can be disabled and delay parameters are changeable.
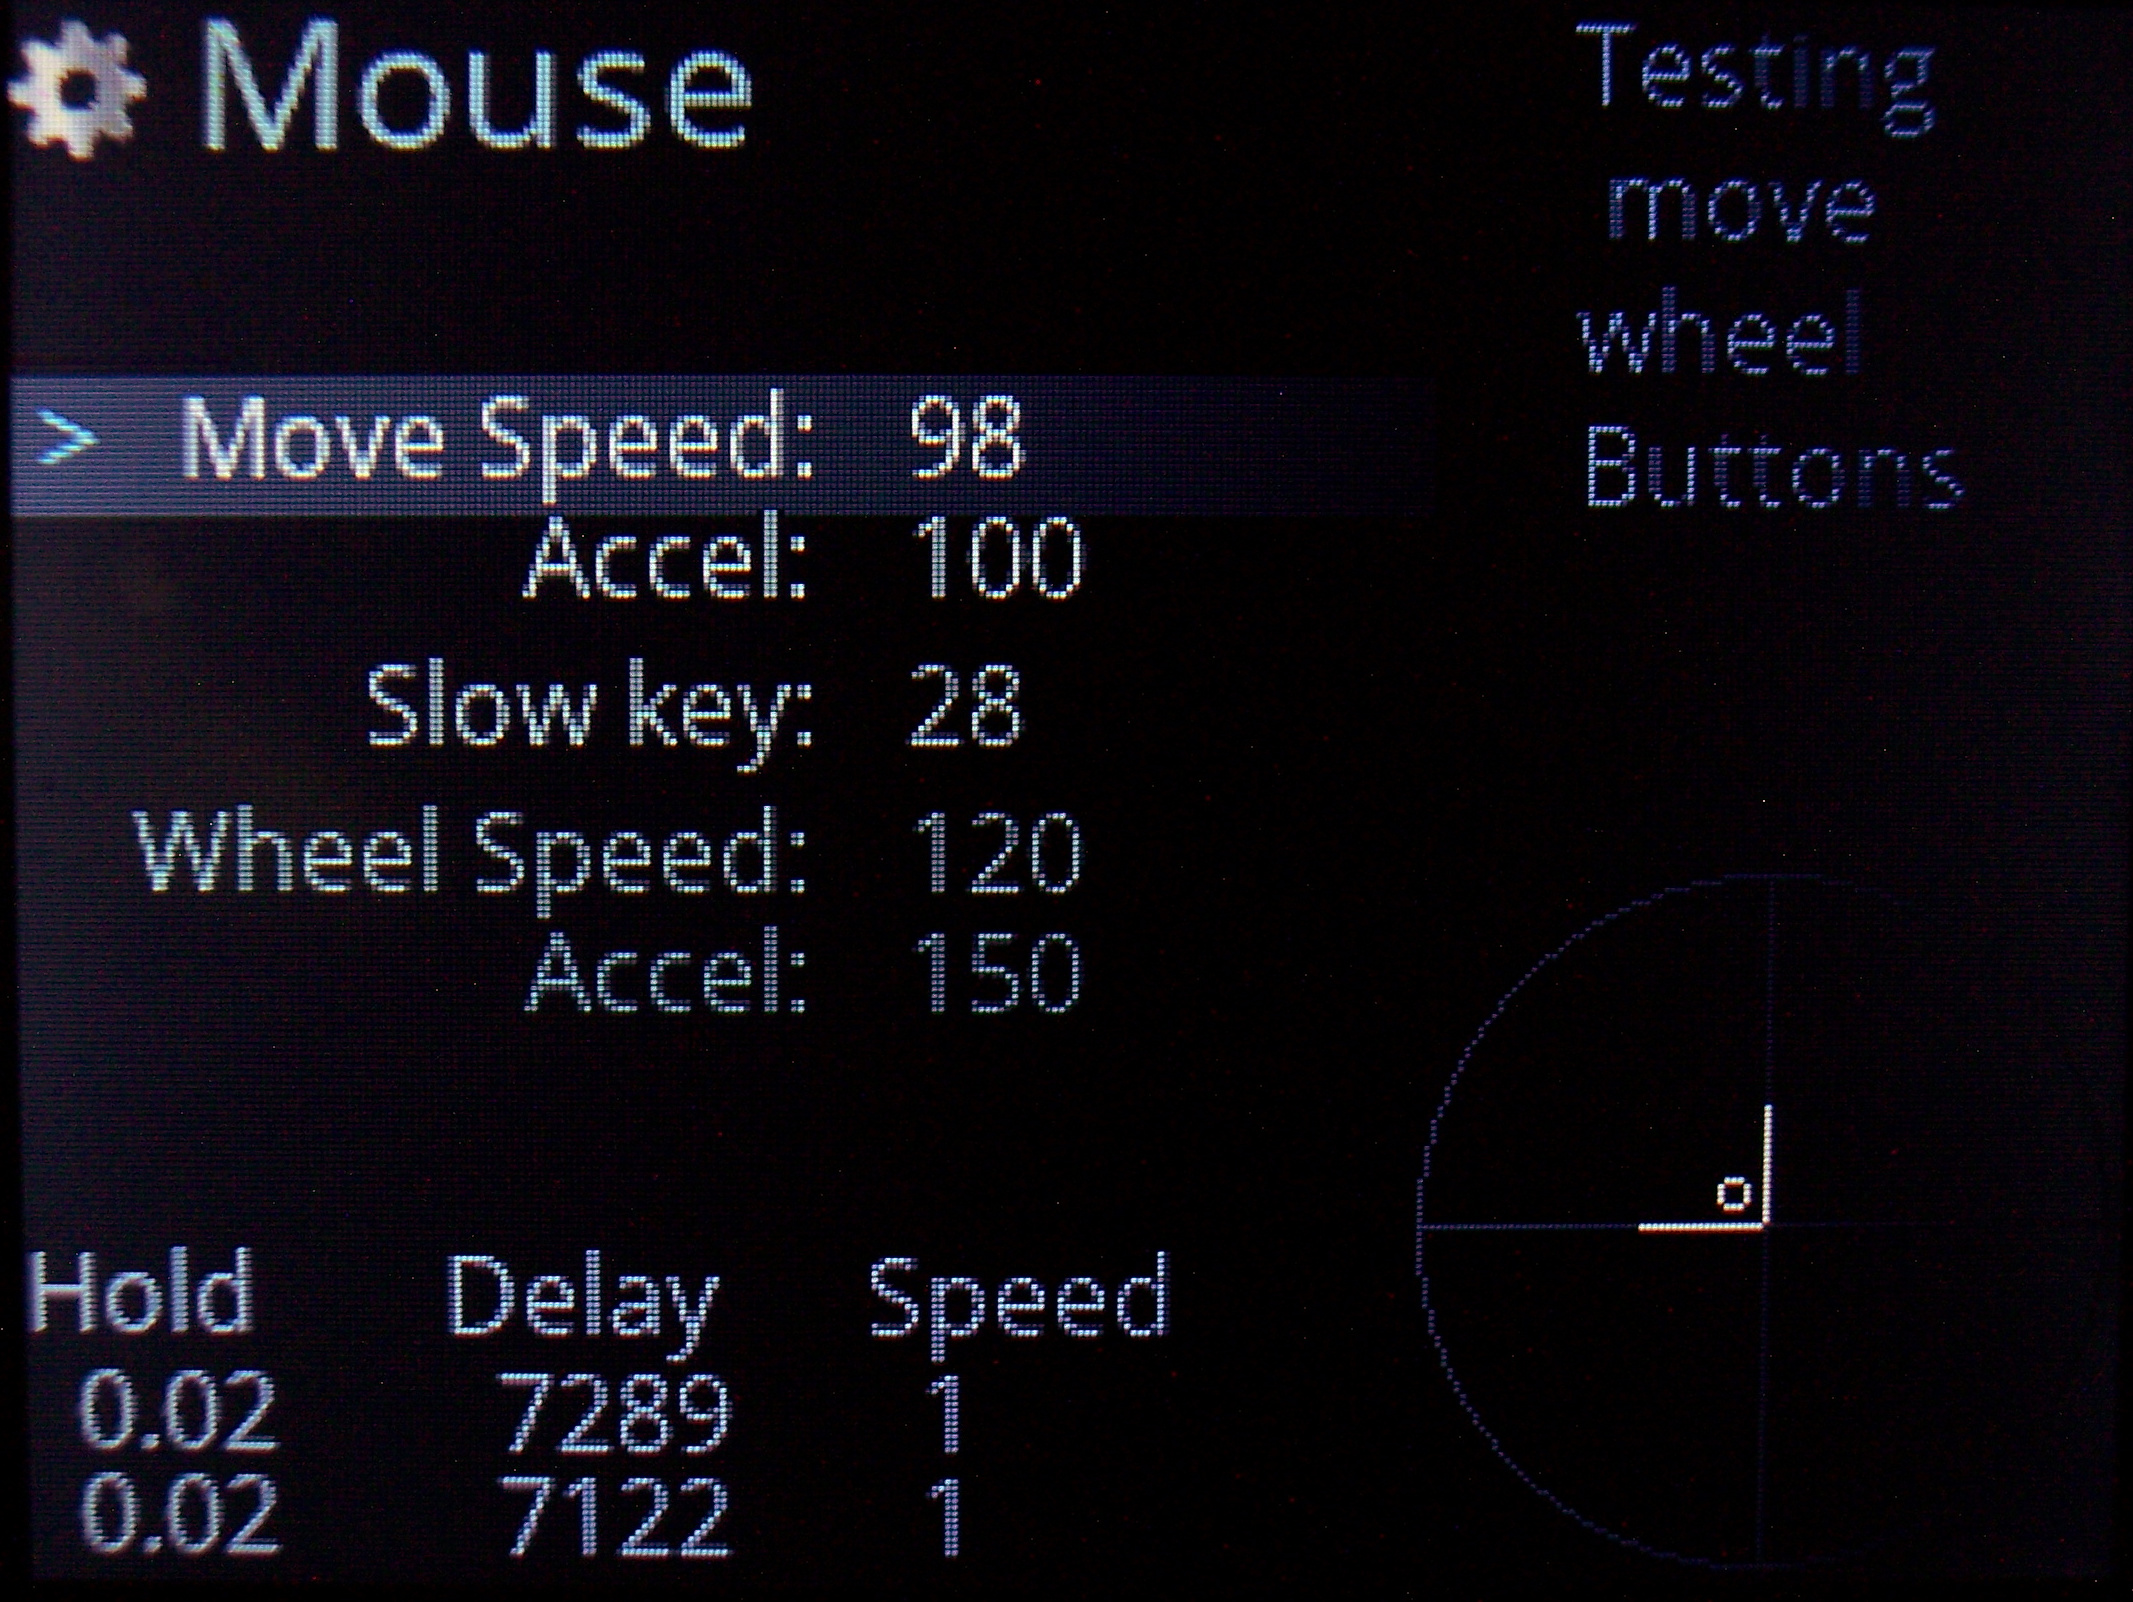
🖱️Mouse keys
Keys that will move mouse, press mouse buttons or scroll mouse wheel. Also featuring acceleration with parameters for it and speed in GUI.
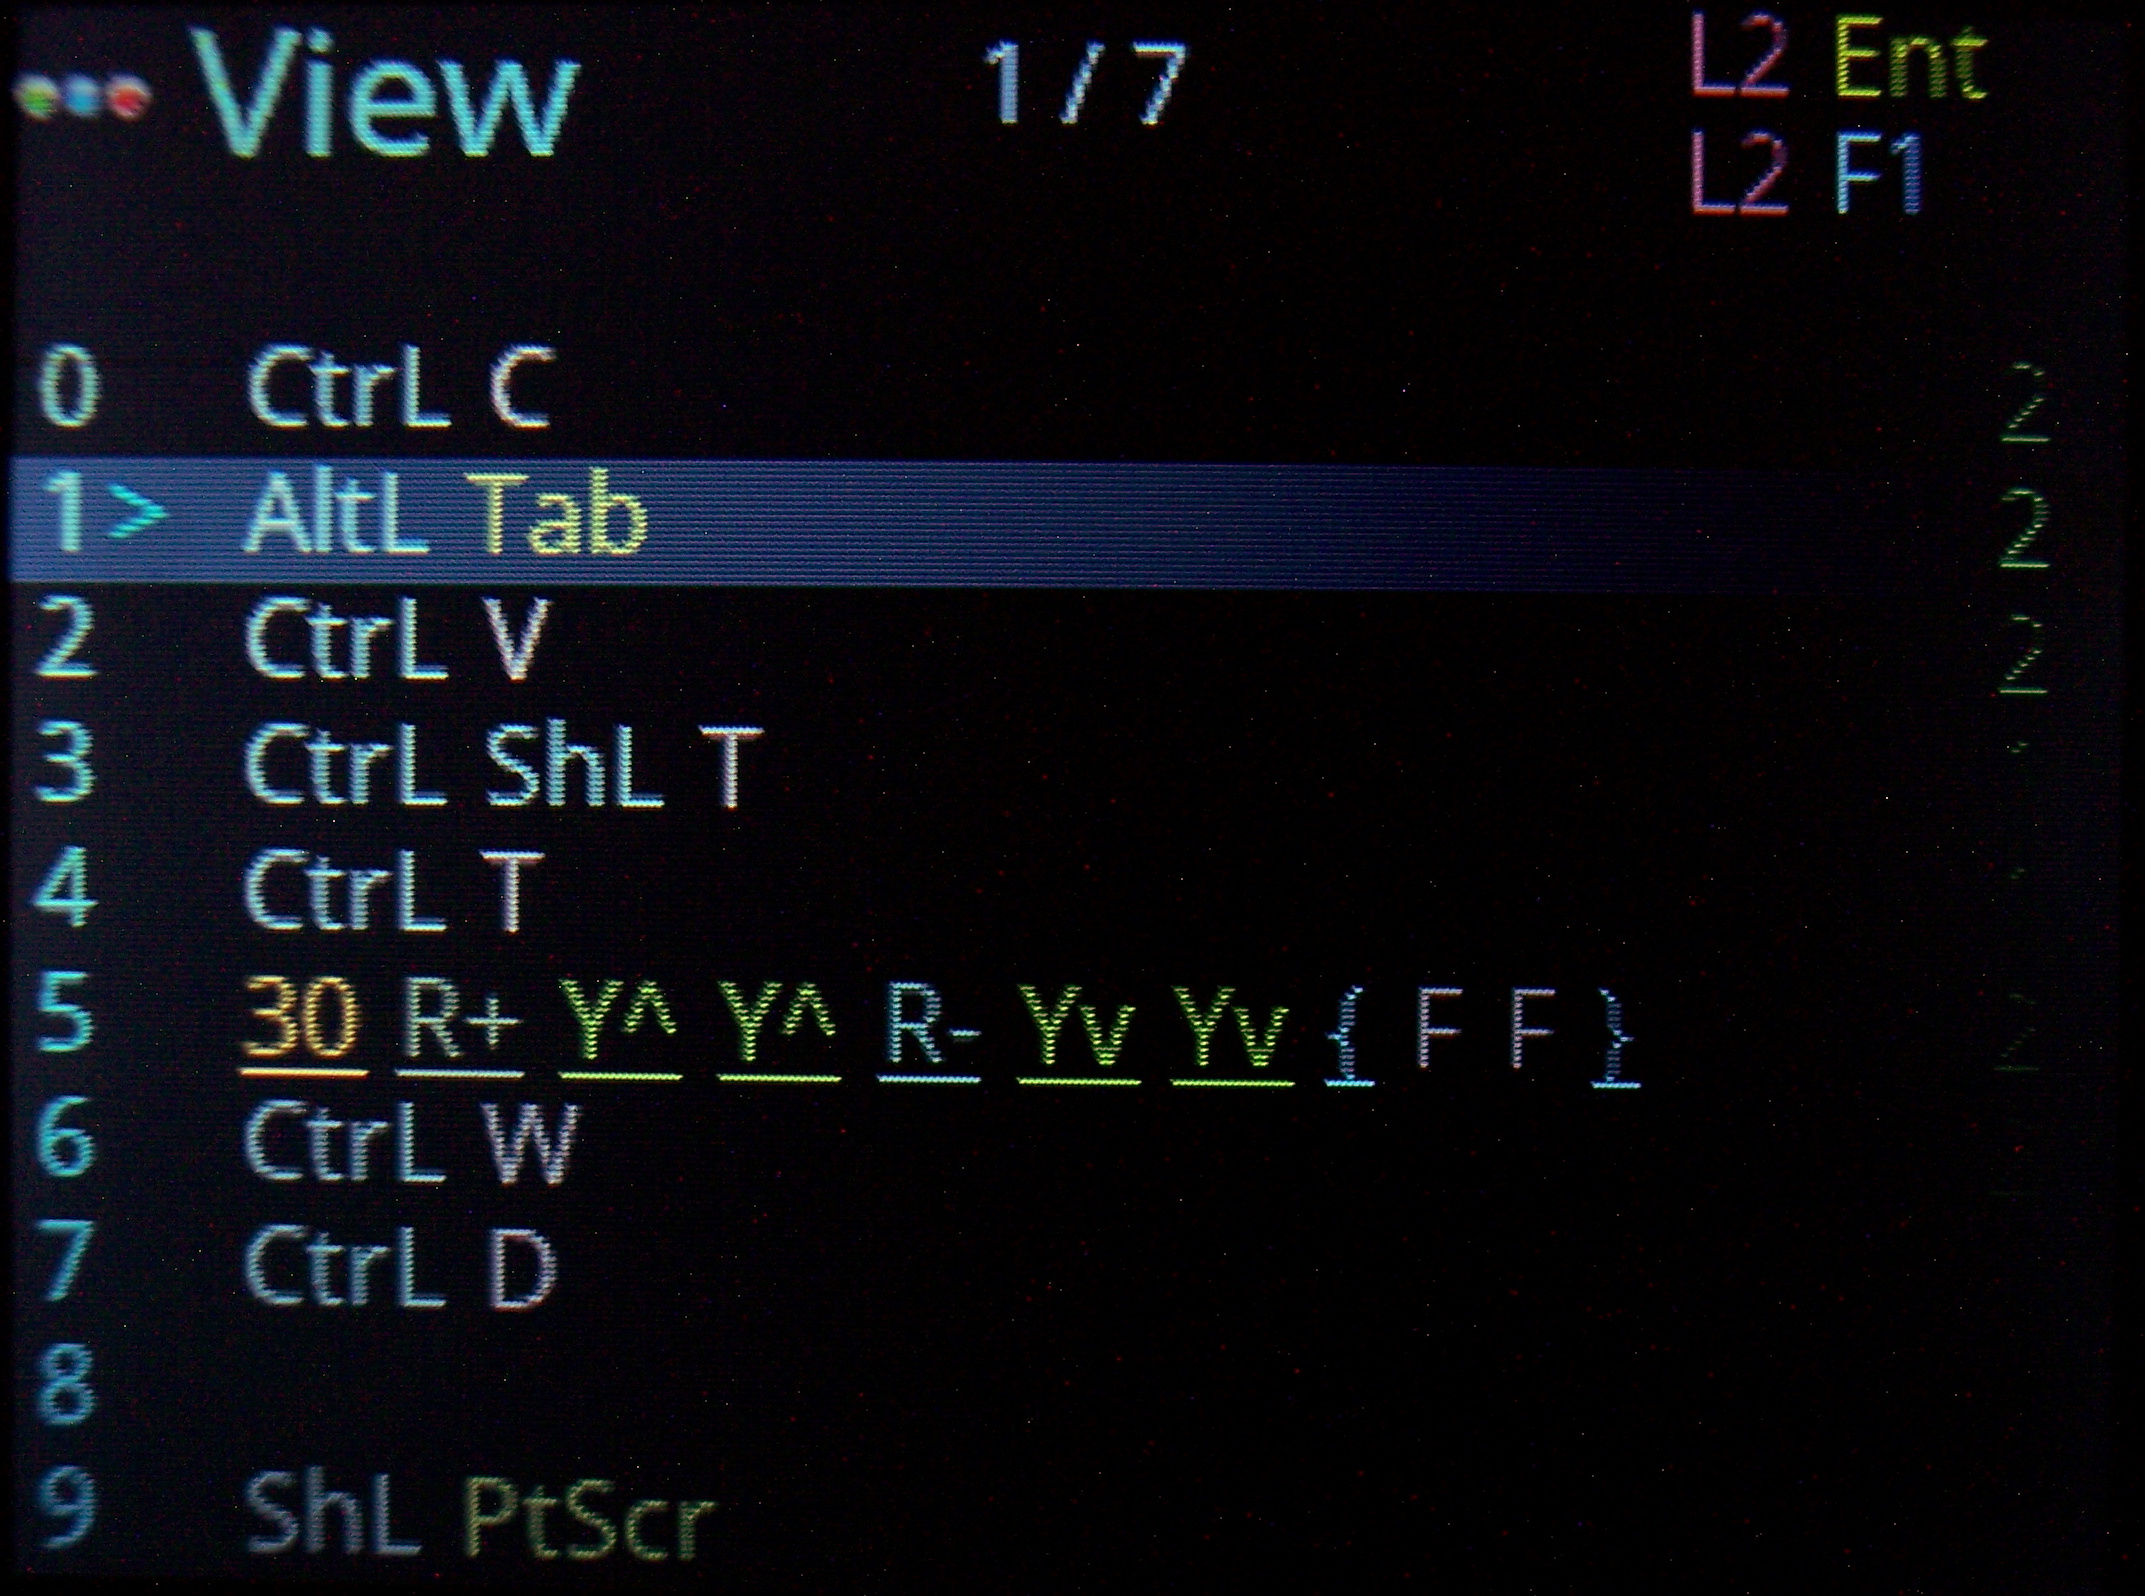
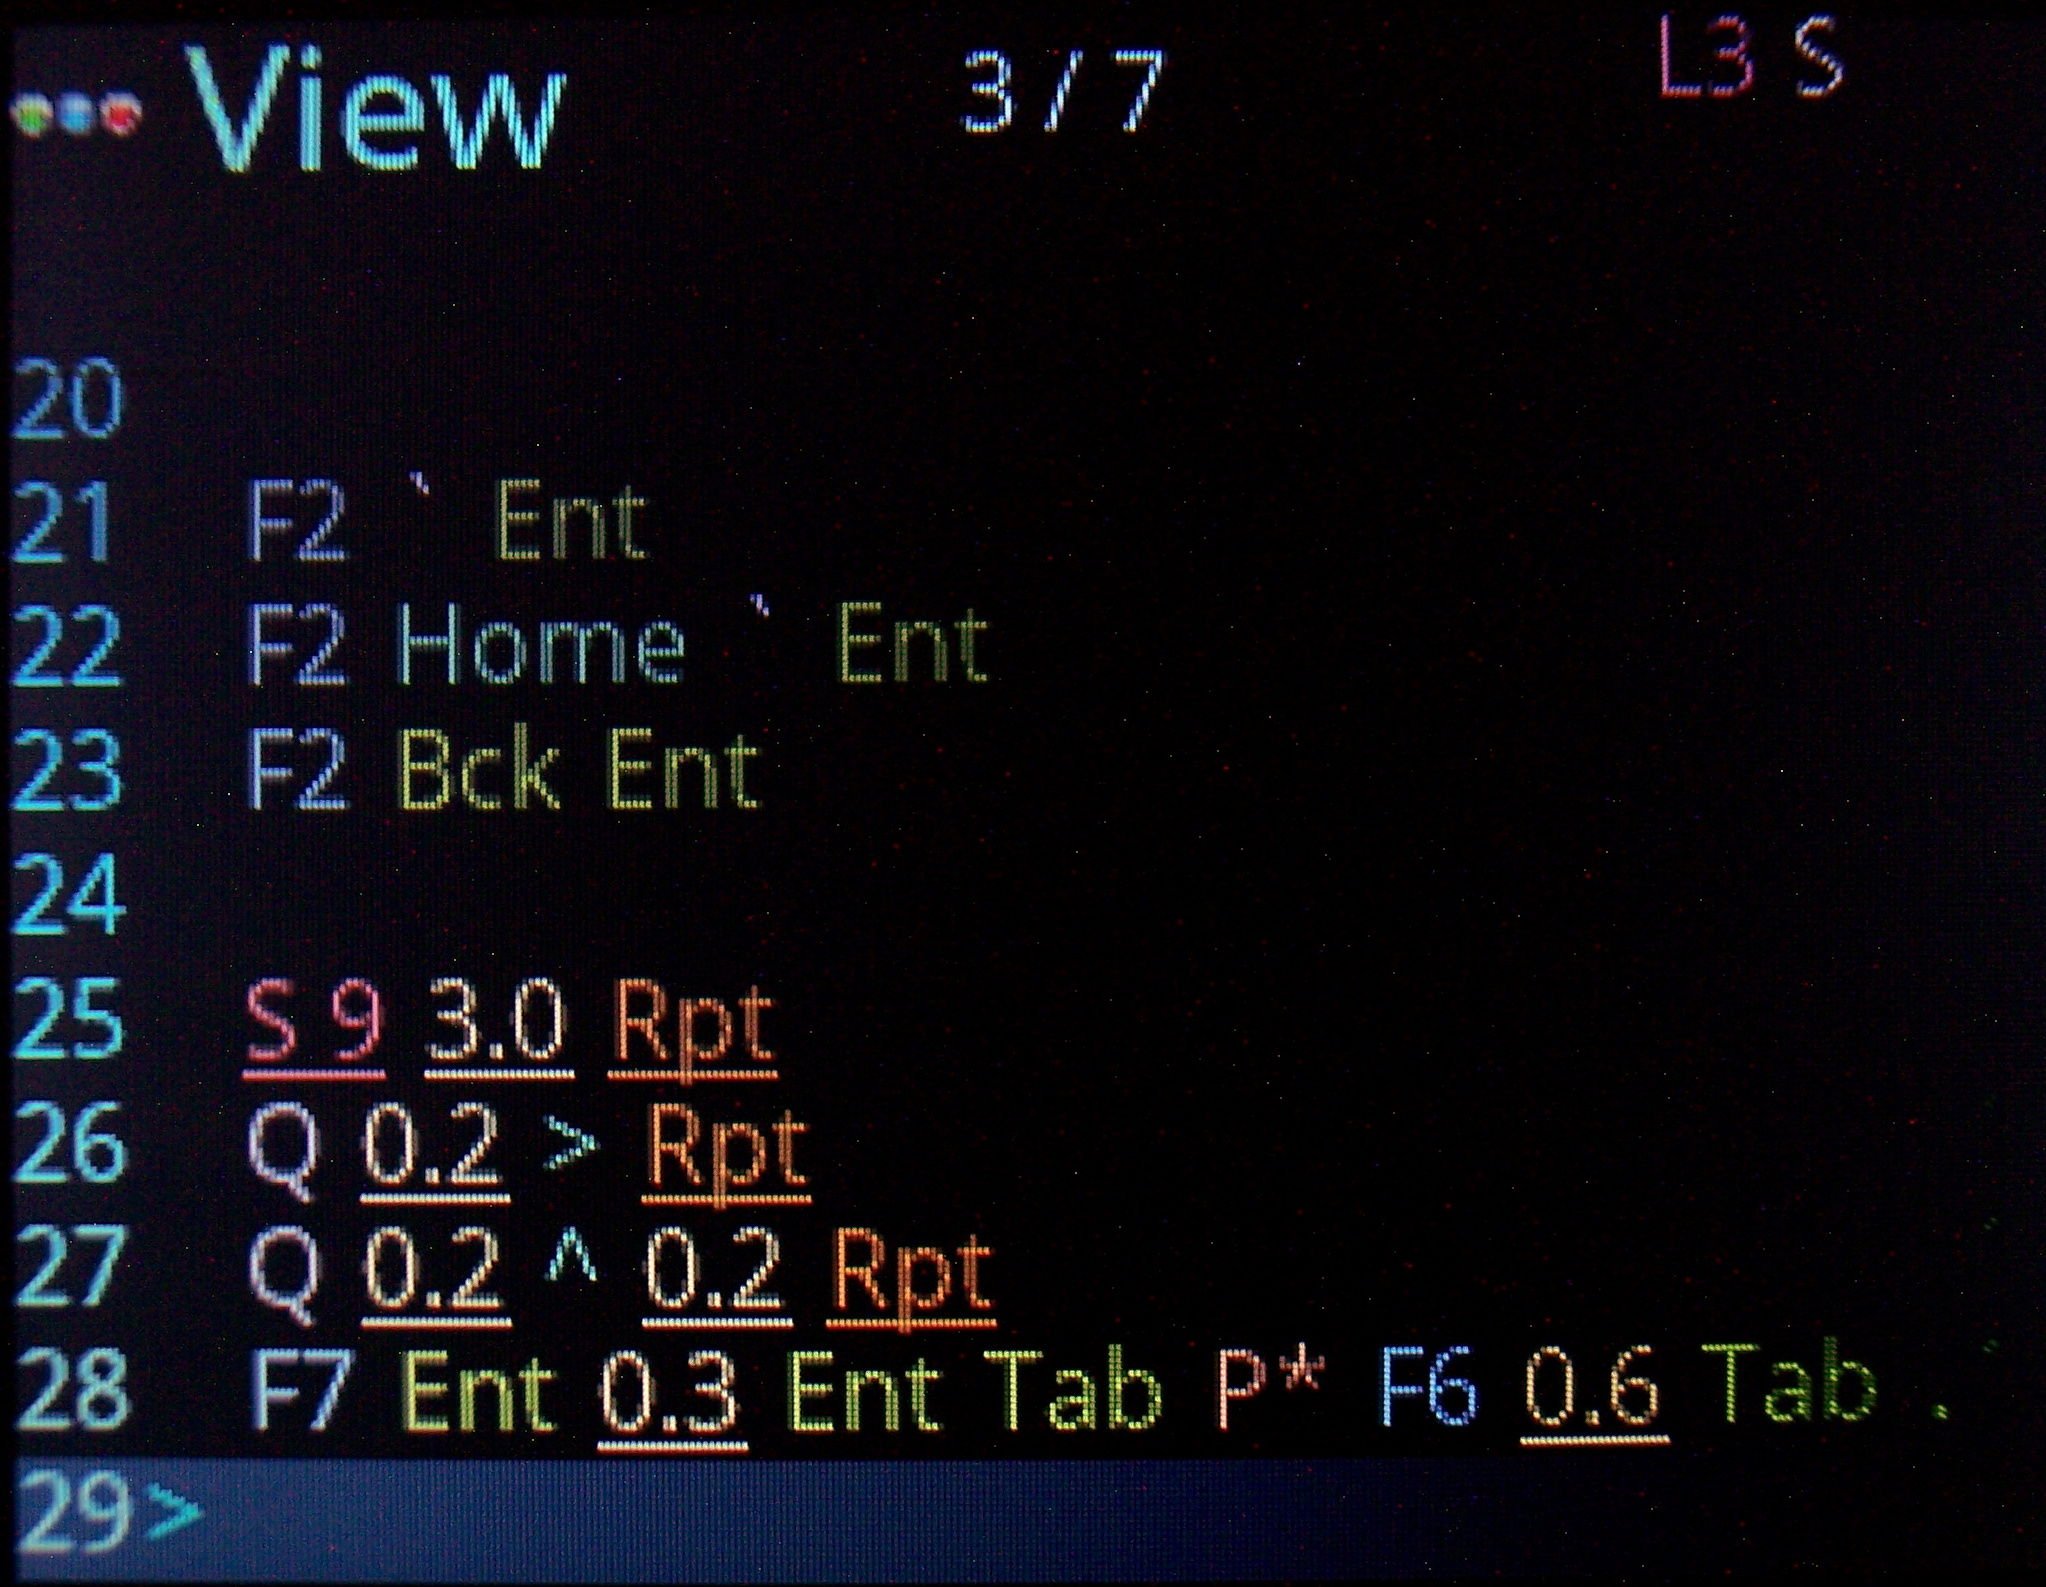
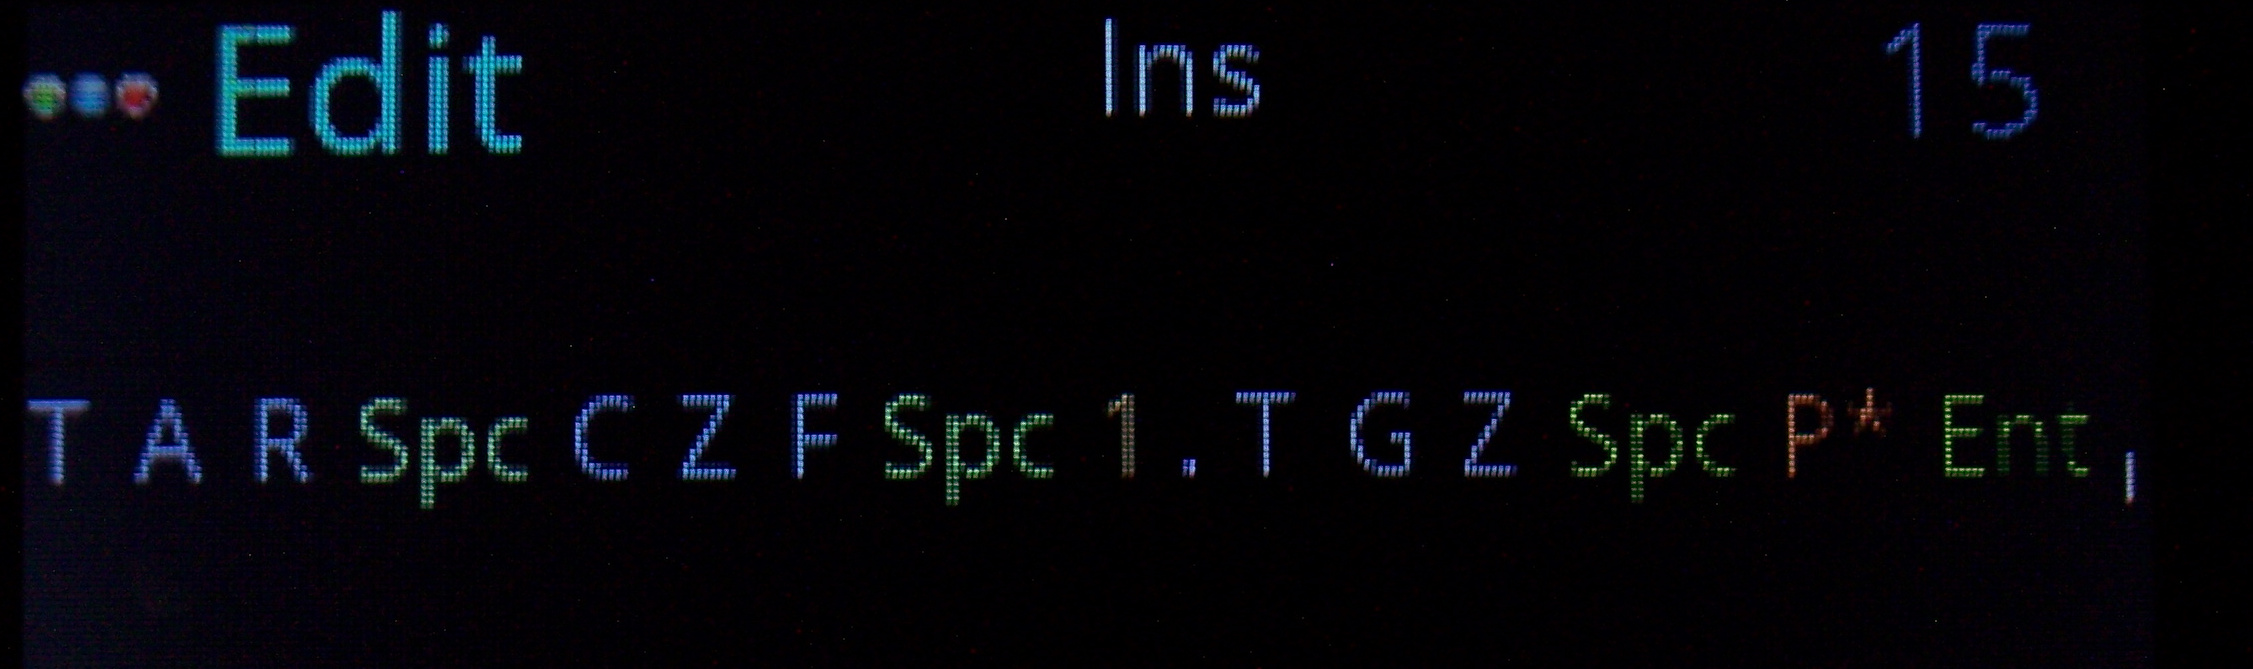
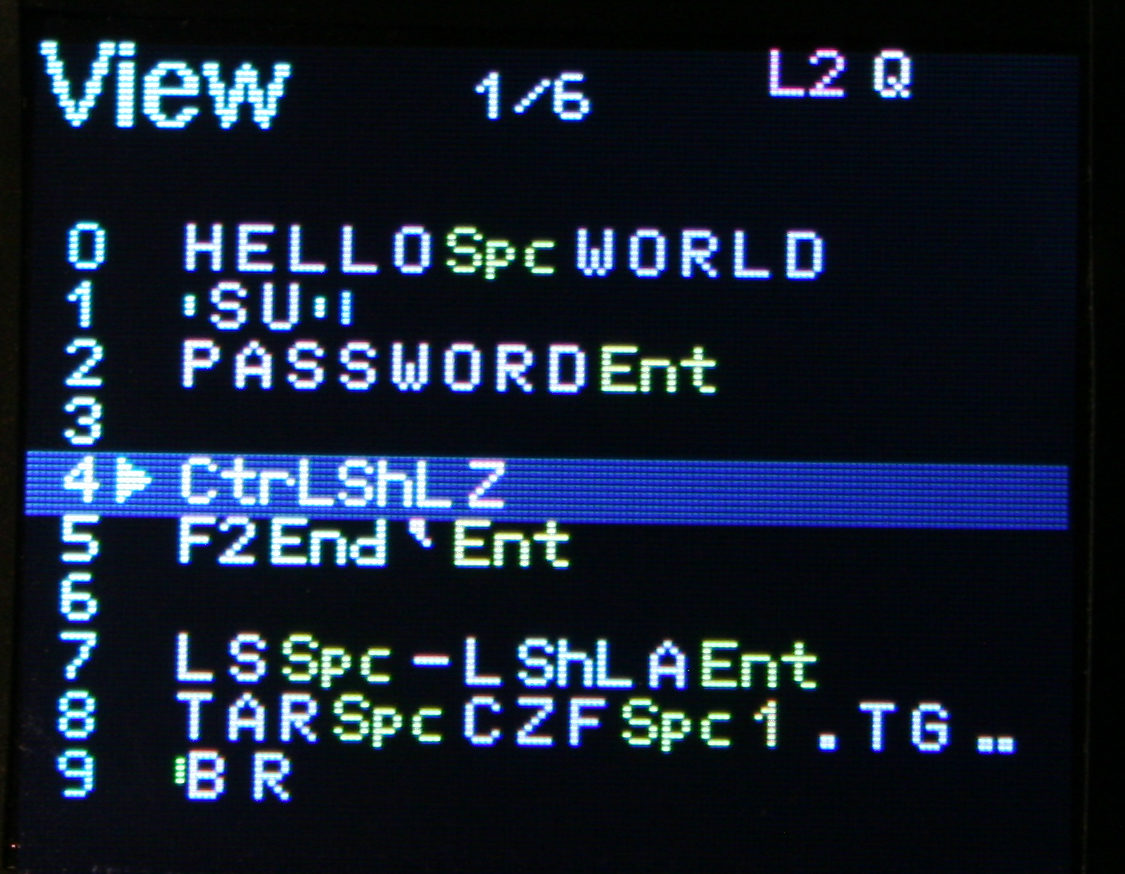
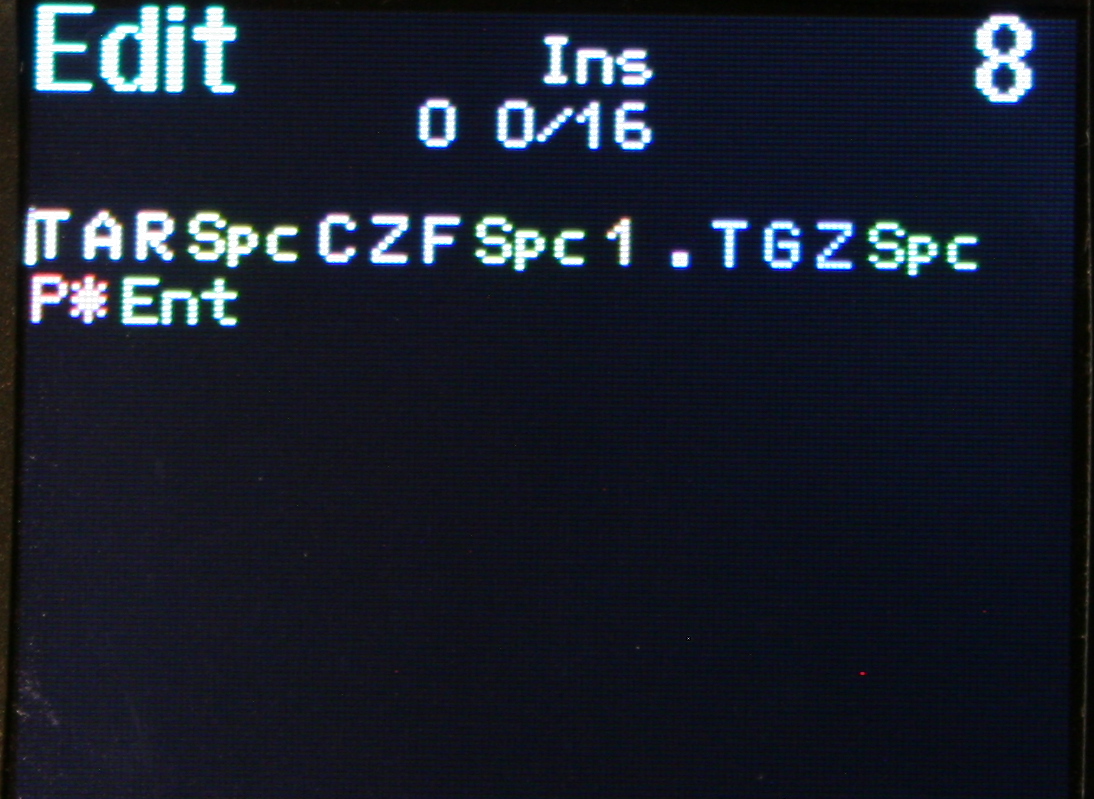
🔤Sequences aka Macros
Basically any key combinations (for key shortcuts) and any sequences of key presses (for e.g. passwords). I am showing sequence previews where possible too, so when editing Mappings (for a sequence key), when picking a key from list or Testing pressed keys (if a key runs a sequence). I am also showing in sequences View, all mapped keys that run selected sequence.
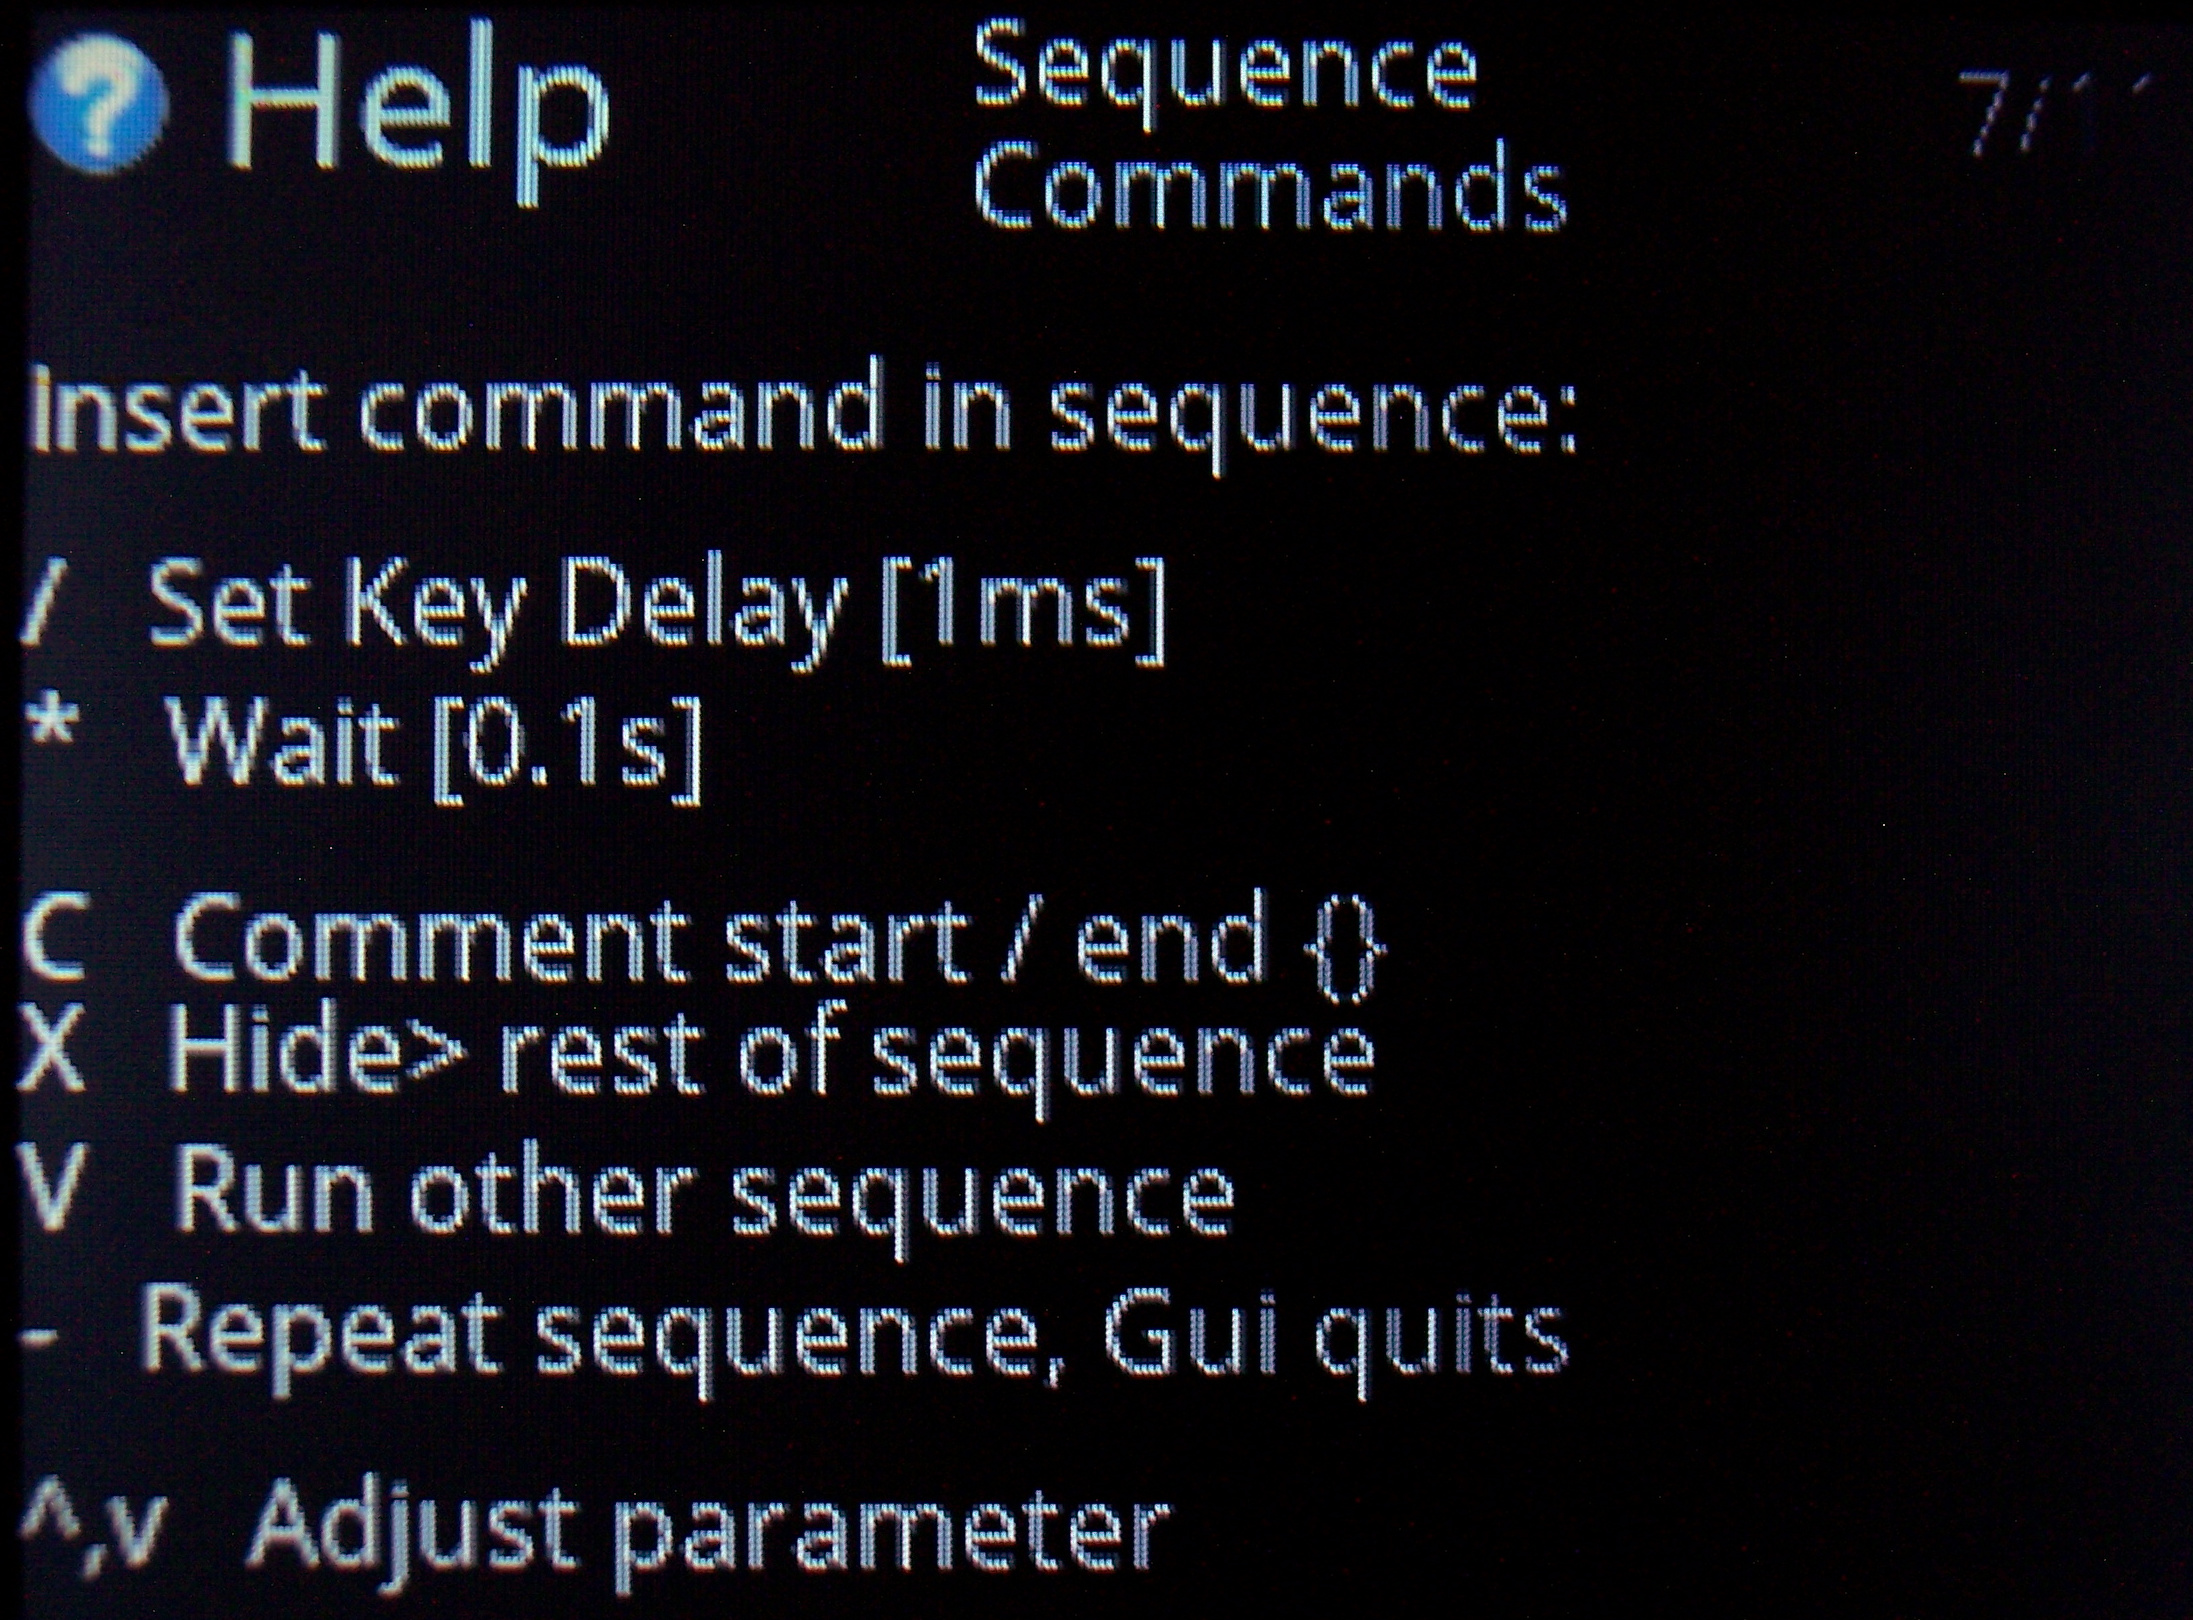
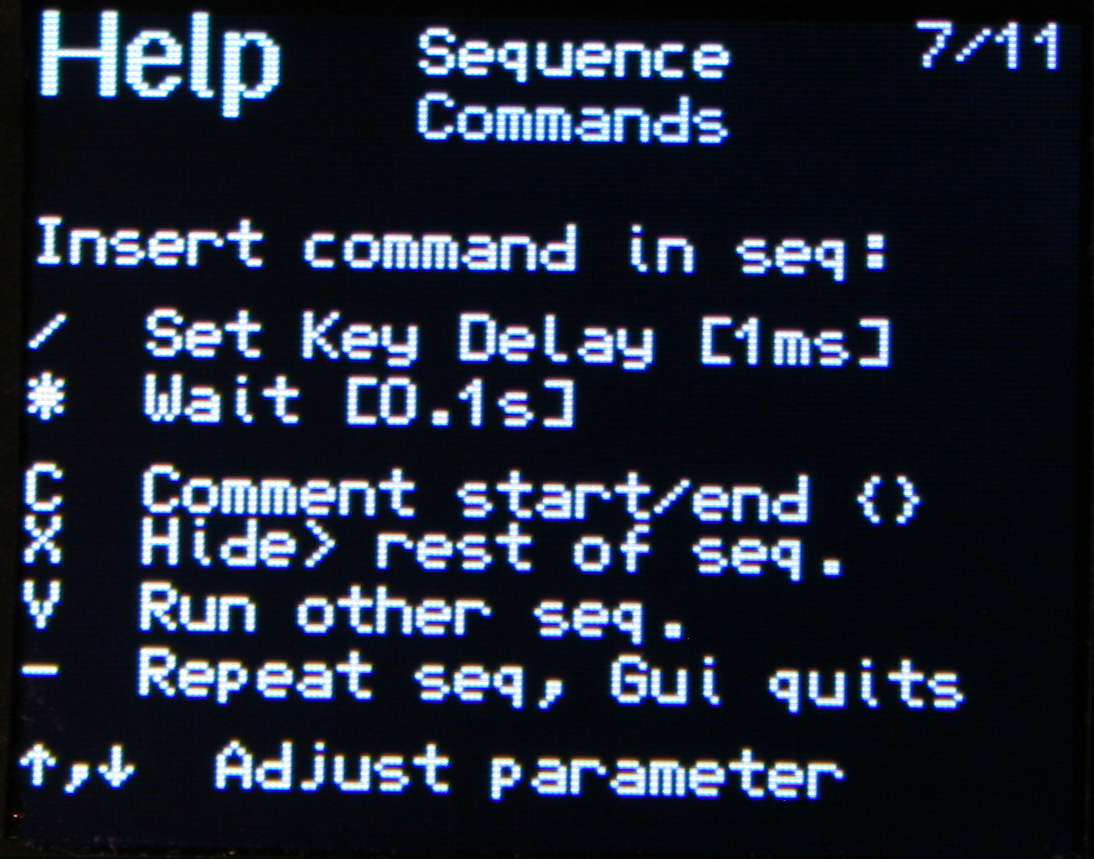
✅Sequence commands
Further extension, these are special commands (beside sequence keys), that e.g. wait for few seconds (0.1s resolution), or change how slow the sequence will run (1ms resolution, useful e.g. for putty).
Others allow putting comments (for sequence purpose), and hiding sequence from preview (e.g. for passwords).
There is also a command to run other sequence(s) from this one. Also a repeat command that will do sequence (keys) continuously, until interrupted. This is e.g. useful e.g. if you want to watch a video faster, skipping parts with arrow keys after a short delay or take screenshots while watching etc. Normal keys can be used when a sequence runs too.
All mouse actions are available as commands too. So for example you can press a key (for a sequence) that will press button or move mouse etc. I have this way a mouse gesture done.
⚙️Internal functions
Keys to e.g. dim brightness, toggle GUI, toggle LED light, quit sequence, lock/unlock layer, change default layer etc. This a direct way, faster than adjusting parameters in GUI.
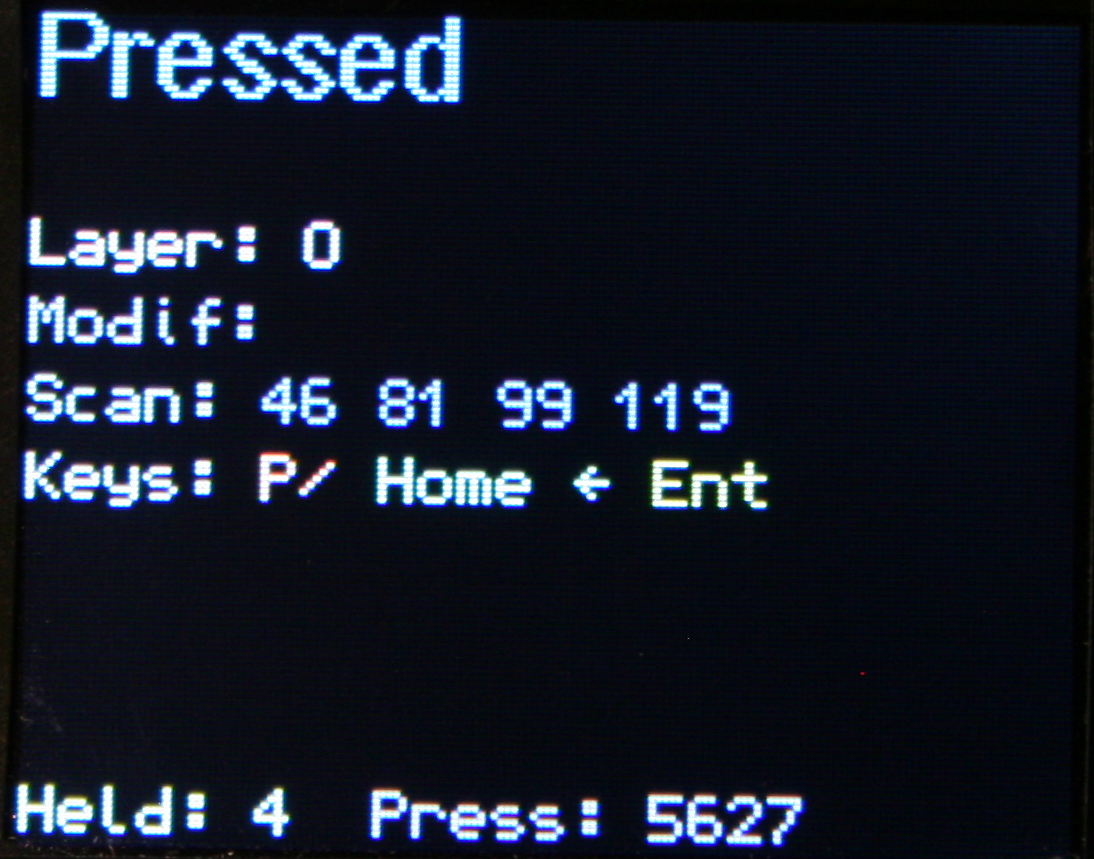
🎛️Testing and Setup pages
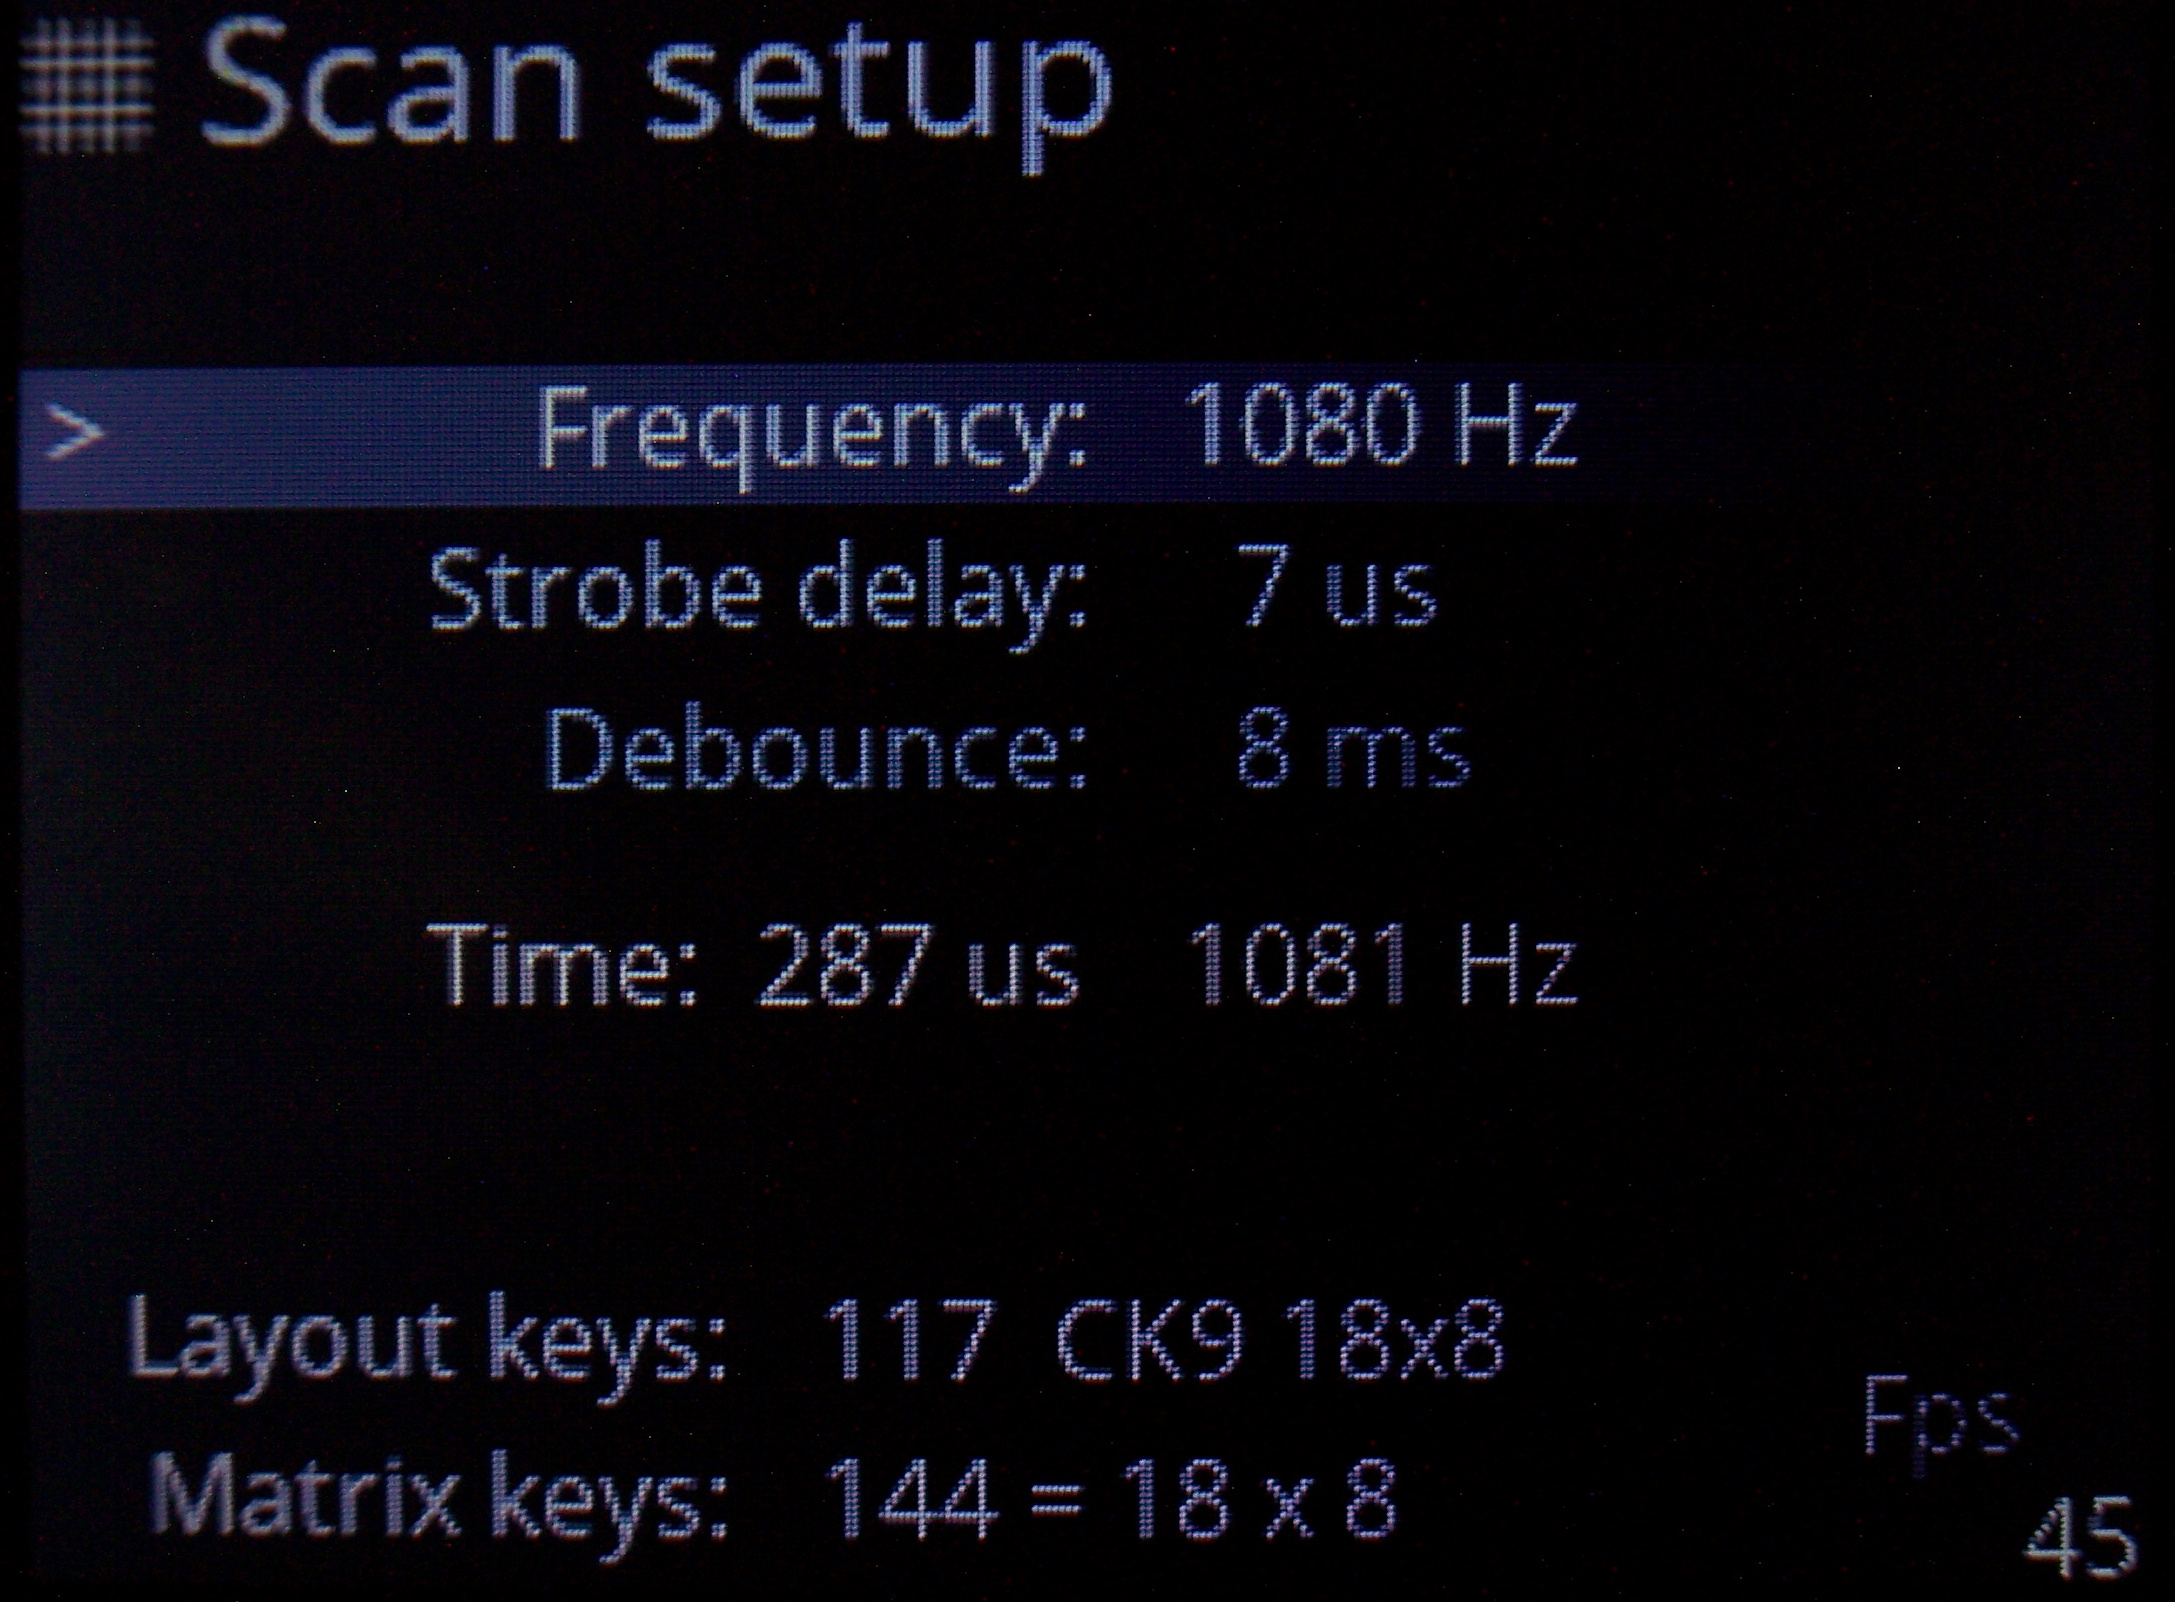
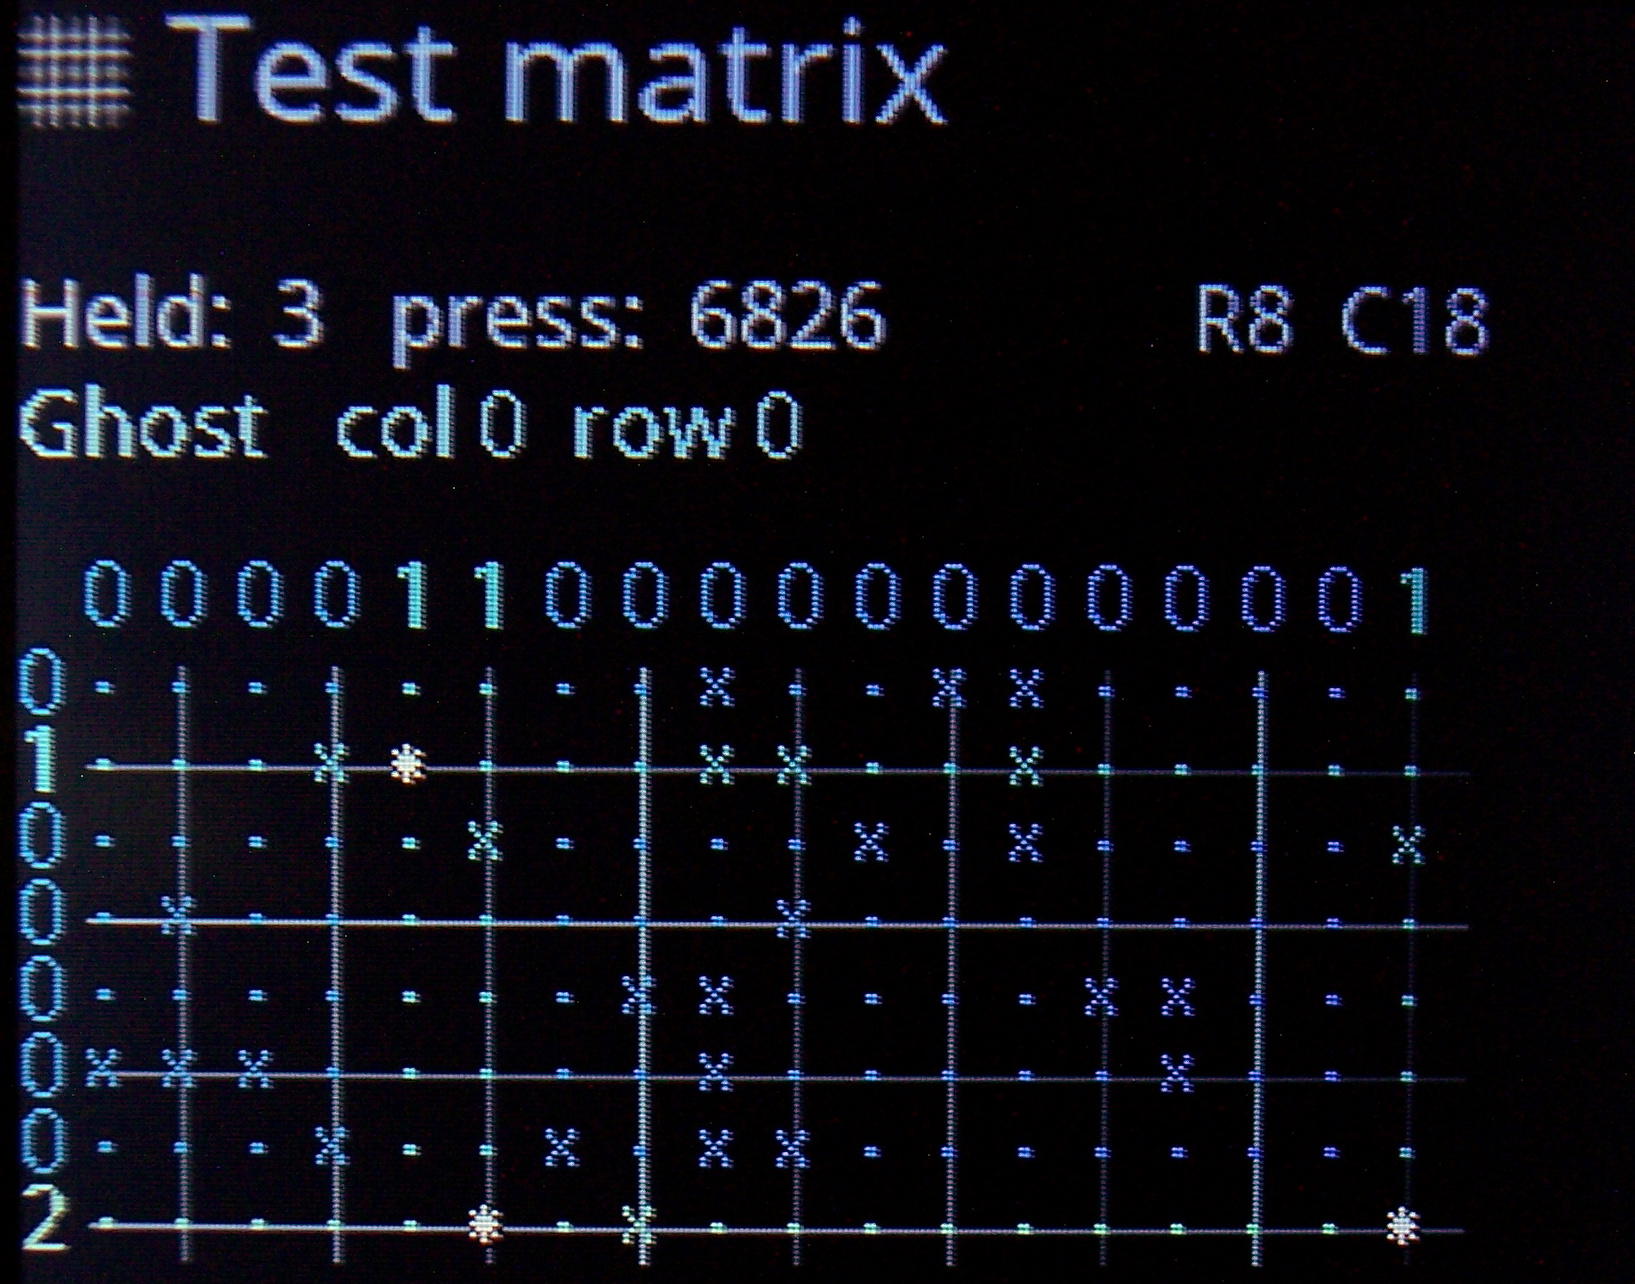
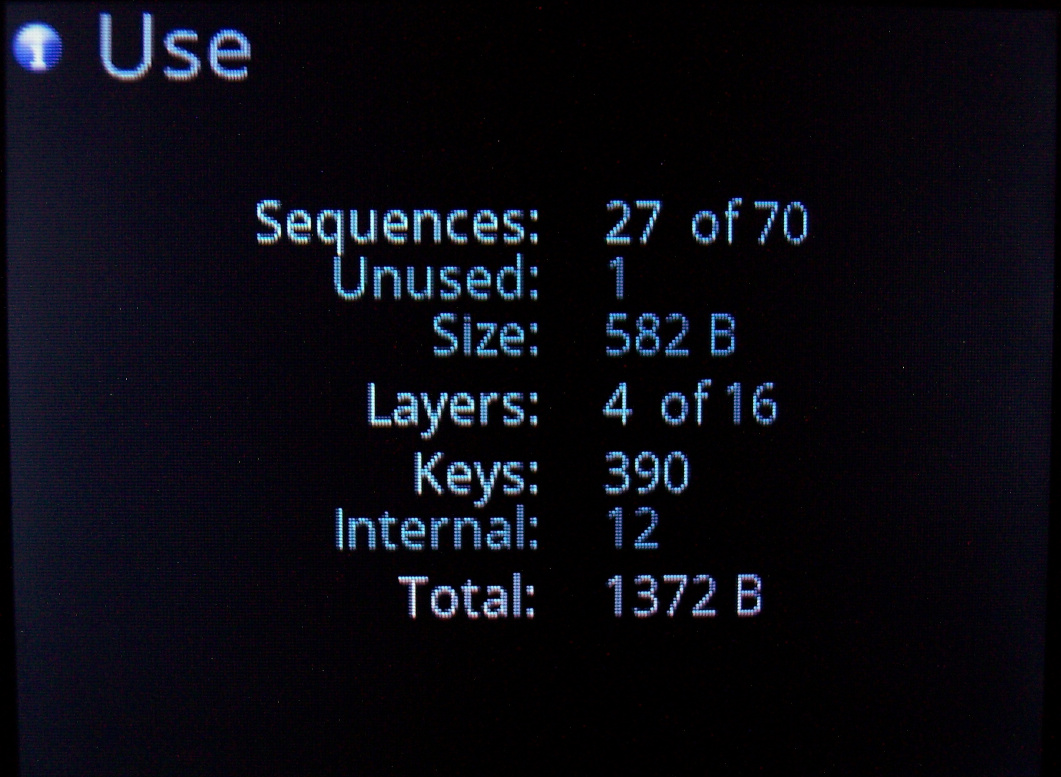
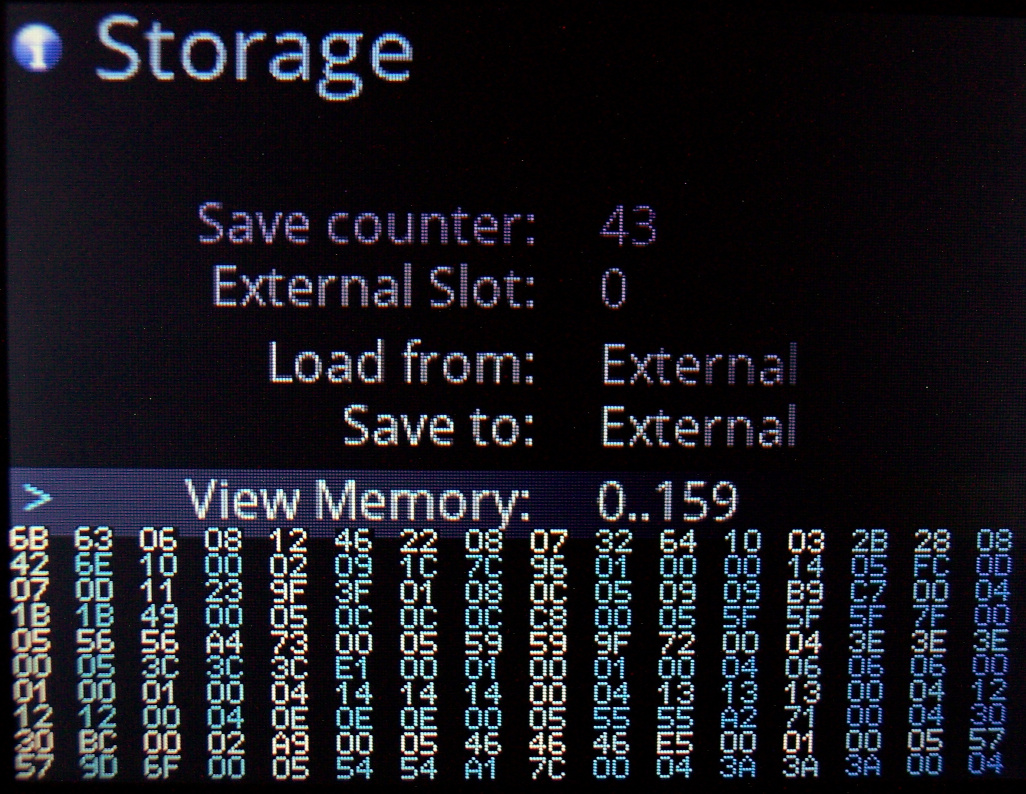
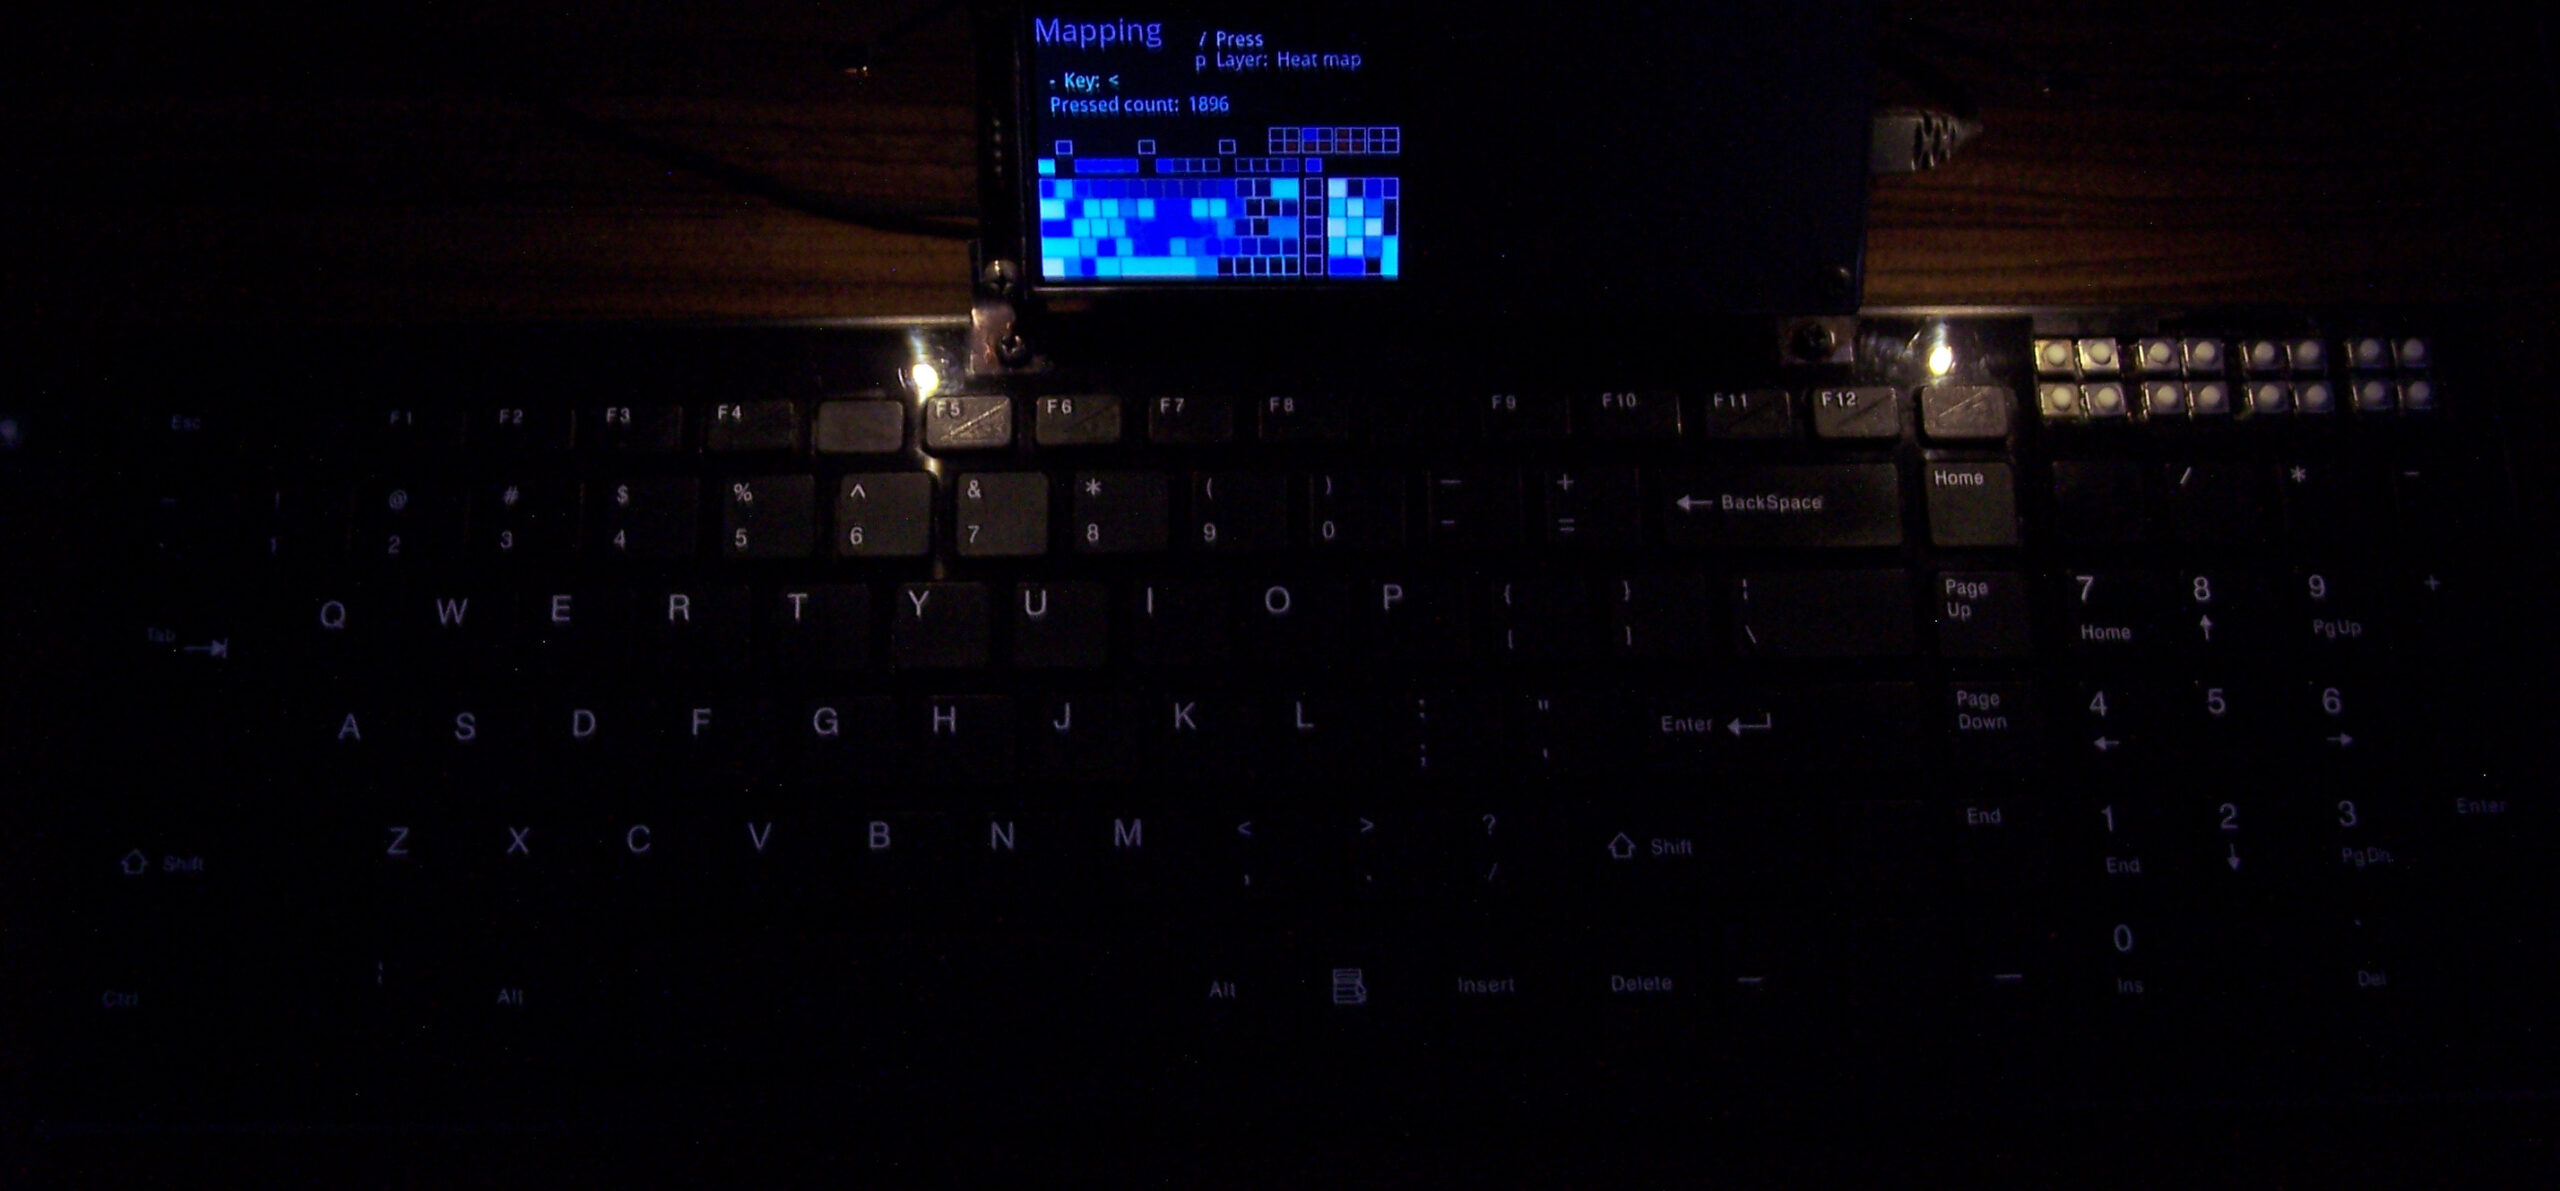
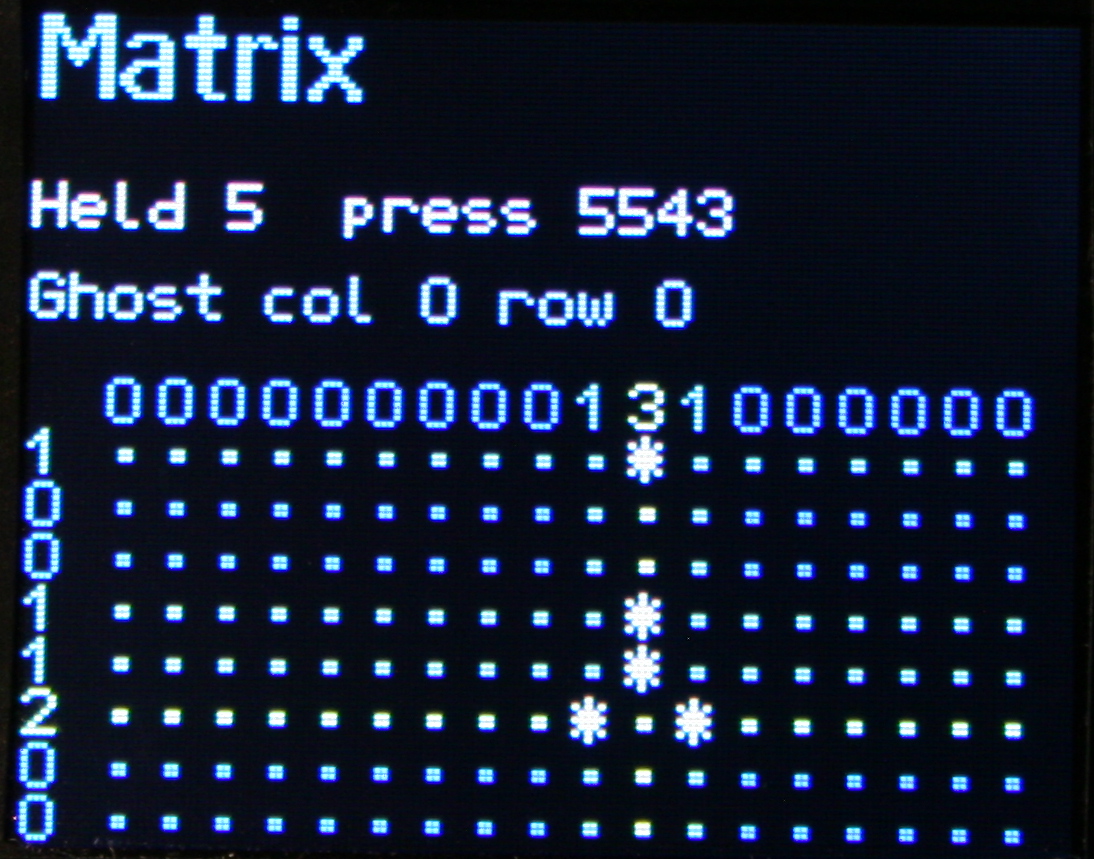
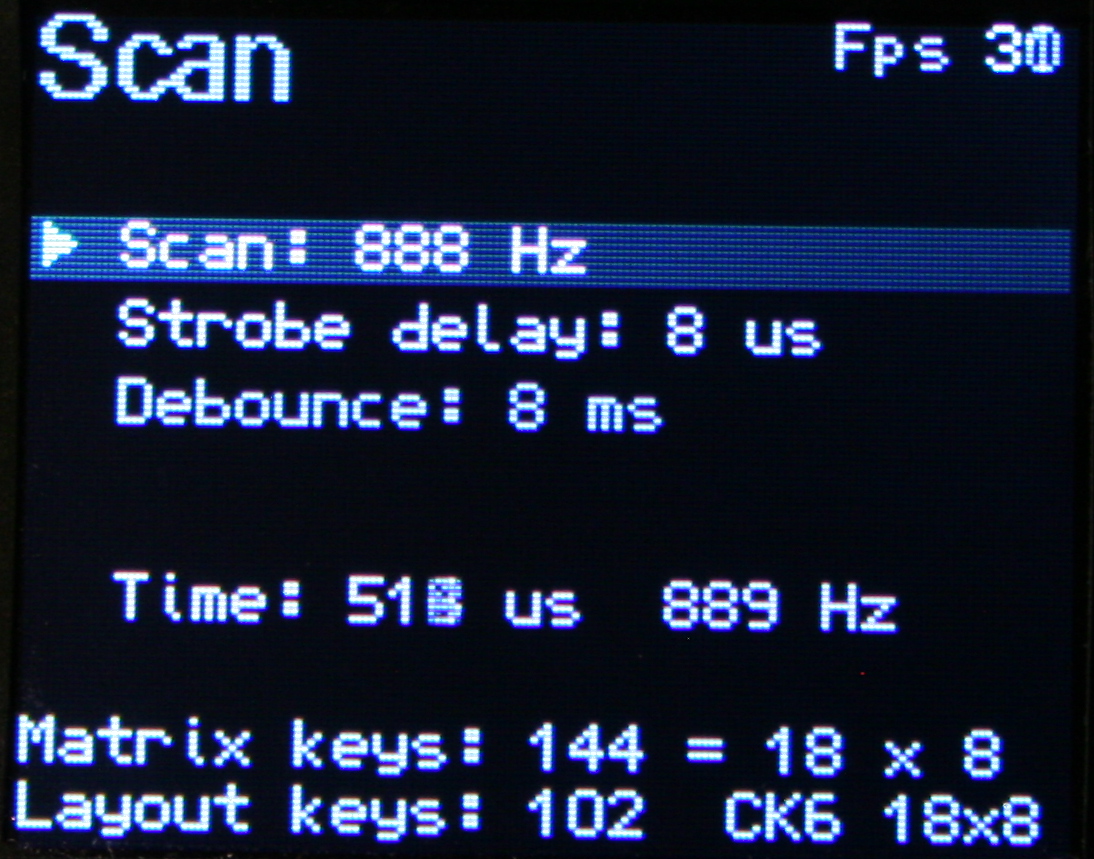
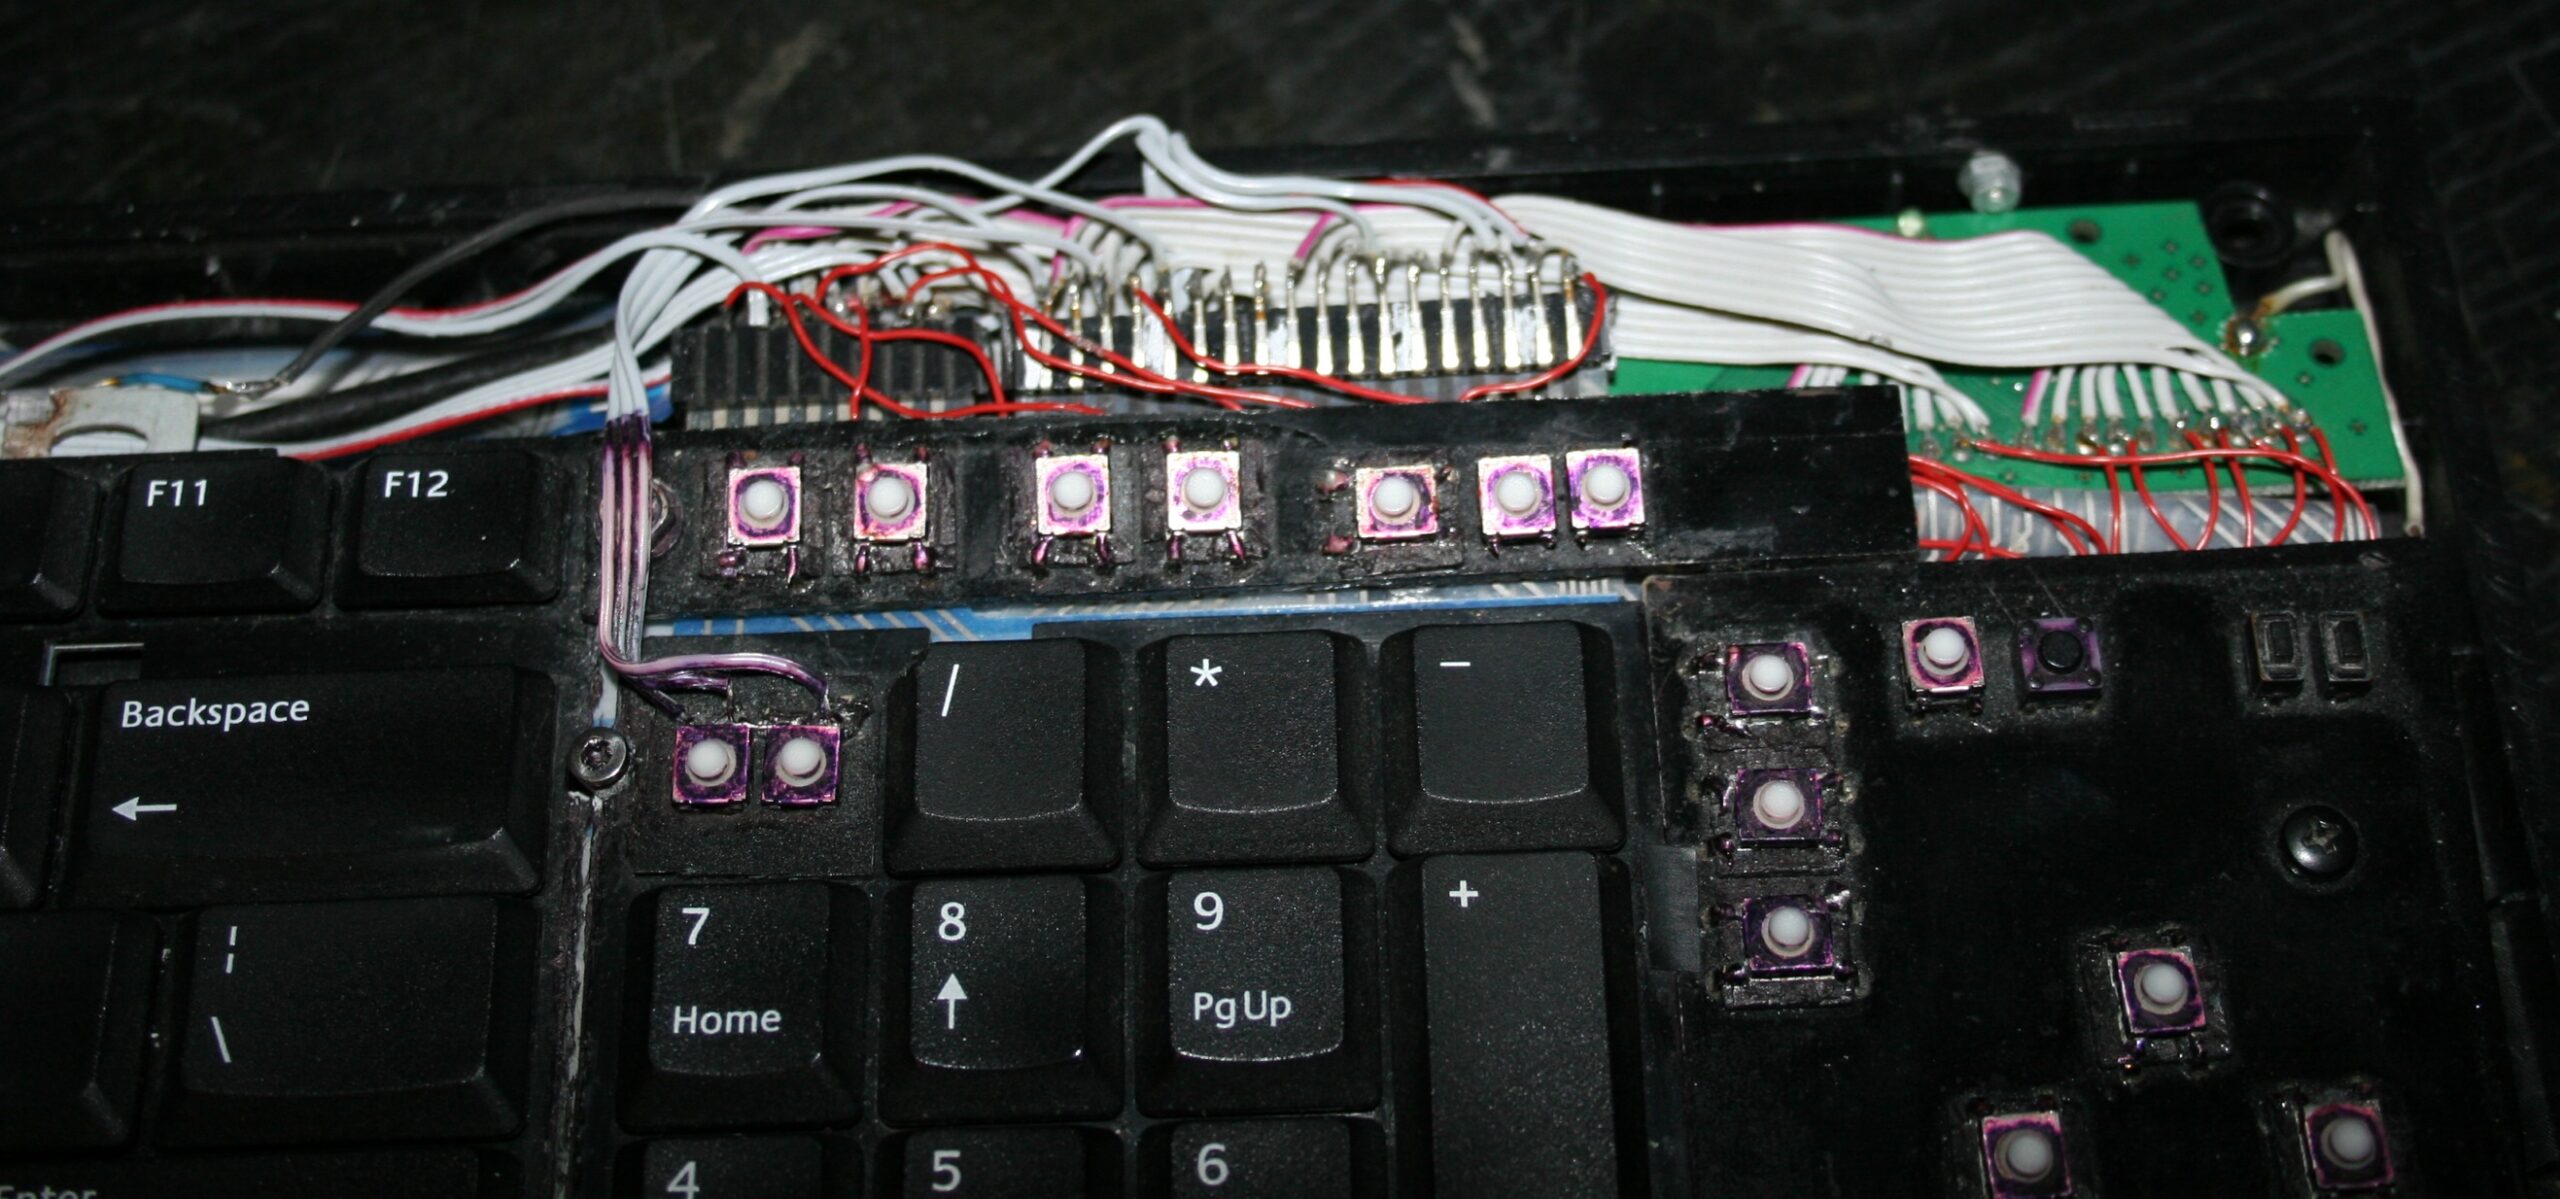
Useful when developing and to check if everything is working properly. Scan setup is advanced and adjust which strobe delay, scan frequency, debounce time I need. Matrix page shows the 18×8 keyboard matrix, with my anti-ghosting code working and any issues from too low strobe delay. It now also features X marks on keys that are available in matrix but not present on layout, this makes locating new extra keys very easy.
🔮Demos and Game
Were already present in previous version and even on the first tiny display I used (128×64 mono). Since I have a display, and a powerful MCU, they show their drawing possibilities. They got extended to new resolution with few added extras. Best shown on videos, links below.
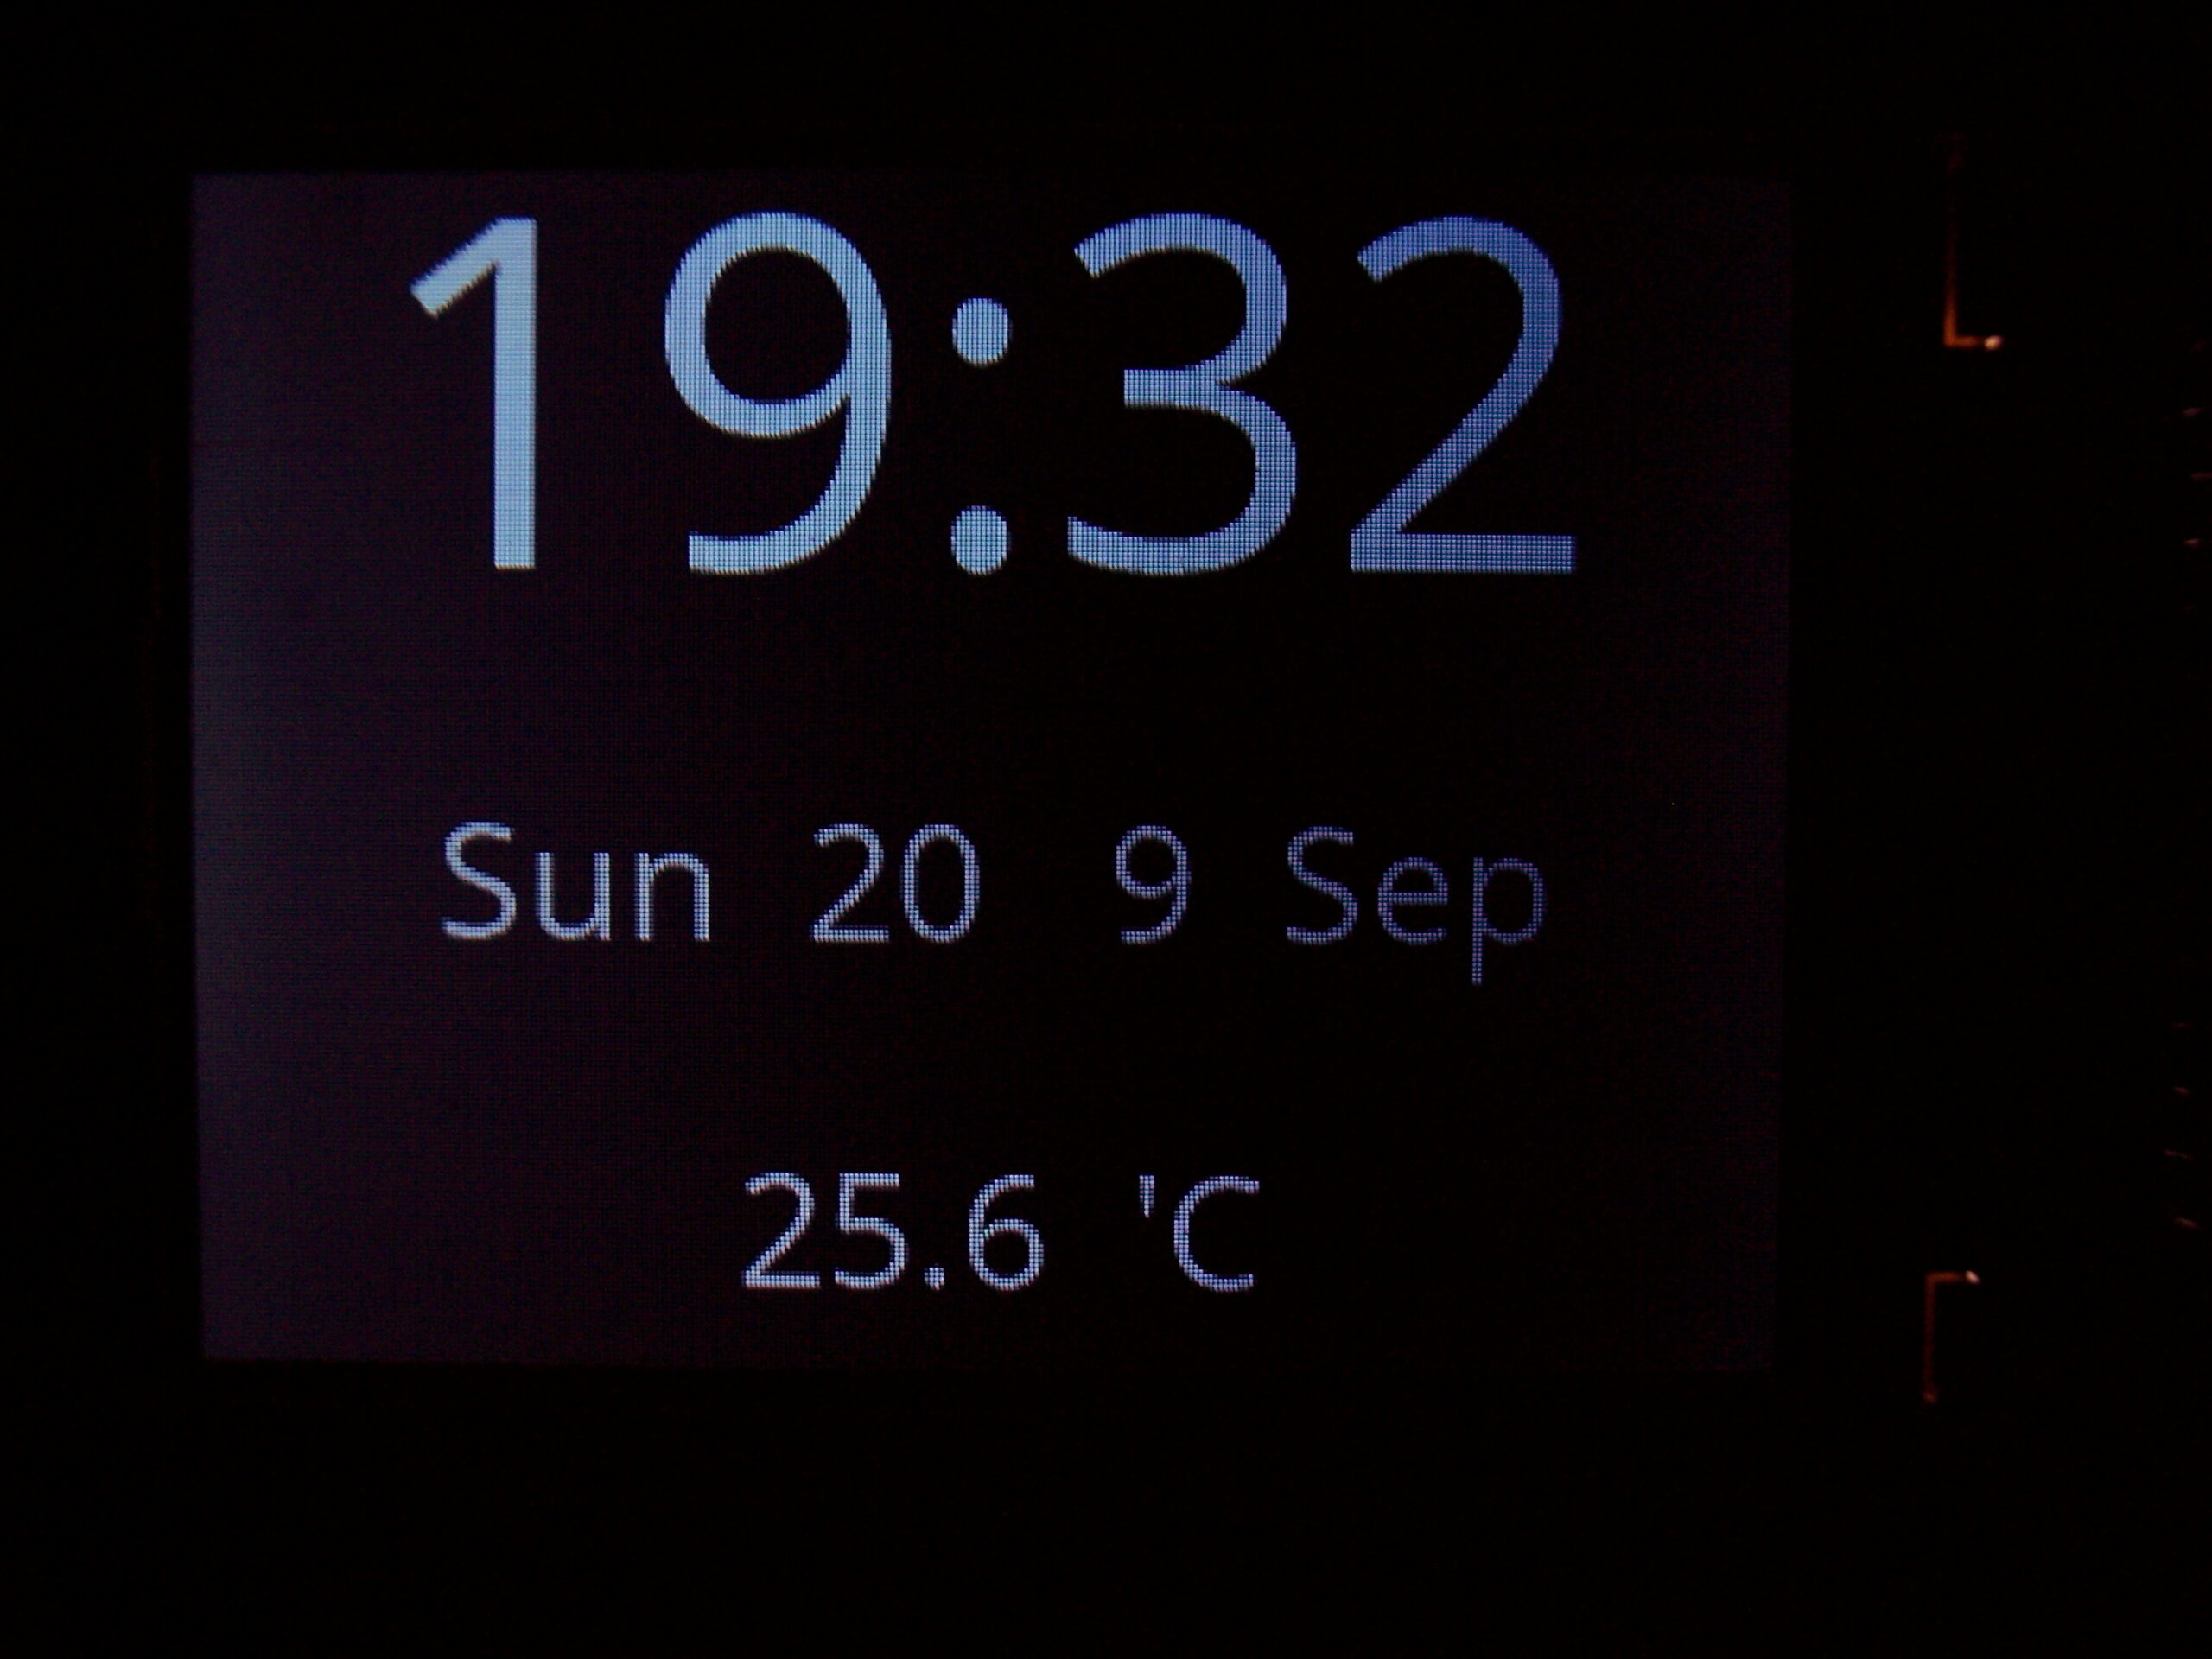
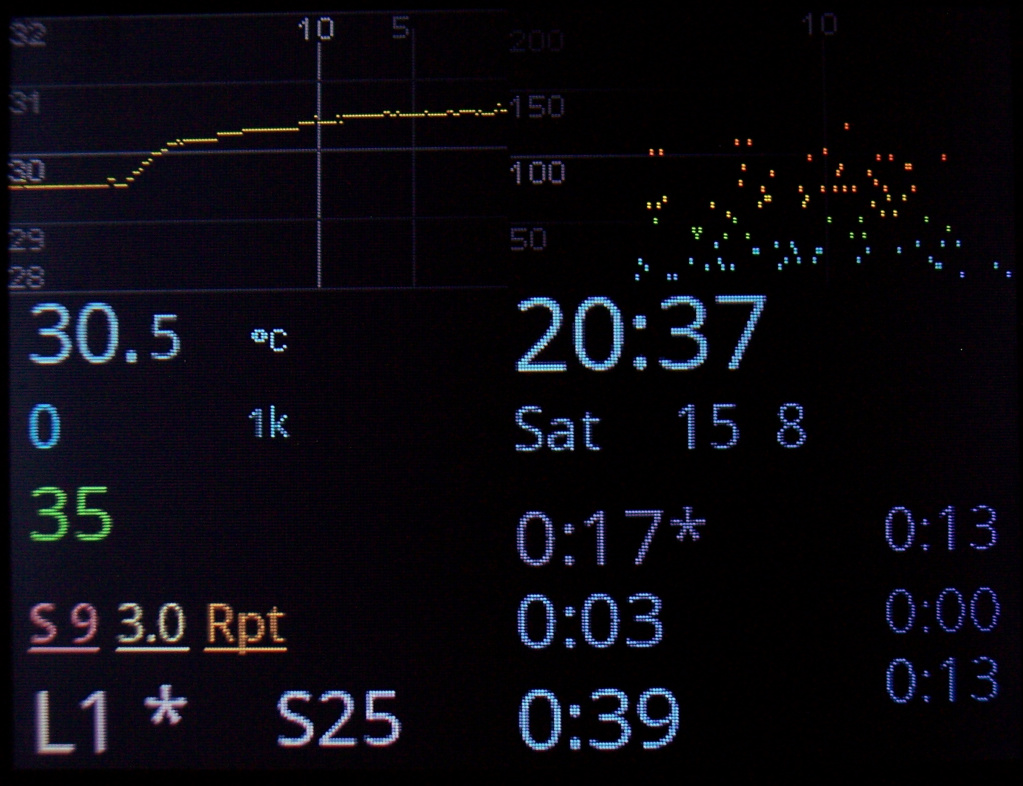
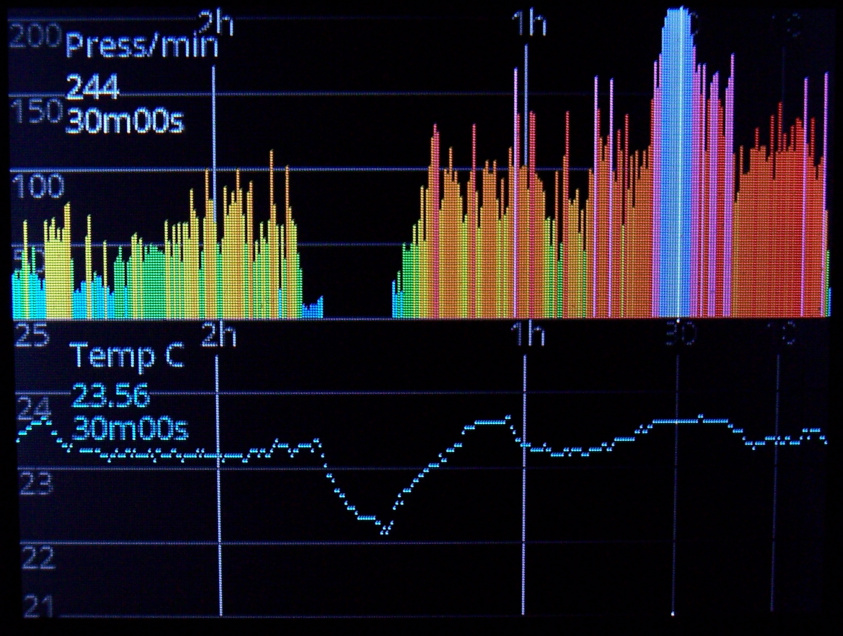
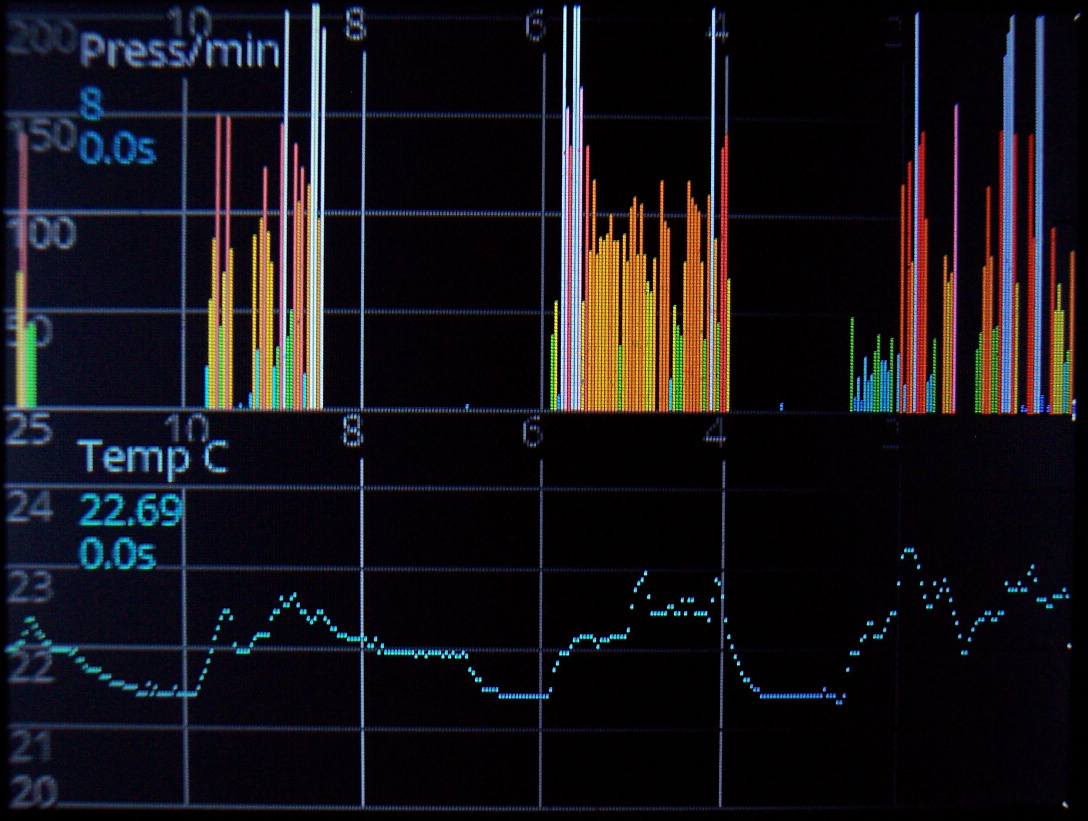
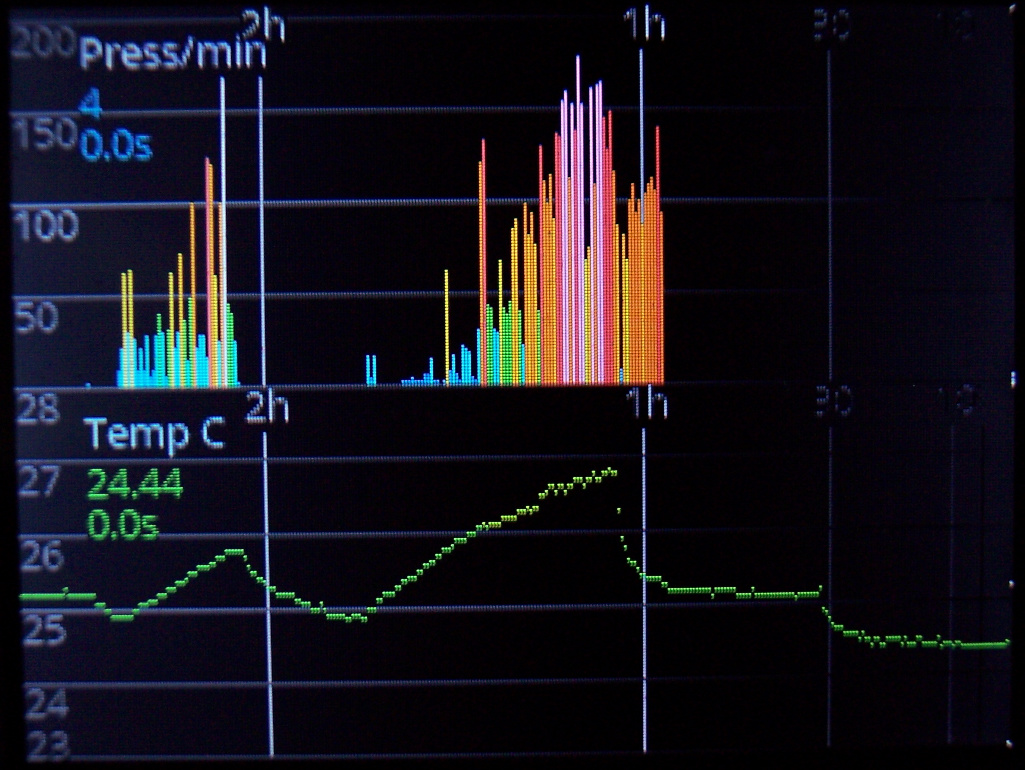
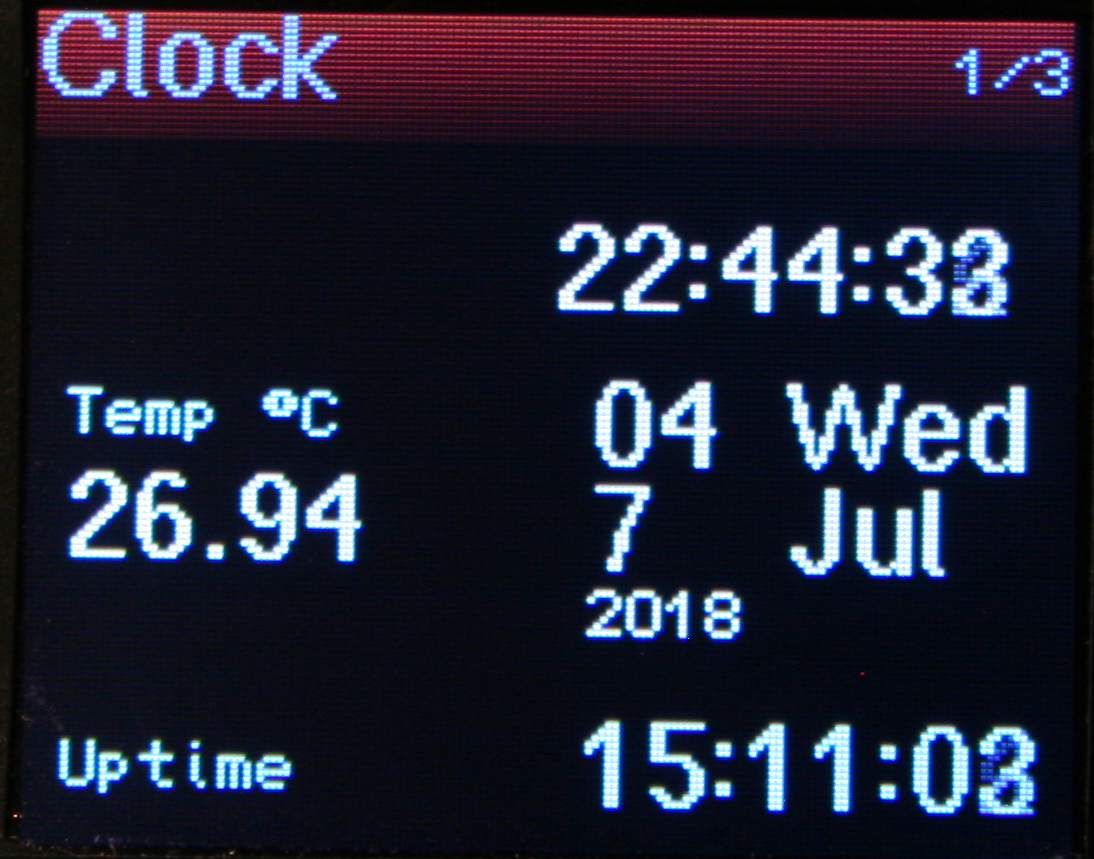
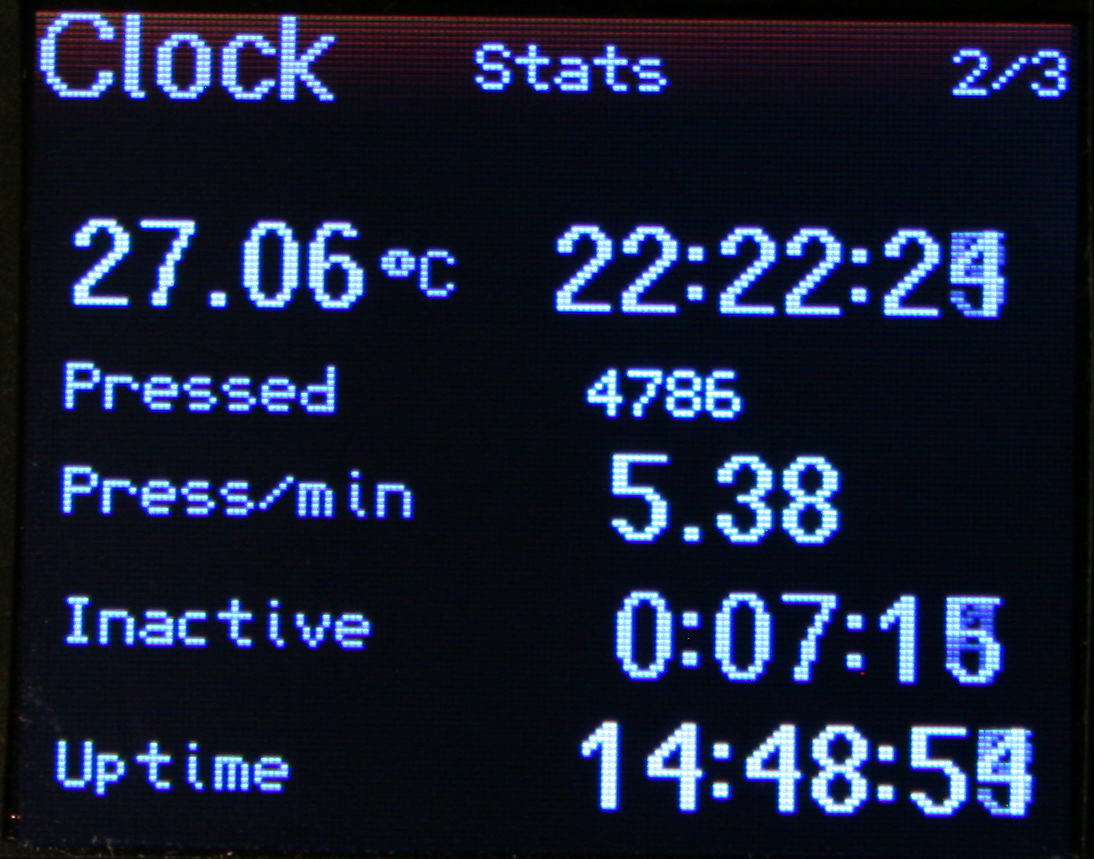
🕙Clock
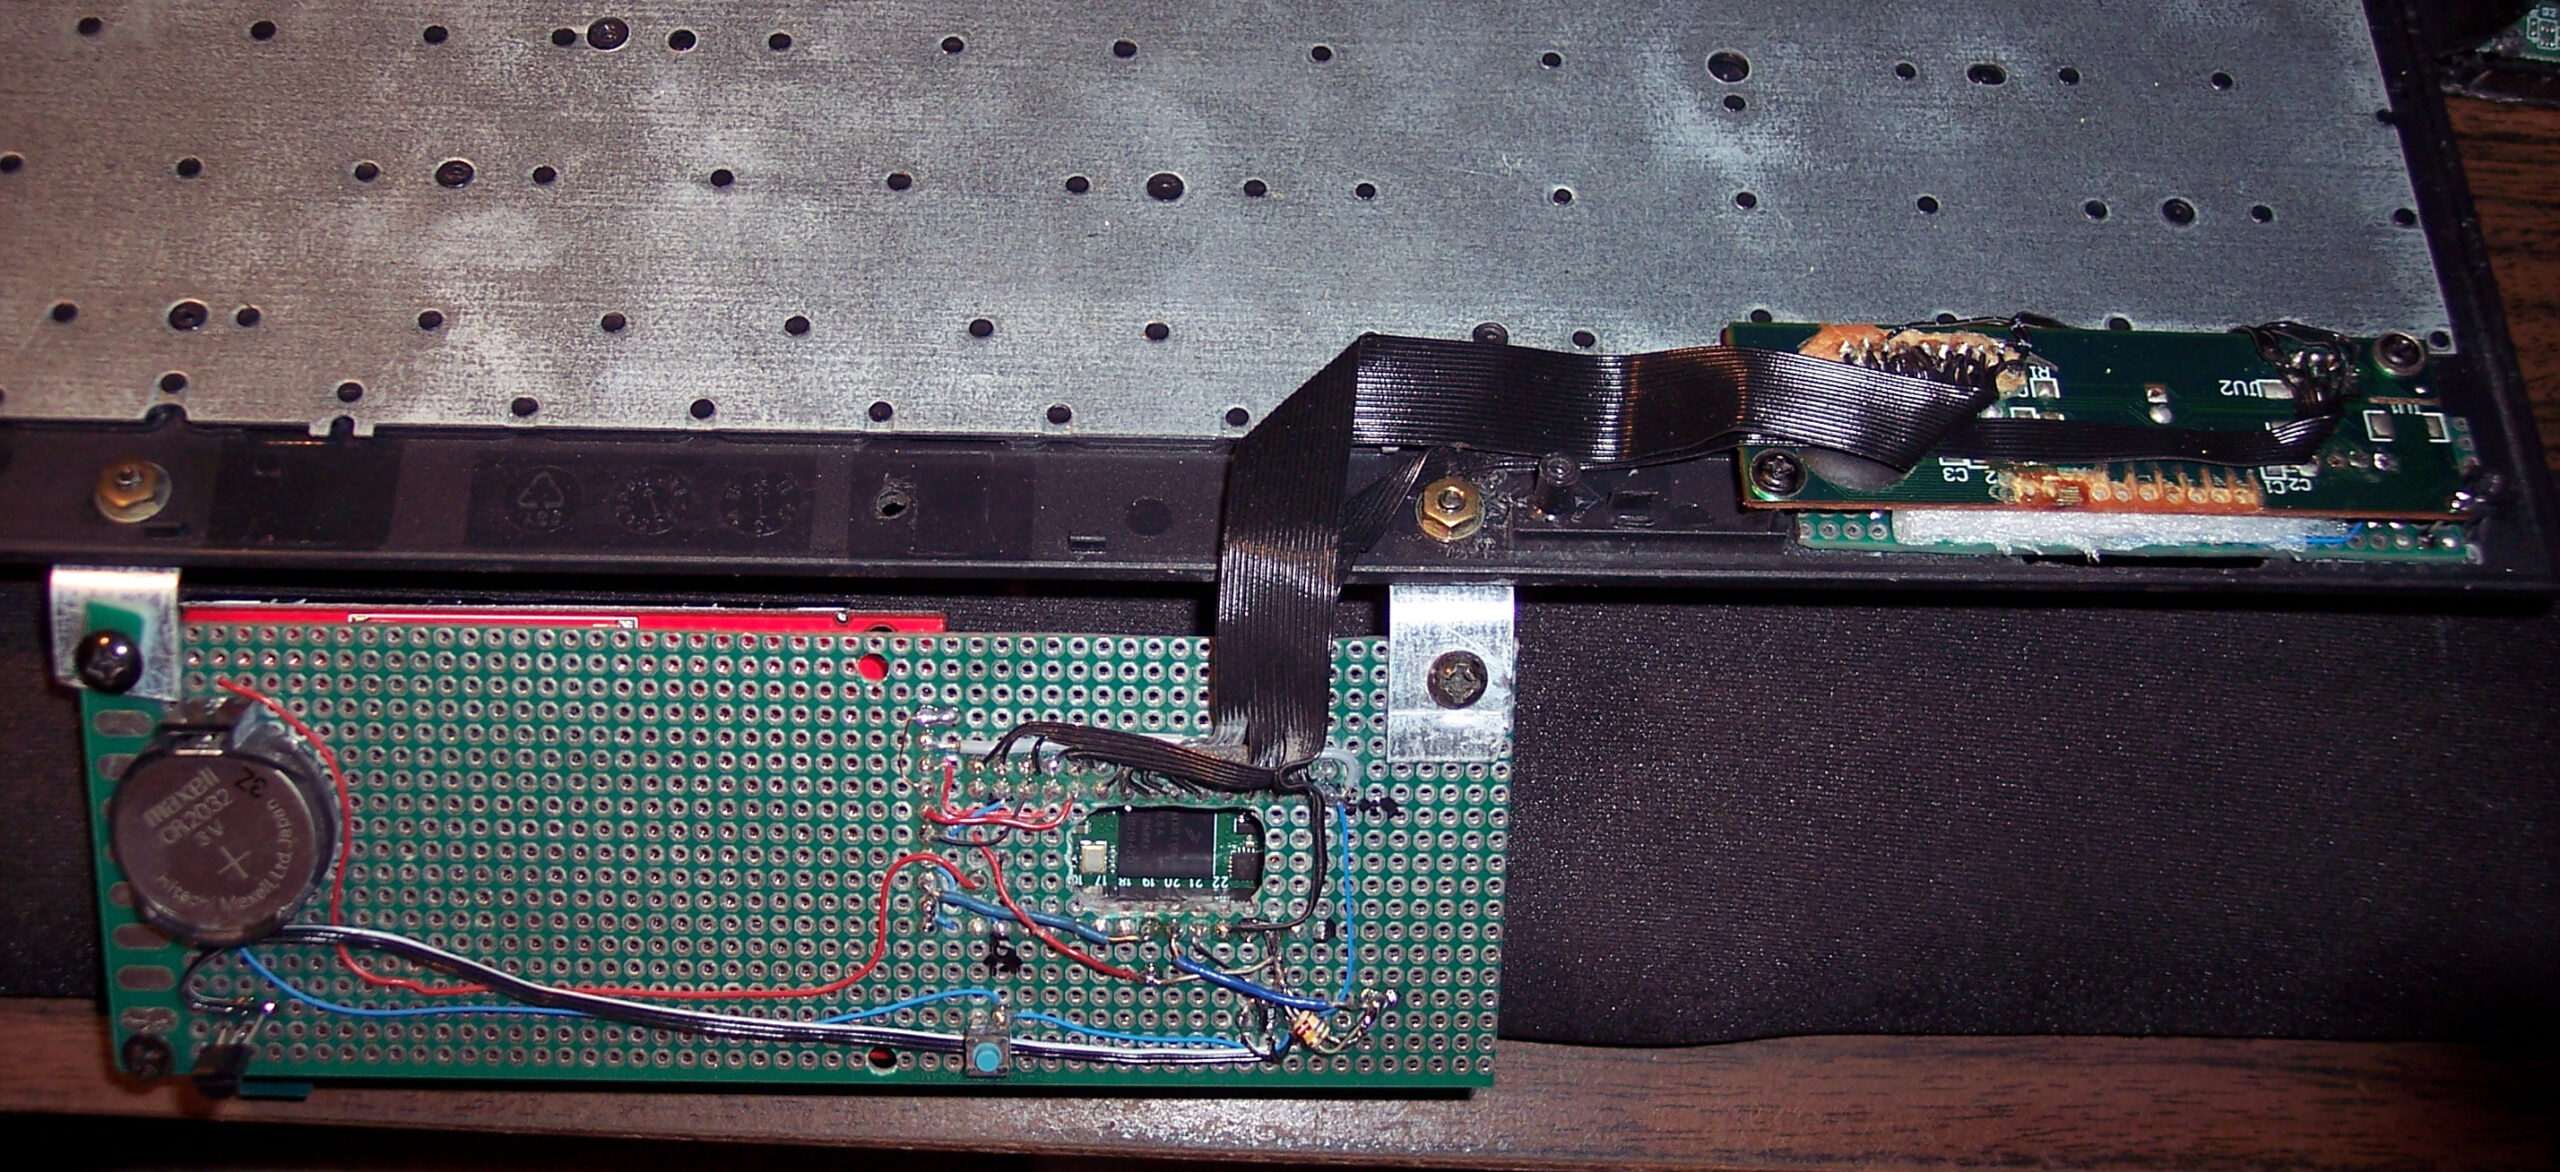
With date (uses internal RTC, needs 3V battery). Also showing Temperature, read from attached DS18B20 1-wire sensor (optional).
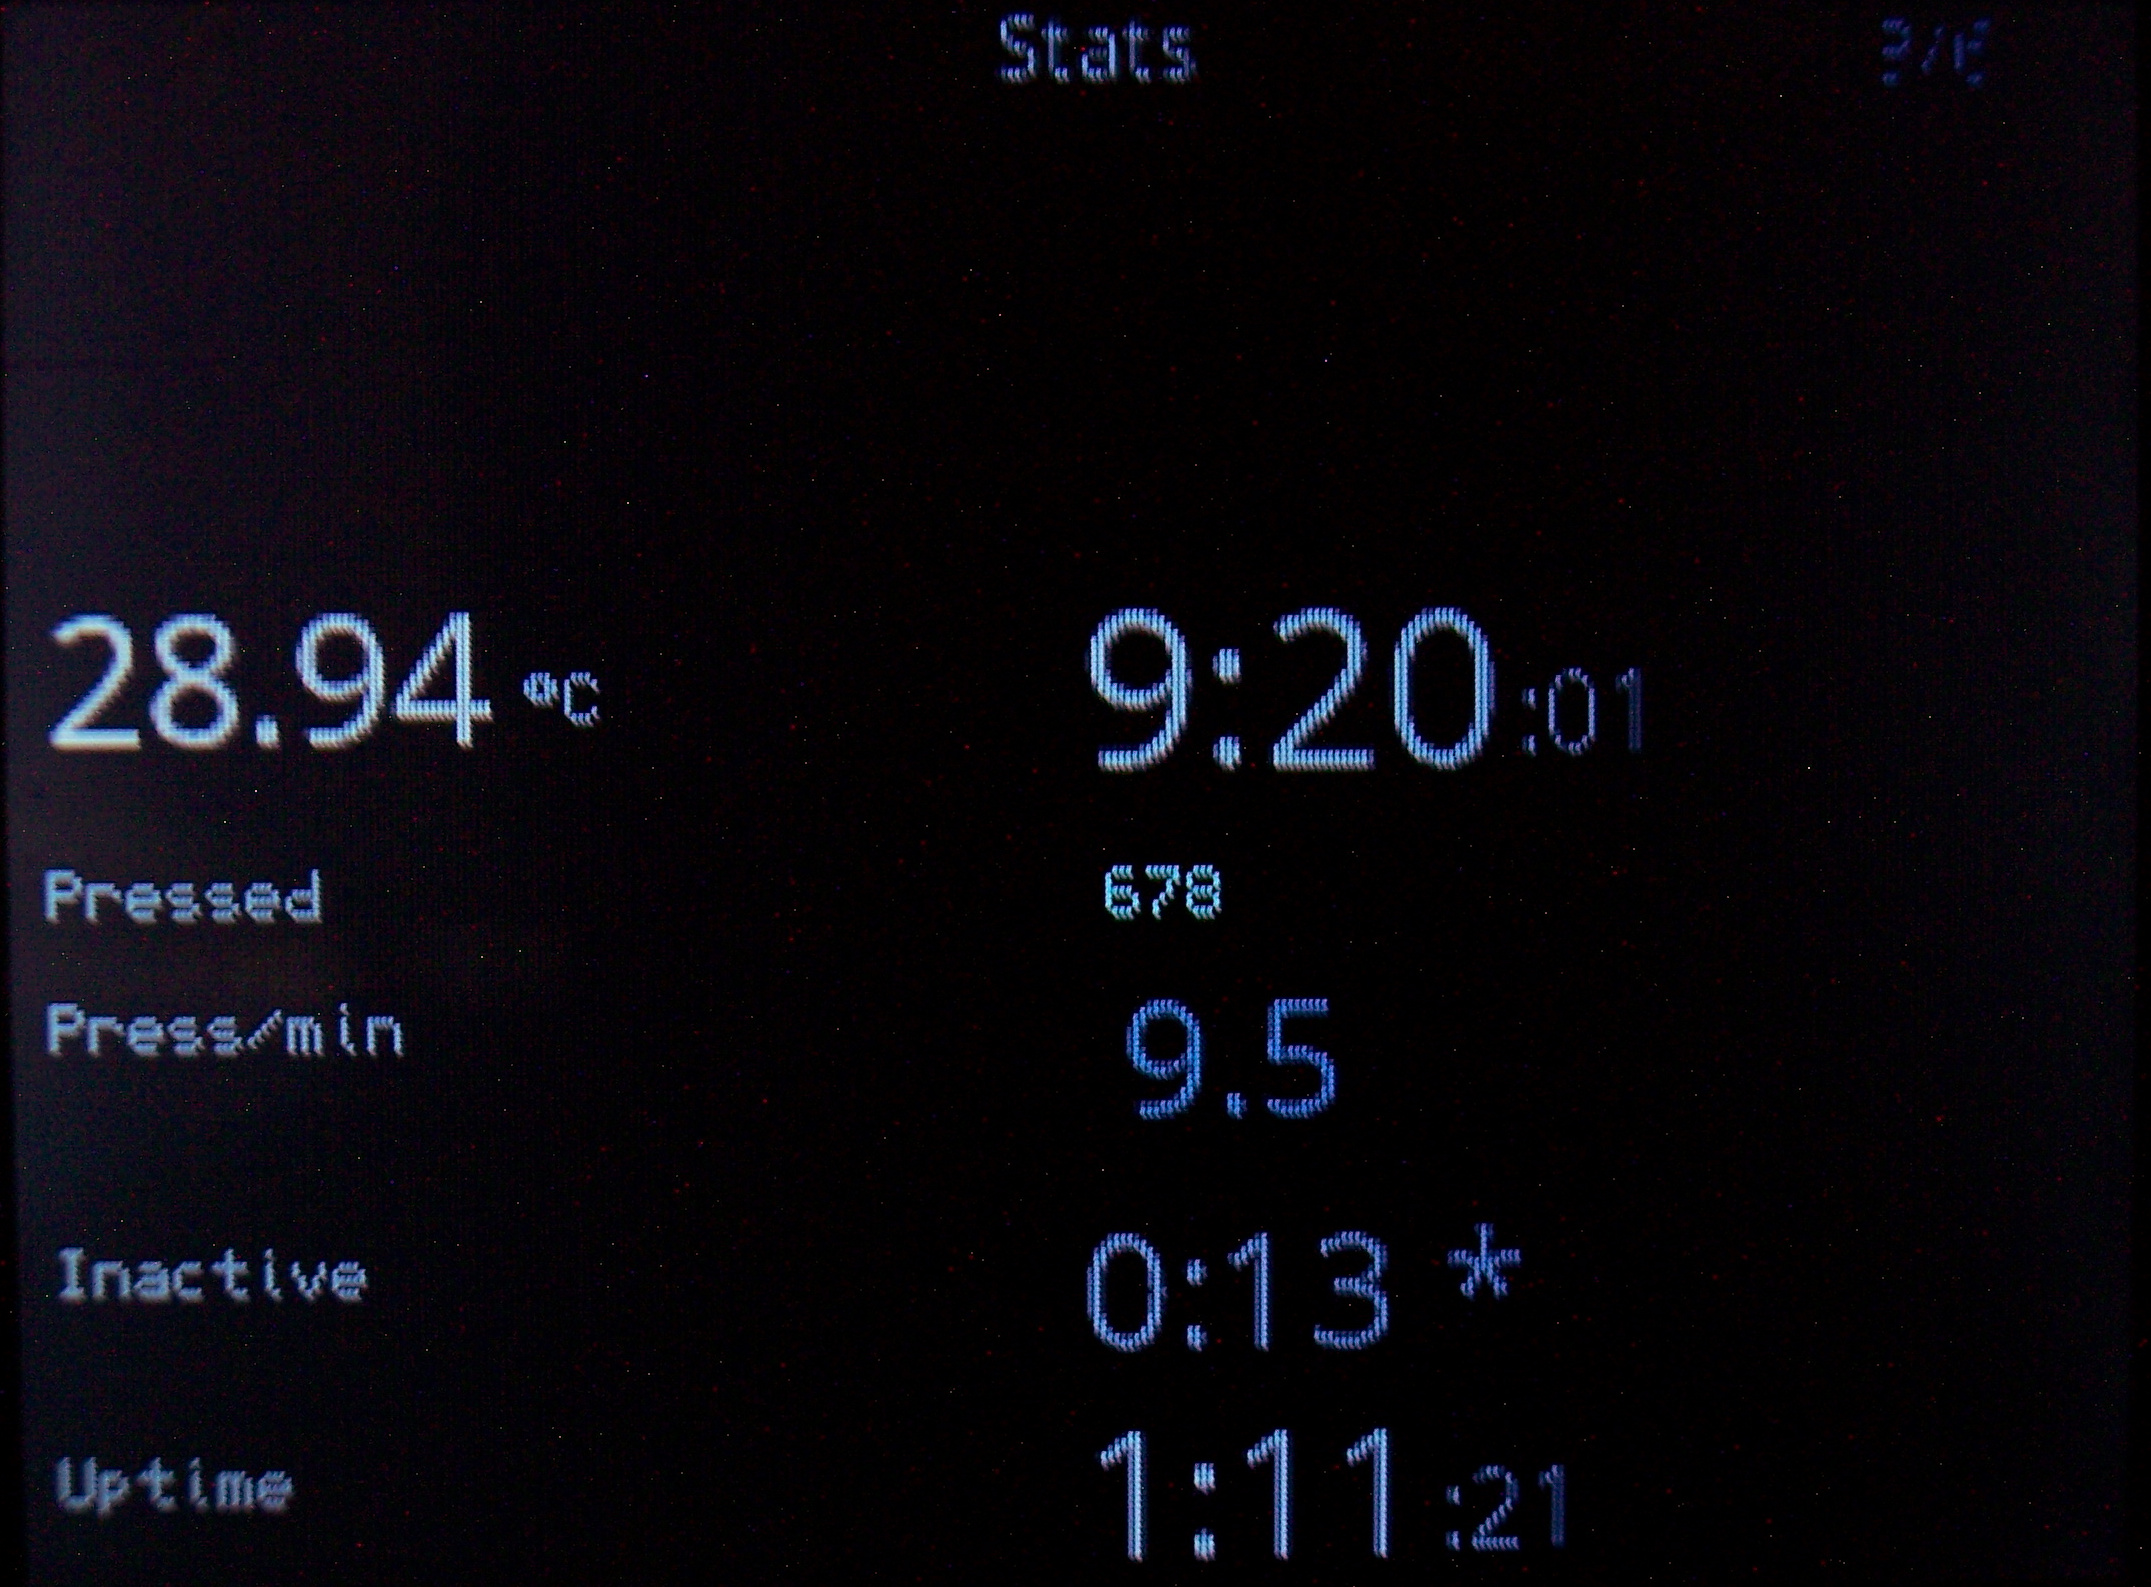
📊Statistics
Clock also displays (on its extended pages) keyboard use statistics:
⌛Uptime. Time since power on or plugged in USB.
🌌Late hour background. Will start slowly showing top of display orange at 22:00 and every 0:30 min going more visible, being yellow after 0:00 (midnight). This is to notify and motivate me to go to sleep when I sit too long at night.
⏱️Active time. I.e. how long I use keyboard without a break (at least 5 min, can be adjusted). Changes color from value. This is helpful to know if I’m doing something too long on PC. After all, it is recommended to take 5 min breaks every hour, it is healthy for spine and hands.
❌Inactive time. The opposite. Useful to know how long was I away from PC (keyboard). Also changes color when over 1 hour. Meaning I probably should have turned it off, to save power.
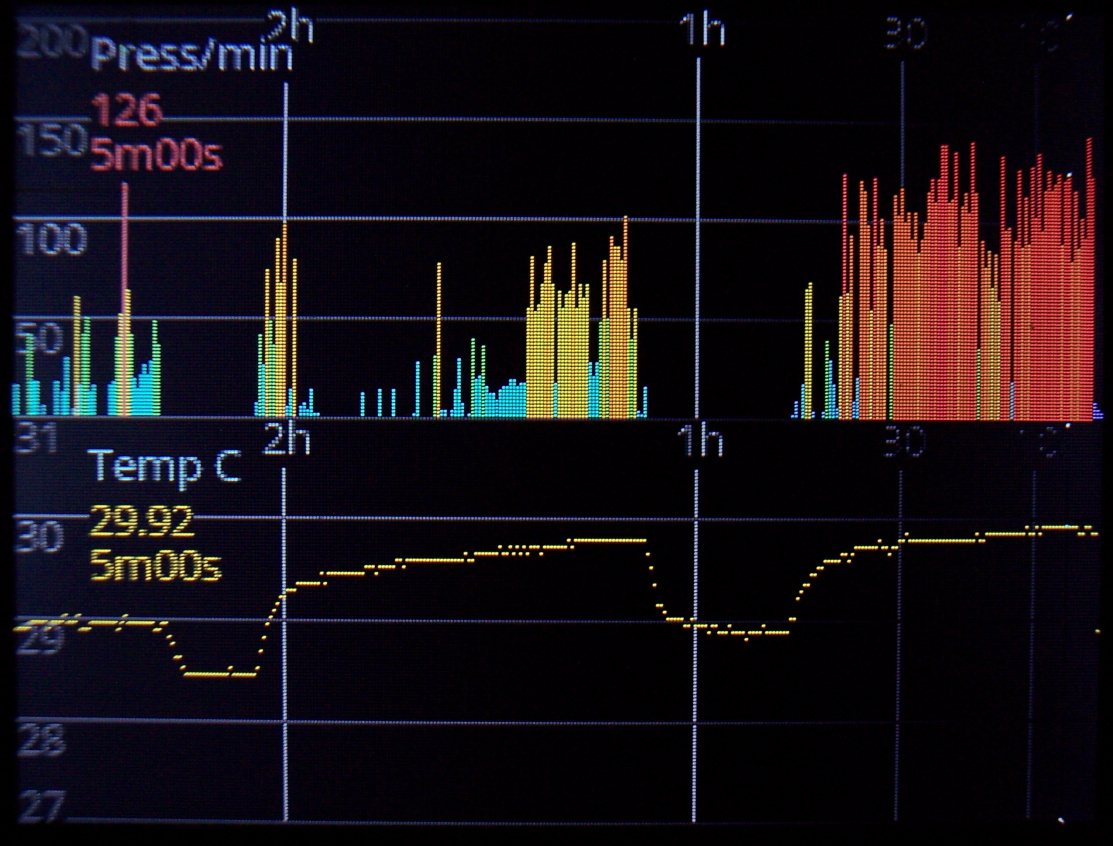
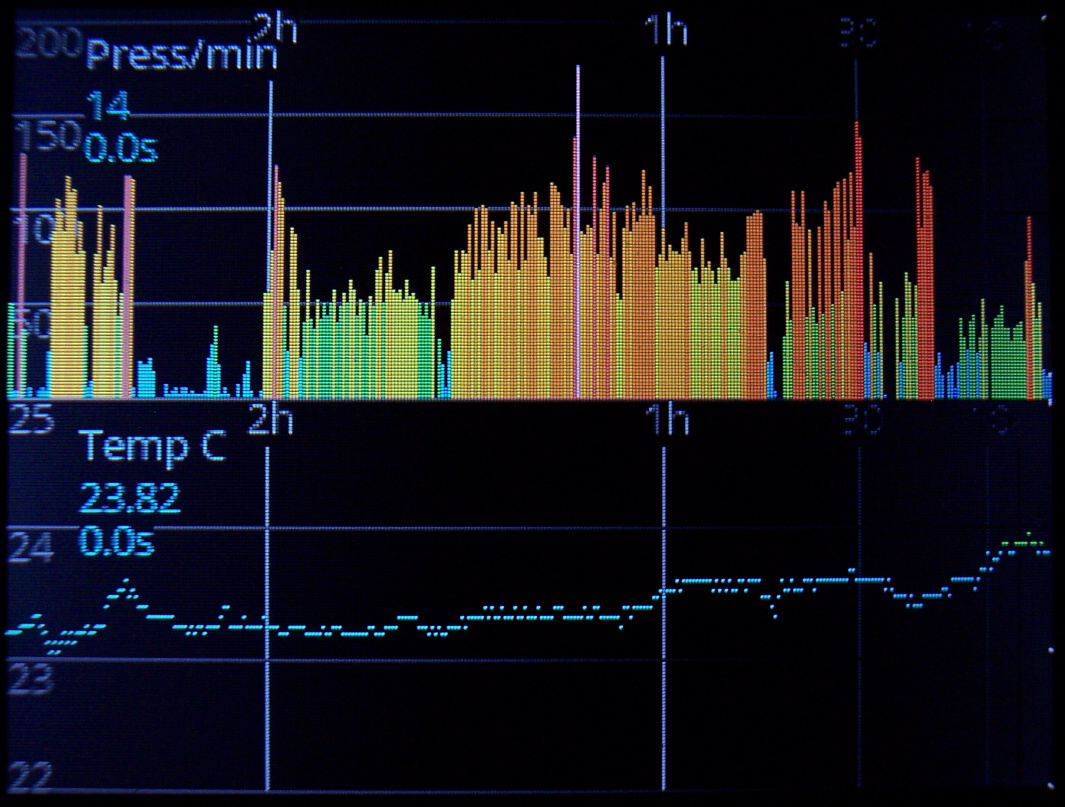
👇Press/min. Typing frequency, so how much key presses are done every minute. A colored value on left, going e.g. red at 120, yellow starting at 50. Also a second value below with total average since power on, with slowly changed value. So it is useful and directly corresponds to how tired will hands be. It’d be great to keep this value below 50, but sadly writing any text (e.g. chat, email etc.) or playing a game makes it go even above 150.
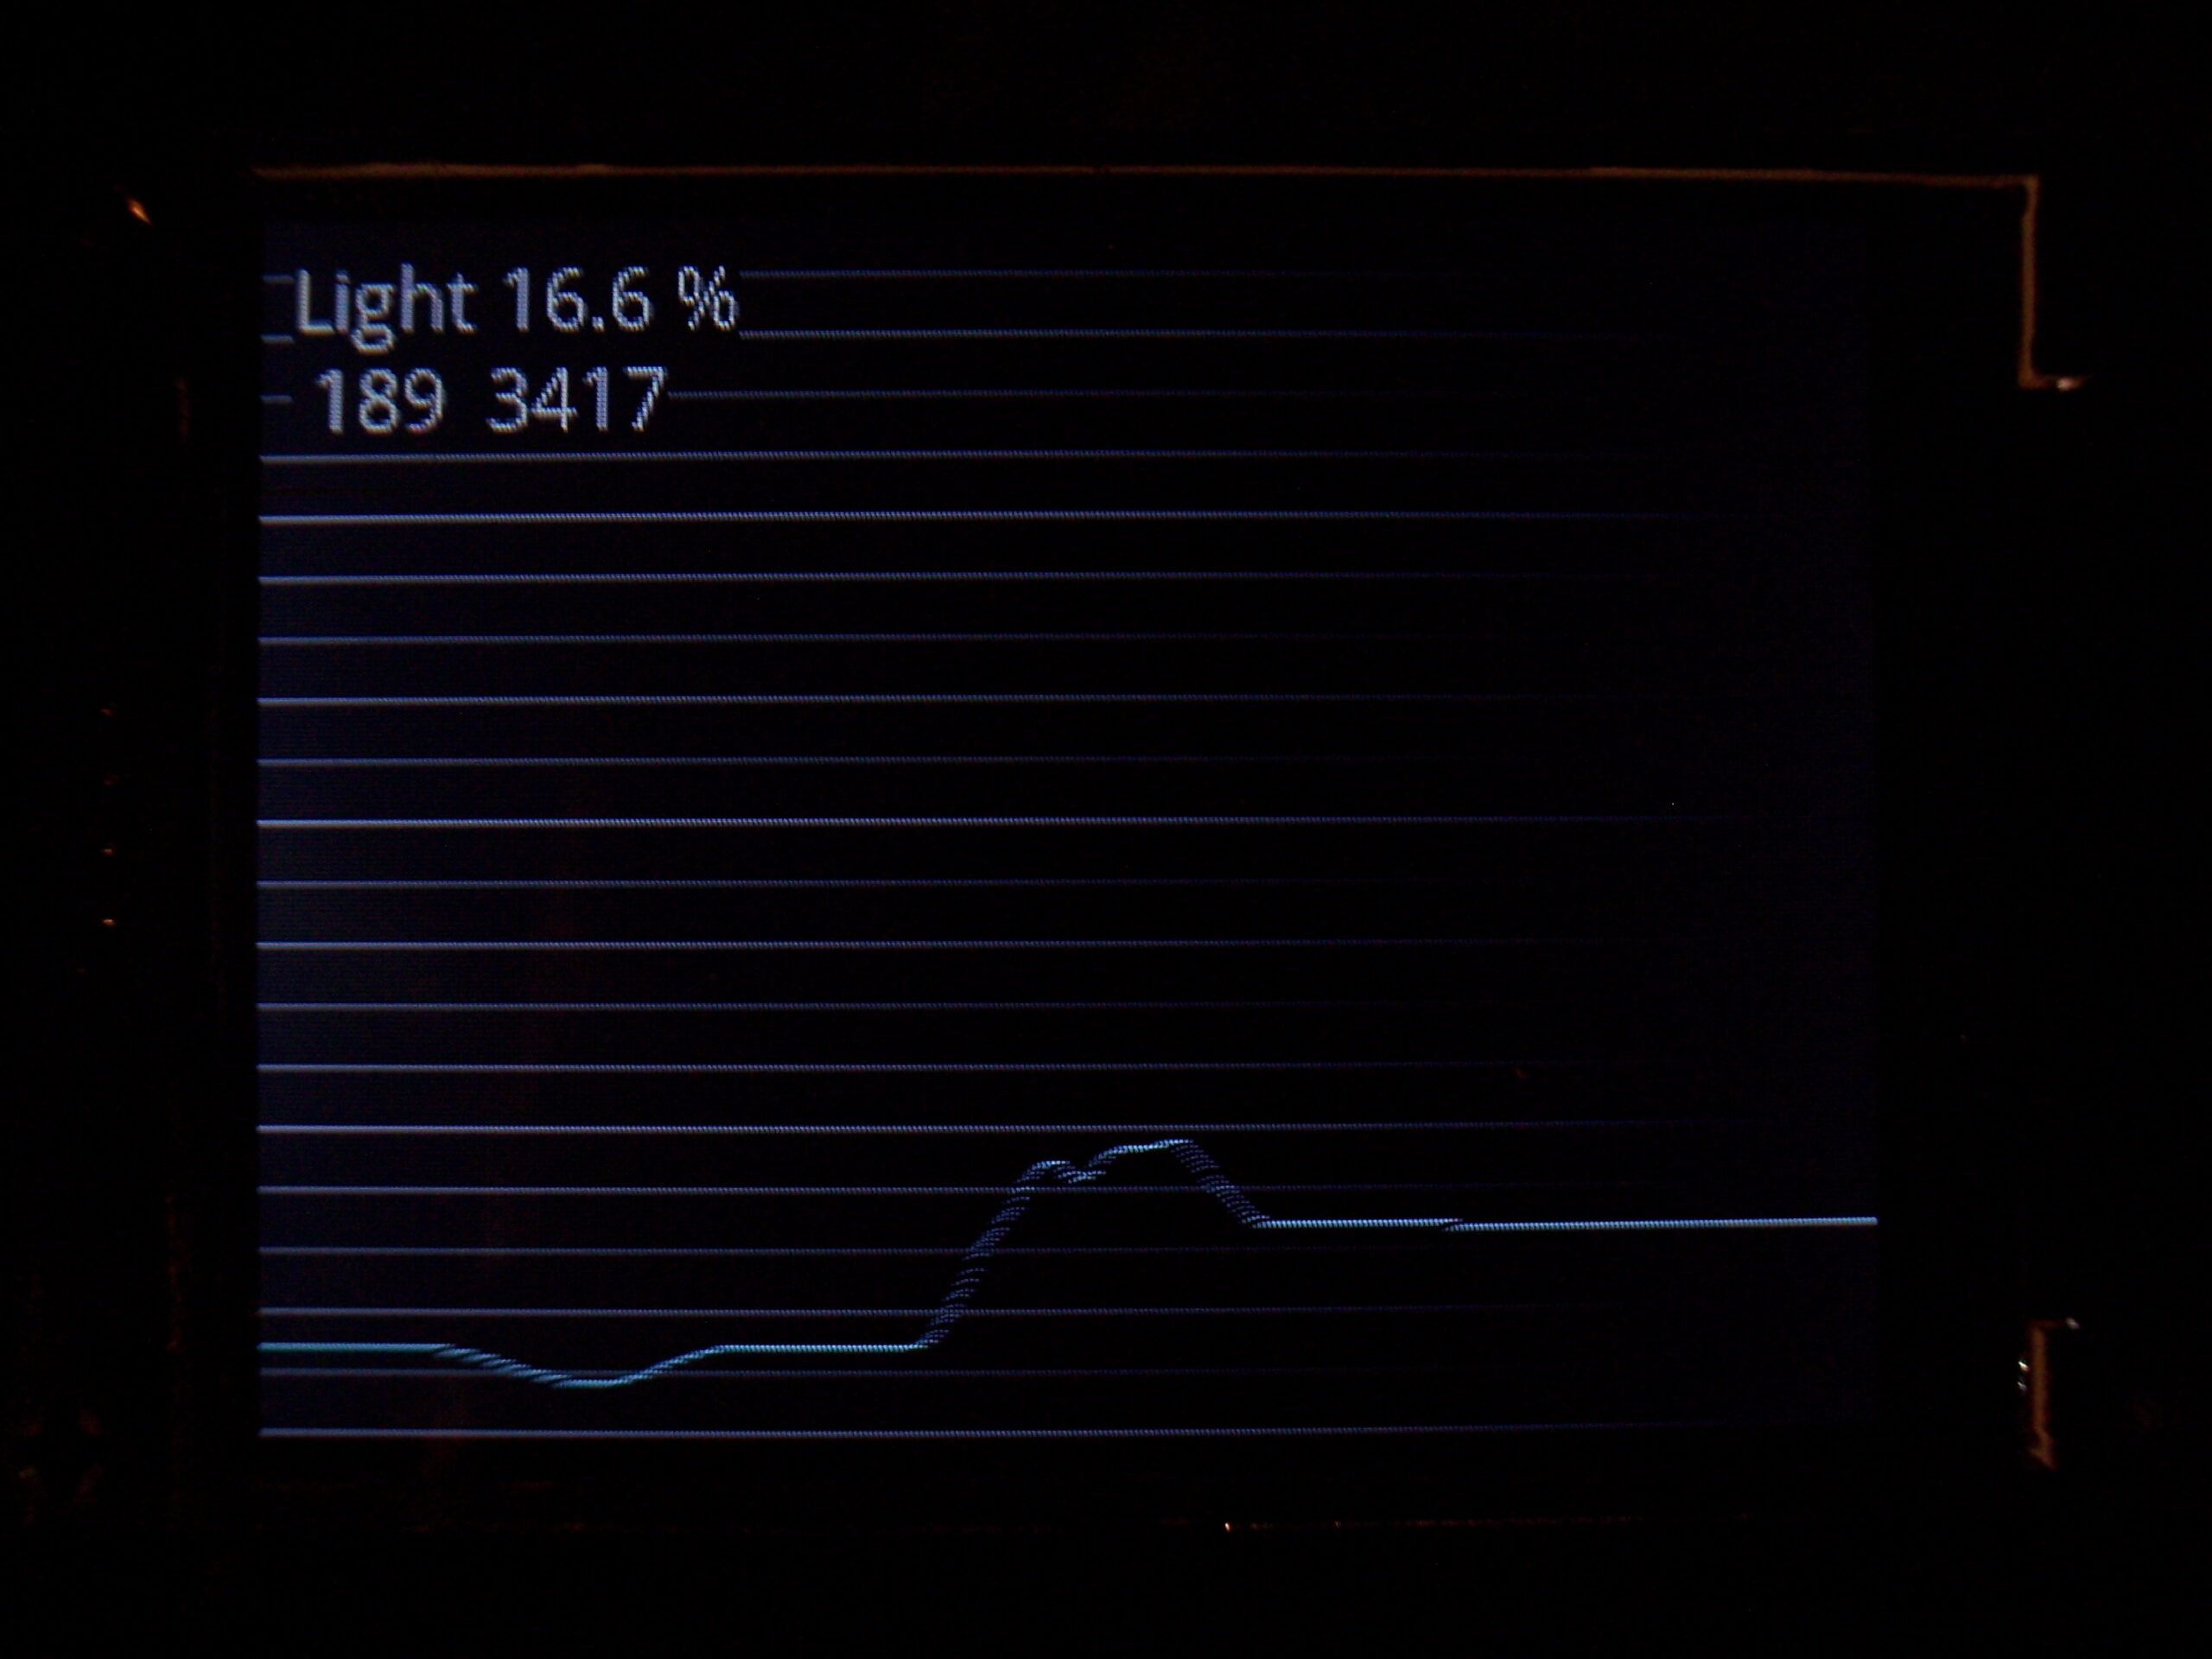
📈Graphs
As a part of clock, they show history of using keyboard (key presses/minute in the past hours). Second one is for temperature history. There are 320 points on display width and parameters for how often a value is added to graph.
⌨️Keyboard CK9
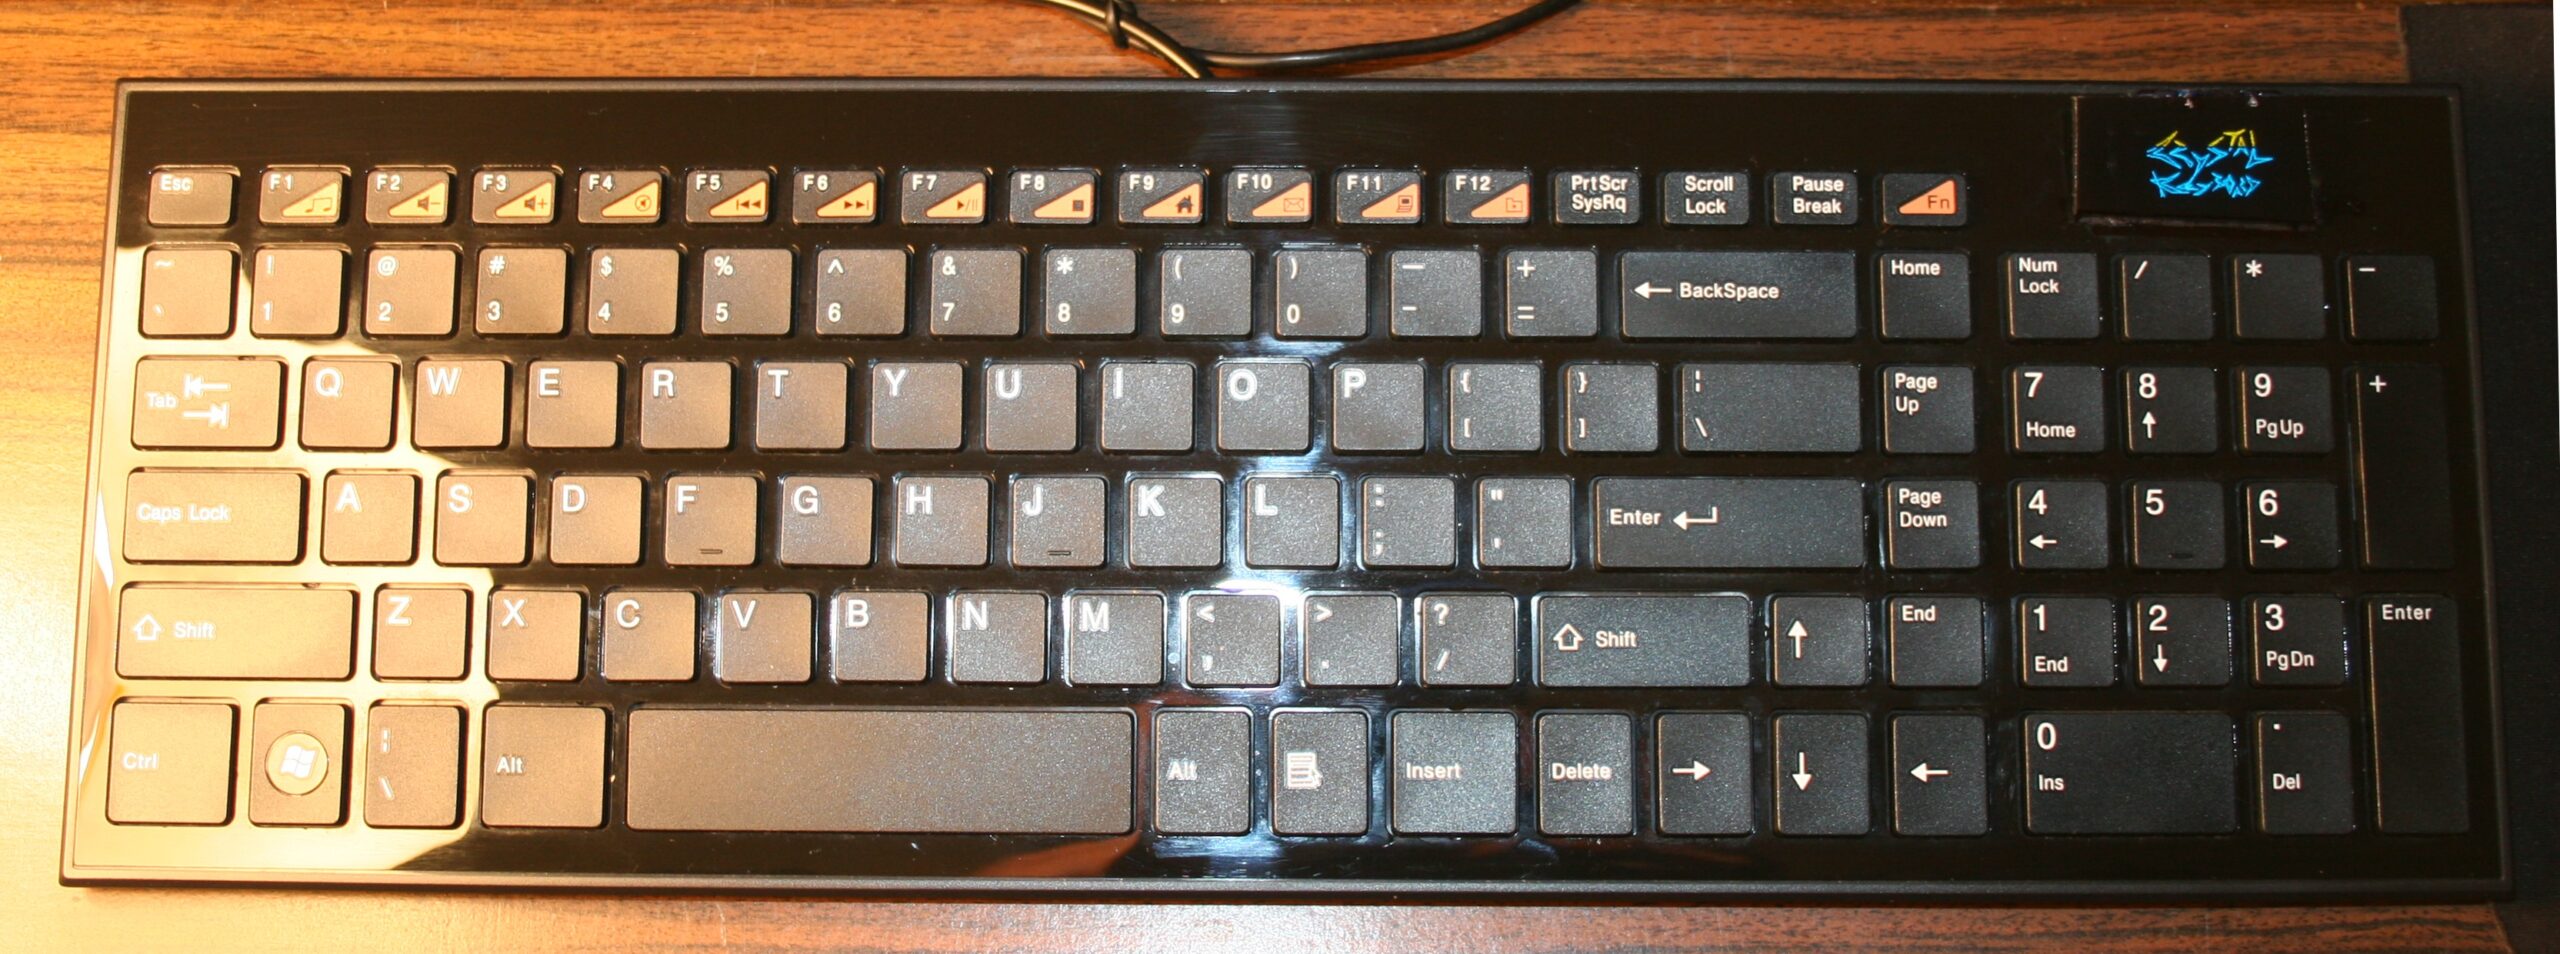
I upgraded my 2018 keyboard CK6 with this bigger display and K.C.4 and it became CK9. I also added tiny extra keys, lots of them. Above Numpad, 2 rows of 8 or in other words 4 groups of 4. Surely will come handy for e.g. internal functions or could be extra F13-F24 keys for OS. The keyboard has visible tear on few keys already, well I use it since 2016 (was CK3 first). Nothing yet, compared to the 14 year old one (CK7/4/2).
✍️Motivation
My previous version of KC and keyboards with it were quite useful and the 1.8″ color display was good too. The keyboard drawn on screen was minimal. Keys with one letter/digit/symbol had a 5×7 font, but 2 letters needed a tiny 3×5 font. It worked, but didn’t look great. So the new display is bigger 2.8″ and has about 2x resolution (320×240 vs 160×128).
The main reason for this upgrade though was the new Teensy 4.0 with a MCU that runs at 600MHz. It seems to be the fastest one available (on a board with USB, ready to use). And is even way faster than all previous. I already didn’t like Arduino in 2014 when I got interested in MCUs (again), seemed like a stone age relic compared to Teensy 3, but today I can say they probably have computational power of a rock, when compared.
The result is constant 45 frames per second almost always. This is what 600MHz MCU with SPI set at 60MHz for this display does, while using DMA for transfers and double buffered drawing (one buffer is being sent by DMA to display, while MCU draws new frame in second buffer, at the same time).
⚖️Comparisons
Of course, there were many projects of using a big display with slow MCU even. A MCU not having enough RAM for screen buffer. But this means very low refresh rate (low Fps) and flickering (blinking when redrawn).
There are few open source keyboard controllers, I think none of them even have a display, and some still use ATmega 8bit MCUs. Their requirements for program and RAM (memories of a MCU) are minimal, way lower than mine. And the price will be lower too. But the main flaw coming from it, is having to compile on PC and upload to MCU after any change. This is a big nope for me.
📢Rants
So for me, this is now the present (not the future anymore). And well honestly, whenever I see a custom keyboard picture I’m just asking: “where’s the display?”. In addition, seeing Cherry MX or any switches turns me away immediately.
Because there is one more very important thing that is the light press modification. All my keyboards since 2005 have it and it’s just the default for me. Sadly all commercial keyboards are garbage in this matter and people continue to produce keyboards that have a tactile feel, 4mm travel and around 50 gram force to press. Well for me this is the middle ages era. This can cause injuries (Carpal Tunnel Syndrome). And I guess it feels awful for those having pain from using such keyboards.
For my modding process (of reducing rubber dome keys press force and travel) pictures are in this gallery and I made a video of it recently (it is CK5).
✅Summary table
For reference, here is a table with current status of all my keyboards, since start until present day:
Name
Assembly year
Original keyboard
Keys actuation
[gram force]
Notes
CK3 > CK6 > CK9
2016 > 2018 > 2020
A4 Tech KX-100
23 g
Cheaper, bit wobbly, but more keys
CK2 > CK4 > CK7
2005 > 2016 > 2018
Logitech Ultra X Flat
33 g
Stiff foil, old, extra keys
CK5, CK5b
2015, 2020
A4 Tech KV-300H
9-18 g
The lightest foil
CK1
2004
Logitech Ultra X Flat
25 g
First, old, had extra keys,
now only for testing, 1 row dead 💀
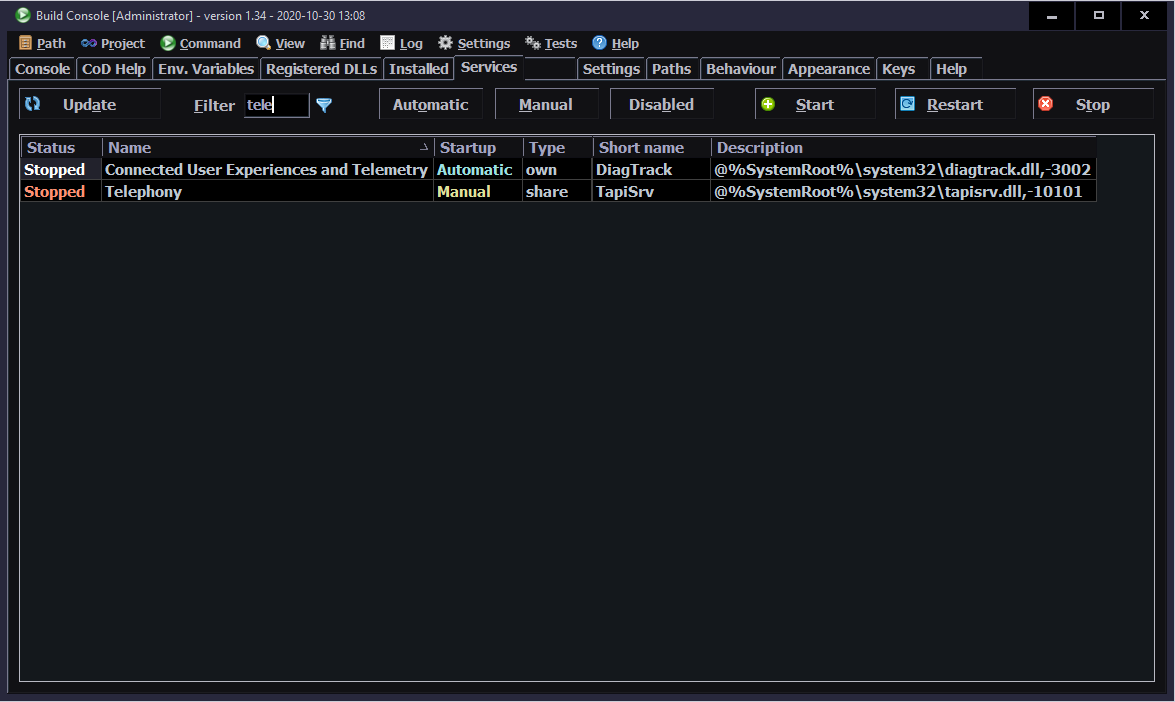
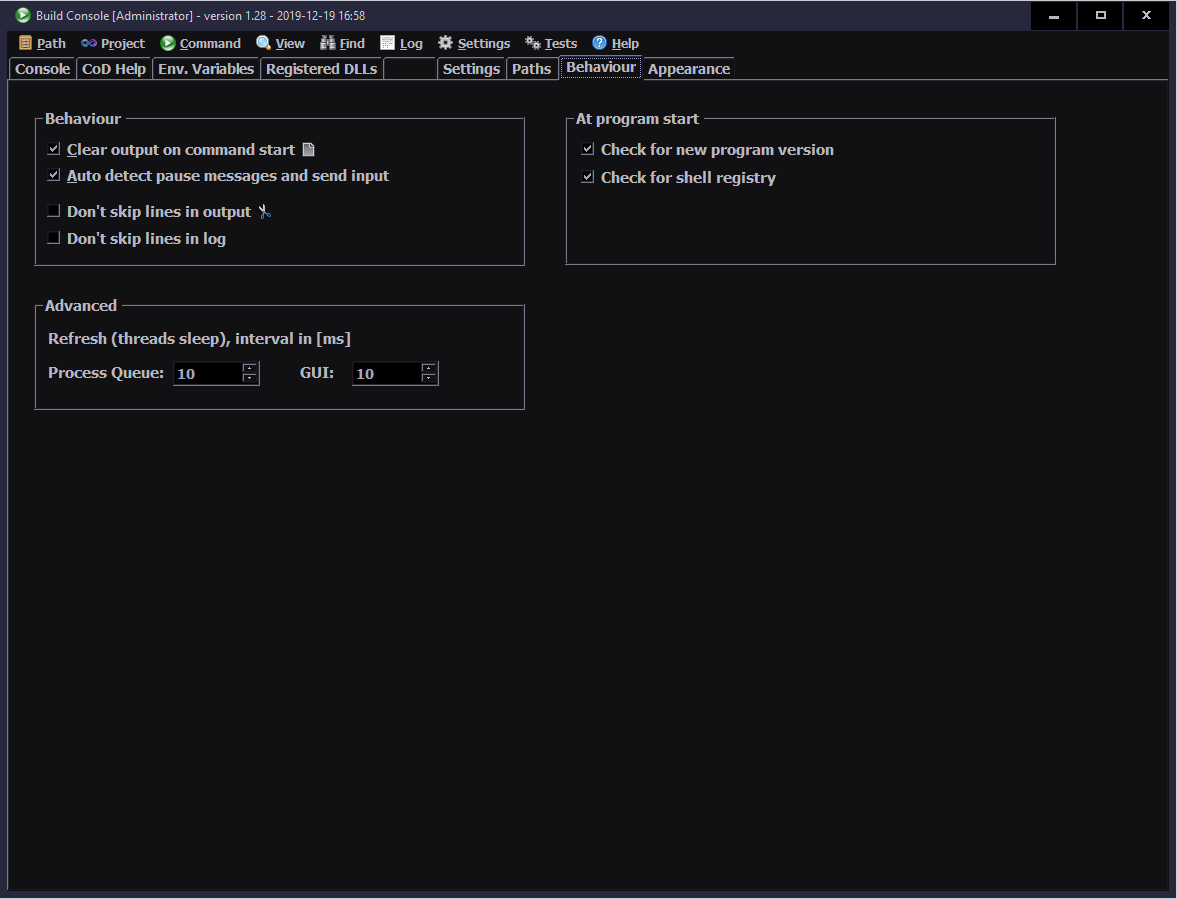
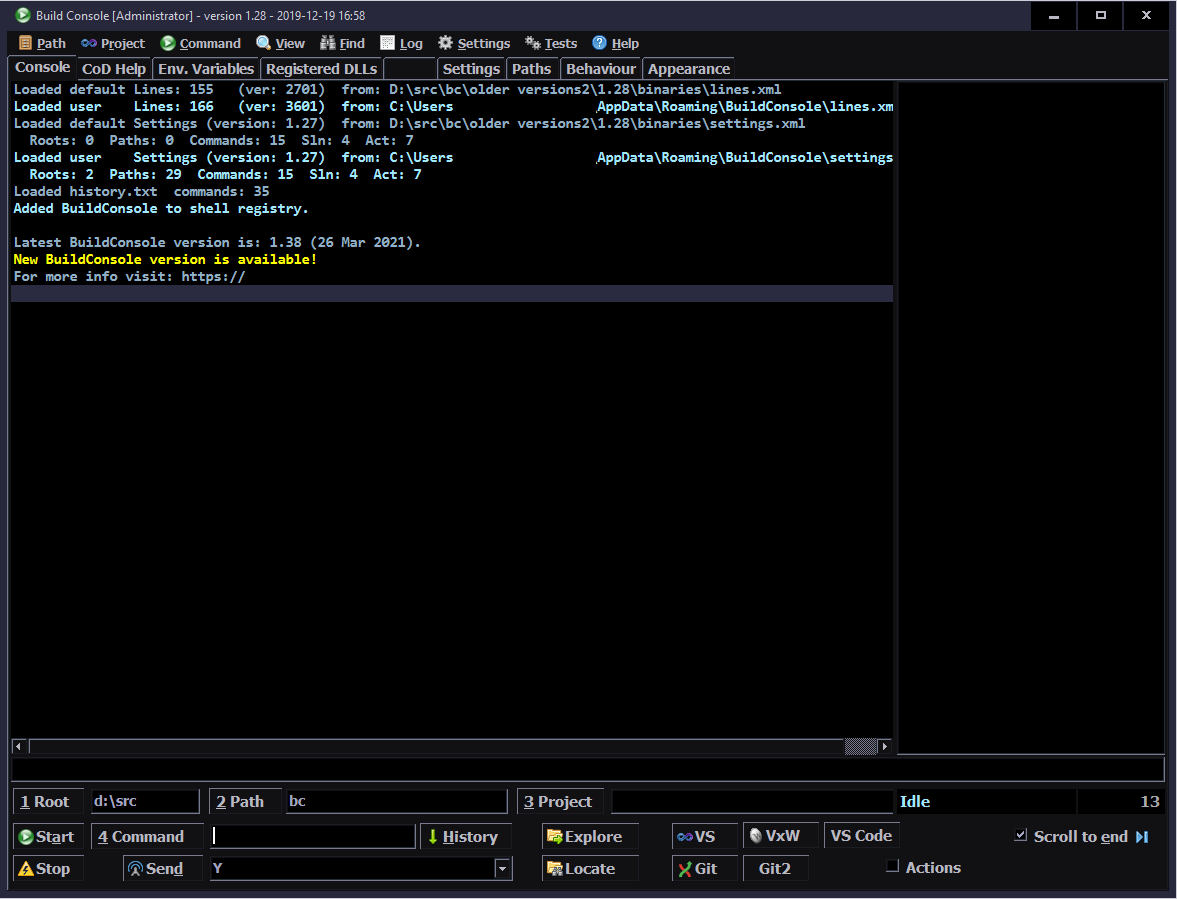
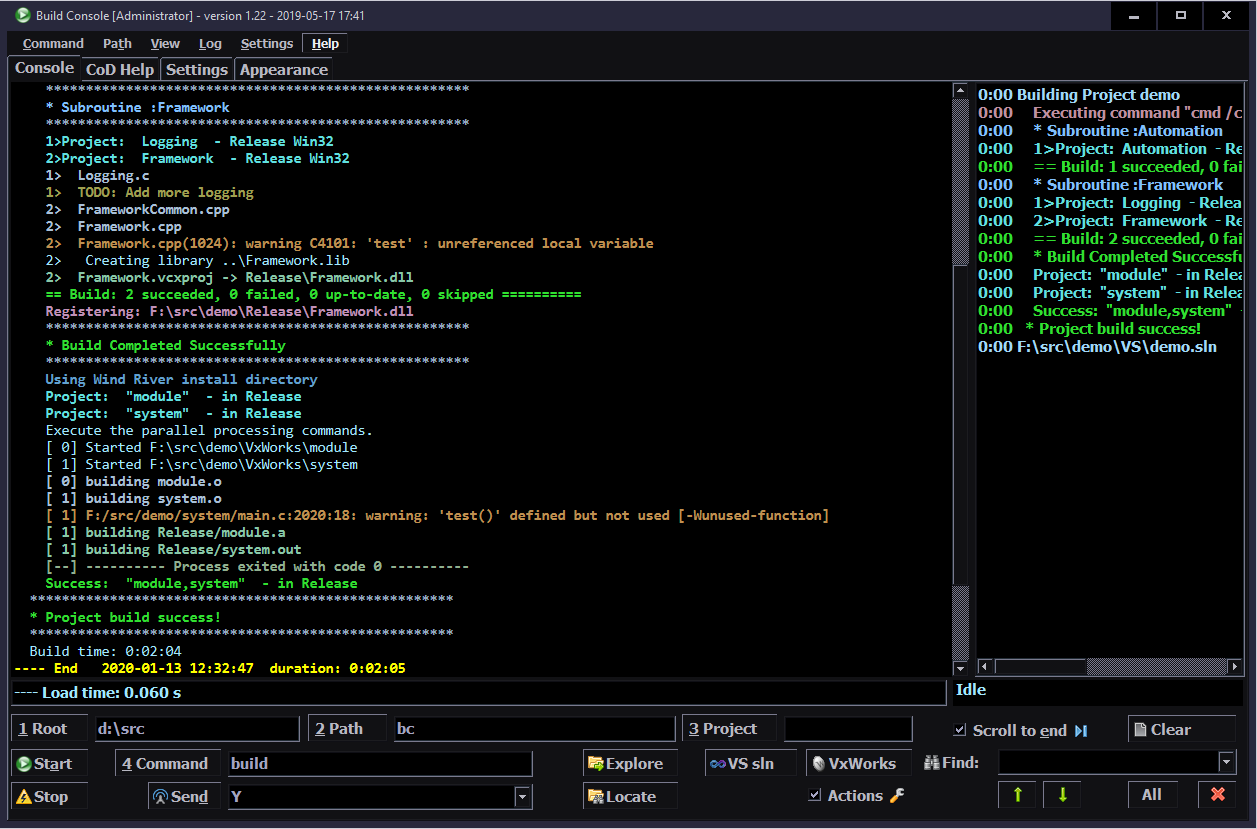
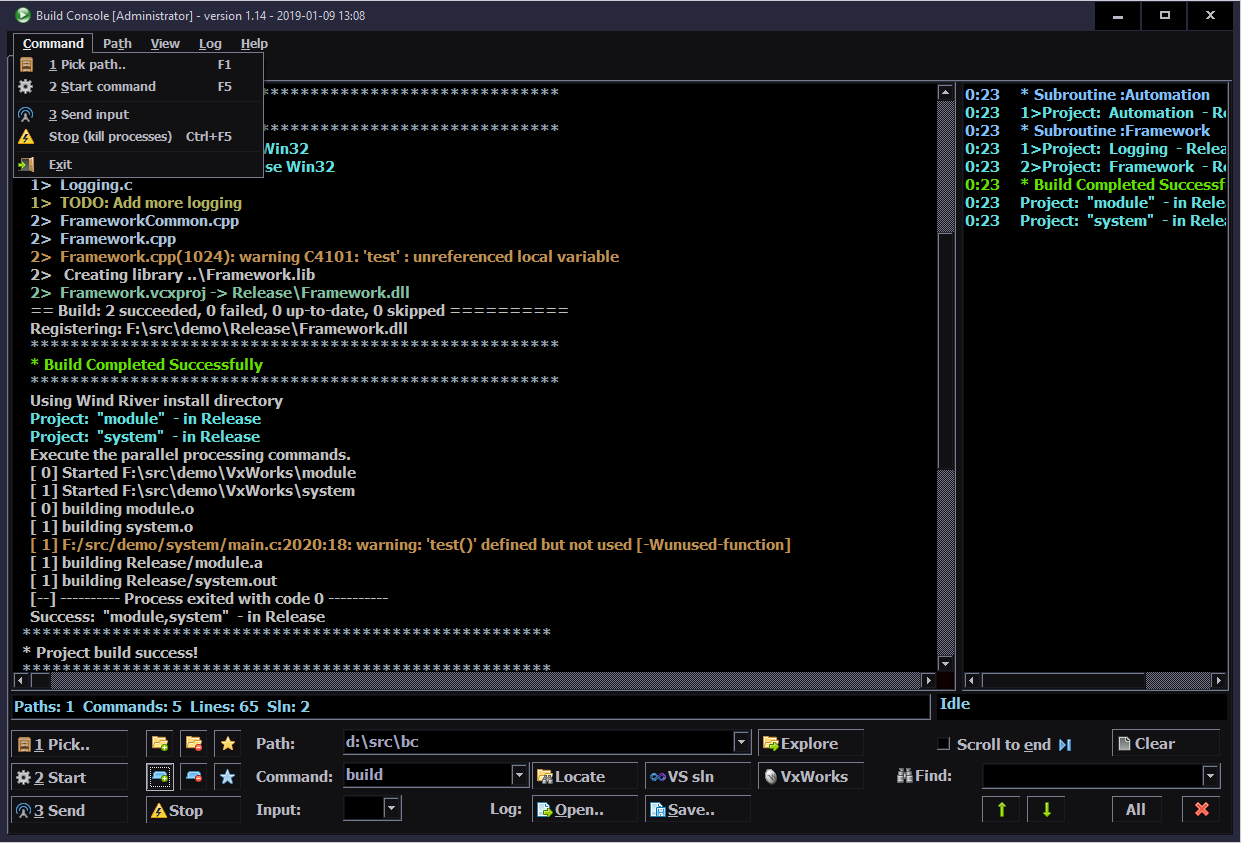
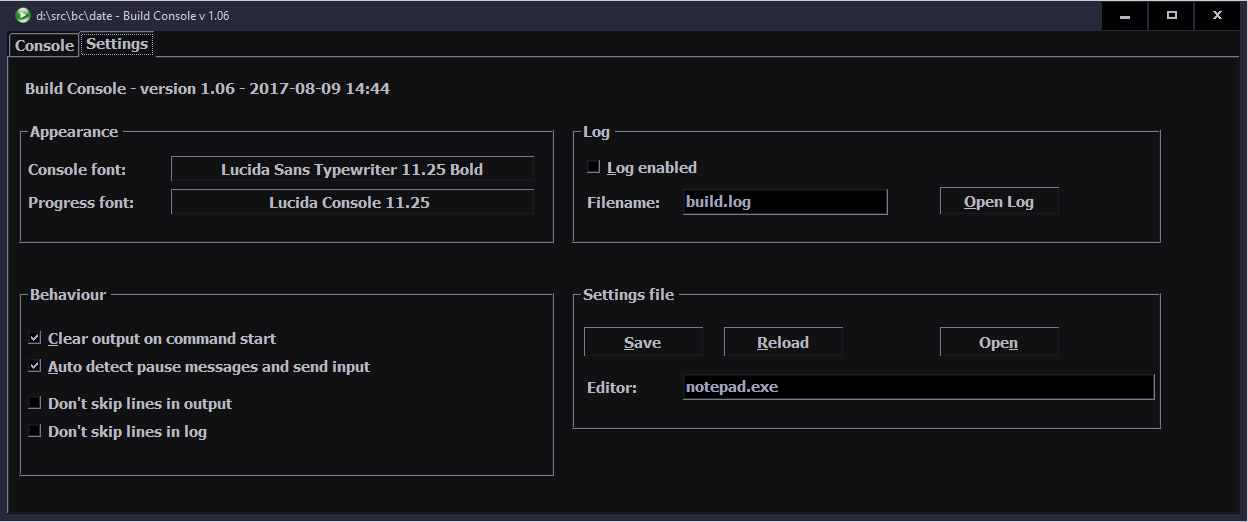
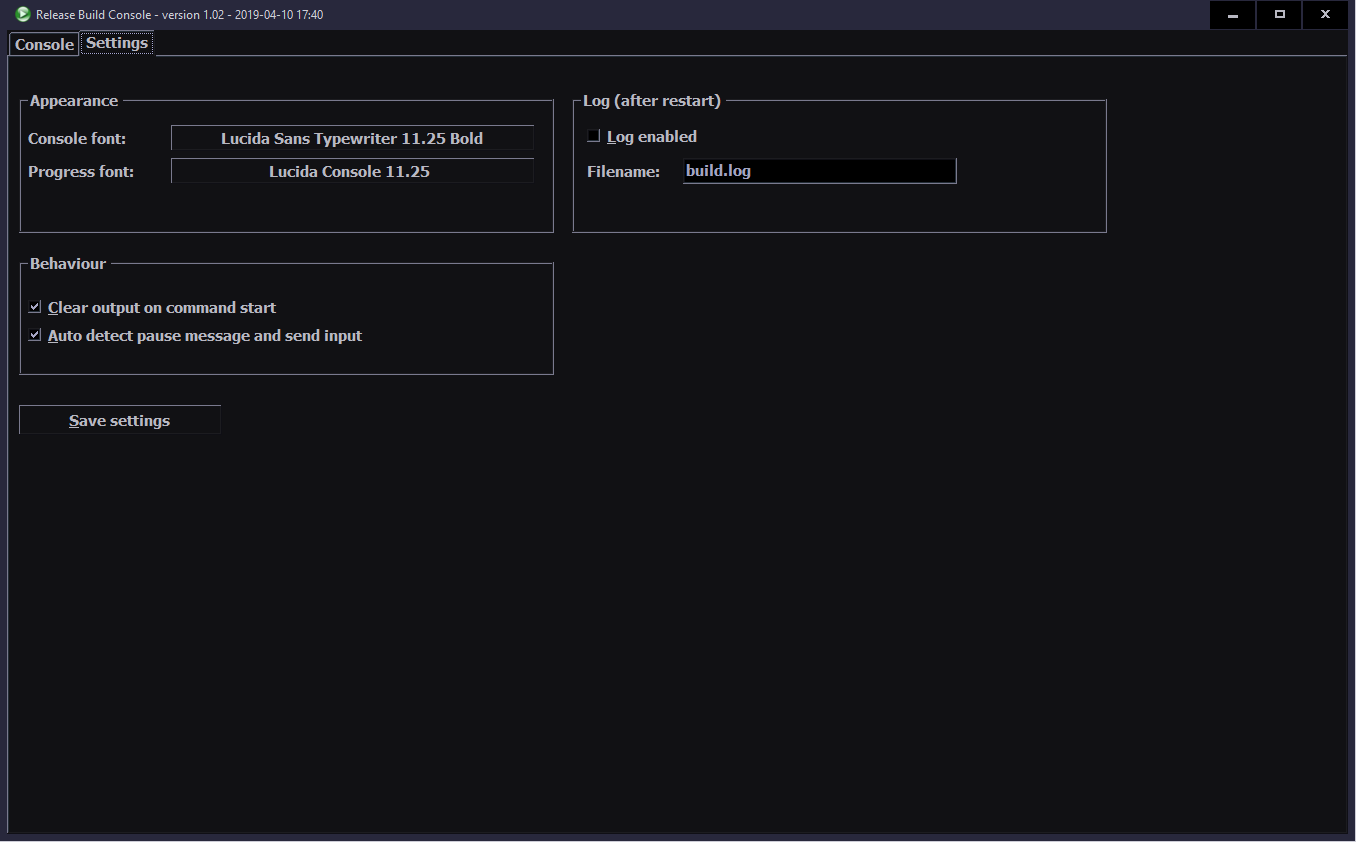
BuildConsole (BC) is the program I created and developed at work*, using C# (syntax here), in WinForms. Specifically to visualize output from build process. It surely is my biggest and most useful C# project so far. Unfortunately I can not open source its code because of that*. But I can share my experience from this process.
⚙️How it works
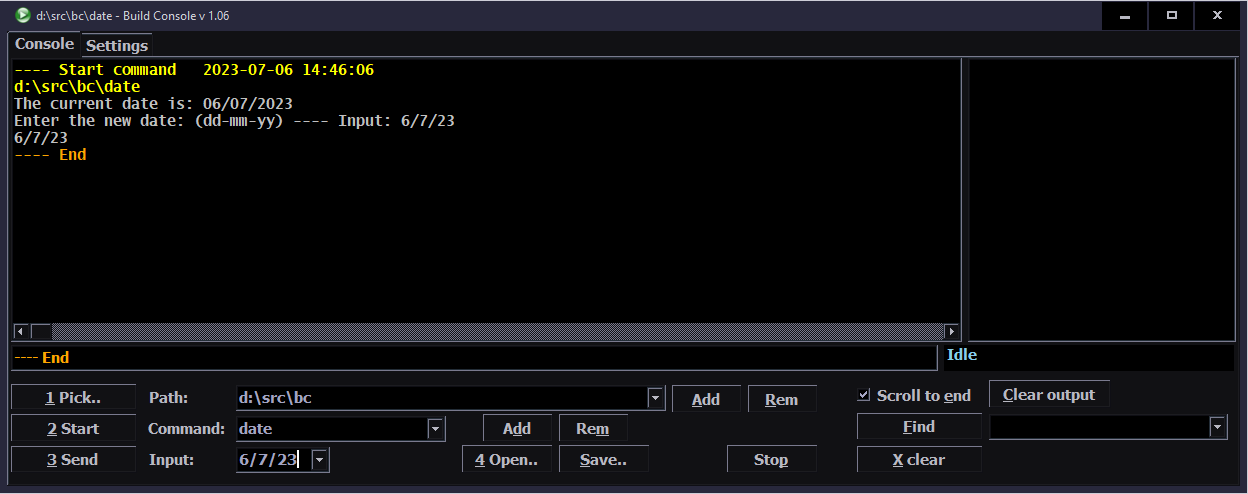
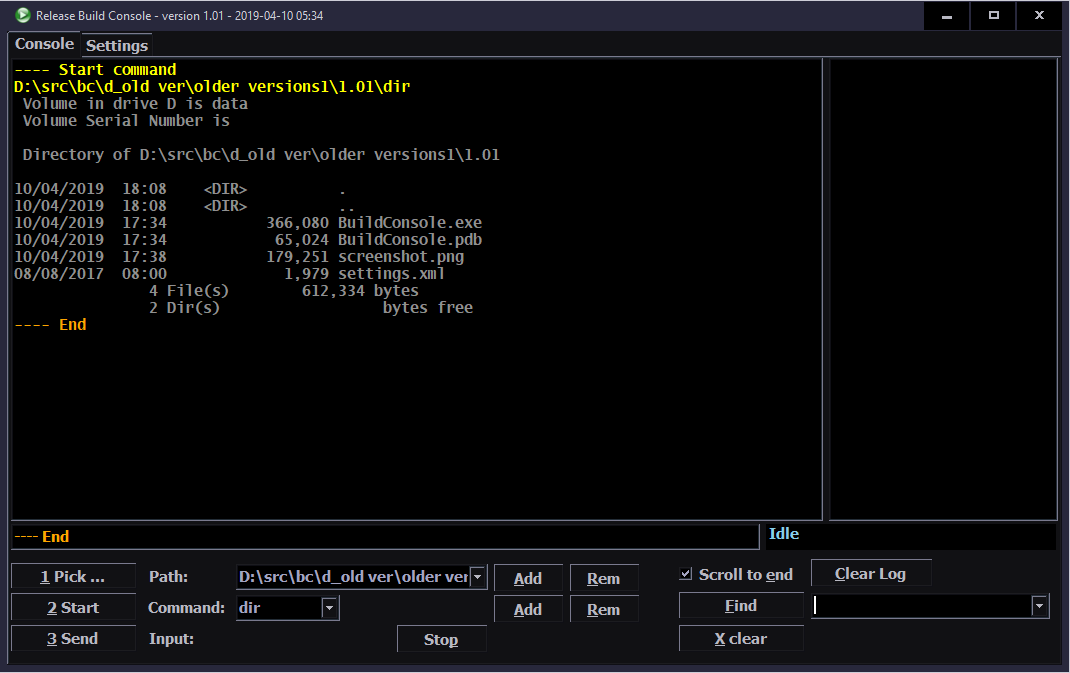
At its core, BuildConsole replaces the Windows cmd.exe command prompt (terminal) and will run any command too.
It does so, by creating a process and redirecting its output, error and input streams. For the core part, it was quite useful to browse ConsoleControl code and many stackoverflow answers as usual.
The main needed part of creating process is located here with redirecting (all 3 RedirectStandard*). It is also using BackgroundWorker classes (e.g. outputWorker) that run on own threads and read those redirected streams, to show output immediately when it comes.
Textbox
I used the richTextbox control (included in WinForms) since the beginning. It turned out to be garbage for this purpose. It makes few easy operations really too difficult:
Centering view to a line not even possible.
Adding a text line, is slowing down the more lines it already has.
View always jumped a little (jittered) when adding lines.
Having a user selection while adding text was a PITA, got it almost working.
Had to be unfocused before browsing text above. Otherwise new added lines would jump to end (even if turned off).
Finding text needed a lot of code. Mark all was painfully slow.
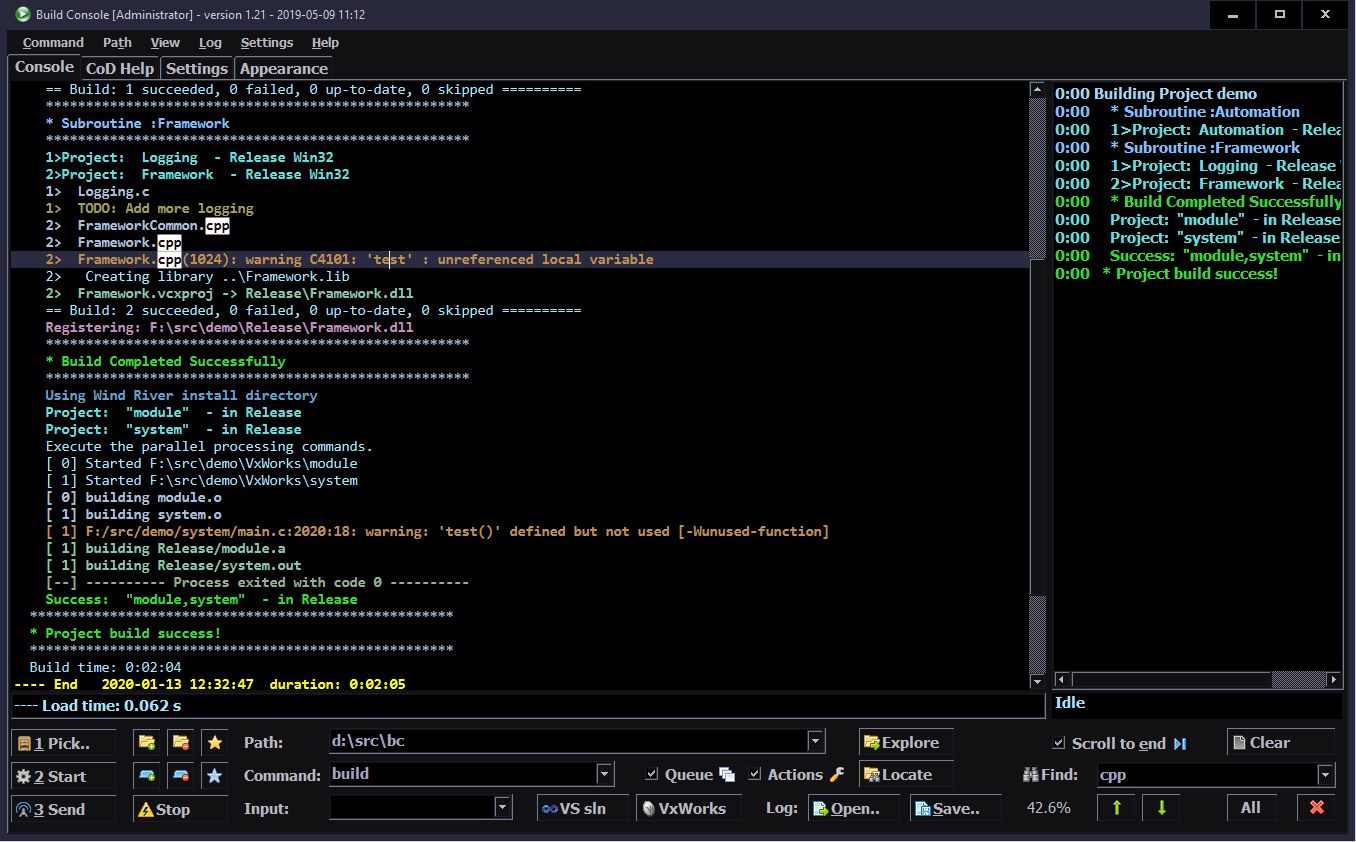
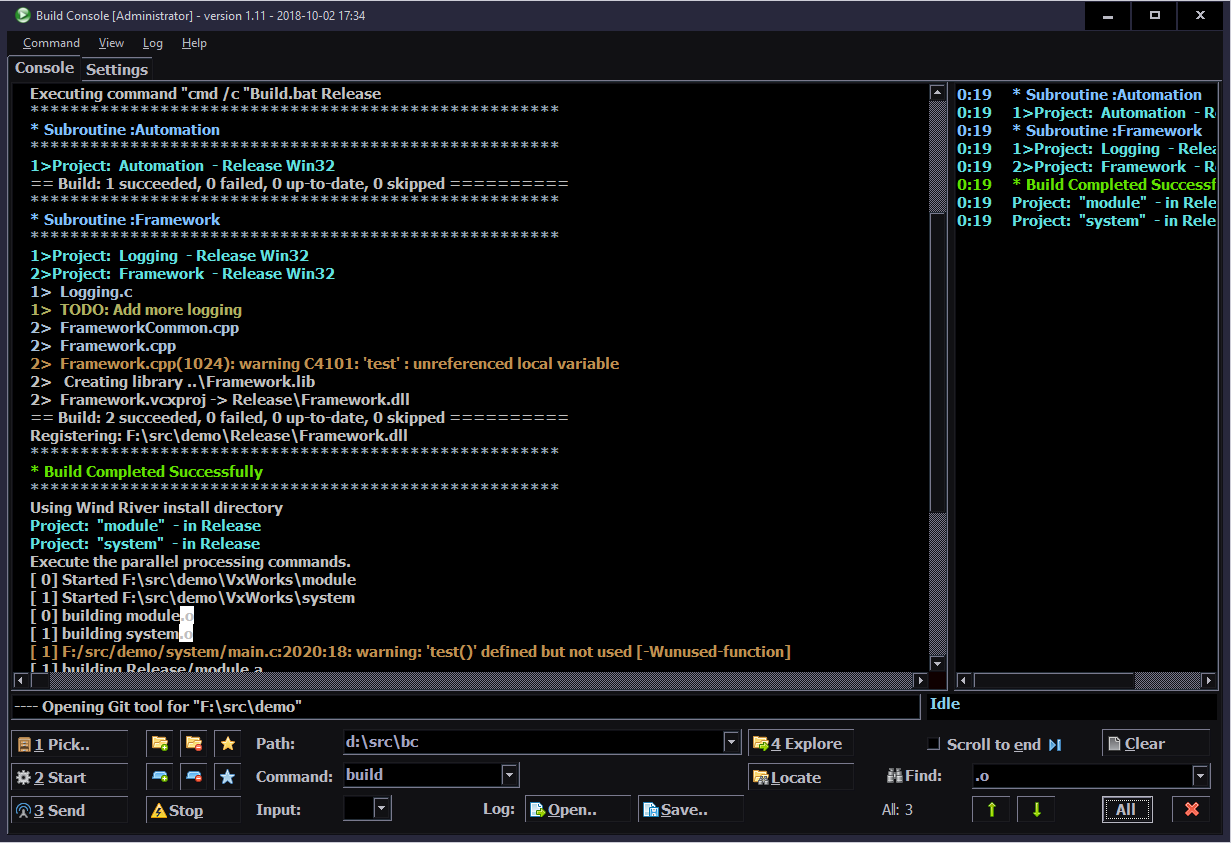
So I recently found and adapted BC to use the FastColoredTextBox control instead. Which is on the other side of spectrum. It is so feature packed (almost like a real IDE) that I probably only use 10% of it. Still, it is way faster at drawing text, has all needed features and even some extras already (like bookmarks). It needs using only fixed width fonts though (I used variable before). But it is understandable that e.g. selecting text (block mode too) was much easier to implement because of that.
✍️Motivation and rants
Well everybody in company was using just cmd.exe to build (nearly all) projects, with a custom .bat file. I can’t post how it looked like exactly, but I can surely tell that at some point, it looked like a black and whiteTV noise. It happened when building with VxWorks started, using GCC (which is awesome). But here, it was outputting full build command, for each file, with all include paths too (like 8 lines of junk). In other words, it seemed like somebody was shoving a black and whitesand at my face. Well I couldn’t even ?.
About 6 months after I started working there, I was building a project very often, to test an upmerge of some stupidly outdated branch. This required to look for build errors in that white textsandbox. It is when I realized I seriously can’t look at this trash and I simply can make a program, that filters out and colors this junk (firstly errors).
So after asking and getting approval, I started implementing it. Then after about 2 weeks I had a first working release. It was pretty basic, but already way more useful. It still had a couple of bugs, which I fixed later.
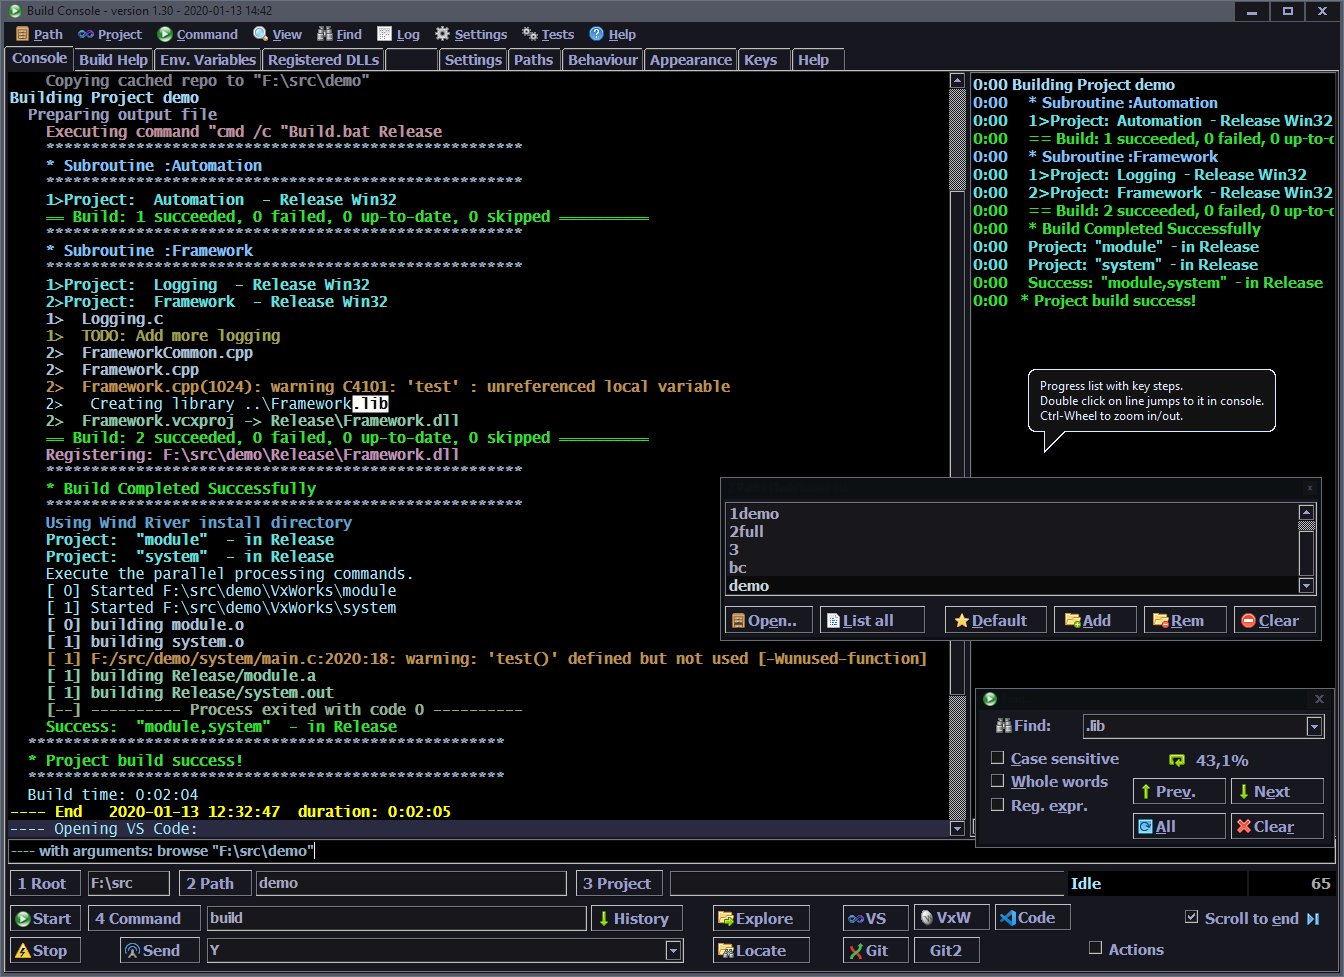
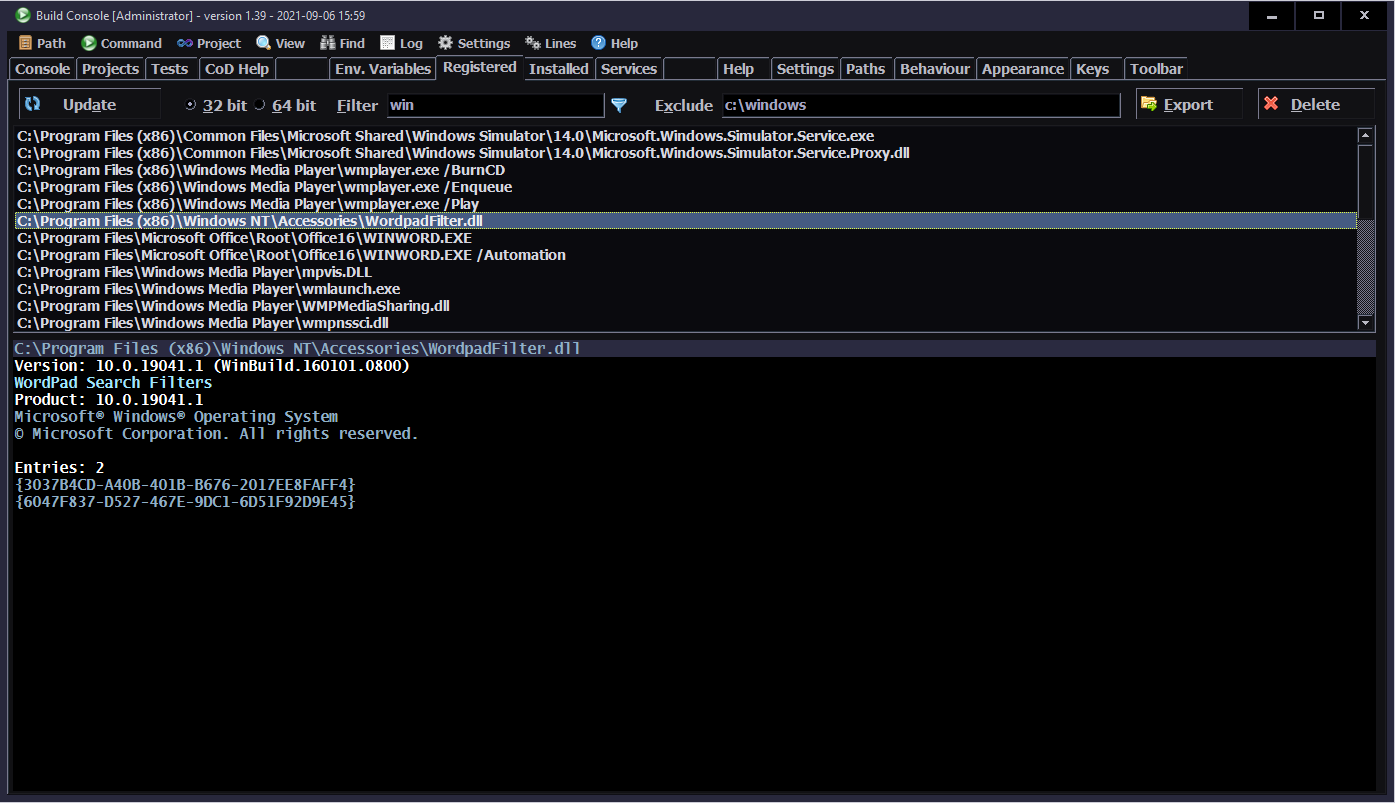
Screenshot
Now I can’t provide a real work example (also because of that*), so I’m including an artificial example on the screenshot (above). Output is similar to real and more general. The good part is that it has like 1 to 3 lines of each common message. Normally there are many similar lines on one screen, but only few unique. This way screenshot shows the whole process on one screen with already most of line types included.
📊Features
Here is a list of all program features from current version. Starting from basic, first implemented and ending with additional extras, added much later (not essential, but useful). I am describing them in place.
🔨Basic
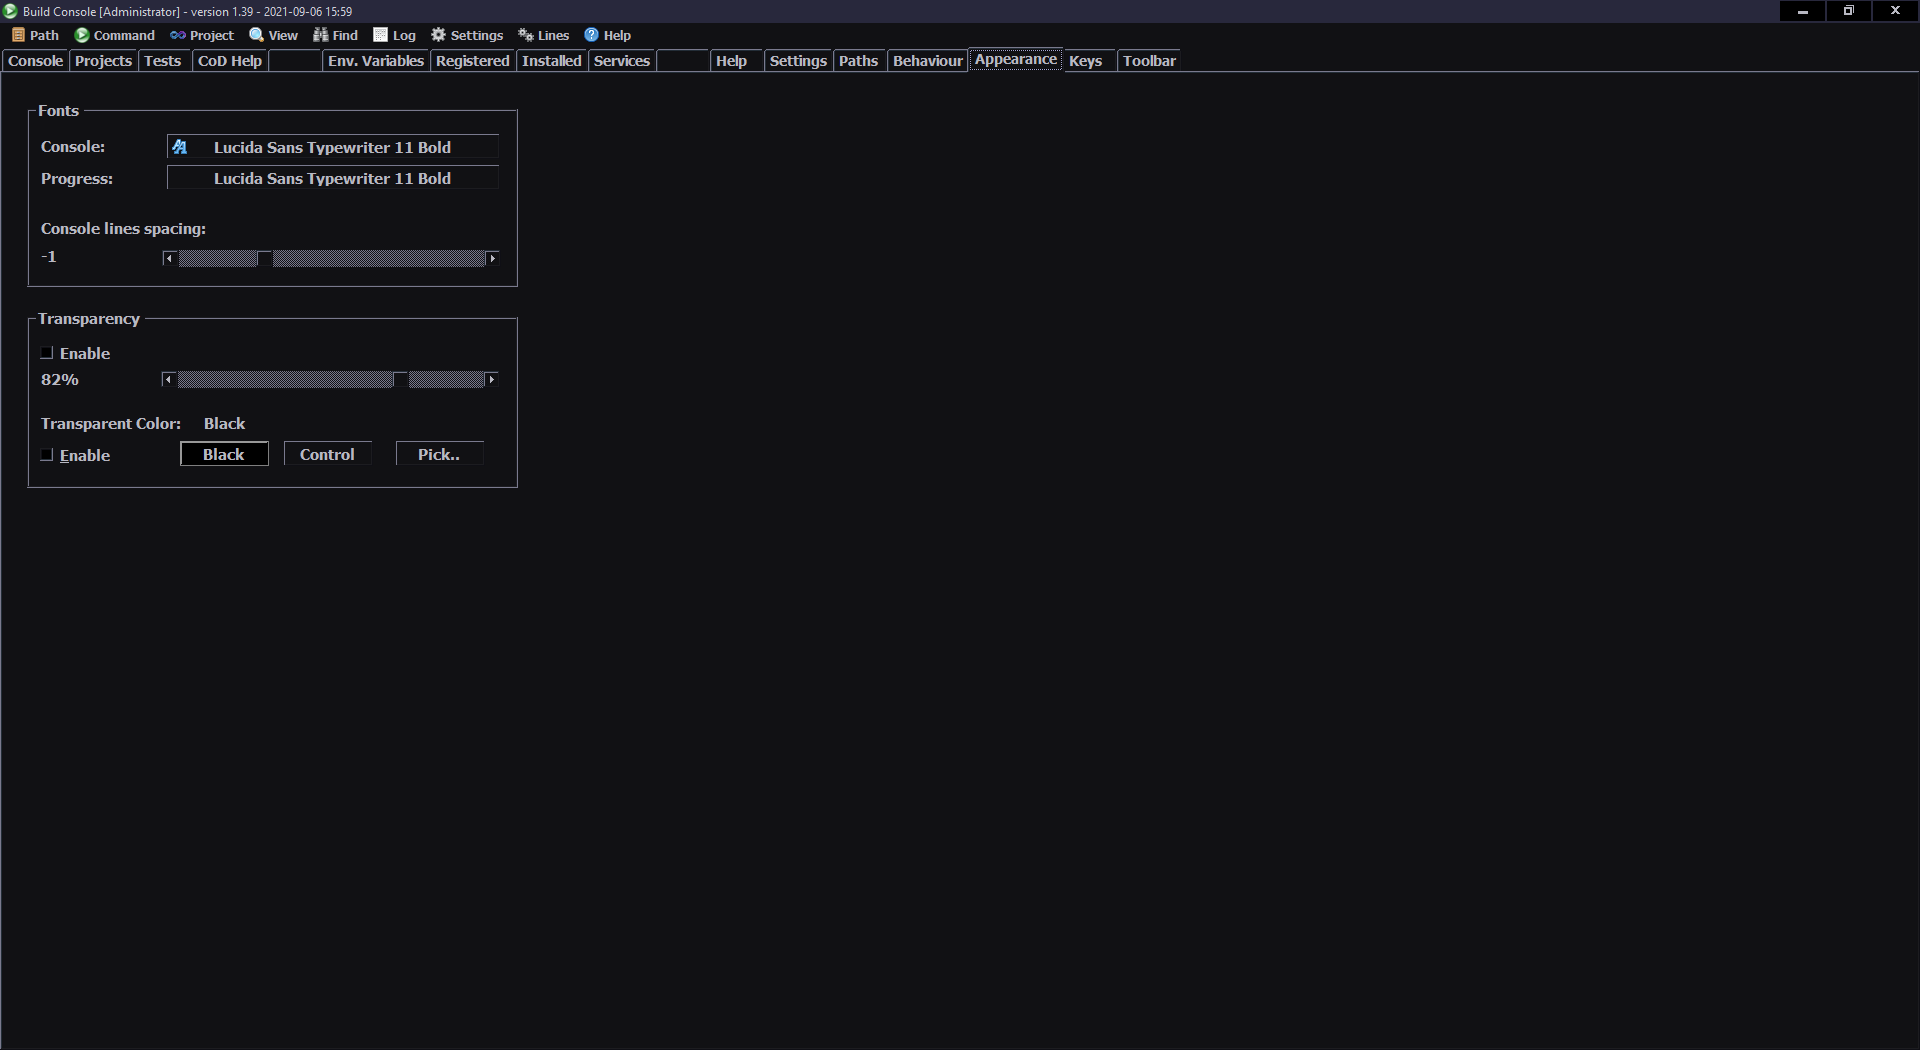
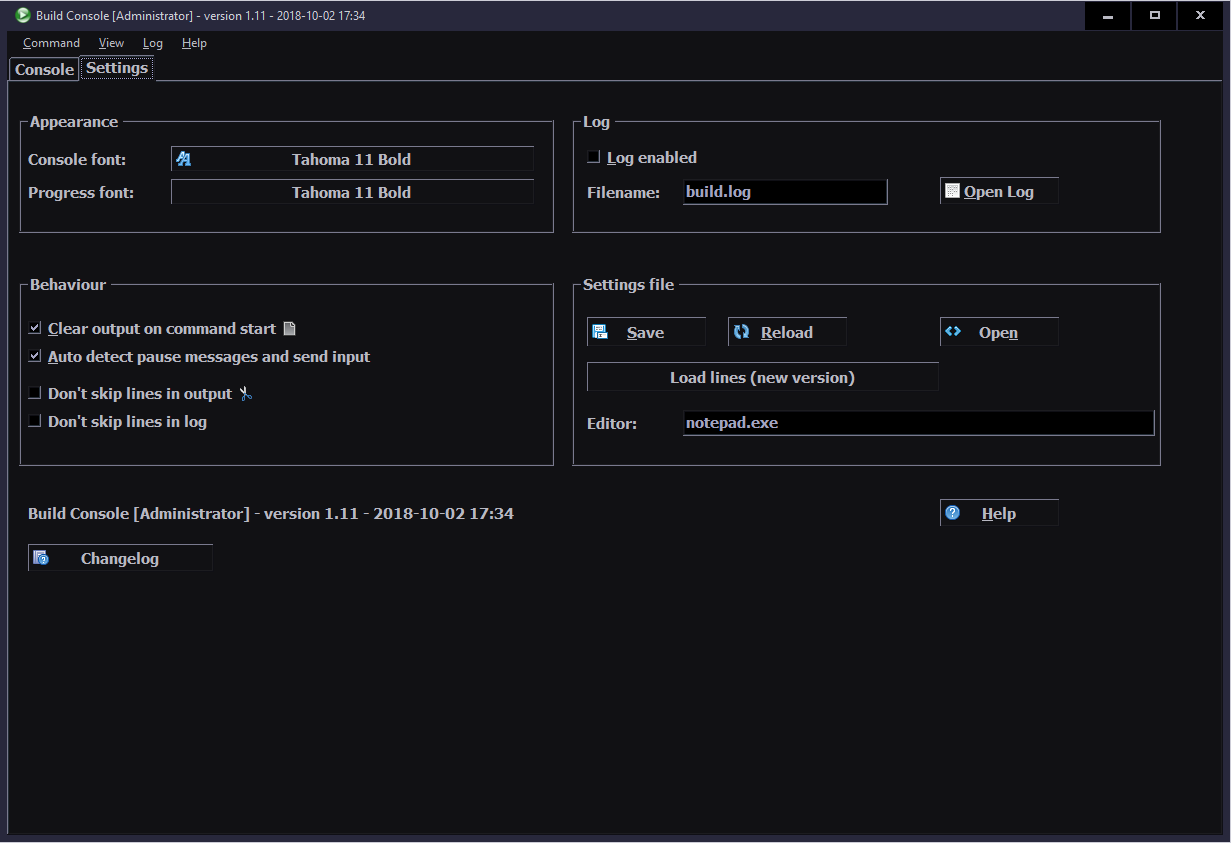
Changing font on Settings tab. Zooming already present, with Ctrl-Wheel or Ctrl-Num+
Unlimited buffer scrollback. cmd.exe has very small default value, and even doesn’t allow more than 9999 lines, in settings.
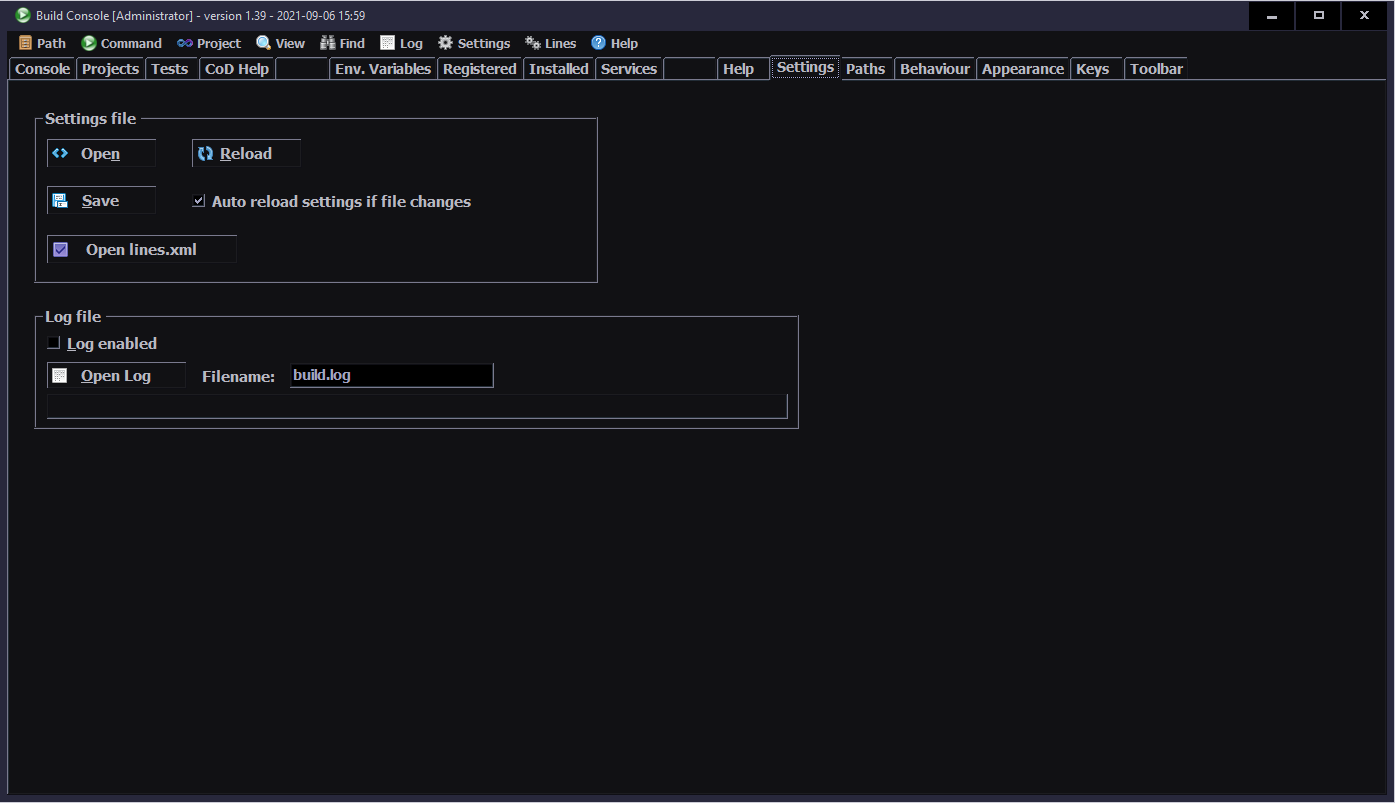
Settings in a XML file, saved in user folder. I’d say a standard thing. Holds both user set options and all line rules (find text, color, skip and more).
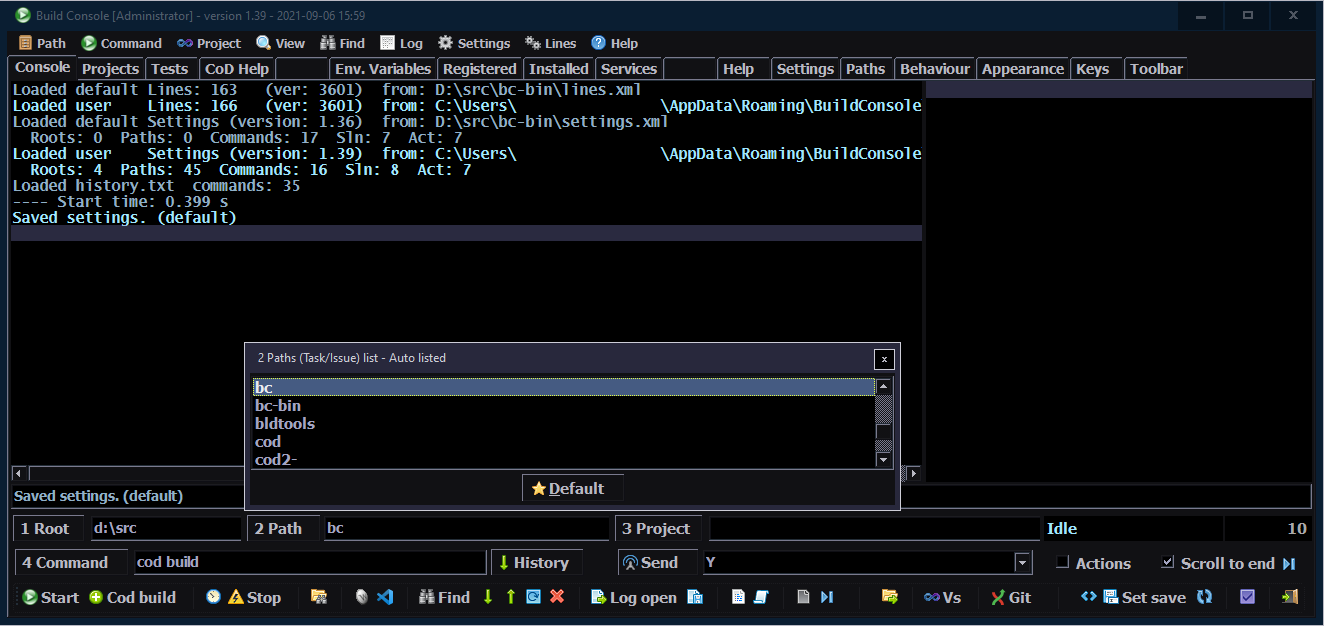
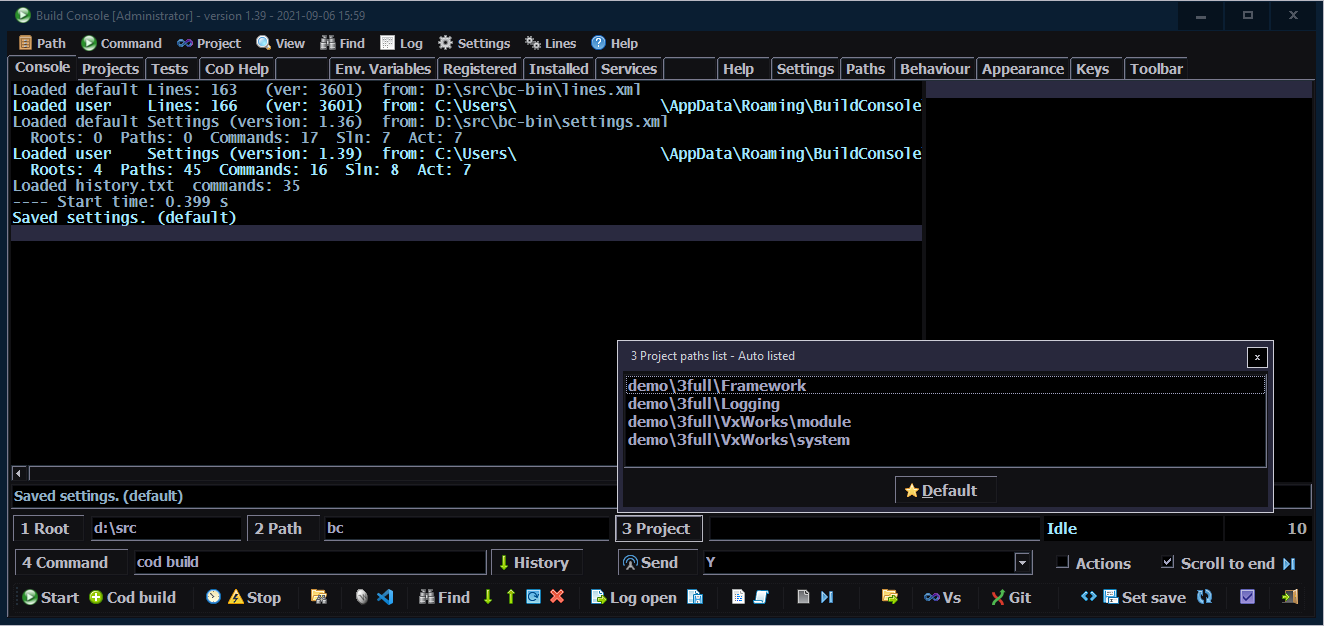
Combo boxes for user paths and commands. With buttons on left to add, delete, set as default.
Filtering (skipping) useless lines. There is a lot of rubbish, e.g. coming from MSBuild (also visible in Visual Studio), like: “Compiling…”, “Generating code…”, something up to date, lines with just “Microsoft Visual Studio” (a greeting commercial) and more. With a simple xml option to skip a line, the final output becomes cleaner and to the point. There is a textbox with last line present (just below console) that shows those skipped ones too.
Coloring lines By regular expression (RegEx), more info on its syntax here.
Later replaced (and extended) by simple find (String.Contains).
Advanced RegExes Use groups and replace (change) the incoming line (to make it cleaner and shorter). Still doing a simple string check first, to make the whole process faster.
⚙️Utility
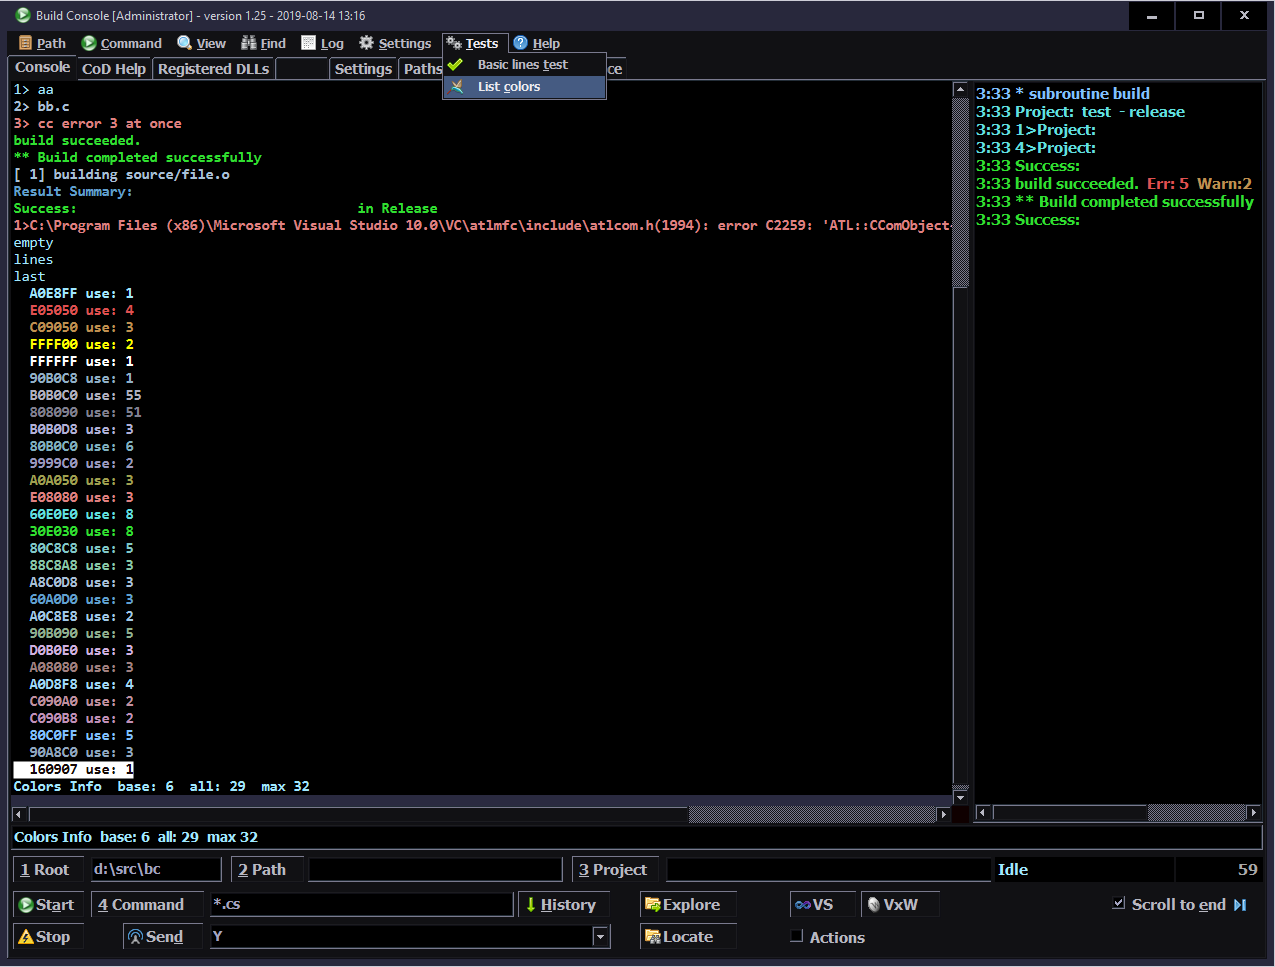
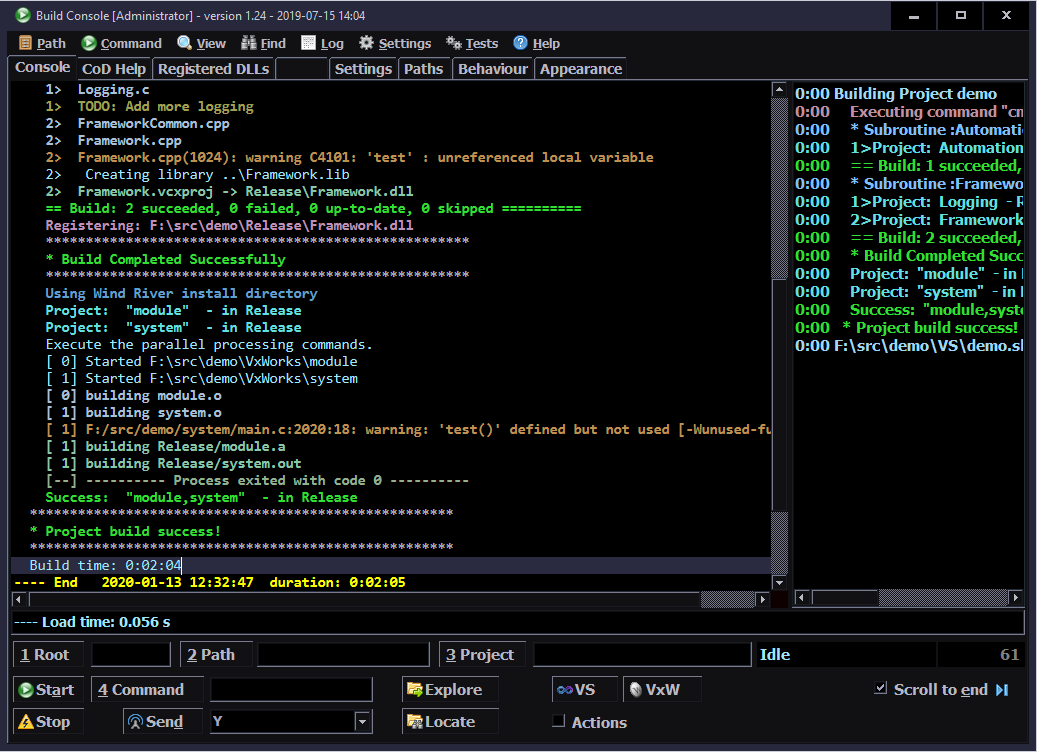
Progress list. On right, it has just key build steps. Copied from output with time since start. It shows only 0:00 here because this test was fast.
Double click on a line in progress list jumps to it in console. This was pretty easy with FastColoredTextBox and it also centers (impossible and awful in richTextbox).
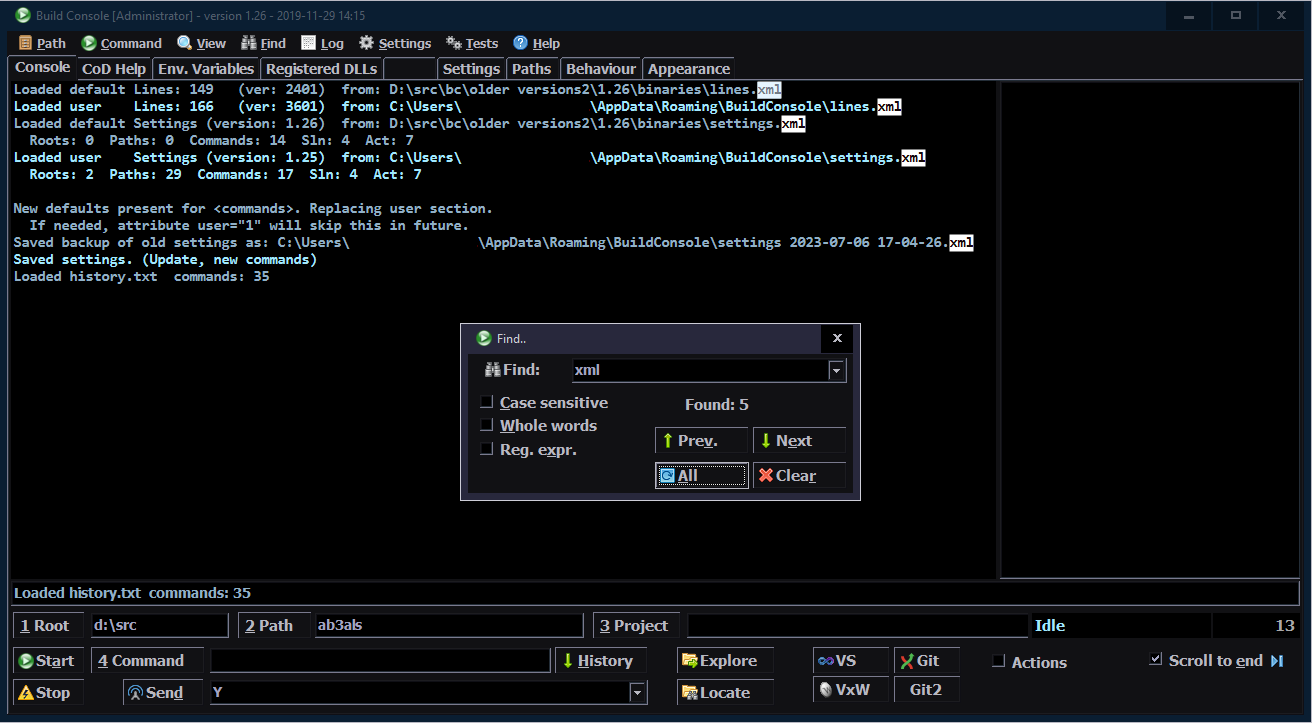
Find. Searching for text in console, with: find next, previous, mark all and clear marks.
Program icon turning green when idle, yellow when running, red when build has errors.
Saving current console output to a text file. Loading saved files into console, to view them later, in same colors.
Log file, optional. Auto incremented for more program instances. There are checkboxes for disabling line skip in log file or in console.
Tooltips with info text for nearly all controls.
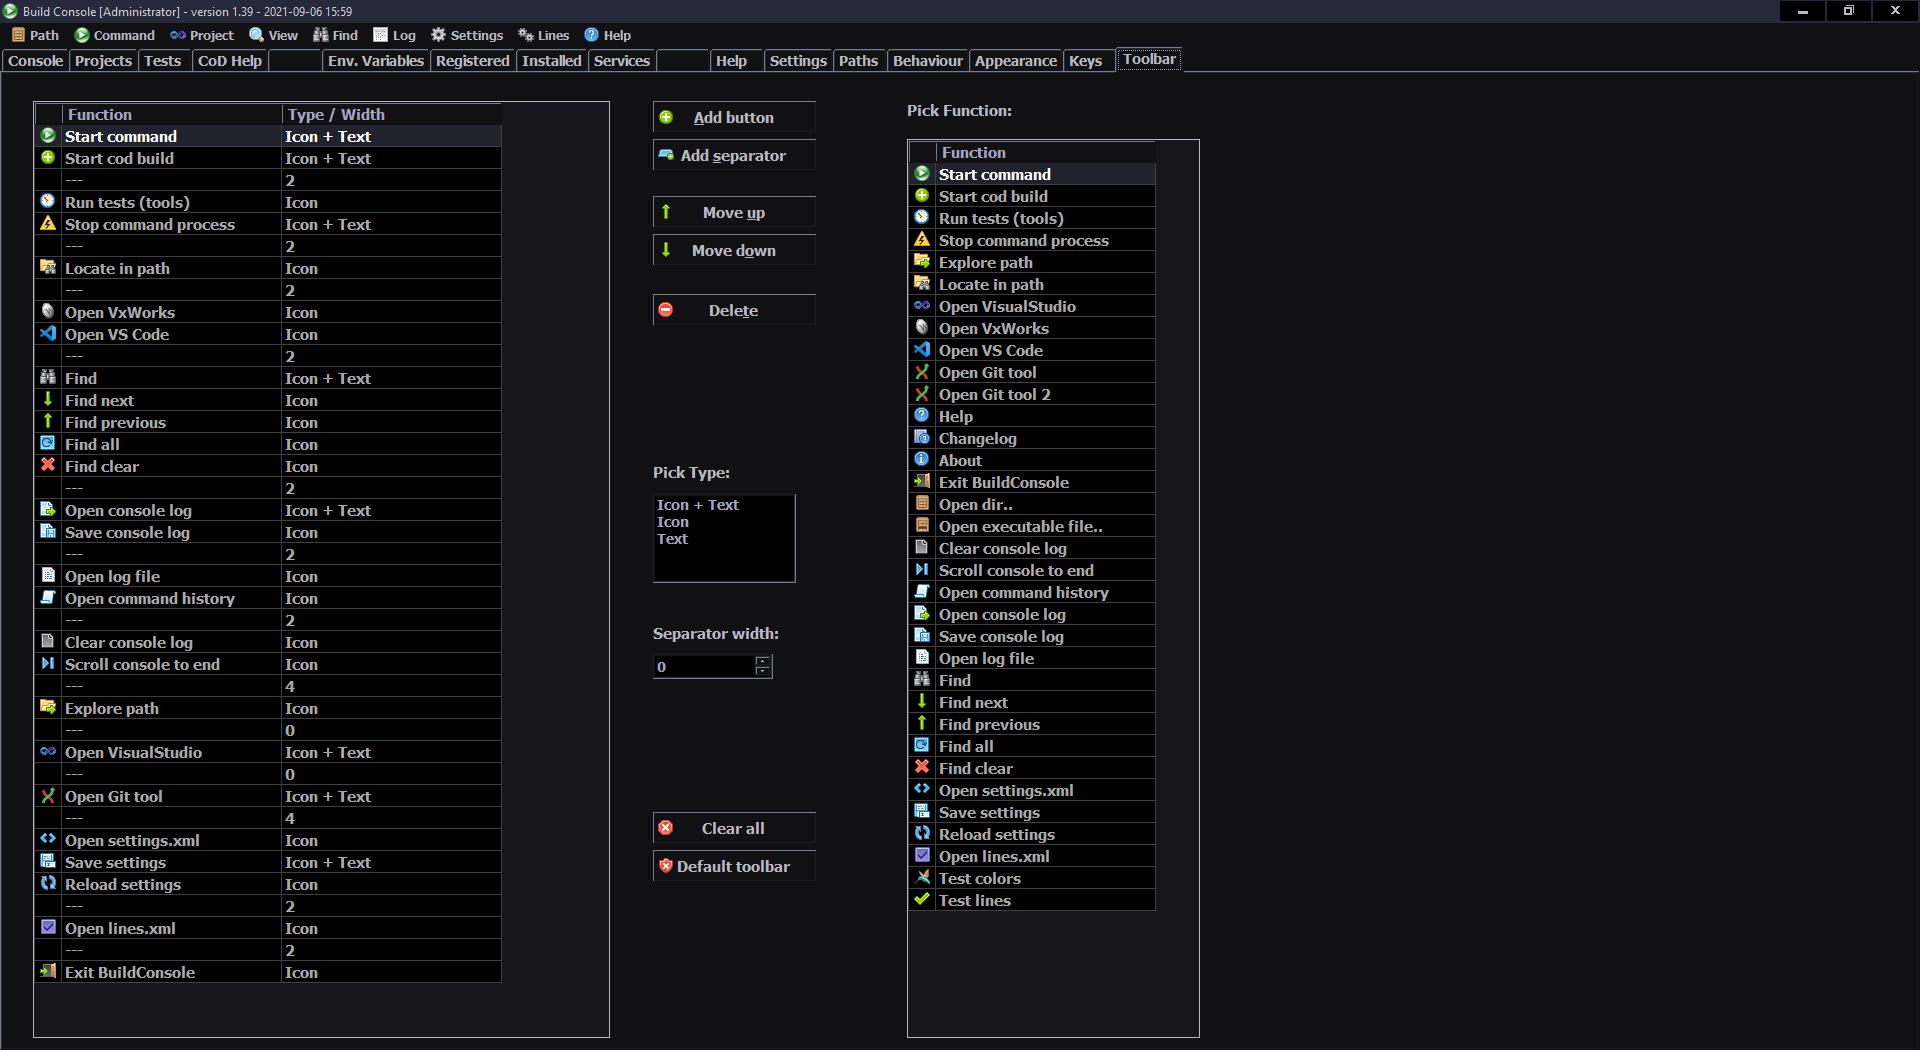
Icons for most controls, also in menu.
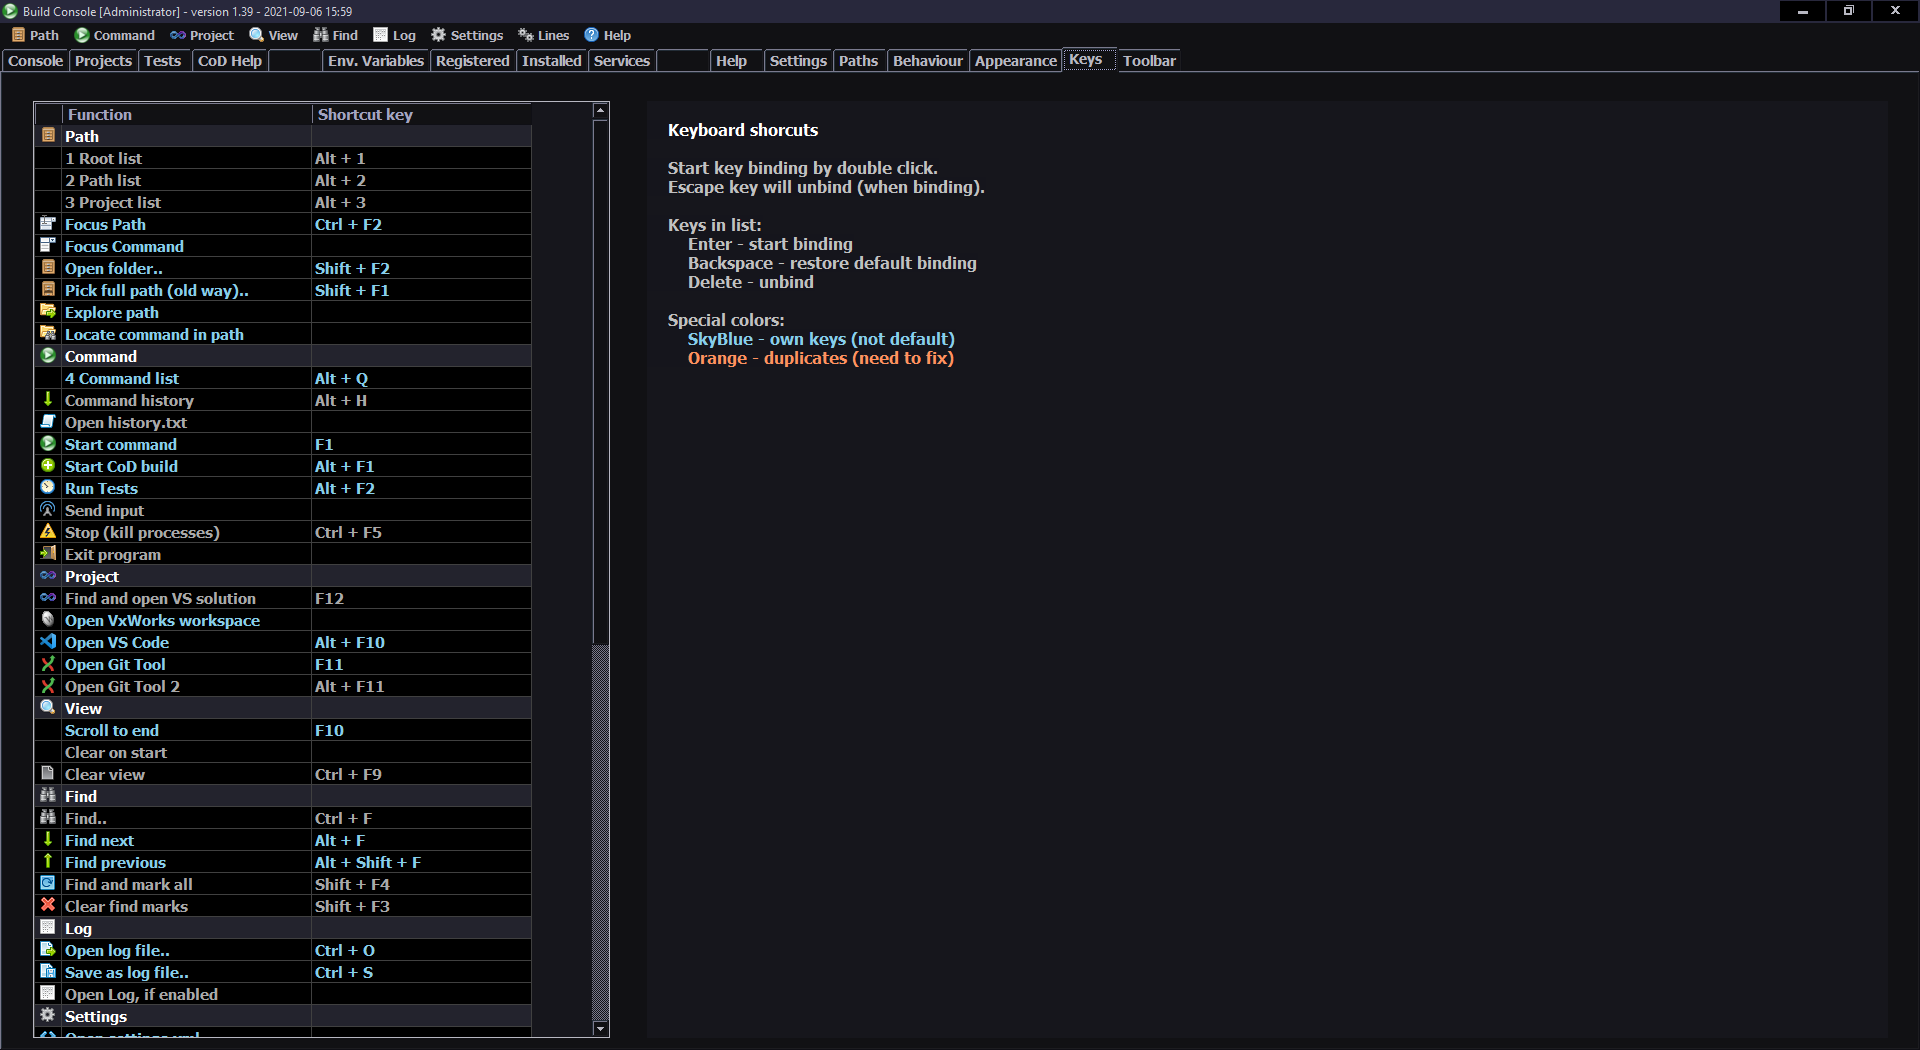
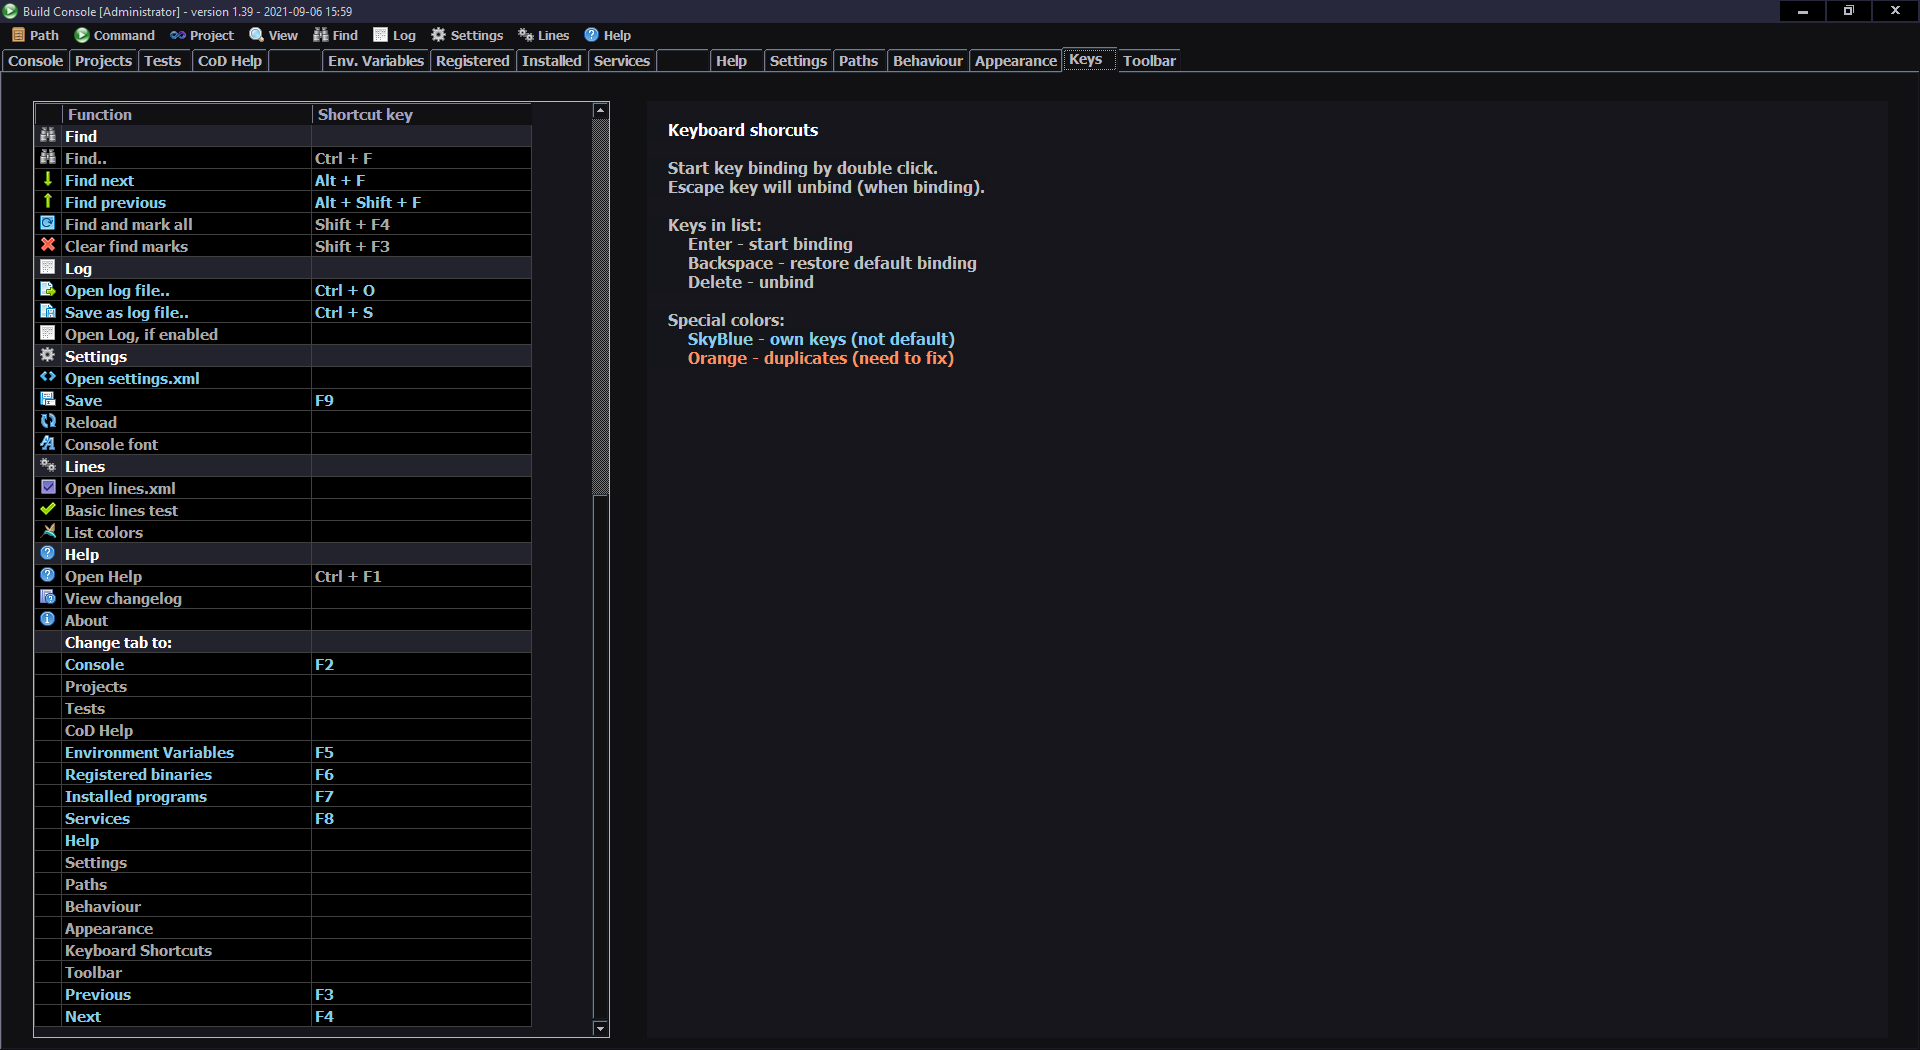
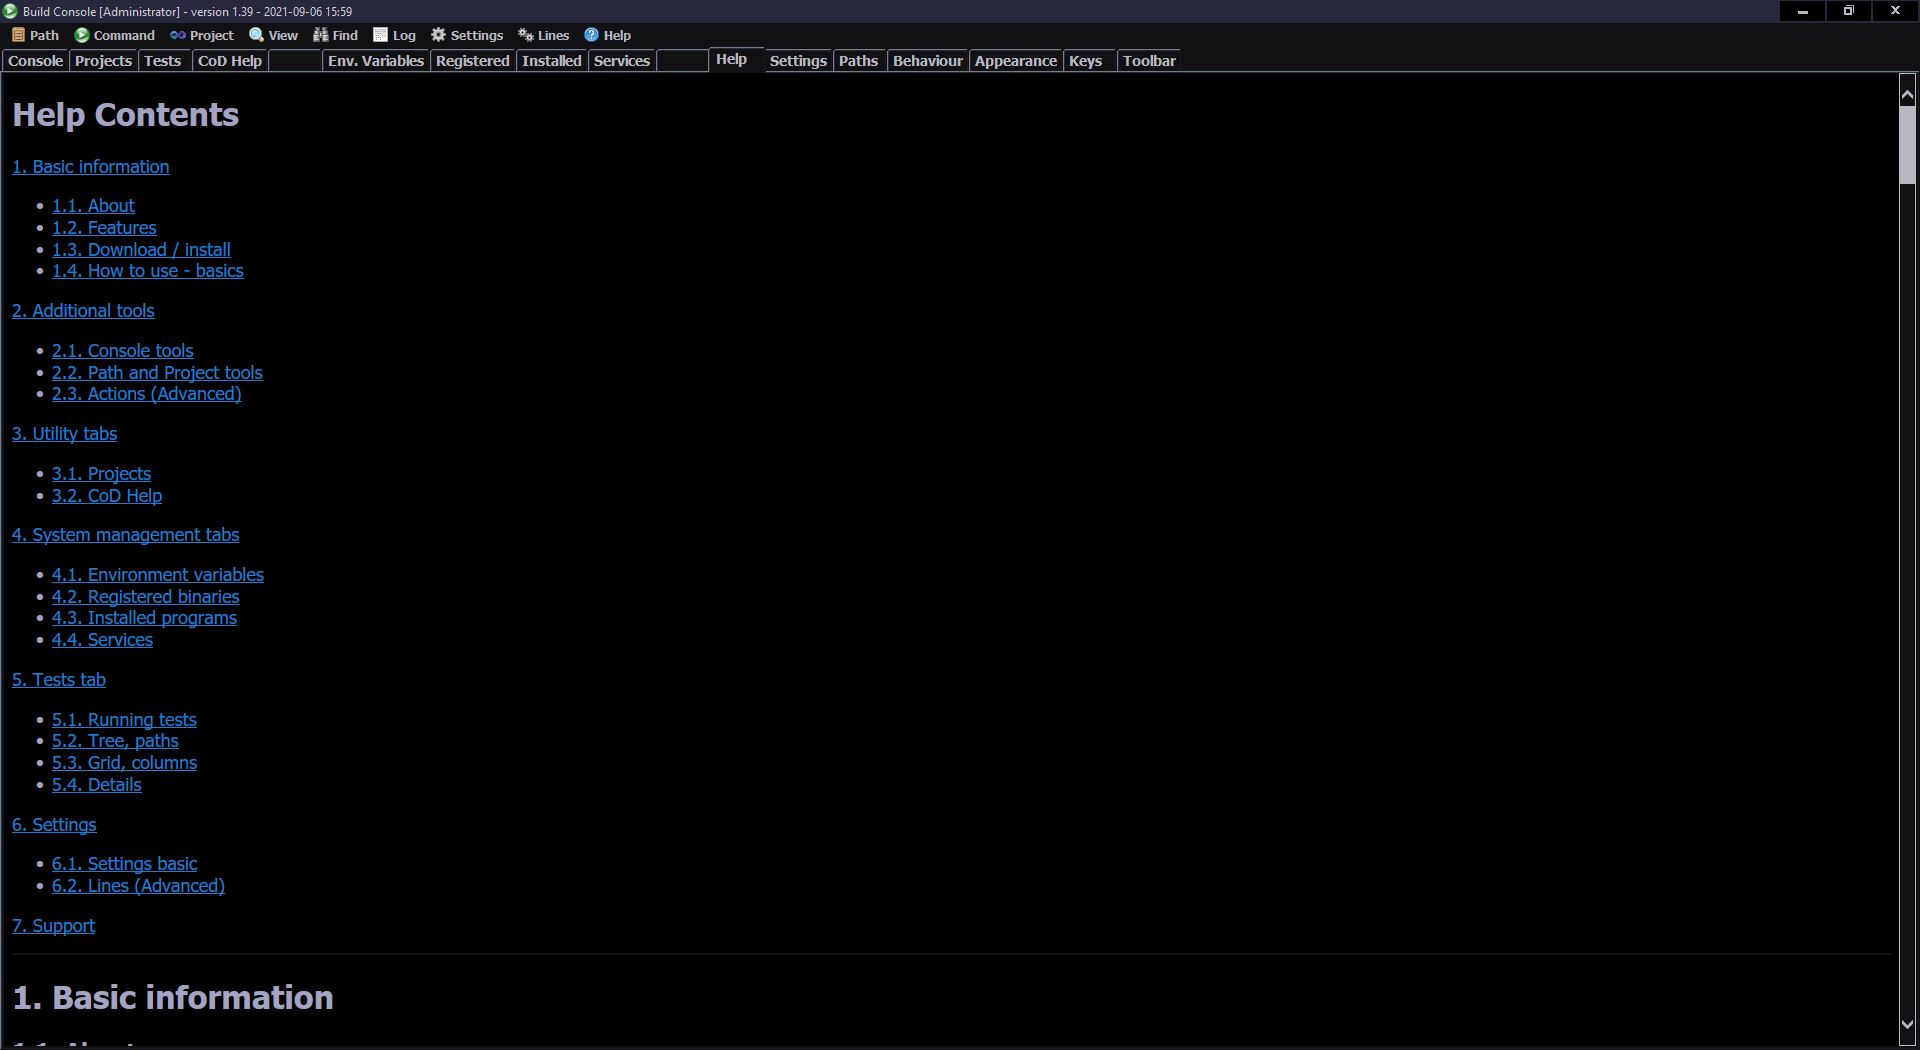
Help menu with full documentation in about 10 chapters. Also Changelog and nice About dialog.
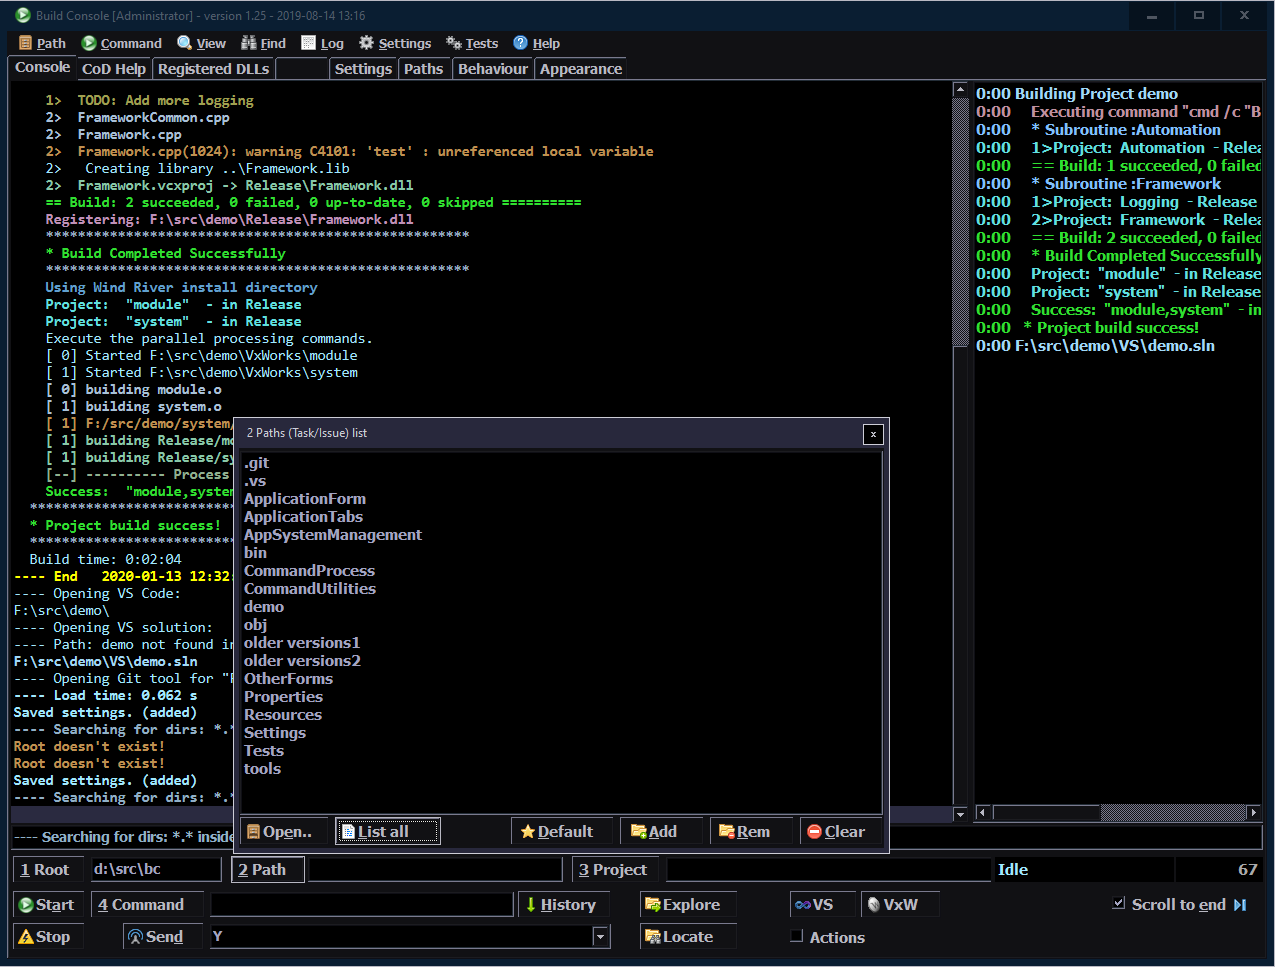
Opening VS solution and VxWorks with workspace By button (all with hotkeys), you could open the project in path quickly. There sometimes were more in one path, so new settings were added in xml.
🛠️Advanced
Auto loading settings.xml file when it changed. Open by button on Settings tab, and on save in editor, program already loads it. Useful with many instances, all will do it. Also if one saves settings, other will load it too.
Queue. Ability to run a command in a number of paths sequentially. Done in settings.xml. Main thing here is that if a build fails in path the queue will quit, leaving the failing project path in combo.
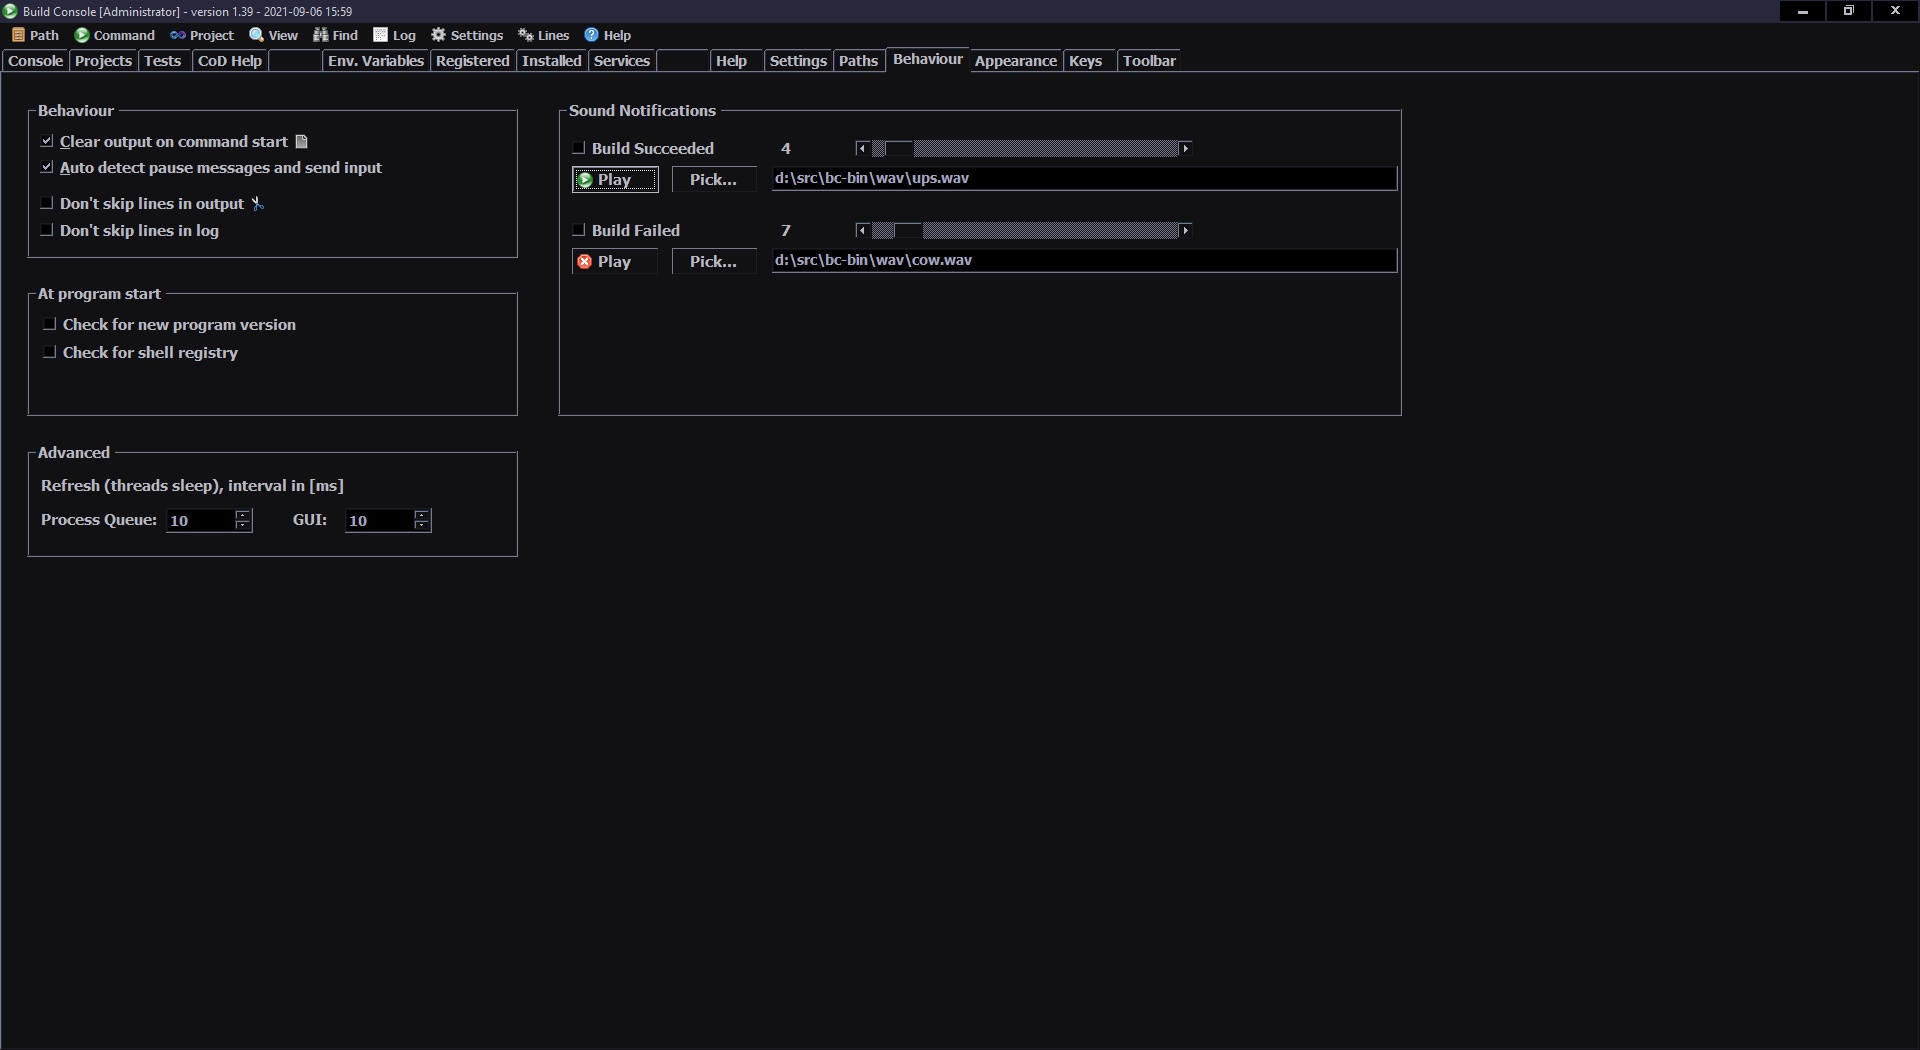
Actions. Ability to start or kill a process, at command start, end or fail (build error).
💡Observations
So first, just as a warning, this is my point of view.
There is a number of things I realized here, some I still don’t get and can only suspect.
It is certain that I made an extremely useful tool. What bothers me here, is that nobody did it, in like 10 years. Well, I guess I’m the one guy who could create it so far and that is rare.
Next, which is even more odd, some people still don’t use it. I can only suspect a few factors here, they:
Don’t know of it. It is obvious for me that even the best software (FOSS, well made and useful) will go unnoticed without promotion (or commercials) and spreading information about it. That’s why I am always announcing each new release in local emails and some also further.
Are too lazy to try. Sure all programs have a learning curve, but this one is easy and well documented. Sadly that can happen, even worse if it takes years. I guess I can’t really expect ability to change especially from people who work for too long in one place.
Are so addicted to old methods, that they can touch the future. Actually the present, for nearly 2 years. That’s for me even worse than laziness.
⏳Conclusions
Whatever the case, it doesn’t matter that much. A software engineer has to deal with users. Sometimes even those who “didn’t even try turning it off and on again”. Also, developers need to balance listening to already users (wanting something) versus shouting at not yet users (to gain new ones).
Lastly, I’m glad I could develop this tool, because otherwise I would hate building even more (now it is nice to look at, just old and inefficient). Also I’m glad if anyone found it useful (beside me).
📷Gallery
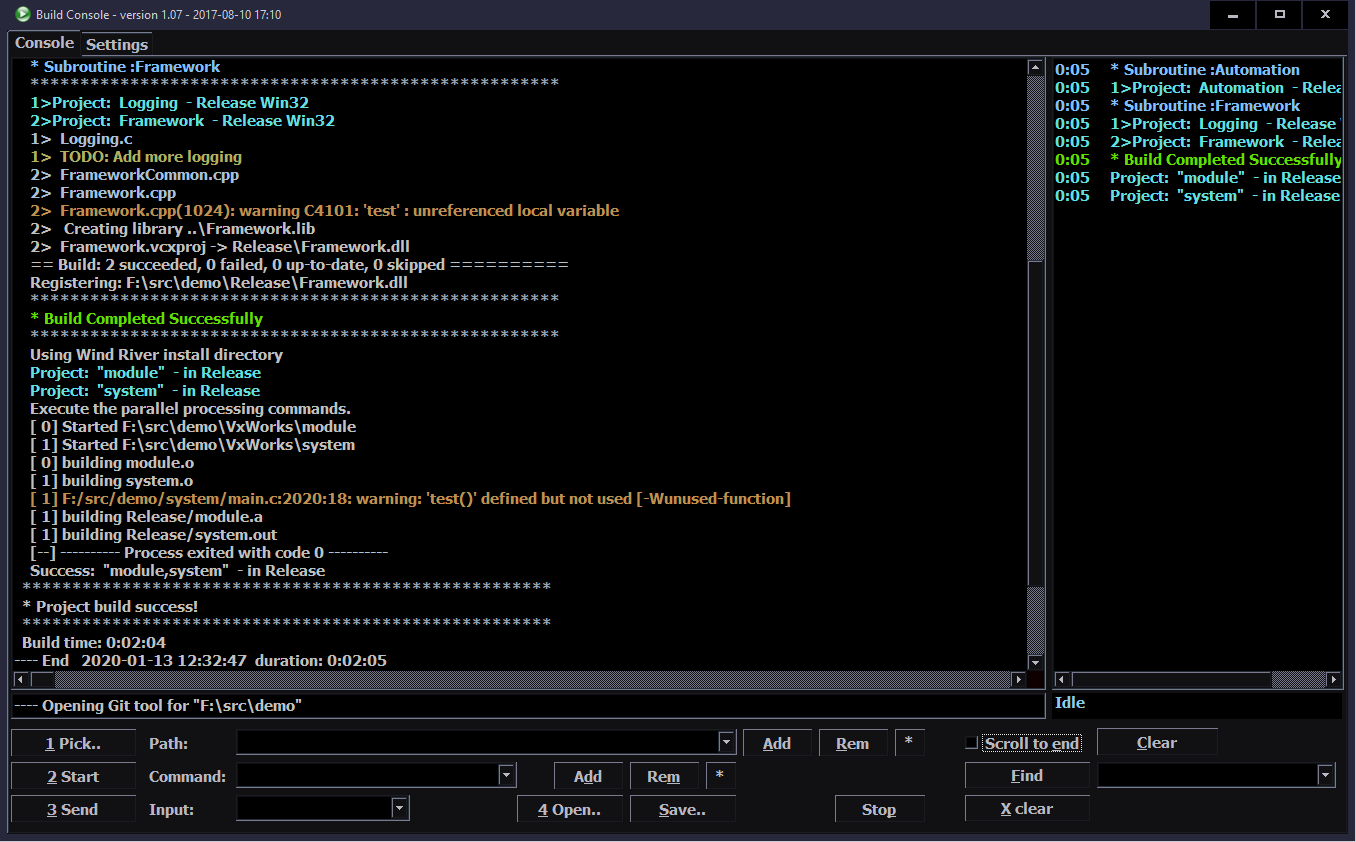
Screenshots starting with latest version from 2021 and its features, then with older until first from 2017.
This is my own keyboard controller software used in my keyboards CK6 and CK7 (upgraded CK3 and CK4), running on Teensy 3.2 (or 3.1) with a color LCD display (160×128, ST7735 chip). It allows editing all: key mappings, layers, sequences/macros in real time on its display. It is continued in newer version with Teensy 4 and bigger display.
📂Sources
My firmware sources are here. I called it K.C. (aka “Kacey”) simply from Keyboard Controller. A catchy cool name for software is a thing, isn’t it.
The readme with all key features is visible there too. Here will be a more practical description.
✍️Motivation
My previous keyboards CK3 and CK4 were quite useful. But there were few flaws that I wanted to improve. They had a very tiny display, sure it did the job, but wasn’t convenient to look at for longer. Since I based my code on existing kiibohd controller software, there were few problems. Any change in key bindings had to be done on PC, needed to build binary and upload it to MCU. That’s a long way to e.g. check if it’d be better if I swapped some keys. Not to mention doing it at work. Lastly, there were few bugs which I couldn’t spend more time trying to fix.
So, it’d be better indeed to start writing my own code. And that’s what I did. Right now I can’t find a reason not to use my controller code. Sure, it was easier back then to get started, knowing there is an open source keyboard controller and it runs on Teensy 3.1, this is how I got into it. My code surely doesn’t have stuff present in kiibohd like NKRO support, keyboard LEDs animations and other fancy things I will likely never need. But it now does have features I wanted and it wasn’t that difficult to code them.
📊Features
So the code features are:
🪟Display with menu, where you can edit everything possible (that I needed so far).
🔠Key bindings (mappings), i.e. what USB codes will the physical key send to PC when pressed. There is a pick list with all common keys (and internal functions) to choose from when binding. It has group colors and group filter for easier orientation.
⌨️Keyboard layout drawn on display. Shown when editing mappings. Has a cursor to move around between keys, can also jump to key by pressing it.
🧮Layers. If you hold a key, whole keyboard layout changes giving you other keys. Kind of like the Fn keys on laptop but much more useful and customizable. Surely a common feature in custom controllers (like tmk or kiibohd).
🔤Sequences aka Macros. Basically any key combinations (for key shortcuts) and any sequences of key presses (for e.g. passwords). Not typing passwords myself, when my keyboard could do it, was my first reason when starting with keyboard controllers back then. Sadly even in kiibohd you couldn’t change them without rebuild and upload. This then was possible in my fork of kiibohd. To be convenient, I am showing (short) sequence preview where possible. So when editing Mapping (for a sequence key), when picking a key from list or Testing pressed keys (if a key runs a sequence). I am also showing in sequences view any mapped keys that run selected sequence.
✅Sequence commands are an even further extension. If you have an editor on display (basically a simpler editbox) one could put special commands (beside sequence keys), that e.g. wait for few seconds, or change how slow the sequence will run (useful for putty). Newest ones allow putting comments, useful if you have lots of sequences and want to rather see what it’s for, not what it will press. And hiding sequence from preview, useful if you don’t want to show important passwords on GUI.
🖱️Mouse keys, i.e. keys that will move mouse, press mouse buttons or scroll mouse wheel. Also featuring acceleration and even parameters for it and speed in GUI.
I now even have mouse commands with all mouse actions possible to add in sequences. Some stupid programs don’t allow everything using keyboard and specifically want you to click with mouse. But hey, now even this could be done automagically by my keyboard.
🎛️Testing and Setup pages. Those are quite useful when developing and in normal use to check if everything is working properly as intended. Scan setup is nice e.g. to check which strobe delay, scan frequency, debounce time I need. Matrix page shows the 18×8 keyboard matrix, with my anti-ghosting code working and any issues from too low strobe delay.
🔮Demos and Game. Were already present in my fork of kiibohd. Now extended with new presets to color display. Best shown on videos, links below.
🕙Clock with date (internal RTC, needs 3V battery) optionally also showing Temperature, read from attached DS18B20 1-wire sensor.
⚙️Internal functions, e.g. to dim brightness or toggle GUI, by keys on other layer.
⌨️Keyboards CK6 and CK7
I then upgraded my 2016 keyboards CK3 and CK4 with bigger, color display (160×128 LCD, ST7735) and K.C. They now became CK6 and CK7. Apart from the new displays and my software, the keyboards are the same.
The CK7 is the oldest one, comes from CK4, which in fact was done from CK2 (2006) and is now 12 years old… Still doing fine. Well this proves then, that cutting and gluing rubber domes is nothing that would decrease the lifespan of a keyboard. Even recently folded keyboard foil since CK4 works okay.
▶️Videos
There are a few videos of my keyboard CK7, showing most of K.C. on its display: (no talk and very poor quality).
View – Short video of keyboard and closeup at display.
Plasma – Quick and colorful show of presets of plasma fullscreen effect. It runs at 10-30 frames per second. Note that I overclocked Teensy 3.2 here at 120 MHz, HW SPI runs at 30MHz. My other keyboard CK6 has Teensy 3.1 at 144MHz, SPI at 24MHz, it gives about 1.5 Fps more here.
Demos – Showing rest of demos: 3D Polyhedrons with diagonals, Wave, Fire (not real) and the older ones: 2D waving CK Logo, Space, Balls, Fountain, Fonts.
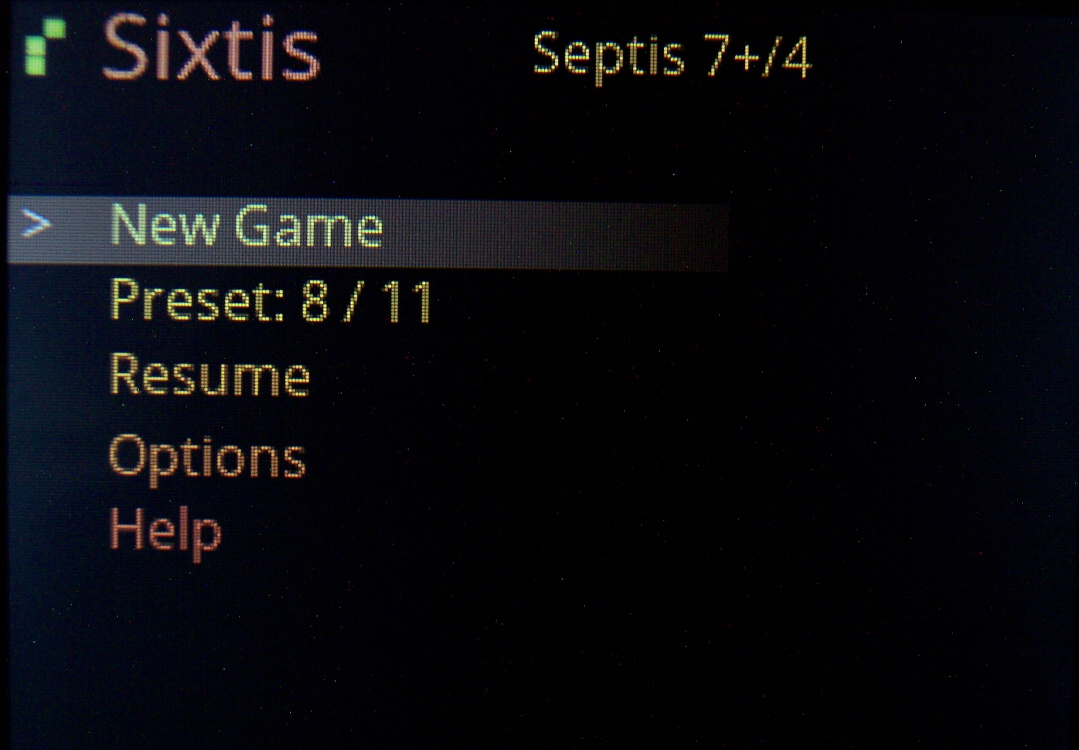
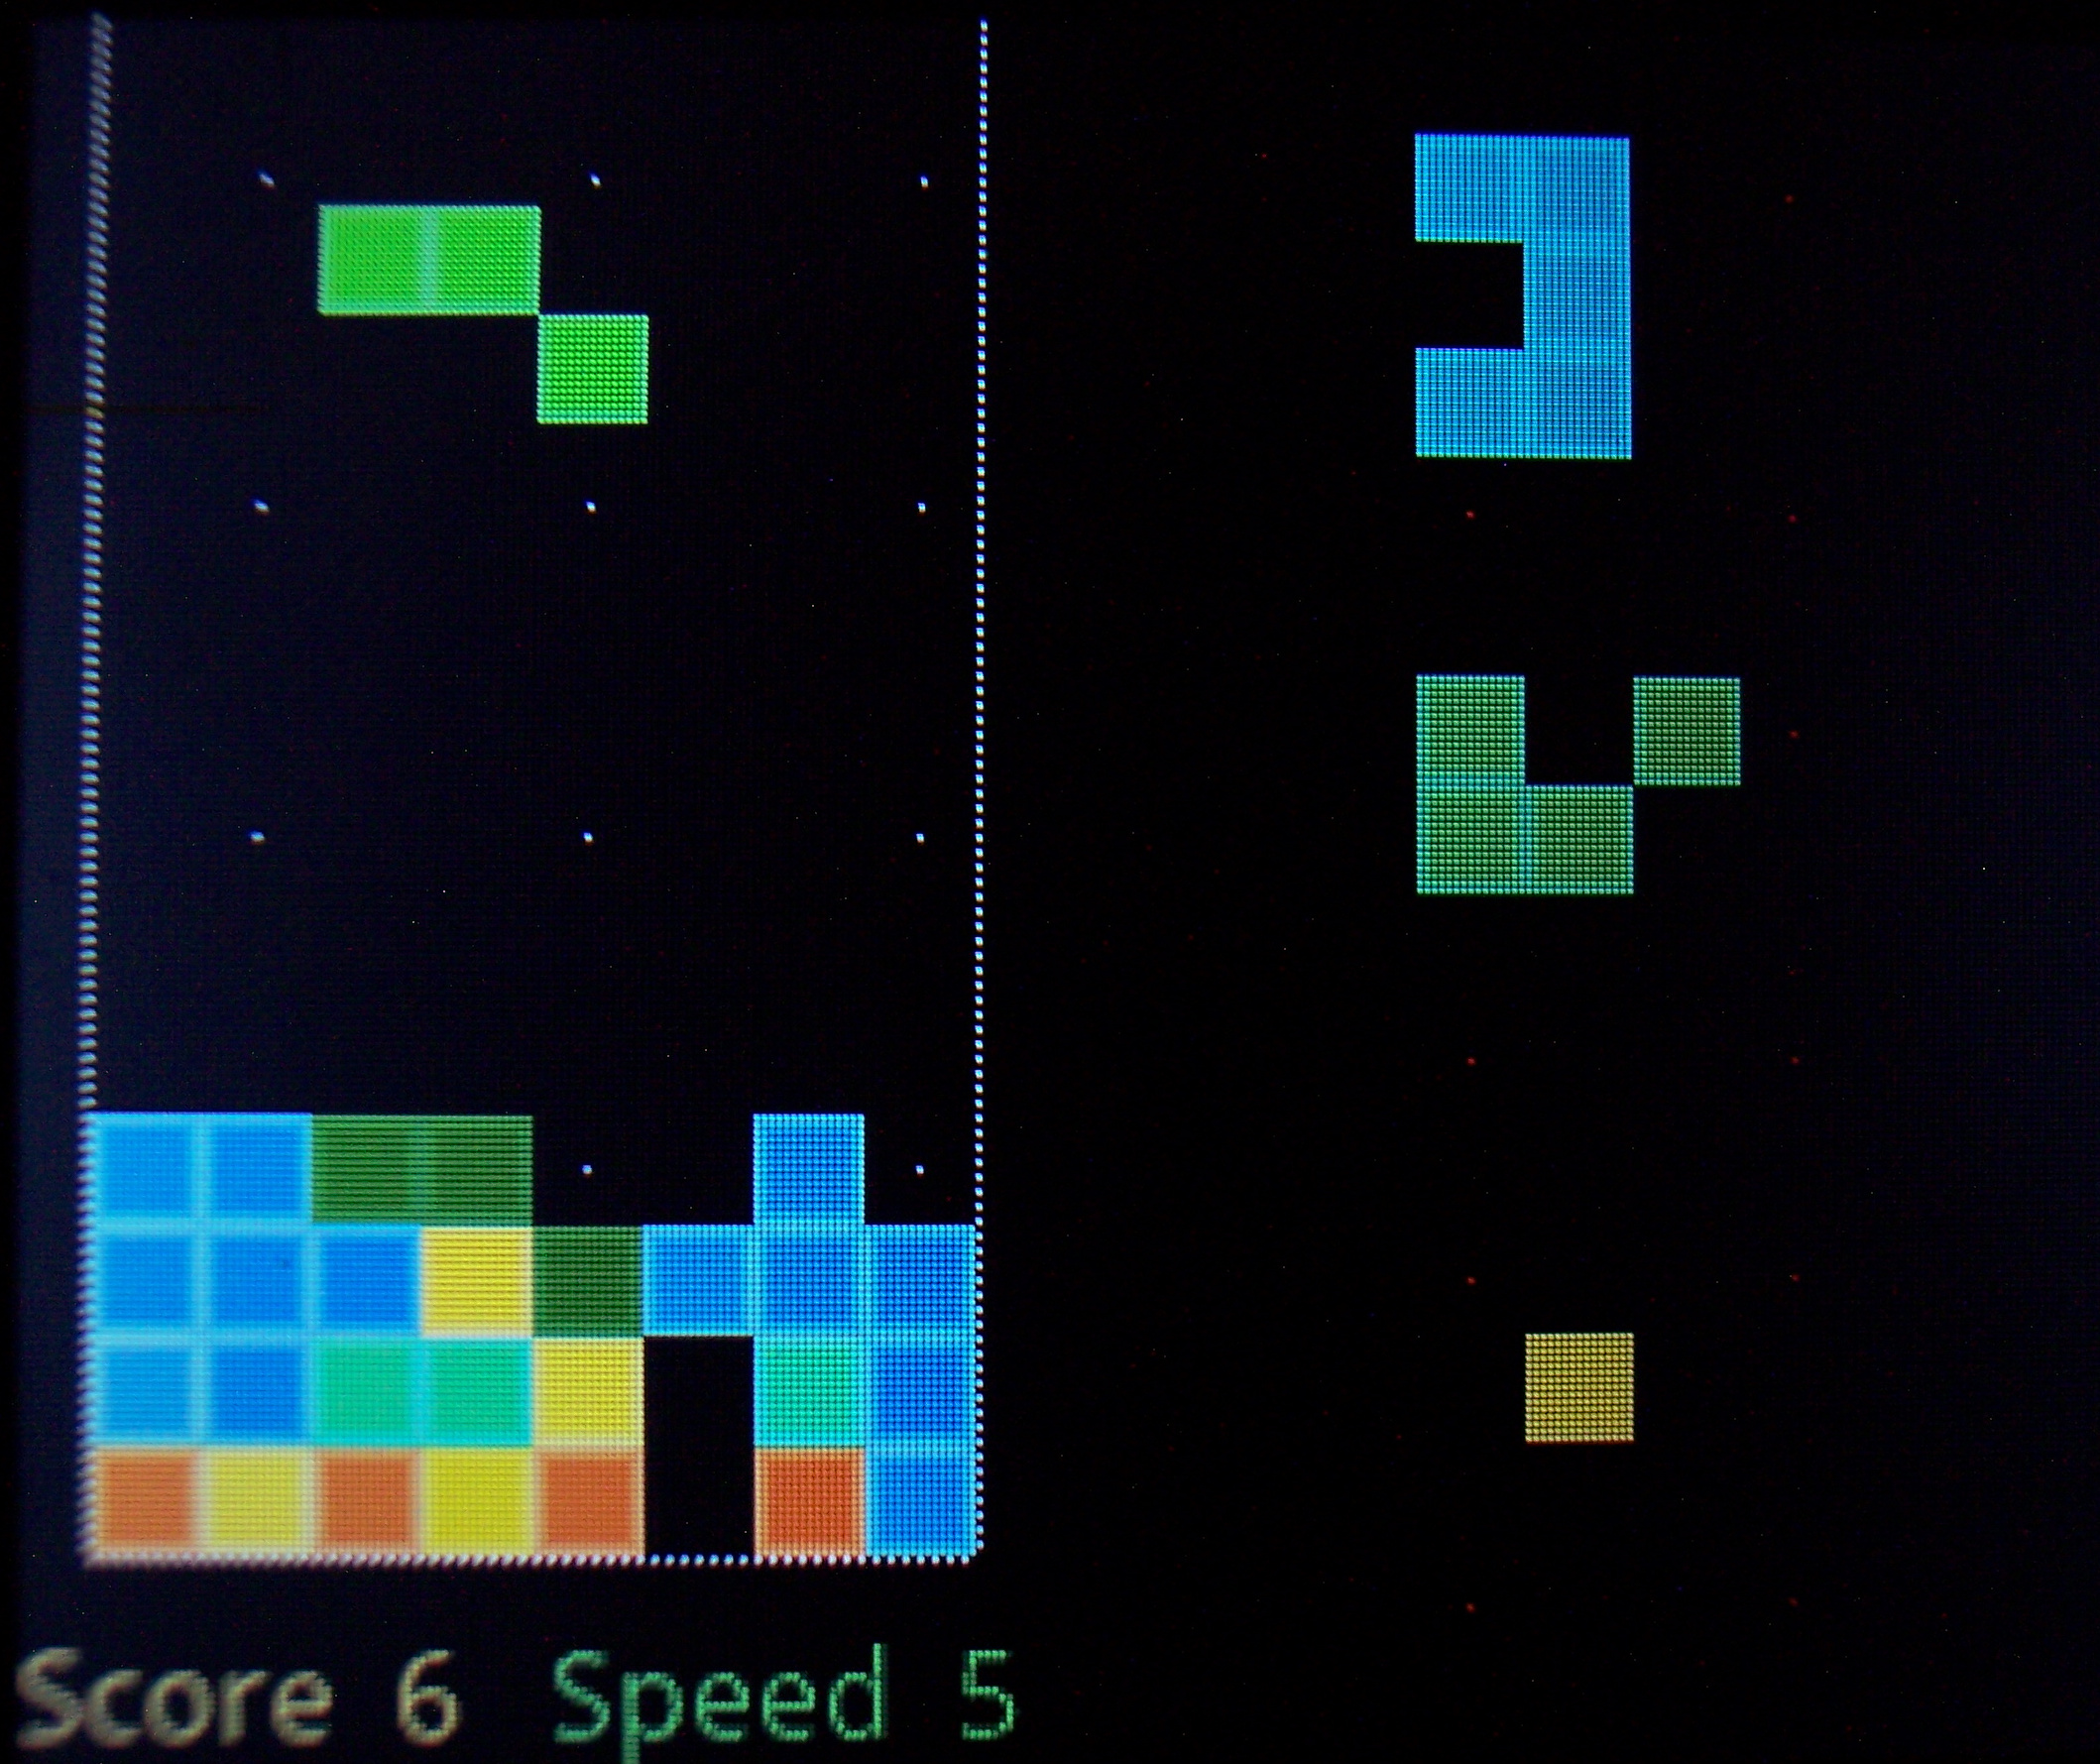
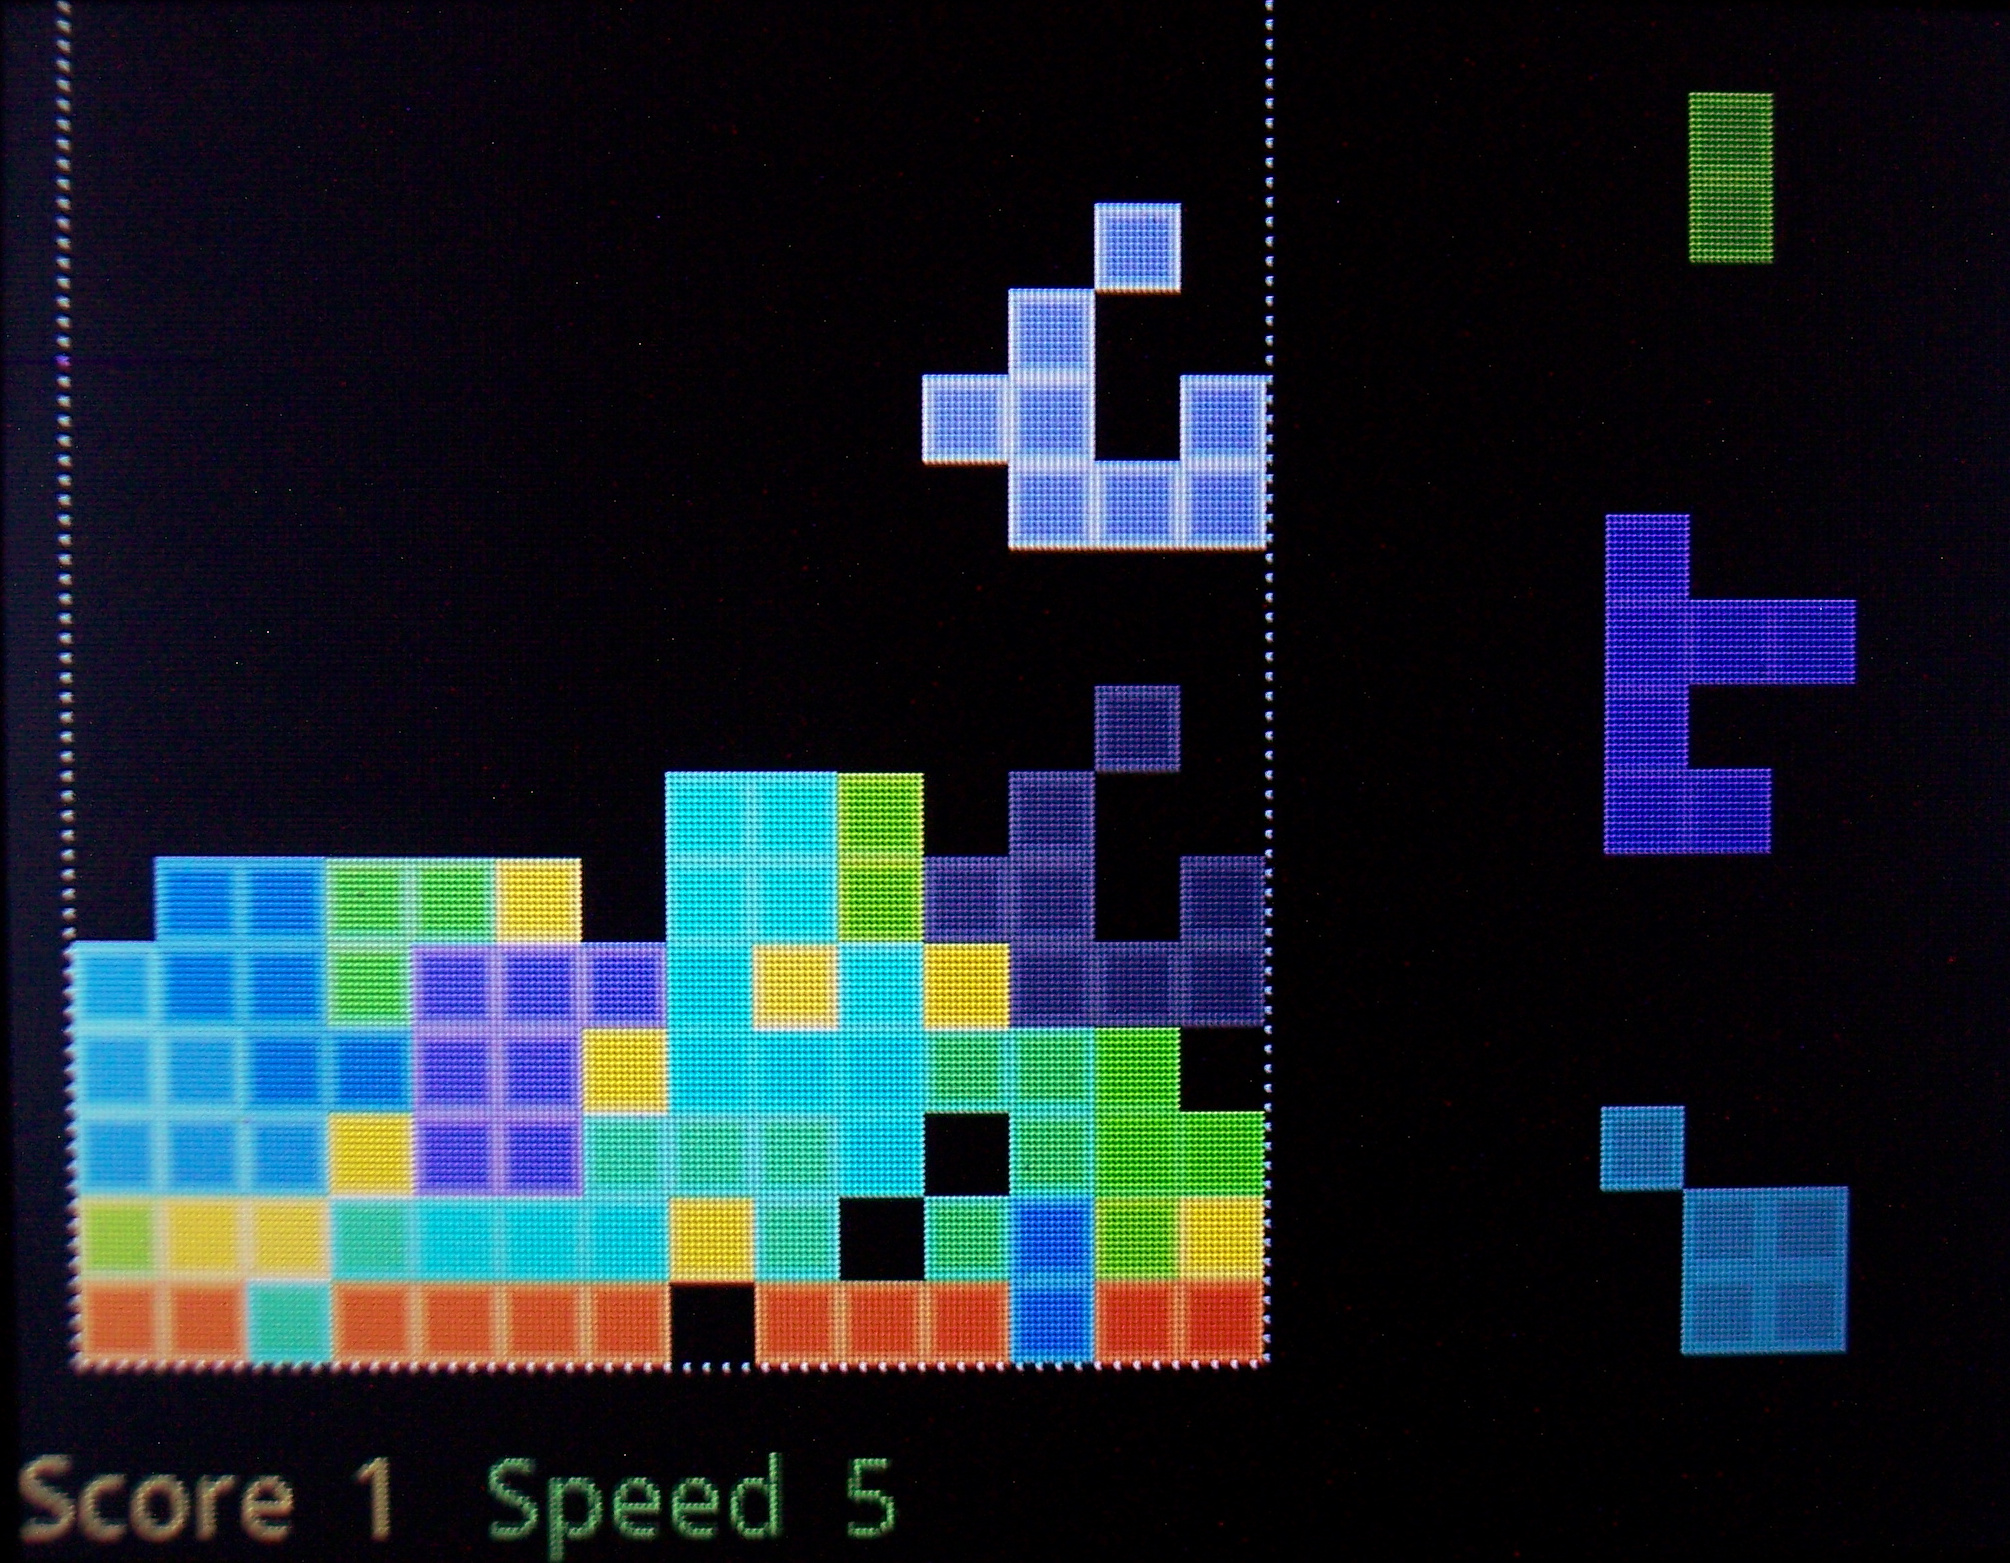
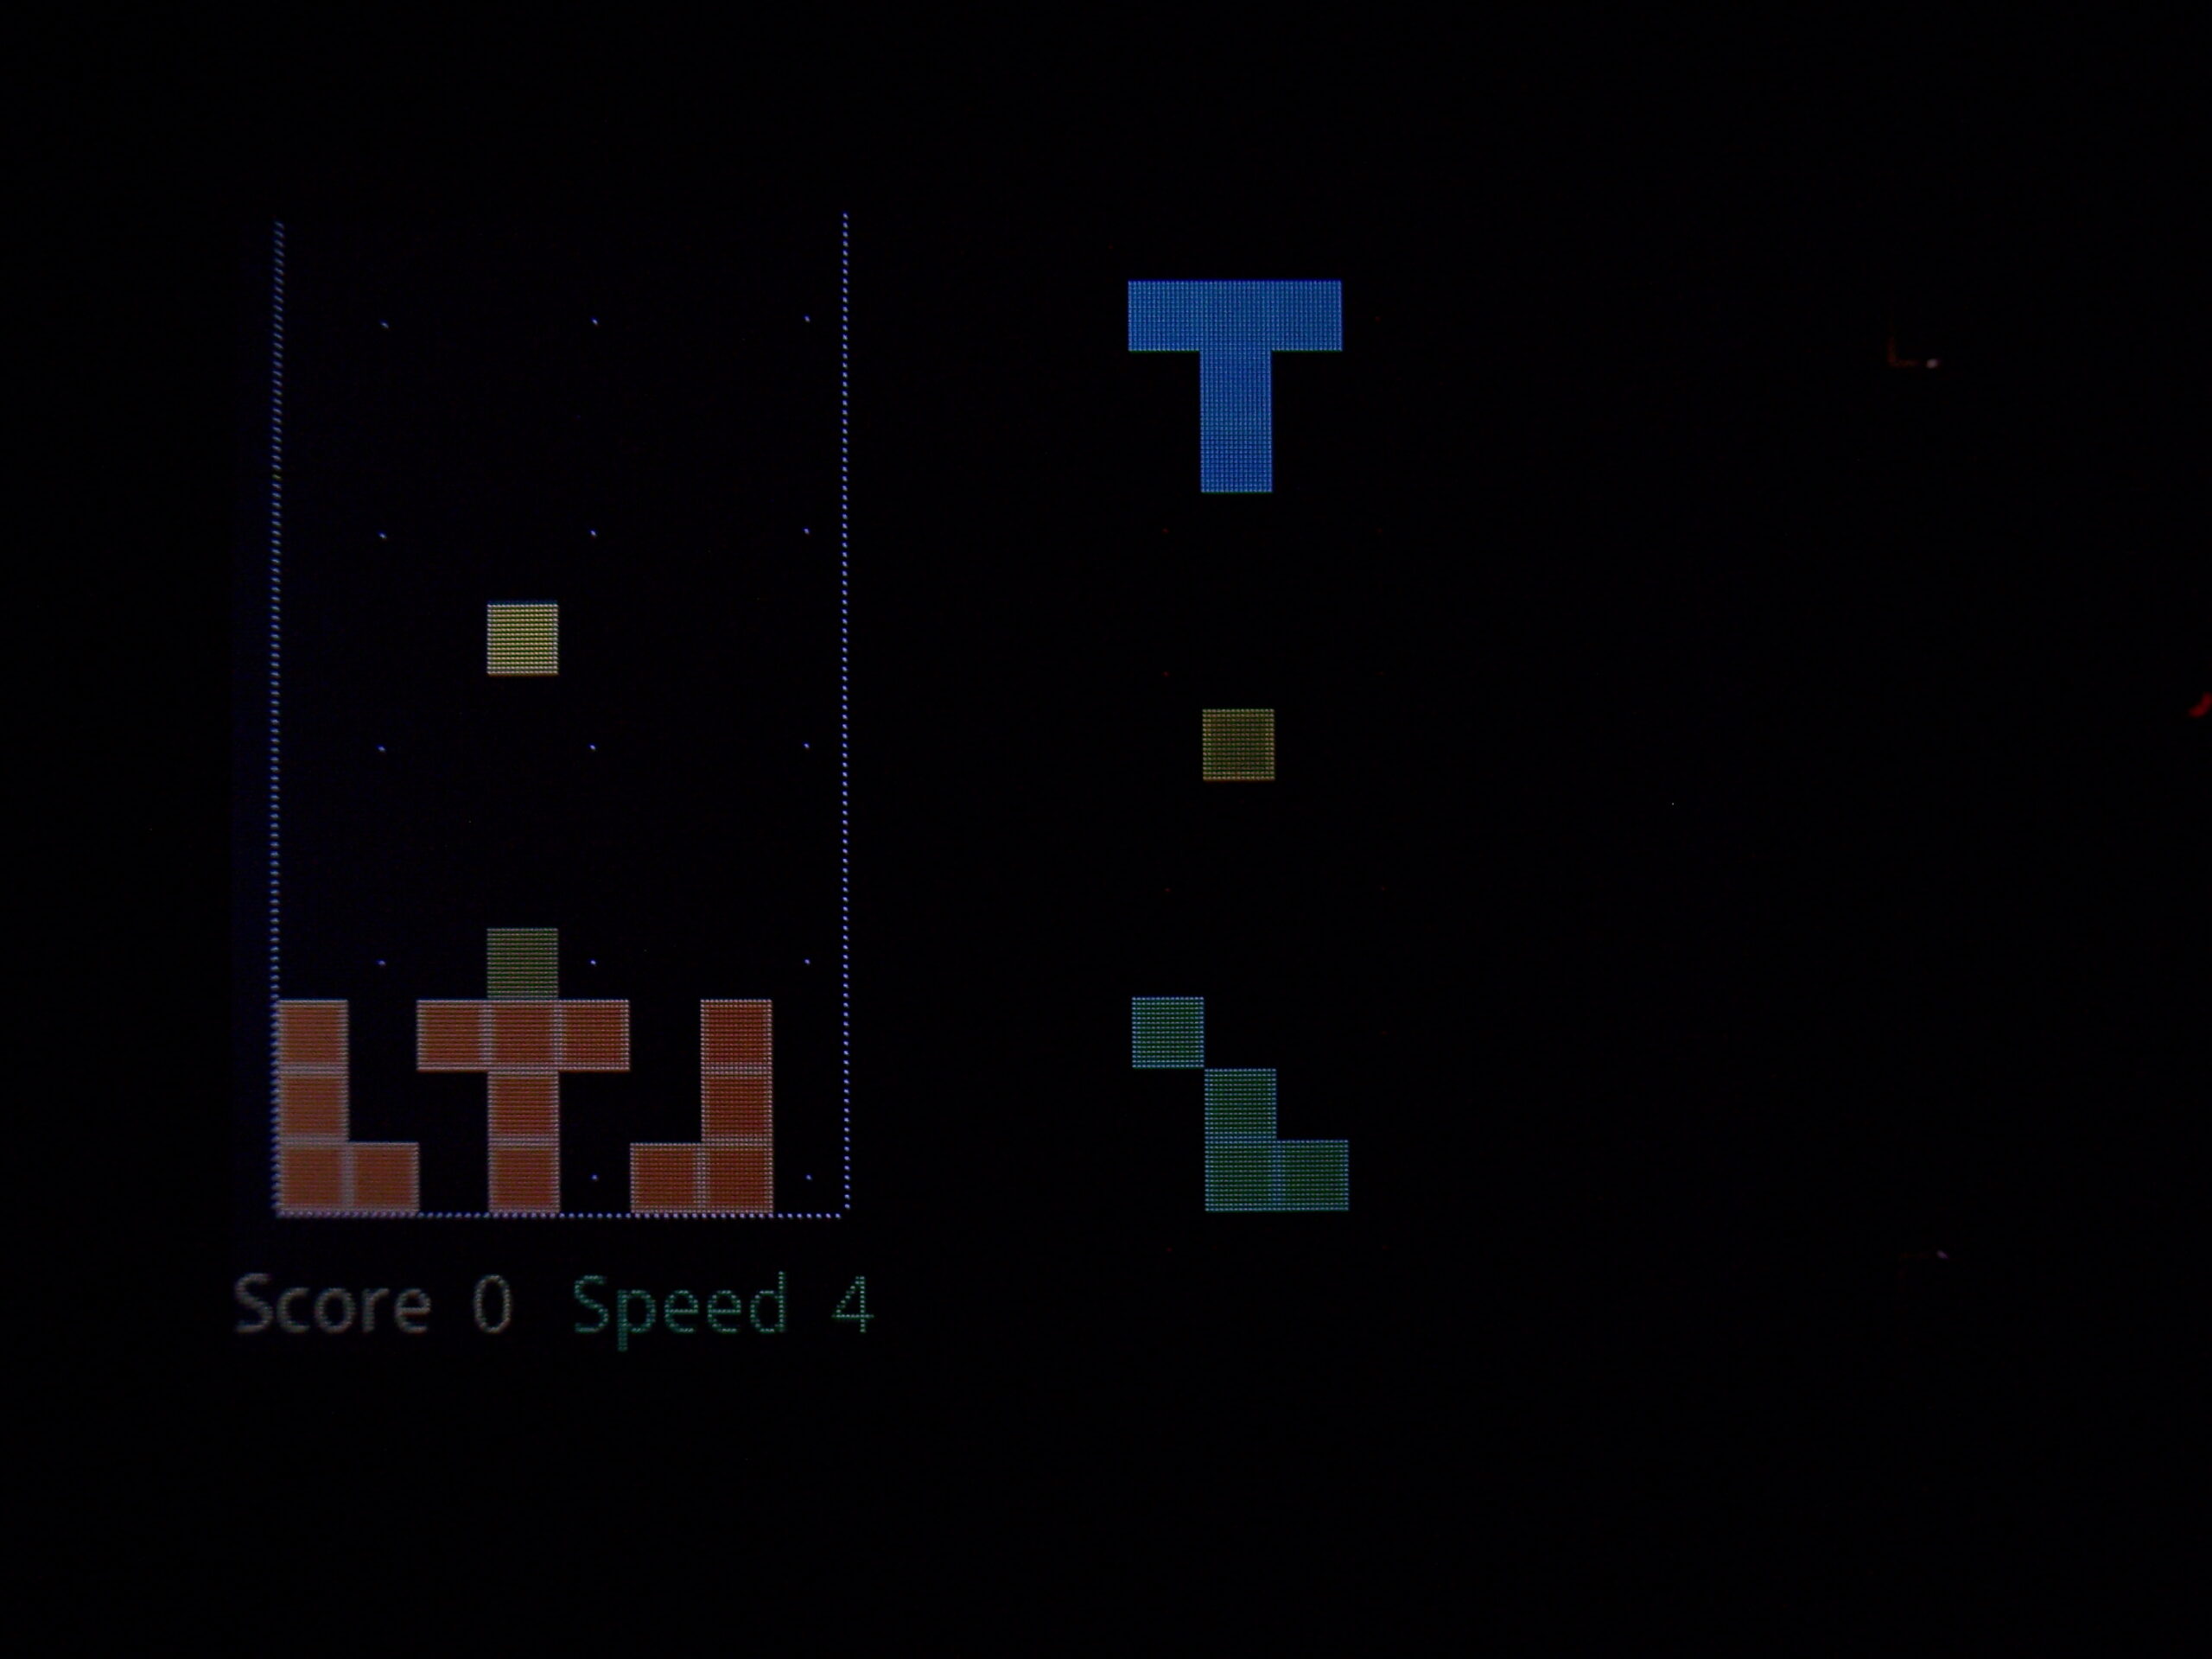
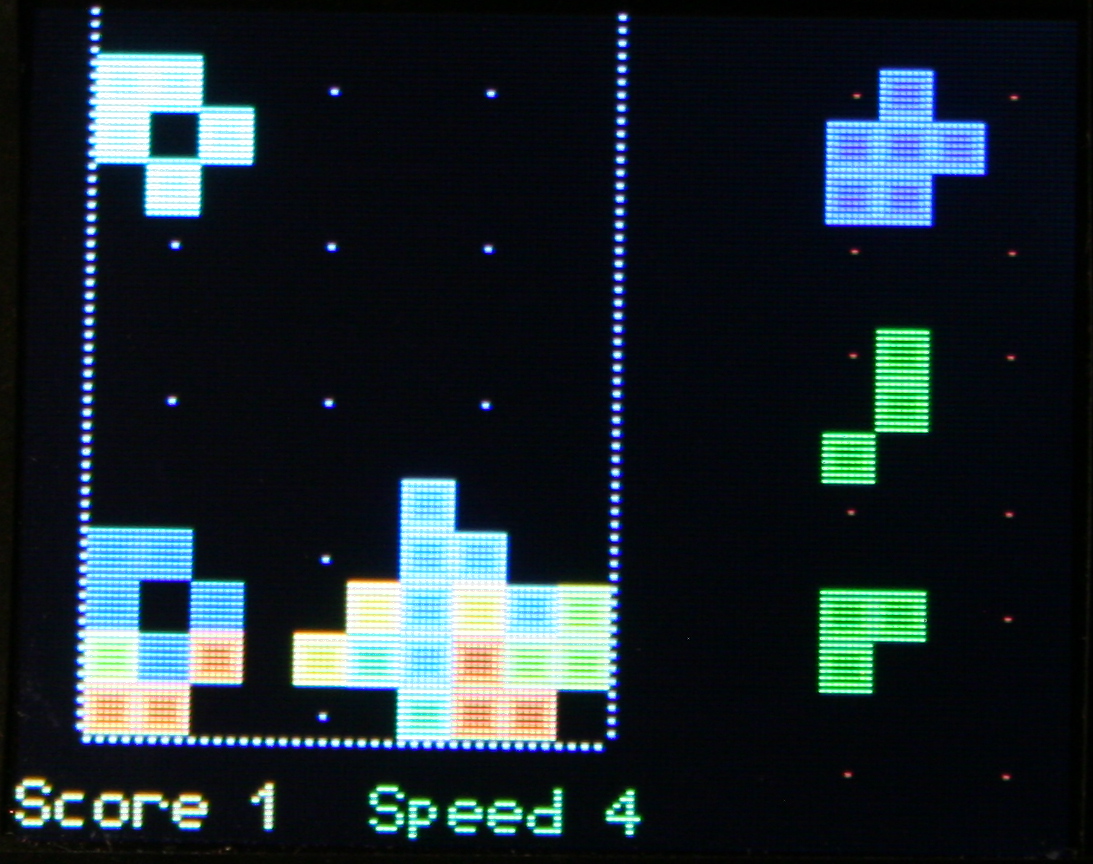
Game – falling blocks (Sixtis), or my version of it. It has 11 game presets, generated blocks, possibly diagonal, with many parameters for custom games.
Features – A detailed look at features, no sound or descriptions though. Editing mappings, sequences, testing etc.
Link to my channel with electronics videos here, mostly from my keyboards.
☑️Summary
For reference, here is a table with current status of all my keyboards, since start until present day:
Name
Assembly year
Original keyboard
Keys actuation
[gram force]
Notes
CK3 > CK6 > CK9
2016 > 2018 > 2020
A4 Tech KX-100
23 g
Cheaper, bit wobbly, but more keys
CK2 > CK4 > CK7
2005 > 2016 > 2018
Logitech Ultra X Flat
33 g
Stiff foil, old, extra keys
CK5, CK5b
2015, 2020
A4 Tech KV-300H
9-18 g
The lightest foil
CK1
2004
Logitech Ultra X Flat
25 g
First, old, had extra keys,
now only for testing, 1 row dead 💀
The newer two of my heavily modified keyboards. This time having Teensy 3.1 (or 3.2) as microcontroller with a tiny 1″ monochrome OLED display. Firmware was based on Kiibohd, it was a fork with my extensions. I added display support (with a library), menu for editing e.g. macros/sequences, few demos and a game. I did improve them further in my newer firmware, with bigger display and later made my own in here.
🛠️Modifications
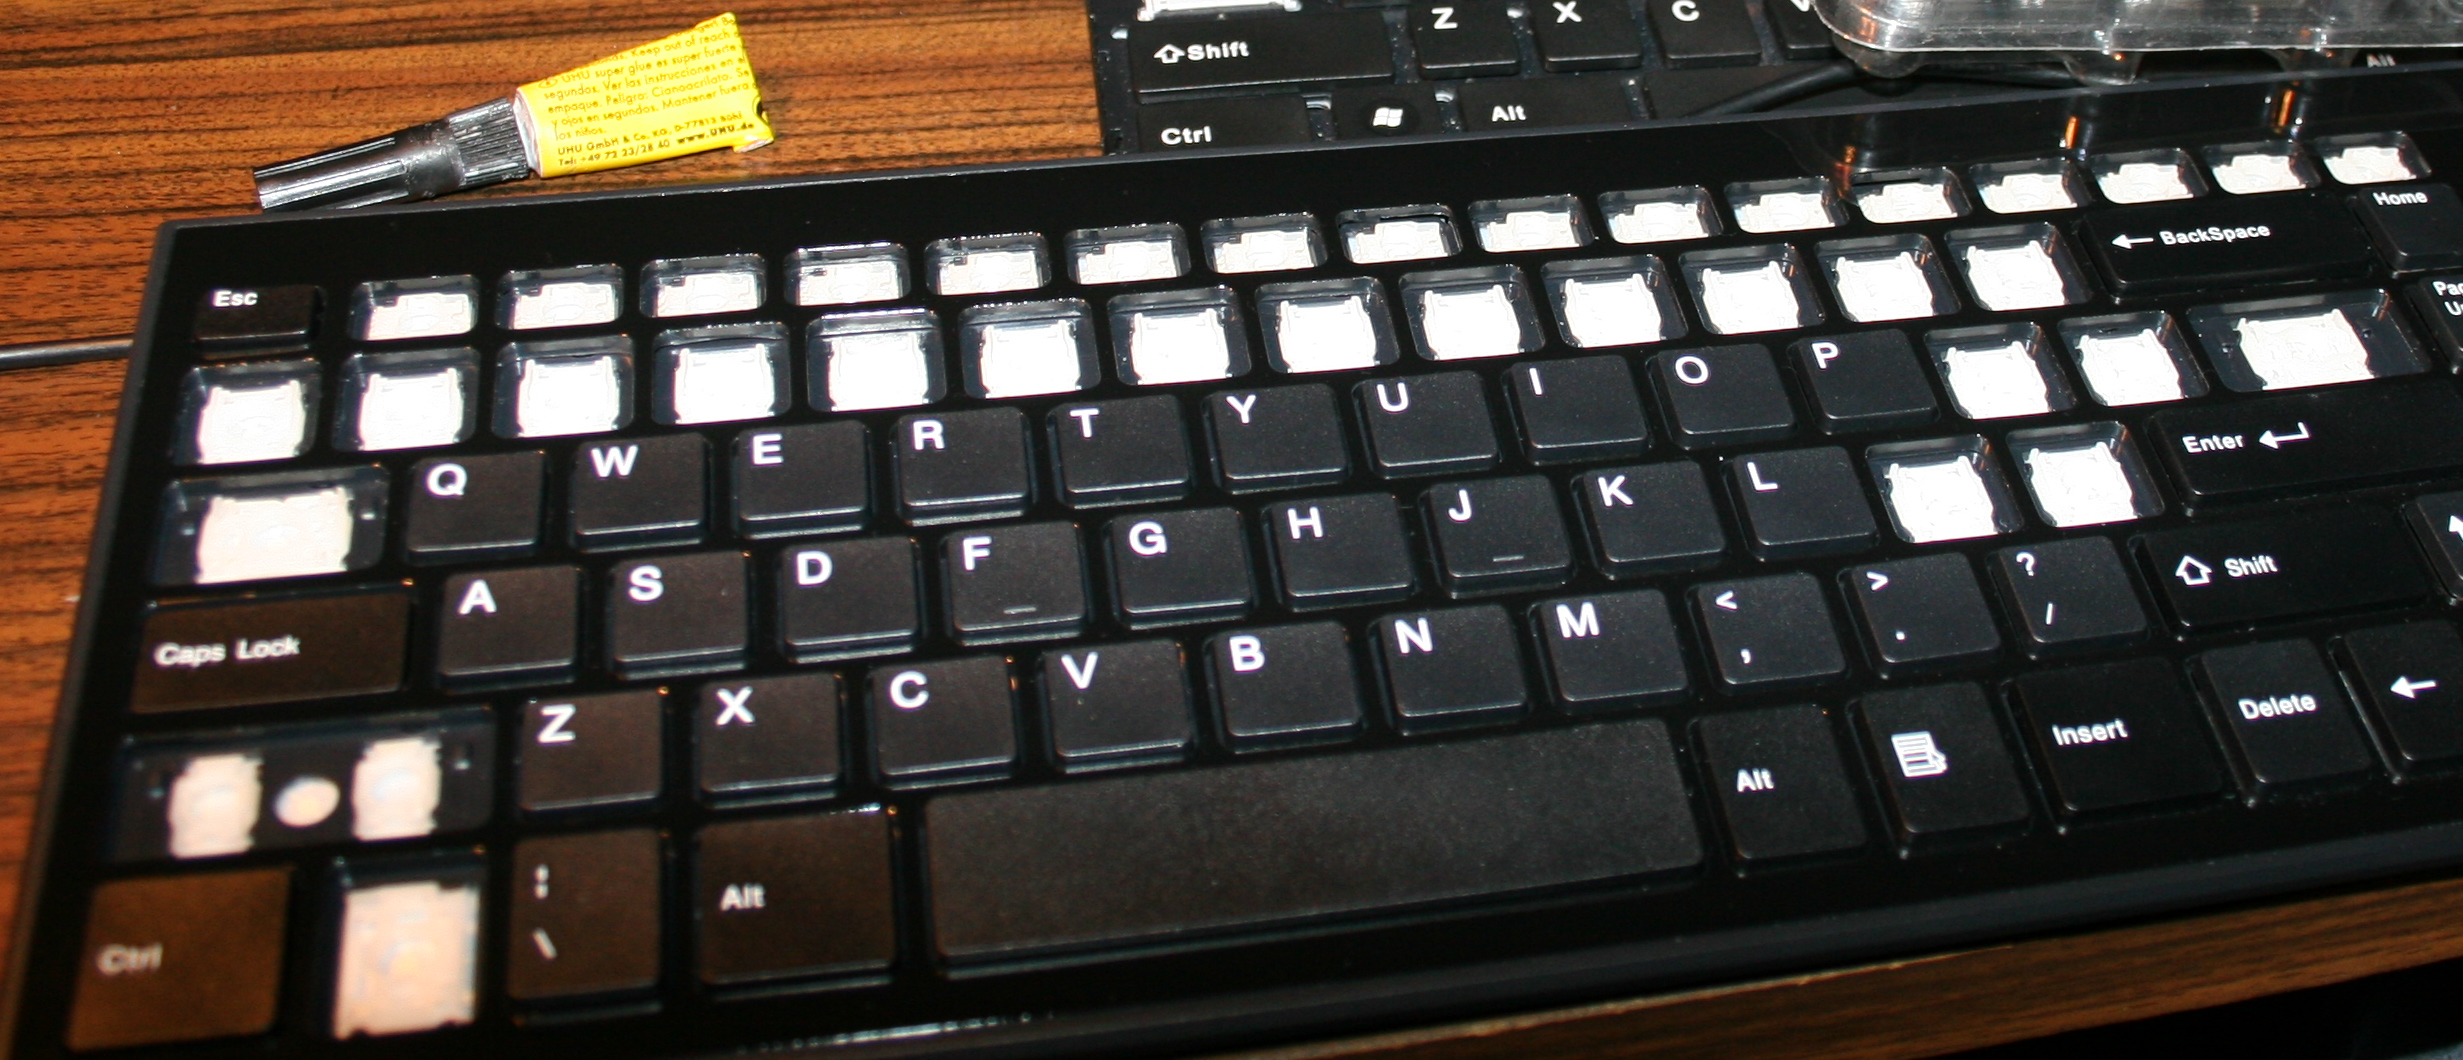
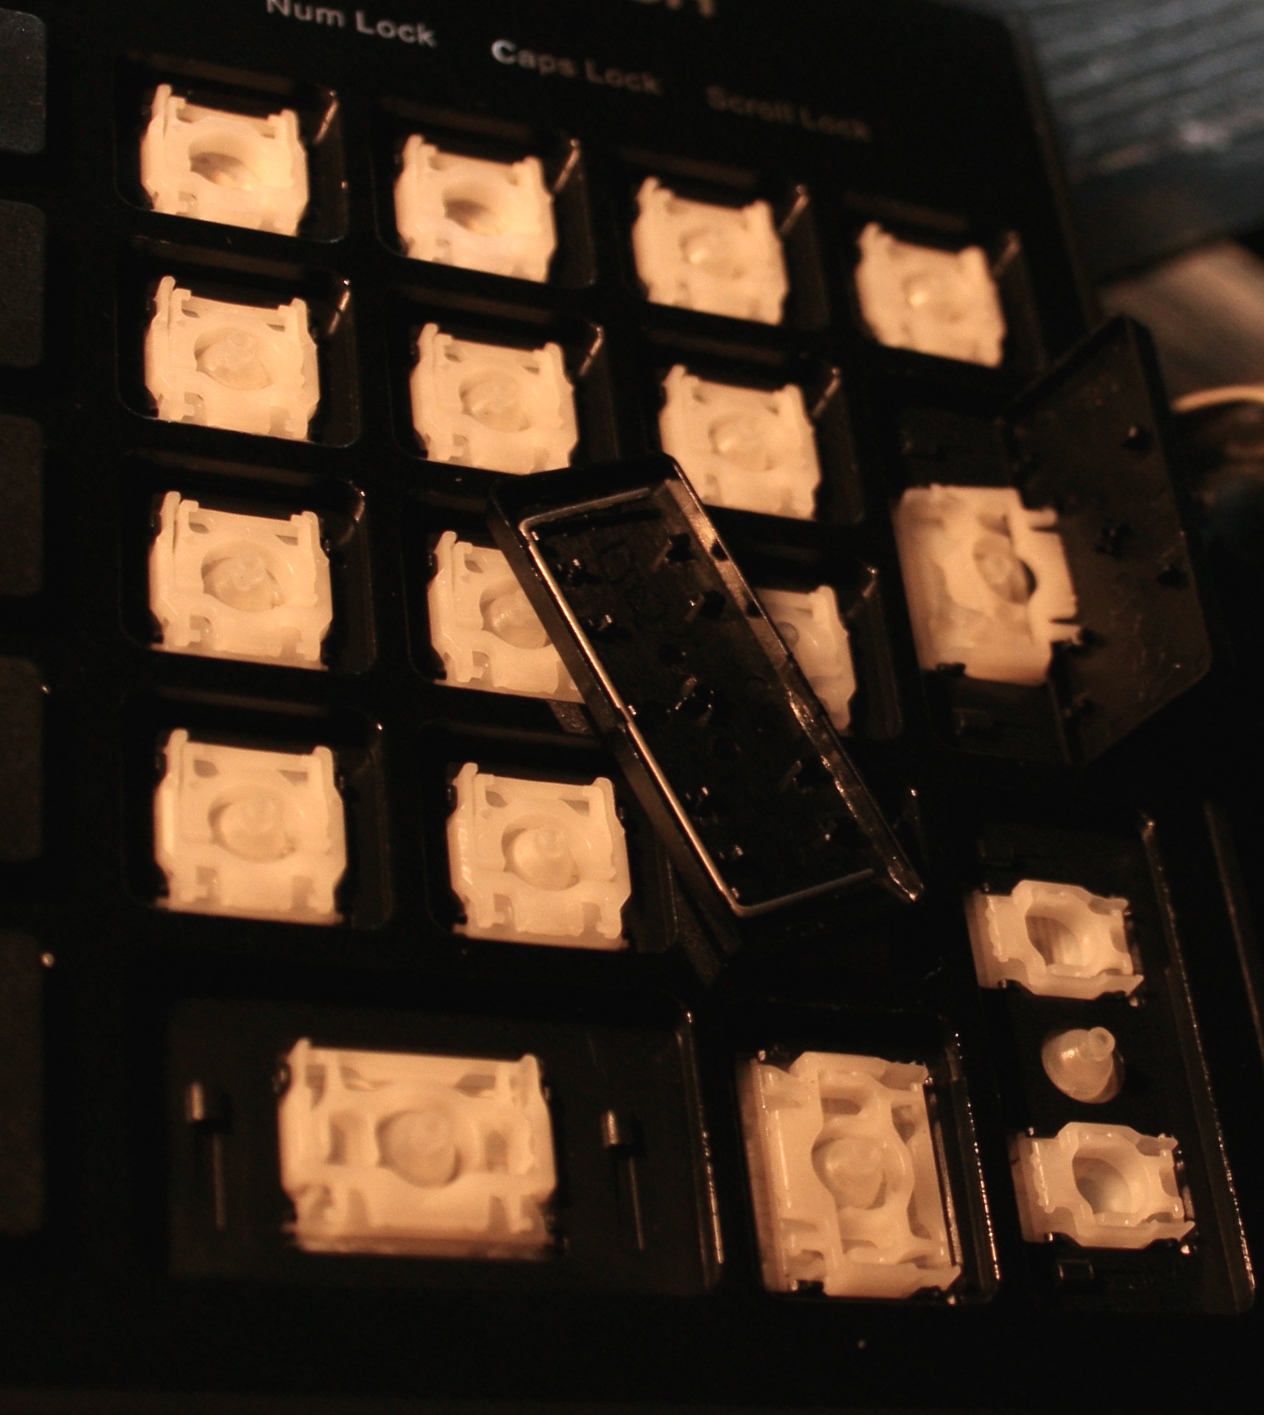
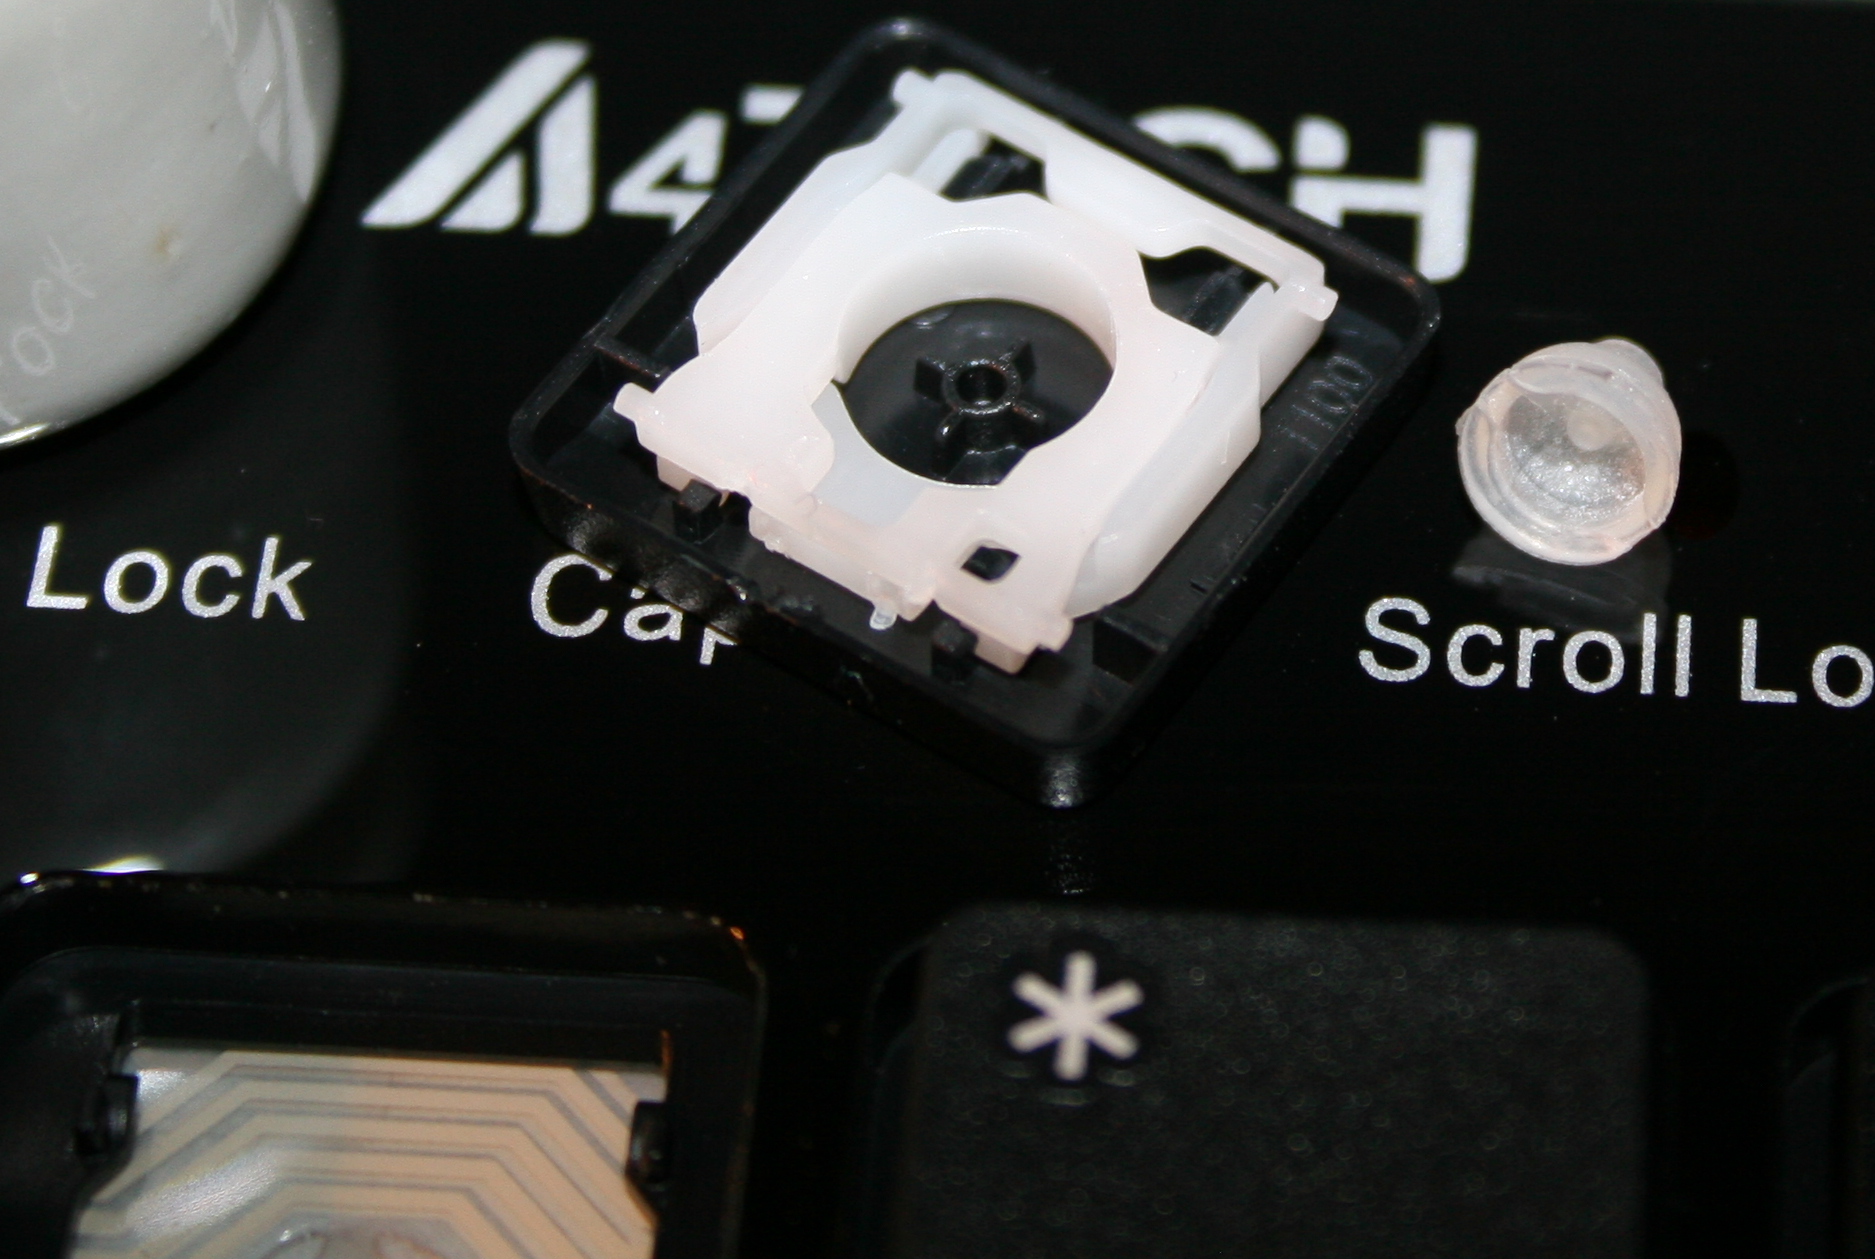
Light press
Rubber domes reduction for minimized pressing (actuation) force and distance. Simply more pleasant and comfortable. Also healthier, since the risk of keyboard injuries decreases. I do it always for all my keyboards. Process with info shown here and in gallery below at end.
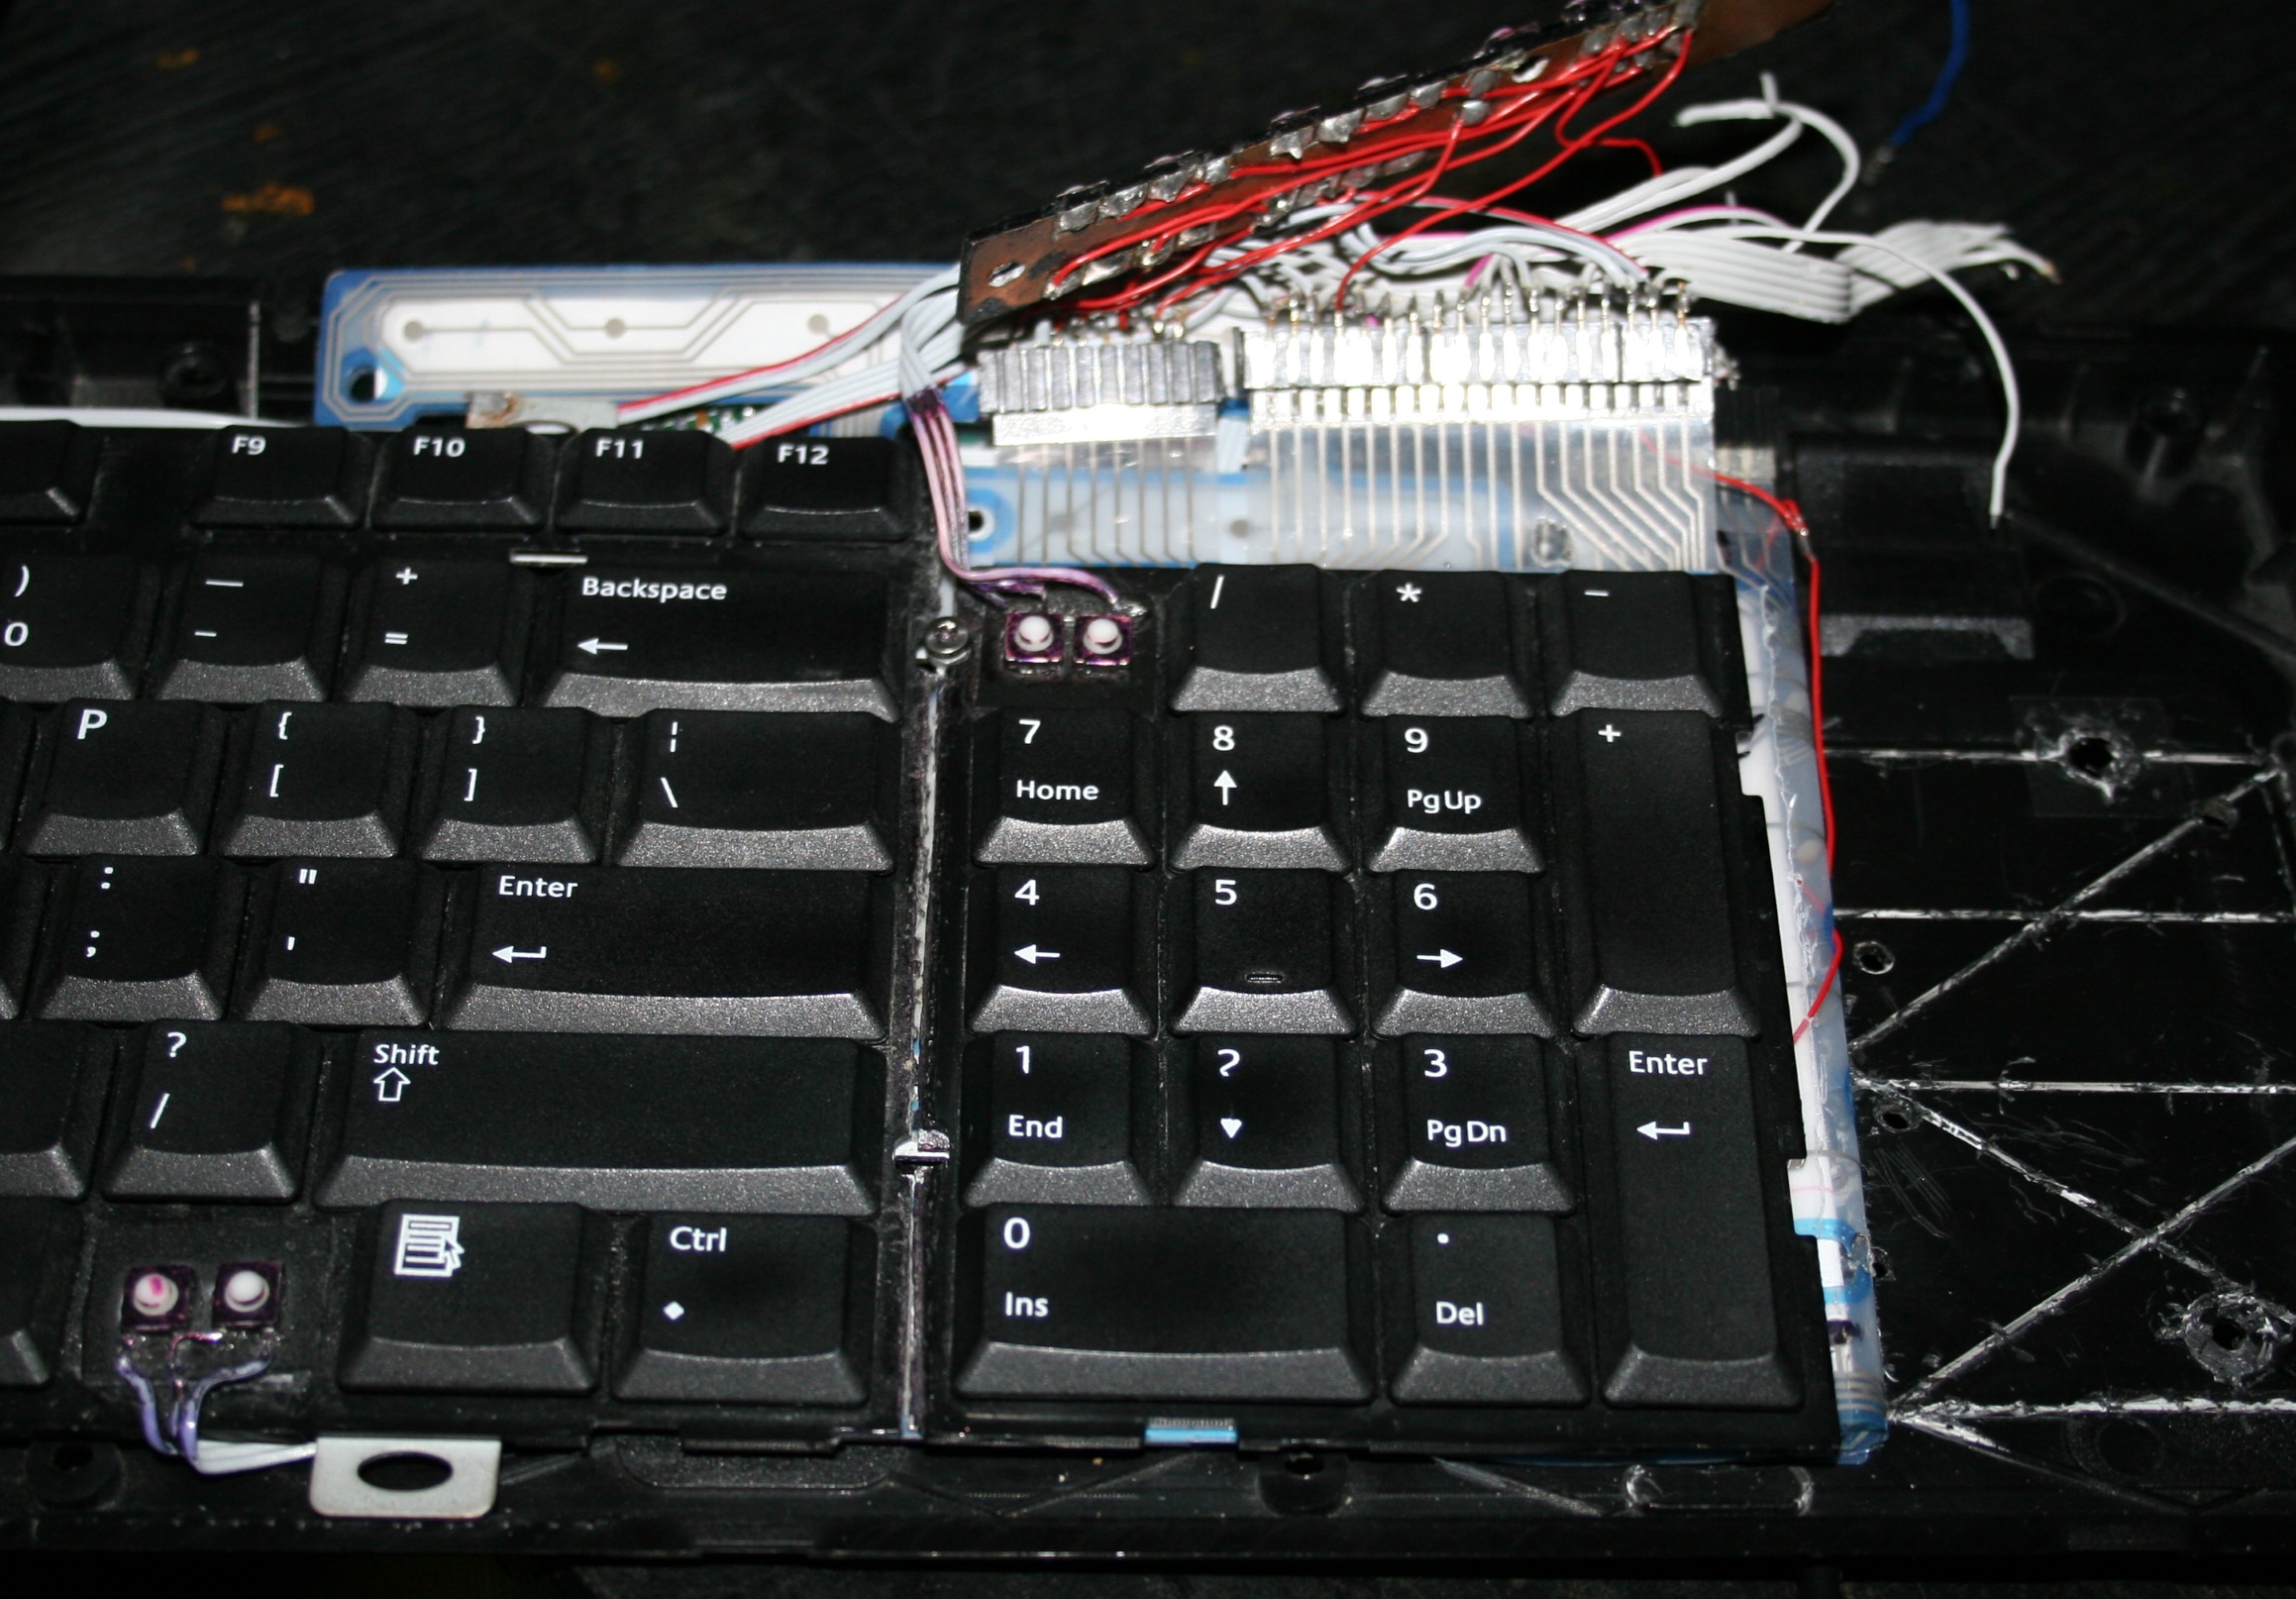
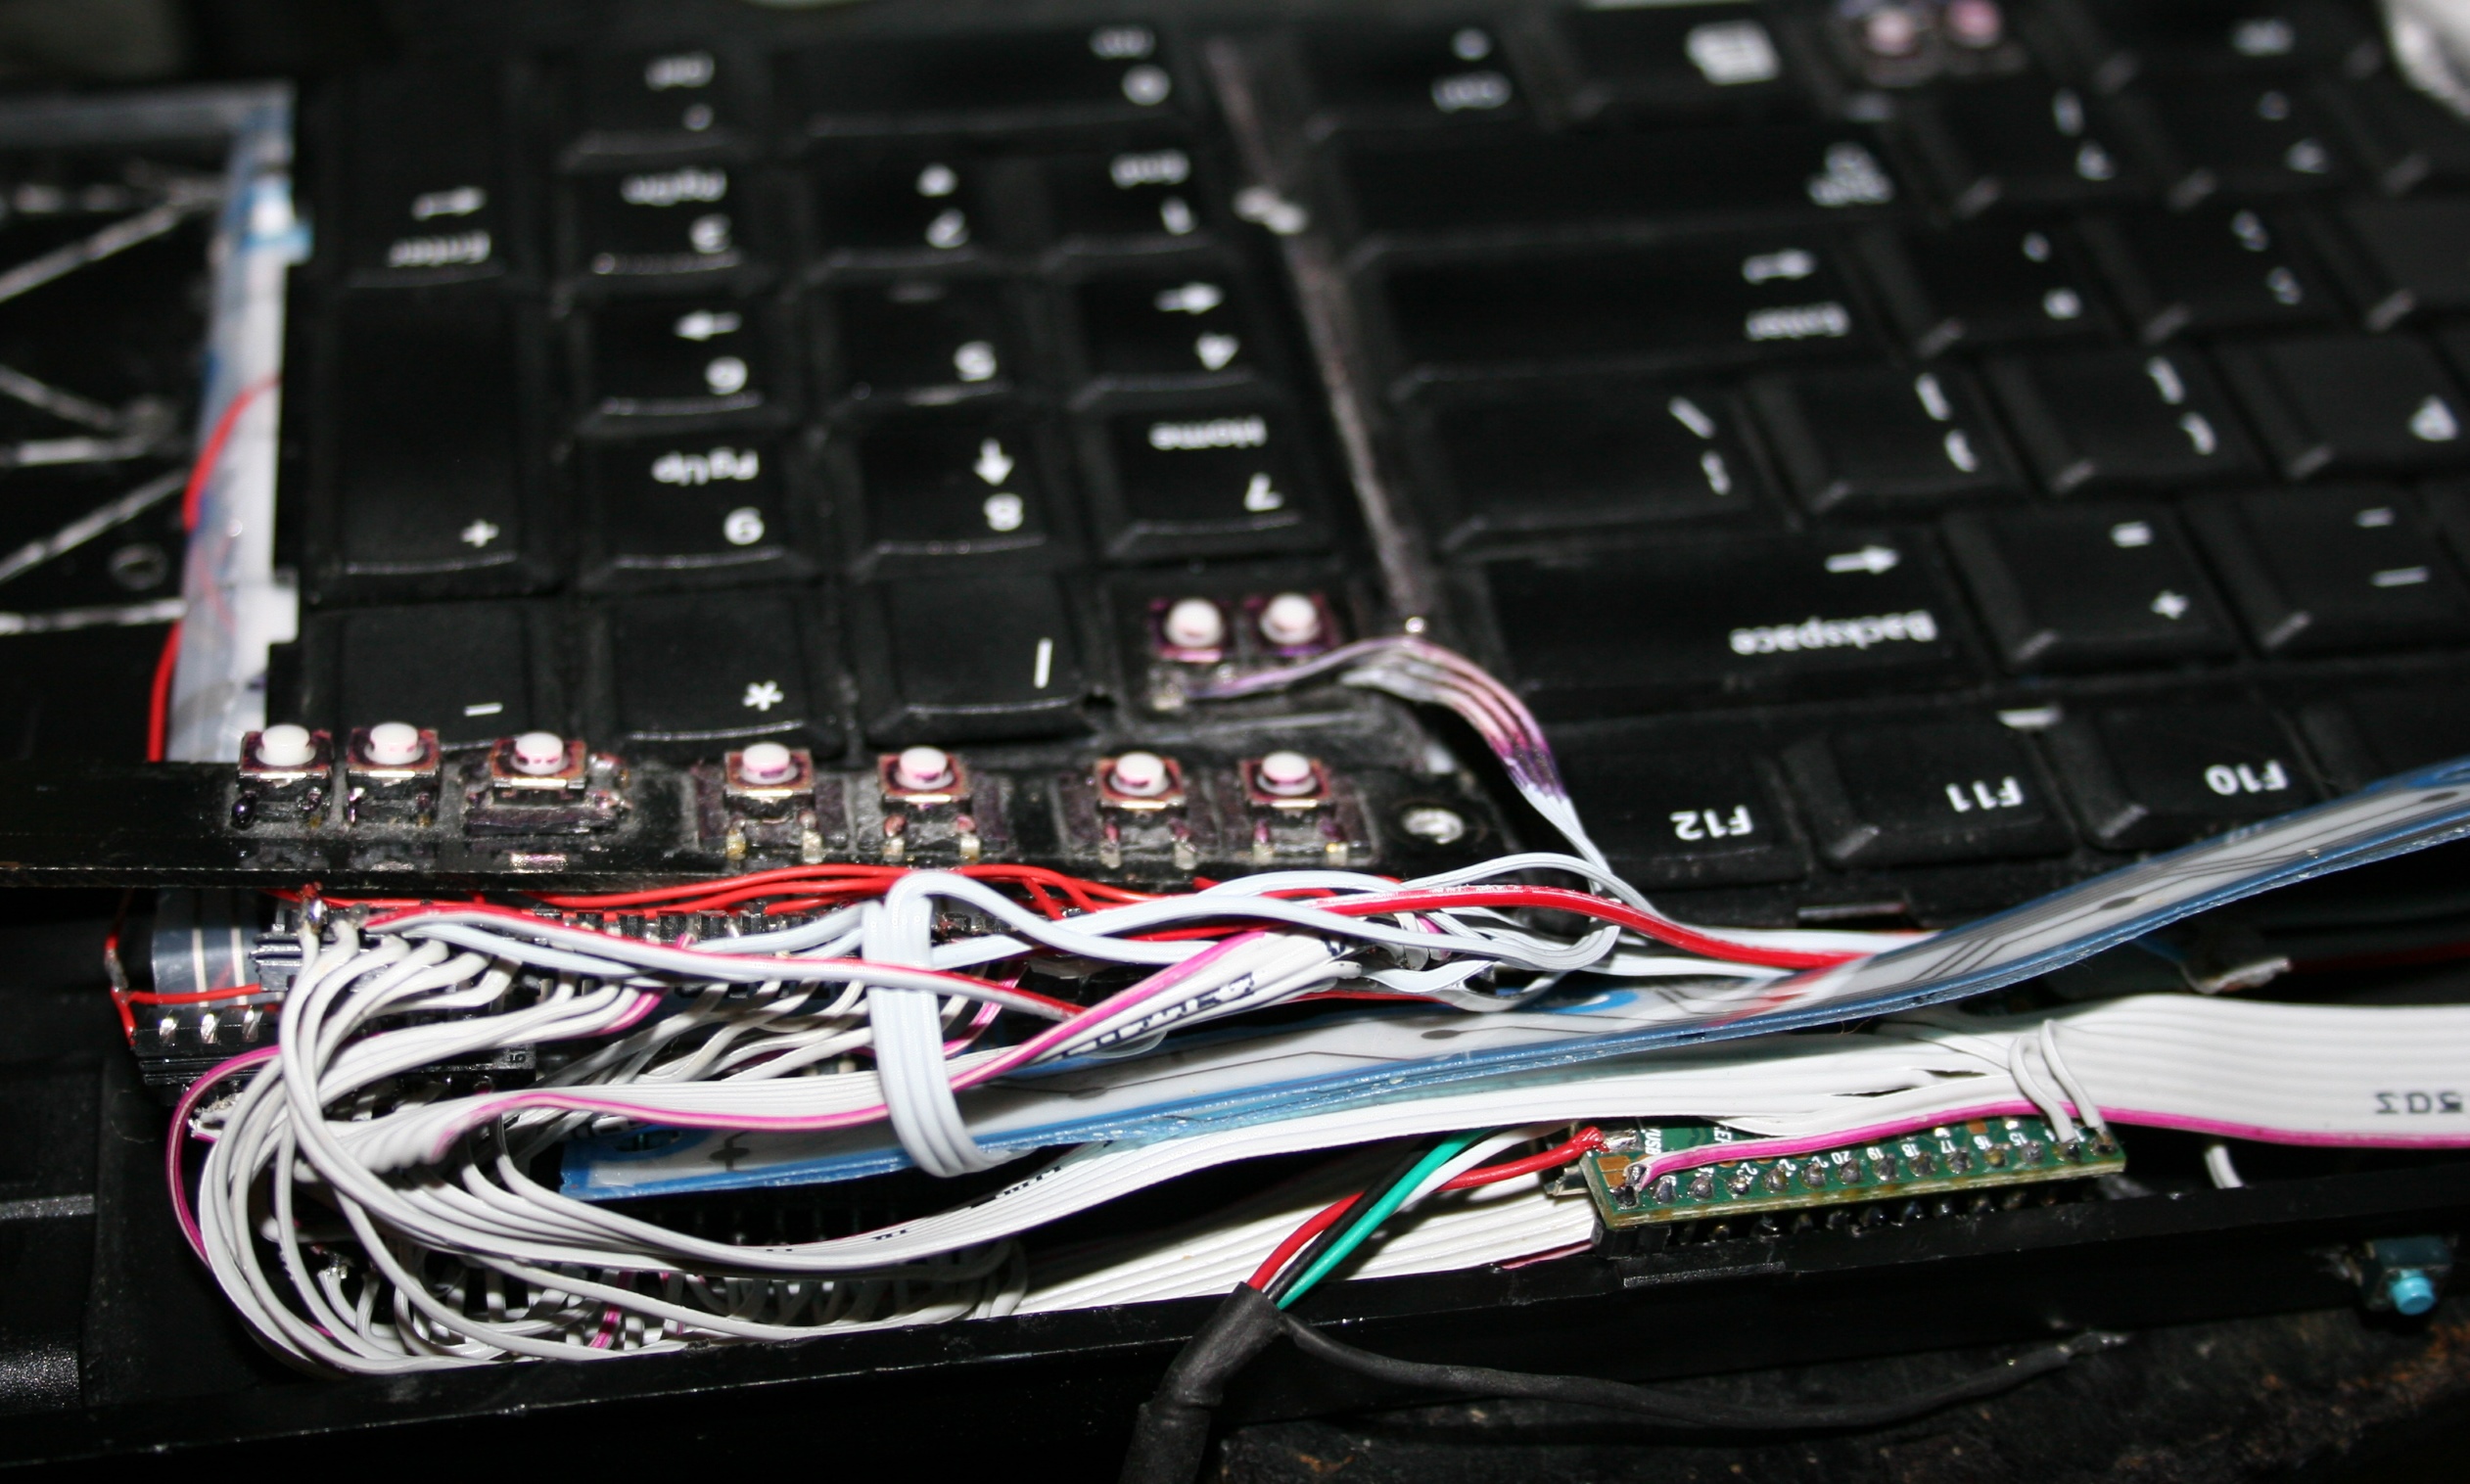
⌨️Additional keys
For CK4 there are also few small extra keys. Which were present already in my earliest keyboards CK1 and CK2. Those are glued on top and are made from lightest 0,5N switches available. The row above numpad is used for my audio player control. Rest is custom. This part is optional and I didn’t do it for CK3. The disadvantage is the difference in pressing those switches and much lighter normal keyboard keys. They are smaller so you can fit more, but are less convenient to press. Lastly, regular keys can be used to switch layers instead.
⚙️Microcontroller (MCU)
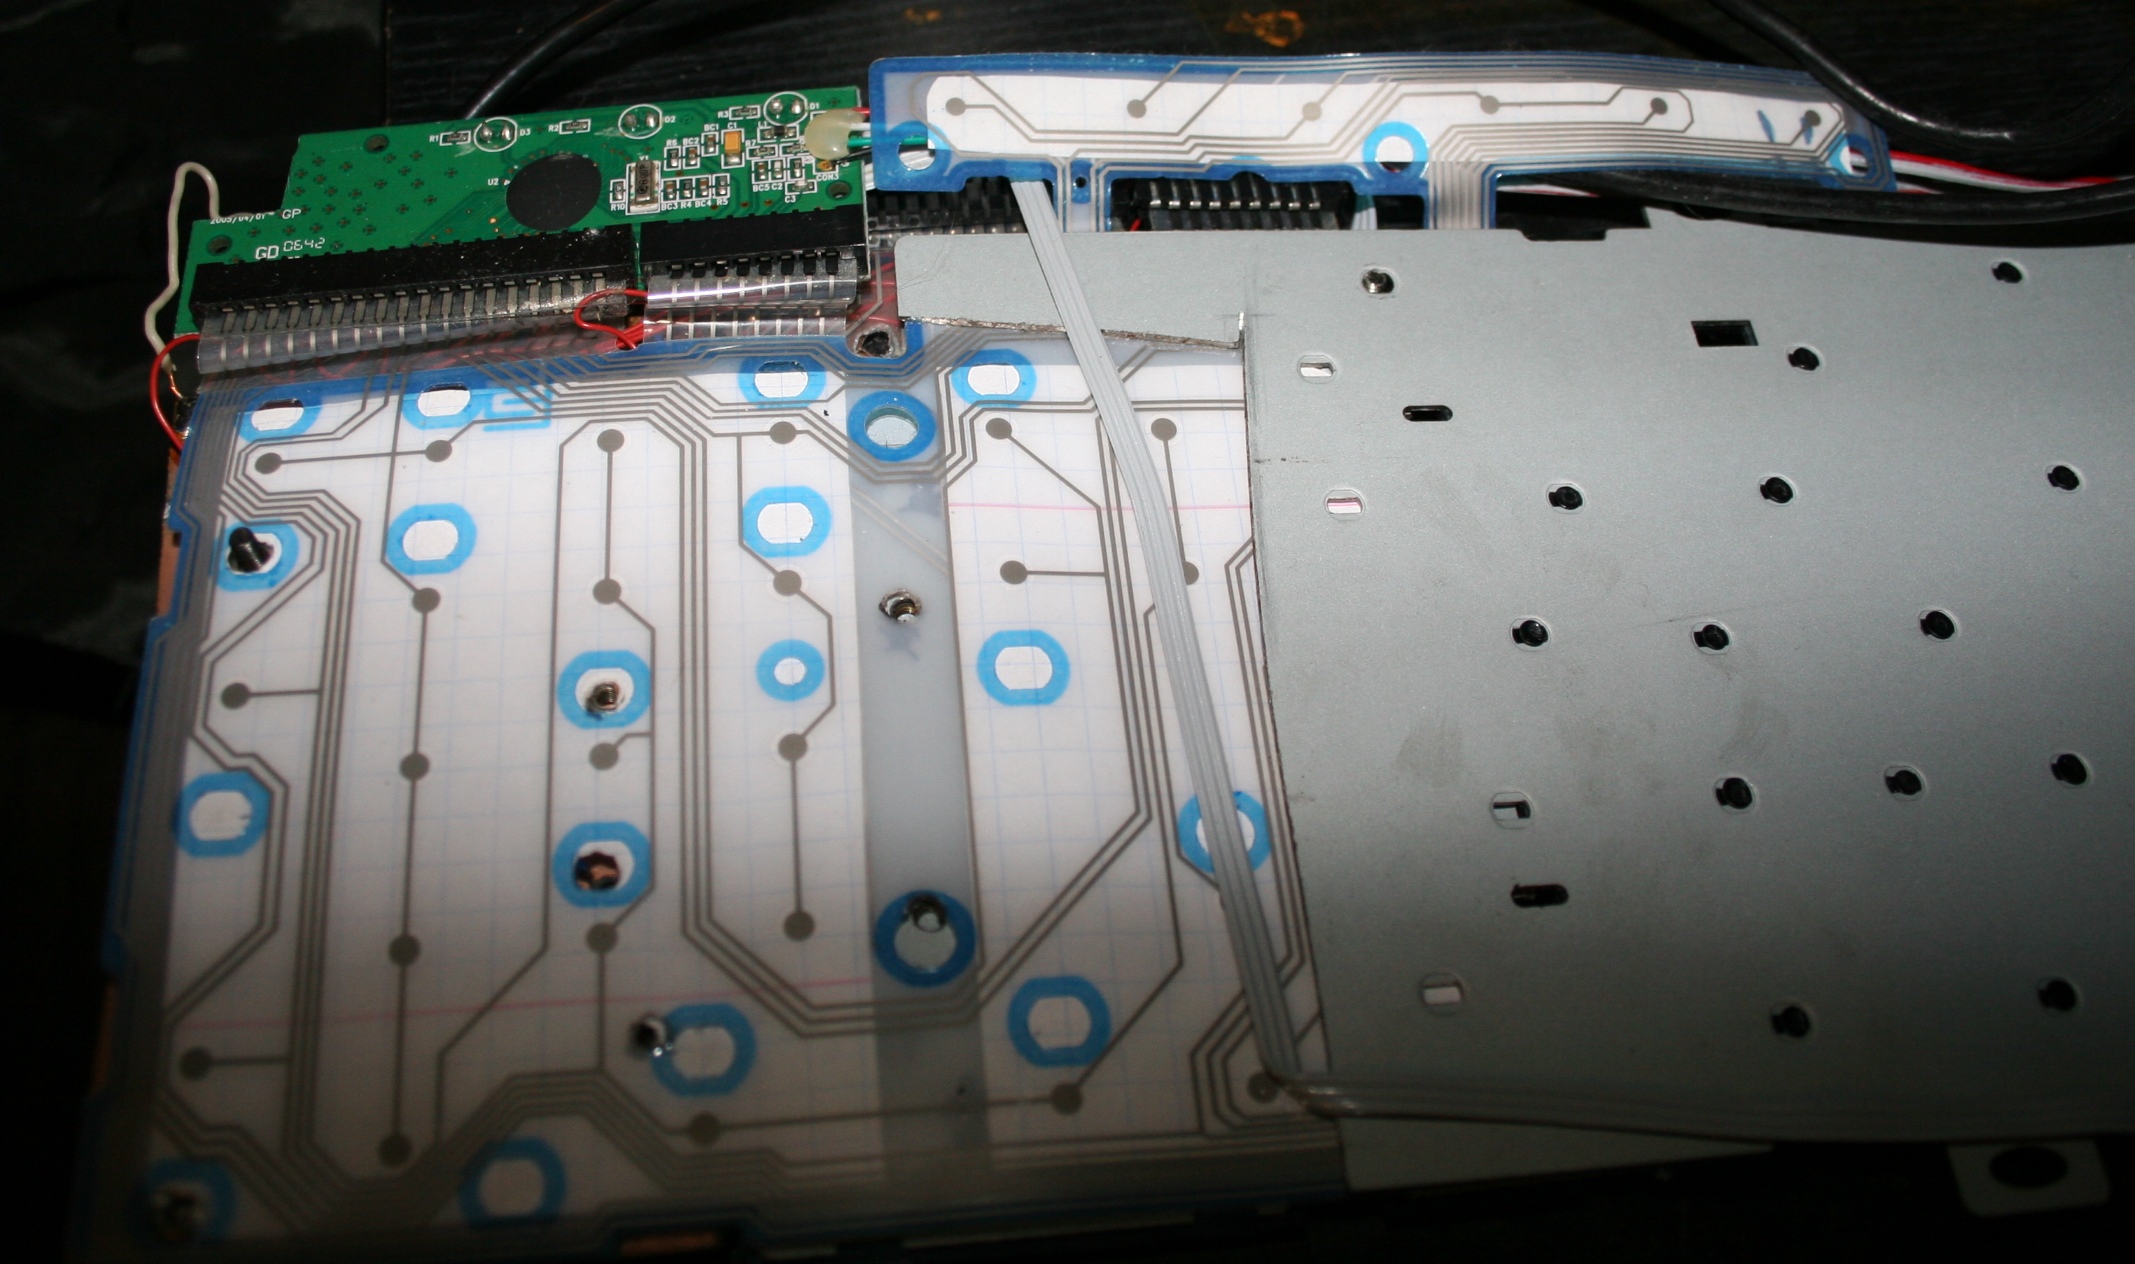
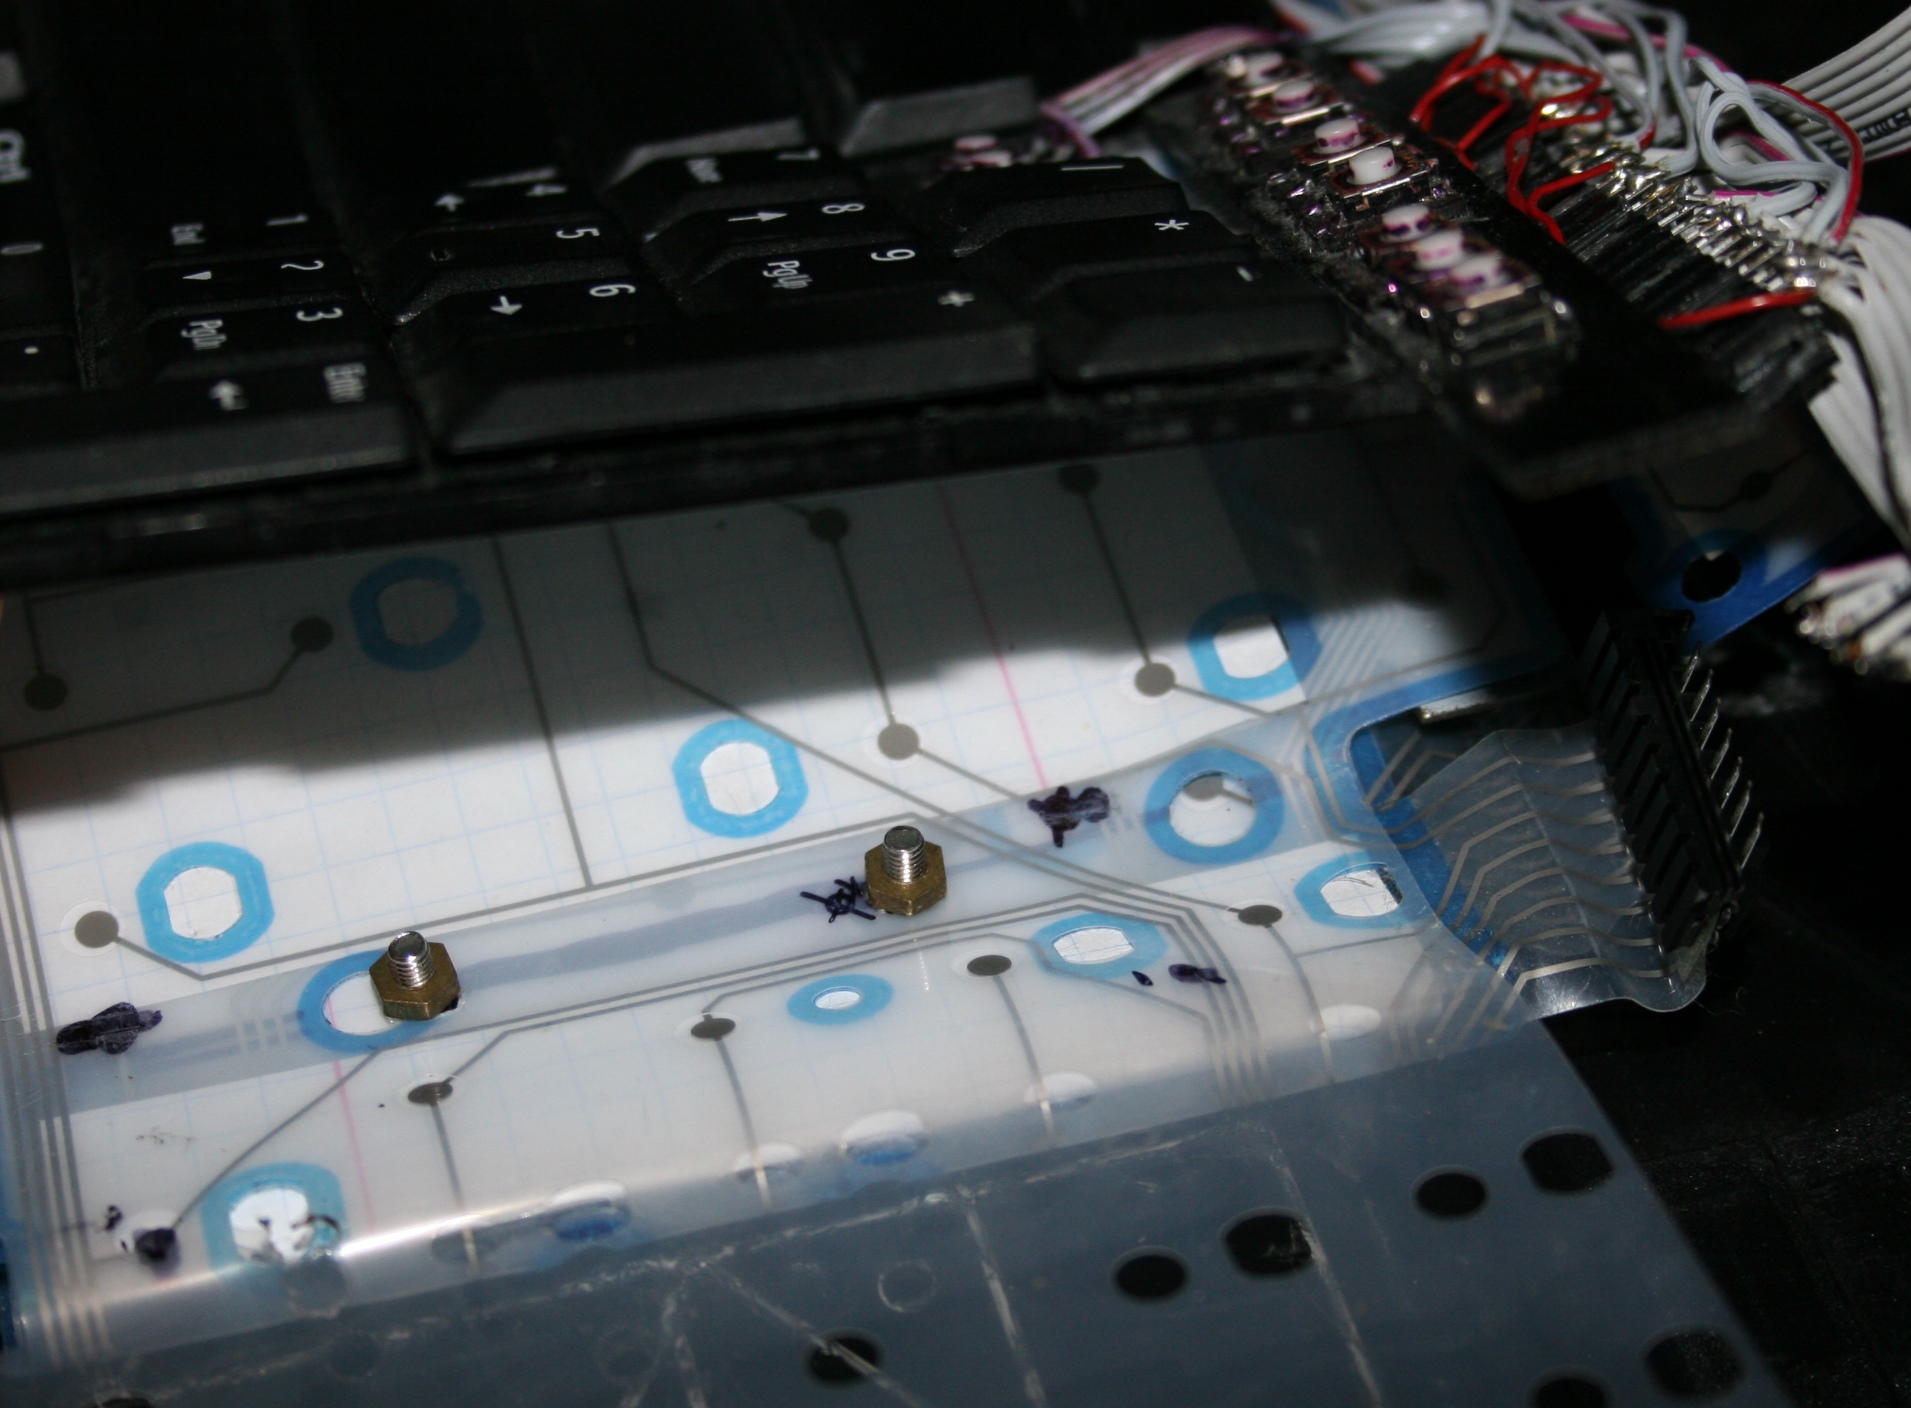
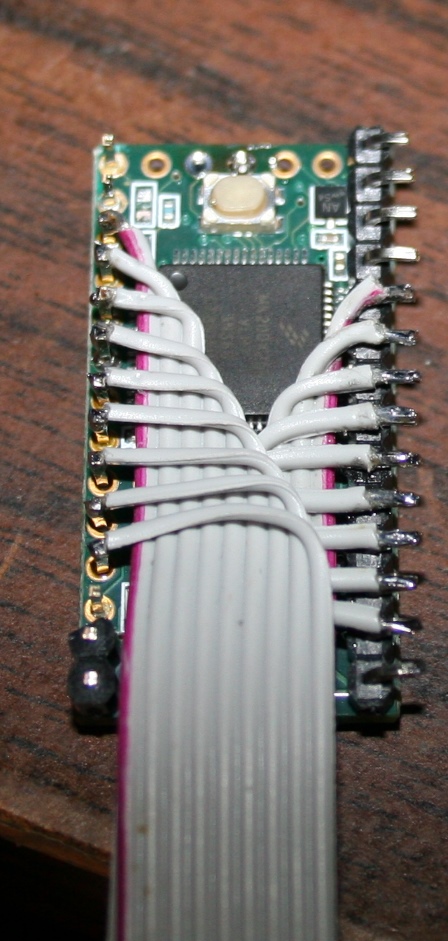
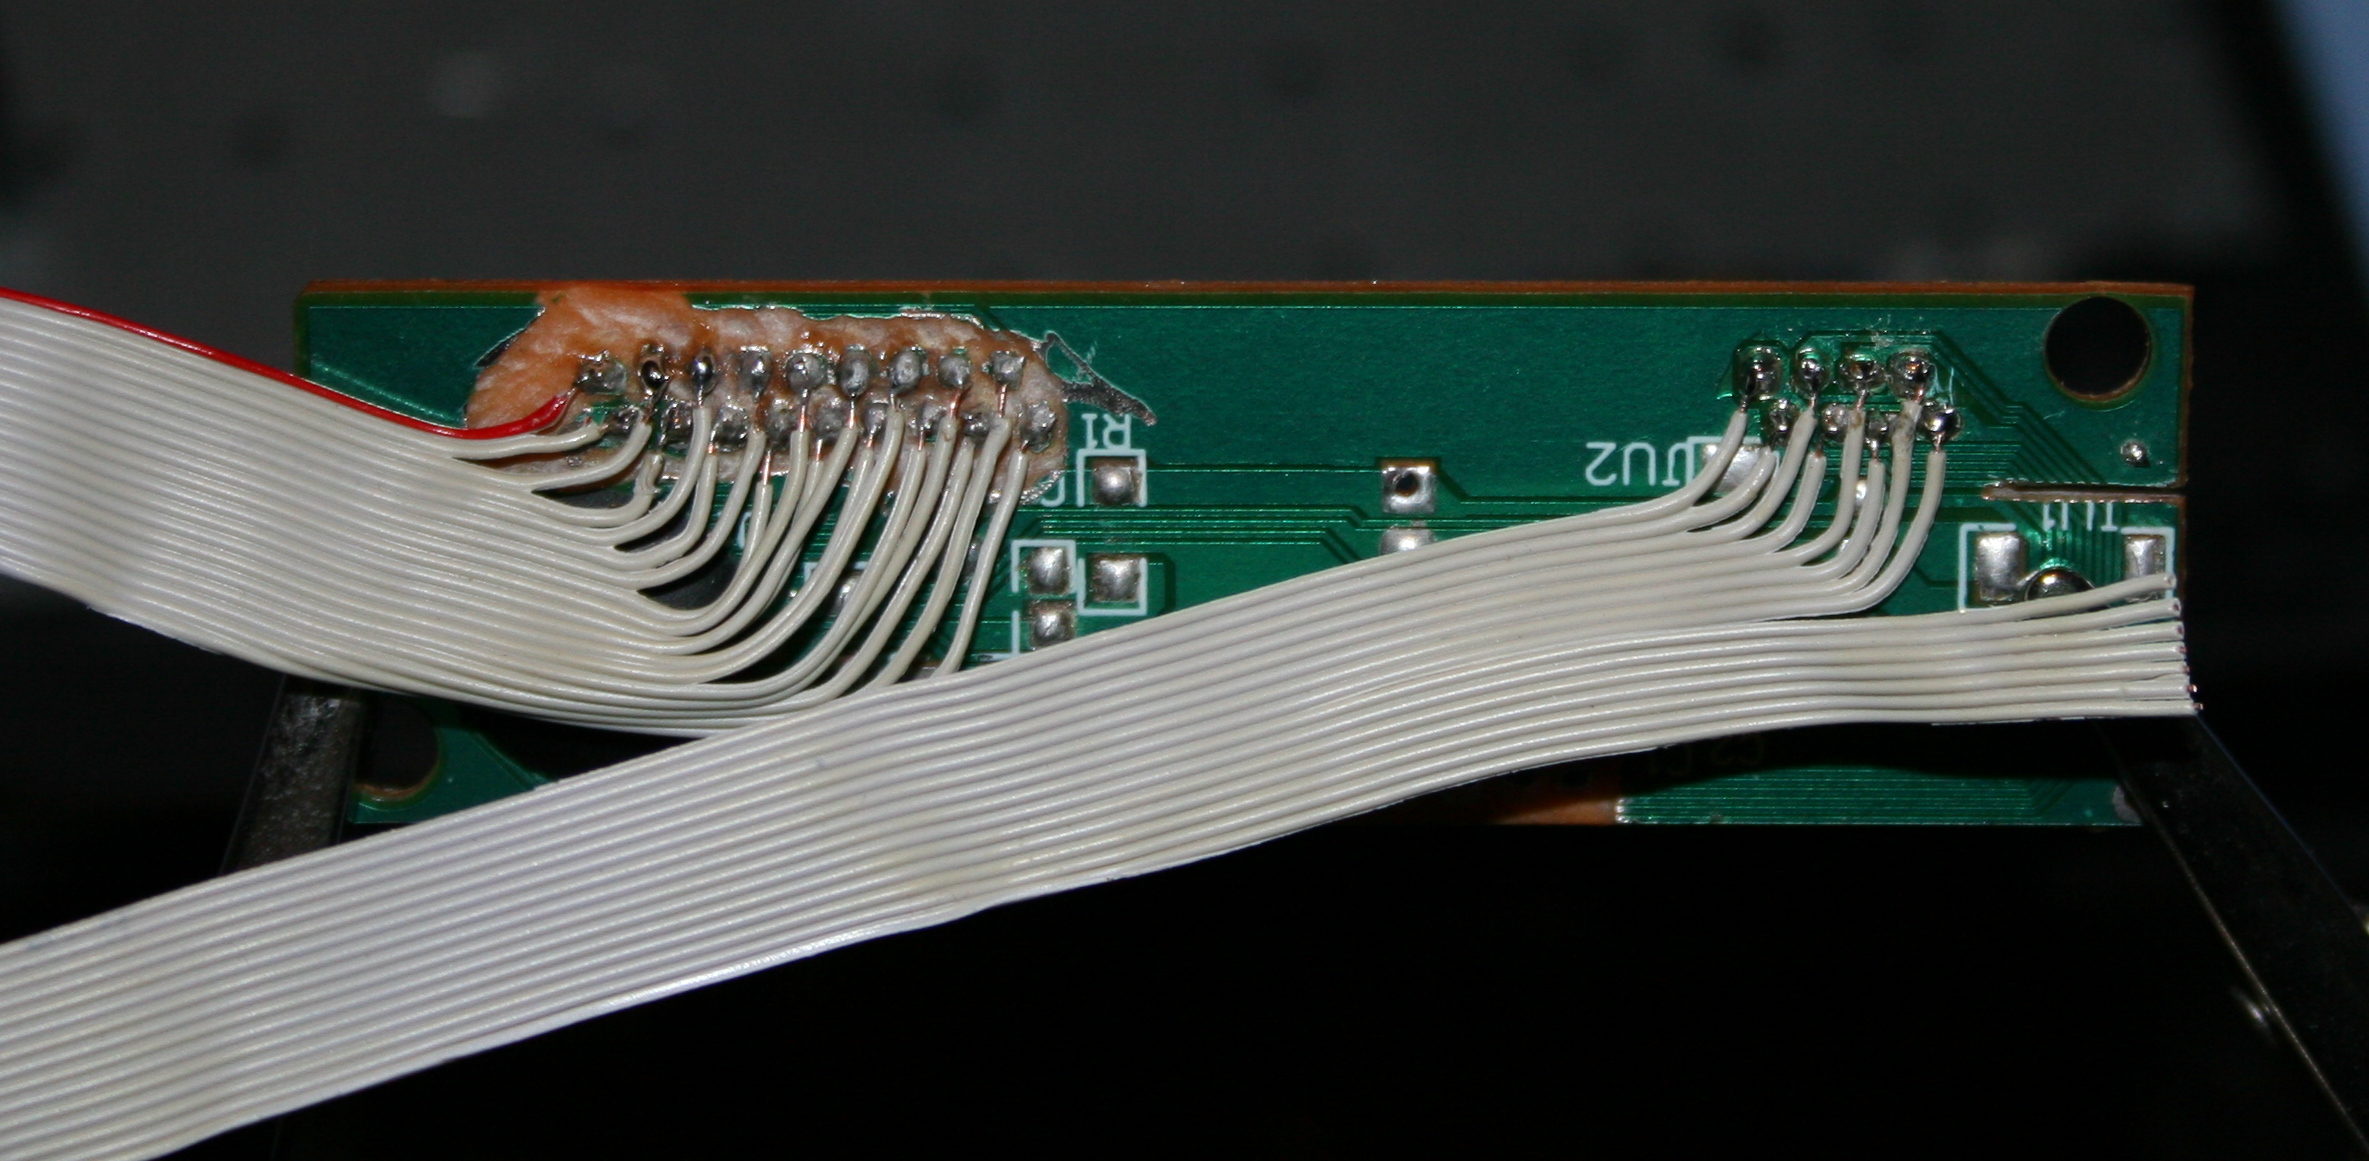
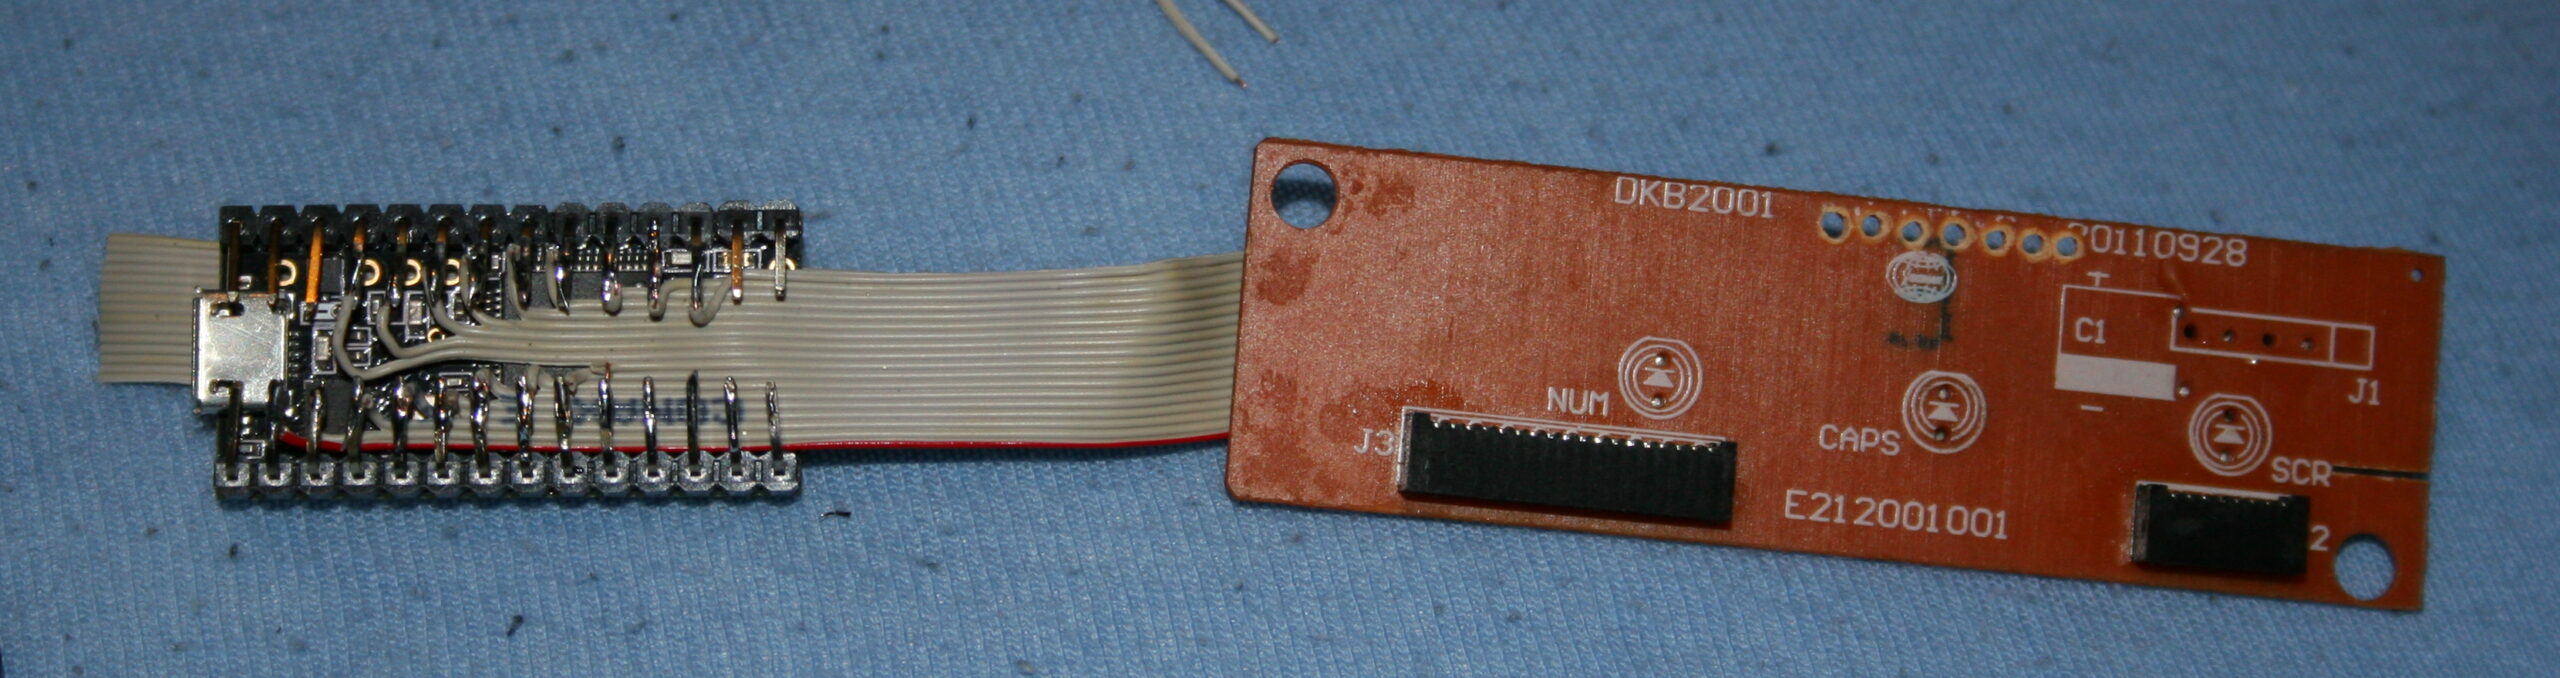
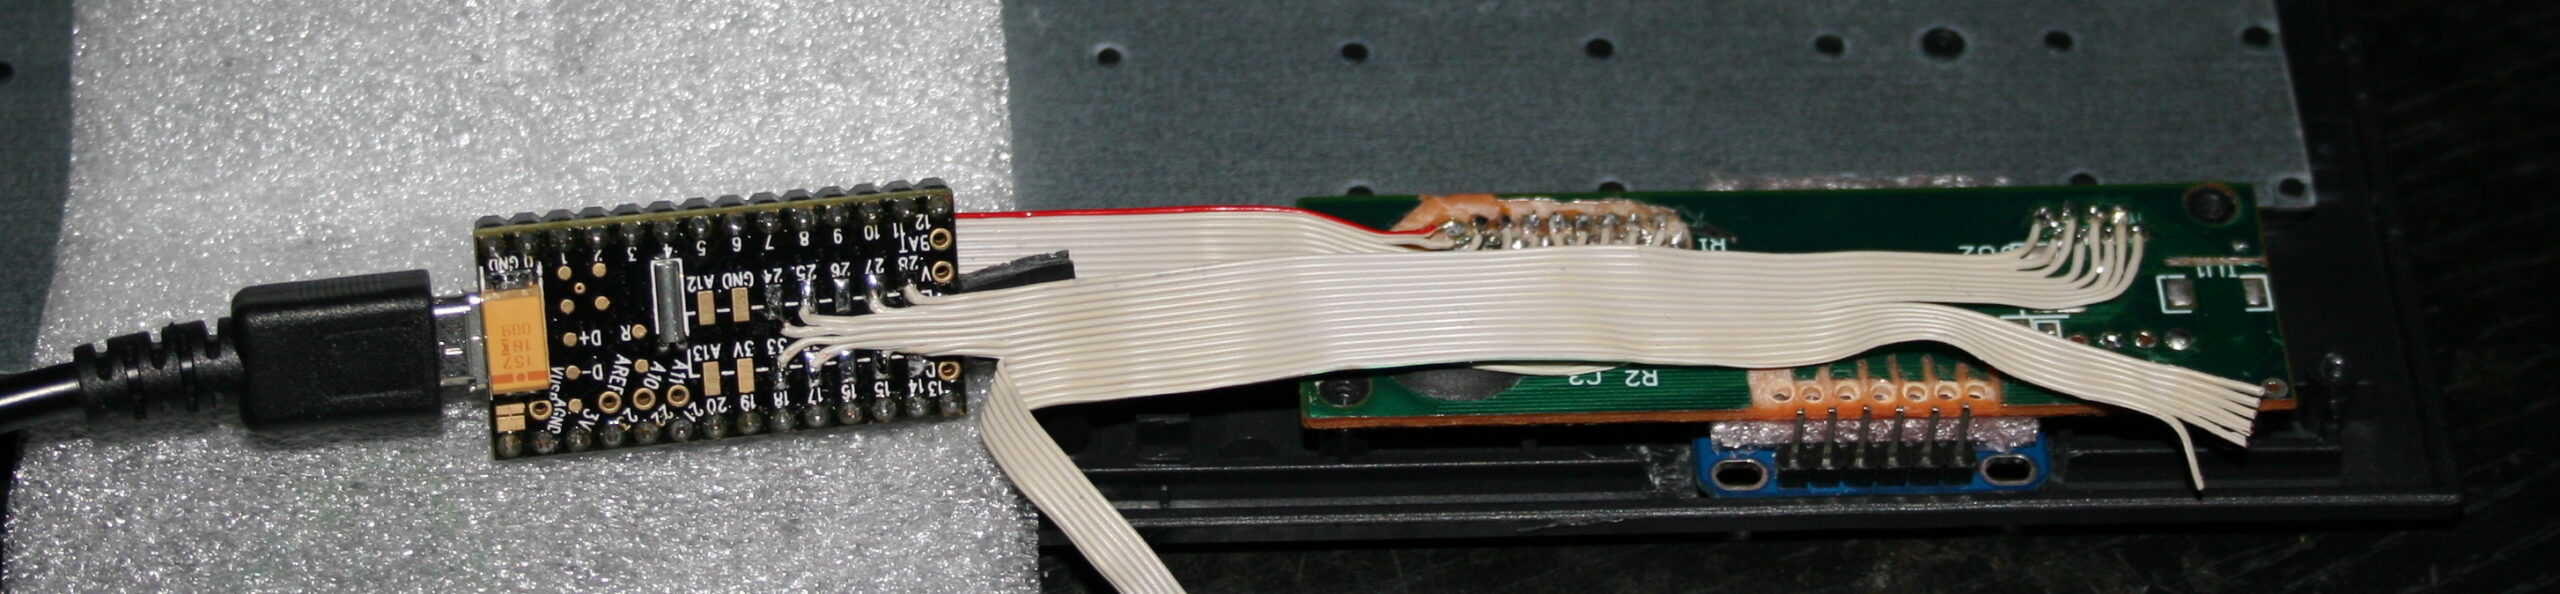
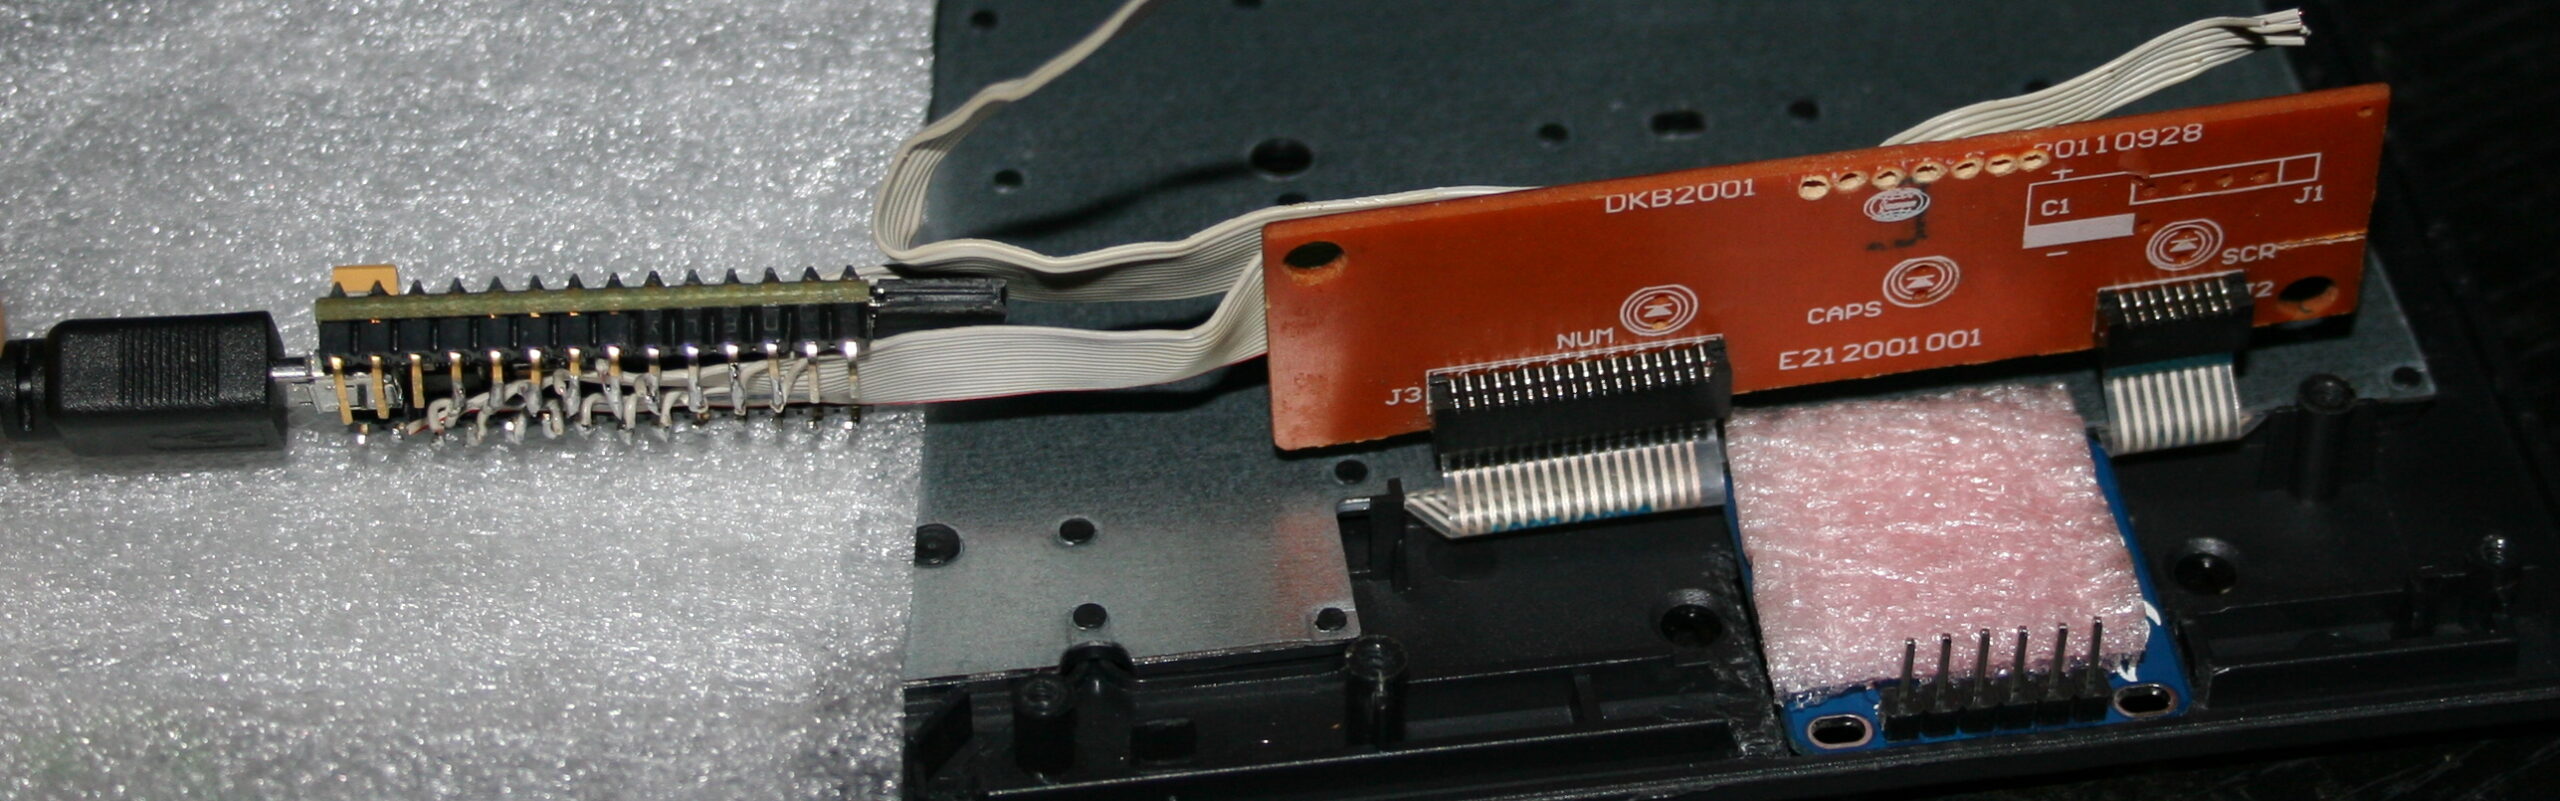
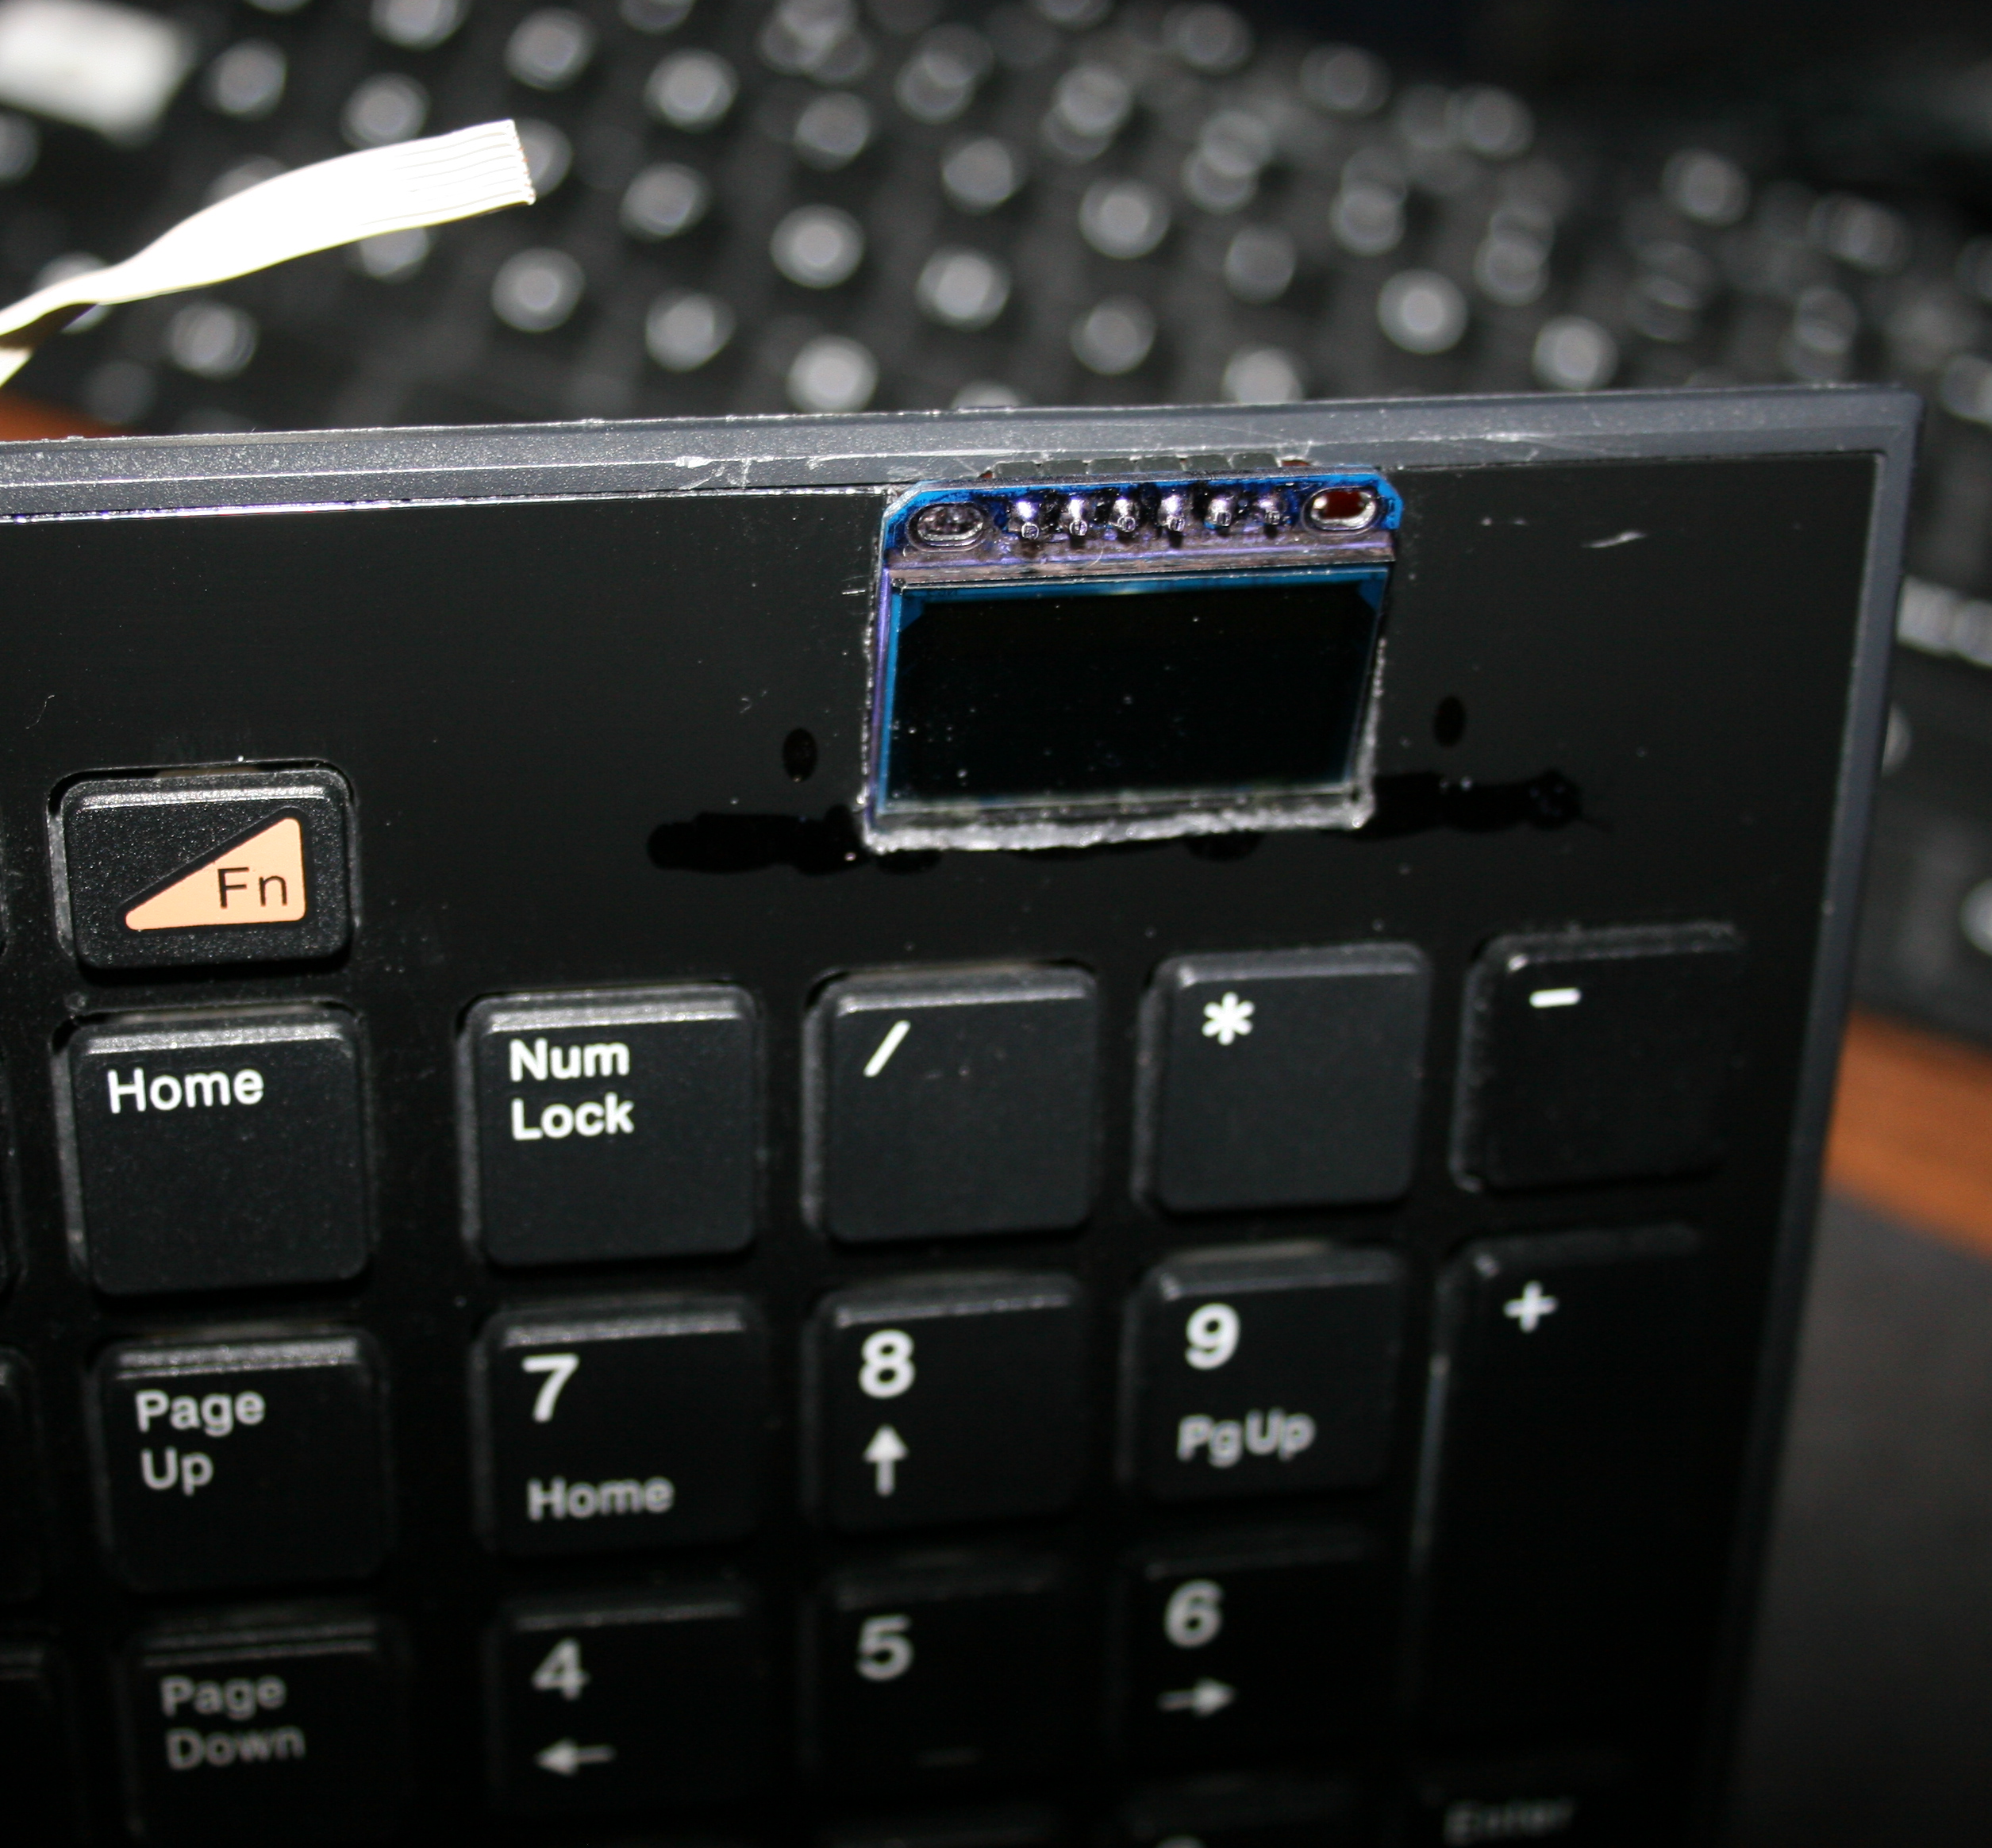
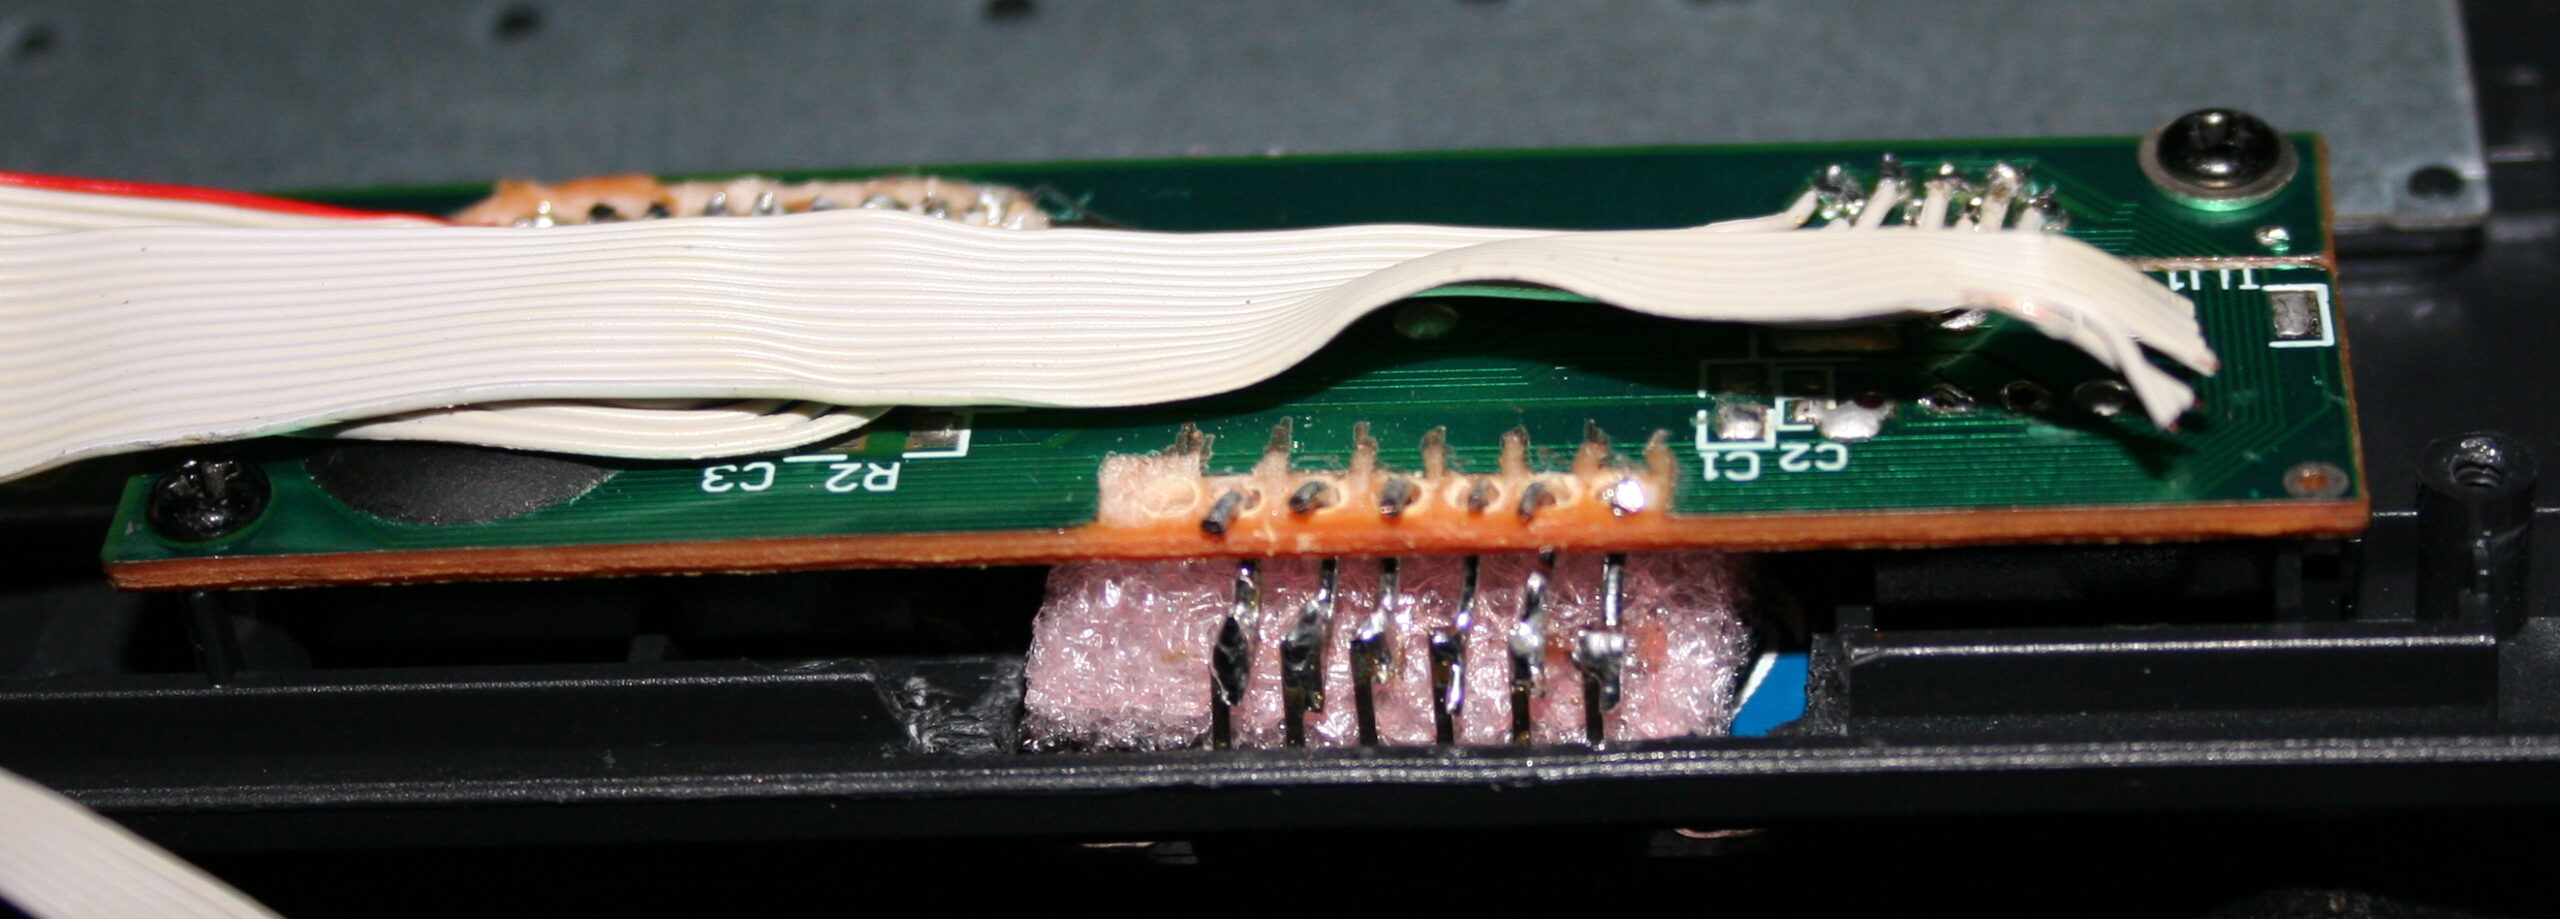
The second step was replacing the keyboard controller board, with my own. The hardware is composed of Teensy 3.1 (or 3.2) with a tiny 1 inch OLED display (SSD1306, monochrome, 128×64) and a bunch of wires to connect to the original keyboard’s matrix.
The reason for this was to take advantage of already made open source Kiibohd controller allowing any imaginable keys assigned and layers. Also possible are macros, key combinations and even mouse buttons and movement simulation. But changing any of this required rebuilding controller software and uploading to controller, through already present USB. Which is a major flaw for me.
📊Features
After getting it to work, I implemented my own menu where you can edit sequences, stored in memory (remembered after power off). The sequences are very useful for not typing passwords or simply binding some useful macro combinations or commands dynamically. Which needed a display and menu for entering.
Once I’ve done the useful stuff, I got carried away and implemented several demos on display and even a falling blocks game. I also wrote about it in this forum post.
📂Sources
The code is in my fork here with some more detail. IIRC it can’t build anymore.
⌛Conclusions
It was a bit simpler to start at the time, instead of writing completely my own later on bigger display. Since the display was so tiny I didn’t yet think of drawing all keys on it. And making them rebindable on display, instead of following the way all other FOSS controllers I knew did, that requires rebuild and upload which is way slower.
✅Summary
For reference, here is a table with current status of all my keyboards, since start until present day:
Name
Assembly year
Original keyboard
Keys actuation
[gram force]
Notes
CK3 > CK6 > CK9
2016 > 2018 > 2020
A4 Tech KX-100
23 g
Cheaper, bit wobbly, but more keys
CK2 > CK4 > CK7
2005 > 2016 > 2018
Logitech Ultra X Flat
33 g
Stiff foil, old, extra keys
CK5, CK5b
2015, 2020
A4 Tech KV-300H
9-18 g
The lightest foil
CK1
2004
Logitech Ultra X Flat
25 g
First, old, had extra keys,
now only for testing, 1 row dead 💀
▶️Videos
CK3 demos, CK4 demos – showing all demos on display, it is only 128×64 resolution
Plasma – uses dithering, since display is mono, 1 color only
Game – blocks falling, shortly played on each preset
Features – menu with all configuration possible back then and options, also keyboard view
Stunt Rally is the game I started in Dec 2009, having first release in Apr 2010 and last (2.6) in Sep 2015. It was my biggest project by far, I developed it for 5 years almost continuously.
Update: I started developing again after about 5 years break, and continued with new version 2.7 and moved to newer Ogre-Next in upcoming Stunt Rally 3.
The game works on GNU/Linux and Windows. It features its own Track Editor. Simulation for cars comes from VDrift and rendering using OGRE 3D engine, more info here.
I’m proud of what it became, but most importantly from the people I met, who contributed to this project, especially developers and track creators. The experiences gained and things learned with this project are significant. And it was a lot of fun.
🔍Detail
I created the 📖SR presentation book, it has 196 pages with lots of screenshots and explanations of the whole project (until version 2.6).
So, the game’s documentation will tell you everything about the game, track editor and tools. But it won’t tell you the history behind it. While the presentation book covers whole project (both the game and editor) in general, this post tells how it all started.
That’s why I made this page. It’s also my dearest project and I get very sentimental every time I play it or even look at screens or videos. So I think it deserves it, and could be informative.
📜History
Around Dec 2009 I started looking for open source racing games, from which I could use the simulation code. My previous projects from 2008 and 2007 already showed me the limits of using only physics engine’s included car demo’s code for games. So PhysX and Newton Dynamics respectively. Bullet had its own car/vehicle demo too, so I knew it could only be fit for a basic arcade game.
I was aiming at a simulation and wanted the most complicated code. After all I was playing Richard Burns Rally already for a long time (on keyboard), liked WRC (on gravel and from 2004-6 mostly) and actually despised any other car simulation games for being too simple (maybe RBR fans of that time know what I mean).
Open source racing games
There were actually just 3 games: some old code from Racer, TORCS (now SpeedDreams) and VDrift. I played them somewhat, then compiled all and tested. After that and decided that VDrift is the best, simulation code was quite sophisticated.
The projects I didn’t consider were: SuperTuxCart (IMO too arcade and for kids) and RigsOfRods (not a racing game, rather a sophisticated vehicle simulation, but also using OGRE).
VDrift was also still actively developed at the time. And I liked their move to also use bullet. That was simply needed to have any collision with environment.
I edited the .car file a lot to find if it is possible to use VDrfit for gravel rally, later posting the results. It was good and fun, I played VDrift somewhat with my setups (gravel, wet, ice) since the original game was quite unplayable for me.
Compiling VDrift and adding OGRE
The beginning part was the most difficult. I was at the time just Windows programmer (but really liked GNU/Linux thanks to this project). So compiling a Linux project on Windows in Visual Studio wasn’t easy. When I finally managed to do it (IIRC after 2-3 weeks), I started tinkering with it, removing code I don’t want, etc. Still using the OpenGL renderer.
Then on side, I started a simple OGRE app with just few models on scene. Later connected both. Getting the VDrift meshes to show right was a bit work (different x,y,z axes, 3D models). But without it, I wouldn’t see anything, so it was crucial.
Once all worked I made the first release pack in April 2010. Was Windows only and most likely it wouldn’t even start without proper MSVC framework installed and such.
It had only 1 car, VDrift tracks and no GUI. I compared the performance and started a topic on VDrift forum. It was terribly bad because of their tracks having thousands of meshes. So using OGRE for VDrift would be a bad idea. But that wasn’t my point. I knew OGRE already and in my previous attempt had a big terrain with good look and performance. I knew what I wanted in my own game and how to do it now.
What happened next was fast (given only my free time) and needed a lot of coding and testing. But it was easier than the previous part. You can check the screenshots of funny situations from versions 0.1 to 0.5 in the first development gallery.
Terrain
I quickly added tire trails and particles, since they were already in OGRE and it was easy. Trails were never in VDrift and particles weren’t great. At the time VDrift moved to using bullet and that was perfect, since it was needed for any car collisions with environment. Then I added the Terrain component and tweaked code to have proper fitted heightmap triangles in bullet world too.
Next I added PagedGeometry (I knew it already) to have some jungle vegetation, that came with Ogitor (same project we had textures from, for a very long time).
Later I also added MyGUI. The options looked quite similar to my previous project, but this GUI system was much better and there were already more tabs.
Also included 2 more cars. Then made the 0.2 release pack in Jun 2010, and started the topic on OGRE forum.
Road
Since there was no road plugin for OGRE, I started coding my own. Based on a Catmull-Rom spline, which is probably the easiest to edit and most intuitive, it just interpolates between points.
Terrain already had its own LOD (level of detail) system. Road surely needed one too, to not quickly produce extreme counts of triangles visible. I thought of just 4 LOD levels for each road segment (auto generated in code), and a simple distance to camera check to pick one accordingly, showing less triangles further. Picture here. It wasn’t the easiest code to write, but I’m glad that I did it. It became the base for road and was extended few times later. Nothing else would fit so perfectly as own written system.
📖Presentation
I focused on creating the SR presentation book, which covers not just our history but the whole project with all of its aspects and implementation. The presentation has 196 pages with lots of screenshots and explanations.
⏩Fast Forward
📜History of added features in each release in Old changelog.
What came next is summarized below in short points, in more detail than on presentation.
Key steps of project:
As described on previous pages the start was in Dec 2009 when I found VDrift and experimented with its car settings.
I created the project on Google Code in 2010 to hold releases.
My first release was in Apr 2010.
Then came first issues.
The game ran only on Windows at start. I suspected it would be rather easy to port to GNU/Linux (since both VDrift and OGRE did work).
I was doing screenshot galleries on each release and game video every few. In a year I made nearly 10 releases (“Release quickly, release often”). I didn’t have a repo.
After a year in Mar 2011 two guys (scrawl and Tapio) have joined and did quickly port game to Linux. Also added CMake build system.
Also in Mar 2011 I created repository. Initially was Mercurial, because Google Code didn’t have Git. But then we quickly moved to GitHub (in Apr 2011 or so).
At the same time we started using IRC on freenode to quickly communicate,
Translations was surely one good thing done by new guys at start.
In version 1.0 (Jan 2011) my track editor was ready and fully functional. I made a series of tutorials on how to use it. I was developing it further too (only I did that).
Game was featured on freegamer blog, first with version 1.0. It did boost game’s popularity. Every time a post appeared after too.
Since version 1.2, we started uploading the Releases to Source Forge. Google Code and its 100 then 200 MB limit were a problem. At that point it only was for homepage and issues (that view was very nice and customizable though).
At some point the game was also added on playdeb, and on lgdb. I think those were (or are) the biggest Linux gaming sites and they helped with game’s popularity too.
Scrawl did many things in the game. A lot of related to input (for controllers), post process effects, shaders, split screen, water in 1.5, etc.
In version 1.5 we finally finalized multiplayer, done by Tapio. I was doing the Gui part. It took him a year to finish it, but I was glad anyway, since I could do other things at the time. I posted on Vdrift forum. I think, VDrift project was developing more slowly then.
Scrawl did a wonderful task of creating a material generator once, and then even a second version called shiny (as a separate library for OGRE). And this thing made us reach a great look with nicely coded shaders (generated for both DirectX and OpenGL) at a higher level. I loved using it.
Scrawl and Tapio (link) were mainly active for about a year. Then I was developing alone again.
We started a forum for the project, somewhat later in version 1.8, Nov 2012.
Forum was great on freegamer, since there were many users already. It attracted the greatest people, artists creating tracks (and even sceneries) for the game using my track editor that I was also developed with the game. The best being: rubberduck (link) who also made many buildings and objects, and Wuzzy (link).
I should also mention Calinou (link). He was always on IRC and had an opinion whenever I asked. This is already a useful skill. A couple of his many tracks went into the game.
At some point I found out the greatest Nobiax/Yughues (link) CC0 textures and replaced all tracks terrain look, also implementing own blendmap with noise (for mixing them). There were a few such revamps of all tracks (big artistic task, bit tedious), for shaders, waters, skies. Terrain was the biggest. I uploaded a pack of them to opengameart in 2014, from version 2.3.
Project’s website was done very late in 2015, more info about it here.
⚖️Contributors
There were few other people e.g. a guy who let me use his IRC bouncer. Tapio was later doing translation syncs, until I someday finally learned that. He was also hosting multiplayer game list server on his PC for years. Scrawl did later a VM setup and was making GNU/Linux binary packages on each version release. There were also few people translating the game to other languages than English (9 all, 5 of them fully). Finally, I can not forget to mention all those artist sharing their CC-BY 3D models on blendswap, also textures, vegetation, objects, and even 0 A.D. buildings. I was gathering all authors and website urls in txt files in our data/ directory each time I added something (later visible in game’s Credits page). Naturally all the open source libraries used (including OGRE and VDrift) have to be mentioned here too, since without them the game would be completely different.
All that was great and helpful. I want to thank all who contributed to this project.
➡️Break
I was constantly developing Stunt Rally for 4.5 years. I was thinking of finishing the development a couple of times.
I first ended developing in Nov 2014. But I returned after about 9 months for 3 more, rewriting sound system, replay files, adding pace notes and more.
I announced development end on 19 Sep 2015. It was version 2.6, the 26th since start.
Lastly, I have to add, it wasn’t just the 5 years it took to create all this. I took many years before that, of me learning from my projects (this fork in 2007, then own in 2008, both using Ogre), and having more experience every year doing so.
Update: It wasn’t the end, but a few years break. I resumed the project over 6 years later as Stunt Rally 3 for 3 years, from 2022 start to 2024 end.


